Component-based programming is a simple, elegant idea. When used properly, it allows your code to be more organized, consistent, and reusable. It's also incredibly easy to implement in a .NET application, because you never need to use the Windows registry or perform any special configuration.
A component, at its simplest, is one or more classes that are compiled into a separate DLL assembly file. These classes provide some unit of logically related functionality. You can access a component in a single application, or you can share the component between multiple applications. Your web pages (or any other .NET application) can use the classes in your components in the same way they use any other .NET class. Best of all, your component is encapsulated, which means it provides exactly the features your code requires and hides all the other messy details.
When combined with careful organization, component-based programming is the basis of good ASP.NET application design. In this chapter, you'll examine how you can create components (and why you should) and consider examples that show you how to encapsulate database functionality with a well-written business object. You'll also learn how to bind your database component to the web controls on a page using the ObjectDataSource.
To master ASP.NET development, you need to become a skilled user of the .NET class library. So far, you've learned how to use .NET components designed for reading files, communicating with databases, calling web services, and storing information about the user. Though these class library ingredients are powerful, they aren't customizable, which is both an advantage and a weakness.
For example, if you want to retrieve data from a SQL Server database, you need to weave database details (such as SQL queries) directly into your code-behind class or (if you're using the SqlDataSource) into the .aspx markup portion of your web page file. Either way, if the structure of the database changes even slightly, you could be left with dozens of pages to update and retest. To solve these problems, you need to create an extra layer between your web page code and the database. This extra layer takes the form of a custom component.
This database scenario is only one of the reasons you might want to create your own components. Component-based programming is really just a logical extension of good code-organizing principles, and it offers a long list of advantages:
- Safety:
Because the source code isn't contained in your web page, you can't modify it. Instead, you're limited to the functionality your component provides. For example, you could configure a database component to allow only certain operations with specific tables, fields, or rows. This is often easier than setting up complex permissions in the database. Because the application has to go through the component, it needs to play by its rules.
- Better organization:
Components move the clutter out of your web page code. It also becomes easier for other programmers to understand your application's logic when it's broken down into separate components. Without components, commonly used code has to be copied and pasted throughout an application, making it extremely difficult to change and synchronize.
- Easier troubleshooting:
It's impossible to oversell the advantage of components when testing and debugging an application. Component-based programs are broken down into smaller, tighter blocks of code, making it easier to isolate exactly where a problem is occurring. It's also easier to test individual components separately from the rest of your web application.
- More manageability:
Component-based programs are much easier to enhance and modify because the component and web application code can be modified separately. Taken to its extreme, this approach allows you to have one development team working on the component and another team coding the website that uses the component.
- Code reuse:
Components can be shared with any ASP.NET application that needs the component's functionality. Even better, any .NET application can use a component, meaning you could create a common "backbone" of logic that's used by a web application and an ordinary Windows application.
- Simplicity:
Components can provide multiple related tasks for a single client request (writing several records to a database, opening and reading a file in one step, or even starting and managing a database transaction). Similarly, components hide details—an application programmer can use a database component without worrying about the database name, the location of the server, or the user account needed to connect. Even better, you can perform a search using certain criteria, and the component itself can decide whether to use a dynamically generated SQL statement or stored procedure.
Component-based programming is sometimes shrouded in a fog of specialized jargon. Understanding these terms helps sort out exactly what a component is supposed to do, and it also allows you to understand MSDN articles about application design. If you're already familiar with the fundamentals of components, feel free to skip ahead.
The idea of three-tier design is that the functionality of most complete applications can be divided into three main levels (see Figure 22-1). The first level is the user interface (or presentation tier), which displays controls and receives and validates user input. All he event handlers in your web page are in this first level. The second level is the business tier, where the application-specific logic takes place. For an e-commerce site, application-specific logic includes rules such as how shipping charges are applied to an order, when certain promotions are valid, and what customer actions should be logged. It doesn't involve generic .NET details such as how to open a file or connect to a database. The third level is the data tier, where you place the logic that stores your information in files, a database, or some other data store. The third level contains logic about how to retrieve and update data, such as SQL queries or stored procedures.
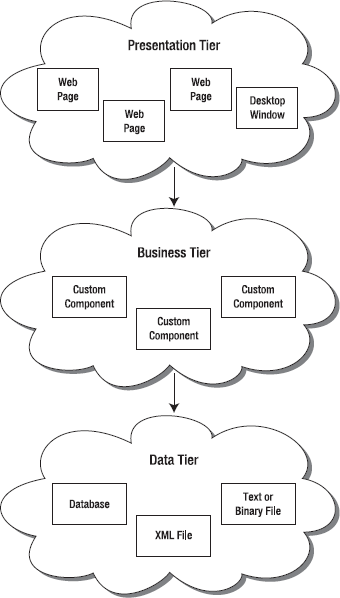
The important detail about three-tier design is that information travels from only one level to an adjacent level. In other words, your web page code shouldn't connect directly to the database to retrieve information. Instead, it should go through a component in the business tier that connects to the database and returns the data.
This basic organization principle can't always be adhered to, but it's a good model to follow. When you create a component, it's almost always used in the second level to bridge the gap between the data and the user interface. In other words, if you want to fill a list of product categories in a list box, your user interface code calls a component, which gets the list from the database and then returns it to your code. Your web page code is isolated from the database—and if the database structure changes, you need to change one concise component instead of every page on your site.
If three-tier design is the overall goal of component-based programming, encapsulation is the best rule of thumb. Encapsulation is the principle that you should create your application out of "black boxes" that hide information. So, if you have a component that logs a purchase on an e-commerce site, that component handles all the details and allows only the essential variables to be specified.
For example, this component might accept a user ID and an order item ID and then handle all the other details. The calling code doesn't need to worry about how the component works or where the data is coming from—it just needs to understand how to use the component. (This principle is described in a lot of picturesque ways. For example, you know how to drive a car because you understand its component interface—the steering wheel and pedals—not because you understand the low-level details about internal combustion and the engine. As a result, you're able to transfer your knowledge to many different types of automobiles, even if they have dramatically different internal workings.)
The term business object often means different things to different people. Generally, business objects are the components in the second level of your application that provide the extra layer between your code and the data source. They are called business objects because they enforce business rules. For example, if you try to submit a purchase order without any items, the appropriate business object will throw an exception and refuse to continue. In this case, no .NET error has occurred—instead, you've detected the presence of a condition that shouldn't be allowed according to your application's logic.
In this chapter's examples, business objects are also going to contain data access code. In an extremely complicated, large, and changeable system, you might want to further subdivide components and actually have your user interface code talking to a business object, which in turn talks to another set of objects that interact with the data source. However, for most programmers, this extra step is overkill, especially with the increased level of sophistication ADO.NET provides.
The term data object is also used in a variety of ways. In this book, data objects are simply packages of data that you use to send information between your web page and your business objects. For example, you might create a data class named Employee that represents the information from one record in an Employees table, complete with properties like FirstName, LastName, and DateOfBirth. A typically data object is filled with properties but provides no methods.
Technically, a component is just a collection of one or more classes (and possibly other .NET types, such as structures and enumerations) that are compiled together as a unit. For example, Microsoft's System.Web.dll is a single (but very large) component that provides the types found in many of the namespaces that start with System.Web.
So far, the code examples in this book have used only a few kinds of classes—mainly custom web page classes that inherit from System.Web.UI.Page and contain mostly event handling procedures. Component classes, on the other hand, usually won't include any user interface logic (which would limit their use unnecessarily) and don't need to inherit from an existing class.
To create a component, you create a new class library project in Visual Studio. First, select File
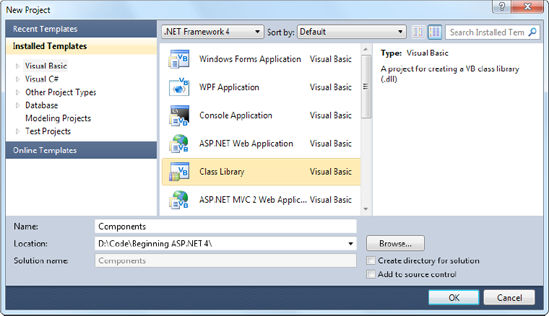
Rather than just choosing File
Figure 22-3 shows a solution with both a website and a class library named Components. The website is in bold in the Solution Explorer to indicate that it runs on start-up (when you click the Start button).
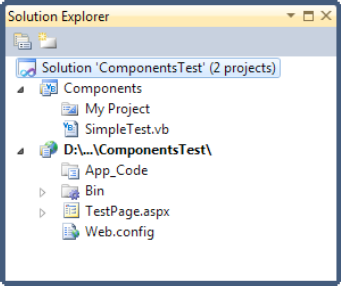
To make it easy to open this solution, you might want to take a moment to save it. Click the solution name (which is "Components" in Figure 22-3) in the Solution Explorer. Then choose File
You can compile your class library at any point by right-clicking the project in the Solution Explorer and choosing Build. This creates a DLL assembly file (Components.dll). You can't run this file directly, because it isn't an application, and it doesn't provide any user interface.
Once you've created your class library project, you're ready to add classes in a .vb file. Class library projects begin with one file named Class1.vb, which you can use, delete, or rename. You can also add more class files simply by right-clicking the project in the Solution Explorer and choosing Add
Here's an example that creates a class named SimpleTest:
Public Class SimpleTest
    ' (Code goes here, inside one or more methods.)
End Class
Remember, a component can contain more than one class. You can create these other classes in the same file, or you can use separate files for better organization. In either case, all the classes and source code files are compiled together into one assembly:
Public Class SimpleTest
    ' (Class code omitted.)
End Class

Public Class SimpleTest2
    ' (Class code omitted.)
End Class
The classes in your component are automatically organized into a namespace that's named after your project. This namespace is known as the root namespace. For example, if you've created a project named Components, the SimpleTest and SimpleTest2 classes will be in the Components namespace, and their fully qualified names will be Components.SimpleTest and Components.SimpleTest2. You need to know the fully qualified name in order to use your classes in another application, because other applications won't share the same namespace.
If you decide that you want to change the root namespace, you can change it quite easily. First, right-click the project in the Solution Explorer and choose Properties. You'll see a multi-tabbed display of application settings. Choose the Application tab and then edit the namespace in the Root Namespace text box. You can also use the Assembly Name text box in this window to configure the name that is given to the compiled assembly file.
If you have a complex component, you might choose to subdivide it into nested namespaces. For example, you might have a namespace named Components.Database and another named Components.Validation. To create a nested namespace inside the default project namespace, you use a Namespace block like this:
Namespace Database

    Public Class SimpleDatabaseTest
        ' (Class code omitted.)
    End Class

End Namespace
Now this class has the fully qualified name Components.Database.SimpleDatabaseTest.
Tip
The general rule for naming namespaces is to use the company name followed by the technology name and optionally followed by a feature-specific division, as in CompanyName.TechnologyName.Feature. Example namespaces that follow this syntax include Microsoft.Media and Microsoft.Media.Audio. These namespace conventions dramatically reduce the possibility that more than one company might release components in the same namespaces, which would lead to naming conflicts. The only exception to the naming guidelines is in the base assemblies that are part of .NET. They use namespaces that begin with System.
To add functionality to your class, add public methods or properties. The web page code can then call these members to retrieve information or perform a task.
The following example shows one of the simplest possible components, which does nothing more than return a string to the calling code:
Public Class SimpleTest

    Public Function GetInfo(ByVal param As String) As String
        Return "You invoked SimpleTest.GetInfo() with '" & _
          param & "'"
    End Function
End Class
Public Class SimpleTest2
Public Function GetInfo(ByVal param As String) As String
Return "You invoked SimpleTest2.GetInfo() with '" & _
param & "'"
End Function
End ClassIn the following sections, you'll learn how to use this component in a web application. A little later, you'll graduate to a more complex, practical component.
Using the component in an actual ASP.NET page is easy. Essentially, your website needs a copy of your component in its Bin directory. ASP.NET automatically monitors this directory and makes all of its classes available to any web page in the application. To create this copy, you use a Visual Studio feature called references.
Here's how it works: First, select your website in the Solution Explorer. Then, select Website
You can take one of two approaches in the Add Reference dialog box:
- Add a project reference:
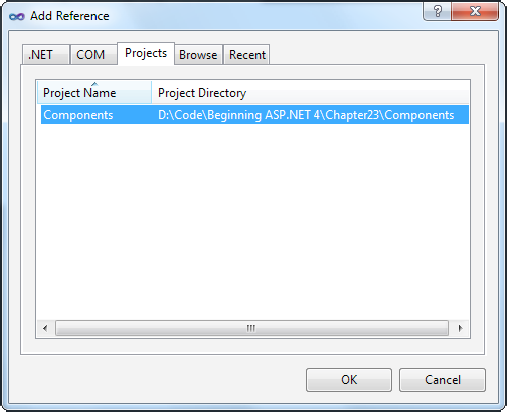
If your class library project is in the same solution, use the Projects tab. This shows you a list of all the class library projects in your current solution (see Figure 22-4). Select the class library, and click OK.
- Add an assembly reference:
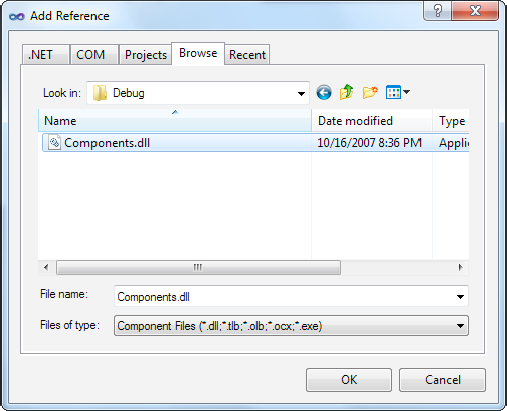
If your class library is in a different solution or you have the compiled DLL file only (perhaps the component was created by another developer), use the Browse tab (see Figure 22-5). Browse through your directories until you find the DLL file, select it, and click OK.
Note
If you're using an assembly reference, you need to compile your component first (choose Build
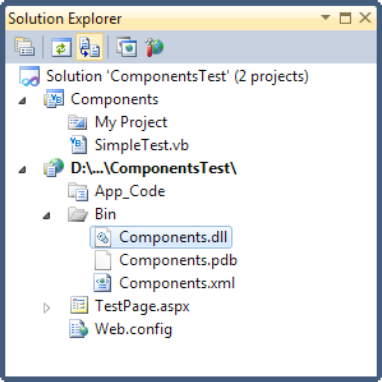
Either way, .NET copies the compiled DLL file to the Bin subdirectory of your web application (see Figure 22-6). You'll also see a .PDB file that contains debugging information for Visual Studio.
Visual Studio also takes extra care to make sure that you keep using the most up-to-date version of the component. If you change the component and recompile it, Visual Studio will notice the change. The next time you run your web application, Visual Studio will automatically copy the new component to the Bin subdirectory.
If you're using a project reference, Visual Studio goes one step further. Every time you run the website project, Visual Studio checks for any changes in your component's source code files. If any of these files have been changed, Visual Studio automatically recompiles the component and copies the new version to the Bin subdirectory in your web application.
When you add a reference to a component, Visual Studio also allows you to use its classes in your code with the usual syntax checking and IntelliSense. If you don't add the reference, you won't be able to use the component classes (and if you try, Visual Studio interprets your attempts to use the class as mistakes and refuses to compile your code).
Note
Removing a reference is a bit trickier. The easiest way is to right-click your web project and choose Property Pages. Then, choose References from the list. You'll see a list of all your references (including assembly and project references). To remove one, select it and click Remove.
Once you've added the reference, you can use the component by creating instances of the SimpleTest or SimpleTest2 class, as shown here:
Imports Components
Public Partial Class TestPage
Inherits System.Web.UI.Page
Protected Sub Page_Load(ByVal sender As Object, _
ByVal e As System.EventArgs) Handles Me.Load
Dim testComponent As New SimpleTest()
Dim testComponent2 As New SimpleTest2()
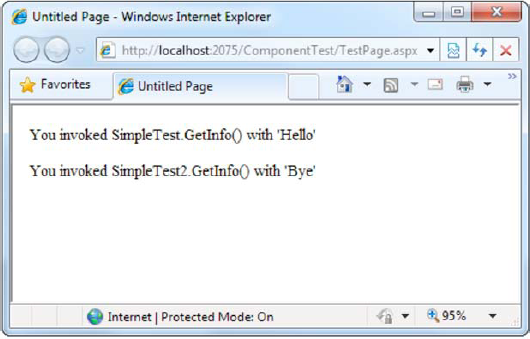
lblResult.Text = testComponent.GetInfo("Hello") & "<br /><br />"
lblResult.Text &= testComponent2.GetInfo("Bye")
End Sub
End ClassThe output for this page, shown in Figure 22-7, combines the return value from both GetInfo() methods.
To make this code slightly simpler, you can choose to use shared methods in the component class so that you don't need to create an instance before using the methods. A shared GetInfo() method looks like this:
Public Class SimpleTest

    Public Shared Function GetInfo(param As String) As String
        Return "You invoked SimpleTest.GetInfo() with '" & _
          param & "'"
    End Function

End Class
In this case, the web page accesses the shared GetInfo() method through the class name and doesn't need to create an object:
Protected Sub Page_Load(ByVal sender As Object, _
  ByVal e As System.EventArgs) Handles Me.Load

    lblResult.Text = SimpleTest.GetInfo("Hello")
End Sub
Tip
Remember, if you're using assembly references and your component and web application aren't in the same solution, you won't see the effect of your changes right away. Instead, you need to recompile your component assembly (choose Build
Deciding when to use instance methods and when to use shared methods is part of the art of object-oriented design, and it takes experience. Shared methods impose additional considerations—namely, your class must be stateless (a concept described in the following section), which means it can't hold on to any additional information in member variables. If it does, it risks a potential conflict if more than one piece of code uses the component at the same time.
As a rule of thumb, use instance methods if you need to be able to create several instances of your class at the same time. For example, instance methods make sense for the SqlConnection class, because you might choose to open a connection to several different databases for one operation. Instance methods are also the best choice if you want to configure an object once and use it several times. For example, the SqlConnection class lets you set the connection string and then open and close the connection as much as needed. On the other hand, consider shared methods if your methods perform a single, discrete task that doesn't require any initialization. Examples include the calculations in the Math class and the business tasks (such as registering a new customer) in a high-level business component.
The SimpleTest classes provide functionality through public methods. If you're familiar with class-based programming (as described in Chapter 3), you'll remember that classes can also store information in private member variables and provide property procedures that allow the calling code to modify this information. For example, a Person class might have a FirstName property.
When you use properties and store information in member variables, you're using stateful design. In stateful design, the class has the responsibility of maintaining certain pieces of information. In stateless design, no information is retained between method calls. Compare the earlier SimpleTest class, which uses stateless design, to the stateful SimpleTest class shown here:
Public Class SimpleTest
    Private _data As String

    Public Property Data() As String
Get
Return _data
End Get
Set(ByVal value As String)
_data = value
End Set
End Property
Public Function GetInfo() As String
Return "You invoked SimpleTest.GetInfo()," & _
"and data is '" & Data & "'"
End Function
End ClassProgrammers who design large-scale applications (such as web applications) sometimes debate whether stateful or stateless programming is best. Stateful programming is the most natural, object-oriented approach, but it also has a few disadvantages. To accomplish a common task, you might need to set several properties before calling a method. Each of these steps adds a little bit of unneeded overhead. A stateless design, on the other hand, often performs all its work in a single method call. However, because no information is retained in state, you may need to specify several parameters, which can make for tedious programming. A good example of stateful versus stateless objects is shown by the FileInfo and File classes, which are described in Chapter 17.
There is no short answer about whether stateful or stateless design is best, and it often depends on the task at hand. Components that are high-performance, components that use transactions, components that use limited resources such as a database connection, or components that need to be invoked remotely (such as web services) usually use stateless design, which is the simplest and most reliable approach. Because no information is retained in memory, fewer server resources are used, and no danger exists of losing valuable data if a software or hardware failure occurs. The next example illustrates the difference with two ways to design an Account class.
Consider a stateful account class that represents a single customer account. Information is read from the database when it's first created in the constructor method, and this information can be updated using the Update() method.
Public Class CustomerAccount
    Private _accountNumber As Integer
    Private _balance As Decimal

    Public Property Balance() As Decimal
        Get
            Return _balance
        End Get
        Set(ByVal value As Decimal)
            _balance = value
        End Set
    End Property

    Public Sub New(ByVal accountNumber As Integer)
        ' (Code to read account record from database goes here.)
    End Sub
Public Sub Update()
' (Code to update database record goes here.)
End Sub
End ClassIf you have two CustomerAccount objects that expose a Balance property, you need to perform two separate steps to transfer money from one account to another. Conceptually, the process works like this:
' Create an account object for each account,
' using the account number.
Dim accountOne As New CustomerAccount(122415)
Dim accountTwo As New CustomerAccount(123447)
Dim amount As Decimal = 1000

' Withdraw money from one account.
accountOne.Balance -= amount

' Deposit money in the other account.
accountTwo.Balance += amount

' Update the underlying database records using the Update() method.
accountOne.Update()
accountTwo.Update()
The problem here is that if this task is interrupted halfway through by an error, you'll end up with at least one unhappy customer.
A stateless object might expose only a shared method named FundTransfer(), which performs all its work in one method:
Public Class AccountUtility
    Public Shared Sub FundTransfer(ByVal accountOne As Integer, _
      ByVal accountTwo As Integer, ByVal amount As Decimal)
        ' (The code here retrieves the two database records,
        '  changes them, and updates them.)
    End Sub
End Class
The calling code can't use the same elegant CustomerAccount objects, but it can be assured that account transfers are protected from error. Because all the database operations are performed at once, they can use a database stored procedure for greater performance and can use a transaction to ensure that the withdrawal and deposit either succeed or fail as a whole.
' Set the account and transfer details.
Dim amount As Decimal = 1000
Dim accountIDOne As Integer = 122415
Dim accountIDTwo As Integer = 123447

AccountUtility.FundTransfer(accountIDOne, accountIDTwo, _
  amount)
In a mission-critical system, transactions are often required. For that reason, classes that retain little state information are often the best design approach, even though they aren't quite as satisfying from an object-oriented perspective.
Tip
There is one potential compromise. You can create stateful classes to represent common items such as accounts, customers, and so on, without adding any functionality. Then, you can use these classes as data packages to send information to and from a stateless utility class. (These are the data objects that were described in the beginning of this chapter.)
Clearly, components are extremely useful. But if you're starting a large programming project, you may not be sure what features are the best candidates for being made into separate components. Learning how to break an application into components and classes is one of the great arts of programming, and it takes a good deal of practice and fine-tuning.
One of the most common types of components is a data-access component. Data-access components are an ideal application of component-based programming for several reasons:
- Databases require extraneous details:
These details include connection strings, field names, and so on, all of which can distract from the application logic and can easily be encapsulated by a well-written component.
- Databases evolve over time:
Even if the underlying table structure remains constant and additional information is never required (which is far from certain), queries may be replaced by stored procedures, and stored procedures may be redesigned.
- Databases have special connection requirements:
You may even need to change the database access code for reasons unrelated to the application. For example, after profiling and testing a database, you might discover that you can replace a single query with two queries or a more efficient stored procedure. In either case, the returned data remains constant, but the data access code is dramatically different.
- Databases are used repetitively in a finite set of ways:
In other words, a common database routine should be written once and is certain to be used many times.
To examine the best way to create a data-access component, you'll consider a simple application that provides a classifieds page that lists items that various individuals have for sale. The database uses two tables: one is an Items table that lists the description and price of a specific sale item, and the other is a Categories table that lists the different groups you can use to categorize an item. Figure 22-8 shows the relationship.

In this example, you're connecting to a SQL Server database using ADO.NET. You can create this database yourself, or you can refer to the online samples, which include a SQL script that generates it automatically. To start, the Categories table is preloaded with a standard set of allowed categories.
The data-access component is simple. It's a single class (named DBUtil), which is placed in a namespace named DatabaseComponent (which is the root namespace for the project). The DBUtil class uses instance methods and retains some basic information (such as the connection string to use), but it doesn't allow the client to change this information. Therefore, it doesn't need any property procedures. Instead, it performs most of its work in methods such as GetCategories() and GetItems(). These methods return DataSets with the appropriate database records. This type of design creates a fairly thin layer over the database—it handles some details, but the client is still responsible for working with familiar ADO.NET classes such as the DataSet.
Note
To use this example as written, you need to add a reference to the System.Configuration.dll and System.Web.dll assemblies in the class library. Otherwise, you can't use the WebConfigurationManager to dig up the connection string you need. To add these references, select Project
Imports System
Imports System.Data
Imports System.Data.SqlClient
Imports System.Web.Configuration

Public Class DBUtil

    Private connectionString As String

    Public Sub New()
        connectionString = _
          WebConfigurationManager.ConnectionStrings( _
          "AdBoard").ConnectionString
    End Sub

    Public Function GetCategories() As DataSet
        Dim query As String = "SELECT * FROM Categories"
        Dim cmd As New SqlCommand(query)
        Return FillDataSet(cmd, "Categories")
End Function
Public Function GetItems() As DataSet
Dim query As String = "SELECT * FROM Items"
Dim cmd As New SqlCommand(query)
Return FillDataSet(cmd, "Items")
End Function
Public Function GetItems(ByVal categoryID As Integer) As DataSet
' Create the Command.
Dim query As String = "SELECT * FROM Items WHERE Category_ID=@CategoryID"
Dim cmd As New SqlCommand(query)
cmd.Parameters.AddWithValue("@CategoryID", categoryID)
' Fill the DataSet.
Return FillDataSet(cmd, "Items")
End Function
Public Sub AddCategory(ByVal name As String)
Dim con As New SqlConnection(connectionString)
' Create the Command.
Dim insertSQL As String = "INSERT INTO Categories "
insertSQL &= "(Name) VALUES @Name"
Dim cmd As New SqlCommand(insertSQL, con)
cmd.Parameters.AddWithValue("@Name", name)
Try
con.Open()
cmd.ExecuteNonQuery()
Finally
con.Close()
End Try
End Sub
Public Sub AddItem(ByVal title As String, ByVal description As String, _
ByVal price As Decimal, ByVal categoryID As Integer)
Dim con As New SqlConnection(connectionString)
' Create the Command.
Dim insertSQL As String = "INSERT INTO Items "
insertSQL &= "(Title, Description, Price, Category_ID)"
insertSQL &= "VALUES (@Title, @Description, @Price, @CategoryID)"
Dim cmd As New SqlCommand(insertSQL, con)
cmd.Parameters.AddWithValue("@Title", title)
cmd.Parameters.AddWithValue("@Description", description)
cmd.Parameters.AddWithValue("@Price", price)
cmd.Parameters.AddWithValue("@CategoryID", categoryID)
Try
con.Open()
cmd.ExecuteNonQuery()
Finally
con.Close()End Try
End Sub
Private Function FillDataSet(ByVal cmd As SqlCommand, ByVal tableName As String) _
As DataSet
Dim con As New SqlConnection(connectionString)
cmd.Connection = con
Dim adapter As New SqlDataAdapter(cmd)
Dim ds As New DataSet()
Try
con.Open()
adapter.Fill(ds, tableName)
Finally
con.Close()
End Try
return ds
End Function
End ClassWhen a DBUtil object is created, the constructor automatically retrieves the connection string from the web.config file, using the technique described in Chapter 5. However, it's important to note that this is the web.config file of the web application (as the component doesn't have a configuration file). This is a good design, because it allows a website to use the database component with any database server. However, if the client web application doesn't have the appropriate configuration setting, the database component won't work.
The code includes methods for retrieving data (those methods that start with Get) and methods for updating data (those methods that start with Add).
This class includes an overloaded method named GetItems(). This means the client can call GetItems() with no parameters to return the full list or with a parameter indicating the appropriate category. (Chapter 2 provides an introduction to overloaded methods.)
Each method that accesses the database opens and closes the connection. This is a far better approach than trying to hold a connection open over the lifetime of the class, which is sure to result in performance degradation in multiuser scenarios.
Tip
Your web server can open and close connections frequently without causing any slowdown. That's because ADO.NET uses connection pooling to keep a small set of open connections ready to use. As long as you don't change the connection string and as long as there are available connections in the pool, when you call SqlConnection.Open(), you receive one of these connections, thereby avoiding the overhead of setting up a new connection.
The code uses its own private FillDataSet() function to make the code more concise. This isn't made available to clients. Instead, the GetItems() and GetCategories() methods use the FillDataSet() function.
To use this component in a web application, you first have to make sure the appropriate connection string is configured in the web.config file, as shown here:
<configuration>

  <connectionStrings>
    <add name="AdBoard" connectionString=
"Data Source=localhostSQLEXPRESS;Initial Catalog=AdBoard;Integrated Security=SSPI" />
  </connectionStrings>
  ...
</configuration>
Next, compile and copy the component DLL file, or add a reference to it if you're using Visual Studio. The only remaining task is to add the user interface for the web page that uses the component.
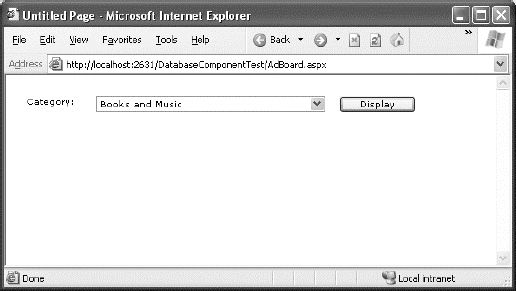
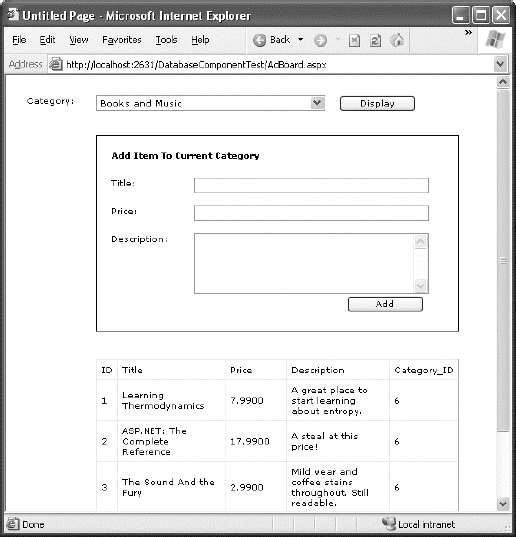
To test this component, you can create a simple test page. In the example shown in Figure 22-9, this page allows users to browse the current listing by category and add new items. When the user first visits the page, it prompts the user to select a category.
Once a category is chosen, the matching items display, and a panel of controls appears, which allows the user to add a new entry to the AdBoard under the current category, as shown in Figure 22-10.
In order to access the component more easily, the web page imports its namespace:
Imports DatabaseComponent
The page code creates the component to retrieve information from the database and displays it by binding the DataSet to the drop-down list or GridView control:
Public Partial Class AdBoard
    Inherits System.Web.UI.Page

    Protected Sub Page_Load(ByVal sender As Object, _
      ByVal e As System.EventArgs) Handles Me.Load

        If Not Page.IsPostBack
            Dim DB As New DBUtil()

            lstCategories.DataSource = DB.GetCategories()
            lstCategories.DataTextField = "Name"
            lstCategories.DataValueField = "ID"
            lstCategories.DataBind()
pnlNew.Visible = False
End If
End Sub
Protected Sub cmdDisplay_Click(ByVal sender As Object, _
ByVal e As System.EventArgs) Handles cmdDisplay.Click
Dim DB As New DBUtil()
gridItems.DataSource = DB.GetItems( _
Val(lstCategories.SelectedItem.Value))
gridItems.DataBind()
pnlNew.Visible = True
End Sub
Protected Sub cmdAdd_Click(ByVal sender As Object, _
ByVal e As System.EventArgs) Handles cmdAdd.Click
Dim DB As New DBUtil()
Try
DB.AddItem(txtTitle.Text, txtDescription.Text, _
Val(txtPrice.Text), Val(lstCategories.SelectedItem.Value))
gridItems.DataSource = DB.GetItems( _
Val(lstCategories.SelectedItem.Value))
gridItems.DataBind()
Catch err As FormatException
' An error occurs if the user has entered an
' invalid price (non-numeric characters).
' In this case, take no action.
' Another option is to add a validator control
' for the price text box to prevent invalid input.
End Try
End Sub
End ClassNot all the functionality of the component is used in this page. For example, the page doesn't use the AddCategory() method or the version of GetItems() that doesn't require a category number. This is completely normal. Other pages may use different features from the component.
The code for the web page is free of data access code. It does, however, need to understand how to use a DataSet, and it needs to know specific field names to create a more attractive GridView with custom templates for layout (instead of automatically generated columns).
The page could be improved with error handling code or validation controls. As it is, no validation is performed to ensure that the price is numeric or even to ensure that the required values are supplied.
Tip
If you're debugging your code in Visual Studio, you'll find you can single-step from your web page code right into the code for the component, even if it isn't a part of the same solution. The appropriate source code file is loaded into your editor automatically, as long as it's available (and you've compiled the component in debug mode).
One way you could enhance the component is with better support for error reporting. As it is, any database errors that occur are immediately returned to the calling code. In some cases (for example, if there is a legitimate database problem), this is a reasonable approach, because the component can't handle the problem.
However, the component fails to handle one common problem properly. This problem occurs if the connection string isn't found in the web.config file. Though the component tries to read the connection string as soon as it's created, the calling code doesn't realize a problem exists until it tries to use a database method.
A better approach is to notify the client as soon as the problem is detected, as shown in the following code example:
Public Class DBUtil
    Private connectionString As String

    Public Sub New()
        If WebConfigurationManager.ConnectionStrings("AdBoard") _
          Is Nothing Then
            Throw New ApplicationException( _
              "Missing ConnectionString variable in web.config.")
        Else
            connectionString = _
              WebConfigurationManager.ConnectionStrings( _
              "AdBoard").ConnectionString
        End If
    End Sub

    ' (Other class code omitted.)
End Class
This code throws an ApplicationException with a custom error message that indicates the problem. To provide even better reporting, you could create your own exception class that inherits from ApplicationException, as described in Chapter 7.
Tip
Components often catch the exceptions that occur during low-level tasks (such as reading a file or interacting with a database) and then throw less detailed exceptions like ApplicationException to notify the web page. That way, there's no chance that the user will see the technical error information. This is important, because detailed error messages can give hackers clues to how your code works—and how to subvert it.
The component doesn't have to limit the type of information it provides to DataSets. Other information is also useful. For example, you might provide a read-only property called ItemFields that returns an array of strings representing the names for fields in the Items table. Or you might add another method that retrieves aggregate information about the entire table, such as the average cost of items in the database or the total number of currently listed items, as shown here:
Public Class DBUtil
    ' (Other class code omitted.)

    Public Function GetAveragePrice() As Decimal
        Dim query As String = "SELECT AVG(Price) FROM Items"

        Dim con As New SqlConnection(connectionString)
        Dim cmd As New SqlCommand(query, con)

        con.Open()
        Dim average As Decimal = CType(cmd.ExecuteScalar(), Decimal)
        con.Close()

        Return average
    End Function

    Public Function GetTotalItems() As Integer
        Dim query As String = "SELECT COUNT(*) FROM Items"

        Dim con As New SqlConnection(connectionString)
        Dim cmd As New SqlCommand(query, con)

        con.Open()
        Dim count As Integer = CType(cmd.ExecuteScalar(), Integer)
        con.Close()

        Return count
    End Function
End Class
These queries use some SQL that may be new to you (namely, the COUNT and AVG aggregate functions). However, these methods are just as easy to use from the client's perspective as GetItems() and GetCategories():
Dim DB As New DBUtil()
Dim averagePrice As Decimal = DB.GetAveragePrice()
Dim totalItems As Integer = DB.GetTotalItems()
It may have occurred to you that you can return information such as the total number of items through a read-only property procedure (such as TotalItems) instead of a method (in this case, GetTotalItems). Though this does work, property procedures are better left to information that is maintained with the class (in a private variable) or is easy to reconstruct. In this case, it takes a database operation to count the number of rows, and this database operation can cause an unusual problem or slow down performance if used frequently. To help reinforce that fact, a method is used instead of a property.
Using a dedicated database component is a great way to keep your code efficient and well-organized. It also makes it easy for you to apply changes later. However, this has a drawback—namely, you need to write quite a bit of code to create a web page and a separate data-access component. In Chapter 15, you saw that you could simplify your life by using components such as the SqlDataSource to encapsulate all your data access details. Unfortunately, that code-free approach won't work if you're using a separate component—or will it?
It turns out there is a way to get the best of both worlds and use a separate data-access component and easier web page data binding. Instead of using the SqlDataSource, you use the ObjectDataSource, which defines a link between your web page and your component. This won't save you from writing the actual data access code in your component, but it will save you from writing the tedious code in your web page to call the methods in your component, extract the data, format it, and display it in the page.
Note
The ObjectDataSource allows you to create code-free web pages, but you still need to write the code in your component. You shouldn't view this as a drawback—after all, you need to write this code to get fine-grained control over exactly what's taking place and thereby optimize the performance of your data access strategy.
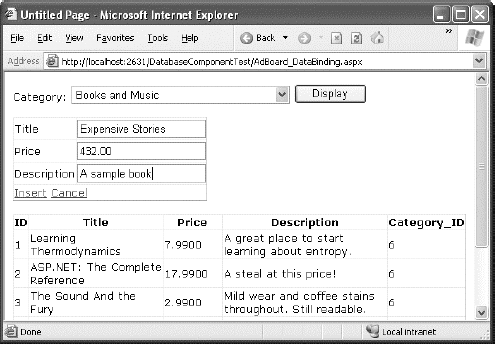
In the following sections, you'll learn how to take the existing DBUtil class presented earlier and use it in a data-bound web page. You'll learn how to replicate the example shown in Figure 22-9 and Figure 22-10 without writing any web page code.
Essentially, the ObjectDataSource allows you to create a declarative link between your web page controls and a data access component that queries and updates data. Although the ObjectDataSource is remarkably flexible, it can't support every conceivable component you could create. In fact, for your data component to be usable with the ObjectDataSource, you need to conform to a few rules:
Your class must be stateless. That's because the ObjectDataSource will create an instance only when needed and destroy it at the end of every request.
Your class must have a default, no-argument constructor.
All the logic must be contained in a single class. (If you want to use different classes for selecting and updating your data, you'll need to wrap them in another higher-level class.)
The query results must be provided as a DataSet, DataTable, or some sort of collection of objects. (If you decide to use a collection of objects, each data object needs to expose all the data fields as public properties.)
Fortunately, many of these rules are best practices that you should already be following. Even though the DBUtil class wasn't expressly designed for the ObjectDataSource, it meets all these criteria.
You can learn a lot about the ObjectDataSource by building the page shown in Figure 22-10. In the following sections, you'll tackle this challenge.
The first step is to create the list box with the list of categories. For this list, you need an ObjectDataSource that links to the DBUtil class and calls the GetCategories() method to retrieve the full list of category records.
To supply data to the list box, you need to define an ObjectDataSource and indicate the name of the class that contains the data access methods. You do this by specifying the fully qualified class name with the TypeName property, as shown here:
<asp:ObjectDataSource ID="sourceCategories" runat="server"
 TypeName="DatabaseComponent.DBUtil" ... />
Once you've attached the ObjectDataSource to a class, the next step is to point it to the methods it can use to select and update records.
The ObjectDataSource defines SelectMethod, DeleteMethod, UpdateMethod, and InsertMethod properties that you use to link your data access class to various tasks. Each property takes the name of the method in the data access class. In this example, you simply need to enable querying, so you need to set the SelectMethod property so it calls the GetCategories() method:
<asp:ObjectDataSource ID="sourceCategories" runat="server"
 TypeName="DatabaseComponent.DBUtil" SelectMethod="GetCategories" />
Once you've set up the ObjectDataSource, you can bind your web page controls in the same way you do with the SqlDataSource. Here's the tag you need for the list box:
<asp:DropDownList ID="lstCategories" runat="server"
  DataSourceID="sourceCategories" DataTextField="Name" DataValueField="ID">
</asp:DropDownList>
This tag shows a list of category names (thanks to the DataTextField property) and also keeps track of the category ID (using the DataValueField property).
This example works fine so far. You can run the test web page and see the list of categories in the list (as shown in Figure 22-9).
The next step is to show the list of items in the current category in the GridView underneath. As with the SqlDataSource, the ObjectDataSource can be used only for a single query. That means you'll need to create a second ObjectDataSource that's able to retrieve the list of items by calling GetItems().
The trick here is that the GetItems() method requires a single parameter (named categoryID). That means you need to create an ObjectDataSource that includes a single parameter. You can use all the same types of parameters used with the SqlDataSource to get values from the query string, other controls, and so on. In this case, the category ID is provided by the SelectedValue property of the list box, so you can use a control parameter that points to this property.
Here's the ObjectDataSource definition you need:
<asp:ObjectDataSource ID="sourceItems" runat="server" SelectMethod="GetItems"
 TypeName="DatabaseComponent.DBUtil" >
  <SelectParameters>
<asp:ControlParameter ControlID="lstCategories" Name="categoryID"
        PropertyName="SelectedValue" Type="Int32" />
  </SelectParameters>
</asp:ObjectDataSource>
Again, you use the DBUtil class, but this time it's the GetItems() method you need. Even though there are two overloaded versions of the GetItems() method (one that takes a categoryID parameter and one that doesn't), you don't need to worry. The ObjectDataSource automatically uses the correct overload by looking at the parameters you've defined.
In this case, you use a single parameter that extracts the selected category ID from the list box and passes it to the GetItems() method. Notice that the name defined in the ControlParameter tag matches the parameter name of the GetItems() method. This is an absolute requirement. The ObjectDataSource searches for the GetItems() method using reflection, and it verifies that any potential match has the number of parameters, parameter names, and data types that you've indicated. This searching process allows the ObjectDataSource to distinguish between different overloaded versions of the same method. If the ObjectDataSource can't find the method you've specified, an exception is raised at this point.
Tip
If you're ever in doubt what method is being called in your data-access component, place a breakpoint on the possible methods, and use Visual Studio's debugging features (as described in Chapter 4).
The final step is to link the GridView to the new ObjectDataSource using the DataSourceID. Here's the tag that does it:
<asp:GridView ID="gridItems" runat="server" DataSourceID="sourceItems"/>
This is all you need. You should keep the Display button, because it triggers a page postback and allows the ObjectDataSource to get to work. (If you don't want to use this button, set the AutoPostback property on the list box to True so it posts back whenever you change the selection.) You don't need to write any event handling code to react when the button is clicked. The queries are executed automatically, and the controls are bound automatically.
The final step is to provide a way for the user to add new items. The easiest way to make this possible is to use a rich data control that deals with individual records—either the DetailsView or the FormsView. The DetailsView is the simpler of the two, because it doesn't require a template. It's the one used in the following example.
Ideally, you'd define the DetailsView using a tag like this and let it generate all the fields it needs based on the bound data source:
<asp:DetailsView ID="detailsAddItem" runat="server" DataSourceID="sourceItems"/>
Unfortunately, this won't work in this example. The problem is that this approach creates too many fields. In this example, you don't want the user to specify the item ID (that's set by the database automatically) or the category ID (that's based on the currently selected category). So, neither of these details should appear. The only way to make sure this is the case is to turn off automatic field generation and define each field you want explicitly, as shown here:
<asp:DetailsView ID="detailsAddItem" runat="server"
  DataSourceID="sourceItems" AutoGenerateRows="False">
  <Fields>
    <asp:BoundField DataField="Title" HeaderText="Title" />
    <asp:BoundField DataField="Price" HeaderText="Price"/>
    <asp:BoundField DataField="Description" HeaderText="Description" />
  </Fields>
</asp:DetailsView>
You need to make a couple of other changes. To allow inserting, you need to set the AutoGenerateInsertButton to True. This way, the DetailsView creates the links that allow you to start entering a new record and then insert it. At the same time, you can set the DefaultMode property to Insert. This way, the DetailsView is always in insert mode and is used exclusively for adding records (not displaying them), much like the non-data-bound page shown earlier.
<asp:DetailsView ID="detailsAddItem" runat="server"
  DefaultMode="Insert" AutoGenerateInsertButton="True"
  DataSourceID="sourceItems" AutoGenerateRows="False">
  ...
</asp:DetailsView>
The ObjectDataSource provides the same type of support for updatable data binding as the SqlDataSource. The first step is to specify the InsertMethod, which needs to be a public method in the same class:
<asp:ObjectDataSource ID="sourceItems" runat="server"
 TypeName="DatabaseComponent.DBUtil"
 SelectMethod="GetItems" InsertMethod="AddItem" >
</asp:ObjectDataSource>
The challenge is in making sure the InsertMethod has the right signature. As with the SqlDataSource, updates, inserts, and deletes automatically receive a collection of parameters from the linked data control. These parameters have the same names as the corresponding field names. So in this case, the fields are Title, Price, and Description, which exactly match the parameter names in the AddItem() method. (The capitalization is not the same, but the ObjectDataSource is not case sensitive, so this isn't a problem.)
This still has a problem, however. When the user commits an edit, the DetailsView submits the three parameters you expect (Title, Price, and Description). However, the AddItem() method needs a fourth parameter—CategoryID. We've left that parameter out of the DetailsView fields, because you don't want the user to be able to set the category ID. However, you still need to supply it to the method.
So, where can you get the current category ID from? The easiest choice is to extract it from the list box, just as you did for the GetItems() method. All you need to do is add a ControlParameter tag that defines a parameter named CategoryID and binds it to the SelectedValue property of the list box. Here's the revised tag for the ObjectDataSource:
<asp:ObjectDataSource ID="sourceItems" runat="server" SelectMethod="GetItems"
 TypeName="DatabaseComponent.DBUtil" InsertMethod="AddItem" >
  <SelectParameters>
    ...
  </SelectParameters>
  <InsertParameters>
    <asp:ControlParameter ControlID="lstCategories" Name="categoryID"
PropertyName="SelectedValue" Type="Int32" /></InsertParameters></asp:ObjectDataSource>
Now you have all the parameters you need—the three from the DetailsView and the one extra from the list box. When the user attempts to insert a new record, the ObjectDataSource collects these four parameters, makes sure they match the signature for the AddItem() method, puts them in order, and then calls the method.
Figure 22-11 shows an insert in progress.
When you click the Insert button, quite a bit takes place behind the scenes. Here's a breakdown of what actually happens:
The DetailsView gathers all the new values and passes them to the ObjectDataSource.
The ObjectDataSource calls the DBUtil.AddItem() method, passing all the values it received from the DetailsView in the right positions (by matching the field names with the parameter names) and the selected value from the lstCategories list box.
The DBUtil.AddItem() method builds a parameterized SQL command. It then opens a database connection and executes the command to insert the new record. (At this point, the ASP.NET data binding system takes a break and lets other events occur, such as Page.Load.)
Just before the page is rendered, the data binding process begins. The DropDownList asks the first ObjectDataSource for the list of categories (which triggers a call to the DBUtil.GetCategories() method), and the GridView requests the list of items from the second ObjectDataSource (which triggers the DBUtil.GetItems() method).
Because the page is always rebound after any insert and update operations are finished, you'll always see the latest information in your web controls. For example, if you add a new item, you'll see it appear immediately, complete with the unique ID value that the database server generates automatically.
Note
In some cases, you might need to supply an extra parameter that needs to be set programmatically. In this case, you need to define a plain-vanilla Parameter tag (instead of a ControlParameter tag), with a name and data type but no value. Then you can respond to the appropriate ObjectDataSource event (such as Inserting, Updating, or Deleting) to fill in the value you need just in time. It's a little messy (and it forces you to write code in your web page), but it's sometimes a necessity. Chapter 15 demonstrates this technique with the SqlDataSource control.
The examples in this chapter demonstrate safe, solid ways to create components and integrate them into your website. As you can see, these objects respect the rules of encapsulation, which means they do a specific business task, but they don't get involved in generating the user interface for the application. For example, the DBUtil class uses ADO.NET code to retrieve records or update a database. It's up to other controls, such as the GridView and DetailsView, to provide the presentation.