
Ordinarily, your ASP.NET website is available to anyone who connects to your web server, whether over a local network or the Internet. Although this is ideal for many web applications (and it suits the original spirit of the Internet), it isn't always an appropriate design choice. For example, an e-commerce site needs to provide a secure shopping experience to attract customers. A subscription-based site needs to limit content to extract a fee. And even a wide-open public site may provide some resources or features that shouldn't be available to all users.
ASP.NET provides an extensive security model that makes it easy to protect your web applications. Although this security model is powerful and profoundly flexible, it can appear confusing because of the many different layers that it includes. Much of the work in securing your application isn't writing code, but determining the appropriate places to implement your security strategy.
In this chapter, you'll sort out the tangled ASP.NET security model. You'll learn two ways to authenticate users—first, using forms authentication (which is ideal for a public website that uses a custom database) and then using Windows authentication (which is ideal for an intranet application on a company network).
The first step in securing your applications is deciding where you need security and what it needs to protect. For example, you may need to block access in order to protect private information. Or, maybe you just need to enforce a pay-for-content system. Perhaps you don't need any sort of security at all, but you want an optional login feature to provide personalization for frequent visitors. These requirements will determine the approach you use.
Security doesn't need to be complex, but it does need to be wide-ranging and multilayered. For example, consider an e-commerce website that allows users to view reports of their recently placed orders. You probably already know the first line of defense that this website should use—a login page that forces users to identify themselves before they can see any personal information. In this chapter, you'll learn how to use this sort of authentication system. However, it's important to realize that, on its own, this layer of protection is not enough to truly secure your system. You also need to protect the back-end database with a strong password, and you might even choose to encrypt sensitive information before you store it (scrambling so that it's unreadable without the right key to decrypt it). Steps like these protect your website from other attacks that get beyond your authentication system. For example, they can deter a disgruntled employee with an account on the local network, a hacker who has gained access to your network through the company firewall, or a careless technician who discards a hard drive used for data storage without erasing it first.
Furthermore, you'll need to hunt carefully for weaknesses in the code you've written. A surprising number of websites fall prey to relatively simple attacks in which a malicious user simply tampers with a query string argument or a bit of HTML in the rendered page. In the e-commerce example, you need to make sure that a user who successfully logs in can't view another user's recent orders. Imagine you've created a ViewOrders.aspx page that takes a query string argument named userID, like this:
http://localhost/InsecureStore/ViewOrders.aspx?userID=4191
This example is a security nightmare, because any user can easily modify the userID parameter by editing the URL to see another user's information. A better solution would be to design the ViewOrders.aspx page so that it gets the user ID from the currently logged-on user identity (a trick you'll learn in this chapter) and then uses that to construct the right database command.
Note
Another example of a security vulnerability introduced by poor coding is the ever-common SQL injection attack. You learned to prevent this attack by using parameterized database commands in Chapter 14 .
When designing with security in mind, it's important to consider the different avenues for attack. However, you can't always anticipate potential problems. For that reason, it makes great sense to layer your security. The mantra of security architects can be summed up like this: "Don't force an attacker to do one impossible thing to break into your system—force them to do several."
As you already know, live ASP.NET websites use the IIS web hosting software. But when you begin building and testing web application, you rely on the built-in Visual Studio web server instead. This difference has two effects on website security:
- The website user account:
When you run a website in Visual Studio, the test web server uses your Windows user account. As a result, your code is allowed to perform tasks (reading a file, writing to a log, connecting to a database, and so on) that might not be allowed on a live web server. To make sure everything keeps working when you deploy your web application, you need to know a bit more about how IIS and ASP.NET use Windows accounts—a topic you'll tackle in Chapter 26.
- Security configuration:
Another difference is in the way you configure security settings, such as the type of authentication your web application uses and the authorization rules that govern who can access different pages. In a test site, you can apply these settings in two ways: by editing the web.config file or by running the Website Administration Tool (WAT), which you first met in Chapter 5. In a deployed application, you can keep using the security settings you set during development, you can edit the web.config by hand, or you can use the convenient IIS Manager configuration tool.
In addition, there are some security settings that come into play only when you configure a deployed website. For example, you can use IIS Manager to switch on Secure Sockets Layer (SSL), an encryption standard that makes sure malicious hackers can't eavesdrop on the messages sent between the user and your web server. You can also configure the specific protocols that IIS uses for Windows authentication (in other words, the exact security standard that's used to transmit user information and log someone in).
This chapter explains how to apply security to a website during development. The concepts and details you'll learn will apply equally well to a deployed application. However, if you want to adjust your security configuration after you deploy your application or if you want to get more advanced with SSL and Windows authentication settings, it's worth learning about IIS Manager. Chapter 26 has all the details.
Two concepts form the basis of any discussion about security:
- Authentication:
This is the process of determining a user's identity and forcing users to prove they are who they claim to be. Usually, this involves entering credentials (typically a user name and password) into some sort of login page or window. These credentials are then authenticated against the Windows user accounts on a computer, a list of users in a file, or a back-end database.
- Authorization:
Once a user is authenticated, authorization is the process of determining whether that user has sufficient permissions to perform a given action (such as viewing a page or retrieving information from a database). Windows imposes some authorization checks (for example, when you open a file), but your code will probably want to impose its own checks (for example, when a user performs a task in your web application such as submitting an order, assigning a project, or giving a promotion).
Authentication and authorization are the two cornerstones of creating a secure user-based site. The Windows operating system provides a good analogy. When you first boot up your computer, you supply a user ID and password, thereby authenticating yourself to the system. After that point, every time you interact with a restricted resource (such as a file, database, registry key, and so on), Windows quietly performs authorization checks to ensure your user account has the necessary rights.
You can use two types of authentication to secure an ASP.NET website:
- Forms authentication:
With forms authentication, ASP.NET is in charge of authenticating users, tracking them, and authorizing every request. Usually, forms authentication works in conjunction with a database where you store user information (such as user names and passwords), but you have complete flexibility. You could even store user information in a plain text file or write customized login code that calls a remote service. Forms authentication is the best and most flexible way to run a subscription site or e-commerce store.
- Windows authentication:
With Windows authentication, the web server forces every user to log in as a Windows user. (Depending on the specific configuration you use, this login process may take place automatically, as it does in the Visual Studio test web server, or it may require that the user type a name and password into a Login dialog box.) This system requires that all users have Windows user accounts on the server (although users could share accounts). This scenario is poorly suited for a public web application but is often ideal with an intranet or company-specific site designed to provide resources for a limited set of users.
You'll concentrate on these two approaches in this chapter. First, you'll explore the forms authentication model, which is perfect for publicly accessible websites. Then, you'll consider Windows authentication, which makes sense in smaller network environments where you have a group of known users.
In old-fashioned ASP programming, developers had to create their own security systems. A common approach was to insert a little snippet of code at the beginning of every secure page. This code would check for the existence of a custom cookie. If the cookie didn't exist, the user would be redirected to a login page, where the cookie would be created after a successful login.
ASP.NET uses the same approach in its forms authentication model. You are still responsible for creating the login page (although you can use a set of specially designed controls to help you, as described in Chapter 20). However, you don't need to create the security cookie manually, or check for it in secure pages, because ASP.NET handles these tasks automatically. You also benefit from ASP.NET's support for sophisticated validation algorithms, which make it all but impossible for users to spoof their own cookies or try other hacking tricks to fool your application into giving them access.
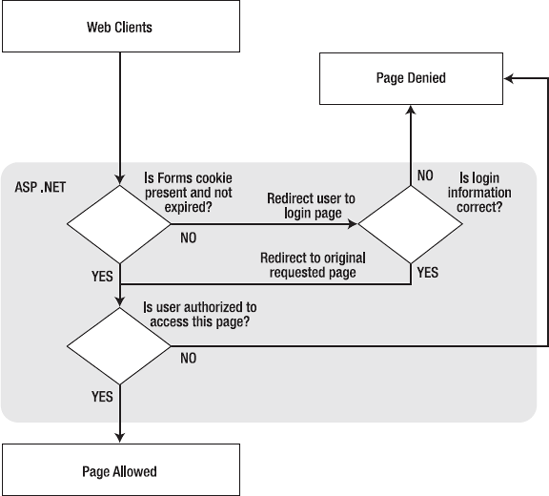
Figure 19-1 shows a simplified security diagram of the forms authentication model in ASP.NET.
To implement forms-based security, you need to follow three steps:
Set the authentication mode to forms authentication in the web.config file. (If you prefer a graphical tool, you can use the WAT during development or IIS Manager after deployment.)
Restrict anonymous users from a specific page or directory in your application.
Create the login page.
You'll walk through these steps in the following sections.
You define the type of security in the web.config file by using the <authentication> tag.
The following example configures the application to use forms authentication by using the <authentication> tag. It also sets several of the most important settings using a nested <forms> tag. Namely, it sets the name of the security cookie, the length of time it will be considered valid (in minutes), and the page that allows the user to log in.
<configuration>
    <system.web>
        <authentication mode="Forms">
            <forms name="MyAppCookie"
                   loginUrl="~/Login.aspx"
                   protection="All"
                   timeout="30" path="/" />
        </authentication>
        ...
    </system.web>
</configuration>
Table 19-1 describes these settings. They all supply default values, so you don't need to set them explicitly. For a complete list of supported attributes, consult the Visual Studio Help.
Table 19.1. Forms Authentication Settings
Attribute | Description |
|---|---|
name | The name of the HTTP cookie to use for authentication (defaults to .ASPXAUTH). If multiple applications are running on the same web server, you should give each application's security cookie a unique name. |
loginUrl | Your custom login page, where the user is redirected if no valid authentication cookie is found. The default value is Login.aspx. |
protection | The type of encryption and validation used for the security cookie (can be All, None, Encryption, or Validation). Validation ensures the cookie isn't changed during transit, and encryption (typically Triple-DES) is used to encode its contents. The default value is All. |
timeout | The number of idle minutes before the cookie expires. ASP.NET will refresh the cookie every time it receives a request. The default value is 30. |
path | The path for cookies issued by the application. The default value (/) is recommended, because case mismatches can prevent the cookie from being sent with a request. |
If you make these changes to an application's web.config file and request a page, you'll notice that nothing unusual happens, and the web page is served in the normal way. This is because even though you have enabled forms authentication for your application, you have not restricted anonymous users. In other words, you've chosen the system you want to use for authentication, but at the moment none of your pages needs authentication.
To control who can and can't access your website, you need to add access control rules to the <authorization> section of your web.config file. Here's an example that duplicates the default behavior:
<configuration>
    <system.web>
        <authentication mode="Forms">
            <forms loginUrl="~/Login.aspx" />
        </authentication>

        <authorization>
            <allow users="*" />
        </authorization>
        ...
    </system.web>
</configuration>
The asterisk (*) is a wildcard character that explicitly permits all users to use the application, even those who haven't been authenticated. But even if you don't include this line in your application's web.config file, this is still the behavior you'll see, because ASP.NET's default settings allow all users. (Technically, this behavior happens because there's an <allow users="*"> rule in the root web.config file. If you're curious, you can find this file a directory like c:WindowsMicrosoft.NETFramework[Version]Config, where [Version] is the version of ASP.NET that's installed, like v4.0.30319.)
To change this behavior, you need to explicitly add a more restrictive rule, as shown here:
<authorization>
    <deny users="?" />
</authorization>
The question mark (?) is a wildcard character that matches all anonymous users. By including this rule in your web.config file, you specify that anonymous users are not allowed. Every user must be authenticated, and every user request will require the security cookie. If you request a page in the application directory now, ASP.NET will detect that the request isn't authenticated. It will then redirect the request to the login page that's specified by the loginUrl attribute in the web.config file. (If you try this step right now, the redirection process will cause an error, unless you've already created the login page.)
Now consider what happens if you add more than one rule to the authorization section:
<authorization>
    <allow users="*" />
    <deny users="?" />
</authorization>
When evaluating rules, ASP.NET scans through the list from top to bottom and then continues with the settings in any .config file inherited from a parent directory, ending with the settings in the base machine.config file. As soon as it finds an applicable rule, it stops its search. Thus, in the previous case, it will determine that the rule <allow users="*"> applies to the current request and will not evaluate the second line. This means these rules will allow all users, including anonymous users.
But consider what happens if these two lines are reversed:
<authorization>
    <deny users="?" />
    <allow users="*" />
</authorization>
Now these rules will deny anonymous users (by matching the first rule) and allow all other users (by matching the second rule).
A common application design is to place files that require authentication in a separate directory. With ASP.NET configuration files, this approach is easy. Just leave the default <authorization> settings in the normal parent directory, and add a web.config file that specifies stricter settings in the secured directory. This web.config simply needs to deny anonymous users (all other settings and configuration sections can be omitted).
<!-- This web.config file is in a subfolder. -->
<configuration>
    <system.web>
        <authorization>
            <deny users="?" />
        </authorization>
    </system.web>
</configuration>
Note
You cannot change the <authentication> tag settings in the web.config file of a subdirectory in your application. Instead, all the directories in the application must use the same authentication system. However, each directory can have its own authorization rules.
Generally, setting file access permissions by directory is the cleanest and easiest approach. However, you also have the option of restricting specific files by adding <location> tags to your web.config file.
The location tags sit outside the main <system.web> tag and are nested directly in the base <configuration> tag, as shown here:
<configuration>
    <system.web>
        <authentication mode="Forms">
            <forms loginUrl="~/Login.aspx" />
        </authentication>

        <authorization>
            <allow users="*" />
        </authorization>
        ...
    </system.web>

    <location path="SecuredPage.aspx">
        <system.web>
            <authorization>
                <deny users="?" />
            </authorization>
        </system.web>
    </location>

    <location path="AnotherSecuredPage.aspx">
        <system.web>
            <authorization>
                <deny users="?" />
            </authorization>
        </system.web>
</location>
</configuration>In this example, all files in the application are allowed, except SecuredPage.aspx and AnotherSecuredPage.aspx, which have an additional access rule denying anonymous users. Notice that even when you use multiple <location> sections to supply different sets of authorization rules, you still only include one <authentication> section. That's because a web application can use only one type of authentication.
Tip
You can also use the location tags to set rules for a specific subdirectory. It's up to you whether you want to use this approach or you prefer to create separate web.config files for each subdirectory, as described in the previous section.
The <allow> and <deny> rules don't need to use the asterisk or question mark wildcards. Instead, they can specifically identify a user name or a list of comma-separated user names. For example, the following list specifically restricts access from three users. These users will not be able to access the pages in this directory. All other authenticated users will be allowed.
<authorization>
    <deny users="?" />
    <deny users="matthew,sarah" />
    <deny users="john" />
    <allow users="*" />
</authorization>
You'll notice that the first rule in this example denies all anonymous users. Otherwise, the following rules won't have any effect, because users won't be forced to authenticate themselves.
The following rules explicitly allow two users. All other user requests will be denied access, even if they are authenticated.
<authorization>
    <deny users="?" />
    <allow users="matthew,sarah" />
    <deny users="*" />
</authorization>
Don't confuse these user names with the Windows user account names that are configured on your web server. When you use forms authentication, your application's security model is separate from the Windows user account system. Your application assigns the user name when a user logs in through the login page. Often, you'll choose user names that correspond to IDs in a database. The only requirement is that your user names need to be unique.
You have another way to set up your authentication and authorization rules. Rather than edit the web.config file by hand, you can use the WAT from inside Visual Studio. The WAT guides you through the process, although you'll find it's still important to understand what changes are actually being made to your web.config file. It's also often quicker to enter a list of authorization rules by hand rather than use the WAT.
To use the WAT for this type of configuration, select Website

To set an application to use forms authentication, follow these steps:
Click Select Authentication Type.
Choose the From the Internet option. (If you chose From a Local Network instead, you'd wind up using the built-in Windows authentication approach described later in the "Windows Authentication" section.)
Click Done. The appropriate <authorization> tag will be created in the web.config file.
Tip
The Select Authentication options are worded in a slightly misleading way. It's true that applications that have users connecting from all over the Internet are sure to use forms authentication. However, applications that run on a local network might also use forms authentication—it all depends on how they connect and whether you want to use the information in existing accounts. In other words, a local intranet gives you the option to use Windows authentication but doesn't require it.
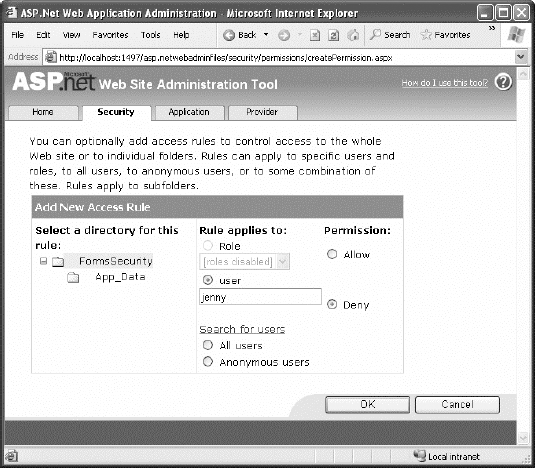
Next, it's time to define the authorization rules. To do so, click the Create Access Rules link. (You can also change existing rules by clicking the Manage Access Rules link.) Using the slightly convoluted page shown in Figure 19-3, you have the ability to create a rule allowing or restricting specific users to the entire site or a specific page or subfolder. For example, the rule in Figure 19-3 will deny the user jenny from the entire site once you click OK to add it.
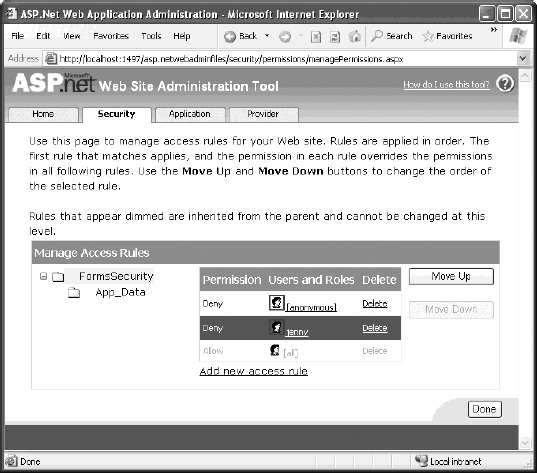
To manage multiple rules, you'll need to click the Manage Access Rules link. Now you'll have the chance to change the order of rules (and hence the priority, as described earlier), as shown in Figure 19-4. If you have a large number of rules to create, you may find it's easier to edit the web.config file by hand. You might just want to create one initial rule to make sure it's in the right place and then copy and paste your way to success.
The Security tab is a little overwhelming at first glance because it includes a few features you haven't been introduced to yet. For example, the Security tab also allows you to create and manage user records and roles, as long as you're willing to use the prebuilt database structure that ASP.NET requires. You'll learn more about these details, which are part of a broad feature called membership, in the next chapter. For now, you'll concentrate on the authentication and authorization process.
Once you've specified the authentication mode and the authorization rules, you need to build the actual login page, which is an ordinary .aspx page that requests information from the user and decides whether the user should be authenticated.
ASP.NET provides a special FormsAuthentication class in the System.Web.Security namespace, which provides shared methods that help manage the process. Table 19-2 describes the most important methods of this class.
Table 19.2. Members of the FormsAuthentication Class
Member | Description |
|---|---|
FormsCookieName | A read-only property that provides the name of the forms authentication cookie. |
FormsCookiePath | A read-only property that provides the path set for the forms authentication cookie. |
Authenticate() | Checks a user name and password against a list of accounts that can be entered in the web.config file. |
RedirectFromLoginPage() | Logs the user into an ASP.NET application by creating the cookie, attaching it to the current response, and redirecting the user to the page originally requested. |
SignOut() | Logs the user out of the ASP.NET application by removing the current encrypted cookie. |
SetAuthCookie() | Logs the user into an ASP.NET application by creating and attaching the forms authentication cookie. Unlike the RedirectFromLoginPage() method, it doesn't forward the user back to the initially requested page. |
GetRedirectUrl() | Provides the URL of the originally requested page. You could use this with SetAuthCookie() to log a user into an application and make a decision in your code whether to redirect to the requested page or use a more suitable default page. |
GetAuthCookie() | Creates the authentication cookie but doesn't attach it to the current response. You can perform additional cookie customization and then add it manually to the response, as described in Chapter 8. |
HashPasswordForStoringInConfigFile() | Encrypts a string of text using the specified algorithm (SHA1 or MD5). This hashed value provides a secure way to store an encrypted password in a file or database. |
A simple login page can put these methods to work with little code. To try it, begin by enabling forms authentication and denying anonymous users in the web.config, as described earlier:
<configuration>
    <system.web>
        <authentication mode="Forms">
            <forms loginUrl="~/Login.aspx" />
        </authentication>

        <authorization>
            <deny users="?" />
            <allow users="*" />
</authorization>
...
</system.web>
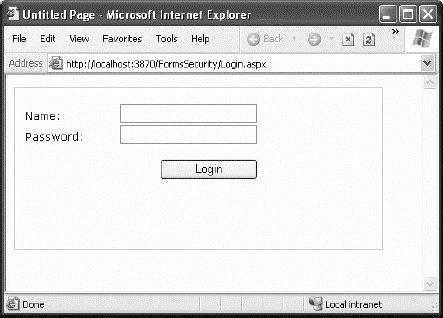
</configuration>Now, users will be redirected to a login page named Login.aspx that you need to create. Figure 19-5 shows an example of the simple login page that you might build.
When the user clicks the Login button, the page checks whether the user has typed in the password Secret and then uses the RedirectFromLoginPage() method to log the user in. Here's the complete page code:
Public Partial Class Login
    Inherits System.Web.UI.Page

    Protected Sub cmdLogin_Click(ByVal sender As Object, _
      ByVal e As System.EventArgs) Handles cmdLogin.Click
        If txtPassword.Text.ToLower() = "secret" Then
            FormsAuthentication.RedirectFromLoginPage(txtName.Text, False)
        Else
            lblStatus.Text = "Try again."
        End If
    End Sub

End Class
The RedirectFromLoginPage() method requires two parameters. The first sets the name of the user. The second is a Boolean variable that specifies whether you want to create a persistent cookie (one that stays on the user's hard drive for a longer period of time). However, in an effort to be more secure, ASP.NET no longer honors this property in the way it was originally designed. (You'll learn more about persistent cookies shortly, in the section named "Persistent Cookies.")
Obviously, the approach used in the login page isn't terribly secure—it simply checks that the user supplies a hard-coded password. In a real application, you'd probably check the user name and password against the information in a database and sign the user in only if the information matches exactly. You could write this code easily using the ADO.NET programming you learned in Part 4, although it requires a bit of tedious code. You'll consider more practical ways to accomplish this task in the next chapter.
You can test this code with the FormsSecurity website that's included with the downloadable code for this chapter. If you request the SecuredPage.aspx file, you'll be redirected to Login.aspx. After entering the correct password, you'll return to SecuredPage.aspx.
Once the user is logged in, you can retrieve the identity through the built-in User property, as shown here:
Protected Sub Page_Load(ByVal sender As Object, _
  ByVal e As System.EventArgs) Handles Me.Load

    lblMessage.Text = "You have reached the secured page, "
    lblMessage.Text &= User.Identity.Name + "."
End Sub
You don't need to place the code in the login page. Instead, you can use the User object to examine the current user's identity any time you need to do so.
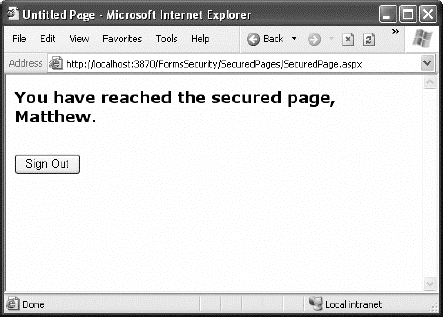
Figure 19-6 shows the result of running this code.
You can access the User object in your code because it's a property of the current Page object. The User object provides information about the currently logged-in user. It's fairly simple—in fact, User provides only one property and one method:
The Identity property lets you retrieve the name of the logged-in user and the type of authentication that was used.
The IsInRole() method lets you determine whether a user is a member of a given role (and thus should be given certain privileges). You'll use IsInRole() later in this chapter.
Any web application that uses forms authentication should also feature a prominent logout button that destroys the forms authentication cookie:
Protected Sub cmdSignOut_Click(ByVal sender As Object, _
  ByVal e As System.EventArgs) Handles cmdSignOut.Click

    FormsAuthentication.SignOut()
    Response.Redirect("~/Login.aspx")
End Sub
Tip
In the next chapter, you'll learn how to simplify life with the login controls. These controls allow you to build login pages (and other types of security-related user interfaces) with no code. However, they require another feature—membership—in order to work.
In some situations, you may be using the forms authentication login for personalization instead of security. In this situation, you may decide to allow persistent cookies. A persistent authentication cookie remains on the user's hard drive and keeps the user signed in for hours, days, or weeks—even if the user closes and reopens the browser.
Creating a persistent cookie requires a bit more code than creating a standard forms authentication cookie. Instead of using the RedirectFromLoginPage() method, you need to manually create the authentication ticket, set its expiration time, encrypt it, attach it to the request, and then redirect the user to the requested page. All of these tasks are easy, but it's important to perform them all in the correct order. (When using nonpersistent cookies, the RedirectFromLoginPage() takes care of all these tasks automatically.)
Persistent cookies also present a potential security risk, because another user could use the same computer to access the secured pages, without being forced to log in. If you want to allow the user to create a persistent cookie, you should make it optional, because the user may want to access your site from a public or shared computer. Generally, sites that use this technique include a check box with text such as Keep Me Logged In.
The following code examines a check box named chkPersist. If it's selected, the code creates a persistent cookie that lasts for 20 days (although you can change this detail to whatever time interval you like).
' Perform the authentication.
If txtPassword.Text.ToLower() = "secret" Then
    If chkPersist.Checked Then
        ' Use a persistent cookie that lasts 20 days.
        ' The timeout must be specified as a number of minutes.
        Dim timeout As Integer
        timeout = CInt(TimeSpan.FromDays(20).TotalMinutes)

        ' Create an authentication ticket.
        Dim ticket As New FormsAuthenticationTicket(txtName.Text, _
          True, cookietimeout)

        ' Encrypt the ticket (so people can't steal it as it travels over
        ' the Internet).
        Dim encryptedTicket As String = FormsAuthentication.Encrypt(ticket)

        ' Create the cookie for the ticket, and put the ticket inside.
        Dim cookie As New HttpCookie(FormsAuthentication.FormsCookieName, _
          encryptedTicket)
        ' Give the cookie and the authentication ticket the same expiration.
        cookie.Expires = ticket.Expiration

        ' Attach the cookie to the current response. It will now travel back to
        ' the client, and then back to the web server with every new request.
        HttpContext.Current.Response.Cookies.Set(cookie)

        ' Send the user to the originally requested page.
        Dim requestedPage As String
        requestedPage = FormsAuthentication.GetRedirectUrl(txtName.text, False)
        Response.Redirect(requestedPage, True)
    Else
        ' Use the standard authentication method.
FormsAuthentication.RedirectFromLoginPage(txtName.Text, False)
End If
End IfIt's worth noting that the FormsAuthentication.SignOut() method will always remove the forms authentication cookie, regardless of whether it is a normal cookie or a persistent cookie.
With Windows authentication, the web server takes care of the authentication process. ASP.NET simply makes this identity available to your code for your security checks.
When you use Windows authentication, you force users to log into IIS before they're allowed to access secure content in your website. The user login information can be transmitted in several ways (depending on the network environment, the requesting browser, and the way IIS is configured), but the end result is that the user is authenticated using a local Windows account. Typically, this makes Windows authentication best suited to intranet scenarios, in which a limited set of known users is already registered on a network server.
To implement Windows-based security with known users, you need to follow three steps:
Set the authentication mode to Windows authentication in the web.config file. (If you prefer a graphical tool, you can use the WAT during development or IIS Manager after deployment.)
Disable anonymous access for a directory by using an authorization rule.
Configure the Windows user accounts on your web server (if they aren't already present).
You'll walk through these steps in the following sections.
Note
The built-in Visual Studio web server doesn't support anonymous users with Windows authentication. Instead, Visual Studio automatically logs you in to the test server using your Windows account. As a result, there's no need to use an authorization rule that denies anonymous users. However, it's still good practice to add it, because at some point you will deploy your application to IIS and need to explicitly deny anonymous users.
To use Windows authentication, you need to make sure the <authentication> element is set accordingly in your web.config file. Here's how:
<configuration>
    <system.web>
        <authentication mode="Windows" />

        <authorization>
          <deny users="?" />
        </authorization>
...
</system.web>
</configuration>At the moment, there's only one authorization rule, which uses the question mark to refuse all anonymous users. This step is critical for Windows authentication (as it is for forms authentication). Without this step, the user will never be forced to log in.
Ideally, you won't even see the login process take place. Instead, Internet Explorer will pass along the credentials of the current Windows user, which the web server uses automatically. The Visual Studio integrated web server always works this way. IIS also works this way, provided you've set up integrated Windows authentication (as described in Chapter 26) and the browser supports it.
You can also add <allow> and <deny> elements to specifically allow or restrict users from specific files or directories. Unlike with forms authentication, you need to specify the name of the server or domain where the account exists. For example, this rule allows the user account matthew, which is defined on the computer named WebServer:
<allow users="WebServermatthew" />
For a shortcut, you can use localhost (or just a period) to refer to an account on the current computer, as shown here:
<allow users=".matthew" />
You can also restrict certain types of users, provided their accounts are members of the same Windows group, by using the roles attribute:
<authorization>
    <deny users="?" />
    <allow roles=".SalesAdministrator,.SalesStaff" />
    <deny users=".matthew" />
</authorization>
In this example, all users who are members of the SalesAdministrator or SalesStaff groups will be automatically authorized to access ASP.NET pages in this directory. Requests from the user matthew will be denied, unless he is a member of the SalesAdministrator or SalesStaff group. Remember, ASP.NET examines rules in the order they appear and stops when it finds a match. Reversing these two authorization lines would ensure that the user matthew was always denied, regardless of group membership.
You can also examine a user's group membership programmatically in your code, as shown here.
Protected Sub Page_Load(ByVal sender As Object, _
  ByVal e As System.EventArgs) Handles Me.Load

    If User.IsInRole("MyDomainNameSalesAdministrators") Then
        ' Do nothing; the page should be accessed as normal because
        ' the user has administrator privileges.
    Else
        ' Don't allow this page. Instead, redirect to the home page.
        Response.Redirect("Default.aspx")
    End If
End Sub
In this example, the code checks for membership in a custom Windows group called SalesAdministrators. If you want to check whether a user is a member of one of the built-in groups, you don't need to specify a computer or domain name. Instead, you use this syntax:
If User.IsInRole("BUILTINAdministrators") Then
    ' (Code goes here.)
End If
For more information about the <allow> and <deny> rules and configuring individual files and directories, refer to the discussion in the "Authorization Rules" section earlier in this chapter.
Note that you have no way to retrieve a list of available groups on the web server (that would violate security), but you can find out the names of the default built-in Windows roles using the System.Security.Principal.WindowsBuiltInRole enumeration. Table 19-3 describes these roles. Not all will apply to ASP.NET use, although Administrator, Guest, and User probably will.
Table 19.3. Default Windows Roles
Role | Description |
|---|---|
AccountOperator | Users with the special responsibility of managing the user accounts on a computer or domain. |
Administrator | Users with complete and unrestricted access to the computer or domain. (If the web server computer uses user account control [UAC], Windows will hold back administrator privileges from administrator accounts, to reduce the risk of viruses and other malicious code.) |
BackupOperator | Users who can override certain security restrictions only as part of backing up or restore operations. |
Guest | Like the User role but even more restrictive. |
PowerUser | Similar to Administrator but with some restrictions. |
PrintOperator | Like User but with additional privileges for taking control of a printer. |
Replicator | Like User but with additional privileges to support file replication in a domain. |
SystemOperator | Similar to Administrator with some restrictions. Generally, system operators manage a computer. |
User | Users are prevented from making systemwide changes and can run only certified applications (see |
One of the nice features of Windows authentication is that no login page is required. Depending on the authentication protocol you're using (see Chapter 26 for the complete details), the login process may take place automatically or the browser may show a login dialog box. Either way, you don't need to perform any additional work.
You can retrieve information about the currently logged-on user from the User object. As you learned earlier, the User object provides identity information through the User.Identity property. Depending on the type of authentication, a different identity object is used, and each identity object can provide customized information. To get some additional information about the identity of the user who has logged in with Windows authentication, you can convert the generic IIdentity object to a WindowsIdentity object (which is defined in the System.Security.Principal namespace).
The following is a sample test page that uses Windows authentication (see Figure 19-7). To use this code as written, you need to import the System.Security.Principal namespace (where the WindowsIdentity class is defined).
Public Partial Class SecuredPage
    Inherits System.Web.UI.Page

    Protected Sub Page_Load(ByVal sender As Object, _
      ByVal e As System.EventArgs) Handles Me.Load
        Dim displayText As New StringBuilder()
        displayText.Append("You have reached the secured page, ")
        displayText.Append(User.Identity.Name)

        Dim winIdentity As WindowsIdentity
        winIdentity = CType(User.Identity, WindowsIdentity)

        displayText.Append(".<br /><br />Authentication Type: ")
        displayText.Append(winIdentity.AuthenticationType)
        displayText.Append("<br />Anonymous: ")
        displayText.Append(winIdentity.IsAnonymous)
        displayText.Append("<br />Authenticated: ")
        displayText.Append(winIdentity.IsAuthenticated)
        displayText.Append("<br />Guest: ")
        displayText.Append(winIdentity.IsGuest)
        displayText.Append("<br />System: ")
        displayText.Append(winIdentity.IsSystem)
        displayText.Append("<br />Administrator: ")
        displayText.Append(User.IsInRole("BUILTINAdministrators"))

        lblMessage.Text = displayText.ToString()
    End Sub

End Class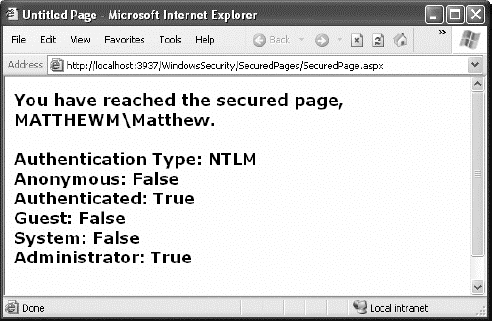
In this chapter, you learned about the multilayered security architecture in ASP.NET and how you can safeguard your web pages and web services by using a custom login page or Windows authentication.
In the next chapter, you'll continue to build on your knowledge by considering some add-on features that can simplify your life and enhance your security. You'll learn how to get ASP.NET to create a basic user database for your site (complete with password encryption), saving you from creating it yourself or writing any ADO.NET code. You'll also extend your authorization rules by learning how you can group forms-authenticated users into logical groups, each of which can be assigned its own permissions.