
So far, you've learned to build web pages that use the postback model. With the postback model, pages are perpetually being sent back to the web server and regenerated.
For example, consider the greeting card maker you first saw in Chapter 6. When the user picks a font, enters some text, or chooses new colors, the page is posted back to the web server, allowing your code to run. The web page code makes the necessary adjustments, ASP.NET renders the page to HTML all over again, and the browser receives (and displays) the new version of the page.
This process seems somewhat labor intensive, but it's actually not that bad. The time required to complete the whole process (transmitting the posted-back page, running the code, rendering the page, and returning the final HTML) is surprisingly short. However, the process isn't seamless. When the greeting card is updated in the greeting card maker, the entire page is refreshed, including the parts that haven't changed. This produces a distracting flicker. This browser refresh is also a bit intrusive—for example, this process might interrupt users while they're in the middle of entering information in another control, or it might scroll them back to the beginning of the page even though they were previously looking at the end. The overall experience of using the greeting card maker is quite different from the experience of using a rich Windows application, which has no noticeable flicker and feels much more responsive.
Today, there's a new generation of web applications that behave more like Windows applications than traditional web pages. These applications refresh themselves quickly and flicker-free and sometimes include slick new features such as animation and drag and drop. Notable examples include web-based email applications such as Gmail and mapping tools such as Google Maps. Other websites—from Facebook to Flickr—use Ajax features more subtly to improve responsiveness and add frills.
This new breed of web applications uses a set of design practices and technologies known as Ajax. Ajax is programming shorthand for a set of techniques that create more responsive, dynamic pages. One of the hallmarks of Ajax is the ability to refresh part of the page while leaving the rest untouched.
In this chapter, you'll learn how Ajax works and you'll see how you can use it to create rich, responsive web pages. You won't delve into the intricate details of do-it-yourself Ajax (which requires an extensive understanding of JavaScript), but you will explore the Ajax features of ASP.NET. These features allow you to use the familiar ASP.NET model—.NET objects and server-side controls—to get Ajax effects with surprisingly little effort.
Before you really get started with Ajax, it's important to understand its capabilities and limitations. Only then will you know how to fit it into your web applications.
The key benefit of Ajax is responsiveness. An Ajax application, when done properly, provides a better experience for the user. Even if the user can't do anything new (or do anything faster), this improved experience can make your web application seem more modern and sophisticated. If you're creating a website that's competing against other similar sites, you just might find that Ajax allows you to distinguish your work from the rest of the pack.
Ajax can also provide genuinely new features that aren't possible in traditional web pages. For example, Ajax pages often use JavaScript code that reacts to client-side events like mouse movements and key presses. These events occur frequently, so it's not practical to deal with them using the postback model. For example, imagine you want to highlight a TextBox when the user moves the mouse over it. With the postback approach, you'd need to send the entire page back to the web server, regenerate it, and refresh it in the browser—by which point the mouse might be somewhere completely different. This approach is clearly impractical. However, an Ajax page can deal with this scenario because it can react immediately, updating the page if needed or requesting additional information from the web server in the background. While this request is under way, the user is free to keep working with the page. In fact, the user won't even realize that the request is taking place.
Note
Ajax isn't really a whole new technology. More accurately, it's a set of techniques, some of which extend existing practices. For example, you've already seen quite a few ASP.NET controls that use client-side JavaScript to provide a richer experience, such as the validation controls (Chapter 9) and the Menu control (Chapter 13). However, Ajax pages use much more JavaScript than normal, they often require interactions between controls, and they often request additional information from the web server using a special browser object called XMLHttpRequest, which is available to client-side JavaScript code.
There are two key challenges to using Ajax. The first is complexity. Writing the JavaScript code needed to implement an Ajax application is a major feat. Fortunately, you'll sidestep this problem in this chapter, because you'll use ASP.NET's Ajax-enabled features. That means you'll let Microsoft manage the complexity instead of worrying about it yourself.
The other challenge to using Ajax is browser support. The technology that supports Ajax has existed for several years, but it's only now found consistently in all major browsers. If you use the Ajax features that ASP.NET provides, they'll work in Internet Explorer 5 and newer, Opera 7.6 and newer, Safari 1.2 and newer, Firefox, and Google Chrome. This captures the overwhelming majority of web users. (The actual percentage depends on your audience, but over 95 percent is a good, conservative assumption.)
But what about the minority of users who are using old browsers or have JavaScript switched off? It all depends on the feature you're using and the way it's implemented. If you're using the partial rendering support that's provided by ASP.NET's UpdatePanel control (which you'll learn about in this chapter), your page will continue to work with non-Ajax-enabled browsers—it will simply use full postbacks instead of more streamlined partial updates. On the other hand, if you're using a more advanced Ajax-enabled web control, you may find that it doesn't work properly or at all. The only way to know is to switch JavaScript off in your browser and try it out. Either way, there's a price to be paid for slick Ajax features, and that price is increased web browser requirements.
Finally, Ajax applications introduce a few quirks that might not be to your liking. Web pages that use Ajax often do a lot of work on a single page. This is different than traditional web pages, which often move the user from one page to another to complete a task. Although the multiple-page approach is a little more roundabout, it allows the user to place bookmarks along the way and use the browser's Back and Forward buttons to step through the sequence. These techniques usually don't work with Ajax applications, because there's only a single page to bookmark or navigate to, and the URL for that page doesn't capture the user's current state. This isn't a showstopper of an issue, but it might cause you to consider the design of your web application a little more closely.
There are a variety of ways to implement Ajax in any web application, including ASP.NET. To implement it on your own, you need to have a thorough understanding of JavaScript, because it's JavaScript code that runs in the browser, requesting the new information from the web server when needed and updating the page accordingly. Although JavaScript isn't terribly complex, it's remarkably difficult to program correctly, for two reasons:
The implementation of key JavaScript details varies from browser to browser, which means you need a tremendous amount of experience to write a solid web page that runs equally well on all browsers (or the help of a higher-level JavaScript library, such as jQuery).
JavaScript is a notoriously loose language that tolerates many minor typos and mistakes. Catching these mistakes and removing them is a tedious process. Even worse, the mistakes might be fatal on some browsers and harmless in others, which complicates debugging. (However, if you find yourself in the unenviable position of trying to correct misbehaving JavaScript code, you can get some help from Visual Studio's top-notch JavaScript debugger.)
In this chapter, you won't use JavaScript directly. Instead, you'll use a higher-level model called ASP.NET AJAX. ASP.NET AJAX gives you a set of server-side components and controls that you can use when designing your web page. These components automatically render all the JavaScript you need to get the effect you want. The result is that you can create a page with Ajax effects while programming with a familiar (and much more productive) model of server-side objects. Of course, you won't get quite as much control to customize every last detail about the way your web pages work, but you will get some great functionality with minimal effort.
Note
It's generally accepted that Ajax isn't written in all capitals, because the word isn't an acronym. (Technically, it's a short form for Asynchronous JavaScript and XML, although this technique is now considered to be just one of several possible characteristics of an Ajax web application.) However, Microsoft chose to write the term in uppercase when it named ASP.NET AJAX. For that reason, you'll see two capitalizations of Ajax in this chapter—Ajax when talking in general terms about the technology and philosophy of Ajax, and AJAX when talking about ASP.NET AJAX, which is Microsoft's specific implementation of these concepts.
In order to use ASP.NET AJAX, you need to place a new web control on your page. This control is the ScriptManager, and it's the brains of ASP.NET AJAX.
Like all ASP.NET AJAX controls, the ScriptManager is placed on a Toolbox tab named AJAX Extensions. When you can drag the ScriptManager onto your page, you'll end up with this declaration:
<asp:ScriptManager ID="ScriptManager1" runat="server"></asp:ScriptManager>
At design time, the ScriptManager appears as a blank gray box. But when you request a page that uses the ScriptManager you won't see anything, because the ScriptManager doesn't generate any HTML tags. Instead, the ScriptManager performs a different task—it adds the links to the ASP.NET AJAX JavaScript libraries. It does that by inserting a script block that looks something like this:
<script src="/YourWebSite/ScriptResource.axd?d=RUSU1mI ..."
 type="text/javascript">
</script>
This script block doesn't contain any code. Instead, it uses the src attribute to pull the JavaScript code out of a separate file.
However, the ScriptManager is a bit craftier than you might expect. Rather than use a separate file to get its JavaScript (which would then need to be deployed along with your application), the src attribute uses a long, strange-looking URL that points to ScriptResource.axd. ScriptResource.axd isn't an actual file—instead, it's a resource that tells ASP.NET to find a JavaScript file that's embedded in one of the compiled .NET 4 assemblies. The long query string argument at the end of the URL tells the ScriptResource.axd extension which file to send to the browser.
The JavaScript files that ASP.NET AJAX uses contain hundreds of lines of highly complex, concise code that forms the basis for all the Ajax features you'll see in this chapter. However, these files are quite compact, requiring the client to download less than 200 KB of script code (depending on the features that you're using). When you're visiting an ASP.NET AJAX–powered site, the script code is only downloaded once, and then cached by the browser so it can be used in various ways by various pages in the website. (In addition, ASP.NET sends a compressed version of the script document, if the browser supports it. Currently, ASP.NET uses compression when receiving requests from Internet Explorer 7 or later.) The bottom line is pages that use ASP.NET AJAX features don't require significantly longer download times.
Each page that uses ASP.NET AJAX features requires an instance of the ScriptManager. However, you can only use one ScriptManager on a page. ASP.NET AJAX-enabled controls can interact with the ScriptManager, asking it to render links to additional JavaScript resources.
Tip
If you're using ASP.NET AJAX features throughout your website, you might choose to place the ScriptManager in a master page. However, this can occasionally cause problems, because different content pages may want to configure the properties of the ScriptManager differently. In this scenario, the solution is to use the ScriptManager in the master page and the ScriptManagerProxy in your content page. (You can find the ScriptManagerProxy on the same AJAX Extensions tab of the Toolbox.) Each content page can configure the ScriptManagerProxy control in the same way it would configure the ScriptManager—in fact, all the ScriptManagerProxy settings are applied to the ScriptManager control when the page is executed.
Now that you've taken a brief overview of Ajax, it's time to start building Ajax-enabled pages. In this chapter, you'll consider the following topics:
Using partial refreshes to avoid full-page postbacks and page flicker
Using progress notifications to deal with slower updates
Using timed refreshes to automatically update a portion of your page
Using the ASP.NET AJAX Control Toolkit to get a range of slick new controls with Ajax features
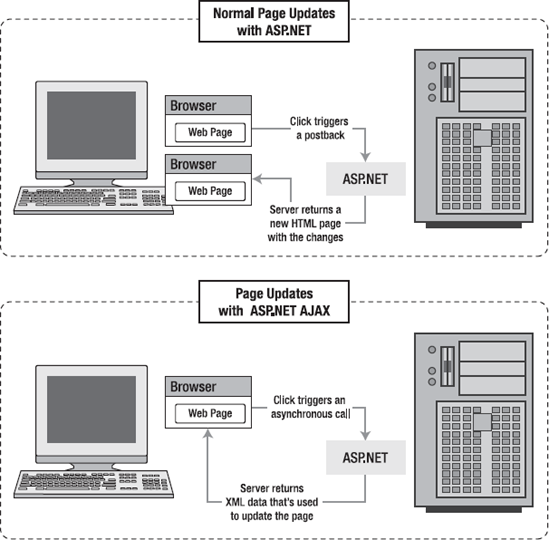
The key technique in an Ajax web application is partial refreshes. With partial refreshes, the entire page doesn't need to be posted back and refreshed in the browser. Instead, when something happens the web page asks the web server for more information. The request takes place in the background, so the web page remains responsive. (It's up to you whether you use some sort of progress indicator if you think the request might take a noticeable amount of time.) When the web page receives the response, it updates just the changed portion of the page, as shown in Figure 25-1.
ASP.NET includes a handy control that lets you take an ordinary page with server-side logic and make sure it refreshes itself in flicker-free Ajax style using partial updates. This control is the UpdatePanel.
The basic idea is that you divide your web page into one or more distinct regions, each of which is wrapped inside an invisible UpdatePanel. When an event occurs in a control that's located inside an UpdatePanel, and this event would normally trigger a full-page postback, the UpdatePanel intercepts the event and performs an asynchronous callback instead. Here's an example of how it happens:
The user clicks a button inside an UpdatePanel.
The UpdatePanel intercepts the client-side click. Now, ASP.NET AJAX performs a callback to the server instead of a full-page postback.
On the server, your normal page life cycle executes, with all the usual events. Finally, the page is rendered to HTML and returned to the browser.
ASP.NET AJAX receives HTML content for every UpdatePanel on the page. The client-side script code then updates the page, replacing the existing HTML that's in each panel with the new content. (If a change has occurred to content that's not inside an UpdatePanel, it's ignored.)
Note
If you access a page that uses the UpdatePanel with a browser that doesn't support Ajax or doesn't have JavaScript switched on, it uses normal postbacks instead of partial updates. However, everything else still works correctly.
To try out the UpdatePanel, it makes sense to build a simple test page.
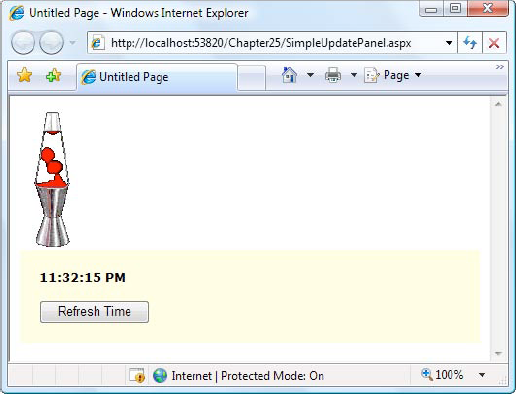
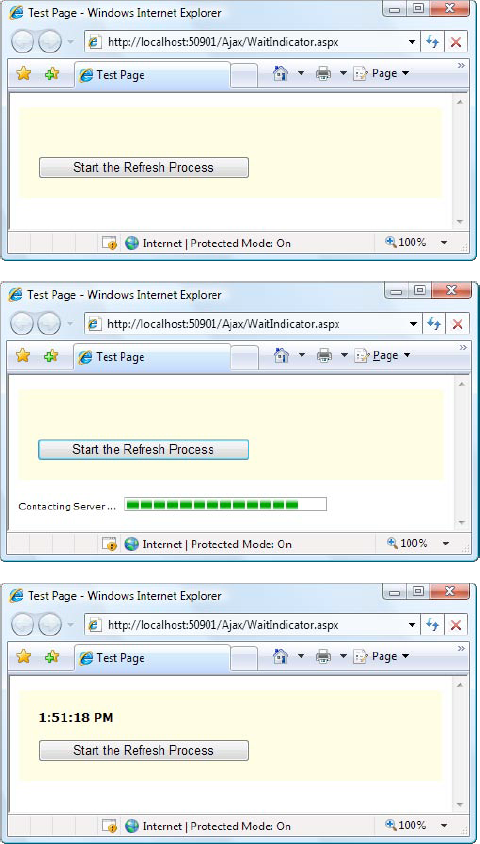
The following example (Figure 25-2) uses a simple page that includes two ingredients: an animated GIF image, and a shaded box that shows the current time and includes a Refresh Time button. When you click the Refresh Time button, the page grabs the current time from the web server and updates the label. However, the refresh process uses a partial update. As a result, the page won't flicker when it takes place. The animated GIF helps illustrate the point—even as you click the button to refresh the label, the lamp continues bubbling without a pause or hiccup.
Building this page is easy. First, you need to add the ScriptManager control to the page. Like all controls that use ASP.NET AJAX, the UpdatePanel works in conjunction with the ScriptManager. If you don't have it in your page, the UpdatePanel won't work (and you'll receive an exception when you run the page). Furthermore, the ScriptManager needs to appear before the UpdatePanel, because the rendered page must have the JavaScript script block in place before the UpdatePanel can use it. It's a good idea to always place the ScriptManager at the top of the <form> section of the page.
Next, you need to add the content to the page. The animated GIF is fairly straightforward—you can use an ordinary <img> element to show it. However, the label and button require a bit more effort. To refresh the label using a partial refresh, you need to wrap it in an UpdatePanel. So start by adding an UpdatePanel to your page, and then drag and drop the button and label inside.
The UpdatePanel has one role in life—to serve as a container for content that you want to refresh asynchronously. Interestingly enough, the UpdatePanel doesn't derive from Panel. Instead, it derives directly from Control. This design causes a few quirks that you should take into account.
First, the UpdatePanel is invisible. Unlike the standard ASP.NET Panel, an UpdatePanel doesn't support style settings. If you want to display a border around your UpdatePanel or change the background color, you'll need to place an ordinary Panel (or just a plain <div> tag) in your UpdatePanel. Here's how it's done in the example shown in Figure 25-2:
<asp:UpdatePanel ID="UpdatePanel1" runat="server" UpdateMode="Conditional">
  <ContentTemplate>
    <div style="background-color:LightYellow;padding: 20px">
      <asp:Label ID="lblTime" runat="server" Font-Bold="True"></asp:Label>
      <br />
      <br />
      <asp:Button ID="cmdRefreshTime" runat="server"
        Text="Refresh Time" />
    </div>
</ContentTemplate> </asp:UpdatePanel>
This markup reveals another difference between the UpdatePanel and an ordinary Panel—the UpdatePanel uses a template. All the controls you add to an UpdatePanel are placed in an element named <ContentTemplate>. When the UpdatePanel renders itself, it copies the content from the ContentTemplate into the page. This seems like a fairly unimportant low-level detail, but it does have one important side effect. If you want to use code to dynamically add controls to an UpdatePanel, you can't use the UpdatePanel.Controls collection. Instead, you need to add new controls to the UpdatePanels.ContentTemplateContainer.Controls collection.
Now that you have the controls you need, you're ready to add the code. This part is easy—when the button is clicked, you simply react to the Click event and update the label:
Protected Sub cmdRefreshTime_Click(ByVal sender As Object, _
ByVal e As EventArgs) Handles cmdRefreshTime.Click
lblTime.Text = DateTime.Now.ToLongTimeString()
End SubRemarkably, that's all you need to do to complete this example. Now, when you click the Refresh Time button, the label will refresh without a full postback and without any flicker.
So how does it all work? Here's a blow-by-blow analysis of what's taking place:
When rendering the HTML, the UpdatePanel looks at its contents. It notices that it contains one control that's able to trigger a postback—the button. It adds some JavaScript code that will intercept the button's click event on the client and use a JavaScript routine to handle it.
When you click the Refresh Time button, you trigger the JavaScript routine.
The JavaScript routine doesn't perform a full-page postback. Instead, it sends a background request to the web server. This request is asynchronous, which means your page remains responsive while the request is under way.
Note
Because the UpdatePanel uses asynchronous requests, it's possible to click the Refresh Time button several times before the result is returned and the time is updated. In this case, the response from the first few requests is ignored, and the response from the last request is used. (It's similar to what happens if you refresh a posted-back page several times before it's finished being processed on the server.)
The background request is processed in exactly the same way as a normal postback. All the data from all the web controls is sent back to the web server, along with the view state information and any cookies. On the web server, the page life cycle is the same—first the Page.Load event fires, followed by the event that triggered the postback (in this case, Button.Click). If you're using data source controls like SqlDataSource, all the normal querying and data binding takes place. The final page is then rendered to HTML and sent back to the page.
When the browser receives the rendered HTML for the page, it updates the current view state and grabs any cookies that were returned.
The JavaScript routine then replaces a portion of the HTML on the page—just the portion that you wrapped in the UpdatePanel. The rest of the HTML for the page is simply discarded. In the current example, that means the HTML with the animated GIF is tossed out. (This really has no effect, because this part of the HTML is exactly the same in the new response as it was originally. However, it's important to understand that if you modify this part of your page on the web server, you won't see the results of your change in the web browser, because that area of the page isn't being updated.)
The most impressive aspect of the UpdatePanel control is that it allows your web page to behave in the same way it would if you weren't using any Ajax techniques. There is a bit of a price to pay for this convenience—namely, the request might take a little longer than necessary because of all the extra work that's taking place. In a more streamlined do-it-yourself approach, you'd simply ask the web server for exactly what you need. In this example, that means you'd simply ask for the current time, rather than an entire HTML document.
However, in most scenarios the UpdatePanel's more long-winded approach doesn't introduce any noticeable delay. Even better, it gives you the ability to deal with much more complex scenarios—for example, when you're modifying a section of a web page much more dramatically. You'll see an example later in this chapter, when you use the UpdatePanel to improve the greeting card maker.
Note
When you use the UpdatePanel, you don't reduce the amount of bandwidth being used or the time taken to receive the response from the server, because the entire page is still sent. The only difference is that the page is updated without a distracting flicker. Small as that advantage seems, it can make a major difference in how your web page "feels" to the person using it.
As you've seen, when the UpdatePanel performs its callback, the web page code runs in exactly the same way as if the page had been posted back. The only difference is the means of communication (the page uses an asynchronous call to get the new data) and the way the received data is dealt with (the UpdatePanel refreshes its inner content, but the remainder of the page is not changed). For that reason, you don't need to make significant changes to your server-side code or deal with new error conditions.
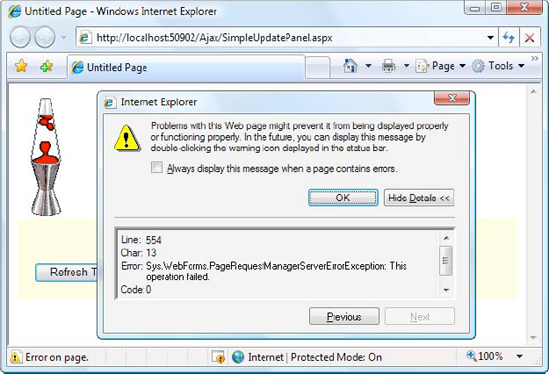
That said, problems can occur when performing an asynchronous postback just as they do when performing a synchronous postback. To find out what happens, you can add code like this to the event handler for the Page.Load event, which causes an unhandled exception to occur when an asynchronous callback takes place:
If Me.IsPostBack Then
Throw New ApplicationException("This operation failed.")
End IfWhen the web page throws an unhandled exception, the error is caught by the ScriptManager and passed back to the client. The client-side JavaScript then throws a JavaScript error. What happens next depends on your browser settings, but usually browsers are configured to quietly suppress JavaScript errors. In Internet Explorer, an "Error on page" message appears in the status bar that indicates the problem. If you double-click this notification, a dialog box appears with the full details, as shown in Figure 25-3.
There's another option for dealing with the errors that occur during an asynchronous postback. You can use custom error pages, just as you do with ordinary web pages. All you need to do is add the <customErrors> element to the web.config file.
For example, here's a <customErrors> element that redirects all errors to the page named ErrorPage.aspx:
<configuration>
<system.web>
<customErrors defaultRedirect="ErrorPage.aspx" mode="On"></customErrors>
...
</system.web>
</configuration>Now, when the PageRequestManager is informed of an error it will redirect the browser to ErrorPage.aspx. It also adds an aspxerrorpath query string argument to the URL that indicates the URL of the page where the problem originated, as shown here:
http://localhost/Ajax/ErrorPage.aspx?aspxerrorpath=/Ajax/UpdatePanels.aspxYou can write code in ErrorPage.aspx that reads the aspxerrorpath information. For example, you might include a button that redirects the user to the original requested page, like this:
Dim url As String = Request.QueryString("aspxerrorpath")
If url <> "" Then Response.Redirect(url)If your website uses custom error pages but you don't want them to apply to asynchronous postbacks, you must set the ScriptManager.AllowCustomErrorsRedirect property to false.
Note
Several controls don't work correctly in an UpdatePanel or don't work in specific scenarios. Most notably, the FileUpload and HtmlInputFile controls don't work at all. The Login, PasswordRecovery, ChangePassword, and CreateUserWizard controls work only if you've converted their content to templates. The GridView and DetailsView controls fail if you've set EnableSortingAndPagingCallbacks to True. And the TreeView and Menu controls don't work if you've set their style properties (instead, you can format their items using CSS styles). However, all these controls will work on pages that contain UpdatePanel controls, so long as they aren't actually in an UpdatePanel.
In complex pages, you might have more than one UpdatePanel. In this case, when one UpdatePanel triggers an update, all the UpdatePanel regions will be refreshed.
If you have more than one UpdatePanel and each one is completely self-contained, this isn't necessary. In this situation, you can configure the panels to update themselves independently. Simply change the UpdatePanel.UpdateMode property from Always to Conditional. Now, the UpdatePanel will refresh itself only if an event occurs in one of the controls in that UpdatePanel.
To try this out, create a page that has several UpdatePanel controls, each with its own time display and button. Then, add code that places the current time in the label of all three controls:
Protected Sub Page_Load(ByVal sender As Object, ByVal e As EventArgs) _
Handles Me.Load
lblTime1.Text = DateTime.Now.ToLongTimeString()
lblTime2.Text = DateTime.Now.ToLongTimeString()
lblTime3.Text = DateTime.Now.ToLongTimeString()
End SubNow, when you click one of the Refresh Time buttons, only the label in that panel will be updated. The other panels will remain untouched.
Note
There's an interesting quirk here. Technically, when you click the button all the labels are updated, but only part of the page is refreshed to show that fact. The next time the page is posted back, the most recent values are pulled out of view state and applied to all the labels, including the ones that weren't refreshed on the client.
Most of the time, this distinction isn't important. But if this isn't the behavior you want in this example, you could use a separate event handler for each button. Each event handler would update just one label—the label that's in the appropriate UpdatePanel. That way, when the page is posted back just one label is changed, and you don't waste time changing parts of the page that won't be updated in the browser.
There's one caveat with this approach. If you perform an update that takes a long time, it could be interrupted by another update. As you know, ASP.NET AJAX posts the page back asynchronously, so the user is free to click other buttons while the postback is under way. ASP.NET AJAX doesn't allow concurrent updates, because it needs to ensure that other information—such as the page view state information, the session cookie, and so on—remains consistent. Instead, when a new asynchronous postback is started, the previous asynchronous postback is abandoned. For the most part, this is the behavior you want. If you want to prevent the user from interrupting an asynchronous postback, you can add JavaScript code that disables controls while the asynchronous postback is under way, but this takes significantly more work. Another option is to use the UpdateProgress control discussed later in this chapter.
Tip
There's one other way to update a conditional UpdatePanel—you can call the UpdatePanel.Update() method from your server-side code. This allows you to decide on the fly whether a certain panel should be refreshed. However, you must be careful not to call Update() on a panel that uses an UpdateMode of Always, and you must not call Update() after the page has been rendered. If you make either of these mistakes, you'll cause an exception.
So far, the examples you've seen have used the built-in behavior of the UpdatePanel. In the next example, you'll use the UpdatePanel in a slightly more sophisticated page, and you'll learn to control its refreshes with triggers.
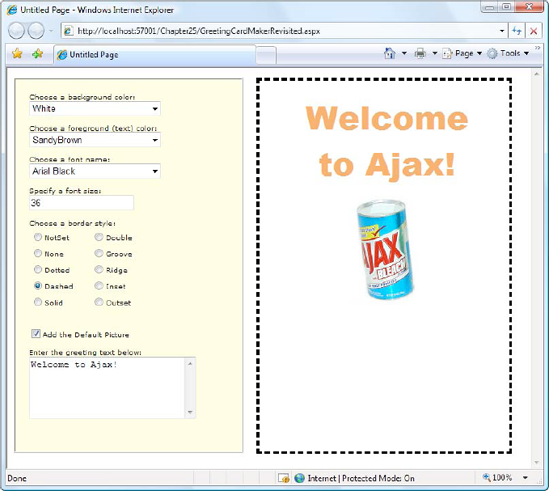
Earlier in this book, you learned how to build a web page that allows the user to dynamically build a greeting card. This page lets the user specify several details—such as text, font, colors, border options, and so on—and then updates a portion of the page to show the greeting card.
Chapter 6 demonstrated two versions of the greeting card maker. The first version allowed the user to specify a number of options at once, and then click a button to update the greeting card. The second version used automatic postback events, so that the greeting card was updated after every change. This second approach gave a more immediate result, but the cost was a less responsive user interface with distracting flicker. If this version of the greeting card maker was running on a slow web server (or over a slow network), the problems get even worse. That's because after every postback the user is forced to wait for the page update before making another change.
The UpdatePanel gives you the ability to get the best of both versions. You can create a greeting card page that updates its display automatically but feels more responsive and doesn't lock the user out.
The simplest approach is to add a ScriptManager and wrap the entire web page—including the controls and the greeting card—in one giant UpdatePanel. Here's the markup you'd use:
<asp:ScriptManager ID="ScriptManager1" runat="server"></asp:ScriptManager><asp:UpdatePanel ID="UpdatePanel1" runat="server"><ContentTemplate><!-- These are the controls for creating the greeting card. --> <div style="..."> Choose a background color:<br />
<asp:DropDownList ID="lstBackColor" runat="server"
Width="194px" AutoPostBack="True">
</asp:DropDownList>
<br /><br />
Choose a foreground (text) color:<br />
<asp:DropDownList ID="lstForeColor" runat="server"
Height="22px" Width="194px" AutoPostBack="True" >
</asp:DropDownList>
<br /><br />
Choose a font name:<br />
<asp:DropDownList ID="lstFontName" runat="server"
Height="22px" Width="194px" AutoPostBack="True">
</asp:DropDownList>
<br /><br />
Specify a font size:<br />
<asp:TextBox ID="txtFontSize" runat="server"
AutoPostBack="True">
</asp:TextBox>
<br /><br />
Choose a border style:<br />
<asp:RadioButtonList ID="lstBorder" runat="server"
Height="59px" Width="177px" Font-Size="X-Small"
AutoPostBack="True" RepeatColumns="2">
</asp:RadioButtonList>
<br /><br />
<asp:CheckBox ID="chkPicture" runat="server"
Text="Add the Default Picture" AutoPostBack="True">
</asp:CheckBox>
<br /><br />
Enter the greeting text below:<br />
<asp:TextBox ID="txtGreeting" runat="server"
Height="85px" Width="240px" TextMode="MultiLine"
AutoPostBack="True">
</asp:TextBox>
</div>
<!-- This is the panel that shows the greeting card. -->
<asp:Panel ID="pnlCard" runat="server" ... >
<asp:Label ID="lblGreeting" runat="server" Width="272px"
Height="150px"></asp:Label>
<br />
<asp:Image ID="imgDefault" runat="server" Width="212px" Height="160px"
Visible="False"></asp:Image>
</asp:Panel>
</ContentTemplate>
</asp:UpdatePanel>The greeting card is then generated when the Page.Load event fires:
Protected Sub Page_Load(ByVal sender As Object, ByVal e As EventArgs) _
  Handles Me.Load

    If Not Me.IsPostBack Then
        ' (Initialize all the controls here.)
    Else
        ' Refresh the greeting card.
        UpdateCard()
    End If
End Sub
The UpdatePanel watches its child controls and intercepts any events that could trigger a postback. The Button.Click is an obvious example, but in this example the TextBox.TextChanged and ListBox.SelectedItemChanged events also trigger a postback, because these controls set the AutoPostBack property to True. Thus, these events are also intercepted by the UpdatePanel. If these controls didn't use the AutoPostBack property, they wouldn't trigger a postback, the UpdatePanel wouldn't get involved, and the greeting card won't be updated until another control causes a postback.
This solution achieves the desired result. Although the greeting card page looks essentially the same (see Figure 25-4), when you interact with the controls on the left, the card on the right is updated without a postback. If you make several changes in quick succession, you'll trigger several postbacks, and the result from the last postback (with the completely updated card) will be used.
Although this example works perfectly well, it's doing more work than necessary. Because the entire page is wrapped in the UpdatePanel, the HTML for the entire page is refreshed. A better option is to wrap just the label and image that represents the greeting card in the UpdatePanel. Unfortunately, this won't work. Once you move the other controls out of the UpdatePanel, their events won't be intercepted any longer, and they'll trigger full-page postbacks with the familiar flicker.
The solution is to explicitly tell the UpdatePanel to monitor those controls, even though they aren't inside the UpdatePanel. You can do this by adding triggers to the UpdatePanel. You add one trigger for each button.
Here's the markup you need:
<asp:ScriptManager ID="ScriptManager1" runat="server"></asp:ScriptManager>

<!-- The controls for creating the greeting card go here. -->

<asp:UpdatePanel ID="UpdatePanel1" runat="server">
  <ContentTemplate>
<!-- This is the panel that shows the greeting card. -->
    <asp:Panel ID="pnlCard" runat="server" ... >
      <asp:Label ID="lblGreeting" runat="server" Width="272px"
        Height="150px"></asp:Label>
      <asp:Image ID="imgDefault" runat="server" Width="212px" Height="160px"
        Visible="False"></asp:Image>
    </asp:Panel>
  </ContentTemplate>

  <Triggers>
    <asp:AsyncPostBackTrigger ControlID="lstBackColor" />
    <asp:AsyncPostBackTrigger ControlID="lstForeColor" />
    <asp:AsyncPostBackTrigger ControlID="lstFontName" />
    <asp:AsyncPostBackTrigger ControlID="txtFontSize" />
    <asp:AsyncPostBackTrigger ControlID="lstBorder" />
    <asp:AsyncPostBackTrigger ControlID="chkPicture" />
    <asp:AsyncPostBackTrigger ControlID="txtGreeting" />
  </Triggers>
</asp:UpdatePanel>
Tip
You don't need to type your triggers in by hand. Instead, you can use the Visual Studio Properties window. Just select the UpdatePanel, click the Triggers property in the Properties window, and click the ellipsis (...) that appears in the Triggers box. Visual Studio will open a dialog box where you can add as many triggers as you want, and pick the control for each trigger from a drop-down list.
These triggers tell the UpdatePanel to intercept the default event in these seven controls. (You could specify the event you want to monitor by setting the EventName property of the trigger, but you don't need to, because you're using the most commonly used default event for each one.) As a result, the page works the same as it did before—it just refreshes a smaller portion of the page after each asynchronous request.
Technically, the UpdatePanel always uses triggers. All the controls inside an UpdatePanel automatically become the triggers for the UpdatePanel. However, you need to add the triggers if the controls are placed elsewhere in the page.
Note
You can add the same trigger to several different conditional UpdatePanel controls, in which case that event will update them all.
You can use triggers in one other way. Instead of using them to monitor more controls, you can use them to tell the UpdatePanel to ignore certain controls. For example, imagine you have a button in your UpdatePanel. Ordinarily, clicking that button will trigger an asynchronous request and partial update. If you want it to trigger a full-page postback instead, you simply need to add a PostBackTrigger (instead of an AsynchronousPostBackTrigger).
For example, here's an UpdatePanel that contains a nested button that triggers a full postback rather than an asynchronous postback:
<asp:UpdatePanel ID="UpdatePanel1" runat="server" UpdateMode="Conditional">
  <ContentTemplate>
    <asp:Label ID="Label1" runat="server" Font-Bold="True"></asp:Label>
    <br />
    <br />
    <asp:Button ID="cmdPostback" runat="server" Text="Refresh Full Page" />
  </ContentTemplate>
  <Triggers>
    <asp:PostBackTrigger ControlID="cmdPostback" />
  </Triggers>
</asp:UpdatePanel>
This technique isn't as common, but it can be useful if you have several controls in an UpdatePanel that perform limited updates (and so use asynchronous request) and one that performs more significant changes to the whole page (and so uses a full-page postback).
As you've learned, the UpdatePanel performs its work asynchronously in the background. As a result, the user can keep working with the page. This is generally the behavior you want, but there's one catch. While the asynchronous request is under way, the user won't necessarily realize that anything's happening. If the asynchronous request takes some time, this could be a bit of a problem. At worst, the user will assume the page is broken or click the same button multiple times, creating needless extra work for your web application and slowing down the process further.
ASP.NET includes another control that can help—the UpdateProgress control. The UpdateProgress control works in conjunction with the UpdatePanel. Essentially, the UpdateProgress control allows you to show a message while a time-consuming update is under way.
Note
The UpdateProgress control is slightly misnamed. It doesn't actually indicate progress; instead, it provides a wait message that reassures the user that the page is still working and the last request is still being processed.
When you add the UpdateProgress control to a page, you get the ability to specify some content that will appear as soon as an asynchronous request is started and disappear as soon as the request is finished. This content can include a fixed message, but many people prefer to use an animated GIF, because it more clearly suggests that the page is still at work. Often, this animated GIF simulates a progress bar.
Figure 25-5 shows a page that uses the UpdateProgress control at three different points in its life cycle. The top figure shows the page as it first appears, with a straightforward UpdatePanel control containing a button. When the button is clicked, the asynchronous callback process begins. At this point, the contents of the UpdateProgress control appear underneath (as shown in the middle figure). In this example, the UpdateProgress includes a text message and an animated GIF that appears as a progress bar, with green blocks that perpetually fill it from left to right, and then start over. When the callback is complete, the UpdateProgress disappears and the UpdatePanel is updated, as shown in the bottom figure.
The markup for this page defines an UpdatePanel followed by an UpdateProgress:
<asp:UpdatePanel ID="UpdatePanel1" runat="server">
  <ContentTemplate>
    <div style="background-color:#FFFFE0;padding: 20px">
      <asp:Label ID="lblTime" runat="server" Font-Bold="True"></asp:Label>
      <br /><br />
      <asp:Button ID="cmdRefreshTime" runat="server"
       Text="Start the Refresh Process" />
    </div>
  </ContentTemplate>
</asp:UpdatePanel>
<br />

<asp:UpdateProgress ID="updateProgress1" runat="server">
  <ProgressTemplate>
    <div style="font-size: xx-small">
      Contacting Server ... <img src="wait.gif" alt="Waiting..." />
    </div>
  </ProgressTemplate>
</asp:UpdateProgress>
This isn't the only possible arrangement. Depending on the layout you want, you can place your UpdateProgress control somewhere inside your UpdatePanel control.
The code for this page has a slight modification from the earlier examples. Because the UpdateProgress control only shows its content while the asynchronous callback is under way, it only makes sense to use it with an operation that takes time. Otherwise, the UpdateProgress will only show its ProgressTemplate for a few fractions of a second. To simulate a slow process, you can add a line to delay your code 10 seconds, as shown here:
Protected Sub cmdRefreshTime_Click(ByVal sender As Object, _
  ByVal e As EventArgs) Handles cmdRefreshTime.Click
    System.Threading.Thread.Sleep(TimeSpan.FromSeconds(10))
    lblTime.Text = DateTime.Now.ToLongTimeString()
End Sub
There's no need to explicitly link the UpdateProgress control to your UpdatePanel control. The UpdateProgress automatically shows its ProgressTemplate whenever any UpdatePanel begins a callback. However, if you have a complex page with more than one UpdatePanel, you can choose to limit your UpdateProgress to pay attention to just one of them. To do so, simply set the UpdateProgress.AssociatedUpdatePanelID property with the ID of the appropriate UpdatePanel. You can even add multiple UpdateProgress controls to the same page, and link each one to a different UpdatePanel.
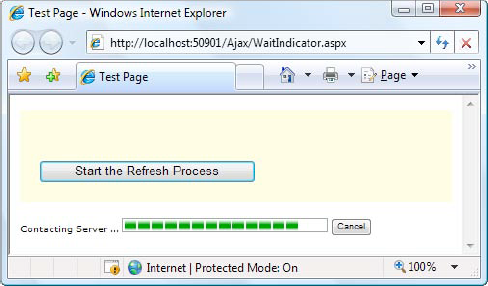
The UpdateProgress control supports one other detail: a cancel button. When the user clicks a cancel button, the asynchronous callback will be cancelled immediately, the UpdateProgress content will disappear, and the page will revert to its original state.
Adding a cancel button is a two-step process. First you need to add a fairly intimidating block of JavaScript code, which you can copy verbatim. You should place this code at the end of your page, after all your content but just before the </body> end tag. Here's the code you need, in its rightful place:
<%@ Page Language="VB" AutoEventWireup="false" CodeFile="WaitIndicator.aspx.vb"
 Inherits="WaitIndicator" %>
<html xmlns="http://www.w3.org/1999/xhtml">
<head runat="server">
    ...
</head>
<body>
  <form ID="form1" runat="server">
    ...
  </form>

  <script type="text/javascript">
    var prm = Sys.WebForms.PageRequestManager.getInstance();
    prm.add_initializeRequest(InitializeRequest);

    function InitializeRequest(sender, args)
    {
        if (prm.get_isInAsyncPostBack())
        {
            args.set_cancel(true);
        }
    }

    function AbortPostBack()
    {
        if (prm.get_isInAsyncPostBack()) {
         prm.abortPostBack();
        }
    }
    </script>
</body>
</html>
Tip
You can cut and paste this code from the WaitIndicator.aspx page (which is included with the samples for this chapter) into your own pages.
Once you've added this code, you can use JavaScript code to call its AbortPostBack() function at any time and cancel the callback. The easiest way to do to this is to connect a JavaScript event to the AbortPostBack() function using a JavaScript event attribute. You can add a JavaScript event attribute to virtually any HTML element. For example, you can deal with client-side clicks using the onclick attribute. Here's a basic HTML button (not a server control) that uses this technique to connect itself to the AbortPostBack() function:
<input ID="cmdCancel" onclick="AbortPostBack()" type="button" value="Cancel" />
If you click this Cancel button, the client-side AbortPostBack() function will be triggered and the callback will be cancelled immediately. Typically, you'll place this button (or an element like this) in the ProgressTemplate of the UpdateProgress control, as shown in Figure 25-6.
Don't confuse this approach with server-side event handling—the client-side onclick attribute allows you to intercept an event in the browser and process it using JavaScript code. The server doesn't get involved at all. In fact, when you cancel an operation, the server continues to process the request, but the browser simply closes the connection and stops listening for the response.
Tip
It makes sense to use an abort button for tasks that can be safely canceled because they don't change external state. For example, users should be able to cancel an operation that retrieves information from a database. However, it's not a good idea to add cancellation to an operation that updates a database, because the server will continue until it finishes the update, even if the client has stopped listening for the response.
Using the two controls you've seen so far—the UpdatePanel and UpdateProgress controls—you can create self-contained regions on your page that refresh themselves when certain actions take place. Of course, in order for this technique to work, the user needs to initiate an action that would ordinarily cause a postback, such as clicking a button, selecting an item in an AutoPostBack list, checking an AutoBostBack check box, and so on.
In some situations, you might want to force a full or partial page refresh without waiting for a user action. For example, you might create a page that includes a stock ticker, and you might want to refresh this ticker periodically (say, every five minutes) to ensure it doesn't become drastically outdated. ASP.NET includes a Timer control that allows you to implement this design easily.
The Timer control is refreshingly straightforward. You simply add it to a page and set its Interval property to the maximum number of milliseconds that should elapse before an update. For example, if you set Interval to 60000, the timer will force a postback after one minute elapses.
<asp:Timer ID="Timer1" runat="server" Interval="60000" />
Note
Obviously, the timer has the potential to greatly increase the overhead of your web application and reduce its scalability. Think carefully before introducing timed refreshes, and make the intervals long rather than short.
The Timer control works by rendering a bit of client-side script that starts a JavaScript timer. When the JavaScript timer fires (at the interval you specify), the client-side script triggers a postback and raises a server-side Tick event.
On its own, this behavior is fairly inefficient (because it causes the page to completely refresh itself, possibly while the user is in the midst of another task). But if you place the Timer in an UpdatePanel, the result is much better. The UpdatePanel converts the postback to a seamless callback and uses partial rendering to update just part of the page. Unlike a full postback, a callback with partial rendering won't cause flicker and won't interrupt the user in the middle of a task.
To use the timer with partial rendering, wrap the updateable portions of the page in UpdatePanel controls with the UpdateMode property set to Conditional. Then, add a trigger that forces the UpdatePanel to update itself whenever the Timer.Tick event occurs. Here's the markup you need:
<asp:UpdatePanel ID="UpdatePanel1" runat="server"UpdateMode="Conditional"><ContentTemplate> ... </ContentTemplate> <Triggers><asp:AsyncPostBackTrigger ControlID="Timer1" EventName="Tick" /></Triggers> </asp:UpdatePanel>
All the other portions of the page can be left as is, or you can wrap them in conditional UpdatePanel controls with different triggers if you need to update them in response to other actions.
Note
You must use triggers with the Timer control. You can't simply place the timer inside an UpdatePanel and expect it to work without a trigger (unlike other controls). If you don't use a trigger, the timer will force a full postback, with flicker.
To stop the timer, you simply need to set the Enabled property to False in server-side code. For example, here's how you could disable the timer after ten updates:
Protected Sub Timer1_Tick(ByVal sender As Object, ByVal e As EventArgs) _
  Handles Timer1.Tick

    ' Update the tick count and store it in view state.
    Dim tickCount As Integer = 0
    If ViewState("TickCount") IsNot Nothing Then
        tickCount = CType(ViewState("TickCount"), Integer)
    End If

    tickCount += 1
    ViewState("TickCount") = tickCount

    ' Decide whether to disable the timer.
    If tickCount > 10 Then
        Timer1.Enabled = False
    End If
End Sub
The UpdatePanel, UpdateProgress, and Timer controls are fairly useful. However, they're the only ASP.NET AJAX-enabled controls you'll find in ASP.NET. Despite their value, developers who have heard the Ajax hype and used advanced Ajax websites like Gmail might expect a bit more.
In fact, ASP.NET's support for Ajax is a bit deceptive. Although there are only three controls that use ASP.NET AJAX features, ASP.NET actually includes a sophisticated library of JavaScript functions that can be used to create all sorts of advanced effects. Business application developers aren't likely to use these libraries (because they're quite complex and require a significant time investment), but third-party component developers will use them enthusiastically.
The first and best example of what ASP.NET AJAX can really do is the ASP.NET AJAX Control Toolkit. The ASP.NET AJAX Control Toolkit is a joint project between Microsoft and the ASP.NET community. It consists of dozens of controls that use the ASP.NET AJAX libraries to create sophisticated effects.
The ASP.NET AJAX Control Toolkit has a lot going for it:
It's completely free.
It includes full source code, which is helpful if you're ambitious enough to want to create your own custom controls that use ASP.NET AJAX features.
It uses extenders that enhance the standard ASP.NET web controls. That way, you don't have to replace all the controls on your web pages—instead, you simply plug in the new bits of functionality that you need.
To get the ASP.NET AJAX Control Toolkit, surf to http://www.asp.net/ajaxlibrary/act.ashx. You can follow the links to the download page, where you'll see several download options, depending on your version of .NET and whether you want the source code. At the time of this writing, the simplest download option is a 6.4 MB ZIP file named AjaxControlToolkit.Binary.NET4.zip, which is designed for ASP.NET 4 and doesn't include the source code. Once you've downloaded this ZIP file, you can extract the files it contains to a more permanent location on your hard drive. (If you need support for ASP.NET 3.5, you'll find a similar download that targets that version of .NET.)
Inside the ZIP file, you'll find a central assembly named AjaxControlToolkit.dll and a host of smaller satellite assemblies that support localization for different cultures. You'll also see a zipped folder named AjaxControlToolkitSampleSite, which contains a huge sample website that demonstrates all the ASP.NET AJAX Control Toolkit ingredients, and a ReadMe.html file with installation instructions.
To get started developing with ASP.NET AJAX Control Toolkit, you could simply open the AjaxControlToolkitSampleSite (or copy the contents of its Bin subfolder to the Bin subfolder in one of your web applications). However, life is much easier if you get Visual Studio to help you out by adding the new components to the Toolbox. Here's how:
Make sure the SampleWebSite folder is in a reasonably permanent location on your hard drive. If you move the SampleWebSite folder after you complete this process, Visual Studio won't be able to find the AjaxControlToolkit.dll assembly. As a result, it won't be able to add the necessary assembly reference when you drag the controls onto a web page. (The only way to fix this problem is to remove the controls from the Toolbox and then repeat the process to add them from their new location.)
First, you need to create a new Toolbox tab for the controls. Right-click the Toolbox and choose Add Tab. Then, enter a name (like AJAX Toolkit) and hit Enter.
Now, you need to add the controls to the new tab. Right-click the blank tab you've created and select Choose Items.
In the Choose Toolbox Items dialog box, click Browse. Find the AjaxControlToolkit.dll (which is in the SampleWebSiteBin folder) and click OK.
Now, all the components from AjaxControlToolkit.dll will appear in the list, selected and with check marks next to each one. To add all the controls to the Toolbox in one step, just click OK.
Figure 25-7 shows some of the controls that will appear in the new Toolbox tab.

Now you can use the components from the ASP.NET AJAX Control Toolkit in any web page in any website. First, begin by adding the ScriptManager control to the web page. Then, head to the new Toolbox tab you created and drag the ASP.NET AJAX control you want onto your page. The first time you do add a component from the ASP.NET AJAX Control Toolkit, Visual Studio will copy the AjaxControlToolkit.dll assembly to the Bin folder of your web application, along with the localization assemblies. It will also add a Register directive that maps the controls in AjaxControlToolkit.dll to the namespace prefix asp so they're available in your code:
<%@ Register Assembly="AjaxControlToolkit" Namespace="AjaxControlToolkit"
    TagPrefix="asp" %>
The ASP.NET AJAX Control Toolkit is stuffed full of useful components. In the following sections, you'll get your feet wet by considering just two of the controls you'll find—the Accordion and the AutoCompleteExtender.
The Accordion is a container that stacks several panels on top of one another, and allows you to view one at a time. Each panel has a header (which usually displays a section title) and some content. When you click the header of one of the panels, that panel is expanded and the other panels are collapsed, leaving just their headers visible. Figure 25-8 demonstrates the effect you'll see as you click different headers.
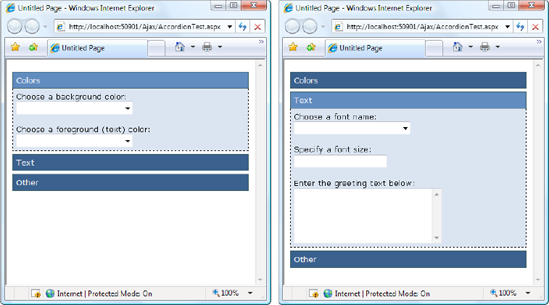
It goes without saying that the collapsing behavior happens without a full-page postback. In fact, there's no need to contact the web server at all. The first time the page is generated, all the panels are rendered to HTML, but they're hidden using CSS style attributes. When you click a header, a JavaScript routine runs and changes these style attributes. (In truth, the Accordion control is a bit more sophisticated than that. When you choose a new panel, it gradually expands into view, which is much more impressive than simply popping into existence in one step. Furthermore, you can set the FadeTransitions property to True if you want panels to fade into and out of sight when you change from one panel to another.)
Using the Accordion control is a bit like using the MultiView control you learned about in Chapter 10. The Accordion control contains a collection of AccordionPane controls. Each AccordionPane represents a separate panel in the Accordion.
Here's an example that illustrates this structure by putting two AccordionPane objects inside the Accordion:
<asp:Accordion ID="Accordion1" runat="server">
  <Panes>
    <asp:AccordionPane runat="server">
...
</asp:AccordionPane>
<asp:AccordionPane runat="server">
...
</asp:AccordionPane>
</Panes>
</asp:Accordion>Tip
To determine what AccordionPane is currently visible (or to set it), you use the Accordion.SelectedIndex property. If RequiredOpenedPane is True, there will always be at least one expanded panel. If it's False, you can collapse all the panels—just click the header of the currently expanded section (or set the SelectedIndex property to −1 in your code).
Each AccordionPane consists of two sections. The Header section is used for the clickable header of the panel, while the Content holds the details inside. Here's the markup you need to create the example shown in Figure 25-6:
<asp:Accordion ID="Accordion1" runat="server"
  HeaderCssClass="accordionHeader"
  HeaderSelectedCssClass="accordionHeaderSelected"
  ContentCssClass="accordionContent">

  <Panes>
    <asp:AccordionPane ID="paneColors" runat="server">
      <Header>Colors</Header>
      <Content>
        Choose a background color:<br />
        <asp:DropDownList ID="lstBackColor" runat="server"
         Width="194px" AutoPostBack="True">
        </asp:DropDownList>
        <br /><br />
        Choose a foreground (text) color:<br />
        <asp:DropDownList ID="lstForeColor" runat="server"
         Height="22px" Width="194px" AutoPostBack="True" >
        </asp:DropDownList>
      </Content>
    </asp:AccordionPane>

    <asp:AccordionPane ID="paneText" runat="server">
      <Header>Text</Header>
      <Content>
        Choose a font name:<br />
        <asp:DropDownList ID="lstFontName" runat="server"
         Height="22px" Width="194px" AutoPostBack="True">
        </asp:DropDownList>
        <br /><br />
Specify a font size:<br />
<asp:TextBox ID="txtFontSize" runat="server"
AutoPostBack="True">
</asp:TextBox>
<br /><br />
Enter the greeting text below:<br />
<asp:TextBox ID="txtGreeting" runat="server"
Height="85px" Width="240px" TextMode="MultiLine"
AutoPostBack="True">
</asp:TextBox>
</Content>
</asp:AccordionPane>
<asp:AccordionPane ID="paneExtras" runat="server">
<Header>Other</Header>
<Content>
Choose a border style:<br />
<asp:RadioButtonList ID="lstBorder" runat="server"
Height="59px" Width="177px" Font-Size="X-Small"
AutoPostBack="True" RepeatColumns="2">
</asp:RadioButtonList>
<br /><br />
<asp:CheckBox ID="chkPicture" runat="server"
Text="Add the Default Picture" AutoPostBack="True">
</asp:CheckBox>
</Content>
</asp:AccordionPane>
</Panes>
</asp:Accordion>Along with the content, this example adds three properties: HeaderCssClass, HeaderSelectedCssClass, and ContentCssClass. These properties take the names of CSS styles that the Accordion uses to format the appropriate region. The styles are defined in a separate style sheet, and look like this:
.accordionHeader
{
    border: 1px solid #2F4F4F;
    color: white;
    background-color: #2E4d7B;
    padding: 5px;
    margin-top: 5px;
    cursor: pointer;
}

.accordionHeaderSelected
{
    border: 1px solid #2F4F4F;
    color: white;
    background-color: #5078B3;
    padding: 5px;
    margin-top: 5px;
    cursor: pointer;
}
.accordionContent
{
background-color: #D3DEEF;
border: 1px dashed;
border-top: none;
padding: 5px;
}Chapter 12 has more about styles. You don't need to use them with the Accordion—after all, you could just set the formatting properties of your controls, or wrap each separate section in a formatted Panel or <div> element—but the style approach is pretty convenient once you get used to it.
You can really fine-tune the display that the Accordion uses by setting a few more properties. TransitionDuration sets the number of milliseconds that the collapsing and expanding animation lasts. FramesPerSecond controls how smooth the transition animation is—a higher value produces better quality, but requires more work from the browser. Finally, AutoSize lets you control how the Accordion expands when you show a panel with a large amount of content. Use a value of None to let the Accordion grow as large as it needs (in which case other content underneath the Accordion is simply bumped out of the way). Use Limit or Fill to restrict the Accordion to whatever you've set in the Height property (the difference is the Limit allows the Accordion to shrink smaller, while Fill keeps it at the maximum height by leaving any unused space blank). With Limit or Fill, the Accordion panels will use scrolling if they can't fit all their content into the available space.
Clearly, the Accordion is a simple-to-use, yet impressive way to deal with dense displays of data and groups of information. If you want to have a similar collapsing and expanding effect with a single panel, you might want to try another one of the components in the ASP.NET AJAX Control Toolkit—the CollapsiblePanelExtender.
The Accordion is an example of a completely new control that has ASP.NET AJAX features baked in. Although this is a perfectly reasonable approach to integrating Ajax techniques with the web control model, it's not the most common solution that you'll see used in ASP.NET AJAX Control Toolkit. In fact, the ASP.NET AJAX Control Toolkit includes just a few new controls, and a much larger set of control extenders.
A control extender is a .NET component that adds features to an existing ASP.NET control. Control extenders allow you to use the same Ajax effects with countless different controls. This is useful when you're dealing with multipurpose features such as automatic completion, drag-and-drop, animation, resizing, collapsing, masked editing, and so on.
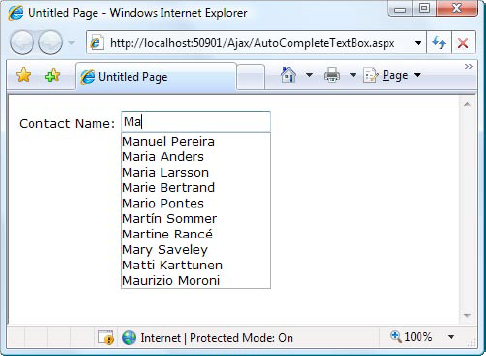
One of the many control extenders in the ASP.NET AJAX Control Toolkit is the AutoCompleteExtender, which allows you to show a list of suggestions while a user types in another control (such as a text box). Figure 25-9 shows the AutoCompleteExtender at work on an ordinary TextBox control. As the user types, the drop-down list offers suggestions. If the user clicks one of these items in the list, the corresponding text is copied to the text box.
To create this example, you need an ordinary text box, like this:
Contact Name:<asp:TextBox ID="txtName" runat="server"></asp:TextBox>
Next, you need to add the ScriptManager and an AutoCompleteExtender control that extends the text box with the autocomplete feature. The trick is that the list of suggestions needs to be retrieved from a specialized code routine called a web method, which you need to create in your page.
Note
You may have heard about web methods and web services, which are remotely callable code routines that can share data between different organizations, programming platforms, and operating systems. The web method you'll use with ASP.NET AJAX isn't quite as ambitious. Although it uses some of the same plumbing, it has a much simpler goal. It's really just a way for the text box to get a list of word suggestions without going through the whole page life cycle.
Here's an example of how you might define the AutoCompleteExtender. It uses the TargetControlID property to bind itself to the txtName text box, and it sets the MinimumPrefixLength property to 2, which means autocomplete suggestions won't be provided until the user has entered at least two characters of text. Finally, the ServiceMethod property indicates the web method you're going to use is named GetNames(). Before you can run this page, you need to create that method.
<asp:AutoCompleteExtender ID="autoComplete1" runat="server"
  TargetControlID="txtName" ServiceMethod="GetNames" MinimumPrefixLength="2">
</asp:AutoCompleteExtender>
The next step is to create the GetNames() web method. Here's the basic method you need to add to the code-behind class of your web page:
<System.Web.Services.WebMethod> _
<System.Web.Script.Services.ScriptMethod> _
Public Shared Function GetNames(ByVal prefixText As String, _
  ByVal count As Integer) As List(Of String)
    ...
End Function
The web method accepts two parameters, which indicate the text the user has typed so far and the desired number of matches (which is ten by default). It returns the list of suggestions. The two attributes that precede the GetNames() method indicate that it's a web method (meaning the client should be allowed to call it directly with HTTP requests) and that it supports JavaScript calls (which is what the AutoCompleteExtender uses).
Actually writing the code that retrieves or generates the suggestion list can be quite tedious. In this example, the code retrieves the list of name suggestions from the Northwind database. To ensure that this step is performed just once (rather than every single time the user hits a key in the text box), the name list is cached using the techniques you learned about in Chapter 23:
Dim names As List(Of String)

' Check if the list is in the cache.
If HttpContext.Current.Cache("NameList") Is Nothing Then
    ' If not, regenerate the list. The ADO.NET code for this part
    ' isn't shown (but you can see it in the downloadable examples
    ' for this chapter.
    names = GetNameListFromDB()

    ' Store the name list in the cache for sixty minutes.
    HttpContext.Current.Cache.Insert("NameList", names, Nothing, _
      DateTime.Now.AddMinutes(60), TimeSpan.Zero)
Else
    ' Get the name list out of the cache.
    names = CType(HttpContext.Current.Cache("NameList"), List(Of String))
End If
...
With the list in hand, the next step is to cut down the list so it provides only the ten closest suggestions. In this example, the list is already sorted. This means you simply need to find the starting position—the first match that starts with the same letters as the prefix text. Here's the code that finds the first match:
...
Dim index As Integer = -1
For i As Integer = 0 To names.Count - 1
    ' Check if this is a suitable match.
    If names(i).StartsWith(prefixText) Then
        index = i
        Exit For
    End If
Next
' Give up if there isn't a match. If index = −1 Then Return New List(Of String)() ...
The search code then begins at the index number position and moves through the list in an attempt to get ten matches. However, if it reaches the end of the list or finds a value that doesn't match the prefix, the search stops.
...
Dim wordList As New List(Of String)()
For i As Integer = index To (index + count - 1)
   ' Stop if the end of the list is reached.
   If i >= names.Count Then Exit For

   ' Stop if the names stop matching.
   If Not names(i).StartsWith(prefixText) Then Exit For

   wordList.Add(names(i))
Next
...
Finally, all the matches that were found are returned:
...
Return wordList
You now have all the code you need to create the effect shown in Figure 25-9.
The Accordion and AutoCompleteExtender only scratch the surface of the ASP.NET AJAX Control Toolkit, which currently includes about 50 components. The easiest way to start experimenting with other controls is to surf to http://www.asp.net/ajaxlibrary/act_tutorials.ashx, where you'll find a reference that describes each control and lets you try it out online.
Table 25-1 highlights some of the more interesting control extenders that are currently available in the ASP.NET AJAX Control Toolkit, and Table 25-2 lists the controls.
Table 25.1. Control Extenders in the ASP.NET AJAX Control Toolkit
Name | Description |
|---|---|
This extender keeps a control fixed in a specific position (such as the top-left corner of the web page) even as you scroll through the content in a page. | |
This powerful and remarkably flexible extender allows you to add animated effects such as resizing, moving, fading, color changing, and many more, on their own or in combination. | |
AutoCompleteExtender | This extender allows you to supply a list of suggested entries based on partial user input. The list of entries is generated by a web service method, as described in the previous section. |
This extender shows a pop-up calendar that can be attached to a text box for easier entry of dates. When the user chooses a date, it's inserted in the linked control. | |
This extender lets you link drop-down lists without coding the solution by hand. | |
This extender lets you collapse and expand panels on your page. The rest of the page content reflows around them automatically. | |
This extender shows a pop-up color picker that can be attached to a text box for easy color selection. | |
This extender intercepts button clicks on a Button, LinkButton, or ImageButton control and displays a confirmation message. The click event is suppressed if the user chooses to cancel the operation in the confirmation dialog box. | |
DragPanelExtender | This extender allows you to drag a panel around the page. |
This extender turns almost any control into a drop-down list when the mouse moves over it. For example, you can use the DropDownExtender in conjunction with an ordinary Label control. The user can then move the mouse over it, pick a different item from the list (thereby changing the text in the label), and then move the mouse away (allowing the label to revert to its ordinary appearance). | |
DropShadowExtender | This extender adds a graphical drop shadow effect around a panel. The drop shadow can be partially transparent, and you can control the size and roundness of its corners. |
This simple extender replaces the contents of a control with the result of a web service method call. | |
This extender allows you to restrict certain characters from being entered in a text box (such as letters in a text box that contains numeric data). This is meant to supplement validation, not replace it, as malicious users could circumvent the filtering by tampering with the rendered page or disabling JavaScript in the browser. | |
This extender allows content to pop up next to a control when the user hovers over it. | |
This extender allows the user to search for items in a ListBox or DropDownList by typing the first few letters of the item text. The control searches the items and jumps to the first match as the user types. | |
This extender restricts the kind of input that can be entered in a text box using a mask. (A mask is a string that defines a pattern for fixed-length text, and supplies prompt characters to help the user enter the value. For example, a phone number mask might display (___) ___-____ in the text box. As the user types, the placeholders are replaced with the valid numeric characters, and nonnumeric characters are rejected.) You can use the MaskedEditExtender in conjunction with the MaskedEditValidator to make sure that the user can't circumvent the JavaScript code and enter an invalid value. | |
This extender allows you to create the illusion of a modal dialog box by darkening the page, disabling controls, and showing a superimposed panel on top. | |
This extender transforms an ordinary TextBox control into a slider. However, this slider has features beyond the standard ASP.NET server-side equivalent. Most notably, it supports multiple thumbs that can be dragged independently along the slider track. This is useful when using a slider to indicate a range of values. | |
This extender allows you to associate a "key" with multiple CheckBox controls. When the user clicks a check box that's extended in this way, any other check box with the same key will be unchecked automatically. | |
This extender attaches to a text box to provide configurable up and down arrow buttons (at the right side). These buttons increment the numeric or date value in the text box. | |
This extender attaches to a BulletedList and gives it client-side paging capabilities so that it can split a long list into smaller sections. | |
This extender attaches to a text box. As you type, it ranks the cryptographic strength of the text box value (the higher the ranking, the more difficult the password is to crack). It's meant to be used as a guideline for a password-creation box. | |
This extender provides pop-up content that can be displayed next to any control. | |
This extender allows the user to resize a control with a configurable handle that appears in the bottom-right corner. | |
This extender rounds the corners of any control for a clean, professional look. | |
This extender converts a text box into a graphical slider that allows the user to choose a numeric value by dragging a thumb to a position on a track. | |
This extender attaches to an image and causes it to display a sequence of images. The images are supplied using a web service method, and the slide show can loop endlessly or use play, pause, previous, and next buttons that you create. | |
This extender allows you to automatically change the background color and supply specific text when a TextBox control is empty. For example, your text box might include the text Enter Value in light gray writing on a pale blue background. This text disappears while the cursor is positioned in the text box or once you've entered a value. | |
This extender turns the ordinary ASP.NET CheckBox into an image check box. | |
This extender allows you to use the same animations as the AnimationExtender. However, it's designed to work with an UpdatePanel and perform these animations automatically when an update is in progress or once the panel has been refreshed. | |
This extender extends the client-side logic of the ASP.NET validation controls so that they use pop-up validation callouts that point to the control with the invalid input. |
Table 25.2. Controls in the ASP.NET AJAX Control Toolkit
Ajax techniques and the ASP.NET's Ajax integration are evolving rapidly. In future versions of ASP.NET, you'll see a broader set of controls and features that use Ajax. However, the Ajax support that you'll find in ASP.NET AJAX is already surprisingly powerful—and practical. As you saw in this chapter, the UpdatePanel, UpdateProgress, and Timer controls give you a surprisingly painless way to take a traditional postback-heavy web form and give it a more responsive Ajax-powered user interface, often without requiring new code. And if you want to step further into the world of Ajax frills and get collapsible panels, autocompleting text boxes, and a wide range of animated effects, you need to look no further than the ASP.NET AJAX Control Toolkit, which provides a lot more to play with.
To learn more about ASP.NET AJAX, check out the Microsoft ASP.NET AJAX site at http://www.asp.net/ajax and the ASP.NET AJAX Control Toolkit at http://www.asp.net/ajaxlibrary/act.ashx.