
Now that you are familiar with iteration and some of the basics of algorithms, it is time to move on to your first complex data structure. Lists are the most fundamental data structure upon which most other data structures are built and many more algorithms must operate.
It's not hard to find examples of lists in the real world: shopping lists, to-do lists, train timetables, order forms, even this "list of lists." Much like arrays, lists are generally useful in most applications you will write. In fact, lists make a great substitute for the use of arrays—it is usually possible (and more often than not desirable) to entirely replace your use of arrays with lists in all but the most memory-sensitive/time-critical applications.
This chapter starts by introducing the basic operations of a list. From there, it heads straight into the tests before covering two different list implementations: array lists and linked lists. Both implementations conform to a common interface but have quite different characteristics. These differences can affect how and when you use them in your applications. By the end of this chapter, you will be familiar with the following:
What lists are
What lists look like
How lists are used
How lists are implemented
A list is an ordered collection of elements supporting random access to each element, much like an array—you can query a list to get the value contained at any arbitrary element. Lists also preserve insertion order so that, assuming there are no intervening modifications, a given list will always return the same value for the same position. Like arrays, lists make no attempt to preserve the uniqueness of values, meaning a list may contain duplicate values. For example, if you had a list containing the values "swimming", "cycling", and "dancing" and you were to add "swimming" again, you would now find that the list had grown to include two copies of "swimming". The major difference between arrays and lists, however, is that whereas an array is fixed in size, lists can re-size—growing and shrinking—as necessary.
As a minimum, a list supports the four core operations described in Table 3-1.
Table 3.1. Core Operations on a List
Operation | Description |
|---|---|
| Inserts a value into a list at a specified position (0, 1, 2, . . .). The size of the list will increase by one. Throws |
| Deletes the value at a specified position (0, 1, 2, . . .) in a list and returns whatever value was contained therein. The size of the list will decrease by one. Throws |
| Obtains the value at a specified position (0, 1, 2, . . .) in the list. Throws |
| Obtains the number of elements in the list. |
These operations are all that is absolutely necessary for accessing a list. That said, however, if the operations listed were the only ones available, then you would find yourself copying and pasting the same code repeatedly as you discovered more sophisticated ways to access your lists. For example, there is no specific method for changing the value of an existing element (as you might do with an array), although you can achieve the same thing by first deleting the element and then inserting a new one in its place. To prevent the unnecessary duplication of logic that comes from repeatedly using such a simple interface, you can choose to encapsulate this common behavior inside the list itself by implementing some convenience operations, as described in Table 3-2.
Table 3.2. Convenience Operations on a List
Operation | Description |
|---|---|
| Sets the value at a specified position ( |
| Adds a value to the end of the list. The size of the list will increase by one. |
| Deletes the first occurrence of a specified value from a list. The size of the list will decrease by one if the value is found. Returns |
| Determines whether a specified value is contained within a list. |
| Obtains the position ( |
| Determines whether a list is empty or not. Returns |
| Obtains an |
| Deletes all elements from a list. The size of the list is reset to 0. |
All of these operations can be implemented on top of the core operations described previously. However, by choosing to implement them as part of the list, you create a much richer interface, thereby greatly simplifying the job of any developer that uses a list.
The set() operation, for example, can easily be implemented using a combination of delete() and insert(),add() and insert(), isEmpty() and size(), and so on. However, again we stress that beyond the core operations, it is this richness, this encapsulation of common functionality and behavior, that makes a data structure such as a list so powerful.
As you can see, you have quite literally taken the operations and converted them, one by one, into methods on an interface, with all the appropriate parameters, return types, and exceptions. It is by no means a trivial interface; there are numerous methods to implement. Once you get into the actual implementation, however, you will see that this extra functionality is quite simple to provide.
You'll also notice that the List interface extends the Iterable interface introduced in Chapter 2. This interface provides a single iterator() method and allows a list to be used anywhere you write code that need only iterate over the contents of a list.
With this interface in mind, have a look at the following two snippets of code. The first creates an array with three values and then iterates over it, printing each value in turn:
String[] anArray = ...;

        anArray[0] = "Apple";
        anArray[1] = "Banana";
        anArray[2] = "Cherry";

        for (int i = 0; i < anArray.length; ++i) {
            System.out.println(anArray[i]);
        }
The second piece of code creates a list with three values and iterates over it, printing each value as it goes:
List aList = ...;

        aList.add("Apple");
        aList.add("Banana");
        aList.add("Cherry");

        Iterator i = aList.iterator()
        for (i.first(); !i.isDone(); i.next()) {
            System.out.println(aList.current());
        }
There isn't a lot of difference between the two—you could argue that in some ways, the version with the list is more readable. In particular, the use of add() and an iterator helps to convey the intent of the code.
Even though you haven't yet implemented a single concrete list, you can still think about and describe in code the different scenarios your lists are likely to encounter. To ensure the correct behavior of the various list implementations, you need to create some tests that any implementation must satisfy. These tests will implement in code the requirements described in Tables 3-1 and 3-2 and become the definition of the list contract. Moreover, by working through each of the tests, you should gain a good understanding of the expected behavior of a list, which will make it much easier when it comes time to write your own implementation.
Apart from some common test data, you've defined an abstract method that returns an instance of a list. This will be used by your test methods to obtain a list to test. Anytime you wish to create a test suite for a new type of list, you can extend AbstractListTestCase and implement the createList() method to return an instance of the specific list class. In this way, you are able to re-use the same tests regardless of the actual implementation.
Now let's move on to testing the behavior of a list.
Next, you want to test what happens when you insert a value between two other values. You expect any elements to the right of the insertion point to shift position by one to make room:
public void testInsertBetweenElements() {
        List list = createList();

        list.insert(0, VALUE_A);
        list.insert(1, VALUE_B);
        list.insert(1, VALUE_C);
assertEquals(3, list.size());
assertSame(VALUE_A, list.get(0));
assertSame(VALUE_C, list.get(1));
assertSame(VALUE_B, list.get(2));
}Now make sure you can insert before the first element of the list:
public void testInsertBeforeFirstElement() {
List list = createList();
list.insert(0, VALUE_A);
list.insert(0, VALUE_B);
assertEquals(2, list.size());
assertSame(VALUE_B, list.get(0));
assertSame(VALUE_A, list.get(1));
}Also test inserting a value after the last element. This is fundamentally how you add to a list. (You will possibly find yourself doing this more often than any other type of insertion, so you need to get this right!)
public void testInsertAfterLastElement() {
List list = createList();
list.insert(0, VALUE_A);
list.insert(1, VALUE_B);
assertEquals(2, list.size());
assertSame(VALUE_A, list.get(0));
assertSame(VALUE_B, list.get(1));
}Next you'll test that the list correctly handles an attempt to insert a value into a position that falls outside the bounds. In these cases, you expect an IndexOutOfBoundsException to be thrown, indicating an application programming error:
public void testInsertOutOfBounds() {
List list = createList();
try {
list.insert(-1, VALUE_A);
fail();
} catch (IndexOutOfBoundsException e) {
// expected
}
try {
list.insert(1, VALUE_B);
fail();
} catch (IndexOutOfBoundsException e) {
// expected
}
}Finally, you can test the add() method. Even though it is simple enough to add to a list using only the insert() method, it is more natural (and requires less coding) to express this intention with a specific method:
public void testAdd() {
List list = createList();
list.add(VALUE_A);
list.add(VALUE_C);
list.add(VALUE_B);
assertEquals(3, list.size());

        assertSame(VALUE_A, list.get(0));
        assertSame(VALUE_C, list.get(1));
        assertSame(VALUE_B, list.get(2));
}The method testInsertIntoAnEmptyList() merely checks that when you insert a value into an empty list, the size of the list will increase by one and that you are then able to retrieve the value from the expected position.
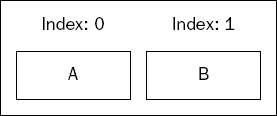
The method testInsertBetweenElements() tests what happens when you attempt to insert a value between two others. The test starts off with a list containing two values—A and B in positions 0 and 1, respectively, as shown in Figure 3-1.
It then inserts another value—C—between them at position 1. This should put the new value between the A and B, resulting in a list that looks like the one shown in Figure 3-2.
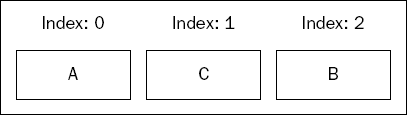
As you can see, the B has shifted right one position to make room for C.
The method testInsertBeforeFirstElement() ensures that inserting a value into the first position shifts all existing values right one place. The test uses the same insertion point—position 0—each time insert() is called and confirms that the values end up in the correct order: The A should start off in position 0 and then move right one place to make room for the B.
The method testInsertAfterLastElement() ensures that you can add to the end of the list by inserting a value into a position that is one greater than the last valid position. If the list contained one element, inserting into position 1 would place the new value at the end. If the list contained three elements, inserting into position 3 would place the new value at the end. In other words, you can add to a list by inserting into a position that is defined by the size of the list.
The method testInsertOutOfBounds() checks that your list correctly identifies some common programming errors, such as using a negative insertion point or using an insertion point that is one greater than the size of the list (using an insertion point that is the size of the list adds to the end). The test code starts off with an empty list, meaning that the first position—position 0—is the only place into which a new value can be inserted. Any attempt to use a negative value or anything greater than zero should result in an IndexOutOfBoundsException.
Finally, the method testAdd() tests the behavior of the convenience method, add(). Three values are added to the list, which is then checked to ensure they end up in the correct order. As you can see from the relative simplicity of testAdd() versus testInsertAfterLastElement(), having a specific method for adding to the end of a list makes the code much more readable and requires slightly less code. More important, it requires less thinking to get it right. Calling add() is far more intuitive than calling insert(), passing in the value of size() as the insertion point!
Another thing you haven't tested are the boundary conditions: What happens when you attempt to access a list before the start or beyond the last element? As with insert(), attempts to access a list beyond the boundaries should result in an IndexOutOfBoundsException:
public void testGetOutOfBounds() {
        List list = createList();

        try {
            list.get(-1);
            fail();
} catch (IndexOutOfBoundsException e) {
// expected
}
try {
list.get(0);
fail();
} catch (IndexOutOfBoundsException e) {
// expected
}
list.add(VALUE_A);
try {
list.get(1);
fail();
} catch (IndexOutOfBoundsException e) {
// expected
}
}You also want to test some boundary conditions when calling set():
public void testSetOutOfBounds() {
        List list = createList();

        try {
            list.set(-1, VALUE_A);
            fail();
        } catch (IndexOutOfBoundsException e) {
            // expected
        }

        try {
            list.set(0, VALUE_B);
            fail();
        } catch (IndexOutOfBoundsException e) {
            // expected
        }

        list.insert(0, VALUE_C);

        try {
            list.set(1, VALUE_C);
            fail();
        } catch (IndexOutOfBoundsException e) {
            // expected
        }
}The method set() works in much the same way as setting the value of an element within an array, so after populating a list with a known value, testSet() replaces it and ensures that the new value is returned instead of the original.
The method testGetOutOfBounds() starts off with an empty list and attempts to access it using a negative position and then again using a position that is too large. Then, just to be doubly sure, it adds a value to the list, creating an element at position 0, and tries once again to access beyond the end of the list. In all cases, you expect an IndexOutOfBoundsException to be thrown.
The method testSetOutOfBounds() is basically the same as testGetOutOfBounds(), but instead of attempting to retrieve a value, you attempt to update its value by calling set().
You also want to see what happens when you delete the first element of a list containing more than one element. All values should shift left one place:
public void testDeleteFirstElement() {
        List list = createList();

        list.add(VALUE_A);
        list.add(VALUE_B);
        list.add(VALUE_C);

        assertEquals(3, list.size());
        assertSame(VALUE_A, list.get(0));
        assertSame(VALUE_B, list.get(1));
        assertSame(VALUE_C, list.get(2));

        assertSame(VALUE_A, list.delete(0));

        assertEquals(2, list.size());
        assertSame(VALUE_B, list.get(0));
        assertSame(VALUE_C, list.get(1));
    }
Now see what happens when you delete the last element of a list containing more than one element:
public void testDeleteLastElement() {
        List list = createList();

        list.add(VALUE_A);
        list.add(VALUE_B);
        list.add(VALUE_C);

        assertEquals(3, list.size());
        assertSame(VALUE_A, list.get(0));
        assertSame(VALUE_B, list.get(1));
        assertSame(VALUE_C, list.get(2));

        assertSame(VALUE_C, list.delete(2));

        assertEquals(2, list.size());
        assertSame(VALUE_A, list.get(0));
        assertSame(VALUE_B, list.get(1));
    }
Next you test the behavior when deleting a value from between two others: All values to the right should shift left by one place:
public void testDeleteMiddleElement() {
        List list = createList();

        list.add(VALUE_A);
        list.add(VALUE_C);
        list.add(VALUE_B);

        assertEquals(3, list.size());
        assertSame(VALUE_A, list.get(0));
        assertSame(VALUE_C, list.get(1));
        assertSame(VALUE_B, list.get(2));

        assertSame(VALUE_C, list.delete(1));

        assertEquals(2, list.size());
        assertSame(VALUE_A, list.get(0));
        assertSame(VALUE_B, list.get(1));
    }
You also need to ensure that attempts to delete from the list outside the bounds throw an IndexOutOfBoundsException:
public void testDeleteOutOfBounds() {
        List list = createList();

        try {
            list.delete(-1);
            fail();
        } catch (IndexOutOfBoundsException e) {
// expected
}
try {
list.delete(0);
fail();
} catch (IndexOutOfBoundsException e) {
// expected
}
}You've tested what happens when you delete by position, but what about deleting by value? Deleting by value is not as straightforward as deleting by index—as you know, a list may contain the same value more than once, so you also need to ensure that in the event that there are duplicates, deleting by value only removes the first occurrence each time it is called:
public void testDeleteByValue() {
        List list = createList();

        list.add(VALUE_A);
        list.add(VALUE_B);
        list.add(VALUE_A);

        assertEquals(3, list.size());
        assertSame(VALUE_A, list.get(0));
        assertSame(VALUE_B, list.get(1));
        assertSame(VALUE_A, list.get(2));

        assertTrue(list.delete(VALUE_A));

        assertEquals(2, list.size());
        assertSame(VALUE_B, list.get(0));
        assertSame(VALUE_A, list.get(1));

        assertTrue(list.delete(VALUE_A));

        assertEquals(1, list.size());
        assertSame(VALUE_B, list.get(0));

        assertFalse(list.delete(VALUE_C));

        assertEquals(1, list.size());
        assertSame(VALUE_B, list.get(0));

        assertTrue(list.delete(VALUE_B));

        assertEquals(0, list.size());
}The first four tests exercise the basic functionality of deleting a specific element. Deletion is the inverse of insertion, so you can expect that when an element is deleted, the size of the list will decrease by one and that any elements to the right of the deleted element will shift left by one. The contract for "delete by index" also states that it must return the value just deleted, so this is also tested.
The method testDeleteOutOfBounds()—as with all the bounds-checking tests—attempts to access the list with an invalid position: first using a negative position, and then using a position that is too big. Each time, you expect an IndexOutOfBoundsException to be thrown to indicate an application programming error.
The method testDeleteByValue() ensures that you can delete a value from a list without knowing its exact location. The test inserts three values into the list, two of which are duplicates of one another. It then removes one of the duplicate values and ensures the other is still contained within the list. The same value is used again to ensure that the second occurrence is removed. Next, it attempts to delete a value that doesn't exist. This should have no effect on the list. Finally, it deletes the last known remaining value, leaving the list empty. Each time, you have checked that the value returned from delete is correct: Deleting a value that does exists should return true; and deleting an unknown value should return false.
You will need to test three general scenarios: iteration over an empty list, iteration forward from the start, and iteration backward from the end.
Start by testing the behavior when iterating over an empty list:
public void testEmptyIteration() {
        List list = createList();

        Iterator iterator = list.iterator();

        assertTrue(iterator.isDone());

        try {
            iterator.current();
            fail();
        } catch (IteratorOutOfBoundsException e) {
            // expected
        }
    }
Next you test forward iteration from the beginning of the list:
public void testForwardIteration() {
        List list = createList();

        list.add(VALUE_A);
        list.add(VALUE_B);
        list.add(VALUE_C);

        Iterator iterator = list.iterator();

        iterator.first();
assertFalse(iterator.isDone());
assertSame(VALUE_A, iterator.current());
iterator.next();
assertFalse(iterator.isDone());
assertSame(VALUE_B, iterator.current());
iterator.next();
assertFalse(iterator.isDone());
assertSame(VALUE_C, iterator.current());
iterator.next();
assertTrue(iterator.isDone());
try {
iterator.current();
fail();
} catch (IteratorOutOfBoundsException e) {
// expected
}
}Finally, you test reverse iteration beginning with the last element in the list:
public void testReverseIteration() {
        List list = createList();

        list.add(VALUE_A);
        list.add(VALUE_B);
        list.add(VALUE_C);

        Iterator iterator = list.iterator();

        iterator.last();
        assertFalse(iterator.isDone());
        assertSame(VALUE_C, iterator.current());

        iterator.previous();
        assertFalse(iterator.isDone());
        assertSame(VALUE_B, iterator.current());

        iterator.previous();
        assertFalse(iterator.isDone());
        assertSame(VALUE_A, iterator.current());

        iterator.previous();
        assertTrue(iterator.isDone());
        try {
            iterator.current();
            fail();
        } catch (IteratorOutOfBoundsException e) {
            // expected
        }
}When iterating over an empty list, you expect isDone() to always return true, indicating that there are no more elements.
The method testForwardIteration() creates a list containing three values and obtains an iterator. It then calls first() to start at the first element of the list and makes successive calls to next() and current(), checking that the values are returned in the expected order. The method isDone() should only return true after all of the elements have been visited.
Testing reverse iteration follows the same steps as testing forward iteration, except that you start at the last element and work your way backward by calling previous() instead of next().
In all cases, once the iterator has completed—isDone() returns true—an attempt is made to access the iterator by calling current(). This should throw an IteratorOutOfBoundsException.
The indexOf() method returns the position (0, 1, 2, . . .) of the value if found, and -1 if not found. In the event that a list contains duplicate values, indexOf() should only ever find the first occurrence:
public void testIndexOf() {
        List list = createList();

        list.add(VALUE_A);
        list.add(VALUE_B);
        list.add(VALUE_A);

        assertEquals(0, list.indexOf(VALUE_A));
        assertEquals(1, list.indexOf(VALUE_B));
        assertEquals(-1, list.indexOf(VALUE_C));
    }
The method contains() returns true if a value is found; otherwise, it returns false:
public void testContains() {
        List list = createList();

        list.add(VALUE_A);
        list.add(VALUE_B);
        list.add(VALUE_A);

        assertTrue(list.contains(VALUE_A));
        assertTrue(list.contains(VALUE_B));
        assertFalse(list.contains(VALUE_C));
}Both tests populate a list with three values, one of which is a duplicate.
The method testIndexOf() then checks that the correct position is returned for existing values—A and B—and that -1 is returned for a non-existing value—C. In the case of the duplicate value, the position of the first occurrence should be returned.
The method testContains() checks that contains() returns true for existing values and false for nonexisting ones.
By now you should have a thorough understanding of list functionality. Having codified the expected behavior as tests, you can easily determine whether your implementations are working as expected. You can now dive into some well-earned production coding.
There are many ways to implement a list, but the two most common, and the two presented here, are an array-based implementation and a so-called linked list. As the name suggests, an array list uses an array to hold the values. A linked list, conversely, is a chain of elements in which each item has a reference (or link) to the next (and optionally previous) element.
You will begin with the simplest case, the array list, followed later by the more sophisticated linked list. Both have characteristics that make them more or less useful depending on the requirements of your application. For this reason, you will consider the specific pros and cons of each along with the explanation of the code.
In every case, we will make some assumptions about the type of data that can be stored within a list. Specifically, we will not allow lists to contain null values. Not allowing null values simplifies the code by removing many boundary conditions that tend to arise when dealing with null values. This restriction shouldn't cause you much concern because in most business applications, lists rarely, if ever, contain null values.
As the name suggests, an array list uses an array as the underlying mechanism for storing elements. Because of this, the fact that you can index directly into arrays makes implementing access to elements almost trivial. It also makes an array list the fastest implementation for indexed and sequential access.
The downside to using an array is that each time you insert a new element, you need to shift any elements in higher positions one place to the right by physically copying them. Similarly, when deleting an existing element, you need to shift any objects in higher positions one place to the left to fill the gap left by the deleted element.
Additionally, because arrays are fixed in size, anytime you need to increase the size of the list, you also need to reallocate a new array and copy the contents over. This clearly affects the performance of insertion and deletion. For the most part, however, an array list is a good starting point when first moving away from simple arrays to using richer data structures such as lists.
You already did most of the hard work when you created the AbstractListTestCase class earlier. By extending this class, you necessarily inherited all of the tests. Therefore, the only other one that was needed was to implement the createList() method in order to return an instance of an ArrayList class, which will be used by the tests. In addition to the standard tests, a couple of extras are needed due to the way array lists work internally.
The first method, testResizeBeyondInitialCapacity(), is needed because as the size of an array list increases, the underlying array is resized to accommodate the extra elements. When this happens, you want to make sure that the contents are correctly copied. The test starts by constructing an array list with an initial capacity of one. Three values are then added. This causes the underlying array to grow accordingly. As a consequence, the elements are copied from the original array to a new, larger one. The test then ensures that the size and contents have been copied successfully.
As the name implies, the second test method, testDeleteFromLastElementInArray(), checks what happens when you delete the last element in the list. As you will see in the code a bit later, this boundary condition can lead to ArrayIndexOutOfBoundsExceptions if not handled correctly.
The class itself is quite simple. All it needs is a few fields and, of course, to implement the List interface. You have created a field to hold the array of elements and a separate field to hold the size of the list. Be aware that the size of the list is not always the same as the size of the array: The array will almost always have "spare" capacity at the end, so the length of the array doesn't necessarily match the number of elements stored in the list.
There are also two constructors. The first is really a convenience—it calls the second with some default values. The second constructor takes as its only argument the size of the initial array, which is validated and saved before calling clear() to initialize the element array and reset the size of the list. (Technically, you could allow a value of 0, but that would require resizing the array the first time you inserted a value. Instead, force the caller to pass a value that is at least 1.)
Once you can insert a value, adding a value to the end of the list follows naturally:
public void add(Object value) {
        insert(_size, value);
}The insert() method starts by validating the input. In the first instance, you need to check for null values, as these are explicitly not allowed. Second, as you may recall from the test cases, insert() is required to throw an IndexOutOfBoundsException if any attempt is made to insert before the first element or further than one beyond the last element of the list.
Next, because arrays are fixed in size but lists are not, it is also necessary to ensure that the underlying array has enough capacity to hold the new value. For example, say you had an array that was of length five and you wanted to add a sixth element. The array clearly doesn't have enough space, but it won't magically resize for you either, thus, the call to ensureCapacity() ensures that there is enough room in the array to accommodate another value. Once the call to ensureCapacity() returns, you know you have enough space, so you can safely shift the existing elements to the right by one position to make room for the new value. Finally, you store the value into the appropriate element, remembering to increase the size of the list.
The method ensureCapacity() handles the dynamic resizing of the underlying array. Anytime it detects that the underlying array is too small, a new array is allocated, the contents are copied over, and the old array is discarded, freeing it up for garbage collection. You could use any number of strategies for determining when and how big to allocate the new array, but in this particular example, the size of the array is increased by an additional 50 percent over what is actually required. This provides a kind of safety net that ensures the list doesn't spend most of its time allocating new arrays and copying the values across.
The add() method simply delegates to insert, passing the size of the list as the insertion point, thereby ensuring that the new value is added to the end.
After first checking that the requested position is valid, the get() method returns the value contained at the element for the specified index, while the set() method replaces whatever value was already there. Additionally, set() takes a copy of the value that was originally stored at the specified position before overwriting it. The original value is then returned to the caller.
As you can probably tell, an array list performs extremely well for indexed access. In fact, while indexed access to a list is generally considered to be O(1), array lists come about as close as you will get to delivering on that promise with identical best, worst, and average case performance.
Having provided a mechanism for searching the list via indexOf(), you can proceed to implement contains():
public boolean contains(Object value) {
        return indexOf(value) != −1;
}The indexOf() method performs a linear search of the list to find a value. It achieves its goal by starting at the first position within the list and working its way through each element until either the value is found or the end is reached.
The contains() method calls indexOf() to perform a search on its behalf and returns true only if it is found (indexOf >= 0).
Although simple to implement, linear searching doesn't scale very well to large lists. Imagine a list containing the following values: Cat, Dog, Mouse, Zebra. Now imagine you were to search for each value in turn (first Cat, then Dog, and so on.) and count the number of comparisons needed to find each value. Cat, being the first in the list, will take one comparison. Dog will take two, Mouse three, and Zebra four. If you calculate the average number of comparisons required, 1 + 2 + 3 + 4 / 4 = 10 / 4 = 2.5, you can see that for a list containing N items, the average number of comparisons required is around N / 2, or O(N). This is the same as the worst-case time and therefore clearly not a very efficient method for searching.
Chapter 9, "Binary Searching," introduces a more efficient method for searching a list, but for now we will make do with this "brute force" approach to searching.
You also need to support the deletion of a specified value without knowing its precise location. As with contains(), you can take advantage of the fact that you already have a mechanism for determining the position of a value using indexOf():
public boolean delete(Object value) {
        int index = indexOf(value);
        if (index != −1) {
            delete(index);
            return true;
        }
        return false;
}After first checking the validity of the input, the first delete() method copies all values to the right of the deletion point left one position. Then the size of the list is decremented accordingly and the value in the last element of the array is cleared.
It is necessary to clear the last element of the array because you haven't actually moved the values left by one position, you've only copied them. If you didn't clear out what used to be the last element containing a value, you might inadvertently hold on to copies of deleted values, thereby preventing them from being garbage collected. This is more commonly referred to as a memory leak.
Notice the bounds checking to ensure you don't cause an ArrayIndexOutOfBoundsException when deleting from the last element of the array. In fact, you may like to try commenting out the entire block of code under the if statement and rerunning the tests to see what happens. Also notice you have been careful to take a copy of the value that was stored at the deleted position so that it can be returned to the caller.
It is worth noting here that the capacity of the underlying array never shrinks. This means that if the list grows very large and then shrinks significantly, there may be a lot of "wasted" storage. You could get around this problem by implementing the inverse of ensureCapacity(). Each time you delete an element from the list, you could check the new size against some percentage threshold. For example, once the size drops to 50 percent of the list capacity, you could reallocate a smaller array and copy the contents across, thereby freeing up the unused storage. However, for the sake of clarity, we have chosen not to do this.
As an aside, the code for the JDK implementation of
ArrayListbehaves in exactly the same way. Again, nothing to worry about in most cases, but something to keep in mind nevertheless.
The second delete() works by first calling indexOf() to determine the position of the first occurrence of the specified value, calling the first delete() method if found. The performance of the first delete() method is O(1)—discounting the time taken to copy the values—whereas the second delete() is intrinsically tied to the performance of indexOf(), giving an average deletion time of O(N).
The iterator() method is very simple—you already have the necessary code in the form of the ArrayIterator class from Chapter 2.
Implementing the size() method is even simpler. The insert() and delete() methods already maintain the size of the list, so you simply return whatever value is currently stored in the _size field.
Finally, isEmpty() returns true only if the size of the list is zero (size() == 0). Although trivial in implementation, isEmpty()—like all the convenience methods on the List interface—makes your application code more readable by reducing the amount of "noise."
Rather than use an array to hold the elements, a linked list contains individual elements with links between them. As you can see from Figure 3-3, each element in a linked list contains a reference (or link) to both the next and previous elements, acting like links in a chain.

More precisely, this is referred to as a doubly linked list (each element has two links), as opposed to a singly linked list in which each element has only one link. This double linking makes it possible to traverse the elements in either direction. It also makes insertion and deletion much simpler than it is for an array list.
As you might recall from the discussion on array lists, in most cases when deleting or inserting, some portion of the underlying array needs to be copied. With a linked list, however, each time you wish to insert or delete an element, you need only update the references to and from the next and previous elements, respectively. This makes the cost of the actual insertion or deletion almost negligible in all but the most extreme cases. For lists with extremely large numbers of elements, the traversal time can be a performance issue.
A doubly linked list also maintains references to the first and last elements in the list—often referred to as the head and tail, respectively. This enables you to access either end with equal performance.
As you did for your ArrayListTest class earlier, you extend AbstractListTestCase in order to take advantage of all the predefined test cases. This time, however, the createList() method returns an instance of LinkedList. Notice also that this time you haven't created any additional test cases because the tests already defined in AbstractListTestCase will be sufficient.
As with any other list, the first thing you need to do is implement the List interface. Once again, you track the size of the list through the instance variable _size. (Theoretically, you could derive the size each time it's required by counting every element, but that really wouldn't scale!)
Not so obvious is why you have a single, unmodifiable, element _headAndTail instead of the two references discussed at the start of the section. This field is known as a sentinel. A sentinel—often referred to as the null object pattern or simply a null object—is a technique for simplifying an algorithm by adding a special element to one or both ends of a data structure to avoid writing special code that handles boundary conditions. Without the use of a sentinel, our code would be littered with statements that checked for and updated null references of the head and tail. Instead, use the next and previous fields of the sentinel point to the first and last elements of the list. Moreover, the first and last elements can themselves always refer back to the sentinel as if it was just another element in the chain. Sentinels can be a difficult concept to grasp, so don't worry too much if it seems a little strange at first. In fact, trying to formulate an algorithm that uses sentinels is not always a particularly intuitive process. However, once you become accustomed to using them, you will find that your algorithms become more elegant and succinct—try writing a doubly linked list without one and you will soon see what we mean.
Lastly, a constructor calls clear(). You'll create the clear() method later, so don't worry too much about what it does right now—suffice it to say that it resets the internal state of the class.
For the most part, the inner class Element is quite straightforward. In addition to holding a value, each element also holds references to the next and previous elements, along with some simple methods for getting and setting the various fields.
At some point, however, your code will need to insert a new element into a list. This logic is encapsulated inside the method attachBefore().
As the name suggests, this method allows an element to insert itself before another by storing the references to the next and previous elements and then updating them to refer to itself.
You also need to delete elements. For this, you created the method detach(), which allows an element to remove itself from the chain by setting the next and previous elements to point at one another.
Notice that at no point in all of this have you needed to check for null values or update references to the head or tail. This is only possible because you are using a sentinel. Because the sentinel is itself an instance of Element, there will always be a next and previous element to update.
As for add(), you again simply delegate to insert(), passing the size of the list as the point for insertion:
public void add(Object value) {
        insert(_size, value);
}As always, insert() starts by first validating the input. You then create a new element with the specified value, find the insertion point, and attach it to the chain before finally incrementing the size of the list to reflect the change.
The getElement() method is really the workhorse of this linked list implementation. It is called by a number of methods and traverses the list in search of the element at the specified position. This brute-force approach gives insert() (and, as you will see later, delete()) an average and worst-case running time of O(N).
You can actually improve on the actual performance of getElement(). As the joke goes, "Q: How long is a linked list? A: Twice the distance from the middle to the end." Recall that our linked list implementation holds a reference to both ends of the list, not just the head. If the position we are searching falls in the first half of the list, we can start at the first element and work our way forward. Conversely, if the desired position falls in the second half of the list, we can start searching from the last element and work our way backward. This means we never traverse more than half the list to reach our destination. Although this has no effect on the magnitude of the search times, it does effectively cut the actual average running times in half. This has been left as an exercise at the end of the chapter.
In both cases, after first checking the validity of the position, you obtain the desired element and get or set the value as appropriate.
Because both get() and set() are tied to the implementation of getElement(), their running times are similarly constrained. This makes indexed-based retrieval of values from a linked list much slower on average than for an array list.
The contains() method is identical in every way to the one found in ArrayList:
public boolean contains(Object value) {
        return indexOf(value) != −1;
}The difference between the linked list and array list implementations of indexOf() is really only in how you navigate from one element to the next. With an array list it's easy: You simply increment an index and access the array directly. With linked lists, on the other hand, you need to use the links themselves to move from one element to the next. If the value is found, its position is returned. Once the sentinel is reached, however, you have fallen off the end of the list, the loop terminates, and -1 is returned to indicate that the value doesn't exist.
The contains() method calls indexOf() and returns true.
}
And, of course, here's a method for deleting by value:
public boolean delete(Object value) {
        assert value != null : "value can't be null";

        for (Element e = _headAndTail.getNext();
                     e != _headAndTail;
                     e = e.getNext()) {
            if (value.equals(e.getValue())) {
                e.detach();
                −−_size;
                return true;
            }
        }

        return false;
}After checking that the specified position is valid, the first delete() method obtains the appropriate element by calling getElement(), detaches it, and decrements the size of the list before returning its value.
The code for the second delete() method is almost the same as for indexOf(), the difference being that, rather than tracking and returning the position, upon finding the first matching element, you immediately delete it and return its value. (Don't forget to decrement the size of the list after calling detach!)
Having defined the inner class, you can return an instance from the iterator() method:
public Iterator iterator() {
        return new ValueIterator();
}The ValueIterator class is virtually identical to the ArrayIterator class from Chapter 2 except that, as was the case for searching and deleting, you use the getNext() and getPrevious() methods to traverse forward and backward, respectively, between the elements until you reach the sentinel.
Not surprisingly, the size() and isEmpty() methods are carbon copies of their array list counterparts.
The last method, clear(), is almost, but not quite, as simple as the array list implementation. In order to maintain the correct behavior while using the sentinel, you need to set its next and previous values to point to itself. This ensures that when you insert the first element into the list, its next and previous values will point to the sentinel, and, most important, the sentinel's next and previous values will point to the new element.
This chapter demonstrated that lists can be used as a replacement for the use of arrays in most real-world applications.
You learned that lists preserve insertion order and that they have no inherent concept of uniqueness.
You've also covered quite a lot of code in order to examine two of the most common list implementations and their relative performance characteristics. Both array lists and linked lists have similar search and iteration times. However, by their very nature, array lists have much better index-based access compared to linked lists. On the other hand, linked lists don't have the overhead of copying and resizing that array lists do, so they have generally better insertion and deletion times, especially at the ends.
Although lists as described here are useful in many situations, there are times when slightly different behavior is needed. The next two chapters discuss some variations on lists, known as queues and stacks, that help solve some very specific computing problems.
Write a constructor for
ArrayListthat accepts a standard Java array to initially populateList.Write an
equals()method that will work for anyListimplementation.Write a
toString()method that will work for anyListimplementation that prints the contents as a single line with values surrounded by square brackets and separated by commas. For example, "[A, B, C]" or "[]" for an emptyList.Create an
Iteratorthat will work for anyListimplementation. What are the performance implications?Update
LinkedListto traverse backward if, when inserting and deleting, the desired index is more than halfway along the list.Rewrite
indexOf()so that it will work for any list.Create a
Listimplementation that is always empty and throwsUnsupportedOperationExceptionif an attempt is made to modify it.