To start development on an Amazon EC2 Mac instance, just like any other Mac build server, iOS build tools such as Xcode must be installed. There are other open-source and third-party automation tools such as Jenkins, Fastlane, etc., which integrate with Xcode to add automation and improve iOS development processes.
In this chapter, we will explore how to install Xcode, Jenkins, Fastlane, and GitLab Runner on an Amazon EC2 macOS instance. But, before installing software, there must be adequate storage space so we will start by seeing how the volume size of a macOS instance can be increased.
Increasing macOS Instance Volume Size
To install an iOS application build tool like Xcode, sufficient disk space must be available. The macOS instance volume size can be modified at launch or after the Mac instance is running. If the volume size is not modified at launch time, the default disk size that is provisioned with the Amazon EC2 Mac instance might not be sufficient.
The macOS instance uses an Amazon Elastic Block Storage (EBS) volume. Increasing the storage capacity of a running macOS instance involves increasing the capacity of the attached EBS volume, rebooting the instance, and making the increased disk space available for use.
The instance volume size can be seen by selecting the macOS instance on the EC2 console as shown in Figure 5-1. To increase the volume size, click on the EBS volume ID as shown in Figure 5-1; this will direct you to the EBS console.
Figure 5-1
Volume size shown in macOS instance details
Access the volume modification page as shown in Figure 5-2.
Figure 5-2
Selecting Modify Volume option
Modify the instance EBS volume size. The example shown in Figure 5-3 increases the volume to 200 GB.
Figure 5-3
Modifying volume to the desired size
After resizing the attached EBS volume of a running macOS instance, it will not be visible within the instance until a reboot occurs. You can reboot the macOS instance from the EC2 console as shown in Figures 5-4 and 5-5.
Figure 5-4
Rebooting macOS instance after volume resizing
Figure 5-5
Confirming instance reboot
After a macOS reboot following an EBS volume resizing, the new disk size should be visible on the macOS instance, as shown in Listing 5-1.
ec2-user@ip-172-31-47-239 ~ % diskutil list external physical
/dev/disk1 (external, physical):
#: TYPE NAME SIZE IDENTIFIER
0: GUID_partition_scheme *214.7 GB disk1
1: EFI EFI 209.7 MB disk1s1
2: Apple_APFS Container disk2 64.2 GB disk1s2
Listing 5-1
Listing disk size
As shown in Listing 5-1, the new disk size is visible, but the APFS container size is still smaller, hence the increased disk space is not being used yet. The added disk size can be made usable as shown in Listing 5-2.
ec2-user@ip-172-31-47-239 ~ % PDISK=$(diskutil list physical external | head -n1 | cut -d" " -f1)
Aligning grow delta to 150,323,855,360 bytes and targeting a new physical store size of 214,538,608,640 bytes
Determined the maximum size for the targeted physical store of this APFS Container to be 214,537,580,544 bytes
Listing 5-3
Resizing APFS container size
Setting Up Xcode
Xcode can be installed manually on the macOS instance from the App Store just as discussed in Chapter 1. After Xcode installation, to begin using Xcode, you must accept the Xcode and iOS SDK License Agreement, as shown in Figure 5-6.
Figure 5-6
Xcode and iOS SDK License Agreement
If prompted to enter password to grant Xcode permissions, enter your user password. If using the default ec2-user, this is the user password that is created for the user as discussed in Chapter 4.
Once Xcode is ready for usage, it should launch into its welcome page, as shown in Figure 5-7.
Figure 5-7
Xcode welcome page
Xcode Command Line Tools
When Xcode is installed from the App Store, its command line tools are also installed without any further action. The installation can be verified from the command terminal, as shown in Listing 5-4.
xcodebuild: error: The directory /Users/ec2-user does not contain an Xcode project.
ec2-user@ip-172-31-47-239 ~ % xcodebuild -version
Xcode 12.5.1
Build version 12E507
Listing 5-4
Verifying Xcode command line tools installation
Setting Up Jenkins
Jenkins is an open-source automation and application build tool. It integrates with a variety of other tools, which makes it suitable for various types of builds and automations. Jenkins supports distributed builds; you can use different build environments for each build project using agents that run jobs in parallel.
These agents are controlled by a controller, which is the main Jenkins node where all build jobs are configured and scheduled. The agents can be the same type of environment as the controller where jobs are scheduled to balance workload or a different environment from the main controller where jobs are scheduled on the agent based on the build environment required by the application being built.
Let us explore in the next two sections how you can configure a Jenkins controller in a Linux environment on an Amazon EC2 instance and have a macOS build agent for building iOS applications.
Provisioning Jenkins Controller
The controller will be provisioned on an Amazon EC2 Linux instance, so, firstly, an EC2 instance must be created from the EC2 console, as shown in Figure 5-8.
Figure 5-8
Starting Amazon EC2 instance launch from EC2 Console
The latest Amazon Linux Amazon Machine Image (AMI) for the applicable AWS region is selected, as shown in Figure 5-9.
Figure 5-9
Selecting latest Amazon Linux AMI
Select the instance type and configure the instance and storage capacity as desired. For the security group, SSH (TCP Port 22) access is needed to enable access into the Jenkins server. Jenkins also serves traffic on TCP port 8080 so this must be allowed in the security group. An example security group configuration is shown in Figure 5-10. These rules can be further restricted with the source IP address of your workstation.
Figure 5-10
Configuring security group rules
After the instance launch, the next step is to log in to the instance through SSH to install the Jenkins software.
Since an Amazon Linux EC2 instance is provisioned, yum package manager will be used to install Jenkins. Similarly, package managers in other operating systems can be used to install Jenkins on those operating systems.
First, a quick software update of all packages on the instance is performed, as in Listing 5-5.
[ec2-user ~]$ sudo yum update
Listing 5-5
Updating software packages
After updating software packages, the Jenkins repo can be added to yum, as shown in Listing 5-6.
To access your Jenkins server for the first time through its management interface, connect to http://<your_server_public_DNS>:8080 from your web browser. The initial setup page is as shown in Figure 5-11. Enter the initial password retrieved as shown in Listing 5-11.
Figure 5-11
Jenkins initial setup page
To support different types of applications and tools, Jenkins uses plugins to extend its functionalities. During Jenkins initial setup, you can select specific plugins to install, or install the suggested plugins as shown in Figure 5-12.
Figure 5-12
Installing Jenkins plugin
An initial admin user must also be created to authenticate into Jenkins. The initial admin user can be set up as shown in Figure 5-13.
Figure 5-13
Creating initial admin user
After all the plugins are installed and the initial admin user is set up, Jenkins is ready for use to start creating jobs and registering build agents. A fresh Jenkins installation welcome page is as shown in Figure 5-14.
Figure 5-14
Jenkins welcome page
EC2 Mac Instance As Jenkins Build Agent
After creating the Jenkins controller, you can set up build agents for distributed builds. To build iOS applications, a macOS build agent must be present. Let us explore how to add an EC2 Mac instance as a build agent to the Jenkins controller via SSH.
To add a Jenkins build agent, Java must be installed. Listing 5-12 shows how to install Java development kit with Homebrew on EC2 Mac.
ec2-user@ip-172-31-47-239 ~ % su ec2-user -c '/usr/local/bin/brew install openjdk@8'
OpenJDK 64-Bit Server VM (build 25.282-b00, mixed mode)
Listing 5-13
Create symlink for OpenJDK and verify Installation
After having Java installed, the next requirement is to create a Jenkins user and set up SSH access for that user. The Jenkins controller will use this user to connect to the macOS build agent via SSH to submit build jobs. You can create a new Jenkins user as shown in Listing 5-14.
2021-07-10 19:50:42.793 sysadminctl[6437:155160] No clear text password or interactive option was specified (adduser, change/reset password will not allow user to use FDE) !
2021-07-10 19:50:43.076 sysadminctl[6437:155160] Creating home directory at /Users/jenkins
Listing 5-14
Creating Jenkins user
With the user created, you can either set up a new key or reuse the existing default ec2-user key on the macOS instance. Listing 5-15 shows how to reuse the default ec2-user SSH credentials with the new Jenkins user.
sh-3.2# mkdir /Users/jenkins/.ssh/
sh-3.2# cp -a /Users/ec2-user/.ssh/. /Users/jenkins/.ssh/
Next let us ensure that the Jenkins controller has SSH access to the EC2 Mac instance from the security groups.
As shown in Figure 5-15, TCP port 22 access is configured for the /32 private IP address of the Jenkins controller instance. The private IP address is used because the Jenkins controller and EC2 Mac instance are in the same Virtual Private Cloud (VPC). If they are in different VPCs and the Jenkins controller will connect with the Mac instance via the Internet, you will add the public IP address of the Jenkins controller instead.
Figure 5-15
Security group configuration for EC2 Mac instance
With Java installed, Jenkins user created, SSH access set up, and security group configured, you are ready to add the EC2 macOS instance as a build node.
On the Jenkins user interface, select “Manage Jenkins” option, then select “Manage Nodes and Clouds” as shown in Figure 5-16.
Figure 5-16
Managing Jenkins options
Initiate the process to add a new node and provide a name for the node, as shown in Figure 5-17.
Figure 5-17
Adding new Jenkins node
Connectivity information of the node will be configured which includes the IP address of the node, the launch method, label, credentials of the node, etc. The label is configured in build jobs and used by the controller to identify the build agent to schedule a specific job on. An example configuration of a node with SSH launch method and an iOS label is shown in Figure 5-18.
The SSH credentials must be configured separately. The credentials can be created in advance or at the time of adding a node. Figure 5-18 shows how to add new credentials when configuring the build node.
Figure 5-18
Configuring new credentials for Jenkins node
To add SSH credentials, you provide the Jenkins username and the SSH private key. To get the private key content, open the private key file that is configured for Jenkins user SSH access.
In this example, the same SSH private key is used for ec2-user and Jenkins user as configured in Listing 5-15 so retrieve the content of that private key from your workstation.
Figure 5-19 shows an example of configuring SSH credentials.
Figure 5-19
Configuring SSH credentials in Jenkins
Environment variables such as path variables can be configured for the node, as shown in Figure 5-20.
Figure 5-20
Configuring environment variables for the node
Save the configuration for the new node. From Figure 5-18, the host key verification is configured as a manual trust, so after the new node configuration is saved, the Jenkins controller attempts to connect via SSH to the build agent and a prompt is shown on the left-side options of the Jenkins node with a request to trust the Jenkins controller; select this to allow the connection to proceed.
You can view the console output on Jenkins to view the status and see it in action. A console output example for a successful agent added is shown in Listing 5-16.
[07/11/21 17:31:16] [SSH] Checking java version of java
[07/11/21 17:31:16] [SSH] java -version returned 1.8.0_282.
INFO: Both error and output logs will be printed to /Users/Jenkins/remoting
<===[JENKINS REMOTING CAPACITY]===>channel started
Remoting version: 4.7
This is a Unix agent
Evacuated stdout
Agent successfully connected and online
Listing 5-16
Output snippet of adding Jenkins agent
After a build node is added, it will be visible in the list of nodes, as shown in Figure 5-21.
Figure 5-21
Jenkins build nodes
Setting Up Fastlane
Fastlane is an open-source automation tool that is used to automate mobile application development. It automates all aspects of building an iOS application from development to release to the App Store. Its major features are
Automate screenshot for use in App Store
Automate beta deployment
App Store deployment
Code signing
Fastlane can be integrated with Jenkins to create a full end-to-end Continuous Integration Continuous Delivery (CICD) process for iOS application development.
Fastlane can simply be installed on a macOS workstation using Homebrew, as shown in Listing 5-17.
After installation, you can verify installation and start using Fastlane. An example of starting Fastlane and an example output are shown in Listing 5-18.
Listing 5-18. Starting Fastlane
Setting Up GitLab
GitLab is a DevOps platform that provides a host of features to increase agility in software development process. Some of the features are git repository manager for managing source code, continuous integration, and deployment pipelines for automatically building and deploying applications etc.
For its continuous integration and deployment feature, it uses GitLab runner. GitLab Runner is an application that works with GitLab CICD to run jobs in a pipeline. The GitLab Runner application can be installed on a separate infrastructure and operating system depending on the job the runner will perform.
GitLab Runner can also be installed on macOS for running iOS-related jobs, so let us explore how to set up GitLab and install a GitLab Runner on macOS EC2 instance.
Creating GitLab Project
To start using GitLab, you must sign up for a GitLab account. You can sign up for free on https://gitlab.com/. Then, create a project as shown in Figure 5-22.
Figure 5-22
Create GitLab project
Next, you are given the option to choose how you want to create the project, as shown in Figure 5-23, you can create a blank project or use a template which will prepopulate your project with files.
Figure 5-23
Selecting project initial configuration
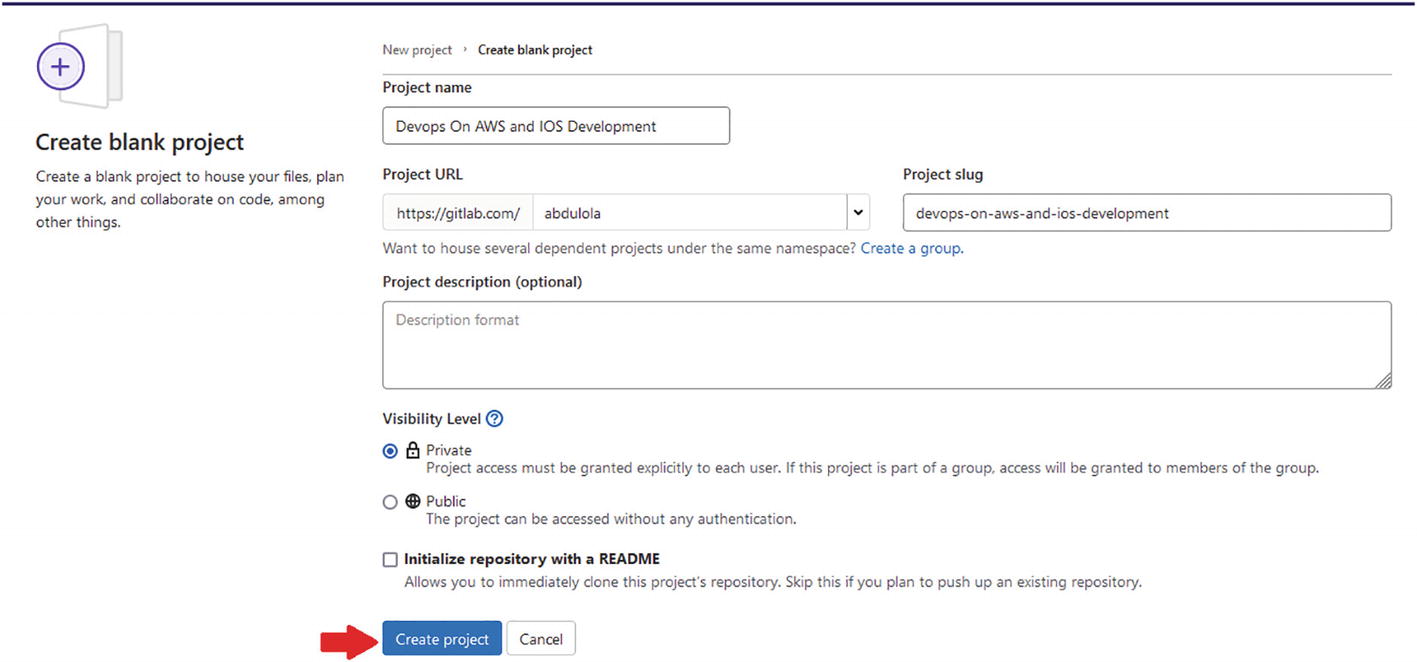
Configure the project name, URL, and the visibility level (Private or Public). Figure 5-24 shows an example project configuration.
Figure 5-24
Configuring and creating the GitLab project
Setting Up macOS GitLab Runner
When you create a GitLab project, a repository is created for the project, and you get access to lots of DevOps features, among which is CICD. To set up a GitLab CICD pipeline that can build iOS applications, a macOS GitLab Runner must be set up.
GitLab Runner configuration for a project can be accessed in the project settings, as shown in Figure 5-25.
Figure 5-25
GitLab project CICD settings
To register a GitLab runner on your macOS instance, it requires the URL of the GitLab location and a unique registration token. You can retrieve both by expanding Runners in project CICD settings, as shown in Figure 5-26.
Figure 5-26
GitLab Runner registration token and URL
The GitLab Runner is available as a binary. You can download the binary and provide appropriate permission on your macOS instance, as shown in Listing 5-19.
Now you can register the runner as shown in Listing 5-20. The registration is an interactive operation where you will provide the registration token, GitLab URL, runner description, etc.
Enter the GitLab instance URL (for example, https://gitlab.com/):
https://gitlab.com/
Enter the registration token:
nxxxxxxxxxxxxxxi
Enter a description for the runner:
[ip-172-31-47-239.ec2.internal]: mac os runner
Enter tags for the runner (comma-separated):
Registering runner... succeeded runner=nYR2beCG
Enter an executor: custom, docker, parallels, docker-ssh, shell, ssh, virtualbox, docker+machine, docker-ssh+machine, kubernetes:
shell
Runner registered successfully. Feel free to start it, but if it's running already the config should be automatically reloaded!
Listing 5-20
GitLab Runner registration
A successful runner registration does not install the runner, you must install the runner separately. Listing 5-21 shows how to install and start the GitLab Runner.
Once the GitLab Runner is installed, you can start scheduling jobs to this runner from a GitLab CICD pipeline. To verify that the runner has been registered with your GitLab project and ready to receive jobs, ensure that you can see the registered macOS runner on the list of runners on your GitLab project. Figure 5-27 shows the macOS instance registered as a runner on GitLab.
Setting up an iOS application development environment requires installation of different software such as iOS-specific Xcode and other third-party and open-source tools. We have covered the installation and setup of all these tools on a macOS Amazon EC2 instance to get it ready for development.