
CHAPTER 5
Administering Joomla!
One of the great benefits of using Joomla is the ease of site management that the CMS offers. Nearly all site administration functions are available through the web browser interface, making it possible to alter content and system configuration from anywhere you have access to the Web. When maintenance is required outside of the Administrator interface, it can usually be handled with industry standard MySQL tools.
The Joomla Administrator interface is structured so that each area of responsibility has a separate manager screen (Front Page Manager, Article Manager, User Manager, etc.). For example, the Template Manager provides the interface for the configuration of all templates, while the User Manager is used to set up and administer user accounts. The Joomla managers can be divided into roughly three categories: presentation administration, content administration, and system administration.
Presentation Administration
The appearance of a Joomla site is governed by various facets of content display. The primary determinant of the look and feel of a site is the template or templates configured in the Template Manager. The template selection will determine the graphics, color scheme, and fonts of all site pages—although some extensions, such as Fireboard (http://joomlacode.org/gf/project/fireboard/frs), have their own theme settings. Therefore, the Template Manager will control most of the site's appearance.
The selected display language (configured in the Language Manager) plays a key role in determining the presentation of the site. While Roman-based languages only slightly alter the appearance, the selection of a pictogram language (such as Chinese) or a language that reads right to left (RTL) can significantly affect the look and feel of the site. The Language Manager offers language configuration options for both the front-end and the Adminstrator interface.
Template Manager
The Template Manager (see Figure 5-1) allows the administrator to do much more than select the default template for the site. From the Template Manager, you can also edit the main index file of the template, modify the style sheet file or files, set template parameters (if available for a particular template), and preview the template with all of the available module positions highlighted with callouts. The template and CSS file-editing capabilities available through the Administrator interface free you from needing access to a text editor or FTP capabilities to make simple edits to a template on your site.
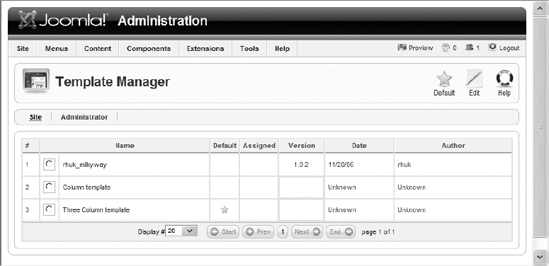
Figure 5-1. The Template Manager allows you to set a template default or edit it.
The Template Manager displays a list of all of the templates that have been installed on the system. Hovering over the name of a template entry will display a thumbnail image of the general graphic appearance of that template. Clicking the template name will take you to the configuration screen for that template, as shown in Figure 5-2. The configuration screen provides all of the basic details of the template, including a short template description that is retrieved from the template's XML descriptor file. Most commercial templates use the description to include both a summary and an enumeration of the screen/module positions that the template supports.
Any parameters available for configuration of the template are shown in the Parameters pane. Generally these parameters can be used to determine presentation settings such as the background color to use, menu navigation types, font sizes, general color variations available in the template, width settings, and CSS class selections.
Although every Joomla site requires at least one default template selection, specific templates may also be assigned to particular menu items using the list box on the right side of the screen. You can assign a template to be used for an individual menu item, multiple menu items, all unassigned articles, or none. To assign the template to all items, you need to set the template as the site default on the main Template Manager screen.
From the Template Edit screen, you can click the Edit HTML button, which will display the basic text editor (see Figure 5-3). This text editor doesn't have any advanced features like syntax highlighting or even search and replace. It was designed to allow minor adjustments and touch-ups when more direct editing is not convenient.

Figure 5-2. The template configuration screen displays general settings as well as template-specific parameters.
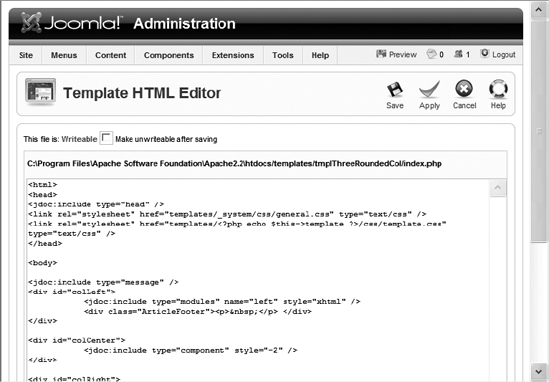
Figure 5-3. You can edit the HTML of the template from the Joomla Administrator interface.
Clicking the Edit CSS button on the template screen will open the text editor with the style sheet file of the template. For a template with multiple style sheets, you can select which one to edit (see Figure 5-4). The list will display all style sheet files located in the template's /css folder—it does not display only the files listed in the template's XML descriptor file. Therefore, the list may contain files that are not actually used by the template.
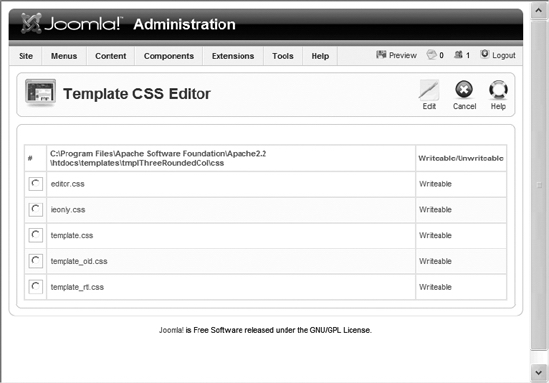
Figure 5-4. When a template has multiple style sheet files, you can select a specific CSS file for editing.
Most administrators don't spend a great amount of time working in the Template Manager. Once you set up the site template, there is only occasional need to change it. Since you can select another template to be used by the site with two mouse clicks, even revising the look and feel of the site requires little time investment.
Language Manager
Joomla is one of the most robust multilingual applications available. The international focus of Joomla drives the development team to make certain that all of the different languages work properly. The development team has an entire group of people devoted to updating and correcting the various plug-in language extensions.
Installed languages are configured through the Language Manager. Joomla provides support for over 40 languages. A single Joomla installation can support multiple languages at the same time. Although the language displayed to new users is the default language set for the site, Joomla allows each registered user to select any language installed on the site for presentation.
Tip One of the most popular Joomla extensions is an open source language plug-in called Joom!Fish (www.joomfish.net). It helps manage multilanguage content, and provides an interface for manual translation capabilities, and holds translations for all dynamically generated content in a single database. It even makes it possible to translate static text used by third-party extensions (through plug-in interception of the display text) so your entire site (including add-ons) can appear in the desired language.
The Language Manager will help you administer a multilingual site, although languages are installed, like other extensions, through the Extension Manager. Once installed, the language will appear in the Language Manager interface for configuration (see Figure 5-5). The pane under the Language Manager banner allows you to select whether configuration will affect the Site or Administrator display. Joomla provides the flexibility of setting one language for the site presentation and another for administration.
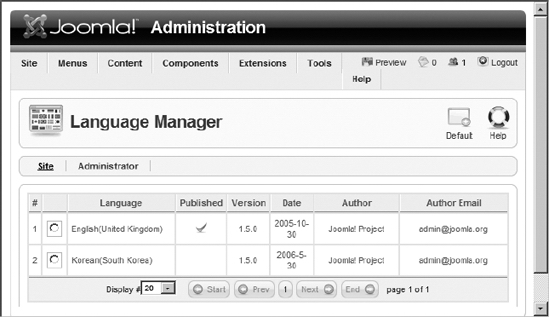
Figure 5-5. The Language Manager allows selection and configuration of the site and Administrator interface languages.
Keep in mind that in addition to the flexibility of allowing language settings for particular users, the site, and the Administrator interface, individual articles can also be configured to use a different language. The Parameters (Advanced) pane, displayed on the right side of the article-editing screen, allows a contributor to select any language currently available on the Joomla system from the Content Language dropdown list.
Content Administration
Content administration lies at the heart of most of the work a Joomla administrator will do. Sections, categories, articles, and media need to be organized, managed, and archived. Since content management is the primary function of the Joomla CMS, the interface has been streamlined and optimized from earlier versions.
Six interrelated manager interfaces are used to administer the site content: Article Manager, Section Manager, Category Manager, Front Page Manager, Media Manager, and Trash Manager. Most content management will be performed within the Article Manager after the Section Manager and Category Manager have been used to configure the areas where the articles will be filed. The Front Page Manager provides a shortcut method of seeing all of the content that will be combined for a sort of "super category" display on the home page of the site. The Media Manager supports uploads and management of media (images, sounds, Flash files, etc.) used within the articles. Finally, the Trash Manager works much like a desktop trash can as a holding place of "trashed" content before final deletion.
Article Manager
You've already used the Article Manager (see Figure 5-6) quite a bit to create both categorized and uncategorized articles (such as the Terms and Condition policy page). The only central feature that hasn't been covered is the archive functionality.
Any successful Joomla site will run into the problems caused by an excess of article content. Even with consistent filing of articles within sections and categories, Joomla can become like an overabundant garden where a profusion of healthy plants may choke the walking path. In this case, the Joomla administrator will need to prune the content on the site so that neither the visitor nor the administrator becomes lost in the chaos.
Joomla provides a mechanism to prevent the site from becoming overwhelmed with older content. Warehousing of less relevant content is accomplished by the use of the Archive button. When an article is archived, it is no longer generally available on the site, it doesn't take up processing time during a site search, and it won't clutter the query results. If you ever need to return the article to the site, simply view the list of archived items, selecting the desired item, and click the Unarchive button and the document will be restored to general publication.
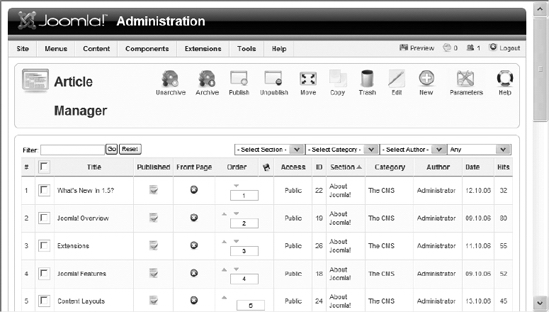
Figure 5-6. The Article Manager displays all of the published and unpublished articles on the system.
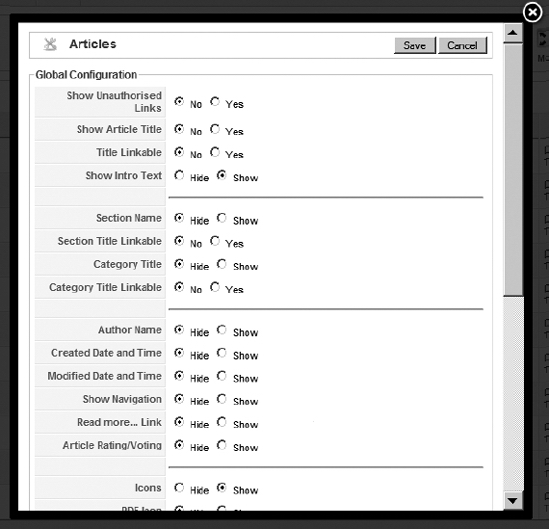
Figure 5-7. The Article Manager configuration lets you configure the global article settings.
Note In previous Joomla versions, archiving was accomplished through a separate Archive Manager. Now that functionality exists in the Article Manager. To view only archived articles as the Archive Manager previously displayed, simply select the drop-down list filter at the far right of the screen and select the Archived option.
You can click the Parameters button in the Article Manager to display the Global Configuration window to access a number of global settings that apply to articles. Parameters such as linked titles, display of author names, and so on are available in the Article - Global Configuration window, as shown in Figure 5-7. These options should already be familiar to you from when you created site articles. When an article parameter is set to the Use Global option, the selection in this configuration window is the one that is used for that parameter.
Section and Category Managers
Since you just worked with the Section Manager and Category Manager extensively in the last chapter, a complete review would be largely redundant. These two managers are used to create the filing sections that determine where and how an article will be displayed. Content is always presented within the section or category where it was filed—except when it is set for Front Page display.
Front Page Manager
While most of the site content is displayed through menus that access sections and categories, there is one page that is entirely unique: the Front Page. The Front Page is the home page of the site, and content from any section, category, or uncategorized article can be displayed there. For that reason, the Front Page has a dedicated manager, as shown in Figure 5-8.
The Front Page Manager is a catchall that acts in much the same way as the Article Manager. It allows articles to be published, unpublished, reordered, and archived. Think of the Front Page Manager as a shortcut that acts the same as an Article Manager filter, only it does so for the content that appears on the home page.
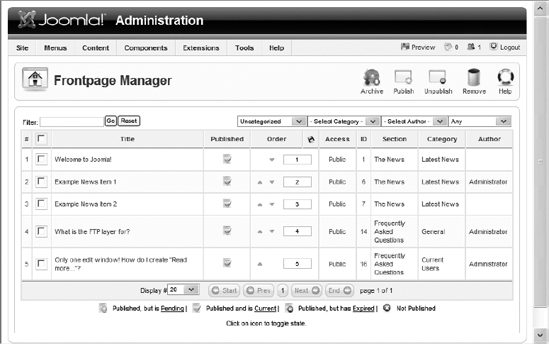
Figure 5-8. The Front Page Manager displays content from any section or category that is displayed on the home page.
Media Manager
Although the Media Manager (shown in Figure 5-9) handles all types of media (including sound and video), most Joomla administrators use it primarily to administer images. The Media Manager allows media files of numerous types to be uploaded, including files with the following extensions: .bmp, .csv, .doc, .epg, .gif, .ico, .jpg, .odg, .odp, .ods, .odt, .pdf, .tif, .ppt, .swf, .txt, .xcf, and .xls. The types allowed for upload may be customized by adding or removing a file extension type in the Legal Extensions parameter of the System tab in the Global Configuration Manager.
By default, newly uploaded files are placed into the /images directory. On a Linux server, the path to this directory will appear something like this:
/home/username/public_html/images/
On a Windows server with the Joomla installation located at the Apache root directory, the path to this directory will appear something like this:
C:/Program Files/Apache Software Foundation/Apache2.2/htdocs/images/
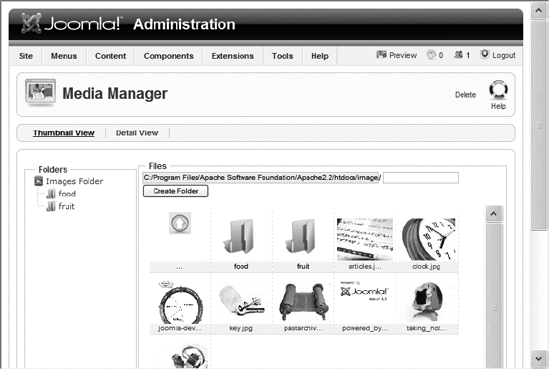
Figure 5-9. The Media Manager provides access to the media folders.
Images inserted into a article are generally held in the /stories subdirectory. The /stories directory is very important because it is the place most article images are located, and it should be a directory that you back up frequently. The path to an image used in a story will be something like this:
C:/Program Files/Apache Software Foundation/Apache2.2/

    htdocs/images/stories/houseicon.gif
In addition to managing files, the Media Manager will allow you to create a new folder. Enter the name of the desired folder in the text box that appears to the right of the current path and click the New Folder button to create one.
Any media uploaded through this interface is accessible for insertion into article content through the article editor (such as TinyMCE). You may have noticed the Image button that appears at the bottom of the Joomla editor window. This is a special button that displays a file selection dialog box that is set to the /images directory. When a file is selected, the button creates a relative path to the selected image and stores it in the article. The HTML reference created by the button to use the previously mentioned image might look like this:
<img src="http://www.example.com/images/stories/houseicon.gif">
Trash Manager
Like most desktop operating systems, deleted content is not immediately deleted from the Joomla system. When the delete button for an item is clicked, the selected item is relocated to the trash receptacle. From the Trash Manager, you can delete all items, select specific items that are to be permanently deleted, or restore individual items to their predeletion location. It is very easy to forget to perform this necessary function of regularly emptying the system trash, so be sure to add it to your administrative to-do list. Emptying content that was placed in the trash will free up valuable resources and can be a good idea from a security standpoint.
Frequent emptying will also promote "discerning disposal." When there are 700 items in the trash, an administrator will tend to simply empty the trash without even examining the contents. If there are only ten items, however, the administrator will be more likely to glance at those items and determine if they should be actually deleted or if one or more items should be restored to the system (because of mistaken deletion or simple rethinking).
System Administration
There are more settings related to system administration than there are for the other managers. Since a Joomla site may have literally tens of thousands of simultaneous visitors, proper understanding of the configuration settings is critical for the site to function at maximum capacity.
There are eight managers related to system administration: Global Configuration Manager, User Manager, Menu Manager, Extension Manager, Module Manager, Plugin Manager, Template Manager, and Mass Mail Manager. The Global Configuration Manager holds most of the global settings for the site, system, and server. The User Manager is used for administration of the user accounts. The Menu Manager allows for creation and editing of menus as well as the menu items used by each menu. The Extension Manager supports installation and removal of new extensions and languages. The Module Manager, Plugin Manager, and Template Manager provide management functionality for each of their specific add-on types. The Mass Mail Manager lets the administrator create a bulk mail transmission to either selected user groups or all users of the system.
The Control Panel acts as a home page for the administrator portion of the Joomla site and provides a good launching point for examining the system options.
Control Panel
The Control Panel is a centralized page that acts as the landing page after an administrator logs into the system, where the administrator can jump to the most common parts of the site. This page is essentially the home page of the Administrator interface. While at first glance the page may reveal only a number of navigation buttons, there are three useful items on the right side of the Control Panel that are often overlooked by Joomla webmasters—the Preview button, introductory text removal instructions, and the administrative panels.
As you can see in Figure 5-10, the Preview button is available on the toolbar (and active from most locations in the Administrator interface). It provides a hyperlink to the Front Page of the Joomla site for quick access. You can use this Preview hyperlink to open the home page in another window so that any changes made through the Administrator interface can be quickly evaluated.
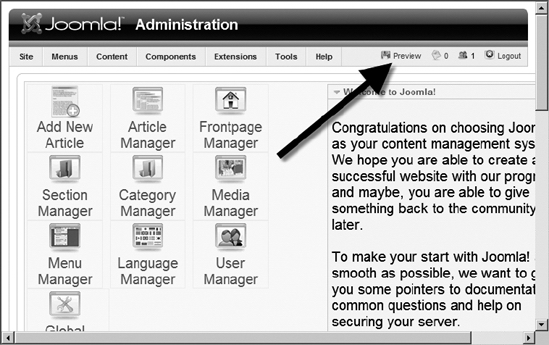
Figure 5-10. The Preview button will take you out of the Administrator interface and to the site Front Page.
At the bottom of the page, there are instructions showing how to delete the introductory message (see Figure 5-11). You will probably want to delete the message to make the panels that appear below it easier to access. The administrative panels (also shown in the figure) provide helpful information such as the identities of logged-in users, the most popular articles on the site, a list of newly added articles, and general menu statistics (the number of items present on each menu).

Figure 5-11. Instructions on how to delete the hello message appear directly above the administrative panels.
Tip You can download and install administrator extensions that add features to the administrative panels. For example, I've written an open source module called the Missing Metadata module (available for free download at www.joomlajumpstart.com). The module displays a table of the articles that have no information in the metadata fields. Clicking an article entry takes you directly to the editor so the empty fields can be populated with the appropriate text. The Missing Metadata module is a good example of the types of extensions that can be added to the Administrator interface for greater management of the Joomla site.
Global Configuration Manager
The Global Configuration Manager, accessed under the Global Configuration option of the Site menu, holds general sitewide settings. These settings will let you set up everything from the administrator password to the FTP upload capabilities. Global configuration is actually divided into three areas: Site, System, and Server. These panels are displayed by clicking the appropriate link under the Global Configuration banner. By default, the Site settings are displayed when the manager is initially presented.
The Site screen includes many of the options you configured during initial installation. Other settings include metadata for the site, search engine optimization (SEO) settings, and feed settings (as shown in Figure 5-12). The Site Settings panel allows you to take the server offline and set the message sent to the visiting browser when the site is inoperative. This option is very useful if you have to shut down the database server for maintenance, since the message will ensure visitors that your site hasn't disappeared when they attempt to access it. When changing the Joomla setting to take the server offline, you can still access the Adminstrator portion of the site.
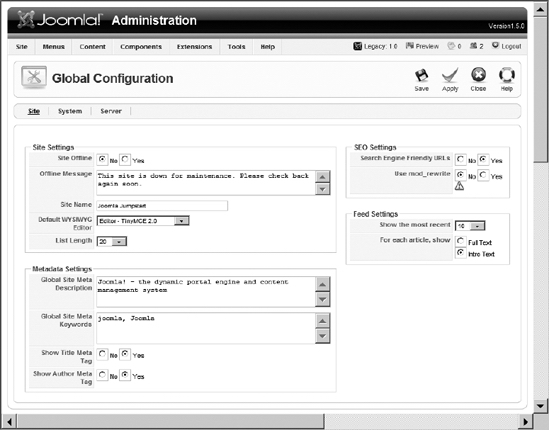
Figure 5-12. The Site screen within the Global Configuration Manager
Two of the more useful options are listed in the SEO Settings frame. The discipline of SEO is complicated and will be discussed at length in Chapter 12. Briefly, these settings create virtual folders for various sections and categories so that when the web browser (or search engine spider) looks at the site, the URL doesn't hold a list of parameters (which search engines don't like). For example, without this option, the URL to access a particular Joomla section might appear like this:
http://www.joomla.org/index.php?option=com_content&

    view=category&id=33&Itemid=53
All of these parameters—the items following the question mark (?)—confuse the search engine. It doesn't have a clear understanding of them simply because they aren't standardized and are used differently by every PHP-based system. In contrast, a URL with a standard folder-based structure is easy for a machine to understand:
http://www.joomla.org/content/view/12/26/
Even better, with the mod_rewrite option activated, the URL could appear like this for maximum search engine ranking:
http://www.joomla.org/about-joomla/technical-requirements.html
You would, of course, want to enable these options. If you're running your own web server, that won't be a problem. If you're running your Joomla site on a remote server, things may be more complicated. For a complete explanation, see Chapter 12.
System Settings
The Site configuration determines how the site functions on the system, while the System configuration screen (see Figure 5-13) holds settings that affect the system itself. Many of these parameters affect performance, so the system should be monitored closely after any modification.
A majority of the system settings are self-explanatory, but a few may be puzzling to the beginning Joomla user. The Debug settings have major performance and security consequences for a Joomla site and are rarely activated on a deployment server. Debugging output reveals the searches that are performed between the web server and the database server, variable settings, and timing of the execution sequence of the Joomla page construction. The functionality these settings afford is generally beyond the scope of anyone not doing advanced Joomla development.
The Cache settings allow you to turn on the page cache, which streamlines the execution process so that the database is not constantly queried to generate the page to send to the user's browser. If a page is requested that has already been generated for another user in the last 900 seconds (or whatever cache time value has been set), the existing cached page is simply read from the cache and sent to the user. Caching can produce significant performance increases on a popular site.
The central drawback with enabling caching is the requirement that the web server must allow the Joomla program to write into the /cache directory. Some web hosts limit this type of functionality, so you'll have to check with your service provider to see if you can enable this setting.
On a Linux-based server, permissions to a directory are set with the chmod utility (on many web hosts this is available through the cPanel web application). The recommended value that can be used with the chmod directory permissions tool for the /cache folder (located at the root Joomla directory) is 755.
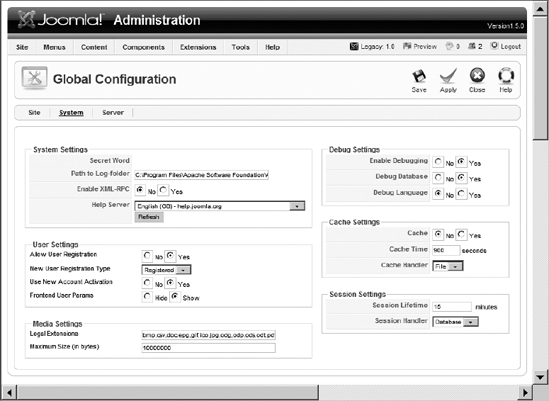
Figure 5-13. The System Settings panel within the Global Configuration Manager
Caution Making a directory writable can have serious security ramifications if not done properly. Be sure to read the "Writable Directories" section later in the chapter before you make these changes.
Server Settings
The final pane of the Global Configuration Manager shows the Server settings (see Figure 5-14) that help you configure the functionality of the Joomla server and its relation to other servers.
One of the most useful options provided on this panel is the ability to activate GZIP page compression if your PHP server has the feature available. During Joomla installation, the installer checks for it and flags you if it isn't active. The GZIP function will perform on-the-fly compression of the page requested by the browser and send the file to browsers capable of decompressing it. The whole process is transparent to the visitor and simply speeds transmission—particularly if the visitor is using a dial-up Internet connection.
To allow e-mail capabilities from the site (such as registered user confirmation messages or mass mail), you will need to configure the mail settings. When the same service provider that hosts your web site also supplies you with your e-mail account, the information for setting these options should be easy to obtain. Getting the proper settings may be as easy as looking at the configuration settings of your e-mail program (such as Microsoft Outlook or Mozilla Firefox) and copying those settings into the Mail Settings panel.
If you don't have e-mail capabilities through a web service provider, enabling this function becomes much more difficult. Most SMTP servers (mail transmission servers) are closed to people (and programs) that are not specifically authorized to send messages through them. This security is activated on e-mail servers because spammers have abused free e-mail servers to flood the Web with their junk, so e-mail servers are locked down to prevent such exploitation. You may be able to use a personal mail server account to provide the mail capabilities to your Joomla server. Check with your service provider.
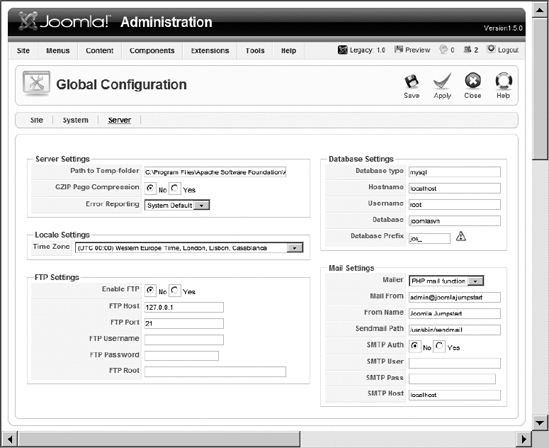
Figure 5-14. The Server Settings panel within the Global Configuration Manager
User Manager
The User Manager allows the administrator to grant and revoke privileges for individual accounts (see Figure 5-15). Joomla was created with collaboration in mind. For that reason, the Joomla user security is configured to essentially follow the needs of an online publication.
If the Joomla site allows for logins, generally the user will register with the system and be sent a confirmation message. Once the account has been validated, the user is placed into the Registered user group. When a registered user logs into a Joomla site, every user (including those with the lowest security level) has two options in common: Edit Account Details and Submit Web Link. Users with Author security level (and above) can also submit new content to the site. If a user clicks the New link in a category or section, they will be taken to the editor that was chosen in the Your Details area of the Account Settings page.
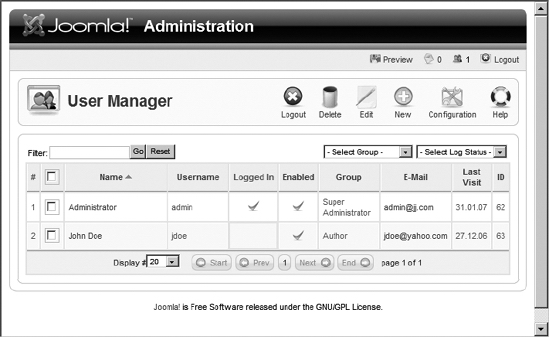
Figure 5-15. The User Manager maintains the user login accounts.
Note User authentication is not limited to the Joomla system. Joomla includes a number of plug-ins that interface with other systems (such as for LDAP and Gmail authentication). If you would like to bridge the user login privileges from another system, particularly if you're unifying intranet infrastructure, see the Joomla documentation for configuration details for these extensions.
At the lowest security level, the Your Details screen lets the user modify the following site parameters:
- Name to be used on the site
- Account e-mail address
- Password (username is displayed, but read-only)
- Editor (e.g., TinyMCE) that will be used when content editing is granted
- Time Zone
Note that the administrator can also change all of these items (including the username) from the User Manager.
Registration Configuration
The setting that allows users to register without administrator approval can be set in the Site panel of the Global Configuration Manager. When the Site panel is displayed, the settings available for the registration system are displayed in the User Settings frame (see Figure 5-16).
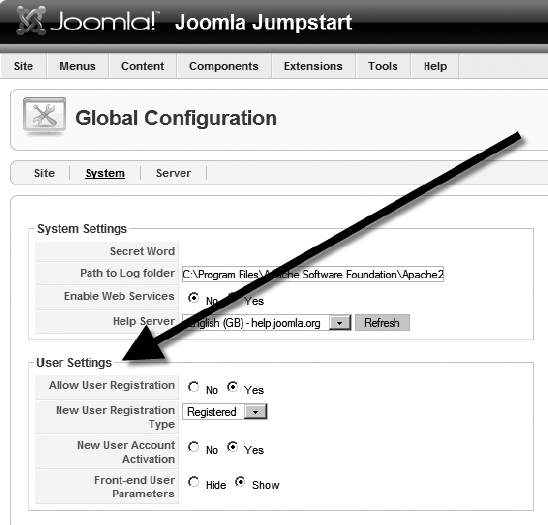
Figure 5-16. In the Global Configuration Manager, the User Settings frame of the Site panel holds the overall user settings.
The administrator can freely modify all settings pertaining to the user account, as well as disable or delete the account if necessary. The Filter drop-down lists on the right side of the User Manager let you separate out all but logged-in users or display the users based on the group to which they belong. Note that unlike other security systems, Joomla users may not belong to more than one group at a time.
Caution If you decide to delete a user record that is linked to a record stored by the Contacts plug-in, you will orphan the contact record. Therefore, after deleting a user record, be sure to check the Contacts list to make sure that there is not a dangling record there.
One of the key aspects of creating a community site is the management of users. Everything from slovenly account request response to malicious cloning of a user's account can lead to distrust from your user base. Be sure that you take user security and responses to authorization requests seriously.
Login Security
Joomla provides anonymous access for everyone and basic login security for registered users. The types of users that will access the Joomla site are broken down into three basic groups:
Unregistered users: These users are simply visitors to the web site who haven't logged in and may not be registered. Most simple web sites don't have a registration system, so all of the users of such a web site would fall into this category. These users are also called public front-end users.
Registered front-end users: These are readers of your site who log in to gain access to restricted content. A registered user account may be activated after filling in a simple form, receiving a confirmation e-mail, or being manually confirmed by an administrator. Content on a Joomla site can be restricted to registered users. Some pay sites such as Salon.com provide articles available only to subscribers who pay a monthly fee. Registered users may be authorized to contribute content to the site, but adding new content is the limit of their authority.
Public back-end users: These are contributors, system administrators, or moderators who have permissions to log in and modify core portions of the site itself. Their ability to make changes to the site is determined by the account level. These users have access to the administrator back-end.
When you edit a user account in the User Manager, as shown in Figure 5-17, you can see these three categories present in the Group list box. Two of these general categories (registered front-end and back-end users) have subcategories that further define the privileges of the user account.
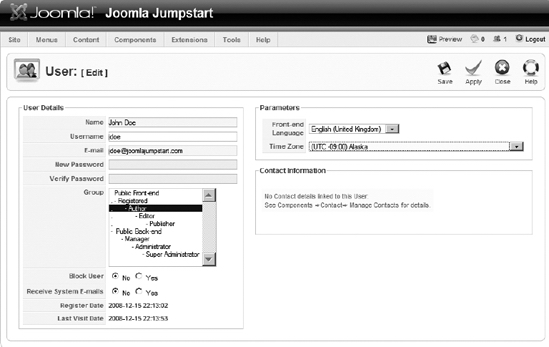
Figure 5-17. Editing a user record from the User Manager allows the administrator to assign the user to a group.
Registered Front-End Users
When registered front-end users are given modification privileges, they can access the WYSIWYG editor to post or edit articles. The four subgroups that are held under the registered front-end users category have varying submission capabilities. The four types of front-end users are as follows:
- Registered: Simple registered users have the ability to read restricted content (if available on the site). They have no capabilities to submit new content articles, although they may submit web links.
- Author: Members of the author group can post and modify their own articles. They can even determine when the article will be published (limited by the administrator's ability to have a moderator set up who must clear any posted content before it appears).
- Editor: Like an author, a user in the editor group can post and modify their content. An editor also has the ability to edit other contributors' content.
- Publisher: A user with publisher status can perform any operation available to an editor, but may also publish or unpublish content on the site.
If the user account was created through the front-end Joomla interface (rather than by an administrator or super-administrator) by the user filling out a registration form, Joomla can be set to send a confirmation e-mail to the user to ensure that the e-mail address is valid. Joomla handles all of this work, and this feature is enabled by default (as long as the mail settings in the Global Configuration Manager are set).
Registered Back-End Users
Registered back-end user groups contain the various administrative users of the site. Administrators have the ability to change access and permissions, alter the site template, create new sections and categories, install new components, and perform other functions. The three groups for back-end users are as follows:
- Manager: The manager group has the lowest authority in the administrative pyramid. Members of this group have limited access to the administrator Control Panel, and can confirm registration for users and perform basic maintenance such as categorizing an article or managing sections and categories.
- Administrator: The administrator can install and uninstall extensions to the Joomla system, change the selected template, change the layout of a page, and modify the permissions of any user lower than their access level. An administrator does not have the power to edit a super-administrator user record (obviously), edit the global configuration, access the mass mail capabilities, or install templates or languages. The administrator level and above are the only groups that can create or authorize new registered users. The Joomla system can be configured to allow a user's automatic registration into the system, but the limits on a user-registered account are determined by administrator settings.
- Super-administrator (SA): The SA is the king of the web site. Like the administrator level on Windows and the root or
sauser level on Linux, the SA has no restrictions on the system. The SA account is the one created during the initial Joomla installation. This account traditionally has a username ofadmin.
When accessing the Joomla Administrator interface, the user's group designation will determine how the interface appears. The interfaces for the lower-level groups (such as manager) are missing many of the buttons and menu items that are present when an SA is logged into the system.
Lost Password
If a user loses their password, the Joomla interface can request a reminder be sent to the registered account's e-mail. Passwords are stored encrypted in MD5 format, so they cannot be recovered easily. If a password is lost, it should be reset by an administrator.
The new password will only be sent to the e-mail address that was registered with the account. If the user has closed down that account or is no longer able to access it, the SA must be contacted to do a special individual reset.
Menu Manager
In Joomla, menus are not the simple drop-down menus found in most desktop user interfaces—Joomla menus essentially are the user interface. Generally speaking, every piece of content that is accessible through the Joomla system has to be connected to a menu. In most cases, content is inaccessible to the web visitor if a menu hasn't been created to link to it.
The Menu Manager (see Figure 5-18) is truly the core of the Joomla system. Second only to the Article Manager, proper configuration of the Menu Manager is critical to your site's user appeal. If visitors can't find and access the content they're looking to read, then that content doesn't exist for them. If the preplanned hierarchical structure you designed in Chapter 4 was thorough, you may not have to spend very much time in the Menu Manager. After all, if the categories are well set to represent the content of your site, new content will be filed properly as it is created, and visitors will have easy access to the categories and sections that lead to that content.
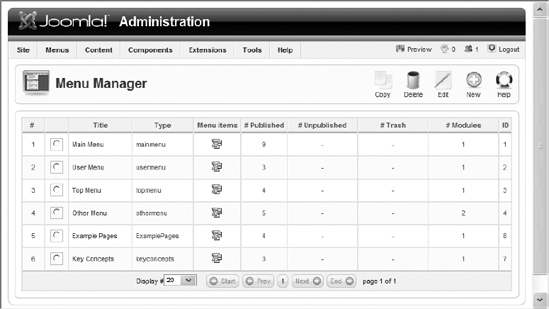
Figure 5-18. The Menu Manager shows all of the menu "categories" that hold menu items.
Every menu in the Menu Manager represents the top level of that menu. A menu is much like a section or a category: it organizes items but does not hold the items itself. Instead, the individual entries in a menu (which are presented on the display as links to content) are stored as menu items connected to the menu.
To access the items held by a menu, click the Menu items icon for any menu row in the Menu Manager. The Menu Item Manager list will display the items attached to that menu. In Figure 5-19, you can see the menu items associated with the Main Menu (mainmenu). From the Menu Item Manager, the administrator can set the default menu item, publish or unpublish an item, and change the item order using the Order column.
One of the features that makes Joomla particularly user-friendly is the ability to disable features (including menus) rather than remove them from the system. If you don't need a feature at the moment, you can simply unpublish it. That way if you later decide that it really does belong on your site, you don't have to reconstruct it—you merely enable it again. On the other hand, if you're sure that it isn't needed, you can delete it at that time.
Since menus are essentially filing categories, it is very easy to move one or more items to another menu.
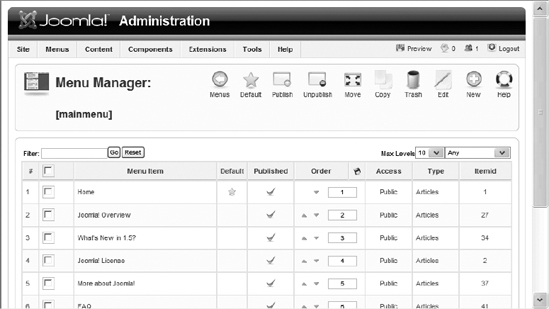
Figure 5-19. From the Menu Item Manager, you can edit or move menu items.
If you click the Move icon with one or more items selected, the Move Menu Items window is displayed (see Figure 5-20). In this window, select a destination menu and click the Move icon to transfer the items to the new menu.

Figure 5-20. The Move Menu Items window allows you to move items from one menu to another.
To edit a menu item, click the name of the menu item or check the box next to the name, and then click the Edit icon. The menu item editor (see Figure 5-21) will display the parameters for that item. This editing screen will vary depending on the type of menu item being edited. The one displayed in the figure is a Front Page blog layout; a Section List layout, for example, will have different options.
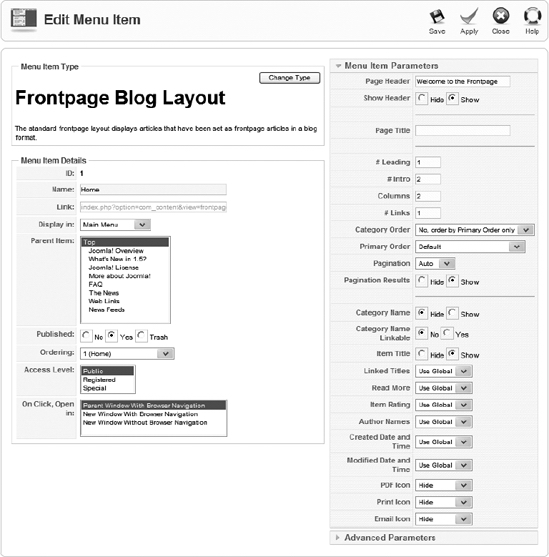
Figure 5-21. The menu item editor display will vary depending on the type of menu item selected.
Extension Manager
The Extension Manager (see Figure 5-22) is accessed via the Install/Uninstall option on the Extension menu, and provides a centralized place where you can install new extensions or examine the extensions that have already been installed on the system. This manager is used to administer components, modules, plug-ins, languages, and templates. It also allows you to uninstall any of these items.
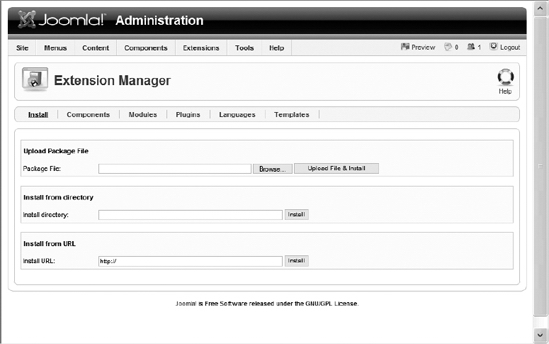
Figure 5-22. The Extension Manager lets you install components, modules, plug-ins, languages, and templates.
There are three possible methods that Joomla can use to access and retrieve items for installation:
- Upload Package File: Joomla includes the Browse feature to allow you to locate the archive file for the package that holds the extension to be installed. Joomla can extract files from either ZIP archives or tarball archives.
- Install from directory: Joomla allows the selection of a local directory where the extension can be read. Note that the web server must have permissions to access this directory or Joomla will return an error. This option is very important if the extension you want to install is fairly large (greater than 2MB). Some PHP installs will time out during the upload of the ZIP file and the install will fail. With this option, you can use FTP or another transfer option to copy extensions of nearly any size to the server and then simply select the directory for installation.
- Install from URL: This option is very convenient—especially if you are managing the Joomla system from a remote client (such as an access point terminal). If you have the URL of a remote component or template, you can simply point the Joomla system at it and the CMS itself will download and install the component.
Once the extension is installed, it can be managed by the appropriate Administrator interface manager (e.g., modules are configured in the Module Manager). The Extension Manager will let you to remove anything that you've installed through it. Simply checking the box to the left of the item and clicking the Uninstall button will remove it from the Joomla system. Joomla has error checking to prevent you from removing extensions that are necessary for the system to function (known as a core extensions).
For component extensions, the Extension Manager allows the administrator to disable a component while still leaving it installed. This functionality is especially useful when testing a new version of a component. For example, an administrator may want to try a new version of the component, but the functionality provided by the component is site critical. Since the old component can be unpublished but left on the system, the Extension Manager provides the ability to instantly reactivate the old version if things aren't working properly.
Module Manager
The Module Manager is used to administer existing module entries and create new entries. Modules are not directly listed in the Module Manager. When you open the Module Manager, you will see a display list of all of the module entries activated in the system, as shown in Figure 5-23. The column titled Type shows the name of the module itself (such as mod_mainmenu, mod_banners, etc.). As you can see, one module (or module type) is used for many different module entries.
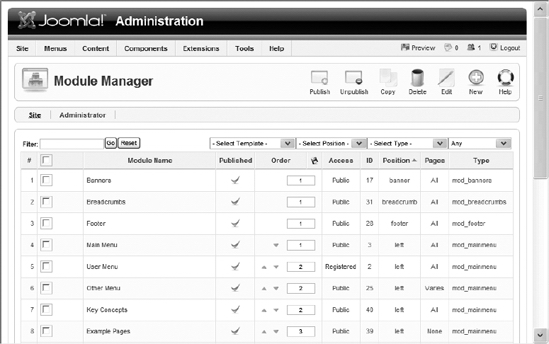
Figure 5-23. The Module Manager can be used to manage or delete active modules entries.
Note Modules represent more than just panels within a template—there are also modules associated with each Joomla menu. In Joomla, a menu (located in the Menu Manager) represents an organizational element, much like a category, that holds the list of menu items. However, a menu doesn't actually display anything—the presentation is left to a module associated with it. When a new menu is created, a module for menu display is automatically created and linked to the menu. Therefore, you can see that every menu listed in the Menu Manager (such as Main Menu) has an identically named module entry (such as Main Menu) in the Module Manager.
Clicking the name of a module entry will display the configuration screen for it. In the case of many modules, the configuration screen offers more than the standard details settings. As you can see in Figure 5-24, the Banners module has almost a dozen specialized parameters (shown in the Parameters frame) that apply specifically to it.
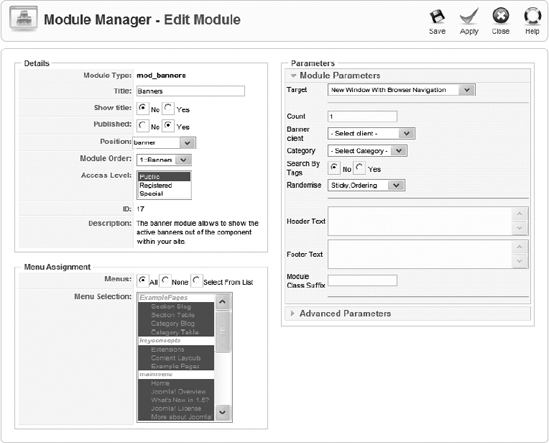
Figure 5-24. The Banners module has numerous custom settings available that govern its behavior.
Modules generally appear at predefined places within a template. However, Joomla allows the administrator to configure modules so that they only appear when particular menus are displayed. In the Menu Assignment frame of the configuration screen, you can set the pages where the module can appear. For example, you could configure a poll module so that the voting form only appears when either the Front Page or the Visitor Input category is active.
Plugin Manager
Plug-ins have the lowest-level interface into the Joomla system, so they have the most power to change how the CMS functions. Plug-ins are designed to sit between the Joomla system and the user/browser. The Plugin Manager (see Figure 5-25) provides the administrative interface to publish, unpublish, organize, and edit the plug-ins installed on the system.
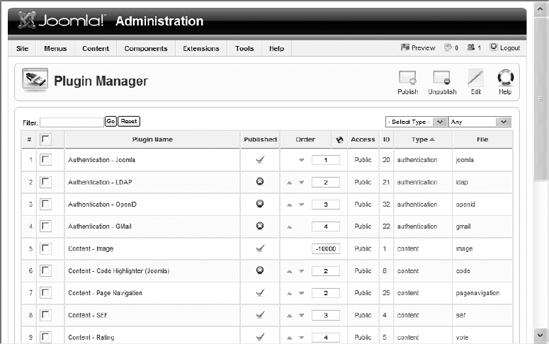
Figure 5-25. Each plug-in can intercept and/or modify information sent by the Joomla system before it reaches the user.
The most comprehensible plug-ins are perhaps the text editors used for modifying content. The TinyMCE editor is actually a plug-in named tinymce. In Joomla, all articles are stored in the database as HTML text content. An editor plug-in sits between the Joomla system output and the user.
When a user edits an article, Joomla retrieves the article from the database and prepares to display the raw HTML code that represents the article in a text-editing box. TinyMCE intercepts this HTML code and converts it into WYSIWYG content, so, for example, bold text is displayed as bold text and inserted pictures actually appear in the user's browser.
Likewise, in the opposite direction, when a user clicks the Apply or Save buttons, TinyMCE takes the displayed content, converts it back to raw HTML, and hands the HTML text to Joomla for proper article storage.
The user interacts a great deal with most editor plug-ins. Other plug-in types, unlike editor plug-ins, often don't provide user interface functionality but instead provide background logic, such as various methods of user authentication for foundation-level interaction with the CMS.
From the Plugin Manager, you can edit many of the parameters that define how a plug-in governs user interaction and behind-the-screens execution. TinyMCE provides a large number of parameters (see Figure 5-26) that can be set by the administrator to modify everything from the text direction to the background code cleanup process.
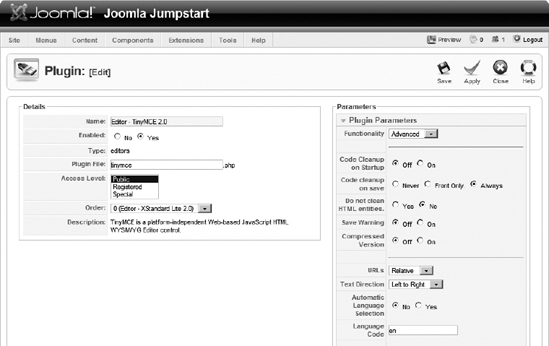
Figure 5-26. The plug-in configuration for TinyMCE holds parameters that determine both display and back-end processing.
Mail Manager
Joomla contains a small back-end mail system so that users can send messages to the administrator users. The mailbox can be examined through the Private Messaging screen, as shown in Figure 5-27. This primitive mail system will not take the place of a standard e-mail account, but can help centralize site-specific communication.
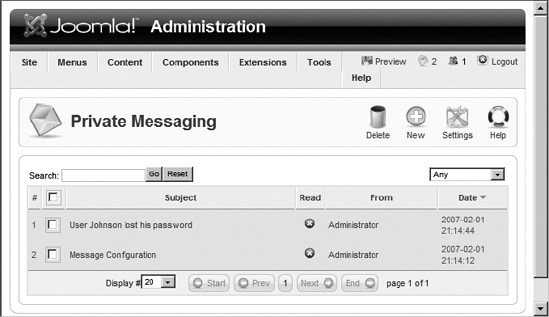
Figure 5-27. The Private Messaging screen displays the Administrator interface for receiving messages.
Each administrative user can configure settings for their private mailbox, including whether to lock the inbox or provide a mail forwarding setting (through the configuration screen shown in Figure 5-28). By default, messages are purged after only seven days. Unless you have a high-traffic/high-message site, I recommend you increase this value to around 30 days so you don't lose any messages if you're away for the week.
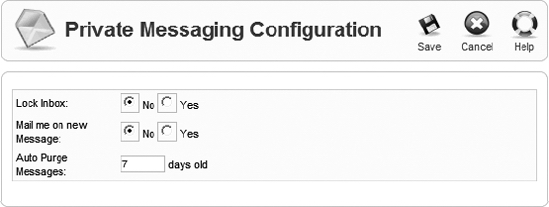
Figure 5-28. The Private Messaging Configuration screen allows you to set auto-purge and other options.
Mass Mail Manager
A Joomla administrator may need to send a bulk e-mail to all of the site users for a site-related occasion, a maintenance shutdown, a security alert, or another event. The Mass Mail Manager (see Figure 5-29) lets the administrator send a bulk message to all members of a particular group. These messages are sent through the Joomla mail system, so if no SMTP server is set up in the Global Configuration Manager, they will only be sent within the site mail system.
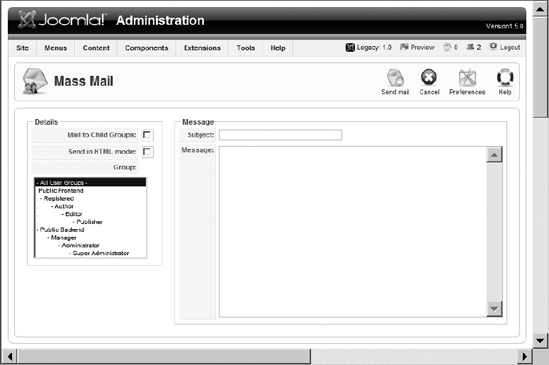
Figure 5-29. The Mass Mail Manager allows a mass message to be sent to a group of users.
If you would like to add a subject prefix or body suffix (such as a site signature), you can click the Preferences button and set these parameters in the Edit Configuration panel (see Figure 5-30).
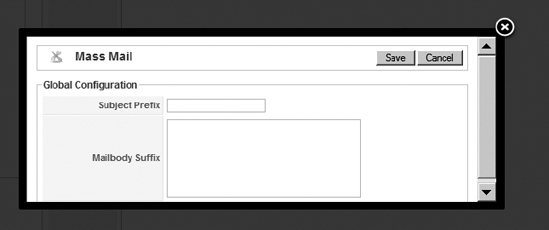
Figure 5-30. The Edit Configuration window for the mass mail preferences lets you add a subject prefix or body suffix to the e-mail.
Global Check-In
When an article is being edited, it is automatically checked out to the user. While checked out, no other user can edit it until it's checked in. This prevents conflicts of two users trying to make changes to the same document.
On a discontinuous system like the Web, however, connections will often be lost or users will close their browser window without checking in the currently displayed document. For that reason, the Administrator interface provides the Global Check-in function, which, when selected from the Tools menu, checks in all items that are currently checked out (see Figure 5-31).
Make sure that all users are logged off of the system before you execute this option. If a legitimate user is editing content and this routine is run, when they attempt to save the changes they've made, those changes will be discarded.
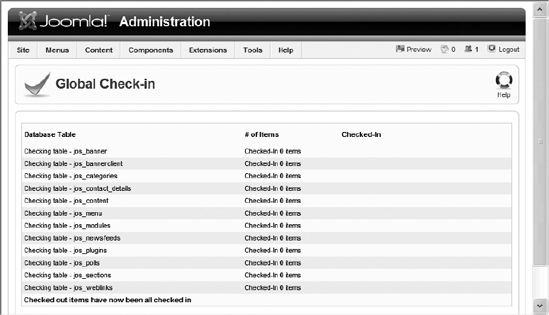
Figure 5-31. The Global Check-in function will check in all user items.
System Info
A small but useful screen is the System Info screen (see Figure 5-32), which can be accessed by the like-named option in the Help menu. System Info lists all of the configuration data accessible to the server that is not available for simple modification through the Global Configuration Manager.
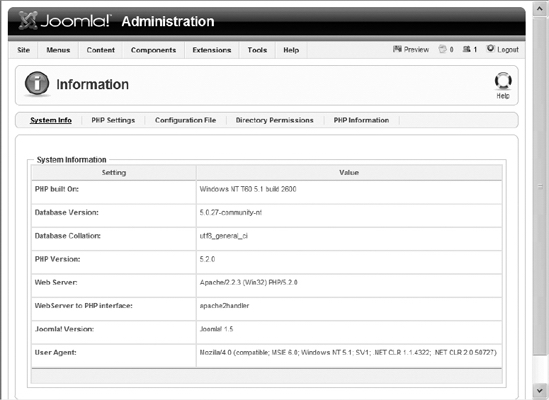
Figure 5-32. The System Info screen displays system configuration and status information.
System Info actually consists of five different panels, as follows:
- System Info: This panel gives a variety of information, including the current version details of the web server; information on MySQL, the database, and the PHP engine; collation settings; and even the details of the Joomla revision.
- PHP Settings: This panel shows the PHP directives that are relevant to Joomla and their current settings.
- Configuration File: This panel displays the current Joomla settings that are stored in the
configuration.phpfile traditionally found in the Joomla root directory. Note that sensitive information such as passwords and usernames are replaced by "xxxx," so if a hacker ever gained access to this screen, this sensitive information would be hidden. - Directory Permissions: This panel indicates the write permissions on directories important to Joomla, including the directories that hold plug-ins, modules, templates, and cache files.
- PHP Information: This screen presents information supplied by the
phpinfo()function call—the same one demonstrated in Chapter 3 to confirm that the PHP installation was running properly.
Backing Up the Joomla! Installation
All of the content and many of the Joomla settings are held in the various tables in the Joomla database. However, all of the installed extensions and the site configuration data are stored as files within the Joomla folder hierarchy. To perform a complete Joomla site backup, you'll need a method of saving the Joomla files in addition to the data.
Note There are a number of fine backup solutions such as JoomlaPack (www.joomlapack.net) and LazyBackup (www.granholmcms.com) available through the Joomla extensions site. These solutions may provide all the backup capabilities that you need. However, be sure whatever solution you choose that you ensure both file and database backup so your site can be restored quickly and effectively.
One mistake many new Joomla administrators make is forgetting to back up the Joomla database. While it is important to back up the files on the FTP server, all of the real content of a Joomla site is stored in the MySQL database. Therefore, you will need to use MySQL to back up your data store. In Figure 5-33, you can see a list of all of the tables used by the Joomla system.
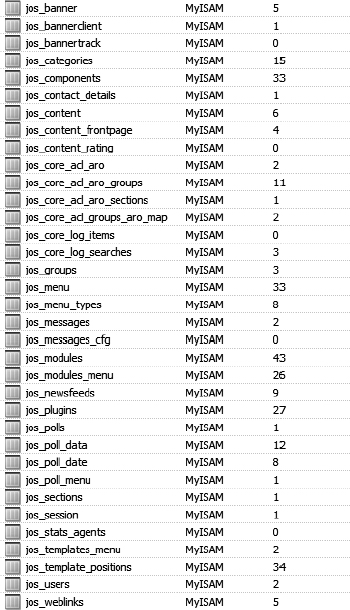
Figure 5-33. There are many tables used by the Joomla system.
Despite the number of tables in the database, the database backup is considerably easier than the file backup in most circumstances. Depending on the size of the site, there is generally less data in the database, in terms of total number of bytes, than in the files that make up the site. Additionally, there are several methods of backing up a MySQL database. Most depend on the type of server on which the MySQL database is stored. There are also a number of plug-ins available for performing backups of the Joomla database. You can find many of them at http://extensions.Joomla.org.
Tip Whenever you run a database backup, make sure you enable the Quote Names option so that quotation marks are put around all of the string content. This will prevent potential conflicts when restoring the database in case some of the fields have keywords stored in them.
Backing Up Through phpMyAdmin
GoDaddy (www.godaddy.com), like many web host providers, uses the online phpMyAdmin utility to allow user configuration of the shared MySQL database server. Through the web interface, the utility offers complete administration capabilities, including full database and table creation, MySQL configuration, querying, and even table data editing.
Importantly for Joomla users, phpMyAdmin also provides database export capabilities, so it is possible to back up a remote site. The utility can export the complete database along with all contained tables and data.
Note The phpMyAdmin application is free and open source. If you have set up your own web server and would like to be able to administer your MySQL database server via the Web, you can install it on your server. You can find the latest version on SourceForge (http://sourceforge.net/projects/phpmyadmin), or go to the phpMyAdmin home page (www.phpmyadmin.net).
In Figure 5-34, you can see the Export screen with all of the options set up for best Joomla configuration. When you click the Go button, the utility will create a ZIP archive with all of the SQL definitions to reconstruct the tables and data they contain, which can be saved or e-mailed to a specified address. If you can perform a site backup every week, you will be pretty well set to recover from a catastrophic site failure.
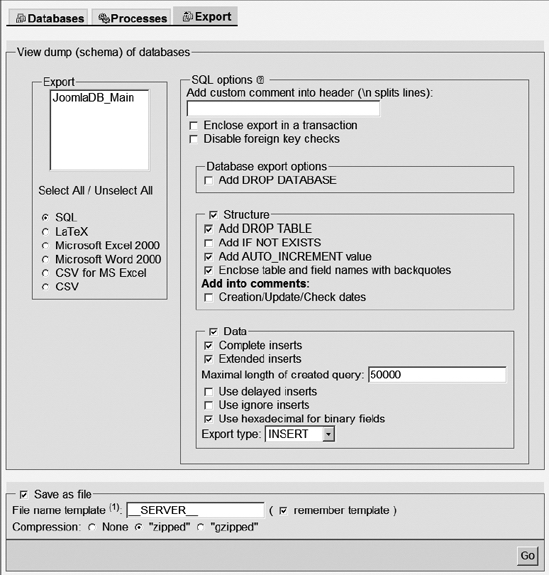
Figure 5-34. Set your Export settings from phpMyAdmin to match those shown here for best Joomla backup.
Restoring the Backup
To restore the backup, you need only open the phpMyAdmin interface, select the database where you'll restore the Joomla data, and click the SQL tab. Click the Browse button to select your file, and click the Go button to execute the SQL code contained in the file. This SQL code will re-create the structure or schema of the Joomla database exactly as it was backed up and restore the data contained in it.
Backing Up from MySQL Administrator
If you have direct access to the MySQL database, the MySQL Administrator application has a complete interface available for easily setting up a database backup. Each backup scenario is stored as a backup project in the MySQL database. Backup projects can be executed manually or scheduled to automatically execute at a particular date and time or on a periodic schedule.
To create a new backup scenario, open MySQL Administrator, click the New Project button, and name the project WeeklyBackup. Select the joomla database in the Schemata pane and click the right-facing arrow to add it to the list of databases that will be archived. Click the Advanced Options tab and select the ANSI Quotes option (this is equivalent to the Quote Names option mentioned earlier) at the bottom of the page. Next click the Schedule tab.
If you haven't already configured a connection, you need to go to the Connection Manager. Click the "Schedule this backup project" check box. Select the folder where you want the backup to be stored. The filename will automatically match the name of the project unless you want to change it. A time stamp will be added to the end of the filename to ensure that it's unique and to make locating the proper archive easier when it is needed.
Leave the default selection of "Execute backup weekly" in the Execution Time area. Click the Save Backup button on the bottom of the screen. It will add the backup project definition to the MySQL server. After you click the button, you will see the project added to the list of backup projects. The MySQL system will now automatically perform this backup process each week.
Backing Up from the Linux Command Line
If you have direct access to the Linux command line, you can use the mysqldump utility to back up the database very quickly. At the command prompt on the Linux server that is hosting the MySQL database, enter the following command (replacing USER, PWD, and JDB with the username, password, and joomla database, respectively):
mysqldump -uUSER -pPWD --databases JDB > joomla_db_bu.sql
This file can be reimported into the database with the following command:
mysql -uUSER -pPWD DBNAME < joomla_db_bu.sql
Making a dump and reimporting the database can be very quick and useful when you want to transfer a Joomla site to another server. Additionally, most Linux distributions have a built-in scheduler for automatic task execution called crontab. With crontab, you can set up the system to automatically back up the database at a recurring time or date.
To set up a backup for every Sunday night at 11:45 pm, you need to edit the crontab file, which you can execute with this command:
crontab -e
Press the Insert button on your keyboard (to put the editor in edit mode) and enter the following line:
45 23 * * 0 mysqldump -uUSER -pPWD -databases JDB > joomla_db_bu.sql
Press the Esc key, type :w, and then press the Enter key to save the new entry. Type :q and press the Enter key to leave the editor. The command line should read as follows:
crontab: installing new crontab
Now the database will automatically be backed up once a week!
Tip For my Joomla installations, I wanted a more automatic solution, so I added automatic FTP capabilities to the open source scripting tool I created called Todo Copy (http://code.google.com/p/todocopy). On the web site, I've posted a script that dumps the MySQL database to a file, zips the database and all of the other Joomla files, and uses FTP to transfer the archive to my FTP server. This provides me with a weekly backup of my complete site.
File Backup
Although bandwidth intensive, it is usually best to back up all of the files in the Joomla installation. Since Joomla is revised constantly, it is possible that backing up only particular files will cause compatibility issues if you install a newer version.
For a Joomla installation on a local server, you can simply use your operating system's built-in archiving capabilities to create a ZIP or tarball file of the entire web site folder. Alternatively, you can use an automated backup utility such as DriveImage XML (there's a free download at www.runtime.org/dixml.htm) or Areca Backup (written in Java and available free from http://sourceforge.net/projects/areca).
When the Joomla site is on a remote server, you can simply use the FTP client to copy the installation to your local drive. You can also use an FTP-based backup utility such as Backup Easy (http://sourceforge.net/projects/bueasy) to archive the files for you. FTP-based backup utilities generally feature the same type of scheduled backup features available through the MySQL Administrator application.
If you want to keep your backup to a bare minimum, be sure at least to archive the following files and folders:
configuration.php: Holds all of the key administrative parameters of the Joomla site, such as database access settings and site metadata information. This file should always be backed up.CHANGELOG.php: Contains the version and build numbers of the current Joomla installation. If you need to recover the Joomla version that is used on your site, this file can provide that information, and you can obtain the proper version from the Web.templatesfolder: If you have installed a new template for your site, back up all of the templates in the folder.administration/templatesfolder: Some administrators change the template that determines the presentation of the Administrator interface. If you've added administrative templates, you'll find them in the folder.modulesfolder: If you've added any new or custom modules, they will be stored in this folder. Also stored in this folder will be any configuration settings that have been made for any of the modules. Archiving the folder will ensure you didn't miss anything.administration/modulesfolder: If you've added administrative modules, you'll find them in this folder.componentsfolder: Like the modules folder, this folder contains any custom installations and all of the user settings that apply to the components.administration/componentsfolder: Components may have installed an administration component for managing the execution of the extension. It will be stored in this folder.languagefolder: If you installed any additional language packs, they will be stored here.pluginsfolder: Any added plug-ins will be stored in this folder. Additionally, plug-in settings are stored in the folder.
Backing up these folders (in addition to the database) should preserve the core of your site should anything happen to it. After you reinstall the Joomla image on a revived server, copy the files back to their appropriate locations.
Security
Joomla's low barrier to entry makes it ideal for almost anyone with a foundation level of technical expertise (or willingness to learn). The drawback to Joomla's ease of installation and administration is the possibility that the site will be left wide open from a security standpoint. I have tried to cover some of the most obvious security loopholes in the installation and configuration chapters.
While a complete bullet-proofing of your site is beyond the scope of this book, there are a few guidelines that an administrator can follow to minimize the chance of a security breach. Remember that security is a moving target and hackers always find new ways into new technology. Therefore, be sure to watch the Joomla web site (www.joomla.org) for upgrades to the Joomla CMS. Often these upgrades will close discovered security holes, so you want to make sure you stay current.
To maximize your Joomla security, follow these general suggestions:
- Remove any
phpInfo()file from your web server since a hacker could execute it and gain a great deal of site configuration information. - Delete installation files from the server once installation is complete.
- Move the
configuration.phpfile outside the public access area (see the Security Checklist at http://forum.joomla.org/index.php/topic,81058.0.html for information on performing this advanced operation). This file contains your database access account and password; if accessed, it could provide a hacker with the keys to the kingdom. - Change the default names of the administrator accounts, both for Joomla and the MySQL database.
- Password protect directories with
.htaccessfiles (if you're running Joomla on Apache). - Restrict access to IPs and pathways with
.htaccess. - Configure PHP filters
mod_securityandmod_rewriteto block attacks. - Restrict MySQL accounts.
By making sure that these basic security barriers are in place, you dramatically reduce the chances that your site will be hacked or destroyed by outsiders. Performing a security spot-check periodically (view the Joomla Security Checklist at http://forum.joomla.org/index.php/topic,81058.0.html) becomes more important the longer a site remains on the Net. The longer a site operates, the more buildup there is of obsolete, unused user accounts (perhaps with significant privileges) and antiquated security settings (sometimes made temporarily for an extension installation and then forgotten).
Tip If you want some automated security checking of your site, there are some excellent open source tools. First take a look at the Joomla Tools Suite (http://extensions.joomla.org/extensions/1734/details), which provides a troubleshooting audit and site health check. If you're an advanced network user, be sure to consider running the open source Nessus (www.nessus.org/nessus) application, which will perform an in-depth vulnerability scan of your local or remote network. Nessus has a video demo online so you can see some of the features it provides.
And remember that one of the most powerful tools in preventing disaster if hacking does occur is a solid backup of the site. If someone does penetrate your site and unfortunately manages to bring it down or alter it in some unpleasant way, a secure up-to-date backup can make all the difference in the world.
Writable Directories
Making a directory writable, as you may have to do for search engine–friendly (SEF) folders and cache capabilities, can potentially create security vulnerabilities. The easiest setting for the directory is a chmod value of 750 (read/write/execute for owner, read/execute for group, and no access for others).
One method of minimizing potential danger is changing the owner group of the directory to the web server account and setting the directory's permissions to a chmod value of 770 (read/write/execute for owner and group; no access for others). That will seal off general users from having any access to the folder. Only the account with full permissions—the web server account—will have access.
Caution You should never have a directory set to a chmod of 777, which gives everyone write access. If you can control the security, even a temporary account with write access should be password protected.
Conclusion
Administration of a Joomla site is made much easier by the Administrator web interface, which is not only easy to use, but can be accessed from anywhere a browser connection is available (even most cell phones!). The various managers in Joomla (Template Manager, User Manager, etc.) effectively divide the tasks by the various administrative roles, such as managing the presentation, administering content, and configuring the actual site.
Although Joomla runs very well after the initial installation, it is important that a web master consider site administration a task to be performed at regular intervals. Backups, content reorganization, content archival, and security administration are just a few of the jobs that should be carried out periodically to keep the site running smoothly. One of the joys of using Joomla is the ease at which the site can be administered, since complex tasks such as content management and filing take only a few mouse clicks.
Much of the administrative interface you've already experienced. In this chapter, you examined each area of the Administrator interface (represented by the manager screens) in depth, so you can now understand the complete system. Proper administration is critical not just to good site functioning, but also to the presentation and organization of the site for visitors. In the next chapter, you're going to do something most Joomla site operators would like to do: created a personalized site template.