
CHAPTER 8
Web Community Features
In the world of Web 2.0 dynamic content, a web site will sustain a broader audience if it can cultivate an active virtual community. Fortunately, Joomla is an ideal CMS for building such a community. You have already seen some of the built-in extensions (such as the Poll module) that can provide interactive features. In this chapter, you'll examine other Joomla extensions that can offer users significant opportunities to interact with your site. You'll also learn about some of the benefits and problems of deploying the community technologies.
Contrary to the perceptions of many webmasters, adding a virtual community doesn't guarantee traffic increases. You can't simply set up a web site and leave it running as users supply content and the site's popularity rises. In fact, maintaining a virtual community often involves more work than maintaining a site that doesn't accept visitor contributions. However, like the interest paid on a deposit in a bank account, the work you put into the site will be compounded by the contributions of others.
Since you want your efforts to be multiplied, it is important to first define the direction where your Joomla site will be headed. It is vital that you have more than a general idea—you need a specific plan. Creating a site profile is a good way to figure out the role of your virtual community and its eventual destination.
A Site Profile
One of the most intractable problems for webmasters is the difficulty of pinning down exactly what they want their web site to be. That seems like it should be a simple task. For example, if you are shoe manufacturer Nike, the site should focus on shoes, right? Well, not exactly. A quick visit to the Nike site reveals that Nike isn't interested in a simple virtual store to sell shoes. The company is more interested in promoting an image that will lead to bigger payoffs down the line.
On the front page of the Nike web site, two-thirds of the screen is devoted to an expensive video that barely focuses on the shoes. What's on the remaining third of the home page? That space is equally divided among a shop-online image (of merchandise with the Nike logo, including a watch, a T-shirt, and a large basketball), a Nike podcast, and a customizable shoe-ordering link.
So is Nike doing anything wrong by dedicating so little actual screen area to selling shoes? I doubt it. Nike understands that people are unlikely to buy shoes often costing exorbitant sums of money just for the sake of having something to wear on their feet. They are selling style. They are selling cool. They are selling the sizzle and not necessarily the steak. And Nike knows that these intangibles are important to its image and should be the focus of the site.
Your Joomla site may not be selling anything but itself, but you still need to recognize exactly what message it should convey to target a specific type of visitor. In fact, choosing the target audience should be key in any site content design.
While these considerations are important to a static web site, to a web site community, they mean the difference between a thriving online metropolis and a virtual ghost town. For instance, a web site for high-end product designers shouldn't communicate a homemade and "cute" atmosphere. On the other hand, appealing to needlepoint aficionados with sleek modern styling could work against creating the online community you desire.
In this section, you'll learn how to put together a site profile to hit the target that you set for your site. The site profile doesn't need to be a formal document. It can be a three-ringed binder filled with notes and outlines. The important part of building a site profile is often not the profile itself, but the time devoted to the thought process that will give you a clear idea of what your community will be about.
Profiling a Site Visitor
The best way to begin any site profile is by thinking about your visitors. Who do you think they will be? Begin by listing general characteristics and then get more specific:
- Are they social or nonsocial in their offline life?
- Do they feel more comfortable communicating over the phone or through e-mail?
- What types of online sites do they already visit?
- What types of information are they looking for, or are they looking for interaction more than information?
If there is a magazine for the topic area that your site will focus on, check out the magazine contents and draw some conclusions about the type of reader interested in this information. Pay particular attention to the advertisements. Advertisers are "putting their money where their mouth is." Looking at the magazine ads will tell you the types of products and services that are purchased enough by your target visitors for advertisers to break even or better.
Your magazine research shouldn't end there. Many magazines do their own extensive market research to know their audience, and you can get some of this information for free. Magazines supply market research to potential advertisers to convince them to spend their advertising dollars. You can contact the magazine's advertising department for this information, although increasingly, you can also find it on the magazine's web site.
Nearly as important as your initial site visitor projection is a follow-up after you've launched the site to determine how close your profile matches the real visitors. Only by updating your initial conception to the mirror of reality will you be able to create a nearly self-sustaining community.
Looking at Your Community
One of the most overlooked factors in choosing a community is looking at the financial demographics. Most nonprofessional web developers begin with a topic that interests them and use that as a starting point for their site profile. However, this might not be the best place to start.
Returning to the Nike example, that web site may have initially targeted professional athletes. After all, for the price and the technical advantages of the shoes, a first glance might suggest that athletic professionals were the market Nike should pursue with its web marketing. However, the financial demographics of professional athletes clearly indicate only a niche market. But what about people who dream of being professional athletes? That could be a huge financial demographic.
Presuming that you don't have a market research firm to do an extensive statistical survey, you might do well to check online and see what the membership looks like for groups and associations related to your desired topic area. That may provide some concept of the depth of the market you want to cater to through a virtual community.
Considering How Much Interaction Your Site Requires
Community features can be thought of in much the same way as leverage in investing. To make a traditional investment of $10,000, you would have to pay $10,000 in most cases. With leverage, however, you can invest that same $10,000 as a down payment and control a $100,000 investment. If the traditional investment doubles, you've made an extra $10,000 from your initial investment. If your leveraged investment doubles to $200,000, you pay back the bank for the $90,000 loan, and you've made $110,000 from your $10,000.
Try to look at community features in the same way. If you put in an hour to create content on a standard web site, you now have the content that can be produced in an hour. In contrast, putting in an hour fostering community growth and expanding the ability of others to interact with the site leverages your time. Depending on the volume of visitors, you will gain the cumulative effort of others spending far more than one hour on expanding your site.
You don't need to look any farther than Wikipedia to see this principle at work. I really enjoy reading the work of author Jack Woodford, who wrote a series of how-to-write-a-novel books in the mid-1900s. I must have spent at least a dozen hours of unpaid time researching and creating a Wikipedia entry for him. Tens of thousands of other people are doing the same on topics that interest them.
If you can provide a community platform where people feel passionate about a subject, they will grow the site for you. It's not that there is no work involved; only that the work you do is leveraged by the other members of the community to create a much larger and more robust site than an individual or small organization could afford to do.
Table 8-1 shows common community features with estimates of the setup and maintenance efforts, and typical return value. Note that these features almost always require work and vigilance to obtain a proper payoff.
Table 8-1. Investment and Return for Joomla Community Features
Take a close look at how the Joomla extensions you're considering might be used to target your site profile and the possibilities of integrating several of them for best effect. Keep in mind that it is never a good idea to throw in everything and the kitchen sink when it comes to added community functionality.
Making Your Site a Home for Other Groups
Once you've incorporated interactive features into the site, you've created a vehicle for promotion. Most web sites lack community features either because the web provider does not offer them or (more likely) the webmaster doesn't know how they might be implemented.
One excellent method of mutually beneficial cross-promotion is to offer the features your Joomla site affords to another web site or special interest group. For example, if your Joomla site focuses on camping, offer a private forum to a local outdoors group. If your site sells archery supplies, let people from the local archery club post reviews of the various target ranges around the nation. If your site focuses on local environmental issues, offer to host a local conservation group's poll on what people see as the barriers to recycling.
Literally hundreds of special interest groups would love to have Web 2.0 features for their activity. They don't even need to be an organized group, thanks to modern search engine technology. For example, I enjoy going to library used book sales. Such sales are very poorly advertised, and there is no central list that identifies them in the Los Angeles area. One day in the future, I might create a Joomla event calendar where people could post such information. When I attend a sale, I often see about 10 percent of the same people at each event. That's easily a big enough group that if a half dozen people kept the calendar updated, hundreds of other people interested in these events would be attracted to that Joomla site.
Using the Community to Retarget Your Site
If you notice that a particular portion of your site is getting a lot more attention than expected (see Chapter 9 for information about site statistics), focusing the interactivity on that area can help "clue you in" to exactly who is visiting your site and what interests them.
If most of your visitors are looking at an odd posting on extending the life of a laser printer, wouldn't it be useful to know that those same people are looking for a good place to buy specialty paper (where you may have a web affiliate account)? Put up a forum in the area, and those people will tell you (and the world) what's on their minds.
Joomla! Technology for Building Web Communities
Once you have established your site profile and general plan, you can begin choosing the extensions that will provide the community features that you want. With Joomla, often a half dozen extensions provide nearly the same functionality, so choosing one can be difficult. The extensions highlighted in this section have been chosen for two reasons:
Availability for free download: In the interest of readers being able to download, test, and deploy extensions that add these features, I have chosen to include only those that are freely available. In some cases, fine commercial components match or surpass the capabilities of the extensions presented here. When possible, I have also mentioned popular commercial extensions that target the same field as the extension being discussed.
High user rating on the Joomla extensions directory site: Most of the selected extensions are the best-of-breed for use with Joomla. However, don't let this stop you from evaluating other extensions that may better cater to your virtual community needs. Application development, particularly open source development, is somewhat like a horse race, with the various contestants constantly jockeying for position. As time goes on, one extension will pull ahead in features and usability, only to fall behind the next month as new versions of other add-ons are released.
The community functionality that can be added to any Joomla site includes newsfeed subscriptions, user article ratings, web poll surveys, guestbooks, user comments, event calendars, and forums/message boards. None of these extensions rely on any other, so there is no reason to read the following sections sequentially. You can read only the sections about the technology that interests you.
Subscribing to Newsfeeds
While you may not want your site to become a portal (due to the high costs of such heavy web traffic), making a few well-chosen newsfeeds available on your web site can increase the amount of information available through your site and give it a sense of up-to-the-minute relevance. While search engine optimization experts argue whether the content will be considered part of your site and contribute to your search engine ranking, it certainly can't hurt your search placement.
In the previous chapter, you learned how to use the Feed Display module to show an RSS or Atom feed. However, finding appropriate feeds that provide information your visitors will want to read can be difficult. From your site profile, you should have a basic idea of the topics that will generally interest your target users. Try looking for newsfeeds related to your desired subjects on the following newsfeed search engines:
• www.syndic8.com • www.rss-network.com • www.2rss.com • www.rssmountain.com
Using these sites, you should be able to find at least a few feeds with topics relevant to your site. Try and keep a list of keywords that describe your site. That will help you to quickly search on the various feed directories for areas that match the focus of your site.
One of the best methods of evaluating a feed is to subscribe to it through a feed aggregator. By executing or accessing the aggregator every day, you will quickly get a feel for the level of content available from each feed and whether it will be useful to your visitors. Popular desktop aggregators include Sage (a Firefox newsfeed reader available at https://addons.mozilla.org/firefox/77), ThinFeeder Java RSS Aggregator (http://sourceforge.net/projects/thinfeeder), Straw for the Linux GNOME desktop (http://projects.gnome.org/straw), and the Windows-based SharpReader (www.sharpreader.net).
You can also use web-based aggregators, like Google Reader (www.google.com/reader) and Bloglines (www.bloglines.com), which require only that you set up an account to store the subscriptions you want to monitor. Internet Explorer 7, Firefox, and Safari all have built-in feed aggregators, but the standalone applications and plug-ins generally offer more features and more accessible user interfaces.
To find useful feeds, examine web sites that you visit often for RSS or Atom feeds. Newsfeeds available from web sites large and small are more common than you might think. You may be surprised that a favorite web site offers a feed that can be used for your Joomla site.
Allowing User Rating of Articles
Allowing users to rate articles is perhaps the first step toward allowing community feedback. This functionality is built in to the Joomla system, so using it requires only simple activation.
To enable article rating, in the Article Manager, click the Parameters button and select the Show option for the Item Rating/Voting parameter, as shown in Figure 8-1. Aside from articles that have been set up to specifically exclude article rating, all content on the site will now be available for user opinion.
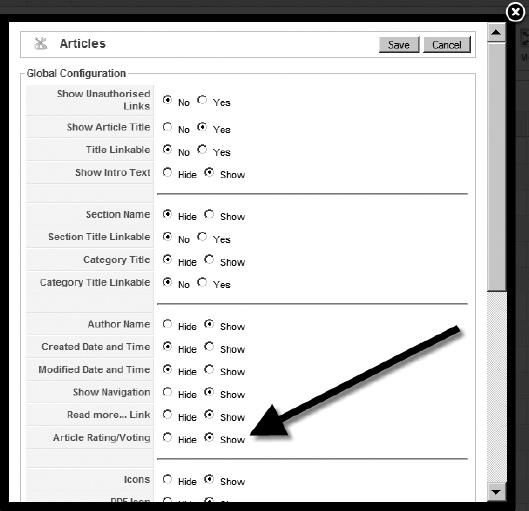
Figure 8-1. Clicking the Parameters button in the Article Manager will display the global Item Rating/Voting setting.
Each article will display a current number of rating votes and the rating average directly under the article title, as shown in Figure 8-2. A small rating submission form will appear directly under the current values, so new users may vote for their preferences. Note that depending on your configuration settings, the voting form may not appear on the articles when they are presented in summary form (such as on the Front Page), although the current rating is displayed.

Figure 8-2. The article rating in filled circles is followed by the number of current votes that generates that average.
The Joomla article rating setting can also be overridden for individual articles. However, you should avoid allowing rating on most articles and disallowing it on only a few—particularly articles that are controversial. Users will notice the missing rating, and your site may come across as disingenuous or give the users the impression that rather than creating a community, you are building an audience to listen to you preach.
Note The user rating system (like the polling system) included with Joomla is a simple implementation. If user ratings will be used prominently on your web site, be sure to check out the variety of alternative third-party implementations that are available from the Joomla extensions site (http://extensions.joomla.org). These offerings generally have many more features and a more powerful interface.
Adding Polls
Polls can be an effective way to get everything from general opinions to feedback on specific site features. Since Joomla makes polling so easy and convenient, you can add a poll to your site within moments of completing the initial installation. The sample poll that appears on the Front Page of a default installation demonstrates the elegance of this handy community feature.
Chapter 7 provided a general overview of the Polls component and module. While the overview described the basic features, implementing a poll is somewhat counterintuitive, so I'll walk through a poll setup here.
Tip The Polls component in Joomla automatically shows the current results of a poll. Other polling components available through the extensions site (http://extensions.joomla.org) have a variety of result display options based on user registration and security privileges. You can even make the results available to only the administrator. Except in the most limited cases, you should (at least eventually) exhibit the public results of the poll. Otherwise, visitors will seldom take the time to vote. There is no better way to kill participation in site polling than to never reveal the results to satisfy the curiosity of those who voted.
Creating a New Poll
To create a new poll, select the Polls option from the Components menu of the Administrator interface. Click the New icon near the top-right corner of the browser window to create a new poll, and then enter some options for the poll. For the EyeVesting web site, I wanted to ask some questions about the most attractive investments, as shown in Figure 8-3.
Before you leave the parameters screen, you should change the default Lag parameter. There are dangers of individuals attempting to stuff the ballot box, regardless of how trivial the subject matter of the poll. Joomla includes a few methods of guarding against poll rigging, such as preventing the same IP address from voting repeatedly in a certain period of time.
You can also limit the poll's appearance to pages displayed to registered members of the site. Of course, this may drastically limit the number of votes cast, making the poll nearly worthless. Therefore, I suggest setting the Lag parameter to a higher value to cut down on repeat votes. The parameter, set in seconds, has a default value of 86,400, which is equal to one day. That means the same user can vote every 24 hours. By setting the parameter around 30,000,000, you ensure that the same user will not be able to vote more than once a year.
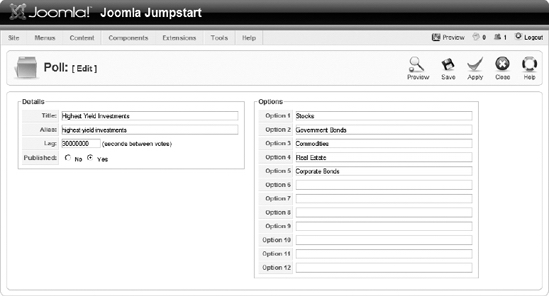
Figure 8-3. Create a poll that is more useful elsewhere in the site than on the Front Page.
Click the Save button to write your poll into the database, and you will be returned to the Poll Manager. Your new poll will appear in the poll list, but may show a red X icon, indicating that it hasn't been published yet. If it isn't published, click the red X icon to publish the poll.
If you refresh the Front Page in your browser, you'll still see the original poll. Although you've set up the poll in the Polls component, you haven't configured the linked Poll module, which actually handles the poll rendering. Open the Module Manager and click the module instance named Polls. In the module editor, the Module Parameters panel includes the Poll parameter, which is a drop-down list of currently available polls created in the component. Select your new poll from the list, and then click the Apply button to write the parameter setting into the system.
Refreshing the Front Page now will display the new poll, as shown in Figure 8-4. Each module instance (such as the Poll module instance you just modified) is created from the foundation mod_poll type. You can create another poll for display elsewhere on the site by creating a new instance. Just click the New button in the Module Manager and select the mod_poll module type.
Right now, the Poll module displays only on the Front Page. You can change the pages on which it appears by modifying the Menu Assignment parameter in the module's parameter panel.

Figure 8-4. The new poll will be displayed on the Front Page by the Poll module.
Setting the Display Menu for the Poll
If you left the parameters screen for the Poll module, return to it now. The bottom-left side of the screen shows a frame labeled Menu Assignment. The menu options list lets you select whether the module is displayed in all the menus, none of the menus, or the menus that are selected from a list. The list displayed below these options is set to Home by default, so the poll displays only on the Joomla Front Page. In the list box, select the Joomla! Overview menu. That will make the poll appear only when the Poll module is displayed by that menu.
If you refresh the Front Page, you'll see that the poll no longer appears there. However, if you click the Joomla! Overview menu, you will see the new poll rendered on that page.
Caution Information generated by polls can be of questionable real value and is difficult to rely on for authentic reaction. Many site visitors, even your most regular users, will ignore polls. Results can be skewed by casual visitors or zealots and may differ widely from the feelings of your general community. Therefore, the data rendered by an online poll should not be acted upon without careful deliberation.
Adding a Guestbook
Guestbooks are a technology that originated with the very genesis of the Web. When the Web was initially developed, almost every web site was made up of static read-only pages. People quickly realized that having a guestbook where visitors could enter a simple message or compliment made creating and updating a web site far more rewarding.
A guestbook can furnish an excellent way for visitors to contribute to your Joomla site. Most often, you'll find that entries are either complimentary or (even more valuable) suggestions on how the site might be improved. However, be sure to check the guestbook frequently, as spammers will occasionally find some way around the spam-protection measures.
One of the best Joomla guestbook extensions is an open source component called Phoca Guestbook (www.phoca.cz/phocaguestbook). It has the following features:
- Joomla editor interface for rich text posting
- Various configuration options for poster name display
- Preview of page before entry is saved
- E-mail interface for administrator and user notification of new postings
- Administrative specification of allowed HTML tags in post
- Spam blocking through a number of configuration settings (including both standard and math CAPTCHA image render confirmations before entry)
- Capability to ban specific IP addresses (so visitors who graffiti or otherwise deface the guestbook can be prevented from cluttering the text)
- Double-posting checking and prevention
- Administrator interface for guestbook configuration
You can install Phoca Guestbook using the Extension Manager, in the same way you add a standard component. Once installed, Phoca Guestbook will add its own menu to the Components menu of the Administrator interface.
To manage your guestbook, select the Phoca Guestbook ![]() Control Panel option to display the Control Panel, as shown in Figure 8-5. From this central interface, the administrator can jump to the other Phoca Guestbook panels. All menu options appear in the Control Panel. If you uninstall the guestbook, it will leave existing guestbook entries in the database for later Phoca Guestbook reinstallation and import.
Control Panel option to display the Control Panel, as shown in Figure 8-5. From this central interface, the administrator can jump to the other Phoca Guestbook panels. All menu options appear in the Control Panel. If you uninstall the guestbook, it will leave existing guestbook entries in the database for later Phoca Guestbook reinstallation and import.
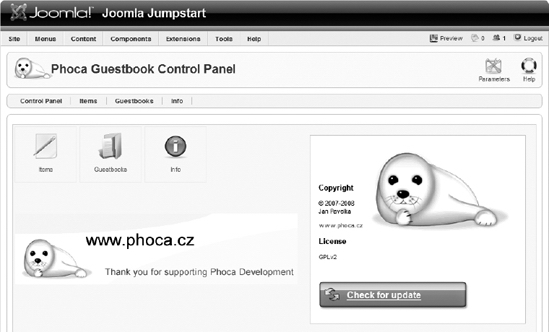
Figure 8-5. The Phoca Guestbook Control Panel is the launching point to access the other administrative panels.
Managing Guestbook Entries from the Items Panel
The Items panel provides a list of existing posts for selecting, editing, and deleting multiple posts. As the administrator, you can view all the existing guestbook submissions (as shown in Figure 8-6) and edit any guestbook entry. Like other Joomla managers, you can easily unpublish entries or filter the displayed list by various criteria.
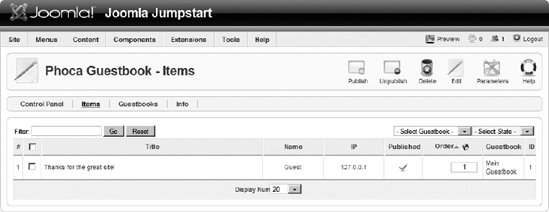
Figure 8-6. The guestbook Items panel lists all the existing guestbook submissions.
For guestbook entries from the front-end, the contributor can enter the title, author, and message using standard user interface fields. You may want to turn off the e-mail address and home page entries through the configuration screen so that you don't encourage spammers and unwanted site associations.
The entry screen in Figure 8-7 provides a much simpler version of the TinyMCE editor available for Joomla article editing. The editor for the guestbook provides basic formatting options for alignment, font styles, smilies, and numbered/unnumbered lists. However, the administrator entry screen has two differences: there is no spam protection image, but there is a Publishing tab that holds security settings for the entry.
When users attempt to post to the guestbook, they are presented with an anti-spam image and asked to enter the letters and characters displayed in the image. For the image to be generated, your web server must have GD2 activated in the PHP installation (see Chapter 10 for additional information about this interface). The double arrow button to the right of the anti-spam image allows the user to refresh the image verification in case the generated one is too difficult to read.
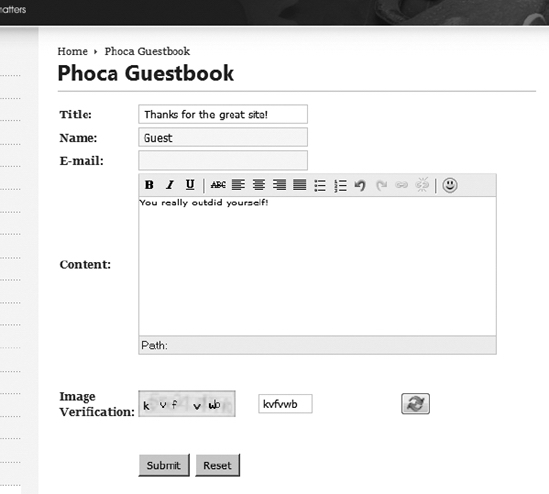
Figure 8-7. Creating a guestbook entry is similar to adding a content article to Joomla.
Managing Guestbooks
The Phoca Guestbook Manager allows multiple guestbooks to be used on a site. Like a Joomla category, a guestbook will organize entries for easy management or page specificity. All entries for a particular guestbook can be hidden by simply unpublishing the guestbook that contains them. New guestbooks may be created or existing ones deleted using a standard Joomla manager interface, as shown in Figure 8-8.
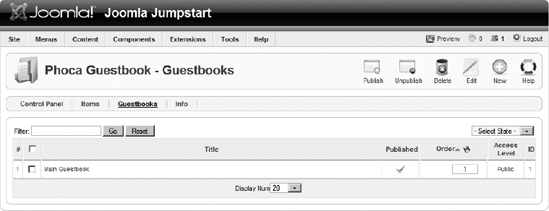
Figure 8-8. The Phoca Guestbook Manager lists all guestbooks currently held in the system.
Clicking a guestbook will display the guestbook parameters, as shown in Figure 8-9. You may notice that the parameters mirror those available for the configuration of a Joomla category. However, unlike a category, there are no menu-creation options available for "Guestbook List Layout" or "Guestbook Log Layout," so an individual Joomla menu must be specified for each guestbook available on the Joomla site.
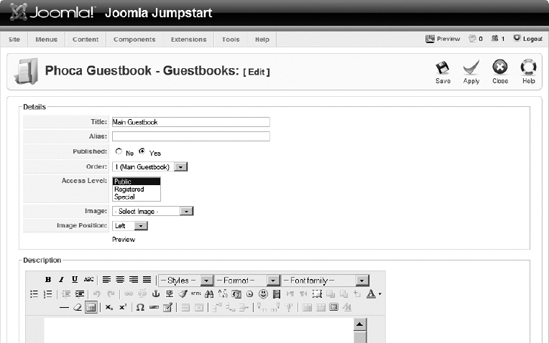
Figure 8-9. Adding or editing a Phoca guestbook is almost identical to setting up a Joomla category.
The Parameters icon on the Control Panel shows the setup screen for guestbook parameters, including general settings, posting selections, e-mail configuration, spam settings, and presentation parameters. As you can see in Figure 8-10, the first set of parameters governs the requirements for posting, including requirements for the entry of a title, a username, an email address, and valid content. You can also limit posting only to registered users or make the guestbook contribution available to all users.
The color settings allow configuration of the presentation for the guestbook entries (not the editor). These can be adjusted to mirror the color scheme of the site template.
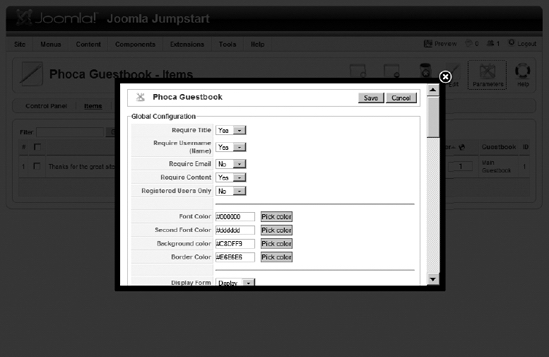
Figure 8-10. Clicking the Parameters button on the Control Panel will display the Global Configuration for the Phoca Guestbook.
There are a number of other important parameters available for configuration on this screen. The three restriction boxes, shown in Figure 8-11, allow you to limit content posting for profanity or user abuse. Configuration of these settings will prove crucial if you are to implement a guestbook effectively. Most powerful is the IP Ban box, which can help you limit spammers as well as those who post abusive or inflammatory messages. Conveniently, the Items panel of the Administrator interface lists the IP address of the poster in the IP column of the table, so ban lists are very easy to create.
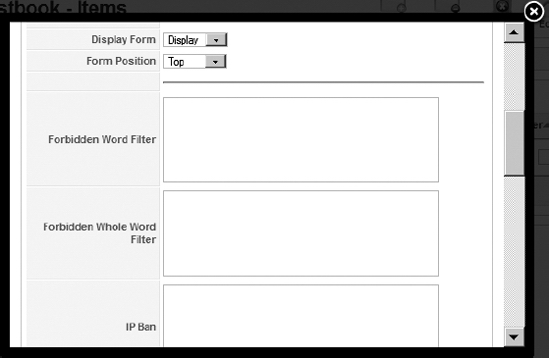
Figure 8-11. In the Global Configuration, you can create a list of prohibited words as well as ban messages from particular IPs from posting.
The Use CAPTCHA setting requires the user to interpret a series of letters and numbers and enter them into a text field before their message can be posted. CAPTCHA is an acronym for "completely automated public Turing test to tell computers and humans apart." It represents an image-generation technology that prevents automated bots (used by spammers) from interpreting the image.
The CAPTCHA settings, shown in Figure 8-12, determine how the verification image will be displayed. You can configure the several different types of images that will be generated, including Standard, Math, and TTF. Alternatively, you can tell the extension to randomize between two or more of these types. For the three main types (Standard, Math, and TTF), you have complete control over the character sets that will be used. This control is extremely useful if some of the lowercase characters, for example, are difficult to read.
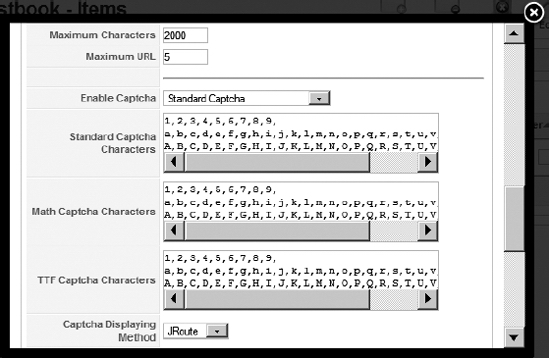
Figure 8-12. CAPTCHA settings let you refine the type and presentation of the CAPTCHA image.
The final configuration screen, shown in Figure 8-13, allows configuration of the editor, entry display, and administration. The editor used for entries can be either the stripped-down version of TinyMCE or a standard HTML text area. You can specify the exact size of the text-editing area.
Entries can be configured to display in a variety of ways. You can determine whether name and email of the contributor will be displayed, as well as the date format. The guestbook can make visible the input fields for the name and email on the form, since they will be automatically filled in for registered users.
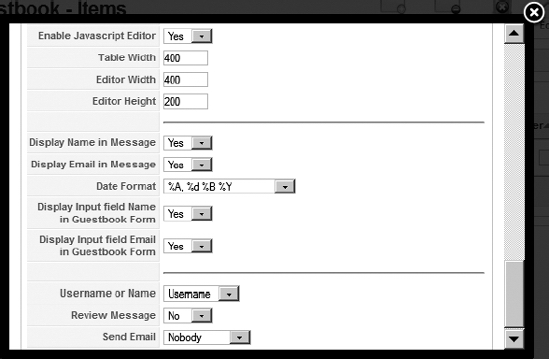
Figure 8-13. The final options allow configuration of the editor, entry display, and administration.
Note The Phoca Guestbook extension uses TinyMCE for rich text editing. However, most other guestbooks allow rich text (fonts, styles, etc.) to be specified in a message with BBCode. BBCode is a lightweight markup language that uses bracketed tags that surround the text to be styled, such as [b]This text will be bold![/b]. BBCode predates HTML tags for text formatting, but it remains in use because it is more difficult to page spoof with, and there is no ability to include dangerous script code (as JavaScript can be embedded in HTML).
Once you have the guestbook configured, you may want to post the first message to set the tone for future posters. You can even create a few entries that remain published for only a limited time (such as "Welcome to our new site!") so the guestbook doesn't seem dated after it has been available for a while.
Allowing User Comments
Allowing users to post comments to site articles is an extraordinarily effective way of retaining users of a virtual community if new content is added regularly. As you steadily increase the content on your Joomla site, providing visitors with the apparatus to comment on the new articles is a great way to promote audience participation.
This model has been used successfully on sites too numerous to mention. Some of the most popular comment-based systems are celebrity gossip sites such as TMZ.com and The Superficial. Sites for niche markets, such as Ain't It Cool News and Slate, also do very well. More merchandise-oriented sites, including CNET and Epinions, have found user commenting to be the magic formula for generating repeat traffic.
Whatever your market focus, if you have a slightly thick skin and regularly post new material (even if your updates are as simple as listing the new camcorders available), adding comment technology is the way to go. It takes simple administrative oversight to ban spammers and people who can't get along with others, so you won't spend a great deal of time managing the comments.
Tip Many of the popular sites that have comment functionality include a document that has clear rules describing what can and cannot be posted. Generally, these site guidelines have evolved over time to handle most of the problems that a comment site encounters. It is a good idea to visit a popular comment-based site and model your own comment guidelines on the battle-tested rules that a popular site has already refined.
The Joomla extensions site offers more than 20 comment extensions for free download. Among the most popular comment extensions is yvComment. It provides a full-featured comment interface and also allows the administrator quite a bit of control regarding the posting policy. The following are some of yvComment's more useful features:
- Administrator list of site-wide comments
- Available for over 35 languages
- Support of CAPTCHA technology
- Parameter limits to specify the maximum comments that can be added or displayed for an article
- System alert generated when a new comment is added
- Integration with the Community Builder extension (discussed later in this chapter)
- Easy installation
Installing yvComment
Installing the yvComment package takes several steps. Start by downloading the extension archives here:
http://joomlacode.org/gf/project/yvcomment/frs/?action=index
Download the archives that contains the plug-in, the component, and the module. The module is optional, but you will need to extract the component and plug-in, and install them via the Extension Manager. By default, when new plug-ins are installed, they remain unpublished. Therefore, to begin yvComment, open the Plugin Manager and publish the yvComment component.
Adding Comments
With the component installed and the plug-in published, yvComment should already be activated. Go to your Front Page and look at the bottom of any article. You should see the options that allow entry of comments for that article, as shown in Figure 8-14.

Figure 8-14. The Comments link will appear at the bottom of the article with the number of comments for the article displayed in parentheses.
If there are no existing comments, the Comments link will state "Add your comment." Clicking the Read More link of an article will display the entire article with existing comments directly below the content, as shown in Figure 8-15. You can see from the comments that the yvComment editor supports basic rich text formatting. Like the Phoca Guestbook extension, yvComment also supports CAPTCHA image generation to prevent automated spam programs from entering a comment.
If the current user is logged into the system (or if you configure yvComment to allow unregistered commenting), the comment editor will appear directly below any current comments, as shown in Figure 8-16. You can see that the TinyMCE editor of the Joomla system is used to enter comments. This can be disabled so that a generic HTML text area is used instead.
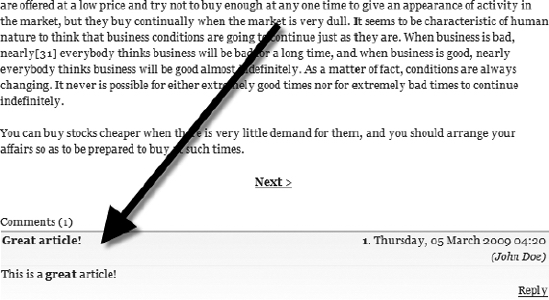
Figure 8-15. Comments appear directly below the associated article.
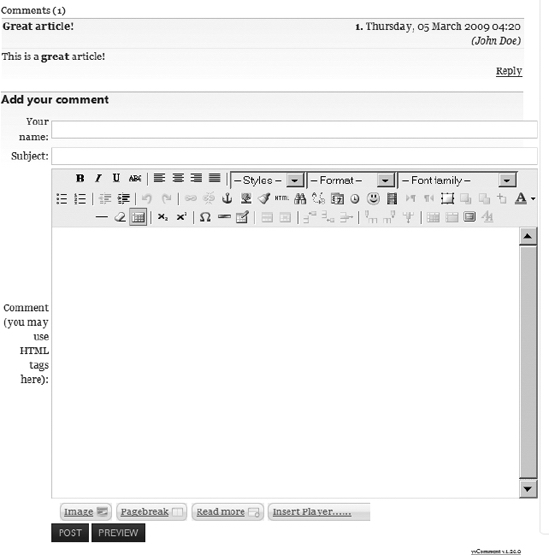
Figure 8-16. The current system editor (in this case TinyMCE) will appear below existing comments for visitors to add new comments.
If the user clicks the Preview button (see Figure 8-17), a formatted version of the comment will appear above the editor. The styling that the comment will use for display is configured in the settings for the plug-in.
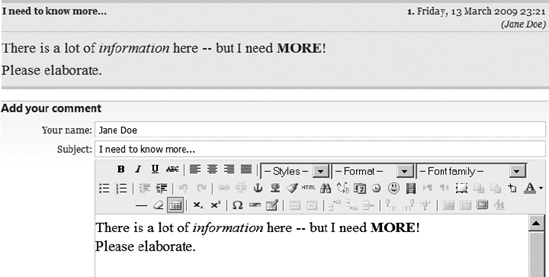
Figure 8-17. The preview mode will let the visitor see the comment as it is formatted by the system.
Finally, once the contributor has clicked the Post button, the comment will be submitted to the system. If yvComment has been configured so that the administrator must approve comments, the author will be thanked for the submission as shown in Figure 8-18. If immediate posting is set, the comment will be added to the existing list instantly.
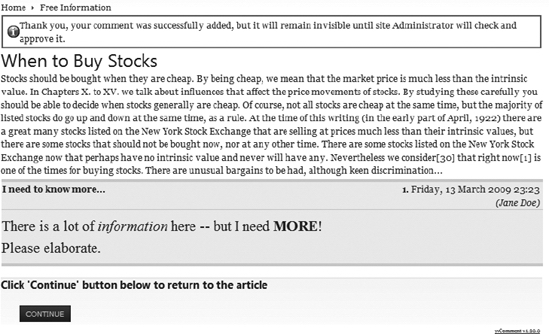
Figure 8-18. Final posting of the article will appear with a confirmation of the article save.
When you first add the comment technology, it will take a popular or controversial article to generate a number of comments. However, as your site's popularity and community grow, you will find an entire subcommunity develop among the regular posters. They will often post comments to each other about new articles, regardless of the subject addressed in the new comment.
Configuring and Managing Comments
One of the great features of yvComment is the substantial control it gives an administrator to govern how comments and posters are handled. From the Components menu, the yvComment option will display all of the existing comments in the system regardless of their post location.
The List of Comments screen, shown in Figure 8-19, lists comments that match the filter criteria. Clicking the large red X next to the article title will delete that article. If you click the edit button, the article will be displayed in the article editor. The editor holds the setting where an article can be published or unpublished for appearance following the article.
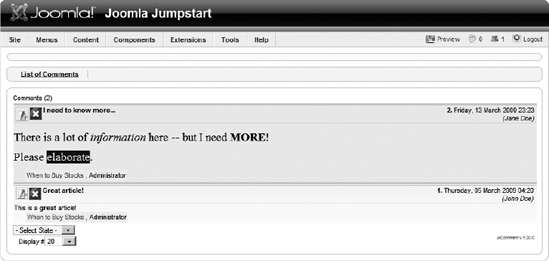
Figure 8-19. Through the List of Comments screen, existing comments may be edited or deleted.
Unlike many other extensions, the central configuration does not occur in the component extension, but rather in the parameters of the plug-in itself. Select the Extensions ![]() Plugin Manager menu option in the Joomla Administrator interface. You should see the yvComment plug-in listed with the other content plug-ins.
Plugin Manager menu option in the Joomla Administrator interface. You should see the yvComment plug-in listed with the other content plug-ins.
Click the yvComment link and you will see the first configuration screen (shown in Figure 8-20) to adjust the plug-in's extensive settings. The Use Content Table option lets you specify where in the HTML layout the comments will appear. For the actual storage of comments, yvComment allows you to select any existing Joomla section and category where the comments will be organized.
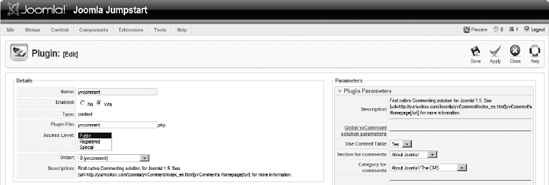
Figure 8-20. The first screen of the yvComment plug-in configuration allows display and filing configuration.
The second configuration screen, shown in Figure 8-21, lets you set where comments will be allowed. These three text boxes allow exacting specification of which sections, categories, and/or articles to exclude from the comment posting. As mentioned earlier in the chapter, think twice before excluding commenting on some site topics while including it on others. It is easy to obtain the reputation of censorship on the generally open World Wide Web.
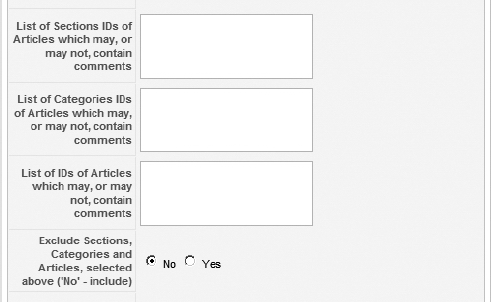
Figure 8-21. Posting of comments can be excluded from sections, categories, or even specific articles.
The third screen, shown in Figure 8-22, governs the presentation of the comments. You can specify the CSS file to use for output styling, as well as the addition of links and hiding of comment information.
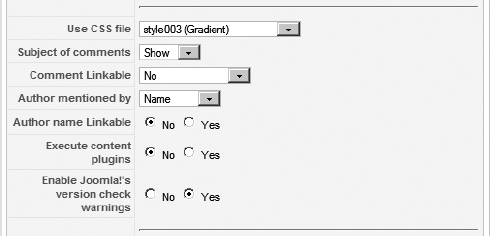
Figure 8-22. The presentation settings allow control over styling and link functionality.
The fourth screen, shown in Figure 8-23, provides the configuration settings for the actual editing and submission of comments. You can restrict whether comments can be made on other comments, allow only the administrator to post a response, restrict comments to only the original comment author, or provide complete threading of comments.
The Editor drop-down menu allows the selection of either the default WYSIWYG editor or an HTML text area. However, if the text area is selected, the two options that follow the editor setting ("Use Smiley form buttons" and "Use BBCode form buttons") allow users to use BBCode formatting for simple styling (smilies, bold, italic, etc.). Further options allow HTML styling, specify the maximum number of characters allowed in a post, and set the required delay between postings by a single user.
The final three options on this screen are very important for the site administrator. The policy of posting can be set to allow comments to immediately appear on the site, to appear immediately only for registered users, or to require all messages to be approved before they are published to the site. This setting will directly effect how much administration will be required for the comment portion of the site. Typically, if all messages are immediately posted, the administrator will seem to have less work. In reality, however, this will require a great deal of attention, as spammers and other undesirables regularly post to the comment section. On the other hand, requiring all posts to be authorized can tremendously increase the administrative burden. For most sites, the immediate posting of registered users is a fair balance between the two extremes.
Following the publish setting is the username notification list. This can allow the administrator and other moderators to be notified of new postings.
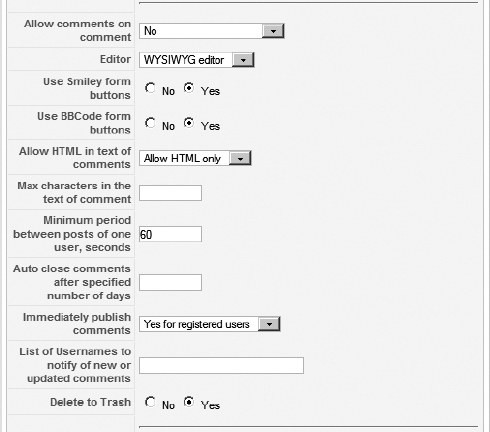
Figure 8-23. The comment submission settings allow configuration of items such as the editor to be used and the restrictions on immediate publication.
Allowing guest posting is a large decision that will have a substantial effect on whether your site will be a good target for spammers and bots. This section of the yvComment settings provides features to restrict the guest postings and discourage automated posting. Shown in Figure 8-24, the guest posting settings let you restrict the content and link capabilities of a post. You can enable CAPTCHA capabilities to further prevent unwanted posts.
The final section of settings lets you set how and where the visual presentation of the comments will appear. The positioning of the comments and comment editor can be specified when they are displayed on the Front Page, in the article view, and in other views. The comments can be set to appear inside the article box, outside the box, as defined by the template, or hidden. You can also add a Please Register link automatically to each comment section.
The yvComment package has an optional module to display the most recent comments in the style of the Joomla Newsflash module. You can place the module on the Front Page or another page to let visitors see a summary of the newest postings.
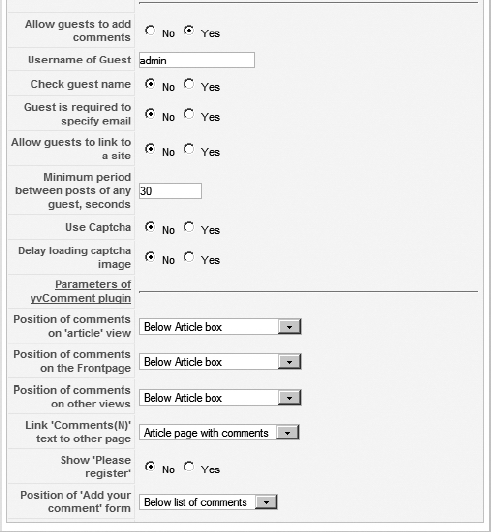
Figure 8-24. The guest settings can help restrict the power of unknown posters, and visual presentation of the comments can specify how and where the comments will appear.
Implementing an Event Calendar
A group or event calendar is an excellent opportunity for your site to become the central source for event information relating to your site's topic. It can also allow you to cater to specific geographic sectors of your target audience. If you've visited the extremely popular Craigslist web site (www.craigslist.org), you may have noticed that all classified and job postings are broken down by geographic area (Los Angeles, Bay Area, San Diego, etc.). Communities that grow within a geographic sector often have the most potential for depth.
Tip If you don't want to host the calendar on your site, Google offers a calendar service (www.google.com/calendar) that has the advantage of integration with the Gmail user interface, and the ability to create and send invitations, track RSVPs, and set up automatic event notifications, including mobile phone messaging. You can use the Wrapper module in Joomla to incorporate Google Calendar into your site.
The chief problem with an event calendar is the danger that it will remain empty. A calendar does no one any good and will attract few visitors if no events are posted. Therefore, when you begin planning your calendar, search out annual events that focus on your topic area. By setting these items up as repeating events, you can ensure that the event calendar always has entries on those days.
A full calendar can also create its own problems—chief among them is the possibility of overwhelming a search engine spider or a sitemap. When a search engine spider visits your web site, it may register the large number of links in the calendar and simply add your site to its slow spider queue. This can hurt the frequency of your site being spidered. Likewise, a sitemap may run into the thousands of links if the calendar is included on multiple pages. Be sure to archive older events and set up exceptions (in the sitemap components and robots.txt file) so that this doesn't become a problem.
Eventlist is one of the most well-regarded Joomla event calendars. It has an excellent CSS-based presentation, as shown in Figure 8-25. It also lets users search for specific events. The component supports native Joomla permissions for event creation and administration.
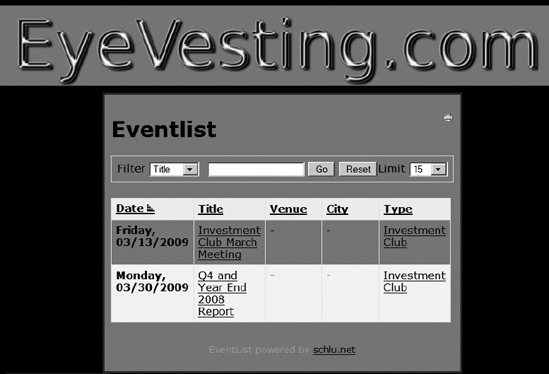
Figure 8-25. The Eventlist presentation adopts the settings of the default template and works across the spectrum of web browsers.
You can download Eventlist for free from the schlu.net web site, at www.schlu.net/eventlist-overview/downloads.html.
The central extension of Eventlist is a single component in the package archive, so you can install it through the Extension Manager. To allow access to the component, simply create a menu reference that links to it.
For event listings, Eventlist uses the Joomla WYSIWYG editor, so descriptions can be in rich text formats. Entries can be configured as repeating events or placed in privately viewable categories to allow complete access control over event viewing. Eventlist also has a different display option from the general calendar mode, in which events can also be viewed from most recent to least recent.
From the Eventlist Control Panel in the Administrator interface, shown in Figure 8-26, you can configure the component, set up categories (akin to standard Joomla categories), create events, edit calendar-specific CSS (akin to Joomla template CSS), archive events, add venues, add groups, and make changes to configuration settings.
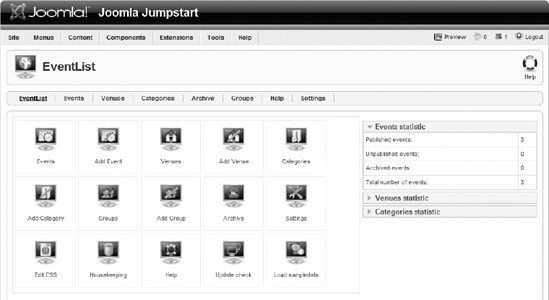
Figure 8-26. Use the Eventlist Control Panel to navigate to the various calendar functions.
Before you can create any new events, you must create relevant categories. Some common categories might include holidays, fairs, conferences, meetings, festivals, talks, movies, concerts, live music, performances, interest groups, and tours.
After you have added categories that suit your Joomla site, you can add and edit events in the event editor, shown in Figure 8-27. As you can see by the number of event parameters, an administrator can be fairly exacting in the parameters of the event. The repeat capabilities can set the repetition of an event to occur in subsequent days, weeks, months, or years. The repeat can be set to cease after a certain number of times or after a particular date.
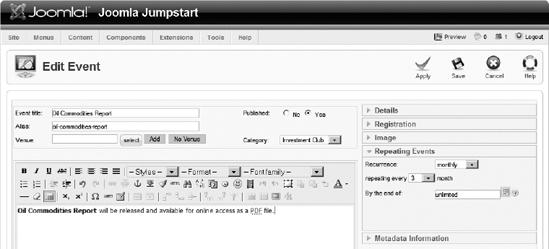
Figure 8-27. Create a new event and set up the date and time of the happening.
Eventlist has a central component, but also includes a number of add-on extensions, including the following:
- Eventlist module: This shows the most recent events in a module displayed in the form of a Recent Events panel.
- Eventlist wide module: This displays a wide list of all the events in the list. This is similar to the main component display, except as a module, it can be displayed anywhere on the page.
- Eventlist search plug-in: This augments the Joomla search system to include calendar events through the normal site search.
There are also a number of language packs available to localize the Eventlist presentation. At the time of this writing, there were 27 available, including Brazilian-Portuguese, Catalan, Croatian, Czech, Danish, Dutch, Finnish, French, German, Hebrew, Hungarian, Italian, Norwegian, Polish, Portuguese, Romanian, Russian, Spanish, Swedish, Traditional Chinese, and Ukrainian.
Creating an Active Forum/Discussion Board
Forums are as useful in generating a user community as they are fraught with peril. Anyone who has run a forum knows about the flame war brawls between users, the posting of content that has questionable legality (copyright-wise), the foul language, and the dead boards where no one posts for months. It is often a difficult balancing act trying to keep a forum flourishing and having it stay on message. Nonetheless, if a forum is successful, it can become a large storehouse of self-generated content.
Several forum components are available for Joomla. However, the main Joomla web site uses phpBB3, which is a pretty substantial recommendation. While phpBB3 is a PHP-based forum, it is not native to Joomla. Several bridge components are available to allow phpBB3 to run within the Joomla page.
Note Although phpBB3 is not native to Joomla, there are a number of excellent forum extensions have been customized specifically to Joomla's capabilities. One popular forum extension is Agora (www.joomlame.com), a lightweight Joomla forum application.
Since the Joomla development team has chosen phpBB3, and this web forum receives more than 1,200 posts per day and has over 60,000 active users, adopting phpBB3 seems to be a wise choice. The forum is free and open source, with many skins and templates available for use with it. Once the bridge is in place, phpBB3 can share the login database so that the user interaction with your site will be fairly seamless. The default skin for phpBB3, as shown in Figure 8-28, won't match your Joomla template, so you'll have it give the visitor the sense they're remaining on the same site.
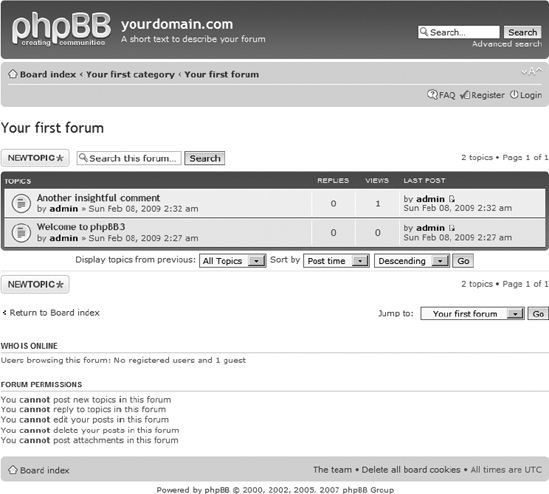
Figure 8-28. The phpBB3 forum software can be bridged into Joomla, but it retains its native presentation.
In addition to choosing a forum, you must also choose a bridge into Joomla. For phpBB3, this section will demonstrate the RokBridge extension.
Installing phpBB3
Before you begin the installation, make sure that your machine supports all of the prerequisites. If your server is already running Joomla and MySQL, you will very likely be able to install phpBB3 without any trouble. The minimum requirements include the following:
- PHP 4.3.3 or higher (it can be running on Apache or Microsoft IIS)
- MySQL 4.0 or higher
- The PHP
enginedirective set to On - The PHP
magic_quotes_sybasedirective set to Off - The PHP
session.save_pathparameter set to a valid, writable path - The PHP
upload_tmp_dirparameter set to a valid, writable path - The PHP
file_uploadsdirective set to On
Once you have established that your web server can execute phpBB3, you can download it from the phpBB3 web site, at www.phpbb.com.
Two basic download packages are available: full install or update package. Since I presume you've never before installed phpBB3, the full install will be required.
Tip As a web administrator, I've found it nearly always a good idea to keep the virgin installer of whatever new system I'm implementing. When I was first getting started, I would simply throw away the installer image file once it finished. I thought that the package could always be downloaded again later if I needed it. Several times after having a system fault, however, I found that the version used on the problem system was no longer available. The package had been upgraded, sometimes making it incompatible with the data and configuration of the older version. Worse still, the developer sometimes would simply evaporate, and I had no way of obtaining a critical installer. For these reasons, I suggest downloading and backing up the virgin installer just in case. Try to avoid web or Internet installers unless you have no choice.
For the RokBridge extension, you can find it at www.rocketwerx.com/products/rokbridge/overview.
To use phpBB3 with Joomla, you will need to extract the files from the package into a folder within the Joomla hierarchy. For simplicity, create a folder called /forum in the Joomla root directory. On the Windows platform, the path may appear something like this:
C:Program FilesApache Software FoundationApache2.2htdocsforum
Once you have extracted the files from the archive into this folder, you need to address it through your web server with a web browser window. The index.php file will automatically execute and begin the installation process. This first installer screen will display the intro screen (as shown in Figure 8-29), and you'll need to click the Install tab to begin.
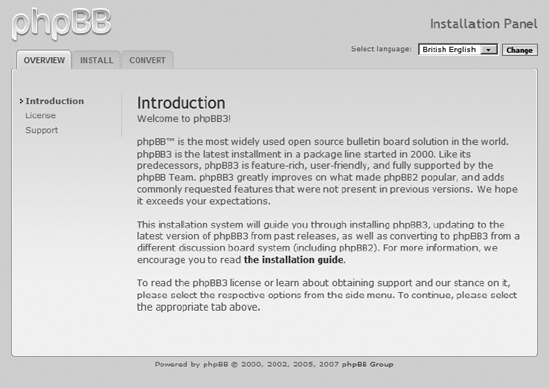
Figure 8-29. Click the Install tab to begin the phpBB3 installation process.
After you advance the installation information screen and the requirements check screen, the database configuration screen will be displayed (as shown in Figure 8-30). The phpBB3 installer will not create the database for you. The tables of phpBB3 can coexist with the Joomla tables in the same database, but I wouldn't recommend it. It is usually best to keep the databases of separate applications separate for reasons that range from backup considerations to optimization settings. I created a database called phpbb3 where the forum postings will be held.
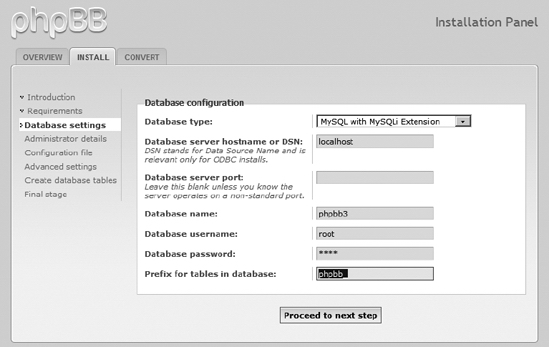
Figure 8-30. Create a database to hold the phpBB3 forum information.
The screen that follows allows you to create an administration account for the forum. Use the standard precautions (such as a varied password with numbers and letters) when choosing an administrative password, to make sure hackers won't be able to guess their way inside.
When you click the "Proceed to next step" button, the system will attempt to write a configuration file to the proper directory. If successful, the screen that follows will let you set advanced parameters such as SMTP server configuration and various server settings. It is fine to use the default settings, because you can always return for reconfiguration later. The final step will create the database tables that the forum will need to hold messages.
That's it! After the tables are created, installation is complete.
Running phpBB3
If you access the URL in a web browser, you can navigate through the forum, as shown in Figure 8-31. The phpBB3 application is a full-featured forum and can be run by simply creating a link within the Joomla system to this URL. However, you will lose many features, such as site navigation, if you don't bridge phpBB3 into your Joomla site, as described in the next section. Nonetheless, take a few moments to examine phpBB3 so you can have a clear idea of how it works.
Clicking a topic will display all of the messages within that topic, as shown in Figure 8-32. The display shows each message along with the user who originated it, how many replies have been made, the number of times the topic was viewed, and when the last posting occurred. If you have spent any time with forum software, you know how useful this information can be to frequent visitors.
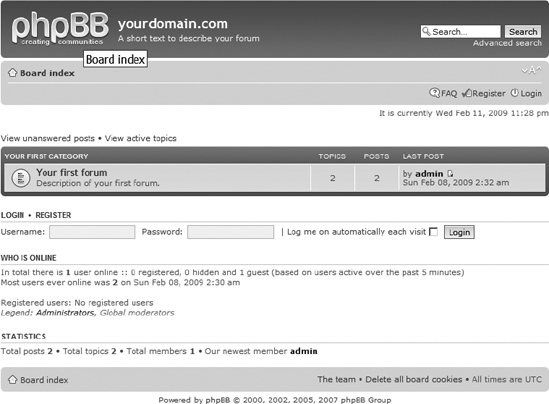
Figure 8-31. The message board home page shows the available topics and general statistics.
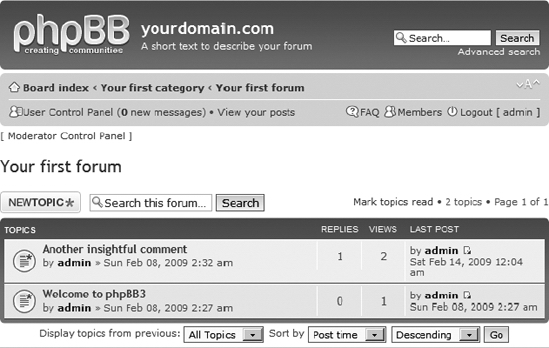
Figure 8-32. Each message within the topic displays summary information about the activity related to it.
Choosing to post a new topic displays a standard editing interface, as shown in Figure 8-33. The editor is not an advanced WYSIWYG interface like the ones included with Joomla. However, it can accept rich formatting within the message, displayed as attributes, as shown in the figure.
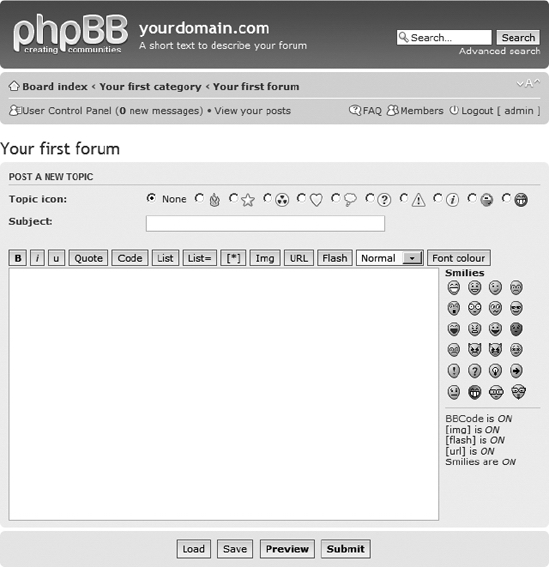
Figure 8-33. You can post a new topic through the phpBB3 editor.
You administer phpBB3 through the phpBB Administration Control Panel (ACP), as shown in Figure 8-34. To get to the administrator interface through the front-end, you will need to first log in as the administrator; a link will appear at the bottom of the page with the text "Administration Control Panel." Click the link and you will be asked to reauthenticate your login. From there you will be taken to the ACP.
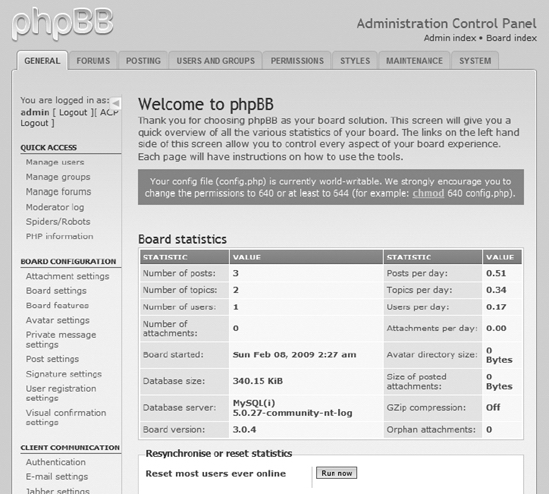
Figure 8-34. The phpBB Administration Center is extensive and allows substantial forum modification.
The configuration available through the ACP is actually fairly complicated, but the phpBB3 site has fairly extensive documentation and tutorials. It will take some time, but it is worth the effort to learn how to configure this robust system to match your exact specifications.
Installing the RokBridge Extension
Once you have the forum installation up and running, you will want to integrate it into the Joomla system. If you have downloaded the bridge archive (it may have a name like com_rokbridge-1.1.zip), you can install the bridge directly from that file.
Install the extension using the Extension Manager. The bridge will add a RokBridge item to the Components menu. Select the RokBridge item from the menu, and the current configuration parameters will be displayed (see Figure 8-35). By default, the path to the phpBB3 install will be set to distribution, as you can see in the figure. In my case, I have installed the forum in the /phpbb3 directory inside the Joomla root directory, so I entered phpbb3 in the path text box. Simply enter the path of your phpBB3 directory in the phpBB3 Path text box, and then click the Install link shown in the Action column of the table below.
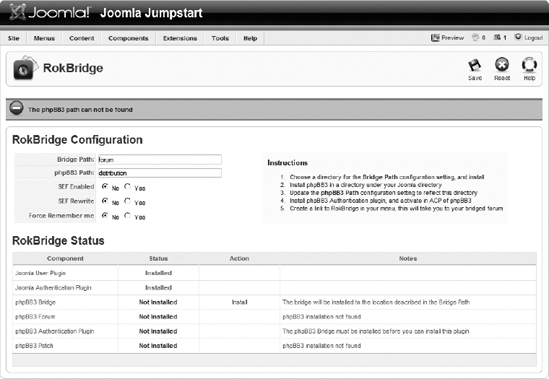
Figure 8-35. Set the path parameter so that the bridge will know where to find the phpBB3 installation.
The bridge should install itself, and the link will change to text reading "Remove." You can now click the Install links for phpBB3 Authentication Plugin and phpBB3 Patch (for the Mark All Forums Read option) to install those parts of the system. Note that if you install the authentication plug-in, after you finish with the RokBridge setup, you will need to activate it through Extensions ![]() Plugin Manager. Finally, click the Save button to store the path.
Plugin Manager. Finally, click the Save button to store the path.
To allow access to the forum from the Joomla interface, create a menu item that directs the user to the RokBridge component. To see the bridge in action, open a browser window and click the menu link that connects to the forum to display the Front Page. Be sure to go to the phpBB ACP to create a new forum that is available for posting. In the ACP, click the FORUMS tab and click the Create New Forum button to access the new forum interface, as shown in Figure 8-36.
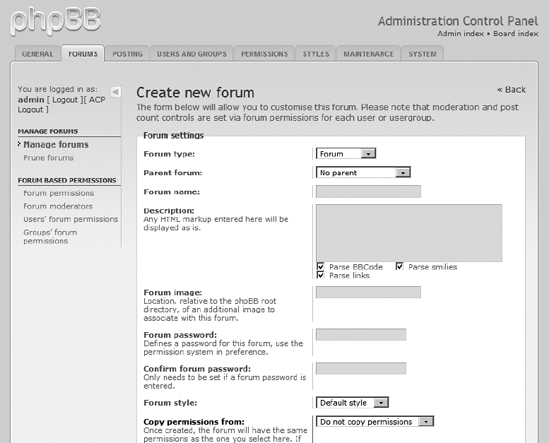
Figure 8-36. Define a forum in the ACP where visitors can post messages.
Adding a Suggestion Box
One thing I rarely see on web sites is a suggestion box. Visitors often want to make suggestions (and sometimes vent their frustration) when your site doesn't have what they're seeking. Don't you want to know? Surely, for the one person who makes a suggestion, there are literally dozens looking for the same content.
You can easily create a suggestion box by simply repurposing any one of the plug-ins available. For example, the comments or guestbook extension can be easily presented as a suggestion box, much to the advantage of your site. And if you add the suggestions, giving a small credit at the bottom of the page will reinforce site loyalty.
Since a suggestion box is an easy application to build, you will build a component in Chapter 13 to add a suggestion box to your web site.
Tip When any suggestion is made, send a "thank you" message, either automatically or manually. No one likes to take the time to make a suggestion only to feel ignored. You don't have to take the suggestions, but do make sure to thank people for submitting them.
Using Community Builder
Community Builder (CB) is one of the most popular Joomla extensions on the Web because it provides wide-ranging user management features. User management on the default Joomla system can be somewhat primitive, and CB fills out the user management and user profile information. The open source CB extension adds the following capabilities to Joomla:
- Robust login system with workflow process for authentication
- User profile capabilities, including extended user fields and the ability to add custom fields and tabs
- Summary list on the user profile page, showing all posts and article submissions by the user
- Connection paths between users, including user lists
- Ability to upload user avatars
- Individual user page contributions through blog entries and custom user pages available through bridge plug-ins
- Complete plug-in architecture for adding capabilities such as CAPTCHA, Google Map (through Joogle) functionality, PonyGallery image display, instant message status, and event sessions tracking
CB is so popular in the Joomla world that many other extensions integrate with the login system it provides. Some of the extensions include Auction Factory, JoomSEF, JoomGallery, and phpBB3.
Installing Community Builder
Before you can download CB, you need to register on the Joomlapolis (www.joomlapolis.com) home page. Without registration, you can enter the Downloads area, but the links to the individual download packages will be disabled. After you register, the site will send a confirmation e-mail message with a link that will confirm your user account. Once confirmed, you will be able to download an archive named something like CBuilder1_2_unzip1st.zip, which contains the complete CB package.
The CB package consists of several extensions that work in concert. The default installation includes the following:
- Comprofiler: The central component retains the name used by CB when it was initially released. This component provides the central user interface and display for CB interaction.
- CBlogin: This module replaces the standard Joomla login on your Front Page to allow users to register, log in, and log out of the CB system.
- Mod_comprofilermoderator: This module handles the workflow of user registration and specifies the moderator responsible for individual registration.
- Mod_comprofileronline: This module displays a list of CB users that are currently logged into the site.
To install CB, use the Extension Manager to install comprofiler.zip and cblogin.zip. If you are going to be using the moderator functions, make sure you also install mod_comprofilermoderator.zip.
After these extensions have been successfully installed, you will need to disable the standard Joomla login system. Open the Module Manager and unpublish the Login Form module. While still in the Module Manager, publish the CB Login module. If you open a browser window and display your Front Page, you will see that the CB Login module has transparently replaced the standard login at the bottom of the left column, as shown in Figure 8-37.
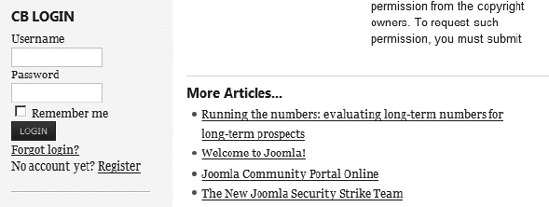
Figure 8-37. CB Login replaces the standard Joomla login.
You can log in now and see how the traditional registration process occurs. If you create a menu that connects to the CB component (Comprofiler), clicking the link when you're logged into the system will display your user profile page, as shown in Figure 8-38.
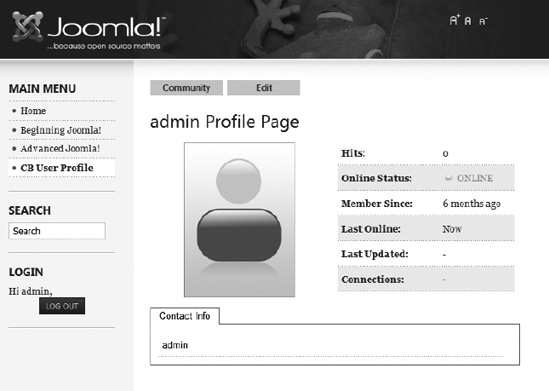
Figure 8-38. A logged-in user will see his personal profile page when viewing the main CB component.
In the Administrator interface, the Community Builder submenu provides the following options:
User Management: This displays the User Manager, which allows you to perform a number of tasks in relation to user records, including creating, editing, searching, enabling, confirming, and approving.
Tab Management and Field Management: These options allow you to make custom additions to the user profile (perhaps the most popular feature of CB).
List Management: The List Manager interface allows you to create new user lists. Lists can be sorted by one or more of the user fields and can include up to four columns (each column can contain one or more values). List filtering and group access rights can also be defined.
Plugin Management: The Plugin Manager shows the large number of plug-ins that are included with the default installation, as shown in Figure 8-39. You can find a number of additional third-party CB plug-ins for download and installation on the Joomlapolis site, in the Add-ons (3PD) section of the Downloads area.
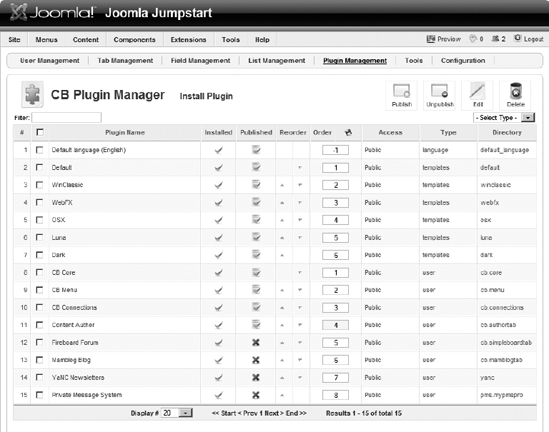
Figure 8-39. CB installs a significant number of plug-ins and allows installation of additional ones.
Tools: The Tools Manager lets you load sample data, synchronize the existing Joomla user table with the CB user table, and test the CB databases for integrity.
Configuration: The Configuration Manager lets you modify parameters for everything from the user profile display, to the registration workflow, to the moderator interface.
If you need more advanced user management than that provided by Joomla (and most community web sites will), you will want to download and install CB. Although the registration system independent of Joomla's standard user table can present some challenges, the extra functionality provided makes it worth the effort.
Conclusion
The extensions you can add to Joomla can enable your web site to host a virtual community. With proper background research and a site profile to guide the site content, you can substantially increase the possibility that your Joomla site will become a real web traffic center.
When you decide to create a web community, you will still need to decide how much interactivity you want to make available to the visitors and how much time you are willing to spend administering the community features.
The content of a traditional site is determined only by the administrator and specially designated contributors. In contrast, a virtual community has the ability to add content, and that renders as much danger as opportunity. Without a watchful eye and proper supervision, a web site can become like an errant child and turn in a dark direction.
Before you deploy the virtual community features, be sure that you are willing to dedicate the time and energy to properly maintain the site. Otherwise, you may one day find that your site has been taken over by distasteful or even illegal content. If you do cultivate an online community, the results can be a thriving hub of growth for your Joomla site.