
In the last chapter, we showed you the fundamentals of Qt as a porting layer and graphics environment. With what you learned, you can begin to design and build applications, but there's still quite a bit Qt offers that you haven't seen yet, some of it essential to most applications, we touch on that in the last chapter and expand upon it here.
This chapter shows you how to do more with Qt: including application resources, incorporating user actions in your application's user interface, implementing a custom widget, integrating Qt with web content, and accessing hardware features such as the positioning subsystem in the handset. We begin by discussing each of these facets of Qt individually with code snippets that demonstrate their use, and then we close the chapter with a revised version of Shake that shows how to integrate what you've learned in a running application.
For all but the simplest of applications, application resources—whether text, data such as XML-encoded default configurations, images, or sounds—play a key role. Over time, different operating systems and application frameworks have tackled the problem of carrying resources differently; some using parts of an application's binary, others using data files in specific locations or hidden from the user.
Qt provides a simple solution to the problem that works across all platforms, encoding resources as a part of the application binary's static read-only segment. Qt utility classes that deal with files can load any application resource as well. Qt accomplishes this by providing a resource compiler, rcc, as part of its tool chain; the resource compiler takes a collection of resources you specify and includes a copy of the binary data for each resource in the application binary. At runtime, you access the resources using QFile by providing a file path to the resource as defined in the collection of resources at compile time. You simply need only precede the path to the resource with a colon character to indicate that the path is to a resource instead of a file on the file system. Because most Qt classes that work with data can take data from files, in practice loading data from application resources is trivial for you to implement.
The Qt resource system stores your resources in a tree within your application, so you can create a logical hierarchy of resources, just as if they were on disk. The resource collection file lets you specify the relationship between the source resources in your project and the destination in the resource tree, although for simplicity it's usually best to have your source representation match the resource tree at runtime so you're less likely to be confused.
As you saw briefly in the previous chapter, including resources in your Qt application is especially easy if you use Qt Creator; to begin, you need to define a collection of resources to include. In Qt Creator, you do this by right-clicking the project in the Projects pane, and then choosing "Add New..."
When using the editor, you specify a resource's path in your source file hierarchy, the file name of the resource, and its path in the application resource tree. You can also provide a language, indicating that the resource should be loaded only when the specific language is active—handy if you're localizing your application with locale-specific icons, for example.
While the Qt Creator editor suffices for making small-scale changes to an application's resource collection, it's handy to understand the internal representation. Once you do, you can create tools to manage larger bodies of resources if your application requires it. A collection of resources is specified as a simple XML file with the suffix .qrc, like this:
<!DOCTYPE RCC><RCC version="1.0">
<RCC>
    <qresource prefix="/images">
        <file>images/map.png</file>
        <file>images/smallmap.png</file>
    </qresource>
    <qresource prefix="/js">
        <file>init.js</file>
    </qresource>
</RCC>
The root-level RCC node indicates that the file contains a collection of Qt resources. You indicate each path prefix in the resource tree using a qresource node; there can be any number of these nodes in your resource collection. In the qresource nodes are one or more file nodes, each providing a path (relative to the .qrc file) to the file that should be included as a resource. In this example, there are three files in two tree locations—two images in the images node, and a single (presumably JavaScript) file in the node named js. The images originate in the application sources' images directory, while the JavaScript file comes from the same directory as the resource collection file.
When working with multiple languages, the qresource node includes a lang attribute, set to the International Standards Organization (ISO) two-letter code for the language (such as "en" for English, "de" for German, and so on). If you specify a resource with a lang attribute and that language is not active at runtime, the resource loader will load the resource without any lang attribute, giving you a succinct way to specify both an international default and localized specific resources.
When you add a resource collection file to your project using Qt Creator, it will automatically update your project file by adding a RESOURCES declaration containing the path to your resource collection. In turn, Qt Creator uses qmake to create appropriate make file directives to compile the resource collection and include it in your application binary.
In general, there is nothing specific that you need to do at runtime to access your application resources, other than provide a path to a resource file in the same way you'd provide a path to a file on the file system. The path to a resource always begins with a colon, like this: ":/images/map.jpg". You can provide a resource path to any API that takes a file path, including not just QFile, but other classes, such as QPixmap, which loads an image as a map of pixels (we'll have more to say about QPixmap in the next section, "Implementing a Custom Widget"). For example, here's a snippet from the implementation of a custom widget that loads an image from the application resource and draws it:
QPixmap map(":/images/map.jpg");
QPainter painter(this);
painter.setRenderHint(QPainter::Antialiasing);
QPoint pt(0,0);
painter.drawPixmap(pt, mMap);
Of course, in practice you'd want to load the pixmap once—say, at initialization time—rather than each time you paint the pixmap, but you get the idea.
It's one thing to use Qt's components to trigger actions—as you saw in the last chapter, both simple controls like buttons and complex ones like list views emit signals when the user interacts with them. However, there are times when you want to embed a call to an action within a screen, rather than attach the operation to a specific widget. For example, many applications have both list views and detail views, and you may want to have a means within the view to switch between views. (Shake does this, as you see later in the section "Putting It All Together".)
Rather than forcing you to handle this on a platform-by-platform basis, Qt provides an abstraction called an action that you can attach to a specific window. The Qt run-time library then performs device-specific gymnastics to present the actions you specify in device-specific ways, ensuring a common look and feel between Qt and other applications on the mobile device. To understand how this works, and to get a better feel for how your application fits with the rest of the device's user interface, it's worthwhile first to take a closer look at Qt's concept of a main window, and then delve into Qt actions in more detail.
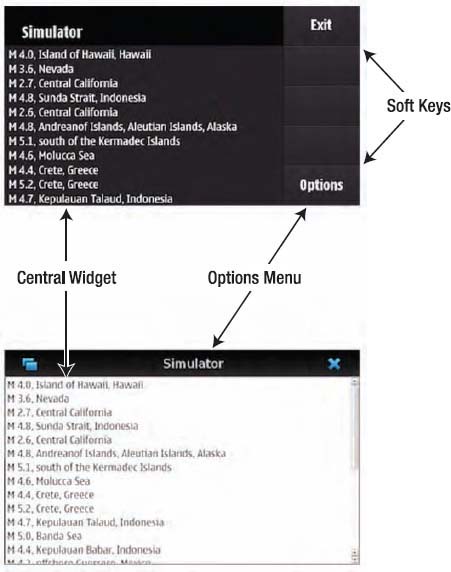
Figure 5-1 shows the layout of a typical Qt application's user interface on both Symbian (top) and MeeGo (bottom) devices. Both layouts reserve space for the following key components:
The status bar, with annunciators for signal strength, GPS activity, new message alerts, and so forth. (These aren't shown in the diagram, which was taken from the Qt Simulator.)
A trigger for the options menu of programmatic actions attached to the main window.
The central widget, which occupies the bulk of the screen.
In addition, on Symbian devices there's room for two soft keys that lie below the screen's content region.
This layout is in turn a refinement of the Qt main window layout for desktop, which includes space for menu bars, toolbars, a dock widget, the central widget, and the status bar. On a mobile device, it's obvious that there's simply not enough room for all of these, so to simplify the user experience, Qt on mobile devices strips out all but the notion of a single menu and the central widget.
When working with QMainWindow, Qt's class that represents your application's main window, you should be aware of three methods that help you manage this organization of your application's user interface.
The first two are the centralWidget and setCentralWidget methods. They let you get the currently established central widget and set it to a new widget. Your central widget can be—and often is—a single widget, such as a QListView or QWebView. If you need a more complicated layout, you can use a composite widget with layouts. Here's where Qt Creator really shines, because you can use it (simply right-click the project
The final method to be aware of is menuBar, which returns an instance of the Qt menu bar that hosts the options menu. Historically from the desktop, this menu bar would have multiple menus (e.g., "File," "Edit." and so forth), but on Nokia's mobile platforms, these menus are collapsed into the single options menu. You'll add actions to the menu bar that represent user actions, such as switching from one view to another.
Qt defines the QAction class as an abstraction of a user action. Actions act as containers for the notion of an action, which has user representations such as its menu text. On desktop platforms, actions bear a lot of additional optional information, including icons, status text, shortcut keys, and tool tip text. On mobile devices, all you'll care about mostly is its menu text, because most of the time you use an action, you are attaching it to a main window's menu bar to represent an options menu item.
Note
Any widget can bear actions, however, but how widgets actually visualize and use those actions depends on the widget. For example, a toolbar collects actions and shows the actions as icons, while the options menu uses less space, but isn't immediately obvious or accessible to the user.
Using an action in the context of an options menu is easy: simply create it and add it to the main window's menu bar, like this:
QAction showListAction = new QAction(tr("Show List"), this);
    mMainWindow->menuBar()->addAction(showListAction);
Actions emit the triggered signal when the user selects the action, so it's also necessary to connect the action's triggered signal to something that can handle the action, like so:
connect(showListAction, SIGNAL(triggered()),
                 this,           SLOT(handleShowList()));
These four lines of code create an action that appears as the options menu item "Show List," add the action to the options menu, and then connect the item to the current class's handleShowList. So when the user selects the "Show List" item from the options menu, Qt invokes the method handleShowList. Note that by setting the showListAction's parent to this, there's no need to track it globally; when the creating object reaches its end of life, the Qt memory manager will destroy the action as well.
With Qt's rich collection of widgets, you might think there isn't much need or room for you to create your own widgets, but there are two reasons you might want to. First, there may simply not be a widget with the appearance and behavior your need; creating a new widget by composing simpler widgets or by performing the widget drawing and event handling yourself lets you create an entirely custom widget. Second, creating a custom widget is the trick to performing your own drawing in an application using other widgets. Qt provides the QWidget class, a base class to all widgets; when you create a widget, you subclass QWidget and override specific methods to indicate how your widget should set its size relative to its layout, handle incoming events, and paint its contents.
To begin, your custom widget needs to implement QWidget and include the Q_OBJECT declaration. Listing 5-1 shows a trivial example:
Example 5.1. A trivial widget
class MyWidget : public QWidget
{
    Q_OBJECT
public:
    explicit MyWidget (QWidget *parent = 0)
        : QWidget(parent) {}

protected:
    void paintEvent(QPaintEvent *) {
        QPainter painter(this);
        painter.setPen(Qt::blue);
        painter.setFont(QFont("Arial", 18));
        painter.drawText(rect(),
                         Qt::AlignCenter,
                         "Hello world");
    }

private:
    Q_DISABLE_COPY(MyWidget)
};
This widget simply paints the message "Hello World" at its origin. It does, however, demonstrate the basic requirements you must fulfill to provide your own widget:
Your custom widget must inherit
QWidget.Like any
QObject-based class, your widget must include theQ_OBJECTdeclaration in its class definition.Your custom widget implements its functionality by overriding parent methods in
QWidget. As you'll see in the section "Handling Incoming Events" later in the chapter, many of these methods are event handlers for specific Qt-based events passed to your widget.Instances of widgets are best thought of as unique objects, and thus can't be copied. To prevent the compiler from including default copy constructors for your widget, use the
Q_DISABLE_COPYmacro in private declarations in your class to ensure that the copy constructors for your widget remain private.
Previously you've learned about Qt's system of layouts, which let you specify how widgets arrange themselves in a container. A key part of the layout system is how widgets indicate their size preference and policies to the layout manager. They communicate this using two methods: sizeHint and sizePolicy.
The sizeHint method provides a hint to the layout manager how big the widget would like to be. It returns a QSize, which has width and height member functions to provide the dimensions, along with an isValid function that indicates whether the size is valid or not. (It also has convenience methods for performing arithmetic on sizes, including scaling a size to fit within a predetermined width and height.)
How the layout system interprets the sizeHint depends on the sizePolicy, which can have the following values for each of the horizontal and vertical axes:
When the value is
QSizePolicy::Fixed, thesizeHint-returned value is the only acceptable alternative, so the widget can never grow or shrink.When the value is
QSizePolicy::Minimum, thesizeHint-returned value is minimal and sufficient. The widget can be expanded, but there is no advantage to it being larger.When the value is
QSizePolicy::Maximum, thesizeHint-returned value is a maximum, and the widget can be shrunk if other widgets require the space.When the value is
QSizePolicy::Preferred, thesizeHint-returned value is best, but the widget can be shrunk or expanded and still be useful.When the value is
QSizePolicy::Expanding, thesizeHint-returned value is a sensible size, but the widget should get as much space as possible.When the value is
QSizePolicy::MinimumExpanding, thesizeHint-returned value is minimal and sufficient. The widget can make use of extra space, so it should get as much space as possible.When the value is
QSizePolicy::Ignored, thesizeHint-returned value is ignored and the widget be made as large as possible.
The widget returns these values when the layout invokes sizePolicy, which returns a QSizePolicy instance. Of course, you can override a specific widget's desired horizontal or vertical size policy by calling setSizePolicy. But in general when creating your own widget, it's easier to override sizePolicy altogether. Expanding our previous example, Listing 5-2 shows what we might write, with the methods you've already seen elided for brevity.
Example 5.2. Handling size preferences in a custom widget
class MyWidget : public QWidget
{
    Q_OBJECT
public:
    explicit MyWidget (QWidget *parent = 0) ...

    QSize sizeHint() {
        return QSize(80, 60);
    }
    QSizePolicy sizePolicy() {
        return QSizePolicy(QSizePolicy::MinimumExpanding,
                           QSizePolicy::MinimumExpanding);
    }
protected:
    void paintEvent(QPaintEvent *event) ...

private:
    Q_DISABLE_COPY(MyWidget)
};
A widget with these methods would start small, filling a rectangle 80 pixels wide and 60 pixels tall, and grow to fit whatever space the layout could provide.
In addition to the signal-slot mechanism (which we discussed in the previous chapter in the section "Understanding Signals and Slots"), Qt provides for decoupled one-to-many application signals, Qt provides a rich event system based on its QEvent class and subclasses. All Qt applications have an event loop that accepts incoming events from the native system's event pump and converts those events to QEvent instances (or a QEvent subclass). It then forwards the events to appropriate receivers through QObject::event. The event receipt method in Qt. QObject::event (or its delegate) can choose to accept an event, handling it and marking it as accepted using QEvent::accept. Or it can ignore the event, in which case the event may propagate elsewhere (such as to a containing parent widget).
Tip
Don't confuse events and signals. They're complementary, but very different. A signal lets you set up a one-to-potentially-many notification by connecting a signal to one or more slots; events are directed to a specific receiver, usually via the parent-child layout of the widget hierarchy and the widget that has focus. While both use method dispatches in their implementation, signals go through Qt's metaobject system, while events passed through straight-up inheritance and method dispatches. In many cases, lower-level events sooner or later get transformed to higher-level signals. For example, a mouse-up event on a button will result in a clicked signal that you can easily process in your application.
The QWidget class provides its own event method, which internally checks the type of incoming events and calls one of a number of delegate methods, depending on the type of event. Table 5-1 shows a number of the events you likely want to intercept and handle in your widget.
Table 5.1. Common QWidget Events and their Delegate Methods
Event | Delegated to | Reason |
|---|---|---|
|
| Invoked when the widget is closed |
|
| Invoked when the widget is focused |
|
| Invoked when the widget loses focus |
|
| Invoked when the view system hides the widget |
|
| Invoked when the user presses a key and a widget is focused |
|
| Invoked when the user releases a key and a widget is focused |
|
| Invoked when the widget receives a double-click |
|
| Invoked when the user moves the mouse or drags on a touch screen |
|
| Invoked when the user presses a mouse button or presses the touch screen |
|
| Invoked when the user releases a mouse button or releases the touch screen |
|
| Invoked when Qt needs the widget to draw itself |
|
| Invoked when the widget's size changes |
|
| Invoked when the view system shows the widget |
You've already seen one widget's paintEvent, which performs the simple task of drawing text. Many widgets also need to interact with the user, requiring them to process either mouse events or gestures (see the next section for more information about gestures).
Occasionally—especially when debugging someone else's code—you may want to intercept an event before it's delegated to the widget hierarchy or wherever it's headed. You can do this by installing an event filter on an object using QObject::installEventFilter. The event filter should be another QObject that implements eventFilter, a method that takes the object being monitored for events (the initial target of the event) and all events destined for the object. Use event filters sparingly, however, because intercepting the event mechanism is computationally expensive (your filter may receive a very large number of events) and may take a toll on run-time and battery performance.
While traditional mouse movement suffices for single-touch interaction on a touch screen, where mouse movement indicates dragging on the screen, Qt provides a gesture framework that handles user panning, pinching, and swiping. It lets you extend the gesture recognizer to interpret and handle application-specific gestures of your own. The framework uses the QGesture class to share information common to all gestures, gesture-specific subclasses such as QPanGesture, and the existing event system.
To indicate your widget can handle gestures, it must invoke grabGesture, passing the gesture ID (Table 5-2) of the gesture it can handle. (If you implement a custom gesture, the framework assigns it an ID when you register the gesture using QGestureRecognizer::registerGesture.)
As an example, here's how to recognize and act on swipe gestures, borrowed from Qt's Image Gesture example. The widget's constructor grabs the swipe (and other gestures), indicating to the gesture system that it wants to receive those gestures:
ImageWidget::ImageWidget(QWidget* parent)
     : QWidget(parent),
...
{
...
    grabGesture(Qt::PanGesture);
    grabGesture(Qt::PinchGesture);
    grabGesture(Qt::SwipeGesture);
...
}
QWidget doesn't define an explicit event handler for gestures, so we need to catch these gestures in QWidget's event method:
bool ImageWidget::event(QEvent* event)
{
    if (event->type() == QEvent::Gesture)
       return gestureEvent(static_cast<QGestureEvent*>(event));
    return QWidget::event(event);
}
The gestureEvent method referred to here isn't one in the QWidget class, but rather a new method we implement that performs gesture-specific recognition and actions, dispatching to specific handlers for each kind of gesture:
bool ImageWidget::gestureEvent(QGestureEvent *event)
{
    if (QGesture *swipe = event->gesture(Qt::SwipeGesture))
       swipeTriggered(static_cast<QSwipeGesture *>(swipe));
    else if (QGesture *pan = event->gesture(Qt::PanGesture))
       panTriggered(static_cast<QPanGesture *>(pan));
    if (QGesture *pinch = event->gesture(Qt::PinchGesture))
       pinchTriggered(static_cast<QPinchGesture *>(pinch));
    return true;
}
Table 5.2. Default supported gestures in Qt and their IDs
Gesture | ID |
|---|---|
Tap |
|
Tap and hold |
|
Pan (press-drag-release) |
|
Pinch |
|
Swipe (press-drag-accelerate-release) |
|
As the gesture recognizer interprets pointer movements and discerns gestures, it generates QGestureEvent instances and passes them to any objects that have grabbed the appropriate gestures via the object's event function, just as it passes any other event.
Each of the individual gesture handlers called from within gestureEvent do the actual gesture handling. This is where the rubber meets the road; you invoke gesture on the incoming QGestureEvent to recover the gesture, determine its type and data, and then perform the necessary widget-specific processing, such as panning, rotating, or zooming. As you do this, you need to be cognizant of the gesture's state, because many of them aren't instantaneous—think pinching, where the user may adjust the distance between the two touched points repeatedly to see the same content at different zoom levels. When using a gesture event, you often need to reflect this state in your own event handling logic—say, by tracking the appropriate zoom level between events.
Creating your own gesture involves subclassing QGestureRecognizer and overriding its recognize event, which takes the widget receiving input events, and performs the filtering necessary to determine whether the incoming events in fact define a new gesture, and parameters that can be discerned from the gesture. Writing a gesture recognizer is beyond the scope of this book, but it's worth noting that gesture recognition typically involves writing a small state machine, in which incoming events are treated differently, depending on the previous events in the stream. When you create a gesture recognizer, you also can subclass QGesture to provide a custom gesture instance that has gesture-specific parameters, such as acceleration or a vector of gesture movement. For more information on writing a gesture recognizer, see Qt's documentation about the gesture framework at http://doc.qt.nokia.com/gestures-overview.html.
Qt provides a trio of classes that permit you to perform painting—QPainter, QPaintDevice, and QPaintEngine. You use QPainter to paint on an output device, represented by QPaintDevice. QPainter delegates its work to a high-performance renderer via QPaintEngine, letting you render to raster images via the QImage class or using OpenGL or OpenVG on devices with hardware support for those standards. In practice, you use QPainter to perform painting and painting-related settings management, using a QPainter instance correctly configured to paint to the device's screen.
You can paint only when the view system is ready for you to paint; this occurs within your widget's paintEvent method on the main application thread. You already saw a small example in Listing 5-1, repeated again here:
void paintEvent(QPaintEvent *) {
        QPainter painter(this);
        painter.setPen(Qt::blue);
        painter.setFont(QFont("Arial", 18));
        painter.drawText(rect(),
                         Qt::AlignCenter,
                         "Hello world");
    }
QPainter provides support for far more than just text drawing. Table 5-3 lists the primitive drawing functions QPainter provides.
Table 5.3. QPainter drawing primitives
Shape | Method |
|---|---|
Arc (including a circle) |
|
Bezier curve |
|
Chord (circle segment) |
|
Convex polygon |
|
Ellipse |
|
Erase a rectangle |
|
Filled arc or circle |
|
Filled polygon |
|
Filled rectangle |
|
Image |
|
Line |
|
Multiple lines |
|
Multiple points |
|
Open polygon |
|
Picture |
|
Pixmap |
|
Point |
|
Rectangle |
|
Rectangles |
|
Rectangle with rounded corners |
|
Text |
|
Drawing with QPainter uses its settings, including its font, brush, and pen. You describe each with a corresponding helper class (QFont, QBrush, and QPen) that encapsulates information such as the font metrics, color, and fill pattern. For example, you can get information and metrics information about a font with fontInfo and fontMetrics, or the color of a pen or brush using the color method. Colors have their own representation, too, using the QColor class, which includes support for interconversion between red-green-blue (RGB), hue-saturation-value (HSV), and the subtractive cyan, magenta, yellow, and key black (CMYK) color systems. The representation of colors includes an alpha channel, as QPainter rendering supports alpha blending during drawing.
When constructing complex shapes, especially repeatedly, you can use QPainterPath, a container class that lets you create a collection of graphical building blocks such as rectangles, ellipses, and so forth. QPainterPath objects can be used for filling, outlining, and clipping, and are more efficient than drawing the same shapes repeatedly because each shape in the composition need be drawn only once. It's especially handy when drawing complex widgets that have precomputed components, because you can compute and cache a QPainterPath as you construct your widget or when its data changes, and then paint it with a single call to QPainter::drawPath in your widget's paintEvent function.
By default, when you paint with QPainter, you're drawing on the device's coordinate system, usually screen pixels. Sometimes it's easier to think about rendering by adjusting the target coordinate system; QPainter lets you perform any affine transformation (linear transformation followed by a translation) of its coordinate system. You can use the following methods to adjust the coordinate system used by QPainter:
s
caleto scale the coordinate system by an offset.rotateto rotate the coordinate system clockwise around its origin.translateto translate (shift by an offset) the coordinate system.shearto twist a coordinate system around the origin.
Another common operation you may want to perform is off-screen drawing. While Qt double-buffers drawing to prevent flickering, sometimes you need to perform off-screen drawing for other reasons, such as to composite multiple bitmaps to create a specific bitmap, or decorate a bitmap with text to be draw in multiple locations. Qt provides the QImage class and its subclasses as other concrete implementations of QPaintDevice. So you can create a QPainter using a QImage instance, and then drawing on the image using the QPainter. Qt provides four implementations of QImage:
QImageclass, optimized for fast input/output and direct pixel manipulation.QPixmapclass, optimized for on-screen drawing.QBitmapclass, an optimizedQPixmapwith a bitdepth of 1.QPictureclass, a paint device that records and replaysQPaintercommands in a manner similar toQPainterPath.
Interestingly, QImage and its subclasses are Qt value classes like QString; because they use implicit data sharing, you can pass them around freely as you would other implicitly shared data classes like QString and QList. Under the hood, Qt's implicit data sharing handles one shared block for multiple instances, using copy-on-write to create multiple copies of the data only when necessary. To read about how Qt's implicit data sharing works under the hood, see Qt's documentation at http://doc.qt.nokia.com/implicit-sharing.html.
In the previous chapter we used Qt's WebKit integration to show HTML, but neither said much about its capabilities, nor took advantage of those capabilities. As it happens, Qt and WebKit are quite well-integrated through the QtWebKit implementation, which lets you not just render web content but enhance it by embedding QObject instances in the web content. QtWebKit is a full port of the open source WebKit engine, including rendering for HTML and XHTML, as well as Scalable Vector Graphics (SVG) documents, all styled using CSS and scripted using JavaScript. The most obvious use for QtWebKit is displaying web content or web-styled content in your application, but there are other things you can do, too, such as process web content into bitmaps for placement in your application (think of a wall in a platform game showing real-time data from a web-based news feed).
Linking against QtWebKit in your application is easy—just be sure that WebKit is in your PRO file's QT variable, like this:
QT += webkit
Of course, C++ classes that access QtWebKit classes need to have access to QtWebkit's interfaces. The easiest way to do this is to include QtWebKit's headers any place you need them, like this:
#include <QtWebKit>
For faster compilation, you can always forward-declare the classes you're going to use in your header files, and include just the definitions you require, although there's no guarantee that under-the-hood QtWebKit headers are doing the same thing.
For most purposes, the first class in QtWebKit you use is QWebView. It's a descendant of QWidget that you first encountered in the last chapter when we used it to display the HTML content associated with an earthShake report in the USGS Really Simple Syndication (RSS) feed using the setHtml method. You could just as easily have it load web content from a remote server using its load method, like this:
QWebView* view = new QWebView(parent);
view->load(QUrl("http://www.apress.com/"));
view->show();
Note
If you find yourself using Qt's graphics scene architecture and need to render Web content, use QGraphicsWebView instead. It inherits from QGraphicsItem and renders correctly in a QGraphicsScene.
The QWebView load method takes a QUrl, representing a URL; there are type coercion functions that let you supply a string and it'll be coerced to a URL at runtime, but it's better to be specific instead of relying on compiler magic to say what you mean.
QtWebKit's content loading is asynchronous, so it doesn't block the user thread. It signals its progress so that you can notify the user or take other action. It emits the loadStarted signal when the view begins loading, and periodically emits loadProgress whenever a web element of the page (such as an image or JavaScript segment) is fully loaded. When the entire page is loaded, the QWebView emits the loadFinished signal, passing true if the page is successfully loaded, or false if there is a failure.
You can control a QWebView's behavior using an instance of QWebSettings, available by calling QWebView::settings. You can change the font family and font size, but the most important things you can adjust are the web attributes that determine how QtWebKit behaves. The attributes include:
Set by default,
QWebSettings::AutoLoadImagesspecifies whether images in content should be automatically loaded.Set by default,
QWebSettings::JavaScriptEnabledspecifies whether JavaScript can be executed.QWebSettings::OfflineStorageDatabaseEnabledindicates whether HTML 5 offline data storage is permitted or not.QWebSettings::LocalStorageEnabledindicates whether HTML 5 local storage is enabled or not.QWebSettings::LocalContentCanAccessRemoteUrlsindicates whether locally loaded documents are allowed to access remote URLs.
The last property is especially handy; using it and locally cached content, you can restrict browsing to local content.
QWebView relies heavily on its QWebPage object, which encapsulates the notion of a single web page. QWebPage, in turn, uses one or more QWebFrame objects to represent individual frames within the web page. You can obtain the QWebView's QWebPage instance by calling QWebView::page, and the main (parent) frame of a web page by calling QWebPage::mainFrame.
QWebPage's API is similar to QWebView, because QWebView is really a widget implementation that delegates its handling of web content to QWebPage. A common use for QWebPage (aside from obtaining the page's main frame, something you do to embed Qt objects into the JavaScript runtime, which we discuss more in the next section) is to use it to render web content to an image. You do this using the QWebPage's render function, by invoking it when the web page finishes loading (when its loadFinished signal fires). Listing 5-3 shows pseudocode from a class to do this drawn from the QWebPage documentation.
Example 5.3. Rendering a web page to an image
class Thumbnailer : public QObject
{
    Q_OBJECT

public:
    Thumbnailer(const QUrl &url, QObject* parent = 0)
        : QObject(parent) {
        page.mainFrame()->load(url);
        connect(&page, SIGNAL(loadFinished(bool)),
                this,  SLOT(render()));
    };
    QImage thumbnail() {
        return thumb;
    };

signals:
    void finished();

private slots:
void render() {
page.setViewportSize(page.mainFrame()->contentsSize());
QImage image = QImage(page.viewportSize(), QImage::Format_ARGB32);
QPainter painter(&image);
page.mainFrame()->render(&painter);
painter.end();
QImage thumb = image.scaled(400, 400, Qt::KeepAspectRatioByExpanding);
emit finished();
};
private:
QWebPage page;
QImage thumb;
};The key work is in render, invoked when the web page finishes loading. It sets the page's view port—the virtual area where the page will render—to the QtWebKit-calculated size for the page, and then it creates a QImage in which the QWebPage will render the web page. Next, it creates a QPainter for the new QImage, and has the QWebPage render the web page into the image. Finally, it scales the image to a predetermined size, and indicates that thumbnailing is complete by emitting the finished signal.
Another common thing you may want is having fine-grained control over which URLs the web content can visit. This can happen if you're using QtWebKit to render content over which you don't have full control, and don't want to provide a full-on browser experience. Doing this is a bit trickier than thumbnailing, because you have to subclass QWebPage and override acceptNavigationRequest, which returns true if the QWebPage should handle the navigation request. To do this:
Subclass
QWebPage.Implement
QWebPage::acceptNavigationRequest, performing your application-specific logic. You can look at the requested URL as well as the trigger for the navigation (form submission, clicked link, etc.) and determine whether to let the request pass or handle it yourself.At runtime, create an instance of your
QWebPagesubclass and set it on your application'sQWebViewinstance usingsetPage.
While it's quite handy to be able to embed a web view in your application, things get really interesting when you embed Qt objects into your web application. Using QWebFrame's addToJavaScriptWindowObject, you can add any QObject subclass to the JavaScript runtime associated with a web page. When you do this, Qt makes any properties the QObject provides available to JavaScript as slots, and signals as JavaScript methods. For example, consider the class in Listing 5-4, which emits a signal when someone calls its trigger method.
Example 5.4. The WebActionProxy class
class WebActionProxy : public QObject
{
    Q_OBJECT

public:
    explicit WebActionProxy(QObject *parent = 0)
    : QObject(parent) {
    };

public slots:
    void trigger() {
        emit triggered();
    };

signals:
    void triggered();
};
In itself, it doesn't seem that useful—until you embed it in a JavaScript context, like this:
mBackAction = new WebActionProxy(this);
mItemWidget->
    page()->currentFrame()->
        addToJavaScriptWindowObject("action",
                                     mBackAction,
                                     QScriptEngine::QtOwnership);
This adds a JavaScript object action that corresponds to an instance of WebActionProxy. On the C++ side in our Qt application, we can connect other QObjects to the triggered method, and then invoke them from JavaScript using something like the following HTML anywhere in the web content:
<p align="center">
  <button type="button"
          onclick="action.trigger()">Back</button>
</p>
This creates a button with the name "Back" that invokes the WebActionProxy method's trigger method, which in turn emits a triggered signal—behaving just like a QAction in a Qt view. We use this in Shake to permit the user to step back from an item view, which you see later in this chapter in "Putting it All Together."
Note
While you could just embed any old object in your JavaScript this way, using a WebActionProxy object helps provide a clean abstraction between the JavaScript and C++ worlds, and makes for a more digestible example here.
The application of this should be obvious: not only can web content directly control the behavior of the C++ portions of your application, but with Qt you can weave JavaScript and C++ together, using each language's strengths. By presenting web-oriented user interface in HTML, you can rapidly prototype and control your presentation using CSS with simple scripts using JavaScript, while leveraging native performance and features using C++.
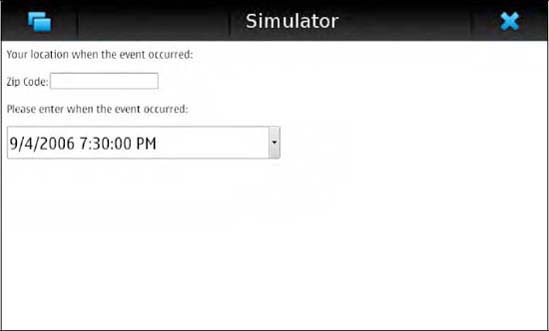
Not only can you embed Qt objects into a page's JavaScript runtime, but you can embed visible widgets in the page as well. This is handy if you want to use HTML and CSS to control the layout of Qt application components, although doing so is a little more finicky than simply embedding a QObject. QtWebKit supports QObject-based plug-ins, which are visible entities in the web content drawn by Qt widgets. For example, Figure 5-2 shows a QDateTime editor embedded in an HTML window.
In the HTML, you might write:
<object type="application/x-qt-plugin"
    classid="MyDateTime"
    name="datetime"
    width="400" height="48">
</object>
This calls out to QWebPage's createPlugin method, which takes the name of a class to create along with the name-value parameters from the HTML origin of the object, and returns a QObject instance that is placed at the appropriate location in the HTML. This method might look something like this:
QObject *MyWebPage::createPlugin(
   const QString& classid,
   const QUrl& url,
   const QStringList& paramNames,
   const QStringList& paramValues)
{
    QDateTimeEdit *edit = new QDateTimeEdit(QDateTime()));
    return edit;
}
Of course, a real implementation might support several QObject plug-ins, and need to switch on the value of the classid variable.
Back in the QtWebKit environment, you can directly access the properties and slots (method invocations) of the resulting object named datetime from JavaScript, just as you could any other object proxied into the JavaScript runtime. The difference is that the object you created is visible, and draws when the web page is painted.
At first it's easy to be overwhelmed by the richness and depth of the porting layer that Qt provides. Experienced mobile developers may soon despair, however, asking where's the geolocation service APIs? How do I access the camera? Can I integrate with the native messaging stack? How do I access contacts?
Nokia provides the Qt Mobility application programming interfaces (APIs) to address these questions. Starting from the capabilities of mobile devices, these APIs may be equally relevant for desktop environments, especially as traditional desktop and mobile computing continue to converge through ultraportable laptops and other computing devices. Like the rest of Qt, Qt Mobility promises cross-platform compatibility without sacrificing application performance by using C++, Qt's metaobject system, and signals and slots to provide a uniform programming environment throughout your Qt application's development. The APIs are provided as a collection of small libraries and headers you include within your application, using only the portions of the Qt Mobility API that your application requires.
As of this writing, Qt Mobility provides you with access to the following device features:
Bearer management, permitting you to start and stop network interfaces, as well as use the system's support for selecting the best bearer interface for a particular application, given the networks available.
The device camera, permitting you to capture still and video imagery.
The contacts database, letting you create, edit, list, delete, and look up contact information.
Device location, giving you an interface to both obtain device location and work with geographical information obtained from satellite or other sources.
The document gallery, letting you use native applications to render data, such as captured photographs or multimedia.
Control over feedback devices, such as on-board haptics.
Messaging, letting you create, originate and receive Short Message Service (SMS), Multimedia Message Service (MMS), Multipurpose Internet Mail Extensions (MIME), and Transport Neutral Encapsulation Format (TNEF) e-mail messages.
Multimedia, letting you play audio and video using the device's coders and decoders, as well as access the built-in FM radio if one exists.
The organizer, where you can request calendar, scheduling, and other personal data from local or remote sources.
Publish and subscribe, letting you share and access item values and obtain change notifications from a tree of values.
Sensors, letting you access sensors for screen orientation, accelometry, and other applications.
Service management for plug-in service discovery and use between applications for internal and external data sources.
Basic system information to determine system-related information and capabilities, such as software versions, hardware features, available network types and status, and so forth.
Versit document management to parse vCard (and eventually iCalendar) data.
The Qt Mobility interfaces have evolved considerably quicker than the existing Qt interfaces, a result primarily of mobile developer needs and the small, well-defined nature of each segment of the Qt Mobility API. Additionally, Nokia plans and frequently makes available technology preview releases of Qt Mobility, giving access to new APIs as soon as Nokia has finished coding and testing them. In the discussion that follows we give you a flavor for the capabilities and use of the first commercial release of Qt Mobility, so that as you design your application, you know what Qt Mobility features are available.
In the discussion that follows we touch on some of what we believe to be the most important and useful Qt Mobility APIs. For a thorough discussion of this fast-evolving part of Qt, see http://qt.nokia.com.
Before you use a Qt Mobility API in your application, you need to do several things:
Identify the Qt Mobility APIs you wish to use.
Update your application's PRO file to include the necessary configuration for that Qt Mobility API.
Re-run qmake by right-clicking on the project name and choosing "Run qmake."
Include the necessary Qt Mobility classes (from the Qt Mobility namespace) in your application.
On Symbian, update the platform capabilities to permit your application to use the desired API.
When you use Qt Creator to create a PRO file for your application, it includes two variables, CONFIG and MOBILITY. The CONFIG variable specifies particular build configuration options for your application (such as whether it's a Qt GUI or Qt console application), while the MOBILITY variable indicates which Qt Mobility APIs you wish to use. To use Qt Mobility APIs at all, you need to add mobility to the CONFIG variable, and then enumerate the desired Qt Mobility APIs, like this:
CONFIG += mobility
MOBILITY += location bearer
This example indicates that you want to use the location and network bearer APIs in your application. Under the hood, qmake uses the installed Qt Mobility configuration to determine the additional include paths and libraries for your application based on the value of the MOBILITY variable at build time. Table 5-4 lists each of the Qt Mobility API domains and the corresponding value to append to the MOBILITY variable.
Warning
Don't forget to include the appropriate values for the MOBILITY variable! If you find you're getting build errors relating to missing include files or mismatches between the Qt Mobility namespace and your own namespace, or an inability to link, be sure and check your project's MOBILITY variable (and be sure you're appending values with +=, not assigning them with =).
Table 5.4. Qt Mobility APIs and the values for the MOBILITY qmake variable
Qt Mobility API | Value |
|---|---|
Bearer Management |
|
Contacts |
|
Document Gallery |
|
Feedback (haptics) |
|
Location |
|
Multimedia |
|
Messaging |
|
Organizer |
|
Publish and Subscribe |
|
Service Framework |
|
Sensors |
|
System Information |
|
Telephony Events |
|
Versit (vCards) |
|
In the class declarations that use Qt Mobility classes, you need to do two things: include the Qt Mobility global declarations, and declare the Qt Mobility namespace so you don't have to declare the namespace containing Qt Mobility classes when you use a Qt Mobility class. You do this with the following two lines:
#include <qmobilityglobal.h>
QTM_USE_NAMESPACE
(If you include a specific Qt Mobility header, you can omit the inclusion of qmobilityglobal.h because it'll be included by the specific header.)
Of course, you also need to forward-declare Qt Mobility classes or include the relevant header files that declare those classes; as with Qt, there's usually an include file for each class. For example, to reference a position using the QGeoPositionInfo class, simply include the QGeoPositionInfo header, like this:
#include <QGeoPositionInfo>
As a general rule to help speed compilations, we like to forward-declare our classes in headers whenever possible, only including the actual class definition in source files when they're actually needed.
Finally, if you're writing an application targeted to Symbian, you need to be aware of Symbian capabilities. Symbian provides a robust security model, in which many APIs that may require user or operator trust are available only to applications that assert specific capabilities in their application binary. For example, before obtaining the device position, an application must be built including the Location capability; if the application doesn't bear this capability, the location request will fail with a platform security violation. You assert these capabilities in the application's PRO file, and the build system includes them in the binary package when building the application, like this:
symbian: TARGET.CAPABILITY += NetworkServices ReadUserData
                              Location
Table 5-5 shows a list of the required capabilities for each of the Qt Mobility APIs. For more information about Symbian's capability model, see http://wiki.forum.nokia.com/index.php/Capabilities.
Warning
Failing to provide a capability is a common source of grief when using Qt Mobility for Symbian. If your application simply fails to start, or exits immediately after starting or when you invoke an operation that's using a Qt Mobility API, be sure to check the capabilities in your application's PRO file. Mismatching capabilities frustratingly causes the system to terminate an application without warning, rather than giving you an error.
Table 5.5. Qt Mobility APIs and the required Symbian capabilities
Qt Mobility API | Value |
|---|---|
Bearer Management |
|
Contacts |
|
Location |
|
Multimedia |
|
Messaging |
|
Organizer |
|
Publish and Subscribe | Depends on the value being read or written. |
Service Framework | None, although plug-ins may have specific requirements |
Sensors | |
System Information |
|
Versit (vCards) | None |
NetworkControl is required for QNetworkSession::stop
Capability requirements are not yet published for the camera, document gallery, telephony events, or feedback APIs.
Note that if you add capabilities to your application, you may need to add a developer certificate, as well to assert those capabilities. You also may need to obtain additional signing from Nokia when publishing your application on the Ovi Store. For more information about certificates in the context of testing and publishing your application, see the section "Signing Your Qt Application for Symbian Devices" in Chapter 9.
Today's devices typically have multiple means of accessing wireless networks, such as support for both WiFi and cellular wide-area networks. Most platforms allow the user to select the system's default configuration, which all applications should honor when accessing the network. This default may be a service network for wide-area network access, a particular Internet access point such as a WiFi network, or a default that prompts the user with available networks at each attempt to connect. The Bearer Management API lets you control when and how your application accesses the network by selecting a particular network interface or using the user-specified system default, without excessive prompting to the user.
The Bearer Management API consists of three classes: QNetworkConfigurationManager, QNetworkConfiguration, and QNetworkSession. The first class provides ways to determine whether the device is already online; detecting system network capabilities such as whether the application can start and stop interfaces; roaming across networks; obtaining a collection of all network configurations; or obtaining the default configuration. This last use, the most common one, occurs when your application needs to go online and should use the default connection, using code as you see in Listing 5-5. The second class, QNetworkConfiguration, represents a specific interface configuration, such as WiFi through a particular WiFi network with its associated security information. The QNetworkConfigurationManager provides these, and you use a QNetworkConfiguration with QNetworkSession, which opens a network session for your application.
Example 5.5. Opening the default network connection
QNetworkConfigurationManager manager;
const bool canStartIAP = (manager.capabilities()
    & QNetworkConfigurationManager::CanStartAndStopInterfaces);
QNetworkConfiguration cfg = manager.defaultConfiguration();
if (!cfg.isValid()
 || (!canStartIAP
     && cfg.state() != QNetworkConfiguration::Active)) {
    QMessageBox::information(this,
                             tr("Network"),
                             tr("No Access Point found."));
    return;
}

session = new QNetworkSession(cfg, this);
session->open();
session->waitForOpened(-1);
Listing 5-5 does just this, beginning by determining if it is permitted to start and stop interfaces, and then determining the default configuration. If there's no default configuration and the network isn't already active, the code tests to see if it can start a new session; if it can't, it fails with an informative error. If, however, there's a default configuration, or the network is already running, the code opens the session, blocking the thread until the network completely opens(typically a few hundred milliseconds at most).
The QNetworkSession class offers a signal when a more suitable network session is available; by keeping a reference to the active QNetworkSession and listening for that signal, you can migrate a network connection to a more suitable access point. To do this:
Connect to the
QNetworkSession'spreferredConfigurationChangedsignal.In the slot that handles the signal, connect to the
QNetworkSession'snewConfigurationActivatedsignal.In the connection that handles the
preferredConfigurationChangedsignal, invoke a migration to the new network by invokingQNetworkSession::migrate, or ignore the new network by invokingQNetworkSession::ignore.If you invoke
migrate, the connection will attempt to migrate, and when migration is complete, it willtrigger thenewConfigurationActivatedsignal.In the slot that handles the
newConfigurationActivatedsignal, callacceptto terminate the previous access point, orrejectto reject the actual migration if the new network is unsuitable (for example, if the new network does not permit a connection to the remote host).
The Bearer Management Qt Mobility API was moved to Qt in Qt 4.7, so if you're developing with the Qt 4.7 release, you should use the classes provided in Qt 4.7 rather than the Qt Mobility API. To do this, simply remove the bearer value from the MOBILITY variable in your PRO file, and remove the declaration of the Qt Mobility headers and namespace from the relevant source files in your application.
The classes in the Qt Mobility Location API help you determine the device's location and manage the notion of precisely specified positions on the Earth's surface, abstracting the latitude and longitude, date and time, velocity, altitude, and bearing of the device when the data was captured. The Location API is explicitly source-agnostic, so under the hood it may be using the Global Positioning System (GPS), positioning through cellular or WiFi network data, or other methods.
To obtain the device's location, you must first obtain an instance of a position information source, which you can do by calling QGeoPositionInfoSource::createDefaultSource, which returns an instance of QGeoPositionInfoSource. This class emits the positionUpdated signal any time the system ascertains position information, so you connect your class to it and call startUpdates to request continuous updates, or requestUpdate to request a single update. We show how to do this in a full application later in the section "Putting It All Together," but Listing 5-6 shows the general idea.
Example 5.6. Obtaining device position
class PositionInfo : public QObject
{
    Q_OBJECT
public:
    PositionInfo(QObject *parent = 0) : QObject(parent) {
        QGeoPositionInfoSource *source =
            QGeoPositionInfoSource::createDefaultSource(this);
        if (source) {
            connect(source, SIGNAL(positionUpdated(QGeoPositionInfo)),
                    this,   SLOT(positionUpdated(QGeoPositionInfo)));
            source->startUpdates();
        }
    }

private slots:
    void positionUpdated(const QGeoPositionInfo &info) {
        qDebug() << "Position updated: " << info;
    }
};
You can begin to receive continuous updates by invoking QGeoPositionInfoSource::startUpdates, and stop those updates by invoking QGeoPositionInfoSource::stopUpdates. You can control how often position reports are returned by invoking QGeoPositionInfoSource::setUpdateInterval, or what positioning methods you prefer using QGeoPositionInfoSource::setPreferredPositioningMethods. Note that different positioning methods have different power consumption characteristics, and the more often you obtain position data, the more you tax the device's battery. So it's best to be judicious about how often you poll.
The position data is returned as an instance of QGeoPositionInfo, a data container class that includes not just a QGeoCoordinate bearing the current device coordinates, but a time stamp indicating when the data was obtained. It also has zero or more attributes that indicate things such as the current direction, ground speed, vertical speed, magnetic variation from true north at that location, and the horizontal and vertical accuracy of the position data. The QGeoCoordinate includes information on the position latitude, longitude, and altitude, and provides helper methods for calculating the distance between two QGeoCoordinate instances as well as the bearing from one QGeoCoordinate to another.
New to Qt Mobility 1.1, the Location API includes an abstract interface to a device's store of landmarks, which may be managed by a native application such as a mapping or landmark application. This API provides QLandmarkManager, a utility class that lets you save, fetch, and remove both landmarks and categories of landmarks. Qt Mobility 1.1 also provides an interface based on server plug-ins that present map and navigation data through the notion of a geoservice provider that can provide mapping, routing, and location search results. Using the geoservice provider, you can request an instance of QGeoMapWidget, a subclass of QGraphicsWidget that can present map data from the geoservice provider. As both the landmarks API and the geoservice API are evolving as we write this, consult http://doc.qt.nokia.com/qtmobility-1.1.0-beta/location-overview.html for more information on the new interfaces available in the Qt Mobility Location API.
Today's mobile devices include support for all kinds of messaging, and many applications benefit from integrating with those messaging solutions. Your application can receive low-cost push notifications via SMS or e-mail, and originating e-mail provides an asynchronous way for your application to interface with remote services. Then, too, there's the obvious: some applications need to permit the user to originate an e-mail with content: think of the "e-mail this story" link on web pages, placed in your application at strategic points in the content.
Qt Mobility's Messaging API provides a host of classes for interfacing with messaging; you can offer the device's native message composition interface, leverage existing installed message transports, including e-mail, SMS, and MMS, and access the native messaging store to pick out specific messages for your application. Two key classes provide the anchor for this functionality: QMessageService and QMessageManager. Together with a number of classes that abstract the notions of messages, recipients, message parts (attachments) message folders and message filters, it's a rich API that lets you use as little or as much of the platform's support for e-mail as you choose.
The QMessageService class gives you a simple interface for managing the messaging services themselves. Using QMessageService, you can:
Prompt the user to compose and send a message using the native messaging interface with the
composemethod.Query for messages matching specific filter criteria using the
queryMessagesmethod.Retrieve an undownloaded message's header or body (given only its unique ID) using the
retrieve,retrieveBody, orretrieveHeadermethods.Send a message you've programmatically composed using the
sendmethod.Show an existing message using the
showmethod.
Sending a message is easy. Here's pseudocode to send an SMS message:
void MyClass::SendHello()
{
    QMessage message;
    message.setType(QMessage::Sms);
    message.setTo(QMessageAddress("+18885551212", QMessageAddress::Phone));
    message.setBody("Hello world!");

    if (mMessageService.send(message)) {
        sendId = message.id();
    } else {
        // Send failed
    }
}
mMessageService is an instance of the QMessageService class; its send message simply sends the message you pass. You can receive confirmation that the message has sent by attaching a slot to its stateChanged signal, like this:
MyClass::MyClass(QObject* parent)  : QObject(parent)
{
    connect(&mMessageService,
                  SIGNAL(stateChanged(QMessageServiceAction::State)),
                  this,
                  SLOT(messageStateChanged(QMessageServiceAction::State)));
}

void MyClass::messageStateChanged(QMessageServiceAction::State s)
{
    if (s == QMessageServiceAction::Successful) {
        // message send successful
    } else {
        // message sending failed
    }
}
Received messages are automatically placed in the message store, which you can query for incoming messages. When querying for messages, you indicate the query criteria using the QMessageFilter class, which has methods that let you specify filter criteria, including:
Message ID or a collection of message IDs using the
byIDmethod,Message priority by the
byPrioritymethod,Message time stamp using the
byTimeStampandbyReceptionTimeStampmethods,Message recipients using the
byRecipientsmethod,Message sender using the
bySendermethod,Message size using the
bySizemethod,Message status using the
byStatusmethod,Message subject using the
bySubjectmethod,Message type using the
byTypemethod.
You can combine independent filters using the & and | operations, just like boolean values. For example, you can search the messaging store for all high priority messages from [email protected] using code like this:
QMessageFilter priorityFilter(
    QMessageFilter::byPriority(QMessage::HighPriority));
QMessageFilter senderFilter(
    QMessageFilter::bySender("[email protected]"));
QMessageIdList results =
    QMessageManager().queryMessages(priorityFilter & senderFilter);
This code uses the QMessageManager, which provides an abstraction over the message store that lets you access individual messages. The QMessageManager class also provides signals indicating when a message was added to the store (such as by message composition or receipt), removed, or updated (such as when a message's body was fetched over IMAP).
You can obtain an individual message using its ID (obtained using one or more QMessageFilters and the QMessageManager's queryMessages method) and the constructor for the QMessage class, which can accept an ID and create an abstraction of the content of the message from its ID. The QMessage class is essentially a large data container, with a number of accessor and mutator methods to obtain message fields and message content, including:
The
to,cc, andbccmethods to obtain recipient information and the correspondingsetTo,setCc, andsetBccmethods to set recipient information.The
attachmentIds,appendAttachments, andclearAttachmentsmethods to obtain attachment information, append files to the message's attachment list, and clear the list of attached files.The
dateandreceivedDatemethods to obtain composition and receipt dates, and thesetDateandsetReceivedDatemethods to set those values.The ID method to obtain a message's ID.
The
frommethod to obtain the message originator, andsetFromto set the message's originator.The
subjectandsetSubjectmethods to obtain and manipulate the message's subject.The
statusandsetStatusmessage to obtain or set the message's status (including the read status).The
bodyIdandsetBodymethods to obtain a reference to the ID for the body or set the body as a string or text stream usingQStringorQTextStream.
The class has several helper classes for data containment, such as QMessageAddress and QMessageAddressList to represent senders or recipients of a message.
Originating a message is easy. To let the messaging user interface do the hard work, you can invoke QMessageService::compose to have the messaging software provide its native composition interface to the user. If you need to originate a message programmatically, you create a QMessage object and use its setter methods to set the recipients, subject, body, and any attachments. Once you do this, invoke QMessageService::send method to send the message.
For examples showing how to use these methods in detail, consult the Keep In Touch example at http://doc.qt.nokia.com/qtmobility-1.0/keepintouch.html and the Message Services example at http://doc.qt.nokia.com/qtmobility-1.0/serviceactions.html on the Nokia web site.
Qt Mobility's Multimedia APIs give you an easy way to harness the device's integrated coders and decoders (codecs) for audio capture, as well as audio and video playback. The Multimedia API is a good choice when rendering sounds or video for games and other entertainment, as well as streaming audio from remote sources like Internet radio stations. While Qt has Phonon, another multimedia framework that provides cross-platform compatibility, the Qt Mobility solution is the accepted path going forward. (There's also the Qt Multimedia framework, slated for addition into later versions of Qt 4.7 that has many of the same features.)
Warning
Unlike all the other Mobility APIs we describe, the Multimedia API is not in the Qt Mobility namespace. When predeclaring or using the classes we discuss in this section, do not include the QTM_USE_NAMESPACE macro.
Audio playback couldn't be easier: create a player, create a URL to the (local or remote) source of the audio content, and invoke play:
QMediaPlayer *player = new QMediaPlayer;
player->setMedia(QUrl::fromLocalFile("beep.mp3"));
player->setVolume(50);
player->play();
The QMediaPlayer has slots that permit control of basic playback functions, making it easy to wire to existing UI controls, such as buttons and actions. These slots are as follows:
The
playslot starts media playback.The
pauseslot pauses media playback.The
setMutedslot mutes or unmutes audio.Not supported by all codecs, the
setPlaybackRateslot takes aqrealindicating a multiplier to the standard playback rate to speed up, slow down, or reverse playback (normal playback is indicated by a value of 1.0).The
setPlaylistslot takes aQMediaPlaylist, a collection of media files, and instructs the player to play them in sequence. If theQMediaPlayerinstance is playing a playlist, you can obtain that playlist by invokingplaylist.The
setPositionslot takes a number of milliseconds and sets the playback position to that number. You can obtain the current playback position by callingposition.The
setVolumeslot takes a volume level as a percentage (from 0 to 100) and sets the playback volume. You can obtain the volume by invokingvolume.The
stopslot stops media playback.
The QMediaPlayer emits a number of signals you can use to monitor playback, including signals for buffering status (bufferStatusChanged), errors (error), media changes (mediaChanged), playback status (stateChanged), position (positionChanged), and volume (volumeChanged).
Playing video requires you to couple a QVideoWidget that renders the video stream to the player. This is a QWidget that integrates with the codec subsystem to render video data, so you can treat it as a standard widget in your application layouts. To wire a QVideoWidget to a QMediaPlayer, you need only pass the QMediaPlayer instance to the constructor of QVideoWidget, like so:
QMediaPlayer *player = new QMediaPlayer;
player->setMedia(QUrl::fromLocalFile("movie.mp4"));
widget = new QVideoWidget(player);
mainWindow->setCentralWidget(widget);
widget->show();
player->play();
Recording audio is a little trickier; not only do you need to set the output location (where the recorded audio will be stored), but you must select an audio device and a codec scheme. The Multimedia API encapsulates the notion of an audio source using the QAudioCaptureSource class, which offers the following methods:
The
isAvailablemethod, indicating if audio capturing is available.The
audioInputsmethod returns a list of audio inputs (strings describing the kind of audio input).The
setAudioInputmethod, which lets you set a particular audio input by its name, indicating that audio should come from that input device.The
audioDescriptionmethod, which returns a string describing the named audio input source.
Once you select an audio input source (typically you would provide the list of sources in a configuration view using a QListView or QListWidget, and use the widget's signal to let you set the appropriate source), you create a QMediaRecorder to record the audio and configure it with a codec and destination for the data. Omitting the user interface for selecting an audio source, we might write:
source = new QAudioCaptureSource;
if (!source.isAvailable()) return;
// Select the first audio input device
source.setAudioInput(source.audioInputs()[0]);

QAudioEncoderSettings settings;
settings.setCodec("audio/mpeg");
settings.setChannelCount(2);

recorder = new QMediaRecorder(source);
recorder->setOutputLocation(QUrl::fromLocalFile ("audio.mpg"));
recorder->setEncodingSettings(settings);
recorder.record();
The QMediaRecorder interface shares some of its configuration responsibilities with the QAudioEncoderSettings (and QVideoEncoderSettings classes, on devices that support video capture), so you use it to determine the names and attributes of codecs. But then you actually delegate the configuration of a specific codec to the QAudioEncoderSettings (or QVideoEncoderSettings) classes. QMediaRecoder has other methods, including:
audioSettingsto determine the current audio encoder settings.videoSettingsto determine the current video encoder settings.supportedAudioCodecsandsupportedVideoCodecsto determine the supported audio and video codecs.metaDataandsetMetaDatamethods to obtain and set metadata in the encoded media stream.stateanderrorto determine the recorder's current state and the last known error, if any.
As with the QMediaPlayer, the key actions a QAudioRecorder can take are actually slots, so it's easy to wire them to buttons or actions. These slots are:
pause, to pause capture.record, to start recording.setMutedto mute the audio.stopto stop capture.
For an example demonstrating the Multimedia API, see the SlideShow example at http://doc.qt.nokia.com/qtmobility-1.0/slideshow.html.
The System Information portion of the Qt Mobility API is perhaps the least exciting but the most important to many developers. It provides fundamental information about the system on which your application is running, and you can use that information to tune your application's presentation and performance. Using the API, you can obtain basic information about the host system, including:
The power system status, including the battery level and presence of a battery or charger (using
QSystemDeviceInfo).The input methods (keys, keyboard, single or multitouch, or mouse) the device supports (using
QSystemDeviceInfo).The sound profile (silent, normal, loud, etc) selected by the user for ringtones and other alerts (using
QSystemDeviceInfo).The International Mobile Equipment Identity (IMEI), a number that uniquely identifies the device (using
QSystemDeviceInfo).The International Mobile Subscriber Identity (IMSI), a number that uniquely identifies the subscriber by the SIM in their device (using
QSystemDeviceInfo).The device manufacturer and model number (using
QSystemDeviceInfo).Whether or not the SIM is available (using
QSystemDeviceInfo).The number of displays and display size (via the existing Qt class
QDesktopWidget) and the color depth and brightness of each display (viaQSystemDisplayInfo).The availability of specific features such as a camera or Bluetooth, the version number of the operating system or Qt installed, and the current country code and language (via
QSystemInfo).Information about the supported networks, current and home mobile country, and network codes (via
QSystemNetworkInfo).The ability to inhibit the screen saver when the handset is idle while your application is running, which may have deleterious battery effects (via
QSystemScreenSaver).Available and total disk space on each storage media, such as the internal storage or a mounted card (via
QSystemStorageInfo).
Getting information from QSystemInfo and its related classes is as easy as creating it and querying it, as the following pseudocode demonstrates:
QSystemDeviceInfo infoSource;
qDebug() << "imei: " << infoSource.imei();
qDebug() << "imsi: " << infoSource.imsi();
qDebug() << "manufacturer: " << infoSource.manufacturer();
qDebug() << "model: " << infoSource.model();
In the last chapter, we showed you some basic Qt features using a prototype of Shake, our earthquake-reporting application that takes data from the U.S. Geological Survey and renders the result as a list of earthquake events, showing the data associated with a specific event. The application had several shortcomings, including a user interface that doesn't match the classic item list/item view paradigm of most mobile applications, an inability to determine how close you were to a particular event, and no good way to get a geographic overview of all of the events that have occurred.
For this chapter, we've extended Shake in several ways:
The application now has separate list, item, and map views, as Figure 5-3 shows. As with other Qt mobile applications, the views are selected from the options menu, although selecting a list item also shows the item view.
The map view demonstrates how to implement a custom widget that renders data from a Qt model.
The application detail view includes more information about the event, including information from its summary and the title, and if information is available, your current distance from the reported event.

Figure 5.3. The three screens of the final Shake application as written using Qt: in (a) the list view, (b) the options menu, (c) an item view obtained by touching a list item, and (d) the map view
To do this, we:
Refactored the application to use a separate application controller class to manage all of the various signals from the UI, network and Qt Mobility layer.
Added actions to the main window options menu for view selection.
Inserted a
QObjectthat proxiesQActioninto the item view'sQWebView, which now displays a "Back" button.Wrote a map widget that takes data from the application model and plots it over a Mercator projection map provided as a bitmap.
The following sections look at each of these changes in more detail.
When you launch Qt Creator to create a new Qt GUI application, by default it creates a subclass of QMainWindow, the object that will contain your application's user interface. As defaults go, it's not bad, but many applications don't really need to subclass QMainWindow. What they do need, however, is a controller—a QObject-derived class that has slots to accept the various signals from different components in the application. While you can certainly use a QMainWindow subclass to do this, as we did in the previous chapter, it seems in principle a poor idea, because there's an implied relationship with QMainWindow that simply doesn't exist. Because we were adding additional slots to our application to handle user actions and position information, this seems a good time to break the controller into its own subclass. First, we refactored main.cpp as you see in Listing 5-7.
Example 5.7. Shake's entry point.
#include <QtGui/QApplication>
#include "maincontroller.h"

int main(int argc, char *argv[])
{
    QApplication app(argc, argv);
    MainController* controller = new MainController;
    int result = app.exec();
    delete controller;
    return result;
}
As you see, instead of creating an instance a QMainWindow subclass and showing it, we create our MainController instance, and it has a QMainWindow it shows as part of its initialization. Listing 5-8 shows the class definition for MainController in full, which we discuss over this and the next section.
Example 5.8. Shake's MainController class
#ifndef MAINCONTROLLER_H
#define MAINCONTROLLER_H
#include <QObject>
#include <QPair>
#include <QMobilityGlobal.h>
#include <QGeoPositionInfoSource>
#include <QGeoPositionInfo>

class QSortFilterProxyModel;
class QProgressDialog;
class QModelIndex;
class QAction;
class QMainWindow;
class QStackedWidget;
class QListView;
class QWebView;
class WebActionProxy;
class WorkerThread;
class QuakeListModel;
class MapItemWidget;
QTM_USE_NAMESPACE

class MainController : public QObject
{
    Q_OBJECT

public:
    explicit MainController(QObject *parent = 0);
    ~MainController();

    void fetch(const QString& url);

public slots:
    void fetch();
    void handleRequestFinished();
    void handleError(const QString& message);
    void handleItemClicked(const QModelIndex&);
    void handleItemClosed();
    void handleShowMap();
    void handleShowList();
    void positionUpdated(const QGeoPositionInfo&);
    void addProxyObjects();

private:
    void createActions();

    QProgressDialog *mProgressDialog;

    WorkerThread* mBgThread;
    QuakeListModel* mEventModel;
    QSortFilterProxyModel* mSortedModel;

    QListView* mListWidget;
    QWebView* mItemWidget;
    MapItemWidget* mMapWidget;

    WebActionProxy* mBackAction;
    QAction* mShowListAction;
    QAction* mShowMapAction;

    QStackedWidget* mMainWidget;
    QMainWindow* mMainWindow;

    QGeoPositionInfoSource* mLocationSource;
    bool mLocationKnown;
    QPair<qreal,qreal> mLocation;
};

#endif // MAINCONTROLLER_H
At this point, there are three things to note about the main controller. First, it has a QMainWindow instance, rather than being one. In a moment, you'll see where we create and configure the main window. Second, it no longer uses a Qt Designer UI class; as you'll see more in a moment, we use a QStackedWidget to easily switch between different central widgets in the window. Finally, most of its methods are slots, because they're triggered by signals emitted from actions, the network thread, or other incoming events.
The constructor (Listing 5-8) is now responsible for setting up the entire user interface, which consists of creating the list view, web view, and map view, and a QStackedWidget to flip between each widget as the controller handles signals to change the user interface's main view.
Example 5.9. The controller constructor, where user interface setup takes place
MainController::MainController(QObject *parent)
    : QObject(parent)
    , mProgressDialog(0)
    , mBgThread(0)
    , mEventModel(new QuakeListModel())
    , mSortedModel(new QSortFilterProxyModel(this))
    , mListWidget(new QListView())
    , mItemWidget(new QWebView())
    , mMapWidget(new MapItemWidget())
    , mBackAction(0)
    , mShowListAction(0)
    , mShowMapAction(0)
    , mMainWidget(0)
    , mMainWindow(new QMainWindow)
    , mLocationSource(
        QGeoPositionInfoSource::createDefaultSource(this))
    , mLocationKnown(false)
    , mLocation(QPair<qreal,qreal>(0,0))
{
    createActions();

    mProgressDialog = new QProgressDialog(
                        tr("Fetching data..."),
                        tr("Cancel"),
                        0, 0);

    mSortedModel->setSourceModel(mEventModel);
    mSortedModel->setDynamicSortFilter(false);
    mSortedModel->setSortRole(QuakeListModel::When);

    mListWidget->setHorizontalScrollBarPolicy(Qt::ScrollBarAlwaysOff);
    mListWidget->setModel(mSortedModel);
    mListWidget->setContextMenuPolicy(Qt::NoContextMenu);

    mMapWidget->setModel(mSortedModel);

    connect(mListWidget, SIGNAL(clicked(QModelIndex)),
            this,        SLOT(handleItemClicked(QModelIndex)));

    addProxyObjects();
    mItemWidget->setContextMenuPolicy(Qt::NoContextMenu);
    connect(mItemWidget->page()->currentFrame(),
      SIGNAL(javaScriptWindowObjectCleared()),
      this,
      SLOT(addProxyObjects()));
mMainWidget = new QStackedWidget(mMainWindow);
mMainWidget->addWidget(mListWidget);
mMainWidget->addWidget(mItemWidget);
mMainWidget->addWidget(mMapWidget);
mMainWidget->setCurrentIndex(kListWidget);
mMainWidget->setContextMenuPolicy(Qt::NoContextMenu);
mMainWindow->setCentralWidget(mMainWidget);
if (mLocationSource) {
connect(mLocationSource,
SIGNAL(positionUpdated(const QGeoPositionInfo&)),
this,
SLOT(positionUpdated(const QGeoPositionInfo&)));
mLocationSource->setUpdateInterval(kLocationUpdateIntervalMs);
mLocationSource->lastKnownPosition();
mLocationSource->startUpdates();
}
QTimer::singleShot(0, this, SLOT(fetch()));
#if defined(Q_WS_S60)
mMainWindow->showMaximized();
#else
mMainWindow->show();
#endif
}After creating the actions for the options menu (more on that in a moment), the constructor creates a QProgressDialog, a stand-alone dialog class that provides a barber pole or progressive bar indicating progress. We'll show it when the network fetch begins, and hide it when the fetch completes. Next we set up the model, just as you saw in the previous chapter, and then set up the list's options to hide the horizontal scroll bar, use the sorted model, and not have a context menu for items. The code then creates and registers a QObject subclass with the QWebView, and connects to the QWebView's javaScriptWindowObjectCleared signal. That way, any time the JavaScript context changes, the same object is re-registered.
After that, the constructor creates the QStackedWidget mMainWidget and registers each of the view widgets with it. The QStackedWidget acts as a collection of widgets, and shows the widget indicated by its current index. We provide all three widgets to the stacked widget at once, and instruct it to show the list widget first by calling setCurrentIndex and passing the index of the 0th widget, the list widget.
Finally, the constructor configures the positioning interface (which we discuss in more detail in the next section) and sets a single-shot timer to commence the request before showing the main window.
Many of the slots in the controller are the same as the ones in the previous section, such as those that involve touching an item or when the network transaction completes. New are the action handlers for showing the list and the map, which involve triggered signals emitted by QActions. Those QAction instances are set up in createActions, which you see in Listing 5-9.
Example 5.10. Creating actions and adding them to the main window.
void MainController::createActions()
{
    mBackAction = new WebActionProxy(this );
    connect(mBackAction, SIGNAL(triggered()),
            this,        SLOT(handleItemClosed()));

    mShowListAction = new QAction(tr("Show List"), this);
    connect(mShowListAction, SIGNAL(triggered()),
            this,           SLOT(handleShowList()));

    mShowMapAction = new QAction(tr("Show Map"), this);
    connect(mShowMapAction, SIGNAL(triggered()),
            this,           SLOT(handleShowMap()));

    // Add to the options menu
    mMainWindow->menuBar()->addAction(mShowListAction);
    mMainWindow->menuBar()->addAction(mShowMapAction);
}
The first action isn't a QAction, but a WebActionProxy, the class we showed you back in the section "Embedding C++ Objects in QtWebKit's JavaScript Runtime." Triggered when you press the back button, an HTML element, it simply brings you back to the list. The other actions are for showing the list and map, and are added to the main window's menu bar to be shown in the options menu.
We made two changes to how the network code works: we added a QProgressDialog to give some indication of progress, and added support for Qt Mobility's Bearer Management API to make sure that requests use the correct network in all places.
QProgressDialog provides a simple show/hide API that displays the dialog asynchronously when you need it. We create the dialog in the controller's constructor (Listing 5-8), and show it at the beginning of the fetch method using the following line of code:
if (mProgressDialog) mProgressDialog->show();
Later, in handleRequestFinished and handleError, we hide the dialog using
if (mProgressDialog) mProgressDialog->hide();
Incorporating the Bearer Management code isn't much more difficult; we changed WorkerThread::fetch to include the boilerplate default access point configuration, as you see in Listing 5-10.
Example 5.11. Requesting a URL after configuring the bearer network
void WorkerThread::fetch(const QString& url)
{
    // Don't try to re-start if we're running
    if (isRunning()) {
        this->cancel();
}
// On Symbian, be sure we're using the desired access point.
// MeeGo doesn't need this.
#ifdef Q_OS_SYMBIAN
// Set Internet Access Point
QNetworkConfigurationManager manager;
const bool canStartIAP = (manager.capabilities()
& QNetworkConfigurationManager::CanStartAndStopInterfaces);
// Is there default access point, use it
QNetworkConfiguration cfg = manager.defaultConfiguration();
if (!cfg.isValid()
|| (!canStartIAP
&& cfg.state() != QNetworkConfiguration::Active)) {
emit error(tr("No Access Point found."));
return;
}
mSession = new QNetworkSession(cfg, this);
mSession->open();
mSession->waitForOpened(-1);
#endif
QNetworkReply *reply = mNetManager->get(QNetworkRequest(QUrl(url)));
if (!reply) {
emit error(tr("Could not contact the server"));
}
}This is exactly the code you saw in the section "Managing Bearer Networks," and it's enabled only for Symbian, the one platform right now that has full support for different bearer networks.
In the constructor for the controller (Listing 5-8) you saw the following code:
if (mLocationSource) {
    connect(mLocationSource,
        SIGNAL(positionUpdated(const QGeoPositionInfo&)),
        this,
        SLOT(positionUpdated(const QGeoPositionInfo&)));
    mLocationSource->setUpdateInterval(kLocationUpdateIntervalMs);
    mLocationSource->startUpdates();
}
This code starts Qt Mobility's Position API to emit position information on a regular basis, invoking our positionUpdated slot when new position data becomes available. Listing 5-11 shows the method that handles that data, code that splits out the latitude and longitude and stores it in a QPair the way we stored position data in the previous chapter's example.
Example 5.12. Handling incoming position data
void MainController::positionUpdated(const QGeoPositionInfo& update)
{
    if (update.isValid()) {
        QGeoCoordinate position = update.coordinate();
        mLocationKnown = true;
        mLocation = QPair<qreal, qreal>(position.latitude(),
                                        position.longitude());
    }
}
This position is global to the controller, and used only when we show a specific list item, when the user touches an item and the list view's clicked signal is emitted, invoking our handleItemClicked slot. Listing 5-12 shows the handleItemClicked method.
Example 5.13. Formatting an earthquake report with position information and the back button
void MainController::handleItemClicked(const QModelIndex& which)
{
    QPair<qreal, qreal> where(mSortedModel->data(which,
        QuakeListModel::Latitude).value<qreal>(),
      mSortedModel->data(which,
        QuakeListModel::Longitude).value<qreal>());
    QString distance = QString(tr("unknown"));
    QVariant desc = mSortedModel->data(which,
      QuakeListModel::Description);
    QVariant title = mSortedModel->data(which,
      QuakeListModel::DisplayRole);
    if (mLocationKnown) {
        distance = QString("%1 km (%2 mi)")
                   .arg((qreal)gcdDistance(where, mLocation))
                   .arg((qreal)gcdDistance(where, mLocation)
                     / kKmPerMile);
    }

    QString html =
      QString(tr("%1<h1>%2</h1>
%3
<strong>Distance</strong>:%4
%5"))
                   .arg(kInitScript)
                   .arg(title.value<QString>())
                   .arg(desc.value<QString>())
                   .arg(distance)
                   .arg(kExitItem);

    mItemWidget->setHtml(html);
    mMainWidget->setCurrentIndex(kItemWidget);
}
This method has changed a lot, because we now no longer only show the bit of HTML provided by the USGS, but a title with the same information as in the list view, a distance (if we can compute one), and the back button.
This method starts by extracting the position of the earthquake event from the item in the model, as well as its description and title. If the location is known, a string containing the distance in kilometers and miles is computed using the Law of Haversines (http://en.wikipedia.org/wiki/Great-circle_distance), although we could have just as easily used Qt Mobility's own code to do the calculation. Then the entire item view's HTML is built up using a single template that has a (currently unused) JavaScript initialization, heading, USGS-provided description, our computed distance, and the HTML and JavaScript for the back button, which looks like this:
<br/><br/><br/>
<p align="center">
  <button type="button"
    onclick="action.trigger()">Back
  </button>
</p>
The action variable in JavaScript is just the WebProxyAction we created in createActions, back in Listing 5-9. It gets added to the JavaScript context each time the context gets cleared in our addProxyObjects slot, which you see in Listing 5-13.
The old saying "A picture is worth a thousand words" is definitely true when it comes to understanding the distribution of spatial data. We added the map to Shake to present earthquake data graphically, giving a quick glance as to where earthquakes had occurred and how big they were. Our goal when creating the map view to Shake was twofold: provide a map that displays something useful and show you the basic idea behind creating your own widget.
The result of this goal is the MapItemWidget, a simple class that draws markers of different sizes on a Mercator projection of Earth. The MapItemWidget gets its data from a model, so it additionally shows you how to watch a model's data for changes and re-renders when those changes occur. Listing 5-14 shows the class declaration for the MapItemWidget.
Example 5.15. The widget for rendering the map
#include <QWidget>
#include <QPixmap>
#include <QModelIndex>
#include <QList>

class QAbstractItemModel;

class MapItemWidget : public QWidget
{
    Q_OBJECT
public:
    explicit MapItemWidget(QWidget *parent = 0);
    ~MapItemWidget();

    QSize sizeHint();
    QSizePolicy sizePolicy();

    void setModel(QAbstractItemModel* model);

public slots:
    void itemsChanged(const QModelIndex& topLeft,
                      const QModelIndex & bottomRight );
    void itemsReset();

protected:
    void paintEvent(QPaintEvent *event);
    void resizeEvent(QResizeEvent *event);

private:
    void initMap();
    void initMarkers();

    QPoint geoToWidgetCoords(qreal lat, qreal lon);

    QPixmap mMap;
    QSize mMapSize;

    QList< QPair<QPoint, int> > mMarkers;
    QAbstractItemModel* mModel;

    Q_DISABLE_COPY(MapItemWidget)
};We can divide the widget's functionality into three broad areas: providing size hints to the containing widget, handling the drawing and placement of map markers, and map rendering. Listing 5-15 shows the code that provides the desired size hints for the widget.
Example 5.16. Providing default size hints
const int kMinWidth = 320;
const int kMinHeight = 240;
QSize MapItemWidget::sizeHint() {
    return QSize(kMinWidth, kMinHeight);
}

QSizePolicy MapItemWidget::sizePolicy() {
    return QSizePolicy(QSizePolicy::MinimumExpanding,
                       QSizePolicy::MinimumExpanding);
}
Maps are useless when they're too small, so we provide a fairly large minimum size, indicate that our policy is to disallow anything smaller than that default, and grow to accept as much size as the layout will provide.
The map rendering and marker handling are closely related and also coupled with resizing the widget. This is because resizing the map involves redrawing the base map and relocating all of the map markers before redrawing them as well. For a given widget size, the map keeps two pieces of data to speed rendering: a pixmap containing the base map, an image of a map of the Earth in Mercator projection we found at WikiCommons (http://en.wikipedia.org/wiki/File:Mercator-projection.jpg), and the location and relative size of each map marker in widget coordinates. The location and size information is kept as a QPair, rather than a separate class; there's no reason not to use a separate class in this case, except that it makes the code longer, and QPair works just as well.
The base map and marker cache are all initialized whenever the widget resizes. This occurs when the widget is placed in a containing widget, as well as if the widget changes sizes (say, because the screen orientation changes). Listing 5-16 shows the initialization code, starting when the widget receives the resize event.
Example 5.17. Map widget initialization when the widget is resized
void MapItemWidget::resizeEvent(QResizeEvent *event)
{
    if (size() != mMapSize) {
        initMap();
        initMarkers();
    }
}

void MapItemWidget::initMap()
{
    // Load the map bitmap
    QPixmap map(":/images/map.jpg");

    QSize newSize(map.size());
    newSize.scale(size(), Qt::KeepAspectRatio);

    if (newSize!=map.size()) {
        mMap = map.scaled(newSize, Qt::KeepAspectRatio);
    }
    // Record the widget size so we only rescale when we need to
    mMapSize = size();
}

void MapItemWidget::initMarkers()
{
    // Always start from scratch
    mMarkers.clear();

    if (!mModel) {
        return;
    }

    for(int i = 0;  i < mModel->rowCount(); i++)
    {
        QModelIndex index = mModel->index(i, 0);
        qreal lat = mModel->data(index,
          QuakeListModel::Latitude).value<qreal>();
        qreal lon = mModel->data(index,
          QuakeListModel::Longitude).value<qreal>();
        qreal mag = mModel->data(index,
          QuakeListModel::Magnitude).value<qreal>();
        QPoint point = geoToWidgetCoords(lat, lon);
        mMarkers.append(QPair<QPoint, int>(point, mag));
    }
}
Handling the resizing event is easy—just reinitialize the map's base layer and cache of item positions if the new size isn't the same as the current size. Resizing the base map itself is also easy, thanks to Qt's handling of image formats; we simply reload the base map (which is an image larger than we expect any device screen to be, but not so unwieldy for today's devices) and scale it to fit within the new widget's bounds, preserving the map's aspect ratio. This isn't perfect—as you saw in Figure 5-2, the map ends up with black bands on the borders of the image—but it prevents additional stretching and tearing that would distort the map projection further.
Initializing the map marker position cache is a little trickier. Because there are a small number of items, we do this any time the map rescales or when the model changes (which you see later in Listing 5-18). In either case, we simply clear the cache of markers and then walk the model, projecting each point from its coordinates on Earth to its coordinate on the map using the private function geoToWidgetCoords (not shown here, but available in the sample code that accompanies this book). As you've seen elsewhere, we simply use the model itself to generate an index for each row in the model, and then extract the latitude, longitude, and quake magnitude from the model using its own data method.
With the cache always up-to-date, the map widget's paint function need only draw the base map and then loop over the cache of projected markers, plotting a rectangle for each marker, as you see in Listing 5-17.
Example 5.18. Drawing the map and its markers
void MapItemWidget::paintEvent(QPaintEvent *event)
{
    QPainter painter(this);
    QPoint pt;

    pt.setX(size().width() /2 - mMap.size().width() /2);
    pt.setY(size().height()/2 - mMap.size().height()/2);
    painter.drawPixmap(pt, mMap);

    painter.setBrush(Qt::SolidPattern);
    for(int i = mMarkers.length(); i>0; i--)
    {
        QPair<QPoint, int> marker = mMarkers.at(i-1);
        pt = marker.first;
        int r = marker.second;
        painter.fillRect(pt.x()-r, pt.y()-r,
                         2*r, 2*r,
                         QColor(255, 0, 0));
    }
}
The code begins by calculating the upper-left-hand corner where to draw the map so it's centered horizontally and vertically. It then loops through the collection of map markers, painting a red-filled rectangle at each marker position. The rectangle's size is twice the magnitude of the earthquake on each axis, providing a slight idea as to the earthquake's relative magnitude without causing too much overlapping between adjacent earthquakes unless they're very close.
The remaining methods of the map widget are largely bookkeeping to manage the map model itself, as you can see from Listing 5-18.
Example 5.19. Managing the view's model and its signals
void MapItemWidget::setModel(QAbstractItemModel* model)
{
    if (mModel) {
        disconnect(mModel, 0, this, 0);
    }
    mModel = model;
    if (mModel) {
        connect(mModel, SIGNAL(dataChanged(QModelIndex,QModelIndex)),
                this,   SLOT(itemsChanged(QModelIndex,QModelIndex)));
        connect(mModel, SIGNAL(modelReset()),
                this,   SLOT(itemsReset()));
    }
    initMarkers();
    update();
}

void MapItemWidget::itemsChanged(const QModelIndex&, const QModelIndex &)
{
    initMarkers();
    update();
}

void MapItemWidget::itemsReset()
{
    initMarkers();
    update();
}
You first saw the map widget's setModel method invoked back in Listing 5-8; it needs to do four things:
Disconnect from all signals emitted by the old model, if there is one.
Cache a reference to the model so it can later get data from the model when it initializes or updates the list of map markers.
Connect slots to the model's
dataChangedandmodelResetmethods, so that the widget can redraw any time the model data changes.Re-initialize the cache of markers, so that the view updates with the new data.
The two slots that handle the model changes, itemsChanged and itemsReset, simply invalidate the entire cache and re-create the cache of markers. A more sophisticated view might keep a cache indexed by model index, so that the dataChanged signal's indices could be used to determine which items should be updated, and then update only the changed items. A good place to start in doing this would be to use a QHash keyed by QModelIndexes, with each entry in the cache being the projected point and its magnitude. However, given the number of items likely for the application (certainly less than one hundred), the infrequency of model updates (never, once the application has received its data), and the relatively low cost of handling a single item (a handful of floating-point operations) this complexity doesn't seem necessary.
In this chapter, we've covered a lot of ground. Armed with a basic knowledge of Qt, we've shown you how to create multiview applications that draw and present information from a variety of sources, including compile-time resources, device position, the Web, the device's messaging subsystem, local and remote multimedia, and system information.
In the next chapter, we largely set this knowledge aside, and turn to writing applications declaratively using Qt Meta-object Language (QML) and JavaScript, and how to bind applications written with these tools to parts of your application in C++.