Chapter 4
Understanding C# Statements
What you will learn in this chapter:
- Operators and operands
- Expressions
- Statements
- lvalues and rvalues
- What a symbol table is and how Visual Studio uses it
- How Visual Studio interacts with Windows
- The Bucket Analogy
- Using the Visual Studio debugger
- Magic numbers and why to avoid them
wrox.com code downloads for this chapter
You can find the wrox.com code downloads for this chapter at www.wrox.com/remtitle.cgi?isbn=9781118336922 on the Download Code tab. The code is in the Chapter04 folder and is individually named according to the names throughout this chapter.
Most beginning books do not discuss many of the topics presented in this chapter. This may cause you to wonder why you need to understand them. There are several reasons. First, after you master these topics, many of the other elements of C# (and other programming languages in general) become clearer and more intuitive. Memorizing certain rules is one approach to learning a language: After you memorized (and obey) a rule, you can avoid some of the error messages that Visual Studio might throw at you. However, truly understanding why a rule exists in the first place is a vastly superior way to learn. It is this higher level of understanding that you should seek. If you understand the material presented in this chapter, finding and correcting program errors becomes easier. Error detection becomes easier because you have a deeper understanding of what C# does “under the hood.” Finally, your knowledge of the material presented here is portable. That is, the concepts and techniques discussed in this chapter apply to all programming languages, not just C#. If you decide to learn another programming language later, these concepts can help you learn that new language.
Basic Building Blocks of a Programming Language
Although the specific rules of a programming language differ from one language to another, the underlying foundation upon which all programming languages are built is similar. There is a hierarchy that all languages follow:
Programs → Statements → Expressions → Operands and Operators
You can verbalize this hierarchy like this: “Programs consist of one or more statements. Statements consist of one or more expressions. Expressions consist of one or more operands with one or more operators.” Therefore, at its lowest level, to write a program you must understand operands and operators. You begin your journey into the innards of C# by learning about operands and operators.
Operands and Operators
In Chapter 3 you wrote a program that used two variables to store the information that was entered by the user. The program was designed to divide the first number by the second number. In the examples for the program in Chapter 3, the user typed in 10 for the first number and 6 for the second. You've been doing this kind of math since you were in grade school. You can write the process of dividing 10 by 6 as:
10 / 6
This simple math process involves taking the value 10 and dividing it by 6. In this example, 10 and 6 are called operands. An operand is simply a piece of information or data. The information associated with an operand might be stored in a variable, or it may be one literal value divided by a second literal value, as previously shown.
To make the program in Chapter 3 more flexible, however, you created variables to store the values entered by the user in the program. In that program, you defined two variables named operand1 and operand2. If operand1 has a value of 10 and operand2 has a value of 6, you can write the same process like this:
operand1 / operand2
The essence of the division process remains the same. All that has been changed is to replace the literal values 10 and 6 with the variables operand1 and operand2.
Sandwiched between the two operands is the division sign (/) that tells you what to do with the two operands. The division sign is the operator. An operator specifies what action should be done with the operand(s). In this example you simply want to divide operand1 by operand2. This leads to the following generalization for a math process:
operandOne operator operandTwo
For all math operations (add, subtract, multiply, divide, and modulo), the math operator (+, -, *, /, and %) requires two operands to perform its function. Because these math operators require two operands, they are called binary operators. Indeed, any operator that requires two operands to perform its task is a binary operator. If an operator requires only one operand, it's a unary operator. The negation operator (!) is a unary math operator. Finally, if an operator requires three operands, it is a ternary operator. Most of the C# operators are binary operators.
Expressions
An expression is simply one or more operands and their associated operator treated as a single entity. For example, in the integer division program in Chapter 3, you wrote the following line:
answer = operand1 / operand2;
This line uses the two operands and the division operator to calculate the result of dividing operand1 by operand2. Because an expression is simply one or more operands and operators treated as a unit, you can visualize this program statement as
answer = expression1;
with the understanding that expression1 consists of operand1 divided by operand2. But, if you generalize the statement
answer = expression1;
it can be rewritten as this:
operand4 = operand3;
where answer is replaced with operand4 and expression1 is replaced with operand3. The only thing that's different is that the operator has changed to the assignment operator (=). From this, you can also conclude that the assignment operator is a binary operator.
Suppose operand1 equals 10 and operand2 equals 5. Notice the sequence followed in processing the program line:
answer = operand1 / operand2;
answer = 10 / 5;
operand4 = 10 / 5;
operand4 = 2;
2;
The process to calculate the result of the division involves little more than using each operator and its operands to generate the proper result. When the chain of events finishes, operand4 holds the result of the division.
Statements
In C#, a program statement is one or more expressions terminated by a semicolon. However, because expressions are composed of operands and operators, it follows that the following is a program statement:
answer = operand1 / operand2;
This program statement actually contains two operators (the division operator and the assignment operator) and three operands (answer, operand1, and operand2) terminated by a semicolon.
You can make program statements as complex as you want, as long as they end with a semicolon. For example, you could take the following program lines:
part1 = v + w;
part2 = x + y;
solution = part1 * part2;
and write them as a single statement:
solution = v + w * x + y;
Now apply some values to the variables in the preceding statement. Assume v = 2, w = 3, x = 4, and y = 5. You can view the program statement as the following:
solution = 2 + 3 * 4 + 5;
The question is, “What does solution equal?” Is the answer 25 or is the answer 19? If you look back at the original set of three program statements, part1 equals 5 after its statement is processed, while part2 resolves to 9. The third statement multiplied part1 by part2 and assigned the result into solution. Because part1 resolves to 5 and part2 resolves to 9, solution is 45, not 25 or 19. What happened? Why did your collapsed statement version produce the wrong answer?
Operator Precedence
Any time a program statement involves multiple operators, like the one you just saw, there must be a set of rules that enables you to properly process the operators and operands in the expressions. Table 4.1 presents the precedence, or order, in which operators are processed.
Table 4.1 Operator Precedence
| ORDER | TYPE | SYMBOL |
| 1 | Negation | ! |
| 2 | Multiply, divide, modulus | *, /, % |
| 3 | Add, subtract | +, – |
| 4 | Assignment | = |
Table 4.1 shows that the multiply, divide, and modulus operations should be performed before you perform any addition or subtraction operations. Given the information in Table 4.1, the order of processing in the program statement
solution = 2 + 3 * 4 + 5;
is performed in the following order:
      (4)   (2) (1) (3)
solution = 2 + 3 * 4 + 5;
This means that C# expects the multiplication operation (3 * 4) to be performed first, followed by the addition of 2 to the result, followed by the addition of 5 to that result and, finally, the values assigned into solution. You can show the operator precedence in action in the following steps:
solution = 2 + 3 * 4 + 5;
solution = 2 + 12 + 5;
solution = 14 + 5;
solution = 19;
How can you know to add 2 and 12 together first and then add 5? Any time two math operators have the same precedence level, you process them from left to right. You resolve the order of execution of operators of equal precedence by the operators' associativity rules. When ties are resolved by processing from left to right, the operators are called left-associative. If ties are broken by the right-most operators being processed, the operators are said to be right-associative.
Math operators are left-associative. The assignment operator, however, is right-associative. Because the assignment operator is right-associative, everything on the right side of the assignment operator is resolved before anything is assigned into the operand on the left side of the assignment operator. In the preceding statements, these precedence and associativity rules ensure that the answer assigned into solution is 19.
Overriding the Default Precedence Order
Suppose you actually do want the correct solution value to be 45 instead of 19. This would be the same as writing the following:
part1 = 2 + 3;
part2 = 4 + 5;
solution = part1 * part2;
What you actually want, therefore, is the final statement to resolve to this:
solution = 5 * 9;
The preceding code assigns a value of 45 into solution. However, you saw earlier that
solution = 2 + 3 * 4 + 5;
resolves to a solution value of 19, not 45. How can you get the wanted result?
You can override the default precedence order by using parentheses. If you change the statement to
solution = (2 + 3) * (4 + 5);
the parentheses tell C# to perform the operations inside the parentheses before any other operations. The parentheses cause the following sequence to be performed:
solution = (2 + 3) * (4 + 5);
solution = 5 * 9;
solution = 45;
The end result is that solution equals 45. Parentheses are left-associative.
You now know the basic rules necessary to writing program statements in C#. Writing even the most complex program simply boils down to stringing the right sequence of operands and operators together to form expressions that are then used to form program statements. Now you need a thorough understanding of how variables are defined so that you can use them as operands in an expression.
The following program and its modifications will help you better understand how the precedence of operators affects the result of an expression.
answer = operand1 / operand2;
answer = 2 + operand1 * operand2 + 5;
answer = (2 + operand1) * (operand2 + 5);
answer = 2 + operand1 * operand2 + 5;
answer = 2 + 3 * 4 + 5;
answer = 2 + 12 + 5;
answer = 19;
answer = (2 + operand1) * (operand2 + 5);
answer = (2 + 3) * (4 + 5);
answer = 5 * 9;
answer = 45;
Defining Variables
Some programmers see a statement like
int val;
and think that the program is defining or declaring a variable named val. Many programmers use the terms define and declare interchangeably. Defining a variable is different from declaring a variable. The two terms are actually quite different.
Defining a Variable from the Compiler's Point of View
Suppose you write the statement
int i;
in a program. In your mind, you are simply telling the program that you want to create an integer variable named i for use in your program. To Visual Studio, however, things aren't quite that simple. Consider what Visual Studio has to do just to process this simple statement.
Step 1: Preliminary Syntax Checking
First, Visual Studio must check the statement for syntax errors. A syntax error occurs anytime you write a program statement that does not obey C# syntax rules. For example, you know that a variable name cannot begin with a digit character or contain punctuation characters. If you try to create a variable with either of these conditions, Visual Studio issues an error message. You learned in Chapter 3 that if you make a syntax error in a program statement, IntelliSense places a squiggly line under the offending statement. Because you know the syntax of your program statement is correct, there is no squiggly line, and Visual Studio moves to the next step.
Step 2: Symbol Table Checking
Just because you have the syntax for the statement right doesn't mean there can't be other problems. Therefore, the next thing Visual Studio does is examine its symbol table to see if you have already defined a variable named i. A symbol table is a table internal to Visual Studio that it uses to keep track of the data you want to use in your program. Table 4.2 shows a hypothetical symbol table. (Although a “real” table might have dozens of columns in it, the simplified symbol table shown in Table 4.2 serves your purpose nicely.)
Table 4.2 Hypothetical Symbol Table

In Table 4.2, assume that column one (ID) shows the names of the variables that have already been defined. (Variable names are often referred to as identifiers, hence the column header name, ID.) The second column of the symbol table tells Visual Studio the data type of the variable. You learn the meaning of the third column, Scope, shortly. The fourth column, lvalue, is where in memory each variable is located. In other words, the lvalue for hatSize is 650,000. Simply stated, if Visual Studio needs to use the value associated with hatSize, it must access memory address 650,000 to find its value.
In this step, Visual Studio scans the ID column to see if you have already defined a variable named i. Because there is no variable in the symbol table with an ID of i, Visual Studio proceeds to step 3. If you had already defined a variable named i (at the same scope level), you would get an error message like this:
A local variable named 'i' is already defined in this scope
If Visual Studio enabled you to define another variable named i at the same scope level, it would not know which i to use when you try to use the variable in some other expression. This particular error message is called a duplicate definition error message and tells you that it is illegal to have two variables with the same name at the same scope level.
However, because you know you can't have two variables with the same name, i does not appear in the symbol table. Therefore, Visual Studio knows it's okay to add i to the symbol table. Table 4.3 shows the state of the symbol table after you add the variable named i.
Table 4.3 Adding New Variable to Symbol Table

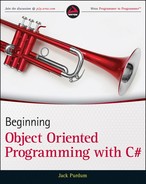
Notice that the lvalue column for variable i does not have a value in it. (Technically, the lvalue is automatically set to null by Visual Studio. However, because null cannot be a valid memory address, you can think of the value as unknown.) You can also represent the current state of variable I, as shown in Figure 4.1.
lvalues and rvalues
Figure 4.1 shows variable i with two “legs” extending from it, labeled lvalue and rvalue. The lvalue of a variable refers to the memory address where the variable is stored. The lvalue for a variable is always interpreted as a memory address. (The term lvalue was coined decades ago when programmers used assembly language to write their programs. The lvalue of a variable was an abbreviation for its “location value,” or memory address. Note also that lvalues are the “left leg” when diagrammed as it is in Figure 4.1. This has caused some interpretations of lvalue to mean “left value.”) The lvalue appears as a question mark for the moment, because you do not presently know variable i's memory address.
The rvalue of a variable refers to the actual data value currently stored in the variable. (The rvalue term also had its roots in assembly language programming and stood for “register value.” Again, some interpretations have this associated as the “right value” because is it the right leg in the figure.) Normally, you use the assignment operator to set the rvalue of a variable. For example, the statement
i = 10;
assigns the value of 10 into the rvalue of variable i. However, because you are still checking the symbol table entries at this point, nothing is presently associated with the rvalue of variable i. Therefore, you also can see the rvalue for i in Figure 4.1 as an unknown value as represented by a question mark.
Figure 4.1 lvalues and rvalues

Step 3: Defining a Variable
Because Table 4.2 does not have another variable named i in it, IntelliSense gives the syntax for the statement a clean bill of health. Visual Studio is now ready to associate a memory address with variable i in the symbol table.
However, assigning memory addresses to specific variables is not Visual Studio's job. It is the responsibility of the operating system to find enough memory for a variable. Therefore, Visual Studio sends a message to the operating system (assume it's the Windows operating system) and says, “Hey, Windows! It's me…Visual Studio. My programmer wants to define an integer variable for use in a program. Can you find 4 bytes of free memory for me?”
Recall from Chapter 3 that each integer variable requires 4 bytes (32 bits) of storage. Upon receiving the message from Visual Studio, Windows routes the message to the Windows Memory Manager because the Memory Manager is responsible for fulfilling memory requests.
You might ask, “Why can't Visual Studio allocate the memory itself?” “The reason is because Windows enables more than one program to execute at a time. Because Visual Studio doesn't bother tracking what other applications are doing, if it allocated the memory, it runs the risk to trample the data of some other application. The Windows Memory Manager, however, is responsible for tracking memory use for every application currently running on the computer.
The Windows Memory Manager scans its list of free memory and probably does find the requested 4 bytes. You can assume that the Windows Memory Manager finds the 4 bytes for the integer starting at memory address 900,000. Having found the requested memory, the Windows Memory Manager sends a message back to Visual Studio, “Hey, Visual Studio! It's me…the Windows Memory Manager. I found you 4 bytes of free memory for variable i starting at memory address 900,000.” Visual Studio gets the message and immediately puts that memory address into the symbol table for variable i. The symbol table now looks like Table 4.4.
Table 4.4 Symbol Table After New Memory Allocation

Notice how the lvalue in the symbol table records the memory address of where the variable named i resides in memory. You can reflect this change in Figure 4.2.
Figure 4.2 lvalue after memory allocation
The rvalue remains unchanged, but the lvalue reflects that variable i is stored starting at memory address 900,000.
You can now state that you have defined variable i. (You see examples of data declarations later in the book.) Whenever you say that a variable is defined, it means that variable appears in the symbol table and has a valid memory address (lvalue) associated with it.
Using a Variable in a Program
Now that you understand what a symbol table is and the information it contains, examine how Visual Studio processes something as simple as an assignment statement. Assuming that you have defined an integer variable named i, suppose you write the following statement:
i = 10;
The program statement seems simple enough, but now examine the steps Visual Studio must perform to process the statement.
The name ‘i’ does not exist in the current context
Figure 4.3 rvalue for variables

The rvalue of variable i has been changed from the question mark shown in Figure 4.2 to the value 10. Because the rvalue has changed, you can also say the state of variable i is changed by the assignment statement.
The Bucket Analogy
The Bucket Analogy can help you remember what lvalues and rvalues are all about and reinforce your understanding of what a data definition is. Suppose you write the statement
int val;
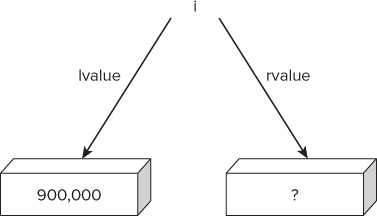
Recall that Visual Studio checks the syntax of this statement and then searches the symbol table to make sure val has not already been defined at the current scope. Assuming those checks are passed and IntelliSense is happy, Visual Studio sends a message to the Windows Memory Manager asking for 4 bytes of free memory for the int you want to define. Assuming all goes well, the Windows Memory Manager sends back the memory address at which val will be stored. Now assume that the memory address for val is 750,000. That memory address is then entered into the lvalue column in the symbol table.
The Bucket Analogy assumes that you have a pile of empty buckets lying around. The buckets come in different sizes. Some are big enough to hold 1 byte of data, some can hold 2 bytes of data, and some buckets are big enough to hold 16 bytes of data. Because you want to define an int data type, you select a bucket big enough to hold an int data type. As you learned in Chapter 3, an int takes 4 bytes of memory, so you grab a 4-byte bucket.
Now, paint the variable's name, val in this example, on the side of the bucket so that you can distinguish it from other buckets that might be stored in memory. Now, pretend you can physically take the bucket inside your computer and place it at memory address 750,000. When you finish, you might see something like what is shown in Figure 4.4.
Figure 4.4 Memory map with bucket
The Bucket Analogy relates to a data definition in the following way:
The Bucket Analogy is used again in Chapter 5, to help explain some additional concepts associated with data definitions and how the data is used in a program. For now, simply remember the three major points of the Bucket Analogy. Those points should help you understand the content in later chapters and make it easier to detect, isolate, and fix program errors.
Types of Program Errors
There are three basic types of program errors. Obviously, your objective is to write programs totally free of program errors. Program errors are also referred to as program bugs. (The term “bug” was created because one of the earliest program errors ever detected involved a moth flying into the computer and short-circuiting the electronics. The process to remove program errors is called debugging.)
The easiest way to remove program bugs is to write perfect code so there are no bugs in the first place. Although that goal is laudable, every programmer, no matter how seasoned, writes programs that contain errors. A skilled programmer, however, can detect, isolate, and correct program errors more quickly than a less skilled programmer. Also, experienced programmers do make fewer programming errors simply because of their experience. The lesson here is that you should expect to make a lot of program errors in the beginning…every novice programmer does.
In the beginning you start with the “flat-forehead” type of programming error. Those are the kind of errors that, when you do find them, you slam the heel of your hand into your forehead while mumbling, “How could I make such a silly mistake?” Relax. We've all made those mistakes…and still do! The key is not to get discouraged. View each program error as a challenge and learn from the experience. Alas, as your programming skills advance, so will the type of errors you make. Although there will be fewer errors as you gain experience, those errors you do make tend to become more sophisticated and harder to isolate and fix. Now take a quick overview of the three types of program errors. You learn a lot more about errors and debugging in later chapters. For now, however, just categorize the types of program errors.
Syntax Errors
The first type of error is a syntax error. You already know that syntax errors are caused when you don't obey the syntax rules of the programming language used. A common syntax rule you might make in the beginning is forgetting to terminate each program statement with a semicolon.
IntelliSense does an excellent job of catching syntax errors. Although you may hate the squiggly line that IntelliSense displays, it's a lot easier for IntelliSense to detect and isolate syntax errors than it is for you to do it.
Semantic Errors
A semantic error occurs when you obey the syntax rules of the language but use the statement out of context. For example, a sentence in English is expected to have a noun and a verb. Consider the sentence, “The dog meowed.” This sentence does obey the syntax rules of having a noun and a verb, but the context of the sentence is out of whack. Dogs don't meow; therefore the context of the statement is incorrect.
The error message you saw earlier,
The name ‘i’ does not exist in the current context
refers to a type of semantic error. There may well be a variable named i defined somewhere in the program, but it is not currently in scope. That is, you are trying to use i when it is out of scope. IntelliSense does a good job to detect semantic errors. Semantic errors are, however, a little more sophisticated than simple syntax errors.
Logic Errors
Logic errors are those errors that remain after all the semantic and syntax errors have been removed. Usually, logic errors manifest themselves when the result the program produces doesn't match the result your test data suggest it should produce. Most of the time, logic errors are found in the Process step you studied in Chapter 3. However, it is also quite possible that the Input step has captured a faulty value and fed it to the Process step. (This is a GIGO problem: Garbage In, Garbage Out.) Logic errors often occur when you implement the algorithm to solve the problem incorrectly.
The key to fixing logic errors is to reproduce the error consistently. A repeatable logic error is much easier to track down and fix than an error that appears to be occurring randomly. (In Chapter 5 you learn the details to use some of the tools Visual Studio provides to help you detect and isolate program bugs.)
The Visual Studio Debugger
Visual Studio provides a number of tools to help you detect errors in your programs. IntelliSense is one of those tools that sits in the background carefully examining your program code as you type it into the Source window. IntelliSense does a great job of finding syntax and semantic errors but is less helpful to find logic errors. Because the computer has no intelligence of its own, it blindly follows whatever instructions you give it even if those instructions are wrong. After you have the syntax and semantics of your program stated correctly, you need a different set of tools to help you if the program produces incorrect results. The next line of defense in fixing program errors is the Visual Studio debugger.
The Debugging Process
A debugger is a programming tool designed to help you locate, isolate, and fix program errors. Visual Studio has a powerful program debugger built into its IDE. The process to remove program errors is called debugging. Following are four steps in the debugging process:
Making Repetitious Debugging Easier
If your program has a particularly nasty bug, chances are that you must rerun the program many times. Frequently, this repetition also requires you to type in the same data set each time the program is rerun. Retyping the data into the textboxes each time you run the program gets tedious in a hurry. If you feel that correcting the bug is going to take several repeated runs of the program, you may want to consider using the Properties window to set the Text property of each of the input textbox objects to its associated test value. This can save you from retyping the input data each time you rerun the program. After you fix the bug, be sure to remove the test data from the Text property of each textbox object.
Let's exercise the debugger a bit in the following Try It Out using a program that you wrote earlier.
Using the Visual Studio Debugger
A number of features are available to you in the Visual Studio debugger. The point of this section is not to present an exhaustive list of those features but to show you some of the more useful features that you can use again and again.
Setting a Breakpoint
A basic feature of any debugger is the capability to set a breakpoint in the program. A breakpoint is simply a point in the program at which you would like to pause the execution of the program. Because program execution pauses at the breakpoint, you can use the debugger to inspect the state of various program variables as they exist at that point.
If the values of the variables aren't what you expected at that breakpoint, the error most likely occurred at some earlier point in the program's execution. In that case, set another breakpoint at some earlier point in the program. If the values are correct at the current breakpoint, remove that breakpoint, and move it to a later execution point in the program.
There are two ways to set a breakpoint. First, you can place the cursor on the program line at which you want to pause the program and press the F9 key. This causes the debugger to highlight that line in red and place a red dot in the extreme left margin of the Source window, as shown in Figure 4.5.
Figure 4.5 Setting a breakpoint
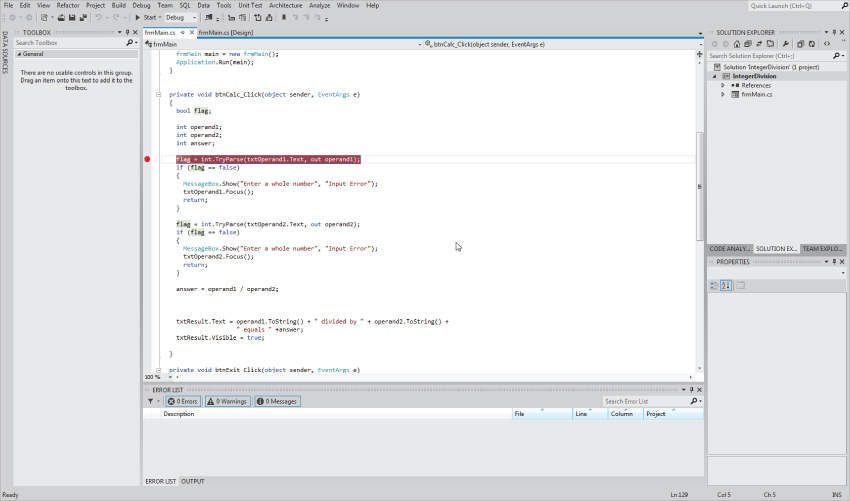
A second way to set a breakpoint is to click the mouse while it's located in the extreme left margin of the Source Window and even with the program line at which you want to pause the program. (The extreme left margin is where the red dot appears in Figure 4.5.)
To remove a breakpoint, move the cursor to the red line of the breakpoint to be removed, and press the F9 key again. You can use the F9 key to toggle a breakpoint on and off for a particular line. Likewise, you can click the extreme left margin a second time to remove a breakpoint.
Using a Breakpoint to Examine Variables
After you have set a breakpoint, run the program until it stops there. When the breakpoint is reached, Visual Studio switches to the Source Window and displays the line where the breakpoint was set. Figure 4.6 shows the state of Visual Studio at the point where the breakpoint was set.
Figure 4.6 Opening the Locals window
Although it doesn't show in Figure 4.6, the breakpoint line has changed its background color from red to yellow. Also note that the red dot now has an arrow inside of it, pointing to the line at which the breakpoint was set.
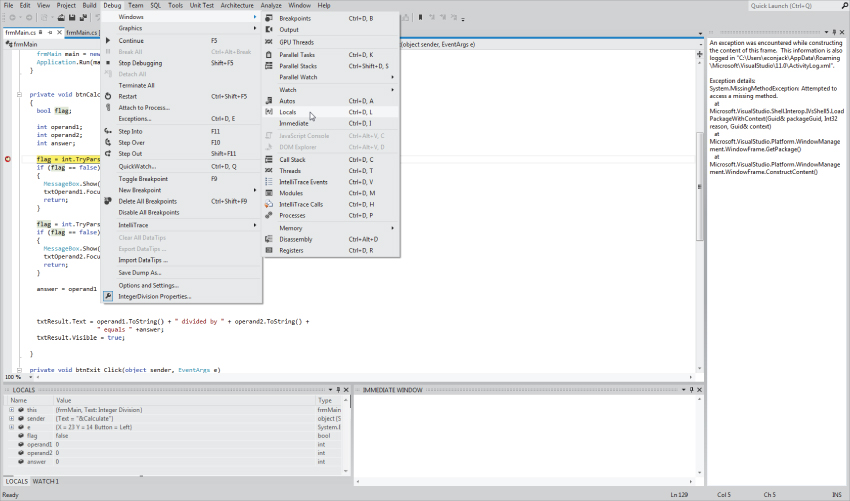
To examine the variables at that point in the program, use the Debug Windows Locals menu sequence to activate the Locals window. Visual Studio should look similar to Figure 4.7.
Figure 4.7 Using the Locals window

The Locals window appears near the bottom of Figure 4.7 and shows you those variables with local scope. Variables that have local scope are those variables that are visible within the current statement block. In Figure 4.7 the program is paused in the btnCalc_Click() method. Therefore, the Locals window enables you to examine those variables with local scope relative to the btnCalc_Click() method.
Figure 4.8 presents an enlarged view of the Locals window for the breakpoint shown in Figure 4.7.
Figure 4.8 Locals window

In Figure 4.8, the C# keyword this refers to the currently active object. In the current program, frmMain is the currently active object. If you click the plus sign shown in the left margin of the Locals window of the this entry, you can see the other objects associated with frmMain. When you click the plus sign, the window displays details about the entry, and a minus sign is shown where the plus sign used to be. If you click the minus sign, the image reverts back to its previous state. Therefore, clicking a plus sign in the Locals window expands the window to present additional information, whereas clicking a minus sign restores the previous (collapsed) state of the window.
The next two lines in Figure 4.8 display information about the sender and e parameters, respectively. These two variables provide information about the event that caused the program to execute the btnCalc_Click() method. (Recall that Windows is an event-driven operating system, so the event information is shared with Windows.) Finally, the last four lines provide information about the flag, operand1, operand2, and answer variables, respectively.
You can also observe the value of a variable by moving the cursor over the variable in the Source window. This action causes Visual Studio to display the current value of the variable. This is the fastest way to view the value of a given variable. Use the Locals window when you need to view more than one variable at a time.
Single-Stepping the Program
In Figure 4.7 the breakpoint line has changed from red to yellow. The fact that the line is yellow is the debugger's way to tell you that it is about to execute the breakpoint line. This means that the debugger has stopped the program before executing the breakpoint line. This is exactly what you want. Because you set a breakpoint at a place in the program where you think a particular statement is causing a problem, the yellow line means that you can examine the state of the variables just before the line is executed.
Now, press the F10 key. Notice how the yellow line advances to the next program line and the original breakpoint line reverts to its red background color. The arrow drawn in the margin has moved down to the line that is about to be executed, and the red dot has reverted to its original state. You can see the changes produced by the F10 key in Figure 4.9.
Figure 4.9 Reaching a breakpoint
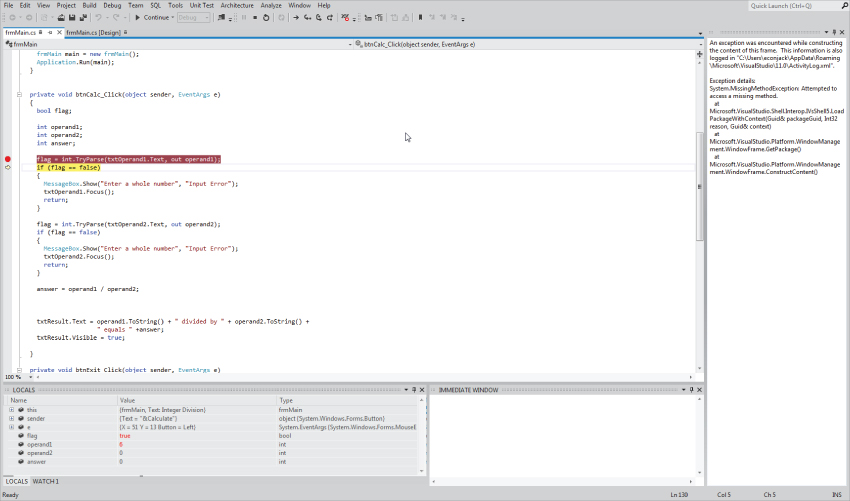
The process to advance the program one line at a time is called single-stepping the program. Because the program has advanced to the next line, you can now examine the values of the variables to see if executing the statement in which the breakpoint was set changed these values in the wanted way. If not, something in the breakpoint line caused a problem. If the values of the variables are as expected, you can continue to press the F10 key to execute additional lines or set another breakpoint at some other place in the program and run the program to that breakpoint.
To restart the program so it runs “at full speed,” simply press the F5 key or click the Start icon (see Figure 1.8). If you have set another breakpoint that is executed at a later point in the program, the F5 key causes the program to execute normally until the new breakpoint is reached. You can continue to set additional breakpoints until you find the statement line that is causing the error. After you locate the source of the error, correcting it is usually fairly simple.
As you can see, the debugger is a powerful tool when you try to perform the Isolation step of the debugging process. You use many other debugger features in later chapters. However, simply setting a breakpoint, examining the values of variables, and single-stepping the program can go a long way toward correcting program errors.
Defensive Coding
As stated earlier, the best way to avoid program errors is to write perfect code. Because that's not going to happen anytime soon, the next best thing is to write your code with the expectation that something may go wrong. The primary step in this defensive strategy is simple: Write your code so that others can read and understand it.
Write Your Code So That Someone Else Can Easily Understand It
Consider the following list of things you can do in your program source code to make it easier to understand.
Use Program Comments
A program comment is simply a message you leave in the program to help the reader understand the code. There is an art to using comments. Too few comments force the reader to take more time to understand what the program is doing. Too many comments can actually get in the way of understanding the code by adding unnecessary clutter. Commenting every line in a program is almost never necessary. At the other extreme, the code might be so complex that it is easier to put in the name and page numbers of a reference book than to explain it.
Try to use comments for those statements that do something unusual or are critical to processing the data. Simply stated, a comment should make it easier for the reader to understand your code and not get in the way of that understanding.
There are two types of program comments: single-line comments and multiline comments. Always keep in mind that comments are ignored by the compiler, so they have no impact on the performance of the program. (There goes one excuse for not having comments in a program!)
Single-Line Comments
You have seen single-line comments before. These are comments introduced with a pair of slashes (//) followed by the comment. The comment must fit on one line, for example:
answer = operand1 / operand2; // This is the Process step
This line uses a comment to identify that this statement performs the Process step in the program. (In real life, such a comment probably adds little to the understanding of the program and could just as well be left out.)
One issue is whether to place the comment as shown in the preceding example or to have the comment precede the line, as here:
    // This is the Process step
    answer = operand1 / operand2;
If you work for a company writing commercial code, there may be a company policy that dictates the style of comments used. Otherwise, which one you select is a matter of personal preference.
Multiline Comments
Multiline comments are introduced with a backslash-asterisk combination of characters and terminated with an asterisk-backslash, for example:
  /* Purpose: The btnCalc-Click() event method is used to
   * calculate the result of dividing two integer values.
   */
  private void btnCalc_Click(object sender, EventArgs e)
Anything that appears between the comment pairs /* and */ is treated as a comment and ignored by the compiler. The asterisk at the start of the second line of the comment was automatically supplied by Visual Studio. The asterisks help make the comment lines stand out in the code. The most obvious use for the multiline comment is when you need to place a long comment in the code. As a rule, you should make each line short enough so that it doesn't require horizontal scrolling to read it.
Using Multiline Comments as a Debugging Aid
However, you can do more with multiline comments than add lengthy comments to a program. There will be times when you have a section of code giving you a problem and you'd like to try an alternative algorithm. Because you're not sure the new algorithm will work and you don't want to retype the original code if the change fails, the easiest way to remove the code from the program yet still have it available is to surround it with a multiline comment, for example:
    /*    This is the original code
     * x = y * .33  (m * g);
     * z = x % 2 + sigma;
     */
    // Start new code…
    x = y * .45  (m * g);
    z = x % 3.2 + sigma;
    // End new code
In this example the multiline comment has the effect of removing the original two lines of code by surrounding them with the multiline comment pairs. My style is to precede the trial code with a single-line comment marking the start of the new code, followed by the new trial code, followed by a second single-line comment marking the end of the trial code. If the trial code doesn't work properly, it's easy to restore the program to its original state by removing the trial code and uncommenting the original code.
Program comments are useful in documenting what the code is doing and also for trying alternative code. Because comments have no impact on the performance of the program and make it easier for others to read and understand your code, you should use them often.
Use Meaningful Variable Names
Just because you've followed the C# rules to create variable names does not mean you've implemented a good variable name. A good variable name has two characteristics:
- The variable name reflects the purpose or use of the data in the program. If you write a program that converts Fahrenheit to Celsius temperatures, the variable names t1 and t2 aren't actually helpful to the reader of your code. Select variable names that help the reader understand the code.
- The variable name must be long enough to indicate its use, but short enough that you don't get tired of typing it. Although t1 and t2 are too short to be helpful, changing them to currentFahrenheitTemperature and convertedCelsiusTemperature is probably overkill. (You'd get tired of typing in such long variable names even though IntelliSense helps fill in the variable name after you begin typing the name.)
Try to strike a balance between names that are long enough to be helpful and names that are tedious to type. In this case, perhaps tempCelsius and tempFahrenheit would work.
Avoid Magic Numbers
Beginning programmers often use literal values in a program, which I call magic numbers because they are often used without any clue as to their purpose. Suppose you read the following line in a program:
f = 125 + (sl) * 10;
It might take a bit of head-scratching to figure out what the statement means without additional information. Now contrast that statement with this:
    speedingFine = MINIMUMSPEEDINGFINE + (postedSpeedLimit) *
                   DOLLARSPERMILEOVERLIMIT;
Symbolic Constants
The new statement makes more sense because you have used better variable names and replaced the magic numbers with symbolic constants. A constant is simply a variable whose value cannot be changed while the program runs. A symbolic constant is a constant that has a name that reflects the constant's function in the program. Convention finds symbolic constants rendered entirely in uppercase; although, that is not a language requirement.
Symbolic constants are usually defined near the top of the class in which they appear, for example:
public class frmMain : Form
{
  const decimal MINIMUMSPEEDINGFINE = 125M;
  const decimal DOLLARSPERMILEOVERLIMIT = 10M;
  // Rest of the class code appears below…
The C# keyword const in front of a data type means that you are defining a constant of that data type. Because it is a constant, you must initialize the constant at the point where you define it in the program, as shown in the preceding code. After these values are initialized, they cannot be changed while the program is running.
You gain another advantage from using symbolic constants. Suppose you didn't use MINIMUMSPEEDINGFINE for the minimum fine. Instead, suppose you used the magic number 125 throughout the program. Further assume that that same value is also the minimum fine for overweight trucks and motorcyclists who don't wear a helmet. Finally, assume that these three amounts are scattered several dozen times throughout the program. Now some politician decides to raise the minimum speeding fine to $150 for cars. The truck and helmet fines stay the same. Your boss now hands you the program and says, “Fix it!”
You can't just do a global search-and-replace for 125 in the program. That would change the truck and helmet fines, too. You are forced to find each program occurrence of 125, decipher the code to see whether the 125 relates to a speeding fine, and then either make the change or leave the line alone. This is a slow process just waiting for a train wreck to happen.
Suppose instead you had originally written the program like this:
  const decimal MINIMUMSPEEDINGFINE = 125M;
  const decimal TRUCKOVERWEIGHTFINE = 125M;
  const decimal NOHELMETFINE = 125M;
This way, you avoid the use of magic numbers in the code. Not only is your code easier to read, simply changing one line in the program to
const decimal MINIMUMSPEEDINGFINE = 150M;
and recompiling the program makes all the necessary changes to the program automatically. Using a symbolic constant permits you to make the necessary program change in seconds and still be absolutely certain that the correct values are used the next time the program is run.
Symbolic constants make your programs easier to read and change when necessary. Avoid magic numbers in your code and use symbolic constants often. They can save you time in the long run.
Use a Consistent Coding Style
If you are writing code just for yourself, eventually you will develop your own coding style. That is, you will place statement block braces in the same place for each C# keyword. You will define variables in the same place within a method. You will create object (for example, clsPort, txtName, btnExit, lblResult, and so on) and variable names (for example, myHat, yourAddress, herName, and so on) in a consistent manner. Such style consistencies make it easier for you to read and debug your code.
If you work in a commercial development environment, someone else (perhaps company policy guidelines) may set the coding style. Clearly, you must follow that style unless you have enough clout to change it. Although you may be unhappy that you must follow a company style that you don't think is as “good” as your own style, be thankful that your company has a coding style policy. You'd be surprised how development can get bogged down when 30 programmers use 30 different coding styles.
Regardless of your coding environment, pick a coding style and stick with it. It can save you time in the long run.
Take a Break
If you have a particularly nasty bug that has caused you to chase it for several hours, it's time to get up and go some place else for a few minutes. Long sessions without a break tend to make you see what you want to see rather than what's actually going on. Just leaving your desk to get a cup of coffee can help give you a fresh view of the code.
Use a Second Set of Eyes
Looking at the same page of code for hours also causes you to see what you expect to see, not what's actually there. You will have times when you tell yourself that the code cannot be doing what it's doing. Well, it is doing what the code says it's doing, but you're suffering from the Forest-for-the-Trees syndrome.
Many times it's useful to get a colleague to look at the code. More often that I'd like to admit, a colleague will see the error in a few seconds even though I've stared at it for an hour. Just like guys who hate to ask for directions, programmers hate to ask for debugging help. Such an attitude is counter-productive. If help's available, use it.
Summary
In this chapter you learned what you need to do to define a variable for use in a program. Although the approach taken here may seem like using an H-bomb to kill an ant, understanding what Visual Studio is doing with something as simple as a data definition can ultimately make you a better programmer.
Make sure you understand completely what lvalues and rvalues are and how they relate to data definitions. Those terms are used often in subsequent chapters.
Exercises
You can find the answers to the following exercises in Appendix A.
What You Learned in This Chapter
| TOPIC | KEY POINTS |
| Operators and operands | The most basic building blocks in a program |
| Expression | How operators and operands combine to make an expression |
| lvalues and rvalues | Conceptual views of where a variable is stored in memory and what value is stored at that location |
| Symbol table | How data items are tracked by the compiler |
| Bucket Analogy | An easy way to remember lvalues and rvalues |
| Debugging | How a debugger can help you locate errors in your program |
| Magic numbers | Why you should avoid them |