![]()
Managing SharePoint with PowerShell
I am now ready to take on the core of the subject of this book: how to interact with your SharePoint environment using PowerShell. In this chapter, I will make various analogies to compare how PowerShell relates to classic .NET interactions using the SharePoint object model. Throughout the following sections you will learn how you can write PowerShell scripts to manage and interact with different levels of SharePoint artifacts such as site collections, sites, lists, items, and so on. By the end of this chapter, you will have been exposed to the different components of SharePoint, and to their methods and properties that are made available through the object model. As mentioned earlier in this book, I am assuming that by now you have had some level of exposure to any version of SharePoint, and that you understand the different hierarchies of entities that exist within it.
Users who have previously done .NET development for SharePoint will recognize many concepts used in the examples that follow. Remember, PowerShell is built on top of the .NET Common Language Runtime (CLR), and therefore it can be used to interact with any .NET artifact just like you could do if you were using C# or Visual Basic. Just like any good piece of software, special care needs to be paid to objects’ disposition in PowerShell. SharePoint object tends to take a lot of resources in memory, and it is important to free these resources once you are done working with the objects in question. I will dedicate an entire section of this chapter to discuss how to properly manage resources and memory.
By the end of this chapter, you will be able to write, test, and deploy PowerShell scripts that will allow you to perform large and repetitive operations on your SharePoint farms. You will be familiar with the various cmdlet made available to you through the Microsoft.SharePoint.PowerShell module that comes with SharePoint 2013, and you will be able to create your own reusable modules. You will learn how to modify configuration settings, create new objects, and interact with them using scripts. Several real-life scenarios will be given to help you understand how the various examples presented could apply to your work environment.
I will start by describing how to interact with high-level objects such as site collections and webs, and will slowly make my way down to lower-level objects such as list items and users. Farm administration and monitoring will be covered in Chapter 8.
PowerShell in the context of SharePoint is all about interacting with the various artifacts made available to us by the server platform. SharePoint objects expose properties and methods just like any good old .NET object. For example, a list item exposes a property that indicates the date it was last modified. It also exposes a method that can induce a checkout operation on it. All of these properties and methods are available in PowerShell, and you can make direct calls to them, as long as you obtain a reference to the object that you wish to modify using a retriever method. I refer to methods as being retrievers when their sole purpose is to return a single or an array of objects. For example, the Get-SPSite method that returns a site collection object is a retriever method.
![]() Note Remember, you can always get a list of all available methods and properties for a specific object by passing it as a pipe operator to the Get-Member cmdlet.
Note Remember, you can always get a list of all available methods and properties for a specific object by passing it as a pipe operator to the Get-Member cmdlet.
PowerShell can also be used to execute long-lasting and repetitive operations against a farm. In many cases, PowerShell has been proven to be faster to execute administrative operations than its predecessor, the stsadm command line utility.
Throughout the following sections, I will give you a quick overview of the most important PowerShell cmdlets that you’ll need to remember to help you do your daily work as a SharePoint administrator. This chapter should serve as a quick reference when you need to perform a specific operation against your SharePoint farm. Content in the next few pages will be presented as a cookbook, listing various operations with a short description that explains what they do and what you should be using them for. The list of cmdlets will be separated by the level of objects that they affect or with which they interact. All examples listed here will use the SharePoint environment that you built in Chapter 5.
Site Collections
Site collections in the SharePoint world represent the highest level of concrete objects with which your end users will interact. A site collection represents a set of websites that are logically linked together. Each site collection has its own set of permissions, solutions gallery, and other types of resources libraries dedicated to it. In the SharePoint object model, site collections are represented by the SPSite object.
The Get-SPSite cmdlet returns a list of site collections matching the specified criteria. You can use this cmdlet alongside with a URL for a specific site. There are also different parameters that could be used to retrieve different sets of site collections, but these are outside the scope of this chapter. Just know that you could, as an example, retrieve all site collections belonging to a specific content database.
$siteCol = Get-SPSite http://localhost
This PowerShell line will return the site collection associated with the http://localhost URL and will assign it to variable $siteCol (see Figure 6-1).
Figure 6-1. Example of Get-SPSite in use
Move-SPSite lets you move an existing site collection from one content database to another. It can be useful to regroup together various site collections for backup purposes. The following example assumes that the NewContentDB database already exists and that you are trying to move the specified site collection to it:
Move-SPSite http://localhost -DestinationDatabase NewContentDB
Copy-SPSite
The Copy-SPSite cmdlet makes a copy of an existing site collection. The copy can be done in the same content database or in a different one. You also can use this cmdlet to copy a site collection from one Web Application to another one, as shown in Figure 6-2.
Copy-SPSite http://localhost http://localhost/sites/destination
Figure 6-2. New site created using the Copy-SPSite cmdlet
New-SPSite
New-SPSite creates a new site collection under a SharePoint Web Application. You have the option of specifying under what content database to have it created. If no content databases are specified, SharePoint automatically determines where to store it. Take note that if you don’t specify a template type when creating your new site collection, you will get a prompt asking you to select a template when you’ll first try to access it through the SharePoint interface. If you wish to specify a default web template, you can do so by adding the -Template parameter to the cmdlet call and passing it the name of the template to use. You can find a full list of all template names that are available in SharePoint 2013 by using the Get-SPWebTemplate cmdlet. Figure 6-3 shows the creation of a new site collection using PowerShell.
New-SPSite http://localhost/sites/test -OwnerAlias "ContosoAdministrator"
Figure 6-3. Creating a new Site Collection using the New-SPSite cmdlet
Set-SPSite applies the specified configuration parameters to a specific site collection. Note that you could also get a reference to your site and directly modify the properties you want. It is what I consider to be a “shortcut” cmdlet:
Set-SPSite http://localhost/sites/test-MaxSize 2000
This example sets a specific quota for the http://localhost/sites/test site collection. The same results could have been achieved by calling the following code:
$siteCol = Get-SPSite http://localhost/sites/test
$siteCol.Quota.StorageMaximumLevel = 2000
The PowerShell snippet in Figure 6-4 proves that the two methods are equivalent.
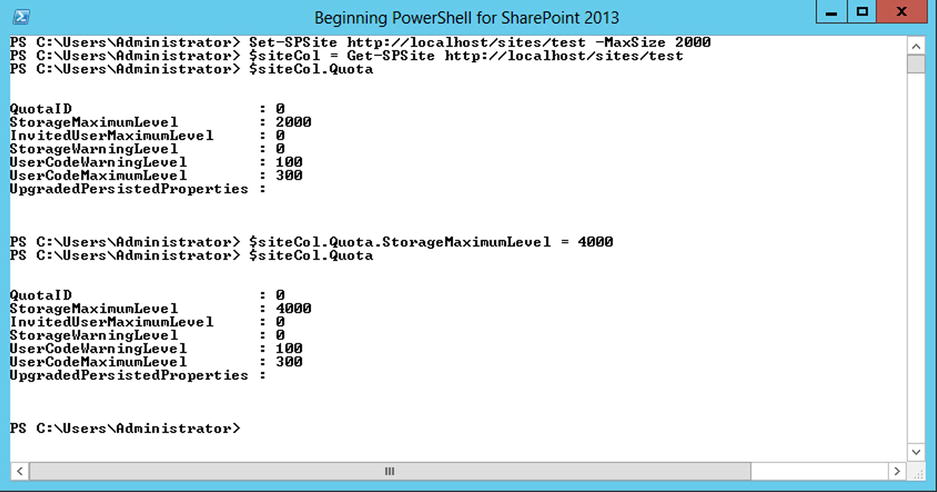
Figure 6-4. Changing a Site Collection’s quota using PowerShell
The Remove-SPSite cmdlet does exactly what you think it does. It deletes a specific site collection from a web application (see Figure 6-5). The only required parameter for this operation is the URL or GUID of the site collection to delete.
Remove-SPSite http://localhost/sites/test
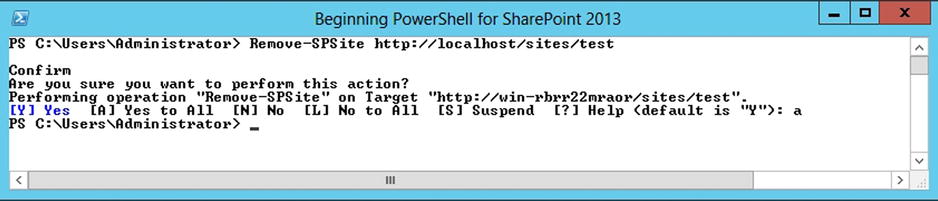
Figure 6-5. Removing a Site Collection using the Remove-SPSite cmdlet
Get-SPDeletedSite is a retriever method that returns a list of site collections that have been deleted based on specific research criteria. For example, you could get a list of all site collections that have been deleted under the “/sites” managed path (see Figure 6-6).
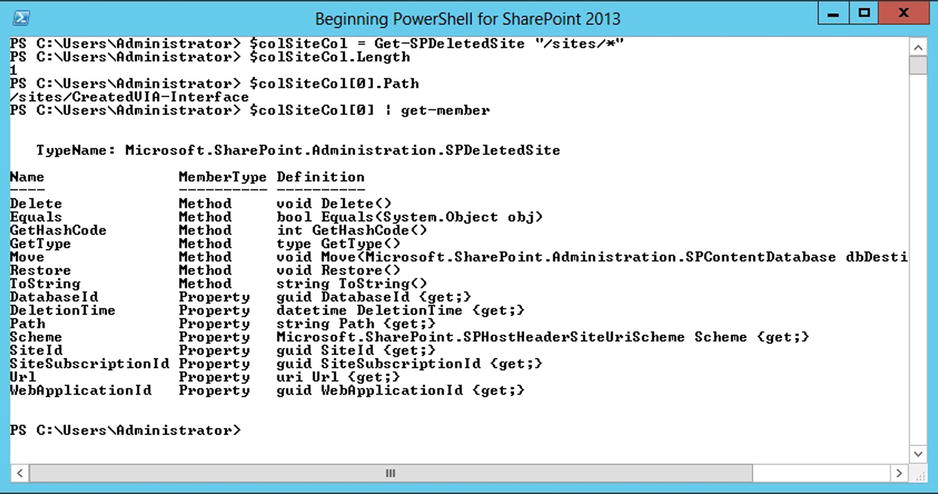
Figure 6-6. Retrieving a deleted Site Collection using PowerShell
![]() Note This cmdlet only returns site collections that have been deleted via the SharePoint interface. The site collection we deleted using PowerShell in our previous example is long gone and cannot be retrieved.
Note This cmdlet only returns site collections that have been deleted via the SharePoint interface. The site collection we deleted using PowerShell in our previous example is long gone and cannot be retrieved.
$colSiteCol = Get-SPdeletedSite "/sites/*"
As you’ve just seen, a special type of site collection object in SharePoint exists, called the Deleted Site Collection. This object is in limbo between life and death. Think of it as being a file in the recycle bin, which is given a second chance. From that state on, a site collection can either be permanently deleted or restored back. Of course, it can be moved over another content database but nothing more.
The Remove-SPDeletedSite cmdlet receives the identity of the deleted site collections you want to permanently delete and deletes it. You can either specify a specific site collection by its GUID, or specify a server-relative URL. Based on the Get-SPDeletedSite example in the preceding section, if we would like to remove the /sites/CreatedVIA-Interface site collection, we could execute the following line of PowerShell.
Remove-SPDeletedSite /sites/CreatedVIA-Interface

Figure 6-7. Removing a deleted Site Collection from the recycle bin using PowerShell
Restore-SPDeletedSite
As mentioned in the preceding section, a deleted site collection also can be restored. The Restore-SPDeletedSite cmdlet does the opposite of Remove-SPDeletedSite and actually brings a deleted site collection back from the dead into its former glory, assuming that it was deleted through the web interface and not through PowerShell (see Figure 6-8).
Restore-SPDeletedSite /sites/CreatedVIA-Interface

Figure 6-8. Restoring a deleted Site Collection from the recycle bin using PowerShell
Putting It Together: Creating a Site Collections Structure
Now that we have learned how easily we can interact with SharePoint site collections using PowerShell, we will build on the environment built in the previous chapter and will create a new site collection for every business unit identified in our fictive company, called Contoso. You will remember that when you created users in your domain, you also created five different security groups, each representing a different business unit. Those were:
- Administration
- Finance
- Human Resources
- Directors
- Tech Support
What you will want to do next is call the New-SPSite cmdlet and let it create these new business site collections. You could just call the cmdlet five times in a row with different parameters, but you’ve learned to do better. Put your newly acquired PowerShell skills to work and write something a bit more creative and reusable. What you are trying to achieve here can actually be achieved as a one liner using a pipe operation. Start by declaring an array containing the name of each business unit, and then pipe each of these names into your New-SPSite cmdlet. Then use the $_ operand to insert the names into the new site collection’s URL as follows (see Figure 6-9):
"Administration", "Finance", "Human Resources", "Directors", "Tech Support" |
%{New-SPSite http://localhost/sites/$_ -OwnerAlias contosoadministrator -Template "STS#0"}
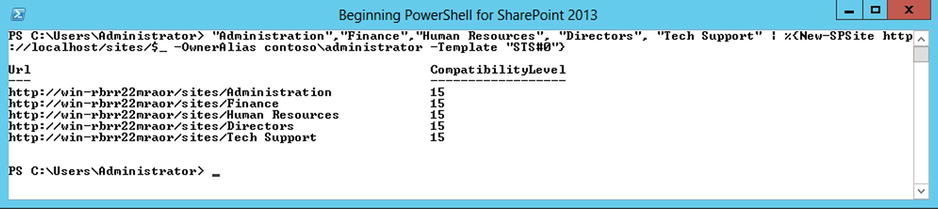
Figure 6-9. Creating Site Collections in batch using PowerShell
It doesn’t get any simpler than this. You are now ready to dig deeper into the SharePoint object model and start looking at the various ways PowerShell can help you interact with webs.
Webs
Some of you may refer to webs as being SharePoint sites. I tend to prefer using “webs,” just because it doesn’t make it ambiguous as to whether we are talking about site collections (SPSite) or about an actual website. Microsoft identifies webs as being SPWeb objects in the SharePoint object model. A web in the context of SharePoint is what your users will be interacting with. It is something more tangible to end users than the concept of site collections. It is important to note that, in SharePoint 2013, every site collection needs at least one web in it. This web needs to exist directly at the root of its site collection and is being referred to as being the root web for the collection. By default, when using the New-SPSite cmdlet, PowerShell will automatically create a new root web inside the new site collection.
The following sections will give you an overview of the different cmdlets that are made available to you to interact with SharePoint webs. You will see several similarities in the naming and in the functionality to the ones made available for interacting with site collections.
Get-SPWeb
Get-SPWeb is the main retriever method to get a reference to a SPWeb object. It only requires you to specify the direct URL for the web you are trying to retrieve (see Figure 6-10).
Get-SPWeb "http://localhost/sites/HumanResources"
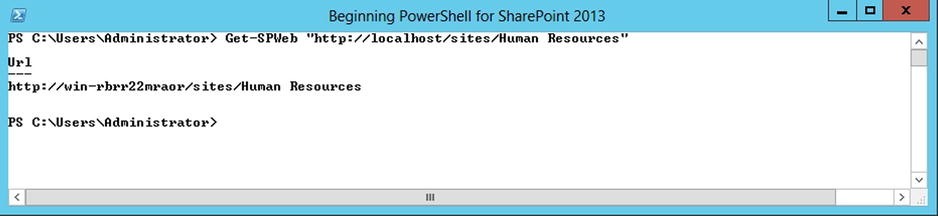
Figure 6-10. Using the Get-SPWeb cmdlet to obtain a reference to a web
New-SPWeb
The New-SPWeb cmdlet lets you create a new web under a specified site collection. Table 6-1 lists the different templates that can be used to create new SharePoint 2013 webs and their short names to use with PowerShell.
Table 6-1. List of available SharePoint 2013 web templates
|
Short Name |
Title |
|---|---|
ACCSRV#0 |
Access Services Site |
ACCSRV#1 |
Assets Web Database |
ACCSRV#3 |
Charitable Contributions Web Database |
ACCSRV#4 |
Contacts Web Database |
ACCSRV#5 |
Projects Web Database |
ACCSRV#6 |
Issues Web Database |
BDR#0 |
Document Center |
BICenterSite#0 |
Business Intelligence Center |
BLANKINTERNET#0 |
Publishing Site |
BLANKINTERNET#1 |
Press Releases Site |
BLANKINTERNET#2 |
Publishing Site with Workflow |
BLANKINTERNETCONTAINER#0 |
Publishing Portal |
BLOG#0 |
Blog |
CENTRALADMIN#0 |
Central Admin Site |
CMSPUBLISHING#0 |
Publishing Site |
ENTERWIKI#0 |
Enterprise Wiki |
GLOBAL#0 |
Global template |
MPS#0 |
Basic Meeting Workspace |
MPS#1 |
Blank Meeting Workspace |
MPS#2 |
Decision Meeting Workspace |
MPS#3 |
Social Meeting Workspace |
MPS#4 |
Multipage Meeting Workspace |
OFFILE#0 |
(obsolete) Records Center |
OFFILE#1 |
Records Center |
OSRV#0 |
Shared Services Administration Site |
PowerPointBroadcast#0 |
PowerPoint Broadcast Site |
PPSMASite#0 |
PerformancePoint |
PROFILES#0 |
Profiles |
SGS#0 |
Group Work Site |
SPS#0 |
SharePoint Portal Server Site |
SPSCOMMU#0 |
Community area template |
SPSMSITE#0 |
Personalization Site |
SPSMSITEHOST#0 |
My Site Host |
SPSNEWS#0 |
News Site |
SPSNHOME#0 |
News Site |
SPSPERS#0 |
SharePoint Portal Server Personal Space |
SPSPORTAL#0 |
Collaboration Portal |
SPSREPORTCENTER#0 |
Report Center |
SPSSITES#0 |
Site Directory |
SPSTOC#0 |
Contents area Template |
SPSTOPIC#0 |
Topic area template |
SRCHCEN#0 |
Enterprise Search Center |
SRCHCENTERFAST#0 |
FAST Search Center |
SRCHCENTERLITE#0 |
Basic Search Center |
SRCHCENTERLITE#1 |
Basic Search Center |
STS#0 |
Team Site |
STS#1 |
Blank Site |
STS#2 |
Document Workspace |
TENANTADMIN#0 |
Tenant Admin Site |
visprus#0 |
Visio Process Repository |
WIKI#0 |
Wiki Site |
The following example shows you how to create a new web using the Blank Site template. If you don’t specify a template for it, you’ll be prompted to select one the first time you access it through the SharePoint interface.
New-SPWeb http://localhost/NewWeb -Template "STS#1"
Remove-SPWeb
Remove-SPWeb lets you delete an existing web by specifying its URL. Note that deleting a web using PowerShell deletes it permanently, unless you specify the -Recycle parameter:
Remove-SPWeb http://localhost/NewWeb
If a web is deleted through the SharePoint interface, it becomes a SPDeletedSite object! Yes, you’ve heard me; just like in the case of a deleted site collection, a deleted web becomes the same object. Why is that? Because when you delete a site collection, all you’re doing is actually deleting the webs contained in it. When you restore at least one web in the site collection, you’re automatically restoring the site collection itself. There is such a thing as a SPDeletedSiteCollection object, but it does not expose any methods to remove or to restore itself.
The sad part, however, is that you cannot use the Get-SPDeletedSite cmdlet to retrieve webs that have been deleted in a site collection that still exists. To get a reference to such a web, you’ll need to get a reference to the site collection’s recycle bin, and then obtain a reference to the deleted web by iterating through the list of deleted objects. The example in Figure 6-11 shows you how you could retrieve a list of deleted webs from the recycle bin, and restore them back using PowerShell.
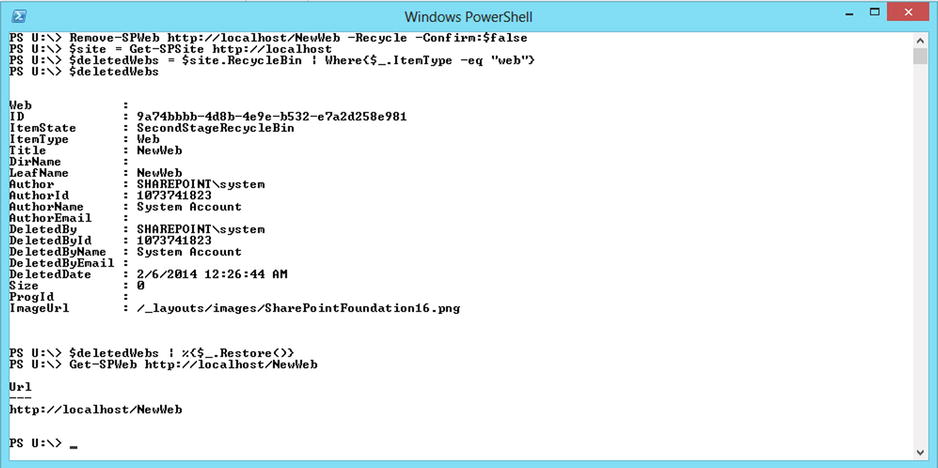
Figure 6-11. Restoring all deleted webs from the recycle bin using PowerShell
Just like the Set-SPSite cmdlet, the Set-SPWeb is a shortcut command that allows you to configure a specified web. It allows you to specify a new URL, a new name, or a new description, or lets you apply a new template for the web. Again, just as is the case with the site collection level method, you could easily accomplish the same operation by getting a reference to the object using its retriever method, and by assigning values to its properties directly. The following example shows you how you could change the URL of a web using this PowerShell cmdlet (see Figure 6-12).
Set-SPWeb http://localhost/NewWeb -RelativeUrl ModifiedWeb
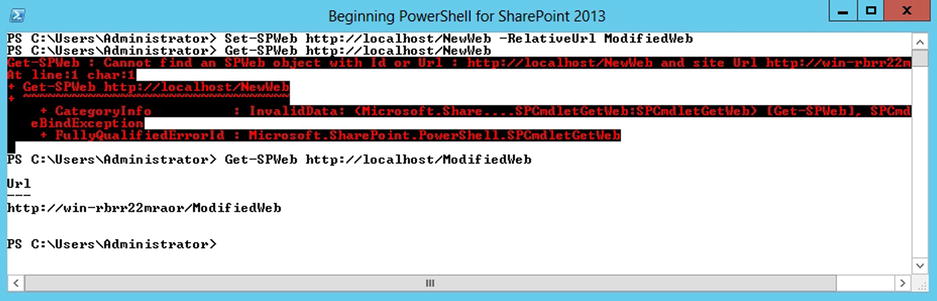
Figure 6-12. Change a web's URL using PowerShell
Export-SPWeb
Export-SPWeb lets you export a web along with all of its lists and libraries and their contents. The operation creates the backup file locally on disk, and generates an associated backup log. If you do not wish to have an export log generated on disk, you can simply us the -NoLogFile parameter. It is also important to note that this cmdlet will not preserve permissions for lists with broken inheritance and for item-level permissions.
Export-SPWeb http://localhost/ModifiedWeb -Path "C:ExportedWeb.cmp"
Peanut butter is to jam what Import-SPWeb is to Export-SPWeb: they just go along together. Cheesy analogy, I know, but what can you do with a backup of something if you don’t have a means to restore it? This cmdlet lets you import a web along with all of its lists, libraries, and items. Just as in the case of the export method, it creates an operation log on disk. You can restore the backup on top of the existing site, or you could make a copy of it by creating a new site and restoring it at this new location, as shown in the following example (see Figure 6-13).
New-SPWeb http://localhost/MyImportedWeb

Import-SPWeb http://localhost/MyImportedWeb -Path "C:ExportedWeb.cmp"
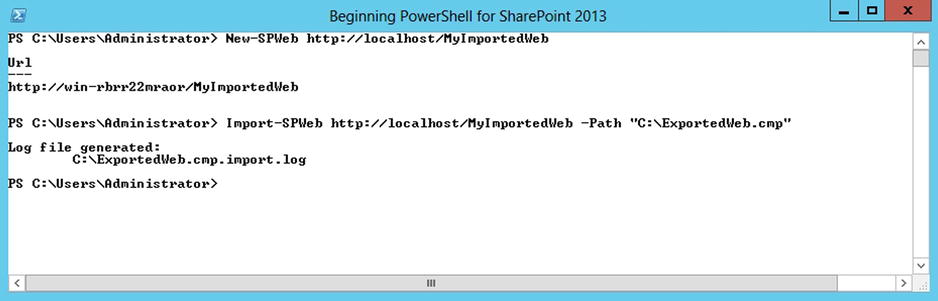
Figure 6-13. Importing a web using the Im port-SPWeb PowerShell cmdlet
![]() Note There are no Copy-SPWeb cmdlets available by default in SharePoint 2013. However, you could easily build on top of the existing set of available cmdlets and create your. A combination of Export/Import on a specific web would have the same anticipated result as a Copy-SPWeb method.
Note There are no Copy-SPWeb cmdlets available by default in SharePoint 2013. However, you could easily build on top of the existing set of available cmdlets and create your. A combination of Export/Import on a specific web would have the same anticipated result as a Copy-SPWeb method.
Putting It Together: Creating Supporting Webs
You have now learned how easy it is to interact with SharePoint webs using PowerShell. You will now put your new learnings to good use, and continue to build on the example you’ve started in the previous section of this chapter. Now that you’ve created a site collection for each business unit within your organization, you will create workspaces for each team within the business unit. You will declare a multidimensional array with two dimensions: one representing the unit and one that will contains its associated teams. The logic will then loop in each row and create the new webs using the Team Site template (STS#0, as seen earlier in Table 6-1). To make things more exciting, each business unit will see their webs use a different theme to make sure that they can be easily differentiated. We will begin by declaring the array as follow:
$teamArray = @{}
$teamArray["Finance"] = @("Payroll", "Financial Systems", "Procurement")
$teamArray["Human Resources"] = @("Training", "Staff Services", "Recruiting")
$teamArray["Administration"] = @("Executive Assistants", "Planification")
$teamArray["Directors"] = @("CIO", "CEO", "COO")
$teamArray["Tech Support"] = @("Help Desk", "Applications", "Infrastructure")
Your next step is to define what the theme will be for each of these team sites. In SharePoint 2013, themes are now referred to as “Composed Looks.” However, the ApplyTheme method is what you need to use to apply custom theming. A composed look is made of three important parts: a color palette, a font scheme, and a background image. You will declare a second multidimensional array to keep track of what composed look will get applied to what web. The array contains the name of the SharePoint theme that you want to apply. The array will be declared as follows:
$themeArray = @{}
$themeArray["Finance"] = "Sea Monster"
$themeArray["Human Resources"] = "Sketch"
$themeArray["Administration"] = "Characters"
$themeArray["Directors"] = "Wood"
$themeArray["Tech Support"] = "Nature"
In order to get a reference to the appropriate color palette, font scheme, and background image, you need to get a reference to the composed look based on its name, as specified in the previous array. In order to achieve this, you need to get a reference to the site collection’s design catalog. This can be achieved by getting a reference to the site collection and calling the .GetCatalog(<name>) method. Once you have obtained the reference to the catalog, all that’s left to do is to query it based on the composed look’s name. You could get a reference to the Sea Monster theme for the Finance unit by using the following piece of PowerShell code (see Figure 6-14):
$site = Get-SPSite http://localhost/sites/Finance
$designCatalog = $site.GetCatalog("Design")
$seaMonsterTheme = $designCatalog.Items | Where {$_.Name -eq "Sea Monster"}

# Color Palette
$seaMonsterTheme["ThemeUrl].Split(',')[1]

# Font Scheme
$seaMonsterTheme["FontSchemeUrl"].Split(',')[1]

# Image
$seaMonsterTheme["ImageUrl"].Split(',')[1]

Figure 6-14. Creating webs in batch and applying custom themes using PowerShell
Now that both of our arrays have been properly declared and initialized, you can loop through each of the entries and make calls to the New-SPWeb cmdlet for each one. You will need to loop through each of the team array’s keys and use its key value to determine what the associated team is for a given business array:
foreach($businessUnit in $teamArray.Keys) # this returns a list of business units
{
    oreach($team in $teamArray[$businessUnit]
    {
        # At this point we have access to the teams' names, and we can dynamically
        # build the urls for the composed looks using that information    }
}
If you now try to put it all back together, your script will look like the following. You can use a unique set of foreach loops to access both the team and theme arrays. The script should take about five minutes to execute, at the end of which all of your webs will have been properly created:
#Declaring all teams in business units
$teamArray = @{}
$teamArray["Finance"] = @("Payroll", "Financial Systems", "Procurement")
$teamArray["Human Resources"] = @("Training", "Staff Services", "Recruiting")
$teamArray["Administration"] = @("Executive Assistants", "Planification")
$teamArray["Directors"] = @("CIO", "CEO", "COO")
$teamArray["Tech Support"] = @("Help Desk", "Applications", "Infrastructure")

#Declaring the various components of composed look for each team
$themeArray = @{}
$themeArray["Finance"] = "Sea Monster"
$themeArray["Human Resources"] = "Sketch"
$themeArray["Administration"] = "Characters"
$themeArray["Directors"] = "Wood"
$themeArray["Tech Support"] = "Nature"

foreach($businessUnit in $teamArray.Keys)
{
    $site = Get-SPSite "http://localhost/sites/$businessUnit "
    $catalog = $site.GetCatalog("Design")
    $theme = $catalog.Items | Where {$_.Name -eq $themeArray[$businessUnit]}

    foreach($team in $teamArray[$businessUnit])
    {
        #Remove-SPWeb "http://localhost/sites/$businessUnit/$team " -Confirm:$false
        $web = New-SPWeb "http://localhost/sites/$businessUnit/$team " -Template STS#0
                -Name $team

        $color = $theme["ThemeUrl"].Split(',')[1].Trim()
        $font = $theme["FontSchemeUrl"].Split(',')[1].Trim()
        $image = $theme["ImageUrl"].Split(',')[1].Trim()
        write-host $color
        $web.ApplyTheme($color, $font, $image, $true)
        write-host $team -backgroundcolor green

        $web.Dispose()
    }
    $site.Dispose()
}
To ensure that everything worked as expected, navigate to http://localhost/sites/Finance/Payroll/. Your team site should have been created with the Sea Monster composed look, which is made of an orange suite bar at the top (where you see the mention “SharePoint”), and of green tiles and icons.
I am now ready to dig deeper in the SharePoint object model and start playing with lists and libraries.
Lists
A SharePoint list is probably the type of object that is the most widely used. Almost any out-of-the-box “apps” (remember that in 2014 everything is an app) uses lists in the backend. Document libraries, as an example, are just a SharePoint list with a special SharePoint Content Type associated with it. Just as with the other types of artifacts we already touched on in this chapter (site collections and webs), SharePoint lists can have unique permissions or inherit permissions from their parent web. Since SharePoint 2010, lists also have a new feature called throttling, which prevents large lists from bringing a server down to its knees because of large lists. Users have a maximum number of items they can have in a list before SharePoint stops trying to render its content on screen.
A list in the SharePoint object model is represented by the SPList object. It represents a set of items that have different properties associated with them. I tend to think as a list in the SharePoint context as being a data table with columns and rows, like a table you would find in an Excel spreadsheet, for example. The rows would be the list’s items, and the columns would be represented by the properties associated with the items. These properties are also referred to as fields. Each field has a data type associated with them, and it represents the type of data that this one can accept as input value.
Lists can also have a predefined set of filters, sorting options, and display fields. These are referred to as views. Think of a SharePoint view just like you would think of a view in the database world. It is a way to present data from a specific source in a format and in a fashion that makes sense to the end user. For example, assume that you are a regional manager in charge of managing a store for the city of Ottawa. Your organization keeps track of every transaction made across all the different stores in the region into a single SharePoint list. It may not make sense for you to view the transactions for the city of Toronto, for example. What you want to do is to create yourself a view on the list so that the data display only ever shows records for the store you are managing. You could also decide to hide certain fields that you may judge are not necessary to display. Creating such a view does not affect the data source; it simply changes its presentation layer.
Throughout the following sections, you will learn how you can use PowerShell to interact with the structure and the configuration properties of SharePoint lists. I will not be discussing list items at this point. This will be addressed in a later section. In comparison to site collections and webs, there aren’t any cmdlets that deal directly with lists. Instead, you need to obtain your own instance of a list and manipulate it through its methods and properties.
Getting a List Instance
SharePoint lists are contained at the web level. Every SPWeb object has a property called Lists that represents an array of all the lists contained in that specific web. In order to get a reference to a specific list, you’ll need to get it from that list array using either its name or its GUID. Another option would be to use the GetList method that expects the list’s relative URL as a parameter. The following example shows you how to get a reference to the Style Library located at the root of our site collection on http://localhost :
$web = Get-SPWeb http://localhost
$list = $web.Lists["Style Library"]
$fields = $list.Fields.InternalName
$fields | Where {$_ -like '*workflow*'}
This gets a list of all the internal names of the fields contained in the Style Library list. Think of internal names as being unique IDs. Each field has two names, an internal one and a display one. There is nothing preventing a list from having two fields with the same display names, but you cannot have two fields with the same internal name being part of the same list. Once you’ve retrieved a list of all internal names, you can query it using the pipeline operator, to retrieve only the field names that contain the word workflow (see Figure 6-15).

Figure 6-15. Obtaining a list of all fields' names in a SharePoint list using PowerShell
To create a new list instance, you will need to first obtain a reference to the web in which you want to add the list. After the reference is obtained, the new list can be created by calling the .Add() method on the Lists properties of the web object. In most cases, you will be calling the Add() method using three parameters: a title, a description, and the list template associated with your list. To get a full list of all available list templates, as shown in Figure 6-16, you can simply run the following PowerShell command:
$web = Get-SPWeb http://localhost
$web.ListTemplates.Name
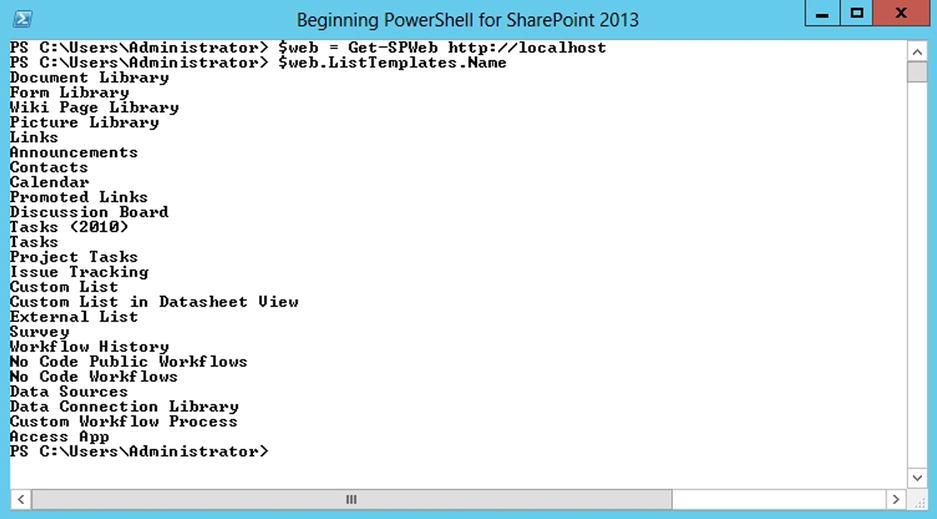
Figure 6-16. Listing all available list templates using PowerShell
Once you have determined what list template you wish to use for your new list, you can call the following commands to have your list created (see Figure 6-17). Note that the Add() method returns a GUID associated with your newly created list, not a SPList object. You will need to get an instance of your new list using either the list’s name or obtained GUID to interact with it further.
$web = Get-SPWeb http://localhost
$ID = $web.Lists.Add("My List", "My Description", $web.ListTemplates["Custom List"])
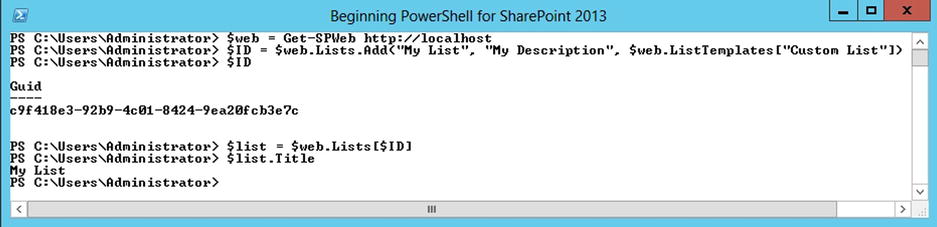
Figure 6-17. Creating a new SharePoint list using PowerShell
Removing a List Instance
In order for you to be able to delete a list instance, you will need to get an instance of it first. After an instance has been obtained, you can simply call the Delete() method on it. Just like site collections and webs, deleting a list instance using PowerShell will permanently remove the list, and it won’t be recoverable through the recycle bin. The following code example shows you how to delete the “My List” instance that was created in the previous section:
$web = Get-SPWeb http://localhost
$list = $web.Lists["My List"]
$list.Delete()
In Figure 6-18, I list the titles of all of the lists that exist at the specified web level. You can clearly see that after calling the Delete() method on your list’s instance, it doesn’t show up in the list anymore, which means it has been properly deleted.
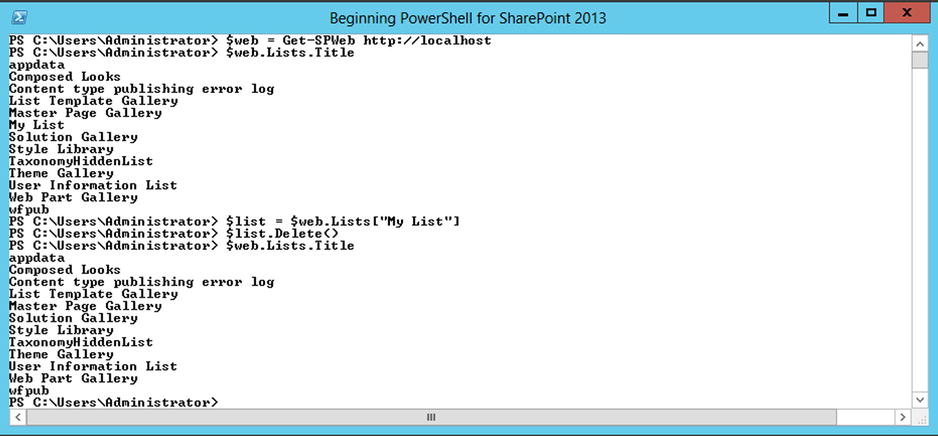
Figure 6-18. Listing all existing lists from a web using PowerShell
Restoring a List Instance
A SharePoint list that gets deleted makes it into the recycle bin before being deleted from the server for good. You then have the option of restoring it by getting a reference to the current site’s recycle bin object, and by iterating through its items. Once you have obtained a reference to the appropriate item in the recycle bin, simply call the Restore() method on it (see Figure 6-19). To have the list deleted permanently, you should call the Delete() method instead.
$spsite = Get-SPSite http://localhost
$bin = $spsite.RecycleBin
$myList = $bin | Where{$_.ItemType - eq "List"}
$myList.Restore()

Figure 6-19. Restoring a deleted list from the recycle bin using PowerShell
Copying a List Instance
Sadly, there are no direct ways to copy a SharePoint list using PowerShell. Despite this fact, you could still copy an existing list along with all of its data using a combination of two operations. To be able to copy a SharePoint list instance using PowerShell, you will need to first save your list as a List Template and then create a new copy of the list using that template. Saving a list as a template is as simple as calling the SaveAsTemplate() method on a SharePoint list instance. This method requires you to specify a name for the resulting .stp (template) file, a title for your template, a description, and lets you specify if you’d like to save the list’s content and data as part of the template:
$web = Get-SPWeb http://localhost
$list = $web.Lists["My List"]
$list.SaveAsTemplate("MyTemplate", "My Template", "This is my custom list", $true)
Custom list templates in SharePoint are stored at the site collection level. To get a list of available custom list templates, you’ll need to call the GetCustomListTemplates() method on the site collection object (see Figure 6-20):
$site = Get-SPSite http://localhost
$customTemplates = $site.GetCustomListTemplates($site.RootWeb)

Figure 6-20. Listing custom SharePoint list templates using PowerShell
With this information in hand, you are now ready to create a new list using your custom list template. This will result in a new copy of the original SharePoint list to be created. You will need to begin by obtaining a reference to your custom list. This can be achieved by calling the following line of PowerShell:
$myListTemplate = $customTemplates | Where {$_.Name -eq "My Template"}
To create the copy of your list, you will need to call the Add() method on a specific web list collection, like you did in the “Creating a New List” section. This time, however, you will call an overload of the method, meaning that you will call the method using a different set of parameters as input. In order to create a list based on a custom list template, you need to call the method using six parameters as shown here:
$web.Lists.Add("My Copy", # Title
        "Description", # List Description
        "Lists/MyCopy", # Relative URL $myListTemplate.FeatureId, # Feature Id of custom template
        100, # List Type - 100 is for none
        "101") # Document Template Type - 101 is for none
Remember that there is an opportunity to create your own cmdlet to automate these two operations into a single one. You could easily create a new Copy-SPList cmdlet taking the source list, and its destination title as input parameters.
Putting It Together: Creating Common Lists
I will now continue to build upon this demo environment, and put your latest acquired knowledge to use. In real-life scenarios, business units will most likely share some very similar processes. For example, every business unit in an organization will be subject to a set of policies, procedures, and guidelines. It would be considered best practice to keep all documents related to these in a SharePoint document library under each business unit workspace. Another important feature that each business unit may also want to have is a task list to allow various tasks assigned to their employees to be tracked.
You will create a new PowerShell script that will iterate through all the various sites created earlier, and that will create a new document library at its root named “Business Documents” as well as a new task list named “Unit Tasks.” The following script will allow you to do just that, but this time you’ll add a little twist to it. In the previous demo (“Putting it Together: Creating Support Webs”), you had obtained references to each site collection by generating their URLs dynamically. This time around, you will delve into some of the material covered in the next chapters to obtain a reference to the SharePoint web application that you’ve created on port 80. Remember, a web application can be thought of as a container for site collections. All site collections that are hosted on port 80 logically belong to the same web application. By obtaining a reference to this object, you will be able to iterate through all of its contained site collections, and then in turn iterate through the set of webs they each contain:
$webApp = Get-SPWebApplication http://localhost

foreach($site in $webApp.Sites)
{
    foreach($web in $site.AllWebs)
    {
        $web.Lists.Add("Business Documents", "",
            $web.ListTemplates["Document Library"]);
        $web.Lists.Add("Unit Tasks", "", $web.ListTemplates["Tasks"]);
    }
}
As you can see from this example, in order to get a reference to a SharePoint web application, you can call the Get-SPWebApplication PowerShell cmdlet.
List Items
The next logical progression of object in the SharePoint object model hierarchy is a list item. A list item in the SharePoint world represents a logical unit that contains pertinent information. For example, a Word document stored in a SharePoint library would be considered to be a list item, as would a new project task stored in a task list. Descriptive data associated with them is referred to as metadata. Think of metadata as being a field in the list. Each field captures different information about each list item. You will learn more about fields in the next section. List items are also the lowest level of objects in the hierarchy that can have unique permissions applied to. SharePoint permissions is also a topic that will be covered later in the chapter.
This section focuses on explaining the basics of list items and how we can interact with them using PowerShell. As with SharePoint lists, the SharePoint modules provided for PowerShell don’t include cmdlets that let you interact directly with list items. You will need to obtain them manually by drilling down into the object model.
To obtain a reference to a list item, you need to obtain a reference to the list that contains it. Once the reference has been obtained, you can get access to a collection of all list items contained in the list by calling the Items property on it. Other than accessing an item directly by its position in the list (e.g., $list.Items[2] where 2 is the position in the list) there is no way to obtain a reference to a single list item in SharePoint. The best you can do to get a reference to a specific item is to query a collection of items back based on certain criteria, and hope that there is only one item contained in it.
To get a collection of items back, you could either write a CAML query and use it to get a specific set of items back from a list, or you could simply use PowerShell to iterate through the collection of returned items and find the item based on a specific property’s value. Both options are explained in the following example. Figure 6-21 shows the SharePoint list used for the example.
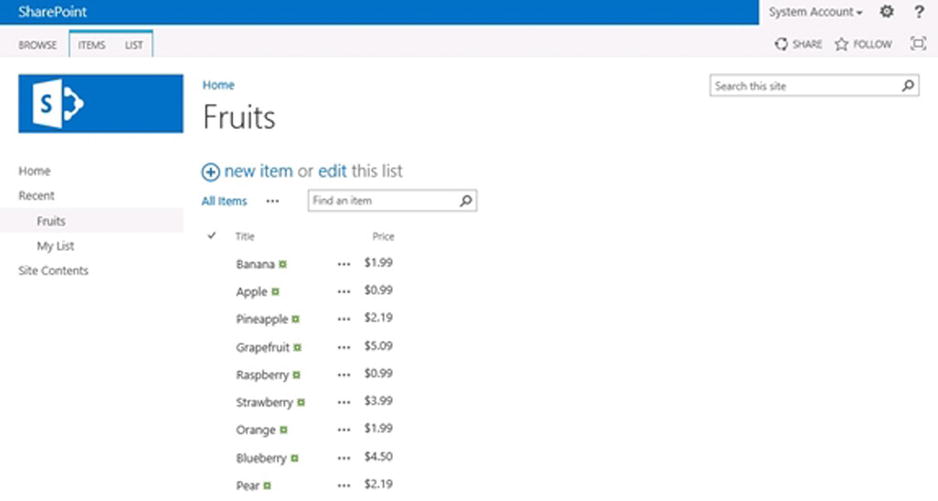
Figure 6-21. SharePoint list containing information about various fruits and their associated unit price
# Assuming a SharePoint List that contains a list of fruits and their unit price.

$web = Get-SPWeb http://localhost
$fruitsList = $web.Lists["Fruits"]

# Scenario A - Get a reference to the apple item

# Option 1 - Write a CAML Query
$query = "<Where><Eq><FieldRef Name='Title' /><Value Type='Text'>Apple</Value></Eq></Where>";
$spQuery = New-Object Microsoft.SharePoint.SPQuery
$spQuery.Query = $query

$items = $fruitsList.GetItems($spQuery)
$items[0].Title

# Option 2 - Use PowerShell to query by property
$items = $fruitsList.Items | Where {$_.Title -eq "Apple"}
$items.Title
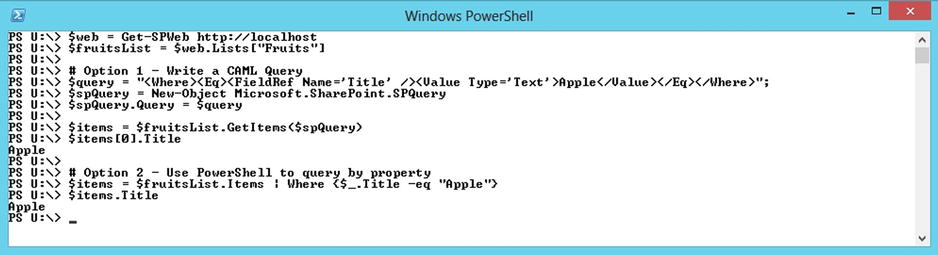
Figure 6-22. Comparing two option to get specific items from a SharePoint list using PowerShell
Here is a second example using the same list, to obtain a list of all items that have a unit price of 4$ or more:
# Scenario B - Get items that are 4$ and over

# Option 1 - Write a CAML Query
$query = "<Where><Gt><FieldRef Name='Price' /><Value Type='Currency'>4</Value></Gt></Where>"
$spQuery = New-Object Microsoft.SharePoint.SPQuery
$spQuery.Query = $query

$expItems = $fruitsList.GetItems($spQuery)

# Option 2 - Use PowerShell to query by property
$expItems = $fruitsList.Items | Where{$_["Price"] -gt 4}
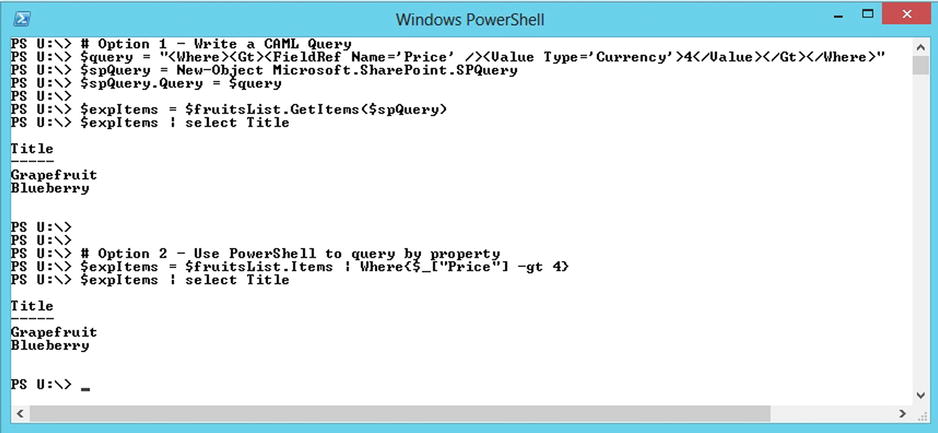
Figure 6-23. Getting a list of items based on a specific property using PowerShell
Removing a List Item
The operation to delete a list items is fairly simple. All you need to do is obtain the ID of the object that you wish to delete, and then call the Delete() method on the list’s item collection, passing the item’s position in the list as a parameter. As with webs and lists, a deleted list item makes it into the site’s recycle bin and can be restored or deleted from there. As always, remember that only list items that have been deleted through the SharePoint interface are given a second chance in the recycle bin. Those deleted through PowerShell are deleted permanently.
You need to pay special attention when deleting an item from a SharePoint list. The index you’re passing to the Delete() method is actually referencing the position of the item to delete in the list. Simply getting the ID position of the object may not end up deleting the proper object. IDs assigned to items in a list are automatically incremented. Once an item has been deleted, its ID stays reserved, and no other items in that list can have the same id. This could prove to be very confusing, and often results in catastrophic results when forgotten.
For example, assume that you have a list of five different items, say user names. When the list first gets created, all items are given a unique number starting from 1 to 5; this is their ID property. In addition, items in a list are also assigned a relative position in the list, based on the order in which they were added. In the beginning, our five users are all assigned a position number that matches their ID. The next user to be added to the list will automatically be granted an ID of 6, with a position value of 6. Now, let’s assume that user #2 is deleted; what happens to the position values? User #3 will now be shifted down one position in the list, and so will the other three users. Only user #1 will keep its original position. With this in mind, if you were to call the Delete() method passing a position value of 4 as a parameter, user #5 is the user that would actually be deleted.
To make sure that you delete the appropriate item in your list, you need to loop through the list of items and get their exact positions. Then you can call the Delete() method on the collection to have the proper item deleted. To illustrate this, see the SharePoint list in Figure 6-24. I’ve used the following PowerShell code to list each item in the list along with their current position:
$web = Get-SPWeb http://localhost
$fruitsList = $web.Lists["Fruits"]
$position = 0
foreach($fruit in $fruitsList.Items)
{
     Write-Host "Position $position :" $fruit.Title "- ID: " $fruit.Id: $position++
}
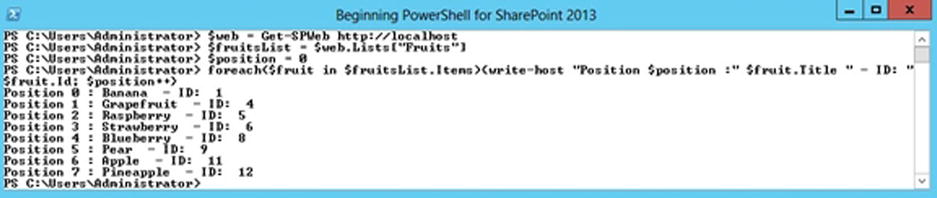
Figure 6-24. Listing items position and IDs from a SharePoint list using PowerShell
The following lines of code will loop through the entire collection of items and compare each item’s ID with the ID of the apple item. If a match is found, then the item at the current position (the apple item) will be removed from the collection (see Figure 6-25):
$web = Get-SPWeb http://localhost
$fruitsList = $web.Lists["Fruits"]
$appleItem = $fruitsList.Items | Where {$_.Title -eq "Apple"}
$appleId = $appleItem.ID

$position = 0;
foreach($fruit in $fruitsList.Items)
{
    if($fruit.ID -eq $appleId)
    {
        $fruitsList.Items.Delete($position)
    }
    $position++ # Increases the current position
}
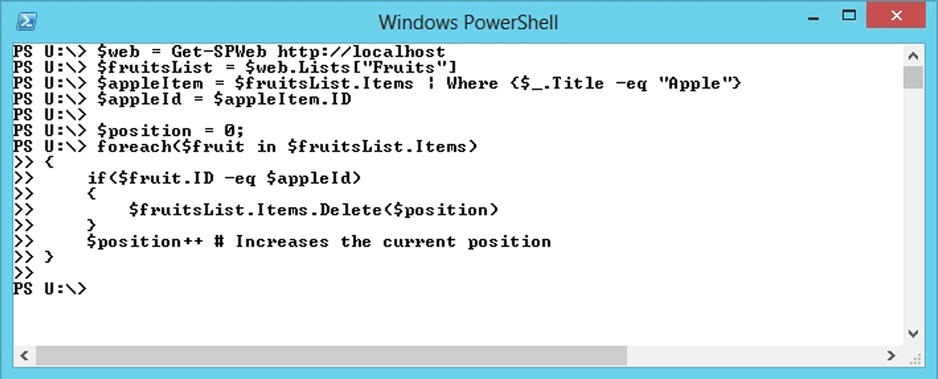
Figure 6-25. Deleting a list item using PowerShell
There are two methods available in the object model that will allow you to create a new list item in a list. The first one is the AddItem() method from the SharePoint list object, and the second is the Add() method available on the collection of items associated with a list. Both methods have the exact same behavior. You can simply use the one you prefer. You should always remember to use the Update() method on an item once you’ve created it; otherwise, it will not get registered with its parent list and, therefore, won’t be accessible through the SharePoint interface. Figure 6-26 shows the results of using the two methods included in the following code:
$web = Get-SPWeb http://localhost
$fruitsList = $web.Lists["Fruits"]

$newItem1 = $fruitsList.AddItem()
$newItem1["Title"] = "Kiwi";
$newItem1["Price"] = 6.99;
$newItem1.Update()

$newItem2 = $fruitsList.Items.Add()
$newItem2["Title"] = "Grape"
$newItem2["Price"] = 5.99
$newItem2.Update()
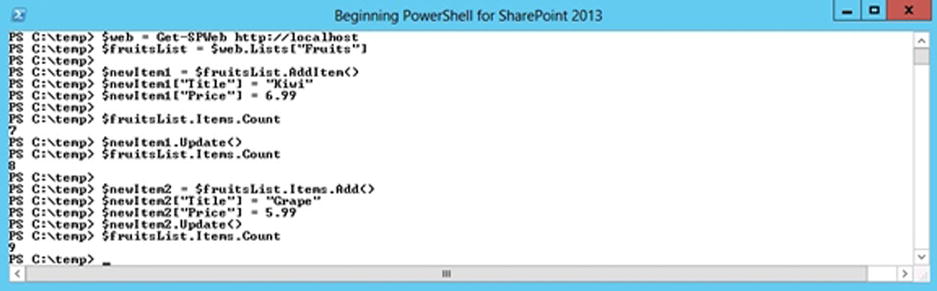
Figure 6-26. Creating a new list item using PowerShell
Updating a List Item
Just like any good artifacts supporting CRUD (create, read, update, and delete) operations, list items in SharePoint allow you to update an existing item’s properties. What you’ll need to do is to first get a reference to the item you wish to update, and then modify the value of the property you wish to change by accessing it directly in the fields’ collection. In the current example, a common scenario may be to update the unit price of a specific fruit on a regular basis. The following lines of PowerShell script provide more details on how you could achieve this update, which is then shown in Figure 6-27. Note that once you’ve modified a list item’s property, you do need to call the Update() method on it for the changes to be reflected.
$web = Get-SPWeb http://localhost
$fruitsList = $web.Lists["Fruits"]

$bananaItem = $fruitsList.Items | Where {$_.Title -eq "Banana"}
$bananaItem["Price"] = 0.99
$bananaItem.Update()
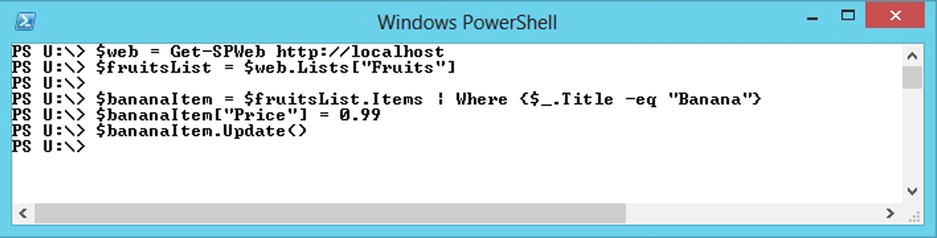
Figure 6-27. Updating an existing list item using PowerShell
Putting It Together: Creating Default Tasks Items
In this section, you’ll continue building on your SharePoint organizational workspaces. The goal of this exercise is to loop through all the various business unit sites that you have and add a default task in each team’s “Unit Tasks” list. The default task will simply be called “Get familiar with your unit’s SharePoint workspace,” and it will have a deadline scheduled a week from today. The key thing to take from this exercise is that you will have to use objects that are of the SharePoint scope, and use objects that are built in the core .NET Framework. In this case, you will be using the .NET DateTime object to get next week’s date.
$webApp = Get-SPWebApplication http://localhost

foreach($site in $webApp.Sites)
{
    foreach($web in $site.AllWebs)
    {
        $list = $web.Lists["Unit Tasks"]
        $newTask = $list.AddItem();
        $newTask["Title"] = "Get familiar with your unit's SharePoint workspace"
        $today = [System.DateTime]::Now
        $nextWeek = $today.AddDays(7)
        $newTask["DueDate"] = $nextWeek
        $newTask.Update()
    }
}
I’ve already briefly touched on the subject of List Fields in this chapter. I’ve explained that a field contains a specific type of information about a list item contained in a list. List fields can have many types, such as text, number, currency, choice, data, and so on. Each field is given two name properties, an internal name and an external name. These two names can be the same, but the internal name has to be unique within the list. This internal name is used by SharePoint to reference a field. Think of it as being the unique identifier for a specific field in a list. In the present section, we will learn how to interact with fields in a SharePoint list using PowerShell.
Getting an Instance of a Field
You’ve already seen how to get a reference to a specific field’s value in the previous section’s examples. When you called a list item property by using a field’s internal name as an index, you’re actually getting a reference to a specific field’s value for a given item. For example, calling $item["FieldName"] will return the value of field "FieldName" associated with the list item $item. To get a reference to the actual field, all you need to do it use the internal name of the field as an index on the list object’s Fields property. This property represents an array containing all of the fields associated with a SharePoint list. The following lines of PowerShell script will create a new SharePoint list, and will iterate through all of its fields and display their internal names:
$web = Get-SPWeb http://localhost
$listID = $web.Lists.Add("DemoList", "", $web.ListTemplates["Custom List"])
$list = $web.Lists[$listID]
foreach($field in $list.Fields)
{
    write-host $field.InternalName" - Hidden:" $field.Hidden" - ReadOnly:" field.ReadOnlyField
}
You will see that some fields listed by the script in Figure 6-28 will look familiar (e.g., title, author, and attachments). Others, however, aren’t recognizable. These are most likely hidden fields that are required by SharePoint. In addition to having a data type defining the type of value that they can accept, fields can have two other properties that can be set to determine their behaviors: the ReadOnlyField and the Hidden properties. One of these two properties set to true on a field will normally indicate that this field is reserved by SharePoint.
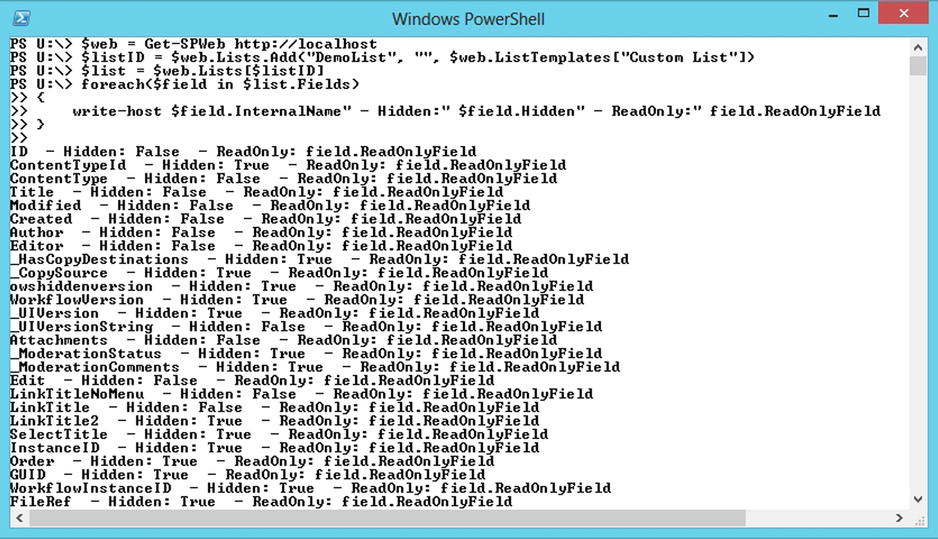
Figure 6-28. Listing information related to a list's fields using PowerShell
Creating a New Field
Fields are created by calling the Add() method on the array of fields associated with a SharePoint list instance. When calling this method, you will need to specify a title for the field, the type of data this field should be accepting, as well as specifying if the field is required or not.
$web = Get-SPWeb http://localhost
$demoList = $web.Lists["DemoList"]
$fieldID = $demoList.Fields.Add("HairColor", [Microsoft.SharePoint.SPFieldType]::Choice, $true)
$myNewChoiceField = $demoList.Fields["HairColor"]

$myNewChoiceField.Choices.Add("Brown")
$myNewChoiceField.Choices.Add("Blond")
$myNewChoiceField.Choices.Add("Red")
$myNewChoiceField.Choices.Add("Black")
$myNewChoiceField.Choices.Add("Grey")
$myNewChoiceField.Choices.Add("None")

# Need to call the Update() method in order for the choices to appear on interface
$myNewChoiceField.Update()
As you can see in Figure 6-29, the new field has been created in SharePoint with all the values that you provided in PowerShell.
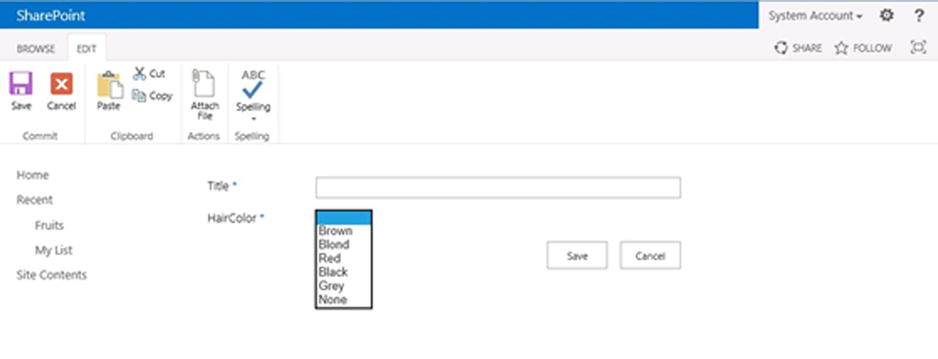
Figure 6-29. New item form showing a list field created by PowerShell
Removing a Field
To remove a field, simply get a reference to the field in question and call the Delete() method on it. The operation of deleting a field is permanent and cannot be recovered. Once a field has been deleted, all of the data that was contained in it is removed as well.
$web = Get-SPWeb http://localhost
$demoList = $web.Lists["DemoList"]
$field = $demoList.Fields["HairColor"]
$field.Delete()
Permissions
Up to this point, you’ve learned about how you can interact with various types of artifacts in your SharePoint environment using PowerShell. I have now arrived at what I consider to be the most important topic: permissions. With the exception of fields, specific permissions can be applied on all the types of artifacts that I’ve covered in this chapter. By default, permissions are applied at a site collections root web and inherited down to every web, every list, and every list item contained within it, which means they all use the same set of permissions. For example, if a list inherits its permissions for its parent web, changes to the permissions on that parent web will automatically be reflected in the list’s permissions, as well. You do have the option, if you want, to break the permission inheritance on any object that inherits permissions from a parent.
For example, if I have a web that contains a document library storing information about salaries for my employees, I would probably want to prevent users that should not have access to information about others’ salary from seeing the information in the library. One way of achieving this could be to break the inheritance at the document library level and only grant access to those authorized. This way, users that are not authorized to see the information contained in the library would not even see the library at all.
Another option may be to break the inheritance at the document level. For example, if each user is entitled to see their own salary information, I could break the inheritance on each document in the library and simply grant access to each employee to their own files. This will result in each employee seeing the library, but only being able to view one document in it. Documents for which they are not granted permissions would be hidden and made inaccessible to them.
In the context of SharePoint, permissions are made up of two different pieces of information: a role definition that specifies what privileges a permission entry is granting, and a role assignment that specifies who is assigned to the role definition entry. In this section, you will learn how easy it is to interact with SharePoint permissions using PowerShell. For the sake of simplicity, I will keep my explanations of permissions at the list level. To interact with permissions at a web, or at a list item level, the same methods and operations apply.
List Permissions on an Object
The following request is something that always comes back: given a specific artifact in SharePoint, I want to know who has access to it. Using PowerShell, it becomes extremely easy to get such information about an object. To illustrate how to obtain information about permissions for a list, I will start by creating a new SharePoint list using PowerShell:
$web = http://localhost
$newListId = $web.Lists.Add("Secure", "", $web.ListTemplates["Custom List"])
$secureList = $web.Lists[$newListId]
By default, using the Add() method with the signature I used here will create the new list and inherit permissions from its parent web. If you want to list the permissions that are applied to it by default, you can simply get access to the RoleAssignments properties of your new list. Doing this will return a list of all users that have some level of access to your list, along with information about what their role definition is (see Figure 6-30):
$newListId = $web.Lists.Add("Secure", "", $web.ListTemplates["Custom List"])
$secureList = $web.Lists[$newListId]
$secureList.RoleAssignments
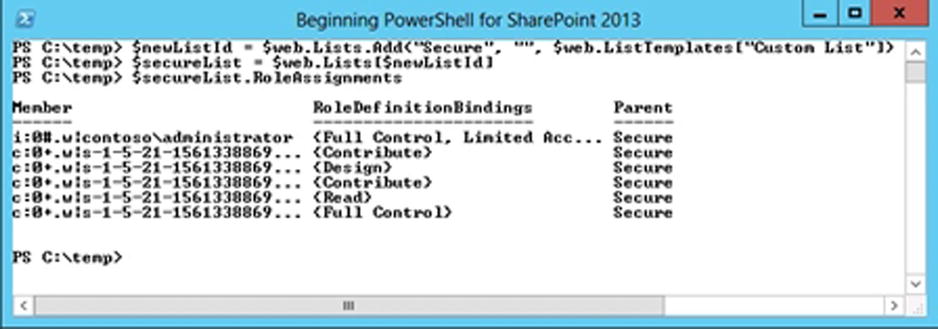
Figure 6-30. Listing all role assignments on a specific list using PowerShell
Breaking Permission Inheritance
The concept of breaking inheritance describes the scenario in which we want to stop permissions on an object from being inherited from its parent container. When breaking inheritance on a container, we are given the choice to copy the parent permissions down to the object’s permissions, or to start fresh. Once the permission inheritance has been broken on an object, modifying the permissions for its parent will not have any impact on it, and vice versa. Permissions inheritance from the parent container can be restored at any time by calling the ResetRoleInheritance() method on the object. The following example shows you how to break inheritance for your list and start fresh with no role assignments (see Figure 6-31):
$web = Get-SPWeb http://localhost
$secureList = $web.Lists["Secure"]
$secureList.BreakRoleInheritance($false)
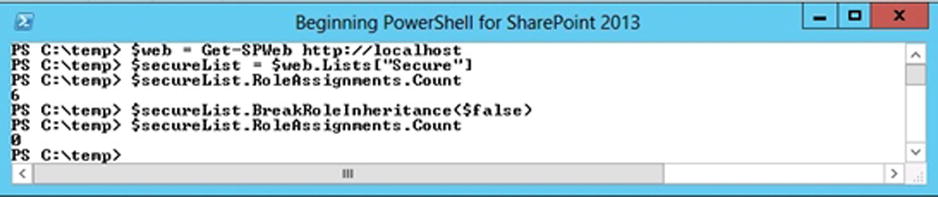
Figure 6-31. Breaking permission inheritance on a SharePoint list using PowerShell
Granting New Permissions
In order for you to be able to grant new permissions on a SharePoint artifact, you’ll need to start by determining what role definition you want to map the user to and obtain a reference to it. A role definition instance can be obtained at the web level, as shown with the following example code and in Figure 6-32:
$web = Get-SPWeb http://localhost
$fullControlRoleDefinition = $web.RoleDefinitions["Full Control"]

Figure 6-32. Declaring a new role definition using PowerShell
Once a reference has been obtained, you will need to declare a new RoleAssignment variable as follows:
$roleAssignment = New-Object Microsoft.SharePoint.SPRoleAssignment("DOMAIN\UserName","[email protected] ",
"Display_Name","Notes about the assignment");
Now comes the tricky part: linking the role definition you’ve obtained previously with the newly created SPRoleAssignment object. In order to achieve this, you need to declare a new object of type SPRoleDefinitionBindingCollecton, and associate both entities through it:
$bindings = $roleAssignment.RoleDefinitionBindings
$bindings.Add($fullControlRoleDefinition)
Once the linkage has been created, you are now ready to add your new role assignment definition to your list:
$secureList.RoleAssignments.Add($roleAssignment)
This will automatically grant Full Control permission on your secure list to the administrator account, as shown in Figure 6-33.
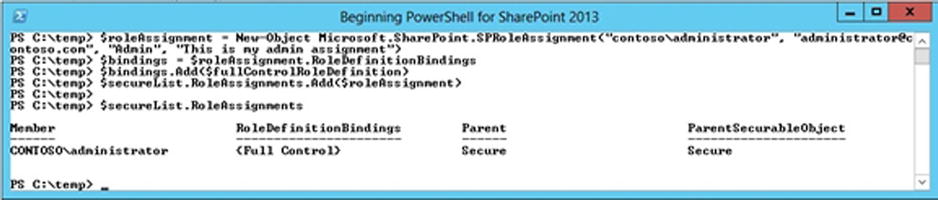
Figure 6-33. Creating a new role assignment on a SharePoint list using PowerShell
To remove permission for a user on a specific artifact, simply get a reference to the associated role assignment item, and remove it from the list of assignments on the artifact. For example, if you want to remove the permission that you just granted to the administrator account on your secure list, you could call the following lines of PowerShell script:
$web = Get-SPWeb http://localhost
$secureList = $web.Lists["Secure"]
$secureList.RoleAssignments.Remove($web.EnsureUser("CONTOSOAdministrator"))
The most straightforward way to update a permission would be to remove the existing one and add a completely new one. Normally, you would update only the role definition portion of an assignment; otherwise, you’d be changing the user associated with a permission entry, which really comes back to creating a new entry all together. There are no ways of updating an existing role assignment without first removing the existing one and adding a new one instead.
SharePoint is a beast when it comes down to memory consumption. For the sake of performance, when dealing with large objects such as site collections and webs, the .NET Framework keeps entire SharePoint objects in memory. The responsibility of properly disposing of SharePoint objects in memory once they are done with them comes back to the user that deals with them. Many large objects in the SharePoint world implement the IDisposable interface behind the scene, meaning that they all expose a Dispose() method to force the removal of objects from memory.
Most of the examples provided throughout this chapter did not properly dispose of objects. Almost all of them have declared a web object without implicitly calling the dispose method on it. In these scenarios, the impact of not properly disposing of items was minimal, but imagine a scenario in which there are thousands of site collections, each having a few hundred sites under them. If you iterate through all these site collections and webs using PowerShell without properly disposing of them, you risk bringing the server to its knees.
To illustrate the effects of memory disposition using PowerShell to interact with SharePoint artifacts, I have created a demo that will loop 10,000 times through all the site collection in a web application and get an instance of all of its webs. The web application used for this demo has about a dozen site collections, with 1,000 webs in each. The first scenario will showcase what happens to the server if you don’t properly dispose of objects in memory, and the second one will show what happens when memory management is properly performed. I have monitored the memory usage for both scenarios.
Scenario #1 - Bad Memory Management
The following PowerShell code example shows a scenario in which memory is not being freed up and objects not disposed of properly:
$webApp = Get-SPWebApplication http://localhost
for($i = 0; $i -le 10000; $i++)
{
    foreach($site in $webApp.Sites)
    {
        foreach($web in $site.AllWebs)
        {
            Write-host $web.Title
        }
    }
}
In Figure 6-34, you can see that the memory usage of our PowerShell script keeps increasing as time goes by without ever releasing it in a significant way. This is because all of the webs and site collection objects used by our script are kept in memory.
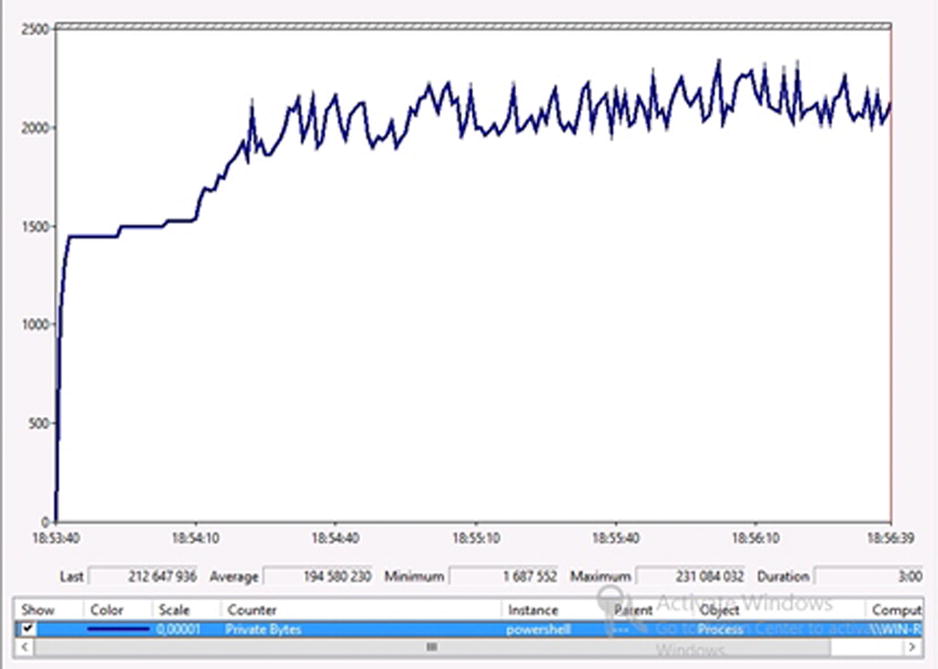
Figure 6-34. Performance monitor window for code running without properly disposing of SharePoint objects in memory
Scenario #2 - Good Memory Management
The following lines of PowerShell code ensure that you dispose of objects in memory after you are done using them:
$webApp = Get-SPWebApplication http://localhost
for($i = 0; $i -le 10000; $i++)
{
    foreach($site in $webApp.Sites)
    {
        foreach($web in $site.AllWebs)
        {
            Write-host $web.Title
            $web.Dispose()
        }
        $site.Dispose()
    }
}
You can clearly see in Figure 6-35 that the memory usage has greatly improved over your previous scenario. Yes, there are spikes of memory usage, but as objects are being disposed from memory, the overall memory usage goes back to normal right away.

Figure 6-35. Performance monitor window for code running that properly disposes of SharePoint objects in memory
Summary
In this chapter, you’ve learned how you can interact with SharePoint objects using PowerShell. To a certain extent, the objects that you’ve been dealing with in this chapter are what I consider to be front-end artifacts: normally tangible objects with which end users can interact, such as list items and webs. In the traditional scenario, automating operations on these types of objects has always been done by developers. However, this reality has changed drastically in the past few years. Administrators are now given the ability to write scripts of their own using PowerShell, without ever having to “open code.” I consider PowerShell to be a gray zone for sure when it comes to governance and responsibility. Even if your organization decides that PowerShell scripts are to be handled by the development team, the fact that these are actually written in plain text and use an administrative scripting language will allow your administrators to at least take a peek at the code and understand what is being executed.
In the next two chapters, I will show you how to use PowerShell to monitor and manage the administrative side of SharePoint, something that the end users don’t see. This chapter has given you an overview of how you can interact with objects that you’ll see in the SharePoint interface, and Chapter 7 will give you an overview of how to use PowerShell to interact with objects that are normally managed through the Central Administration interface.