![]()
Managing Office 365 SharePoint Online with PowerShell
As the title says, this chapter is about teaching you how you can use PowerShell to manage your SharePoint Online instance in Office 365. We will not be covering the Exchange and Lync aspect of the Office 365 story in this chapter. It is assumed that readers have already had some level of exposure to the maintenance of site collections in Office 365. In October 2010, Microsoft announced their new wave of online products that was going to be taking their Office suite to the clouds. This new service was going to let users manage their own SharePoint 2010 instances in a multitenant environment. For the sake of clarity, I will be using the term SharePoint Online to make reference to the SharePoint offering side of Office 365.
Microsoft had attempted in early 2009 to launch the ancestor of SharePoint Online, called Business Productivity Online Services (BPOS). This is my own opinion (one that I know is shared by all of my SharePoint colleagues), but BPOS was a disaster. The service offered highly restrictive SharePoint 2007 environments to users who could not do any significant level of customization to their site collection. Of course, Microsoft offered users the choice to buy a license for a dedicated online server instance, but the prices for those licenses were just ridiculous. Things got a lot better with Office 365. For barely $10 a month per user, you could create both a hosted collaborative SharePoint 2010 environment for your organization and also have a public site collection to expose to the outside world as your corporate web site. On top of this, for a few additional dollars monthly came all the Office client licenses benefits, which, for me, was simply icing on the cake.
Then, at the beginning of the year 2013, Microsoft announced that they were going to upgrade all SharePoint online farms to run SharePoint 2013, or to whatever their latest version of SharePoint was. I say this because even today, if you look at the configuration link files on the Office 365 servers, you see that they are running SharePoint version 16 dot something, and SharePoint 2013 was always labeled version 15. Anyway, we’ve sidetracked, but the important point to take out of this is that with this new cloud offering, Microsoft ensures that users will always be running the latest and greatest version of their platform.
In summer of 2012, Microsoft announced something they called the SharePoint Online Management Shell, which allowed users to remotely configure and interact with their SharePoint online instances using PowerShell. Of course, Microsoft could not make all the same cmdlets that you have on premises to interact with SharePoint available on the cloud. Remember that SharePoint Online is a multitenant environment and that there are several users on the same farm. Therefore, they needed to ensure that whatever cmdlets they made available were not able to go over the site collections boundaries. This chapter will be all about using this new SharePoint Online Management Shell tool to interact with your SharePoint Online environment.
Overview of the Environment
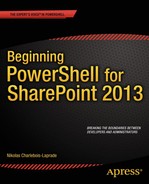
Throughout this chapter, I will be using an Office 365 trial account that I’ve created. The trial account is using Microsoft Office 365 E3 plan, which offers 30 days of free use. The account that I’ve created uses a custom subdomain that I registered when creating my trial registration. The domain that I will use in this chapter is PowerShellBook.onmicrosoft.com. The environment has been created from scratch, and only contains the default SharePoint site collections created by Microsoft on provision of a new Office 365 account. Figure 9-1 shows the default site collection made available by default using the SharePoint admin center of Office 365.
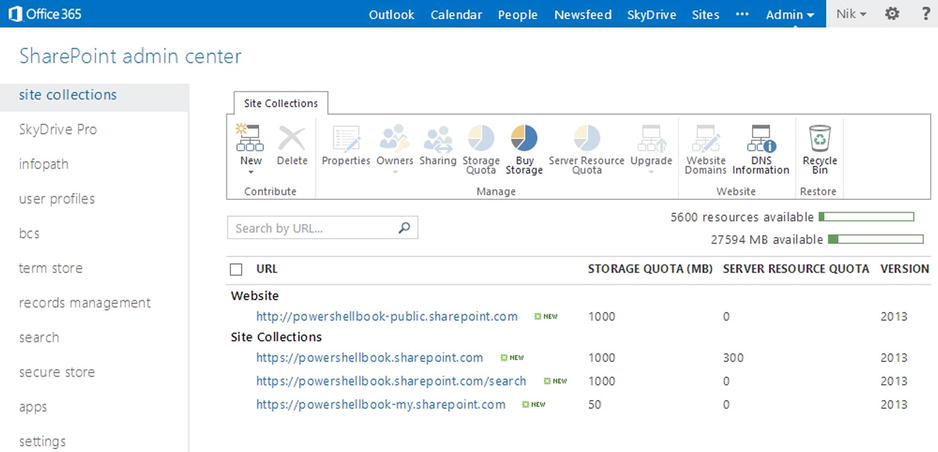
Figure 9-1. Default site collections viewed in the Office 365 SharePoint admin center
SharePoint Online Management Shell
As mentioned earlier in this chapter, Microsoft released a tool to help to manage SharePoint Online instances remotely using PowerShell. In order for you to be able to use it, you will need to go to Microsoft’s site and download and install it locally. The tool can be downloaded from http://www.microsoft.com/en-us/download/details.aspx?id=35588. On the site, on trying to download the tool, you will be prompted to choose between the 32 -and 64-bit versions of the tool. Choose the appropriate version for your machine. The installation process is straight forward, and I won’t be covering it in this book.
Once the tool is installed on your system, you can open a new instance of it. The SharePoint Online Management Shell looks in every aspect similar to the default PowerShell console. It uses the same profile, making it generic across all PowerShell consoles; the only difference is that you’re not allowed to change the console’s title. Figure 9-2 shows the default aspect of the SharePoint Online Management Shell.
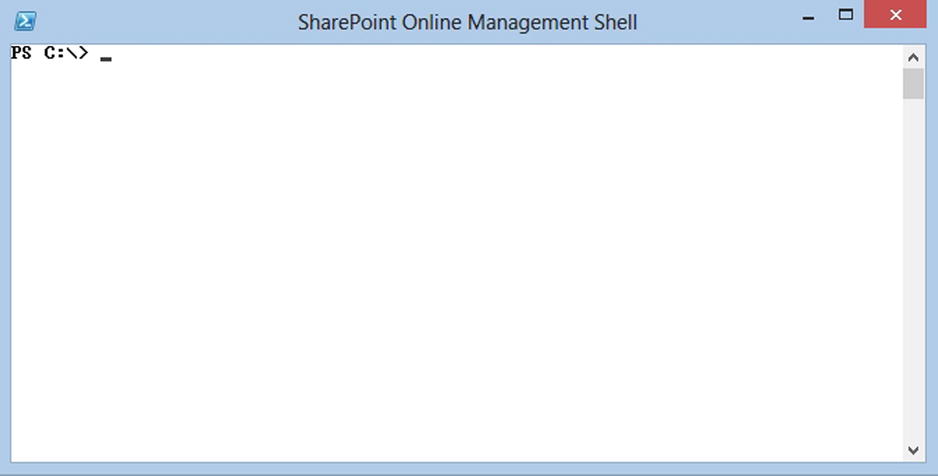
Figure 9-2. SharePoint Online Mangement Shell console
Connecting to the Office 365 Instance
The first thing to do once you have the management shell set up is, obviously, to connect to your remote Office 365 instance. The management shell offers a new cmdlet named Connect-SPOService that allows you to remotely connect to the Office 365 SharePoint Online service. Every PowerShell session that wants to interact with Office 365 needs to first authenticate using this method. In this example, you will use this cmdlet to connect to your environment using the following PowerShell line:
Connect-SPOService -URL https://powershellbook-admin.sharepoint.com -Credential [email protected]
In this line, the URL parameter is the root of the SharePoint admin center for your Office 365 account, and in which the credentials used are the credentials of a user with administrator rights on the SharePoint Online instance. Calling this PowerShell line of code will automatically prompt the user for their credentials (see Figure 9-3).
Figure 9-3. SharePoint Online Management Shell prompting for user’s credentials upon authenticating
Enter your credentials as requested, and click OK. It may take a few seconds for the management shell to properly authenticate you with Office 365. Once the authentication has been successful, you will simply be returned to the management shell and allowed to type in new commands.
Listing Available Commands
This is more of a refresher, but just like you did for the on-premises aspect of PowerShell, you can generate a list of all available cmdlets in the online shell by using the Get-Command cmdlet. However, simply calling this command without any filters will return a list of well over 1,000 items, including all the basic PowerShell cmdlets that are not specific to SharePoint. What you want to do is filter this list so that you only get the cmdlets that are pertaining to SharePoint back. The module that contains all of the SharePoint Online PowerShell cmdlet is named Microsoft.Online.SharePoint.PowerShell. Using this information, you can produce a query that will filter the list of all commands to only return the ones related to what you want. The following lines of PowerShell will allow us to achieve just that:
$spo = Get-Command |
Where{$_.ModuleName -eq "Microsoft.Online.SharePoint.PowerShell"}
With this command, you’ve captured all SharePoint Online related cmdlets into a PowerShell variable named $spo. Getting the Count property of this variable will tell you that there are currently 30 cmdlets available to manage SharePoint Online. Note that because this is a cloud environment, this number is subject to change at any time given that Microsoft has frequent releases for the online platform. The rest of this chapter will give you an overview of what each of these 30 online cmdlets are all about.
The following section will give details about the various cmdlets that are available to you in the cloud and will give some examples of real-life scenarios in which you may have to use them to manage your SharePoint Online instances. They are grouped by the type of SharePoint artifacts they interact with.
Site Collections
The current section will go over each PowerShell cmdlets that are available to interact with SharePoint Online site collections. There is a total of 11 cmdlets available to manage these. In the context of SharePoint Online, the PowerShell object that represents a site collection is called a SPOSite object.
The Get-SPOSite cmdlet returns a reference to a SharePoint Online site collection. As mentioned earlier, the object returned by this method is a SPOSite object as opposed to a SPSite object for an on-premises site collection. Because this object exposes a different type of SharePoint artifact, the properties exposed by it are also different to the one exposed by the on-premises object. I’ve developed a short PowerShell script that allows you to loop through each property of a SPOSite object and prints its value on screen. The script will prompt the user to enter the URL to one of its SharePoint Online site collection, will get a reference to it, and will query its members to obtain the list of available properties. The script then loops through each of these properties obtained, and prints both its name and its value on screen. Figure 9-4 shows the execution of this PowerShell script against our public facing site collection.
$url = Read-Host "What is your Site's Url"
$site = Get-SPOSite $url

$members = $site | Get-Member | Where{$_.MemberType -eq "Property"}
for($i = 0; $i -lt $members.Count; $i++)
{
        $name = $members[$i].Name
        Write-Host $name":" $site.$name
}
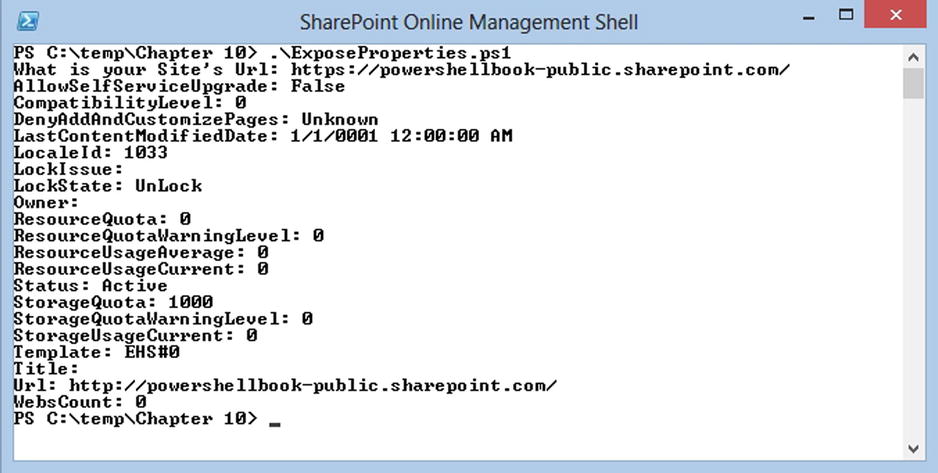
Figure 9-4. SPOSite properties and their values for your SharePoint Online public facing site collection
By default, Office 365 creates four site collections for each Enterprise level accounts. Table 9-1 shows the site collection template ID used for each of these four site collections for your demo account.
Table 9-1. List of default SharePoint Online site collections and their associated site template id
|
Site Collection |
URL |
Template ID |
|---|---|---|
Public |
EHS#0 | |
Intranet |
EHS#1 | |
Search Center |
SRCHCEN#0 | |
My Site Host |
SPSMSITEHOST#0 |
It is important to note that although the Search Center and My Site Host templates are also available on-premises, the two site collection templates used for the Public and the Intranet site collections are new templates that are exclusive to SharePoint Online in Office 365.
The New-SPOSite cmdlet lets you create a new SharePoint Online site collection. This PowerShell cmdlet takes three mandatory parameters to execute, a URL for the new site collection, the username of the Office 365 user that will be its owner, and a storage quota. You’re probably wondering why you’re not passing the site collection’s template ID as a parameter. Actually, although this is not a mandatory parameter, you can still go ahead and pass it to the cmdlet. If you omit to mention it, your SharePoint Online will force you to select a template the first time that you try to access your new site collection. Figure 9-5 shows the prompt that a user gets the first time he or she accesses a site collection in SharePoint Online for which no default site collection template has been chosen.
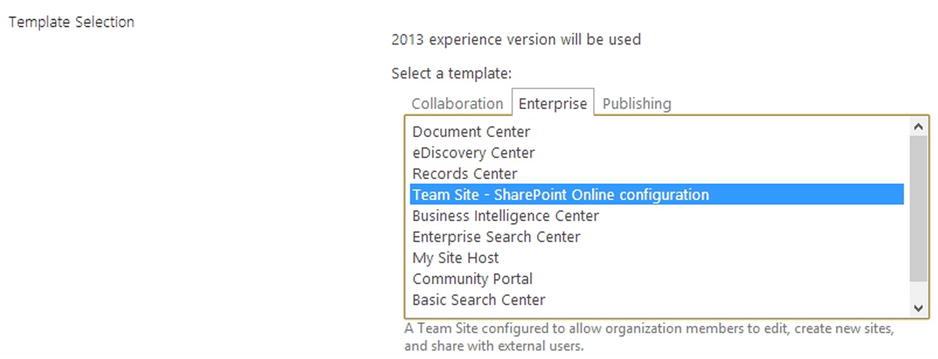
Figure 9-5. SharePoint Online prompting user to select a site collection template
Remember that I’m a developer at heart, and so, to me, something is always missing in the default offering of site collections in SharePoint Online. The beauty of Office 365 is that it lets developers create their own sandbox to develop custom business apps and test them out in the cloud. The online service offering gives the user the choice to create a developer’s site collection, which is invaluable to any organization wanting to do testing for their SharePoint 2013 apps. The first thing I always do when registering a new Office 365 account is to connect to its SharePoint Online portal and create such a site collection. The following few lines of PowerShell will show you how you can get started and automatically create such a site collection using PowerShell. The code shown here will automatically create a new developer site collection in your PowerShellBook SharePoint Online account. Figure 9-6 shows the new site collection being created in the SharePoint Online admin center. It normally takes a minute or two after the creation process has been initiated by PowerShell for the SharePoint Online site collection to be entirely created.
New-SPOSite -URL https://powershellbook.sharepoint.com/sites/dev -Owner [email protected] -StorageQuota 500 -Template DEV#0
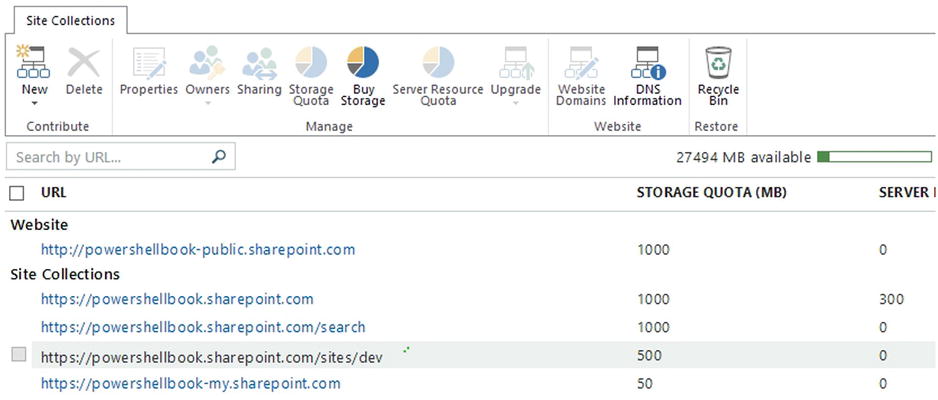
Figure 9-6. Developer site collection being created in SharePoint Online admin center
The Remove-SPOSite cmdlet is to be used when you wish to delete an existing SharePoint Online site collection. The only parameter required for this PowerShell cmdlet is the URL to the site collection that you wish to delete. The following line of PowerShell code will delete the developer site collection that you’ve created in the previous section of this chapter:
Remove-SPOSite https://powershellbook.sharepoint.com/sites/dev
This SharePoint Online cmdlet is a special one. You can call Repair-SPOSite against a single or a group of site collections in your SharePoint Online account, and it will run all health analyzer rules against them. If it encounters any errors, it automatically attempts to fix them. This operation is not available through the web interface of the SharePoint Online admin center; you must use the SharePoint Online Management Shell to use it. Although there is no real need for Office 365 clients to use this cmdlet at the moment, it was probably one of the most widely used cmdlets by the Microsoft team when they had to upgrade millions of tenants from SharePoint 2010 to SharePoint 2013 back in the spring of 2013. Assuming that Microsoft ever releases another version of their SharePoint Online offering, there may be some future need for this cmdlet. Figure 9-7 shows the result of running this cmdlet against your demo intranet site.
Repair-SPOSite https://powershellbook.sharepoint.com
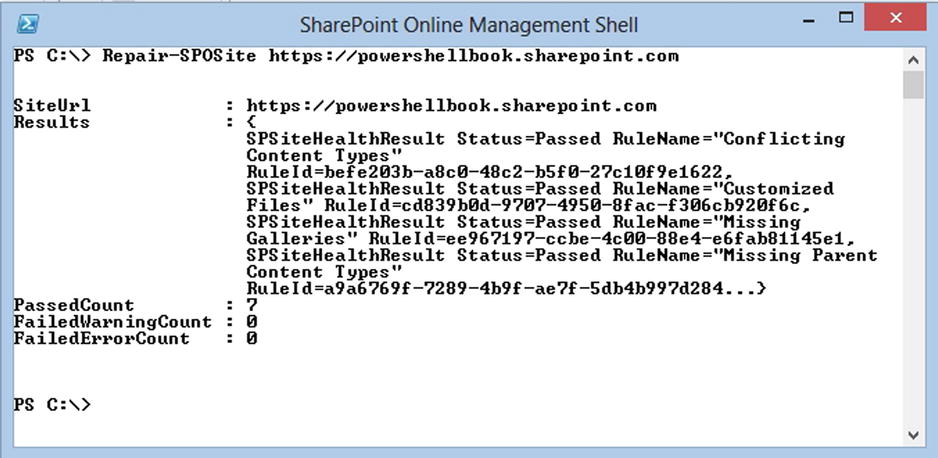
Figure 9-7. Running the repair site collection PowerShell cmdlet against a SharePoint Online site collection
Imagine that you wish to use PowerShell to modify a property of an existing site collection, say, its title. Your normal reaction may be to use the Get-SPOSite PowerShell cmdlet to get a reference to the site collection, and then to set its Title property to whatever you wish. The big problem with this approach using SharePoint Online is that a SPOSite object does not expose the Update method that is normally used to commit changes on SharePoint artifacts back to the database. Therefore, simply getting a reference to the site collection and setting the value of one of its property is not going to work. This is where the Set-SPOSite cmdlet comes to the rescue. This cmdlet lets you specify what property of a SPOSite object you wish to set, and in the background it secretly calls the Update method on the object. The PowerShell code below shows you how you could use PowerShell to set the title of your internal SharePoint Online site. Figure 9-8 shows the result of executing this line of PowerShell code:
Set-SPOSite https://powershellbook.sharepoint.com -Title "This is me showing the Set-SPOSite cmdlet"
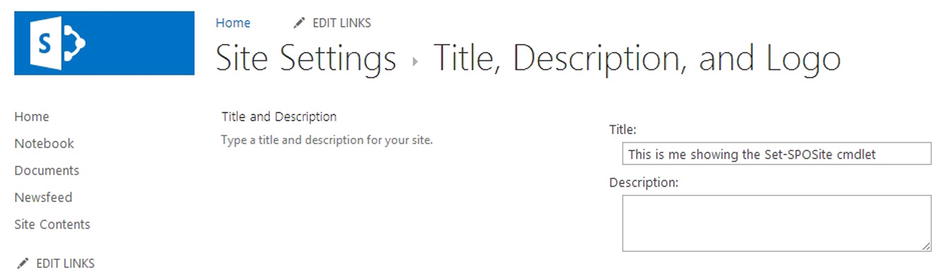
Figure 9-8. Internal SharePoint Online site collection's root web title changed using PowerShell
There are several other properties that can be modified using this method. Table 9-2 gives a list of all of the properties of a SharePoint Online site collection that can be set using this PowerShell cmdlet.
Table 9-2. List of SharePoint Online site collection properties that can be modified using PowerShell
|
Property Name |
Description |
|---|---|
AllowSelfServiceUpgrade |
True or false to specify if a site collection administrator is allowed to upgrade its site collection or not |
LocaleId |
Specifies the locale ID of the language to use for the site collection |
LockState |
Sets a lock on a site collection. Available values are: NoAccess—Redirects user to a specific URL Unlock—Users access the site normally |
Owner |
Sets the owner of the specified site collection |
ResourceQuota |
Specifies a resource quota in megabytes for the site collection |
ResourceQuotaWarningLevel |
Specifies the warning level in megabytes that, when reached, notifies the site collection administrator that the site collection is approaching its maximum resource quota |
StorageQuota |
Specifies a storage quota in megabytes for the site collection |
StorageQuotaWarningLevel |
Specifies the warning level in megabytes that, when reached, notifies the site collection administrator that the site collection is approaching its maximum storage quota |
Title |
Specifies the title of the site collection |
The Test-SPOSite cmdlet does the same thing as the Repair-SPOSite cmdlet, but it doesn’t actually commit the changes. Using it results in the same thing as calling the Repair-SPOSite using the -WhatIf switch, which also won’t commit the results of the operation.
Just as was the case for the test and repair functions, the upgrade cmdlet for SharePoint Online site collections has already served its purpose, and tenants won’t have to use it anymore. It was heavily used by the Microsoft team when upgrading tenant site collections from SharePoint 2010 to SharePoint 2013. If you try to call this PowerShell cmdlet against any of your existing site collections, you will simply get a notification message saying that the site has already been updated and that it does not need to be updated (see Figure 9-9).

Figure 9-9. SharePoint Online Management Shell printing notification on screen that site collection is not upgradable
Request-SPOUpgradeEvaluationSite
The Request-SPOUpgradeEvaluationSite PowerShell cmdlet lets a user request a temporary Upgrade Evaluation site collection in Office 365. This method was mostly used when Office 365 tenants were given the option to upgrade from their original SharePoint 2010 site collections over to the new SharePoint 2013 ones. Now that every new tenant is automatically given a 2013 environment, the use for this cmdlet is slowing disappearing. Making calls to this cmdlet doesn’t do anything anymore. No upgrade evaluation sites will ever be triggered for site collections that are already running in compatibility mode.
Just as was the case for SharePoint on-premises, site collections that have been deleted through the web interface are given a second shot at life. One major difference in the online world, however, is that in Office 365, even SharePoint site collections that have been deleted through PowerShell are sent to the recycle bin. The SharePoint Online admin center offers the option to view deleted site collections by clicking on the Recycle Bin button in the management ribbon (see Figure 9-10).
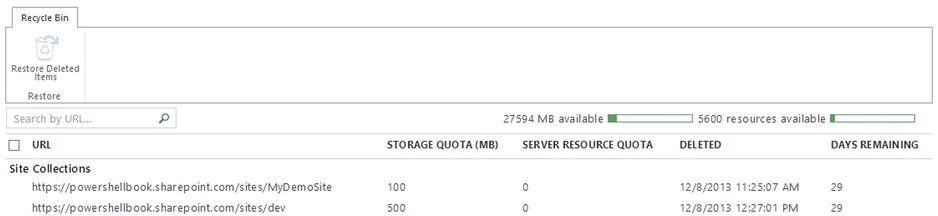
Figure 9-10. Recycle bin in the SharePoint Online admin center
The Get-SPODeletedSite PowerShell cmdlet takes in a unique parameter, the URL of the deleted site collection to which you wish to obtain a reference. A deleted site collection in SharePoint Online is represented by the SPODeletedSite object. Figure 9-11 shows how you can obtain a reference to the deleted developer site collection that you’ve deleted previously, and shows you all the methods and properties exposed by this object.
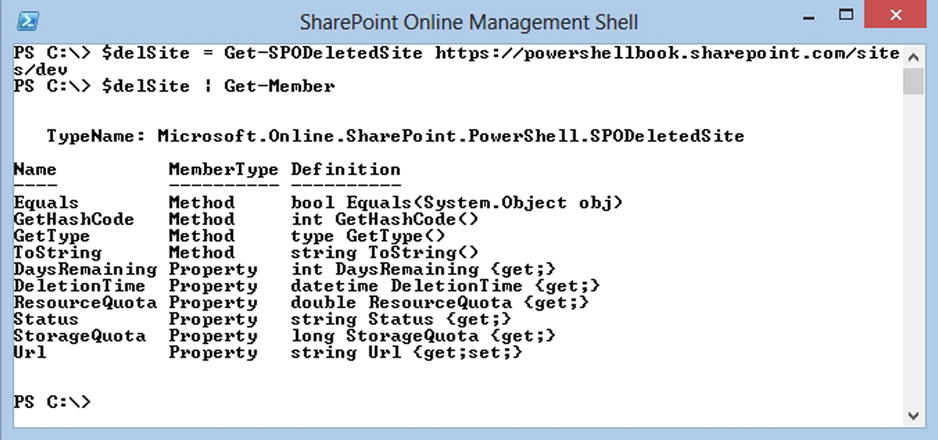
Figure 9-11. Getting a reference to a deleted site collection in SharePoint Online and listing its available properties and methods using PowerShell
Restore-SPODeletedSite
The Restore-SPODeletedSite PowerShell cmdlet restores a deleted site collection back to life. While they are in the recycle bin, site collections are no longer accessible through the browser. Restoring a deleted site collection puts it back in the list of available site collections in the SharePoint Online admin center. The Restore-SPODeletedSite cmdlet simply takes the URL of the site collection that you wish to restore from the recycle bin. The process of restoring a deleted site collection converts the SPODeletedSite object back to a SPOSite object.
Remove-SPODeletedSite is like the “Grim”. It takes a site collection that has been previously deleted and that is patiently waiting in the recycle bin, and permanently makes it disappear. Once a site collection has been removed from the recycle bin, it is no longer restorable; it’s gone. One very interesting fact is that in SharePoint 2013, there is no way for an administrator using the web interface to force the deletion of a site collection from the recycle bin. Site collections that have been deleted in Office 365 are given a 30-day grace period during which administrators can reverse their decision and restore them. If after these 30 days the site collections are still in the recycle bin, then SharePoint Online will automatically remove them permanently. Using PowerShell is the only way for an administrator to force an immediate permanent deletion of a site collection. The following line of PowerShell will take the developer site that you’ve deleted previously and permanently delete it from this world. Figure 9-12 shows the permanent removal of your developer site using PowerShell.
Remove-SPODeletedSite https://powershellbook.sharepoint.com/sites/dev
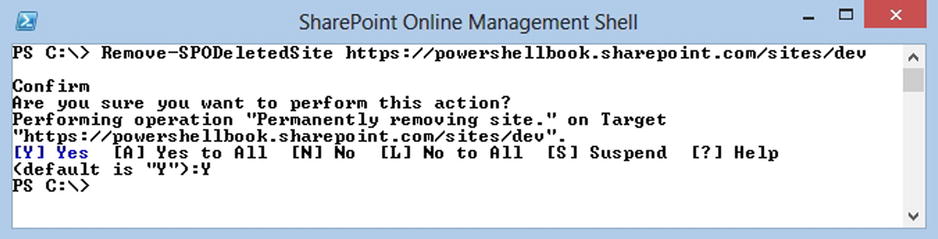
Figure 9-12. Permanently deleting a site collection from SharePoint Online using PowerShell
In this section, I will cover the various PowerShell cmdlets that are made available to you in the SharePoint Online Management Shell console to manage site collection security groups. SharePoint Online includes default security groups that vary from the default ones that you have on-premises.
The Get-SPOSiteGroup PowerShell cmdlet allows you to get a list of all existing security groups for a specific site collection. The default security groups in each site collection vary. Table 9-3 lists the various default security groups in each, and lists their default permissions.
Table 9-3. List of default security groups and their permissions in Office 365
|
Site Collection |
Security Group |
Permissions |
|---|---|---|
Public Facing |
Approvers |
Approve |
Designers |
Design | |
Hierarchy Managers |
Manage Hierarchy | |
Home Members |
Contribute | |
Home Owners |
Full Control | |
Home Visitors |
Read | |
Restricted Readers |
Restricted Read | |
Translation Managers |
Restricted Interfaces for Translation | |
Intranet |
Excel services Viewers |
View Only |
Members |
Edit | |
Owners |
Full Control | |
Visitors |
Read | |
My Site |
Members |
Contribute |
Owners |
Full Control | |
Visitors |
Read | |
Search Center |
Approvers |
Approve |
Designers |
Design | |
Excel Services Viewer |
View Only | |
Hierarchy Managers |
Manage Hierarchy | |
Members |
Contribute | |
Owners |
Full Control | |
Restricted Readers |
Restricted Read | |
Translation Managers |
Restricted Interfaces for Translation | |
Visitors |
Read |
You can obtain the permission level associated with each site collection security group by accessing the Roles property of a group. The following example shows how you can determine the permission level associated with the Translation Managers group of our default Search Center site collection (see Figure 9-13).
$groups = Get-SPOSiteGroup https://powershellbook.sharepoint.com/search
$translationMgr = $groups | Where{$_.Title -eq "Translation Managers"}
$translationMgr.Roles

Figure 9-13. Getting the permission level of a site collection security group in Office 365 using PowerShell
The New-SPOSiteGroup PowerShell cmdlet lets you create a new SharePoint Online site collection security group. It requires you to pass in the site collection’s URL where you wish to create this new security group, the name of the new group, as well as the permission level that you want to assign to it. Figure 9-14 shows you how you could use this cmdlet to create a new security group on your public site called MyNewGroup having both Contribute and Design rights.
New-SPOSiteGroup https://powershellbook-public.sharepoint.com
-Group "MyNewGroup" -PermissionLevels "Contribute", "Design"
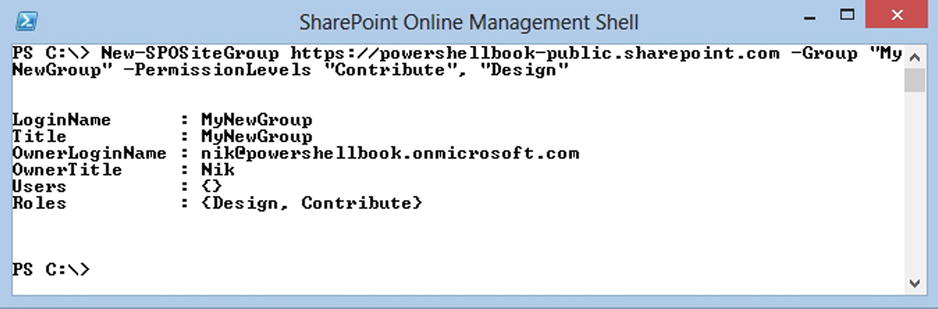
Figure 9-14. Creating a new site collection security group in Office 365 using PowerShell
Starting to figure out a pattern in the available methods? Yes, you’ve guessed it; the Remove-SPOSiteGroup cmdlet lets you delete an existing site collection security group. It simply requires you to pass it the URL of the site collection, as well as the name of the security group to delete. For example, to delete the security group that you’ve created in the previous section, you could run the following line of PowerShell:
Remove-SPOSiteGroup https://powershellbook-public.sharepoint.com
-Identity "MyNewGroup"
Just as was the case when we dealt with SharePoint Online site collections, the Set-SPOSiteGroup cmdlet lets you modify properties related to existing site collections’ security groups. For example, if you wish to modify the permission levels of a specific group, you’ll need to use this cmdlet to do it. Assume that you want to modify the permissions level of a custom security group called “Partners” that exists on your public-facing instance. Assuming that this group currently has Design permission, if you wish to bring this down a notch and simply grant contributor access, you could use the following line of PowerShell code to make the change shown in Figure 9-15:
Set-SPOSiteGroup https://powershellbook-public.sharepoint.com -Identity "Partners"
-PermissionLevelsToRemove "Design" -PermissionLevelsToAdd "Contribute"
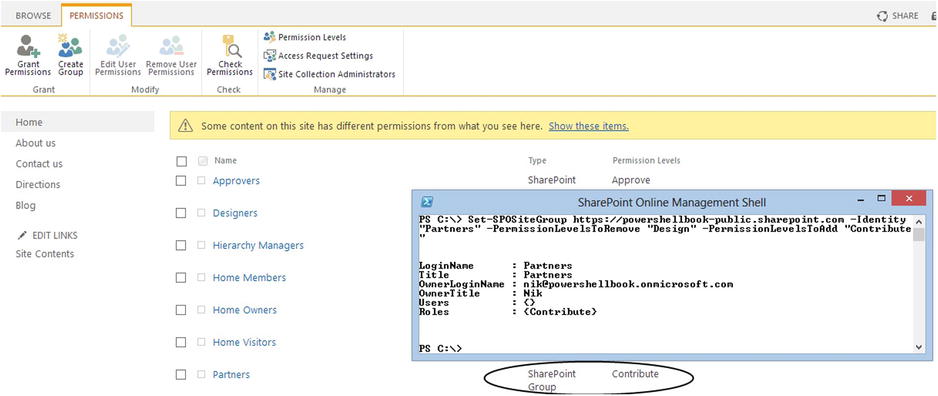
Figure 9-15. Custom site collection security group's permission level modified by PowerShell
Users
In this section, I will cover the various PowerShell cmdlets that are available to us to interact with SharePoint user objects. In Office 365, there are two types of users with whom you can interact. The first type, internal users, typically works for your company. They have been assigned an Office 365 license and have a user name on the company’s domain in the cloud. The second type, external users, are users that are not employees of the company but that need to be granted some level of access to SharePoint sites in order to consult or contribute on documents or items store in SharePoint Online. These users are identified by their personal or external organization’s email (e.g., @gmail.com, @hotmail.com, @contoso.com, etc.). In this section you will learn how to use PowerShell to interact with both types of users in the SharePoint Online context.
The Get-SPOUser cmdlet lets you obtain a list of all users (internal and external) on a specific SharePoint Online site collection. The only required parameter is the site collection’s URL. Figure 9-16 shows the result of executing this PowerShell cmdlet against our internal site collection.
$users = Get-SPOUser https://powershellbook.sharepoint.com
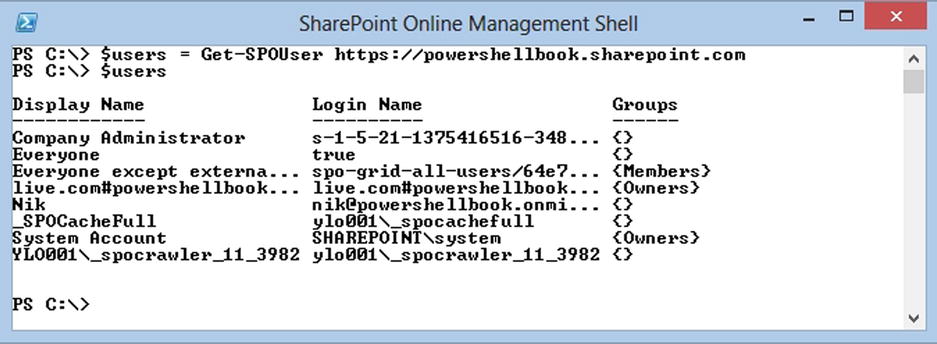
Figure 9-16. Listing all users on an internal SharePoint Online site collection using PowerShell
You can see from this example that there are some abstract users being returned. Those are simply what I would consider “maintenance” accounts. They are required accounts that the SharePoint farm needs in order to operate properly. What I’m really interested in are the two accounts right in the middle of the list. You can easily see my personal account on my domain ([email protected]), but what about the live.com#[email protected] user? This is an external user I invited to join my SharePoint site. I put him in the Owners group, giving him complete access over the site collection. This user can login to my Office 365 environment by using its personal @Outlook.com email account, and interact with the environment as if he was a company’s user.
The Get-SPOExternalUser cmdlet lets you get a list of all external users specified in your current Office 365 tenant account. The last part of my previous sentence is key to understanding how external users are managed in SharePoint Online. They are not managed at the site collections level directly but are, rather, generic to all of your SharePoint environments. Just like the internal users, these are stored at the account level. When you add an external user to a site collection, however, it gets registered against it, and the site collection keeps a footprint of its login name. This makes sense when you think that even external users a My Site page created in your environment; SharePoint needs to know who they are, no matter what site collection you are in. Get-SPOExternalUser doesn’t require any parameters. It simply connects to your tenant store and returns all of the external users it finds, no matter where in the site collection architecture they were granted access. Figure 9-17 shows the result of executing this cmdlet against our demo Office 365 tenant account:
Get-SPOExternalUser
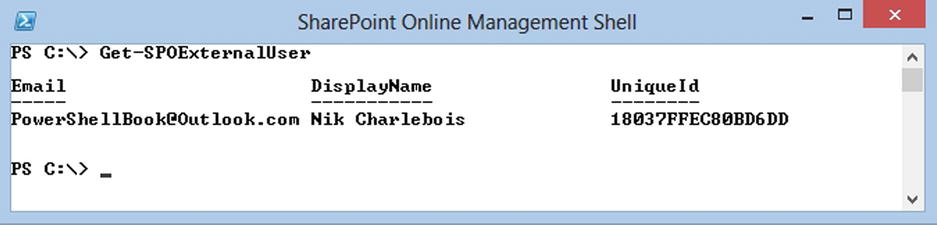
Figure 9-17. Getting a list of all external users for an Office 365 tenant account using PowerShell
Note that there is no way for you, with this cmdlet, to identify where in the site collections’ architecture a specific external user has been granted access. You would have to loop through each one and check for their presence in the list of users. The following PowerShell script allows you to enter the user name of a specific external user and to figure out what site collections he’s been granted access to (see Figure 9-18):
# Prompts for the external user's login name;
$extUserName = Read-Host "External User Name?"

# Gets a list of all available site collections in the current tenant;
$sites = Get-SPOSite

# Loops through all site collections
for($i = 0; $i -lt $sites.Count; $i++)
{
    # Query the list of users for the current site collection to see if external user is in
    # there;
    $user = Get-SPOUser $sites[$i].Url | Where{$_.LoginName -like "*$extUserName"}
    if($user -ne $null)
    {
        # If the user has been found, print the site's Url he has been found in;
        Write-Host $sites[$i].Url
    }
}

Figure 9-18. Finding site collections in which a specific external user has access to using PowerShell
The Add-SPOUser cmdlet lets you add an existing user to a SharePoint Online security group. This PowerShell method takes in three required parameters: the URL of the site collection, the name of the group to add the user in, and the login name for the user to add. This cmdlet allows you to add both internal and external users to security group. For example, you could try to add an internal user by passing its user name in the form DomainUsername or add an external user using the default user id provided with Office 365 that includes its email address (e.g., live.com#[email protected]). However, an external user name needs to have been registered against the site collection before attempting to add it to a security group; otherwise, Office 365 won’t recognize its login name. For example, Figure 9-19 shows the use of this cmdlet to try to add the same external user to two different site collections. In the first case, the external user had not been registered with the site collection, whereas, in the second case, the user had properly been registered. Note that there is currently no way to use the SharePoint Online Management Shell to automatically register an external user against a site collection.
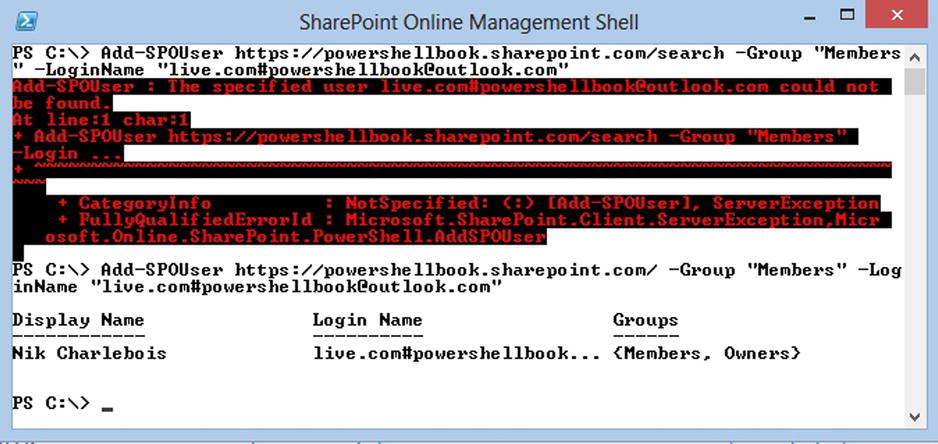
Figure 9-19. Trying to add an external user against two different site collections using PowerShell
Remove-SPOUser
The Remove-SPOUser cmdlet lets you remove both an internal, and an external user from a SharePoint site collection. It requires you to pass it both the site collection’s URL and the login name for the user to remove. Remember that when dealing with external users, when you are at the site collection level, login names take the form of <Authorization Provider>#<User Email> (e.g., Live.com#[email protected]). The following line of PowerShell will remove the external user you’ve added to our internal site collection:
Remove-SPOUser https://powershellbook.sharepoint.com
-LoginName live.com#[email protected]
You are probably wondering why it is that you need a separate remove method to get rid of external users, when the method I’ve just covered takes care of both internal and external users. You need to remember that when I talk about external users, you must think of this in the tenant context, meaning external users are registered against your entire Office 365 account. When an external user is registered against a specific site collection, it becomes what I’d call a “semi-internal” user, meaning that you can interact with it as if it was just a regular internal SharePoint user. The concept of external user only really makes sense when you’re talking about the higher level of SharePoint management: the entire SharePoint environment. This method deals exactly with this. It gets rid of an external user at the tenant level, meaning that it will no longer be registered at the account level.
In order to use the Remove-SPOExternalUser cmdlet, you’ll need to obtain the external user’s unique id. An important thing to note as well is that by simply removing the entry to the external user at the tenant’s level, you are not revoking the user’s access to the site collections to which he has been granted access previously. The following PowerShell script will come in handy if you ever need to get rid of an external user and want to ensure all registered instances are also removed from the site collections. Therefore, the script makes sure that the specified external user is no longer able to access any SharePoint site collection in your Office 365 environment:
# Get the external user login name;
$extUser = Read-Host "External User Login Name?"

# Get a list of all site collection;
$sites = Get-SPOSite

for($i = 0; $i -lt $sites.Count; $i++)
{
    $user = Get-SPOUser $sites[$i].Url | Where{$_.LoginName -like "*$extUser"}
    if($user -ne $null)
    {
        # Remove the user from the site collection;
        Remove-SPOUser $sites[$i] -LoginName $user.LoginName
    }
}

# Gets the external user's unique id and remove it from the tenant account;
$userRec = Get-SPOExternalUser | Where{$_.LoginName -eq $extUser}
Remove-SPOExternalUser $userRec.UniqueId -Confirm:$false
The Set-SPOUser cmdlet lets you specify if a specific user should be granted site collection administrator rights or not. For example, the following line of PowerShell code could be used to revoke my SharePoint site collection administrator rights from your internal SharePoint environment. Just make sure that you don’t accidentally remove administrative rights from your unique administrator account when using this cmdlet:
Set-SPOUser https://powershellbook.sharepoint.com -LoginName [email protected] -IsSiteCollectionAdmin $false
Just like the on-premises story, SharePoint in the cloud on Office 365 also lets you install and develop custom SharePoint 2013 apps. You can create a developer’s site collection and let your developers publish apps in testing to it. Once the apps get approved, they can be pushed in your organization’s store and be consumed by all your site collections. The current section will give you an overview of what can be achieved with PowerShell to maintain and monitor your apps in an Office 365 SharePoint Online environment.
Assume that you have installed a custom app from the Office marketplace on one of your sites. The Get-SPOAppInfo cmdlet lets you get a reference to this app instance by simply passing it the name of the app you’ve installed somewhere in any of your site collections. Because this is tough to explain, I’ll show you a concrete example. Assume that a user went in the Office app marketplace and installed an app, called Timer Clock, on my internal SharePoint Online site collection. I now want to go and get a reference to this app instance. By using the Get-SPOAppInfo cmdlet and passing it the name of my app instance, I can get easily get a reference to that object. Notice that in this example, I’m simply passing it part of the actual app’s name. This works fine because PowerShell treats this parameter as a wildcard and gets any app that has the word “timer” in its name. Using this method gives you an overview of all of the apps that have been installed throughout the SharePoint Online environment as well as telling you important information about them, such as the source from which they were installed (organizational catalog, marketplace, etc.). Figure 9-20 shows the results of running this line of PowerShell code:
$timerClockApp = Get-SPOAppInfo -Name "Timer"
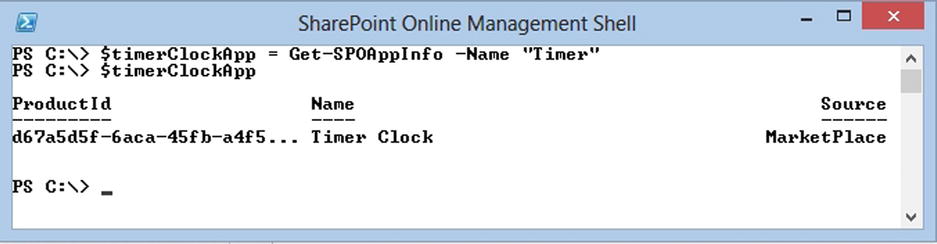
Figure 9-20. Getting information related to installed apps in an Office 365 environment using PowerShell
In Office 365, you are given the option to create an App Catalog for your tenant account. An app catalog site collection is created by using the Apps management section in the Office 365 SharePoint Online admin center (see Figure 9-21). This type of site collection allows you to make custom apps developed by your organization available to all site collections, and lets end users install and use them as they wish.
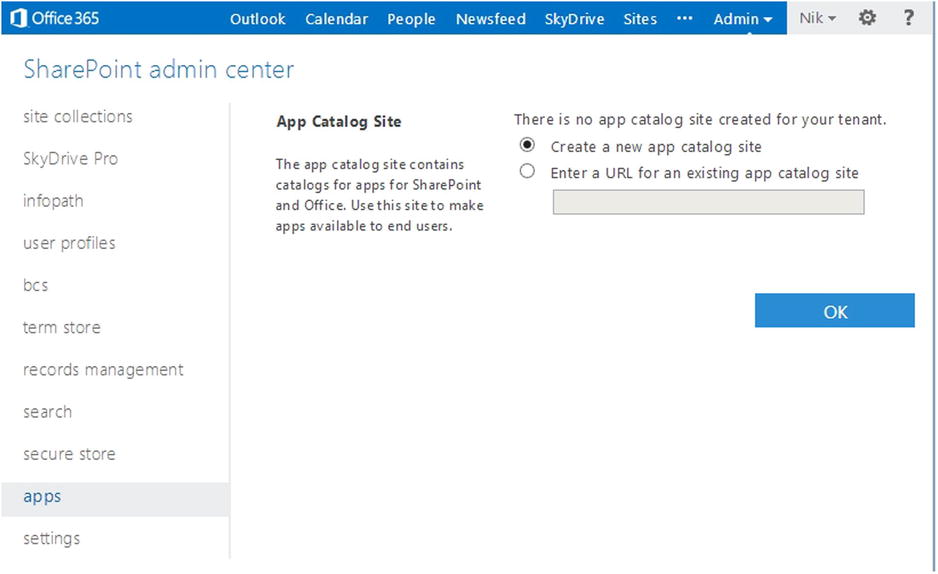
Figure 9-21. Creating a new App Catalog site collection using the web interface in Office 365
The question now becomes, how do you monitor errors related to these custom apps your development team produces? The Get-SPOAppErrors cmdlet lets you access information related to errors due to installation, upgrade, and execution errors. It requires you to pass the app’s product ID as a parameter. This data is only being updated every 24 hours by Office 365 timer jobs, so don’t worry if you don’t see stats appear right after your users start calling you about errors. The following example shows a scenario in which a faulty app has been deployed to the organization. Users trying to access the app in question are getting an error page. Calling the following lines of PowerShell code would return a list of all errors associated with the MyCrashingapp instance:
$myCrashingApp = Get-SPOAppInfo -Name "MyCrashingApp"
Get-SPOAppErrors $myCrashingApp.ProductId
Tenant
As mentioned previously, SharePoint Online in Office 365 runs in a multitenant mode, meaning that there are multiple users/organizations on the same SharePoint farm. PowerShell provides you with various ways of viewing information about the tenant’s account. This section will give an overview of what the various options are available to you with the SharePoint Online Management Shell.
The Get-SPOTenant cmdlet returns information about the current tenant account. Figure 9-22 shows the results of running this cmdlet against our demo environment:
Get-SPOTenant
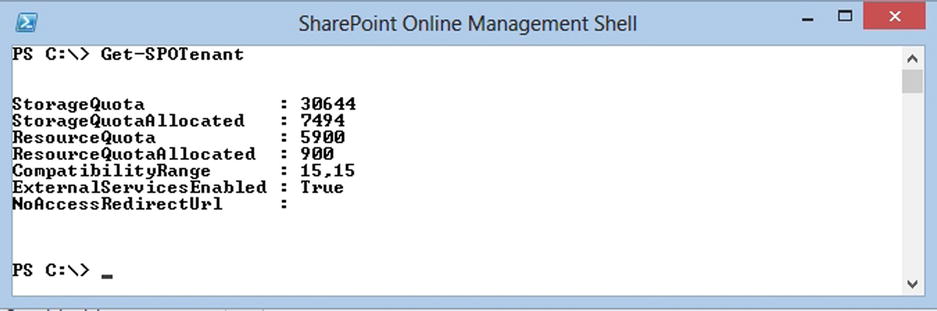
Figure 9-22. Getting information about the current Office 365 tenant account using PowerShell
You can use this cmdlet to set properties of the current tenant account. One example of properties you can set is the NoAccessRedirectUrl, which specifies a URL to redirect a user if the site they are trying to access has been locked. A locked site means it can’t be access by users. In real life, you want to lock a site while it is in development or while it is undergoing maintenance. It is a temporary state that freezes a site collection into its current state. To illustrate this, assume the following scenario. Pretend that you need to lock down the developer’s site collection in your environment because you want to prevent users from submitting new apps in testing (harsh example). You want users trying to access the developer site while it is locked down to be redirected to a user-friendly page that will explain to them what is going on, and tell them when to expect that the site will be back up. This PowerShell script will start off by locking the developer site, and then will set the NoAccessRedirectUrl property of your tenant account to contain the URL of the temporary page to which you want to redirect users:
Set-SPOSite https://powershellbook.sharepoint.com/sites/dev -LockState NoAccess
Set-SPOTenant -NoAccessRedirectUrl https://powershellbook-public.sharepoint.com
You probably got very excited when you first read the name of this PowerShell cmdlet. Let me burst your bubble right away; it doesn’t do what you think it does, at least not exactly. The biggest downside of SharePoint Online is that we don’t have direct access to our servers and therefore can’t directly get access to the SharePoint logs. The cmdlet lets you get access to certain information pertaining to your tenant account logged in the SharePoint logs. It will contain information about component failures if there are any (BCS, User Profile Service, etc.). It also contains information related to important events that happened on the environment. Figure 9-23 shows you what the results of running the method against our demo environment are. By looking at it, you can see that two events have been logged, one for every developer’s site that I created. This could be important information for you to monitor, because developer sites allow users to side-load SharePoint apps. You probably don’t want anybody creating such sites and loading their own applications in them.
$logs = Get-SPOTenantLogEntry
$logs[0].Message

Figure 9-23. Displays the latest log entry from our SharePoint Online environment using PowerShell
Get-SPOTenantLogLastAvailableTimeInUtc
Yes, somebody at Microsoft ought to be fired for coming up with such a long name for this PowerShell cmdlet. On the good side, the Get-SPOTenantLogLastAvailableTimeInUtc cmdlet does exactly what its 10-foot-long name says it does: it returns the date of the latest log entry in UTC time. This cmdlet could prove useful if you are automating a script that regularly checks on the cloud server to see if any new errors have been logged, and then notify the user. Figure 9-24 shows the results of running this cmdlet against our demo environment.

Figure 9-24. Getting the last log entry time from SharePoint Online using PowerShell
Web
I have mentioned previously that there is no way through the SharePoint Online Management Shell to create new webs in SharePoint Online. However, when creating a new site collection, you are also creating a root Web, which is assigned a web template type. There is only one PowerShell cmdlet in SharePoint Online that interacts with web objects. However, as you’ll learn in the next section, there are many more options available to you to deal with webs in Office 365.
The Get-SPOWebTemplate cmdlet returns a list of all available web templates in SharePoint Online. Figure 9-25 shows the resulting list produced by this cmdlet.
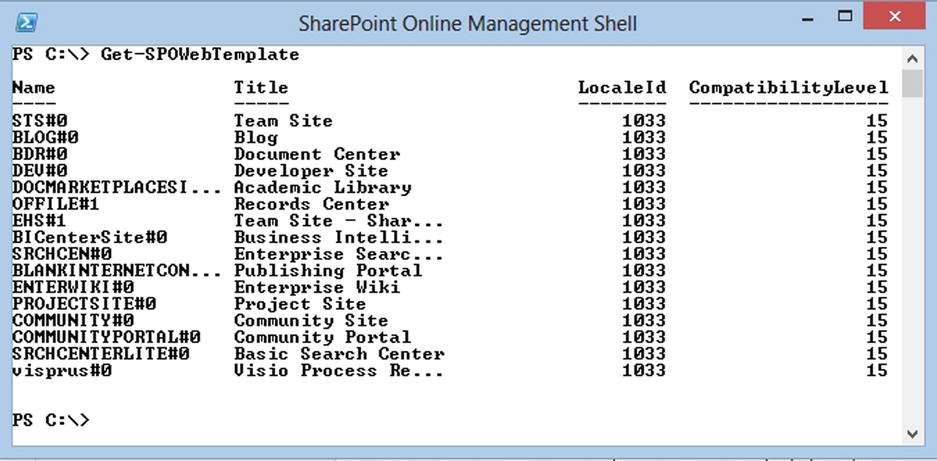
Figure 9-25. Listing all available web templates in SharePoint Online using PowerShell
Doing More with the Client Context
I’m sure that a lot of people were disappointed when they learned that there were only 30 PowerShell cmdlets made available to manage SharePoint Online. Let me bring up some good news: there are other ways than by using the default cmdlets to interact with SharePoint Online using PowerShell. In SharePoint 2010, Microsoft introduced a new development model called the Client Side Object Model, often referred to as CSOM. This new model allows developers to build applications running remotely outside of the SharePoint server and allows them to interact with the remote SharePoint environment.
Microsoft released three flavors of this new model: the JavaScript model, the Silverlight model, and the .NET model. If you’ve never heard of Silverlight, don’t worry about it; it was never good enough to get two capitalized letters like the other good Microsoft products (just joking). We will not be covering this topic in this book, due to the technical aspect of it. This book is intended for PowerShell beginners, and I feel that developing PowerShell scripts with CSOM is really an advanced development topic. Just know that whatever you are able to do using this model, it is possible to automate with PowerShell; for example, creating webs and subwebs under a site collection and dynamically changing themes for sites are now possible with this new approach.
Summary
In this chapter, you’ve learned that you can use PowerShell for more than just managing SharePoint on-premises environments. With the SharePoint Online Management Shell, you now have the option to automate operations on your Cloud environments residing in Office 365. In the next chapter, I will discuss how you can use PowerShell to help you in the process of upgrading SharePoint 2010 environments to SharePoint 2013.