Hour 6. Controlling Your Programs
This hour’s lesson extends your knowledge of JavaScript by showing you how to compare values and repeat sections of JavaScript programs. A user’s responses or calculated data can control the flow of your program. This lesson teaches you how to write programs that make decisions. The code sometimes needs to repeat sections in order to complete the processing of several data values. You’ll learn how to create a loop to do just that.
With the concepts that you learn in this lesson, you can write powerful programs to do what you need done. You will find yourself thinking of new ideas and new ways to use your computer.
The highlights of this hour include the following:
![]() Making decisions with JavaScript
Making decisions with JavaScript
![]() Using the
Using the if statement
![]() Changing decisions with the
Changing decisions with the else statement
![]() Repeating sections of code
Repeating sections of code
![]() Using the
Using the for loop
![]() Using
Using while and do...while loops
Comparing Data with if
JavaScript provides the ability for your program to make a choice and to perform one or another action depending on a condition. A JavaScript decision statement has two possibilities. To decide which path to take in a JavaScript program, you must use the if statement. Most programming languages have an if statement that works exactly like JavaScript’s. Therefore, once you learn how JavaScript supports the if statement, you will be able to apply the same principles for most other computer languages as well.
LISTING 6.1 Use an if statement when you want your program to make a decision.
<! DOCTYPE html>
<html>
<head>
<title>Ifbranch</title>
</head>
<body>
<script>
// Filename ifbranch.html
// program that decides how much of a bonus
// to pay a salesperson
// Get the name and sales of the salesperson
var salesname = prompt("What is the name?");
var salestot = prompt("What were his or her sales?");
if (salestot < 5000)
{
bonus = 0;
daysOff = 0;
}
else
{
bonus = 100;
daysOff = 2;
}
document.write(salesname+" earned a bonus of $");
document.write(bonus+" as well as "+daysOff);
document.write(" Days Off<p>");
</script>
</body>
</html>
What is the salesperson's name? Jim
What were the total sales made last month? 3234.43
Jim earned a bonus of $0 as well as 0 days off.
What is the salesperson's name? Jane
What were the total sales made last month? 5642.34
Jane earned a bonus $25 as well as 2 days off.
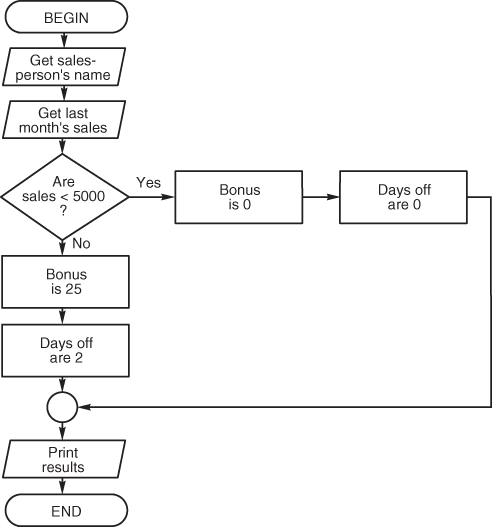
FIGURE 6.1 The flowchart’s decision symbol illustrates the nature of the salesperson program’s if statement.
if (age < 18)
document.write("You are not old enough");
Note
The parentheses around the statement to the right of the if are not required, but they clarify what exactly is being tested. This statement to the right of if, typically enclosed within parentheses, is called a relational test.
Writing the Relational Test
The if statement reads just as it does in plain English: If something is true, do one thing; otherwise do something else. You do not always add an else after a spoken if, and you do not have to have one in JavaScript either. Consider the following statements:
If I make enough money, I’ll retire early.
If you’re out late, call me, else you’ll get in trouble.
If you’re in town, we’ll eat dinner together.
As a programming language, JavaScript is fairly strict about how you make the if test. The relational test, the statement to the right of the if, usually includes one of the symbols from Table 6.1.
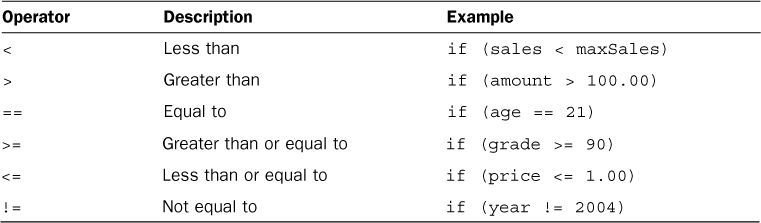
You learned about math operators in Hour 5, “Data Processing with Numbers and Words.” JavaScript supplies these relational operators so you can test certain conditions with if statements. There are always two possibilities with the relational operators. Something is either less than something else, or it is not. Something is either greater than something else, or it is not. Something is either equal to something else, or it is not.
Tip
The two possibilities that the relational operators enable provide the means for duplicating the two-legged decision symbol in a flowchart. A decision symbol has two possible outcomes, and so does the if. if is either true or false.
Note
JavaScript allows for multiple if...else if...else if layers, but there is another way to handle several possible conditions or values to a single variable, the switch statement.
Looping Statements
Looping statements are another important feature of any programming language. JavaScript supplies three statements that control loops. Your computer will never get bored. It will loop over and over, quickly repeating statements as long as you need it to.
Loops have many uses. You might need a loop to ask the user for several people’s data, to calculate a combined total, or to print several lines of data. JavaScript’s three primary looping statements are
![]()
for loops
![]()
while loops
![]()
do...while loops
The following sections describe these looping statements.
Using the for Loop
The for loop is actually a block of statements enclosed between braces following the initial for statement. Before you look at a for loop, an analogy to things in everyday life might be helpful. As with the if, a for loop is a natural way of expressing an idea. Consider the following description:
For each of today's invoices:
check the accuracy of the invoice,
add the total amount to the daily sales total.
You can sense from this description of invoice totaling that a repetitive process happens. If there are five invoices, the process repeats for each invoice.
The computer’s for loop works just like the for-each concept in the invoice description (that’s why it’s called for). To ease you into the method of for loops, Listing 6.3 shows a simple loop that explains the for statement.
LISTING 6.3 Use for to control a counting loop.
<! DOCTYPE html>
<html>
<head>
<title>forloop</title>
</head>
<body>
<script>
// Filename forloop.html
// program that prints 10 numbers using
// a for loop
for (i = 1; i <= 10; i++)
{
document.write(i+"<br>");
}
</script>
</body>
</html>
Here is the output from Listing 6.3’s program:
The for statement can save a programmer time and effort by repeating a line or block of code. The for statement is broken into three parts enclosed in parentheses to the right of the for. Generally, the first part sets up a counter variable, and the second tests the counter variable using a relational operator like the ones in Table 6.1. In Listing 6.3, the variable i is set to 1, and 1 is clearly less than 10. Because the statement is true, the block of code inside the braces prints below the for statement. In this case, there’s only a single line of code in the block, but it prints the current value of i, 1.
Once the block finishes executing, the third part of the for statement executes. In this case, a math operator new to you, the increment operator, runs. The increment operator (++) adds one to the variable, increasing i from 1 to 2. Now the for statement returns to the second part of the parenthetical section, and again tests the relational statement there. 2 is still less than 10, so once again the block of code executes, printing the current value of i, 2. Once the block is completed, the third portion of the for loop kicks in again, incrementing i by 1 to 3, and testing and looping continue until i is not less than or equal to 10, at which point the loop would terminate and the program would proceed to the next section of code.
Note
You don’t have to increase your test variable by 1. You can use a different operator (+=) to increase the value by any number. The statement i += 2 increases the counter by two and if you changed i++ to i += 2 in Listing 6.3, you would only print the odd numbers.
Listing 6.4 shows a program that does exactly the same thing as Listing 6.3, but without using a for loop. You can see that the for loop makes repetitive statements much easier to code. (Consider how much easier it would be to use a for statement to print the numbers from 1 to 200, instead of writing 200 lines of code to print those numbers if you used the method in Listing 6.4.)
LISTING 6.4 Printing without a for loop gets tedious.
<! DOCTYPE html>
<html>
<head>
<title>noforloop</title>
</head>
<body>
<script>
// Filename noforloop.html
// program that prints 10 numbers without
// the benefit of a for loop
i = 1;
document.write(i+"<br>");
i = 2;
document.write(i+"<br>");
i = 3;
document.write(i+"<br>");
i = 4;
document.write(i+"<br>");
i = 5;
document.write(i+"<br>");
i = 6;
document.write(i+"<br>");
i = 7;
document.write(i+"<br>");
i = 8;
document.write(i+"<br>");
i = 9;
document.write(i+"<br>");
i = 10;
document.write(i+"<br>");
</script>
</body>
</html>
You do not have to print the value of the loop variable as done in Listing 6.4. Often, a for loop controls a set of statements, determining the number of times those statements repeat, without using the control variable for anything else. Listing 6.5, controlled by a for loop, prints a message 15 times.
LISTING 6.5 Printing a message several times in a loop is efficient.
<! DOCTYPE html>
<html>
<head>
<title>formessage</title>
</head>
<body>
<script>
// Filename formessage.html
// program that prints a message
// 15 times
for (i = 1; i <= 15; i++)
{
document.write("HAPPY BIRTHDAY!<br>");
}
</script>
</body>
</html>
Another example will make this clearer. Look at the program in Listing 6.6. A teacher might use it to print a grade sheet. The program asks the teacher how many test scores are to be entered. It uses that answer to loop through a series of statements asking for the next child’s name and grade. As the teacher enters the data, the values are printed to the printer. At the end of the program, there is a complete listing of names and grades. (In Hour 9, “Programming Algorithms,” you will learn how to program an accumulator to add all the grades together and to print a class average.)
LISTING 6.6 A teacher’s grade-printing program is easy to follow when you use a loop.
<! DOCTYPE html>
<html>
<head>
<title>Grading Papers</title>
</head>
<body>
<script>
// Filename gradingpapers.html
// program asks how many students are in a class
// and then gets their names and grades
var names = new Array();
var grades = new Array();
var students = prompt("How many kids in the class?");
for (i = 0; i <students; i++)
{
names[i] = prompt("Enter student name:");
grades[i] = prompt("What was their test grade?");
}
for (i = 0; i < students; i++)
{
document.write(names[i]+" got a "+grades[i]+"!<br>");
}
</script>
</body>
</html>
Now after running the program, the user gets a prompt box asking for a number of students in the class (for the example, 5 was entered). The program loops through a series of additional prompts asking for names and grades of each student. After the data entry is complete, the following information appears on the web page (yours will match the data you enter):
Katie got a 94!
Maddie got a 93!
Chris got a 87!
Andrew got a 78!
Ben got a 81!
A quick note about one extra method used in this program. Just as you learned in the last chapter that a word is an array of characters, you can also create and use arrays of names or numbers. These come in handy when you need a collection of similar numbers, like grades in this program, or monthly expense totals. You could obviously create separate variables for each item, but one variable name with multiple numbered versions is so much easier to handle, particularly if you get larger number needs. What if you had 5,000 customers, and needed to keep a balance for each? Would you prefer to create 1 name with 5,000 copies or 5,000 different variables? The latter, right? And in JavaScript if you want to create an array of any type of data, you just need to call the new Array() method.
This program calls it twice, once for an array of student names and once for an array of grades. The program then runs through two for loops, with the first to get the input and the second to print out the data. If the teacher has 5 students, the for loops will loop 5 times. If the teacher inputs that there are 10 students, the program loops 10 times. With just 12 lines of JavaScript, you’ve managed to create a pretty powerful piece of code.
Controlling the for Loop
There are additional ways you can control a for loop. You can make the control variable increment by a value other than 1 each time through the loop. You can also make the count variable count down instead of up.
Listing 6.7 shows you a program that counts down from 10 to 1 and then prints “Blast Off!” at the end of the loop. To carry out the countdown, a negative value had to be used in the third part of the for statement (just as the ++ operator increases a variable by 1, the -- operator, also known as the decrement operator, decreases a variable by 1). Each time through the loop, −1 is added to i, which causes the descending count.
LISTING 6.7 Counting down from 10 to 1 is simple with a for loop.
<! DOCTYPE html>
<html>
<head>
<title>Countdown!</title>
</head>
<body>
<script>
// Filename countdown.html
// program uses a for loop to
// countdown instead of up
for (i = 10; i > 0; i--)
{
document.write(i+"...<br>");
}
document.write("BLAST OFF!");
</script>
</body>
</html>
Here is the output from the program:
10...
9...
8...
7...
6...
5...
4...
3...
2...
1...
Blast Off!
The for loop offers much loop control, but it is designed to count through the control loop’s value. You don’t have to increase or decrease your counter variable by 1 in the third part of your for loop. You can increase it by 2 (i += 2), 5 (i += 5), decrease by 2 (i -= 2), 0.5 (i -= .5), or any amount.
You can nest one loop inside another. Such nested constructs can seem rather advanced to beginning programmers, but the nested loops are simple to understand if you consider what happens when you need to perform a loop more than once. You could write the loop twice, back to back, or you could enclose the loop inside another loop that executes its body twice. Hour 9 explains nested loops in more detail.
Not all your loops can be determined by a counting variable. Sometimes you need loops that loop while a certain condition is true or until a certain condition is met. The loops described in the next section often prove more effective when that is your programming goal.
Using the while Loop and do...while Loops
The while loop supplies a way to control loops through a relational test. The loop’s relational test uses the same relational operators used with if statements (refer back to Table 6.1 for a complete listing of relational operators).
Suppose the teacher with the grade-printing program doesn’t know exactly how many students took the test, and doesn’t want to take the time to count them. Because the total number of tests must be specified to control the for loop properly, another method is required. Listing 6.8 shows you the same program, but controlled by a while loop. Notice that the while continues looping while a certain condition is true. The condition is the teacher’s answer in response to having more tests to enter.
LISTING 6.8 You can control the grade program with a while loop.
<! DOCTYPE html>
<html>
<head>
<title>Grading Papers</title>
</head>
<body>
<script>
// Filename gradingpapers.html
// program loops until the teacher does
// not have any additional students
var names = new Array();
var grades = new Array();
var ans = 'Y';
i = 0;
total = 0;
while (ans == 'Y')
{
names[i] = prompt("Enter student name:");
grades[i] = prompt("What was their test grade?");
total += parseFloat(grades[i]);
ans = prompt("Do you have another grade? (Y/N)");
i++;
}
for (j = 0; j < i; j++)
{
document.write(names[j]+" got a "+grades[j]+"!<br>");
}
average = total / j;
document.write("<p>The class average was "+average);
</script>
</body>
</html>
This program keeps looping until the teacher indicates that there are no more grades to enter. Notice that the while is followed by a relational test, the result of which (true or false) determines whether the loop repeats again or quits. So if the conditional statement is false the first time, the block of code will not run at all. In this program, we’ve guaranteed the code will run one time by setting the ans variable to ‘Y’ to trigger the first pass through the loop. This is where a do...while loop can be more efficient. The only difference between a while loop and a do...while loop is the placement of the test expression. In the code you just saw, the condition is tested and then the code runs. A do...while loop will run at least once before the condition is tested. The following snippet is the while from the previous program rewritten as a do...while loop:
do
{
names[i] = prompt("Enter student name:");
grades[i] = prompt("What was their test grade?");
total += parseFloat(grades[i]);
ans = prompt("Do you have another grade? (Y/N)");
i++;
} while (ans == 'Y'),
This would make more sense for your grading program—you would not have to set ans equal to ‘Y’ before the loop, and you’d run the code at least one time, which should almost always happen (unless every single student was sick on a particular day. Senior skip day, anyone?).
One added bonus to this program was the addition of a total variable, which got the value of all grades and then was divided by the number of students that took the test in order to get an average grade—an extra piece of information your program calculates for the teacher to add some additional programming value.
When using a while or do...while loop, make sure that somewhere in the block of code you are altering the variable you are testing in the relational statement. Otherwise, you may get yourself caught in an infinite loop and your program will not end.
Summary
Congratulations! You can now enter data into a JavaScript program and format the resulting output. You have also mastered the true power of any programming language—looping. The programs you saw in this lesson are getting to be powerful, yet you have seen that programming is easy. You have learned how the relational operators are used with the if statement so that a JavaScript program can make decisions based on the data. In addition, the looping constructs enable sections of your program to repeat as long as necessary.
The next hour shows you how to analyze your programs to locate errors that might appear in them. You’ll learn bug-catching secrets so that you can write more accurate programs more quickly.
Q&A
Q. Does it matter whether I select while, do...while, or for statements when I’m writing loops?
A. Generally, for loops are useful when you must count values or iterate the loop’s body for a specified number of times. The while loop is useful for iterating until or while a certain condition is met, and a do...while loop is best when you know a block of code needs to run at least once. If you are counting up or down, a for loop is easier to write and is slightly more efficient than an equivalent while loop. Ultimately though, you can use whatever style of loop you prefer.
Q. How does if compare to for?
A. Both the if statements and the for statements, as well as the while and do...while statements, rely on conditional values to determine their job. Nevertheless, an if statement is never considered to be a loop. Always keep in mind that an if statement executes its body of code at most one time, and possibly never if the if is false to begin with. Even if the if condition is true, the if statement never executes its body more than one time, unlike the looping statements that can repeat their code bodies many times.
Quiz
1. How does a conditional operator differ from a mathematical operator?
2. What is a loop?
3. True or false: Code inside an if statement might never execute.
4. True or false: Code inside for loops always executes at least once.
5. How can you make a for loop count down?
6. How many times does the following for loop print?
for (i = 2; i <= 19; i += 3)
{
document.write(i);
}
7. Which loop, while or for, is best to use when you want to execute the loop a fixed number of times?
8. Where does the conditional appear in the while loop?
9. What is the difference between a while and do...while loop?
10. What method do you need to call in order to declare an array?
Answers
1. A conditional operator tests how two values compare, whereas a mathematical operator calculates an answer based on the values.
2. A loop is a set of instructions that repeat.
3. True. If the conditional tested by the if statement is false, the code inside the if statement will be skipped.
4. False. If the for loop’s counter variable is already past the limit before the loop begins, the for loop will not execute and control passes to the statement that follows the loop’s next statement.
5. Use a negative increment to make a for loop count down.
6. The loop executes six times.
7. Use the for loop when you want to execute a loop a fixed number of times.
8. The conditional appears after the while command.
9. Set the conditional to true before entering the loop.
10. The new Array() method.