Hour 20. Programming with Visual Basic 2012
Unlike many programming languages, much of the work of a Visual Basic programmer doesn’t lie in code but in the design of the application’s visual elements, such as the controls that the programmer places on forms at design time. These controls allow interaction to and from the user. The code that the programmer places behind the controls handles the events as well as data calculations and manipulations that produce the information required by the program.
This chapter is intended to introduce you to Visual Basic and Microsoft’s Visual Studio Environment. Like other chapters in this section, you will only be getting a taste of the language, but if you like it, you can dive deeper into Visual Basic 2012 with a tutorial book such as Sams Teach Yourself Visual Basic 2012 in 24 Hours.
The highlights of this hour include
![]() How to set control property values
How to set control property values
![]() How to embed code within a Visual Basic application
How to embed code within a Visual Basic application
![]() How to place and size controls so they look correct on the form
How to place and size controls so they look correct on the form
![]() What kind of code appears in a Visual Basic application
What kind of code appears in a Visual Basic application
Reviewing the Visual Basic Screen
Unlike most programming languages, Visual Basic is and always has been a Windows programming language. Whevn you learn to write programs with Visual Basic, you learn not only the language but also its environment. With its most recent release, Visual Basic is part of Microsoft’s Visual Studio, a shared Integrated Development Environment (IDE) where you can develop in Visual C++, Visual C#, SQL Server, and F#. The advantage to a shared IDE like this is that once you learn the ins and outs using the editor and tools of one programming language, you’ve got a head start on your next language. Before you can do anything in Visual Basic you must understand the Visual Basic screen.
Note
This hour will assume that you’ve installed the Visual Studio environment and instead focus on using Visual Basic 2012. If you need help installing Visual Studio, there are many online resources to help.
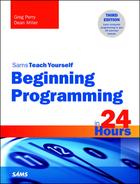
Figure 20.1 shows the New Project selection screen with Visual Basic 2012 Windows options selected. You can see there’s a rich variety of options, and on the left side, there are more template choices depending on the languages and the submenu (Windows, Web, Office, for example). You can always select an Empty Project and build your offering from scratch, but picking a template gets things started for you. Much of what you do with Visual Basic is Windows-based, so Windows Form Application will be a common starting point.
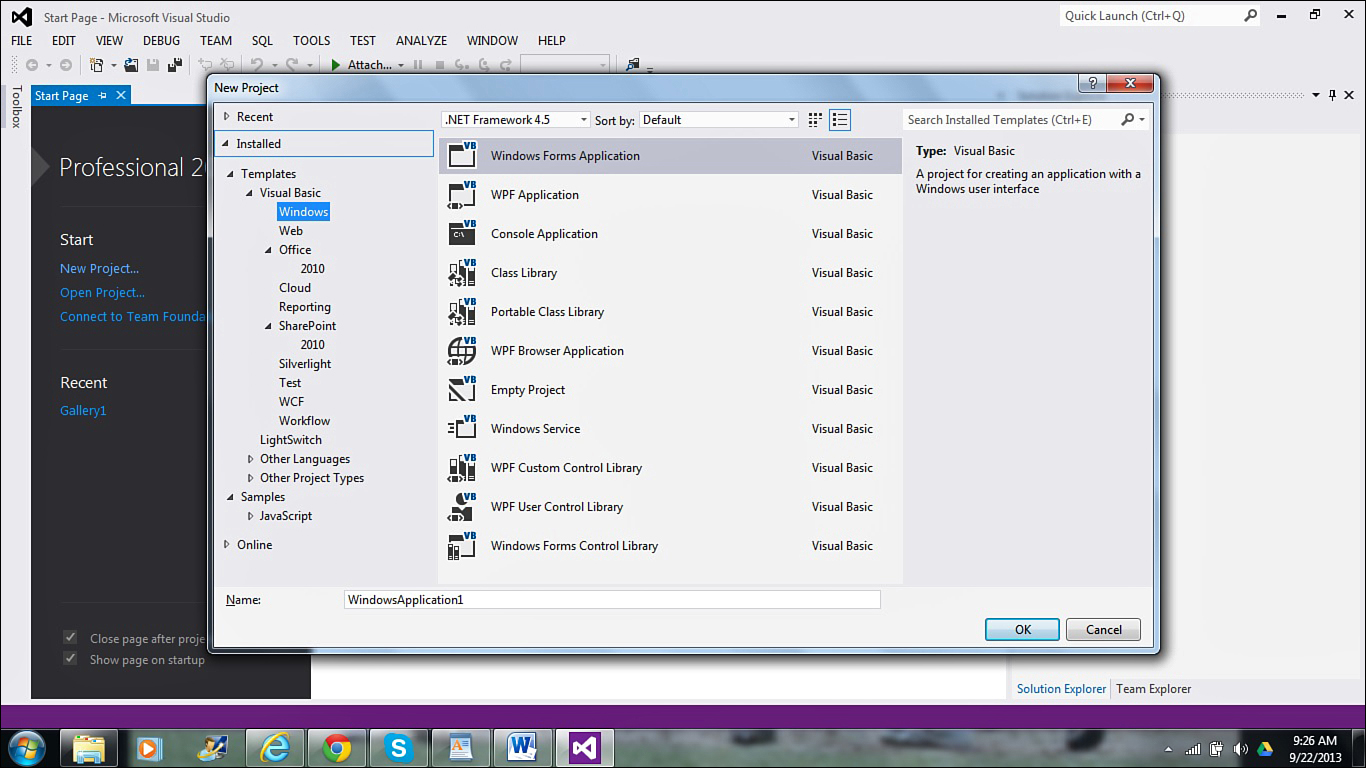
FIGURE 20.1 When you start a new Visual Basic project, you have a rich variety of options to choose.
A Windows application is often comprised of several files, including the following:
![]() Form files that contain the form and its description, controls, and related event procedure code
Form files that contain the form and its description, controls, and related event procedure code
![]() Code modules that hold general-purpose code
Code modules that hold general-purpose code
![]() Other files that contain elements needed by the application
Other files that contain elements needed by the application
The Project window keeps track of all items within an application.
The term project is used to describe the collection of all files that compose a single Windows application. (The Project window is often called the Project Explorer window because of its tree-structured nature that mimics the Windows Explorer program.) The Form Layout window lets you determine, by dragging with your mouse, the location of the current form on the user’s screen when the user runs the program.
Depending on the version of Visual Studio you have, you may see slightly different screens than the ones presented here. Figure 20.1 shows the project options in Visual Studio 2012 Professional. Other versions of Visual Studio will have fewer options to select. Don’t worry though, Windows Form Application, covered in this hour is a universal option to all Visual Studio installations.
The latest versions of Visual Basic include tools that go far beyond those found in most other languages. However, creating a Visual Basic application from scratch involves little more than these steps:
1. Design the application by stating its goals and detailing its requirements.
2. Place graphics controls on the application’s Form window (this is the output definition design stage). As you place the controls, you’ll assign many of the initial properties to the controls.
3. Add event procedures that handle control events.
4. Add any other code needed to tie the controls together and process data as required by the application.
5. Test and distribute the application to users.
As you’ll see in the next section, Visual Basic can greatly help reduce the time it takes between steps 1 and 5.
Creating a Simple Application from Scratch
With just a single lesson on Visual Basic, you might as well take the plunge into the creation of a program from scratch. However, if you don’t have access to a Visual Basic programming environment, reading through this section still has some value. You can follow along the task list to get an idea of what Visual Basic requires when you create applications.
This first application displays a picture and a command button. The program will change the picture when you click the command button. You would follow these steps to create this simple application:
1. After starting Visual Studio, select File, New Project to display the New Project list.
2. Make sure Windows Form Application is highlighted and type your project name in the space at the bottom. This project is being named TyBegin24App, but feel free to name yours something better.
3. Click OK to create your project. Visual Basic will add a single form (currently named Form1) for you to start building your project.
The small white squares that appear on the right side, bottom, and bottom right corner of the form are sizing handles that you can use to change the width or length of your form. Notice that the Properties window in the bottom right displays properties about the form.
4. Drag the form’s lower right sizing handle down and to the right. As you drag the form, notice the width and height measurements at the right of the toolbar as they change. Size the form so that it measures about 740 by 520 pixels. If you want to be exact in the size of the form and you are finding that stretching the form with the sizing handles is too difficult, click the plus sign next to the Size information in the Properties window. This will make two lines, Width and Height, appear. You can then type the specific data you want and the window will instantly resize to your new numbers. Figure 20.2 shows your screen.
Note
The size of the window is measured in pixels, a refreshing change from previous Visual Basic versions that used twips. Twips were screen units used commonly during programming screen controls. The number of twips was somewhat dependent on hardware, however, the general calculation of a twip was approximately 1/1,440th of an inch. That is, there were 1,440 twips to an inch. Switching to pixels made so much more sense as it is a more universal measurement to computers in general.
5. Assign a better name than Form1 to the form. To do so, you’ll see how to work with the Properties window. A property called (Name) (enclosed in parentheses to keep the name at the top of the alphabetical property list) holds the selected form’s name. (In the future, this tutorial will omit the parentheses from around the Name property.) Scroll up the Properties window if necessary until you see the Name value, and notice that the Name value is currently assigned Form1.
6. Click the form’s Name property and type frmMyFirst for the form name. As you type, the name appears to the right of the property called Name as well as Visual Basic’s title bar.
Tip
You’ll change and assign all properties inside the Properties window the same way you just changed the form’s name. Scroll to the property, click the property, and enter (or select for those properties with drop-down list boxes) a new property value. Notice that the name frmMyFirst is more descriptive than Visual Basic’s default form name of Form1. Get in the habit of changing the default object names to make them more representative of what they label. It makes your program easier to maintain.
7. Change the form’s title bar from its original value to Hat Picture Application by selecting the Text property and typing Hat Picture Application. The Text property determines what appears in the form’s title bar when the user runs the program. The new name appears in both the Properties window and the form’s title bar and helps describe the picture this application will produce.
8. Save the form to disk for safety. Select File, Save All. The Save All option saves every file inside your project (your project currently holds only a single form file) as well as a project description file with the filename extension .VBP. Visual Basic asks first for the filename you want to assign to your form. Visual Basic uses the form’s Name property as the default filename. If you accept that default name, as you should now do, Visual Basic also adds the extension .FRM to the form’s filename. (If your project contained more forms or modules or other objects stored in files, Visual Basic would ask you to name the remaining items as well.) Visual Basic then asks for a project name for the project description file. Visual Basic will automatically create a subfolder with the name of the project in your Projects directory in order to maximize organization.
Now that the application’s background is complete, you are ready to add the details by putting controls on the form.
1. Select the control from the toolbox.
2. Place the control in its proper location.
3. Size the control.
4. Set the control’s properties.
5. Activate the control with Visual Basic code if needed.
In the steps that follow, you’ll quickly learn how to place controls on the form. Generally, you’ll perform these steps in one of two ways:
![]() Double-click the control’s icon on the toolbox. Visual Basic then places that control in the center of the form. You can then drag the control to its proper location and size the control by dragging the control’s sizing handles in or out.
Double-click the control’s icon on the toolbox. Visual Basic then places that control in the center of the form. You can then drag the control to its proper location and size the control by dragging the control’s sizing handles in or out.
![]() Click the control’s icon on the toolbox and move the resulting crosshair mouse cursor to the form where the control is to be placed. Click and hold your mouse button where the control is to start. As you drag the mouse, Visual Basic draws the control’s outline on your form. When you’ve drawn the control at its proper location and size, release the mouse button to place the control.
Click the control’s icon on the toolbox and move the resulting crosshair mouse cursor to the form where the control is to be placed. Click and hold your mouse button where the control is to start. As you drag the mouse, Visual Basic draws the control’s outline on your form. When you’ve drawn the control at its proper location and size, release the mouse button to place the control.
The following steps spruce up the application you began in the previous section:
1. Double-click the Label control so that Visual Basic places the label in the center of your form. The label control contains the letter A. (Remember that ToolTips pop up to let you know what a toolbox icon is for.) The label is now the selected tool on your Form window editing area so the sizing handles appear around the label. In addition, the Properties window changes to show the label’s properties, and the toolbar’s location and size coordinate pairs now reflect the label’s measurements. A label displays text on a form. This new label will hold a title banner for your application.
2. Drag the label up the form until it rests approximately 340 pixels from the left edge of the form window and 20 pixels from the top of the form. Again you can use the Location values in the Properties window to type in exact values if you don’t want to mess with dragging it around.
3. In the properties Window, scroll down to the text control and type your title. The default font and size are a little bland, but you can use the font properties to alter its style, size, and any effects, much like you would do in a word processor. If the text for this box has caused the box to lose its centering, feel free to go back and tweak the positioning of the label.
4. Click the Toolbox button on the upper left corner to bring back the choices, and double-click the toolbox’s Button control to place a button in the center of your form. The icon on each choice in the toolbox should illustrate the purpose of the button. You can also point to any button to see a ToolTip pop up at the mouse pointer that shows the name of the button. Use the other properties to alter the size of the button and the style and size of the font for the button’s text label that you can change from Button1 by typing in the words in the Text Property.
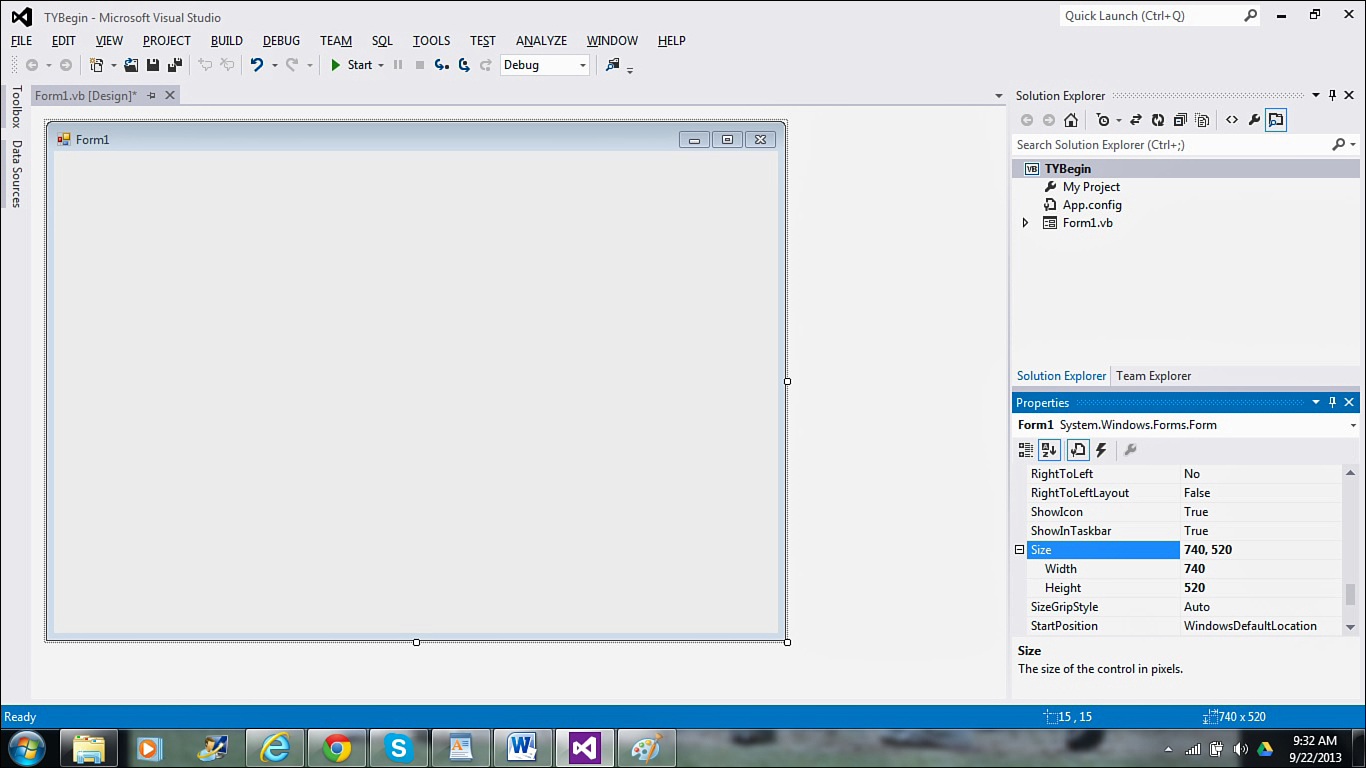
5. Locate the toolbox’s PictureBox control. Instead of double-clicking to place the control as you did with the label, click the control’s icon once. Move your mouse to the Form window and draw the Image control, trying to first anchor the image at 260 pixels from the form’s left edge and 210 from the form’s top edge. Size the image at approximately 220 pixels wide and 190 pixels high. Again, you can do this by meticulously dragging the handles so that Visual Basic’s ScreenTips pop up showing you the coordinates of the image. When the coordinates appear at their proper size, release your mouse button to place the image at that size. Or you can type the information into the Location and Size property boxes. I find the latter so much easier. Figure 20.3 shows your screen at this point. The PictureBox control displays a graphics image when you run the program.
The sample application is not exactly centered at this point. You can use some simple math to center align your controls if you wish. Simply divide the size of the form in two. (Our form is 740, so half would be 370.) Then take the size of your controls, divide them in half, subtract that number from our form half number, and that should be the first number of the location of your form. This sounds complicated, but once you do one or two it gets easy. So if the label is 300 pixels wide, it should start at 220 pixels in order to center it.
Note
Location pixel coordinates and size pixel coordinates are always specified in pairs. Often, you’ll see such coordinate pairs specified inside parentheses, as in a location value of (250, 280). For the coordinates, such a pair of values would signify that the width is 250 pixels and the height is 280 pixels.
6. Now that you’re more familiar with setting property values for controls, even though you may not understand many of the properties yet, you are now equipped to set additional properties for the form and controls to finalize the look of the application. After you set appropriate property values, you will then add code to connect the controls and make them work together.
Table 20.1 contains a list of properties that you would need to set for the form and the three controls in order to match. Remember that you must select the form or specific control before you can change property values for that form or control. To select the form, click anywhere inside the form or title bar but not over any of the controls. The Properties window will change to display the form’s properties. Click either the label, command button, or image to select the control, and then you can change one of that control’s properties by clicking the property name and typing the new value.

Finalizing with Code
Adding Visual Basic programming statements will turn your creation into a working, although simple, application. Visual Basic automatically adds the opening and closing statements needed when you write a subroutine as you’ll see in the following steps:
1. Double-click the command button to open the Code window. A set of beginning and ending statements will appear for a new procedure related to the command button that looks like this:
Private Sub FranPic_Click() Handles FranPic.Click
End Sub
These lines are two of the three lines needed for code required by the command button. The Code window works like a miniature text editor in which you can add, delete, and change statements that appear in your program code.
Note
All code appears in procedures and every procedure requires beginning and ending lines of code that define the procedure’s start and stop locations. Visual Basic automatically adds the first and final line of many procedures.
2. Press the spacebar three times and type the following line between the two that are there:
ProductPicture.Image = Image.FromFile("C:UsersDeanWorkDocumentsTY Begin
24product1.jpg")
As soon as you type the Image.FromFile, Visual Basic offers pop-up help with the statement’s format. Some Visual Basic statements, especially those with parentheses, such as the ones you see in this statement, require that you type one or more values. Visual Basic pops up the format of these required values, so you’ll know how many to enter. You’ll learn more about why these values are required if you decide to pursue the language in more depth. Visual Basic is a large language, so this help comes in handy. By the way, depending on the location where you installed Visual Basic, your pathname to the graphics file will differ from the pathname specified here.
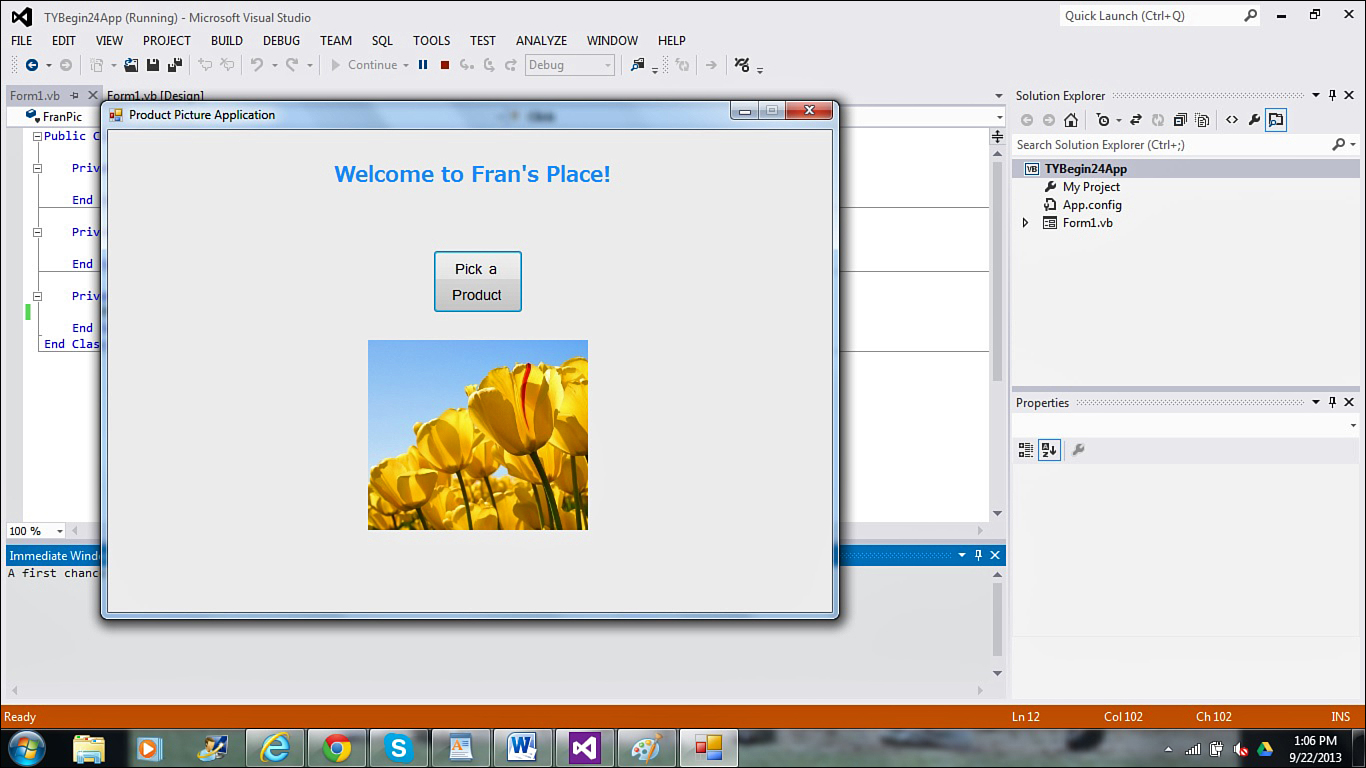
3. Run your program and click the command button. A figure appears as shown in Figure 20.4. You have successfully completed your first Visual Basic application. You’ve created an application that displays a picture when you click the command button. The application contains code, and its controls all have property values that you’ve set.
4. Click the Close window button to terminate the program. Be sure to save your project before you exit Visual Studio.
Other Visual Basic Programming Considerations
This hour approaches the Visual Basic language differently from most other languages discussed in these 24 hours. Instead of walking you through specific programming language commands, this hour walked you through the steps required to create a sample application from start to finish. If you look back through the previous sections, you’ll notice that very little of the discussion included actual programming language statements. Visual Basic does so much just from its visual environment that adding code sometimes seems like an afterthought.
Even adding menus to the Visual Basic applications that you create from scratch is relatively simple because of another tool called the MenuStrip control (see Figure 20.5). The MenuStrip lets you build a menu bar and the pull-down options from that menu bar by selecting and specifying options inside the MenuStrip. No code is required as you add the menu options to your application but once you use the MenuStrip to add the options, you’ll have to specify event code procedures for each menu option. When the user selects a menu option, a Click event for that menu option occurs and each event procedure that you write will tell Visual Basic how to respond to that event.
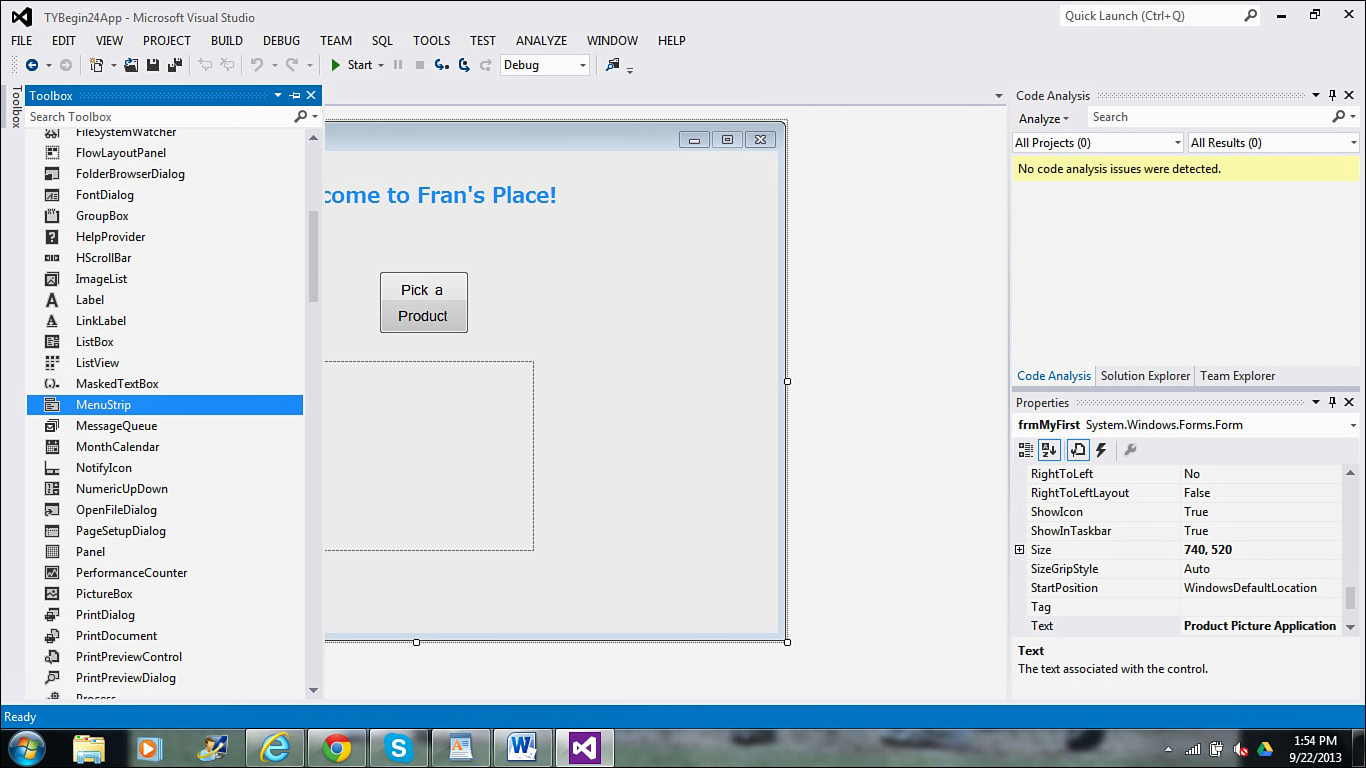
FIGURE 20.5 Use the MenuStrip control in the Toolbox to add menu options to your Visual Basic application.
Understanding Procedures
Consider the following event procedure for the File, Exit menu option:
Private Sub ExitToolStripMenuItem_Click(sender As Object, e As EventArgs) Handles
ExitToolStripMenuItem.Click
' Terminates The Program
End
End Sub
By studying this simple procedure, you can learn quite a bit about all event procedures. The Private keyword indicates that the procedure is local to the current form and cannot be called by other form modules. Therefore, if several forms exist in the current Windows application, selecting File, Exit from this form will execute this specific event procedure and not one outside the scope of this form. The opposite of Private is Public and public procedures are available to any code in the entire application. Such public procedures are known as global procedures because any procedure in the application can call them.
The keyword Sub or Function always follows the Private (or Public) keyword and indicates the type of the procedure. A subroutine is a procedure that always performs work and then returns control to whatever code was executing before the event took place. A function is a procedure that always performs its job when the event takes place and then returns a value to another place in the program that might need that value.
The name of the event procedure specifies exactly which control and event this procedure responds to. The body of the procedure may consist of several lines but this one happens to include only two lines, a remark and the End statement that stops the running program. All procedures end with an End Sub or End Function statement. The parentheses that follow the procedure name indicate that the code begins a new procedure; sometimes, when one procedure must pass data values to another, you’ll list one or more values separated by commas inside the parentheses. Even if you don’t pass data, you must type the parentheses after every procedure declaration.
Understanding the Language Behind Visual Basic
The language behind Visual Basic has significant differences from the JavaScript you’ve learned to this point, but the concepts are similar—you just need to understand the tweaks you must make to the syntax of loops, conditional expressions, and assignments. Visual Basic also includes several statements that are unique to the Windows environment.
One of the ways that Visual Basic is unique, however, is in its distribution of procedures across different areas of an application. You now know that several small event procedures reside in a form’s Code window to handle any events that occur on that form. Other forms can exist as well and code appears in them to handle events that occur there. In addition, other files might be part of a complex application. A code module is a file, separate from any form and the form’s associated code, which holds code that you might use in more than one application. Suppose that you write a procedure that prints your company logo at the top of a page. Such a logo would appear before any report that you produce, before any accounting statement, and before anything you print. Therefore, you’ll use this procedure in many different applications.
Instead of typing the procedure in every application that needs it, you can put the code in a general-purpose code module that you then can copy into a new code module for all applications that need to produce the logo. You can, from anywhere else in the application, call a Public general procedure with a Call statement such as this:
Call logoPrint ' Detour to the procedure
When the Call finishes, execution returns to the statement that follows the Call.
Your Next Step
This hour offers only a walkthrough of the steps that you take to create a Visual Basic application and it provides some insight into the nature of Visual Basic programming. Although Visual Basic is probably the easiest programming tool available for creating Windows applications, Visual Basic is vast compared to a simpler language such as JavaScript. Therefore, an hour’s lesson could not hope to cover more than what is included here. Nevertheless, you now have a firm grasp of what it takes to write Windows applications in Visual Basic.
Tip
If you want more in-depth Visual Basic programming coverage, pick up a copy of Sams Teach Yourself Visual Basic 2012 in 24 Hours, from Sams Publishing, a tutorial that explores Visual Basic programming and takes the beginning Visual Basic programmer to advanced levels in 24 lessons.
Summary
Visual Basic is more than a language; it is part of a complete Microsoft programming environment called Visual Studio. Other languages are available for Visual Studio, such as Visual C#. Visual Basic was the first language to use the Visual Studio environment. When you create a Visual Basic application, you first create the visual elements of the program by placing the controls from the Toolbox window onto the form. As you place the controls, you set the properties and then write event procedure code to activate the controls when certain events take place.
The next hour describes another language within Visual Studio, C#, as well as Microsoft’s overall .NET strategy.
Q&A
Q. Could I allow the user to pick an image instead of displaying a specific image when they click a button?
A. Absolutely. With Visual Basic you can use most controls you see in windows-based programs, so you can trigger a dialog box that lets users browse their hard drive and select an image of their choice instead of a predetermined file.
Q. Do all Visual Basic applications contain code in addition to event procedures?
A. Some Visual Basic applications contain code that forms event procedures only but most other Visual Basic applications contain other kinds of code. More goes on in most applications than events. Data must be processed, calculations must be performed, reports must be printed, and files must be read and written. The code behind these specific tasks often appears in a code module separate from the form module.
Workshop
The quiz questions and exercises are provided for your further understanding.
Quiz
1. How much code do you have to write to add Internet access to a Visual Basic application?
2. What toolbox control would you use to add menus to a form?
3. Why is it a good practice to change the names of controls from their default names that Visual Basic assigns?
4. What happens when you double-click a Toolbox control?
5. What tool do you use to help you create menus for Visual Basic applications?
6. How does Visual Basic determine which control properties appear in the Properties window?
7. Name one advantage to running a Visual Basic application inside of Visual Basic’s environment as opposed to running a compiled application from Windows.
8. Which runs faster: a Visual Basic application running inside Visual Basic’s environment or a compiled Visual Basic application running outside Visual Basic’s environment?
9. What information can you gather from the following Visual Basic procedure’s declaration line?
Private Sub scrMeter_Change()
10. True or false: All Visual Basic procedures reside in the application’s form module.
Answers
1. You don’t have to write any extra code to add Internet access to a Visual Basic application.
2. You would use the MenuStrip control.
3. The default names are not meaningful, and when your application uses several controls, you should name those controls with names that you will recognize when maintaining the program so you modify correct controls when needed.
4. The Toolbox control appears in the center of your Form window.
5. The Menu Editor helps you build and test menus.
6. The control you place on the form determines which properties appear in the Properties window.
7. You can debug the application inside the Visual Basic environment.
8. A compiled Visual Basic application is faster than one run inside the Visual Basic environment.
9. The procedure is private, which means only the enclosing program can access the procedure, the procedure is a subroutine so it does not return any values, and no arguments are passed to the procedure.
10. False. Some procedure code can appear in Code modules.