
Chapter 9
while Running in Circles
In This Chapter
![]() Looping using the while statement
Looping using the while statement
![]() Breaking out of the middle of a loop
Breaking out of the middle of a loop
![]() Avoiding the deadly infinite loop
Avoiding the deadly infinite loop
![]() Nesting loops within loops
Nesting loops within loops
Decision-making is a fundamental part of almost every program you write, which I initially emphasize in Chapter 1. However, another fundamental feature that is clear — even in the simple Lug Nut Removal algorithm — is the ability to loop. That program turns the wrench in a loop until the lug nut fallsl off, and it loops from one lug nut to the other until the entire wheel comes off. This chapter introduces you to two of the three looping constructs in C++.
Creating a while Loop
The while loop has the following format:
while (expression)
{
// stuff to do in a loop
}
// continue here once expression is false
When a program comes upon a while loop, it first evaluates the expression in the parentheses. If this expression is true, then control passes to the first line inside the {. When control reaches the }, the program returns back to the expression and starts over. Control continues to cycle through the code in the braces until expression evaluates to false (or until something else breaks the loop — more on that a little later in this chapter).
 The following Factorial program demonstrates the while loop:
Factorial(N) = N * (N-1) * (N-2) * ... * 1
//
// Factorial - calculate factorial using the while
// construct.
//
#include <cstdio>
#include <cstdlib>
#include <iostream>
using namespace std;
int main(int nNumberofArgs, char* pszArgs[])
{
// enter the number to calculate the factorial of
int nTarget;
cout << "This program calculates factorial.
"
<< "Enter a number to take factorial of: ";
cin >> nTarget;
// start with an accumulator that's initialized to 1
int nAccumulator = 1;
int nValue = 1;
while (nValue <= nTarget)
{
cout << nAccumulator << " * "
<< nValue << " equals ";
nAccumulator = nAccumulator * nValue;
cout << nAccumulator << endl;
nValue++;
}
// display the result
cout << nTarget << " factorial is "
<< nAccumulator << endl;
// wait until user is ready before terminating program
// to allow the user to see the program results
cout << "Press Enter to continue..." << endl;
cin.ignore(10, '
'),
cin.get();
return 0;
}
The program starts by prompting the user for a target value. The program reads this value into nTarget. The program then initializes both nAccumulator and nValue to 1 before entering the loop.
(Pay attention — this is the interesting part.) The program compares nValue to nTarget. Assume that the user had entered a target value of 5. On the first loop, the question becomes, “Is 1 less than or equal to 5?” The answer is obviously true, so control flows into the loop. The program outputs the value of nAccumulator (1) and nValue (also 1) before multiplying nAccumulator by nValue and storing the result back into nAccumulator.
The last statement in the loop increments nValue from 1 to 2.
That done, control passes back up to the while statement where nValue (now 2) is compared to nTarget (still 5). “Is 2 less than or equal to 5?” Clearly, true; so control flows back into the loop. nAccumulator is now set to the result of nAccumulator (1) times nValue (2). The last statement increments nValue to 3.
This cycle of fun continues until nValue reaches the value 6, which is no longer less than or equal to 5. At that point, control passes to the first statement beyond the closed brace }. This is shown graphically in Figure 9-1.

Figure 9-1: Control continues to cycle through the body of a while loop until the conditional expression evaluates to false.
The actual output from the program appears as follows for an input value of 5:
This program calculates factorial.
Enter a number to take factorial of: 5
1 * 1 equals 1
1 * 2 equals 2
2 * 3 equals 6
6 * 4 equals 24
24 * 5 equals 120
5 factorial is 120
Press Enter to continue …
You are not guaranteed that the code within the braces of a while loop is executed at all: If the conditional expression is false the first time it’s evaluated, control passes around the braces without ever diving in. Consider, for example, the output from the Factorial program when the user enters a target value of 0:
This program calculates factorial.
Enter a number to take factorial of: 0
0 factorial is 1
Press Enter to continue …
No lines of output are generated from within the loop because the condition “Is nValue less than or equal to 0” was false even for the initial value of 1. The body of the while loop was never executed.
Breaking out of the Middle of a Loop
Sometimes the condition that causes you to terminate a loop doesn’t occur until somewhere in the middle of the loop. This is especially true when testing user input for some termination character. C++ provides these two control commands to handle this case:
- break exits the inner most loop immediately.
- continue passes control back to the top of the loop.
The following Product program demonstrates both break and continue. This program multiplies positive values entered by the user until the user enters a negative number. The program ignores zero.
//
// Product - demonstrate the use of break and continue.
//
#include <cstdio>
#include <cstdlib>
#include <iostream>
using namespace std;
int main(int nNumberofArgs, char* pszArgs[])
{
// enter the number to calculate the factorial of
cout << "This program multiplies the numbers
"
<< "entered by the user. Enter a negative
"
<< "number to exit. Zeroes are ignored.
"
<< endl;
int nProduct = 1;
while (true)
{
int nValue;
cout << "Enter a number to multiply: ";
cin >> nValue;
if (nValue < 0)
{
cout << "Exiting." << endl;
break;
}
if (nValue == 0)
{
cout << "Ignoring zero." << endl;
continue;
}
// multiply accumulator by this value and
// output the result
cout << nProduct << " * " << nValue;
nProduct *= nValue;
cout << " is " << nProduct << endl;
}
// wait until user is ready before terminating program
// to allow the user to see the program results
cout << "Press Enter to continue..." << endl;
cin.ignore(10, '
'),
cin.get();
return 0;
}
The program starts out with an initial value of nProduct of 1. The program then evaluates the logical expression true to see if it’s true. It is.
 There aren’t too many rules that hold in C++ without exception, but here’s one: true is always true.
The program then enters the loop to prompt the user for another value to multiply times nProduct, the accumulated product of all numbers entered so far. If the value entered is negative, then the program outputs the phrase "Exiting." before executing the break, which passes control out of the loop.
If the value entered is not negative, control passes to the second if statement. If nValue is equal to zero, then the program outputs the messages "Ignoring zero." before executing the continue statement which passes control back to the top of the loop to allow the user to enter another value.
If nValue is neither less than zero nor zero, then control flows down to where nValue is multiplied by nProduct using the special assignment operator (see Chapter 4 if you don’t remember this one):
nProduct *= nValue;
This expression is the same as:
nProduct = nProduct * nValue;
The output from a sample run from this program appears as follows:
This program multiplies the numbers
entered by the user. Enter a negative
number to exit. Zeroes are ignored.
Enter a number to multiply: 2
1 * 2 is 2
Enter a number to multiply: 5
2 * 5 is 10
Enter a number to multiply: 0
Ignoring zero.
Enter a number to multiply: 3
10 * 3 is 30
Enter a number to multiply: -1
Exiting.
Press Enter to continue …
Nested Loops
The body of a loop can itself contain a loop; this arrangement is known as nested loops. The inner loop must execute to completion during each time through the outer loop.
I have created a program that uses nested loops to create a multiplication table in the following form:
0 1 2 3 4 5 6 7 8 9
0 0*0 0*1 0*2 0*3 0*4 0*5 0*6 0*7 0*8 0*9
1 1*0 1*1 1*2 1*3 1*4 1*5 1*6 1*7 1*8 1*9
2 2*0 2*1 2*2 2*3 2*4 2*5 2*6 2*7 2*8 2*9
//... and so on...
You can see that for row 0, the program has to iterate from column 0 through column 9. The program repeats the process for row 1, again for row 2, and so on right down to row 9. This implies the need for two loops: an inner loop to iterate over the columns and a second outer loop to iterate over the rows. Each position in the table is simply the row number times the column number.
This is exactly how the following NestedLoops program works:
//
// NestedLoops - this program uses a nested loop to
// calculate the multiplication table.
//
#include <cstdio>
#include <cstdlib>
#include <iostream>
using namespace std;
int main(int nNumberofArgs, char* pszArgs[])
{
// display the column headings
int nColumn = 0;
cout << " ";
while (nColumn < 10)
{
// set the display width to two characters
// (even for one digit numbers)
cout.width(2);
// now display the column number
cout << nColumn << " ";
// increment to the next column
nColumn++;
}
cout << endl;
// now go loop through the rows
int nRow = 0;
while (nRow < 10)
{
// start with the row value
cout << nRow << " - ";
// now for each row, start with column 0 and
// go through column 9
nColumn = 0;
while(nColumn < 10)
{
// display the product of the column*row
// (use 2 characters even when product is
// a single digit)
cout.width(2);
cout << nRow * nColumn << " ";
// go to next column
nColumn++;
}
// go to next row
nRow++;
cout << endl;
}
// wait until user is ready before terminating program
// to allow the user to see the program results
cout << "Press Enter to continue..." << endl;
cin.ignore(10, '
'),
cin.get();
return 0;
}
The first section creates the column headings. This section initializes nColumn to 0. It then iterates through nColumn printing out its value separated by a space until nColumn reaches 10. At this point, the program exits the first loop and then tacks a new line on the end to finish the row. Figure 9-2 illustrates this process graphically.
Executing just this section alone generates the following output:
0 1 2 3 4 5 6 7 8 9
This program demonstrates an unfair advantage that I have over you, the reader. The expression cout.width(2) sets the display width to two columns — C++ will pad a space on the left for single-digit numbers. I know it’s cheating to make use of a feature like width() that I don’t introduce until Chapter 31 (you can sneak a peek if you like), but it’s very difficult to get the columns to line up without resorting to fixed-width output.

Figure 9-2: The first loop outputs the column headings.
The second set of loops, the nested loops, starts at nRow equal to 0. The program prints out the row number followed by a dash before launching into a second loop that starts nColumn at 0 again and iterates it back up to 9. For each pass through this inner loop, the program sets the output width to two spaces and then displays nRow * nColumn followed by a space.
The display width resets itself each time you output something, so it’s necessary to set it back to 2 each time before outputting a number.
The program outputs a newline to move output to the next row each time it increments nRow. This is shown graphically in Figure 9-3.
The output from this program appears as follows:
0 1 2 3 4 5 6 7 8 9
0 - 0 0 0 0 0 0 0 0 0 0
1 - 0 1 2 3 4 5 6 7 8 9
2 - 0 2 4 6 8 10 12 14 16 18
3 - 0 3 6 9 12 15 18 21 24 27
4 - 0 4 8 12 16 20 24 28 32 36
5 - 0 5 10 15 20 25 30 35 40 45
6 - 0 6 12 18 24 30 36 42 48 54
7 - 0 7 14 21 28 35 42 49 56 63
8 - 0 8 16 24 32 40 48 56 64 72
9 - 0 9 18 27 36 45 54 63 72 81
Press Enter to continue …
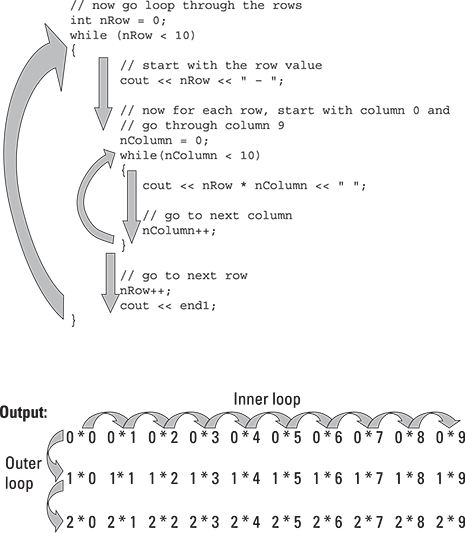
Figure 9-3: The inner loop iterates from left to right across the columns, while the outer loop iterates from top to bottom down the rows.
There is nothing magic about 0 through 9 in this table. I could just have easily created a 12 x 12 multiplication table (or any other combination) by changing the comparison expression in the three while loops. However, for anything larger than 10 x 10, you’ll need to increase the minimum width to accommodate three-digit products: Use cout.width(3).