
Chapter 2
Installing Code::Blocks
In This Chapter
![]() Reviewing the compilation process
Reviewing the compilation process
![]() Installing the Code::Blocks development environment
Installing the Code::Blocks development environment
![]() Testing your installation with a default program
Testing your installation with a default program
![]() Reviewing the common installation errors
Reviewing the common installation errors
In this chapter, you review what it takes to use C++ source code to create executable programs that you can run on Windows, Linux, or Macintosh computers. Then you install the Code::Blocks integrated development environment used in the remainder of the book — and build a default test program to check out your installation. If all is working, then by the time you reach the end of this chapter, you’ll be ready to start writing and building C++ programs of your own — with a little help, of course!
Reviewing the Compilation Process
You need two programs to create your own C++ programs. First, you need a text editor that you can use to enter your C++ instructions. Any editor capable of generating straight ASCII text letters will work; I’ve written programs using the Notepad editor that comes with Windows. However, an editor that knows something about the syntax of C++ is preferable; it can save you a lot of typing, and sometimes highlight any mistakes you might make as you type, in much the same way that a spell checker highlights misspelled words in a word processor.
The second program you need is a compiler that converts your C++ source statements into machine language that the computer can understand and interpret. This process of converting from source-code C++ statements to machine code is called building. Graphically, the process looks something like Figure 2-1.
The process of building a program actually has two steps: The C++ compiler first converts your C++ source code statements into a machine executable format in a step known as compiling. It then combines the machine instructions from your program with instructions from a set of libraries that come standard with C++ in a second step known as linking to create a complete executable program.

Figure 2-1: The C++ program development process.
Most C++ compilers these days come in a software package known as an Integrated Development Environment or IDE. IDEs include the editor, the compiler, and several other useful development programs together in a common bundle. Not only does this save you from having to purchase the programs separately, but also offers productivity benefits by combining them into a single package:
- The editor can invoke the compiler quickly without making you switch back and forth manually.
- The editors in most IDEs provide quick and efficient means for finding and fixing coding errors.
- Some IDEs include visual programming tools that allow the programmer to draw common windows such as dialog boxes on the display.
- The IDE generates the C++ code necessary to display onscreen boxes automatically.
 As nice as that sounds, the automatically generated code only displays the windows. A programmer still has to generate the real code that gets executed whenever the operator selects buttons within those windows.
Invariably, these visual IDEs are tightly coupled into one particular operating system. For example, the popular Visual Studio is strongly tied into the .NET environment in Windows. It’s not possible to use Visual Studio without learning the .NET environment — and something about Windows — along with C++ (or one of the other .NET languages). In addition, the resulting programs only run in a .NET environment.
In this book, you use a public-domain C++ IDE known as Code::Blocks. Versions of Code::Blocks exist for Windows, Linux, and Mac OS. Versions of Code::Blocks for these three operating systems (as well as a few others) are available for free download at www.codeblocks.org. The specific version used in the generation of the book is version 13.12. You can also download the Windows 13.12 binary at www.dummies.com/extras/beginningprogrammingcplusplus.
You’ll use Code::Blocks to generate the programs in this book. These programs are known as console applications because they take input from — and display text back to — a console window. Okay, this isn’t as sexy as developing programs in onscreen windows, but staying with console applications lets you focus on C++ without being distracted by the requirements of a windowed environment. In addition, using console applications will allow the programs in the book to run the same on all environments that support Code::Blocks.
Installing Code::Blocks
The following instructions take you through installing Code::Blocks on a Windows, Mac OS, or Linux computer. Jump to the section that applies to your operating system.
Windows installation
This section provides detailed installation instructions for installing Code:: Blocks for Windows Version 13.12 available at www.dummies.com/extras/beginningprogrammingcplusplus.
- Download the file codeblocks-13.12mingw-setup.exe.
That’s straightforward enough.
- Double-click the downloaded file to start the installation process.
Depending on which version of Windows you’re using, you may a warning pop-up message like this one:
Do you want to allow the following program from an unknown publisher to make changes to your computer?
- Select Allow.
Setup unpacks the files it needs to start and run the Code::Blocks Setup Wizard. This process may take a minute. When it finishes, the startup window shown in Figure 2-2 appears.
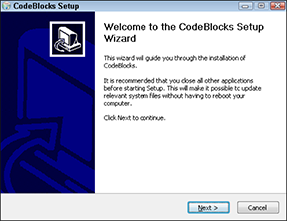
Figure 2-2: The Code:: Blocks Setup Wizard guides you through the installation process.
- Close any other programs that may be running and then select Next.
The Setup Wizard displays the generic End User License Agreement (EULA). There’s nothing much here to get excited about.
- Select I Agree.
The Setup Wizard then displays a list of the components that you may choose to install. See Figure 2-3. The defaults are okay.
 It’s absolutely critical that the MinGW Compiler Suite option appear onscreen and have a check mark next to it. This is the option that installs the C++ compiler.
 - Select Next.
The next window asks you to choose the installation’s location. This window also tells you how much space Code::Blocks requires on your hard drive (about 250MB, depending on the options you’ve selected) and how much space is available. If you don’t have enough free disk space, you’ll have to delete some of those captured YouTube videos to make room before you continue.
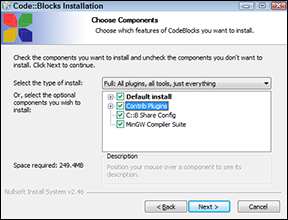
Figure 2-3: Checking the MinGW Compiler Suite installs the GNU C++ compiler that Code:: Blocks uses to compile your programs.
- The default installation location is fine, so when you’re sure you have enough disk space, click Install.
At this point, the Code::Blocks Setup Wizard really goes to work. It extracts umpteen dozen files that it installs in a myriad of subdirectories in a flurry too complicated for mere mortals to follow. This process may take several minutes.
- When the installation is complete, a dialog box appears asking you whether you want to run Code::Blocks now. Select No.
If all has gone well so far, the Installation Complete window shown in Figure 2-4 appears.

Figure 2-4: The Installation Complete window signals that Code:: Blocks has been successfully installed.
- Click Next.
Finally, the Completing the Code::Blocks Setup Wizard window appears. This final step creates the icons necessary to start the application.
- Click Finish.
You’ve installed Code::Blocks but you still need to make sure that it’s set up properly for the programs in this book. Jump to the “Setting up Code::Blocks” section farther along in this chapter.
Ubuntu Linux installation
Code::Blocks does not include the gcc compiler in the Linux installation, so installation is a two-step process. First you’ll need to install gcc. Then you can install Code::Blocks.
Installing gcc
The gcc compiler is readily available for Linux. Follow these steps to install it:
- Enter the following commands from a command prompt:
sudo apt-get update
sudo apt-get upgrade
sudo apt-get install g++The standard Ubuntu Linux distribution includes a GNU C compiler, but it does not include the C++ extensions; in particular, it doesn’t have the C++ 2011 standard extensions. The first two commands update and upgrade the tools you already have. The third command installs C++.
- Enter the following command from a command prompt:
gcc --version
My Ubuntu 13.04 downloaded GNU C++ version 4.7.3. You’ll be fine with version 4.7.1 or later. If you have an earlier version, some of the C++ 2011 features may not work properly, but otherwise it should be okay.
 If you’re using Debian Linux, the commands are the same. If you’re using Red Hat Linux, replace the command apt-get with yum so that you end up with
sudo yum install g++
Installing Code::Blocks
Fortunately for all concerned, an Ubuntu-ready version of Code::Blocks is available in the Ubuntu Software Center. Many other versions of Linux include something similar to the Software Center. Follow these steps to install Code::Blocks:
- Click the Software Center Icon on the Ubuntu desktop.
- Select Code::Blocks from the list of available software.
The installation process starts.
Code::Blocks searches your hard drive, in quest of your C++ compiler. If Code::Blocks finds your C++ compiler,, you’re done.
If Code::Blocks doesn’t find your C++ compiler, then execute the following steps. - Start Code::Blocks.
- Select Settings⇒Compiler.
- Select the Compiler Flags tab.
- Select the Toolchain Executables tab.
- Select the "..." icon.
- Navigate to /usr, unless you installed your gcc compiler someplace other than the default location of /user/bin.
- Set the following options in the dialog box: “C compiler” should be gcc, the “C++ compiler” should be g++ and the “Linker for dynamic libs” should be g++.
- Select OK to close the window.
Jump to the “Setting Up Code::Blocks” section of this chapter to make sure that Code::Blocks is set up properly for the programs in this book.
Mac OS installation
The Macintosh version of Code::Blocks relies on the Xcode distribution from Apple for its compiler.
Installing Xcode
Xcode is a free development package offered by Apple; you’ll need it. Follow these steps to install it first:
- Open the Safari browser and go to http://developer.apple.com.
- Click Download Xcode to get the most recent version.
This will open the Xcode download dialog box shown in Figure 2-5.
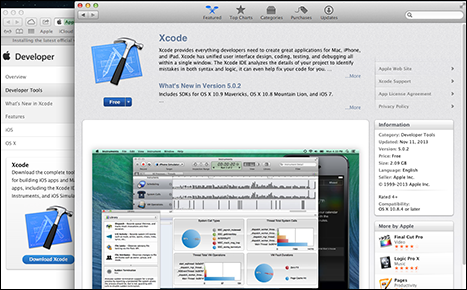
Figure 2-5: The Xcode download dialog box allows you to install Xcode for free.
- Click the Free icon to change it to Install App. Click it again.
- Enter your system password (the one you log in with when your Mac boots up).
The icon changes to Installing.
The download and installation takes quite some time, as Xcode takes up a little over 2GB as of this writing.
Installing the Command Line Tools
As big as Xcode is, you might think that it has everything you need, but you’d be wrong. You need one more package from Apple to make your joy complete and to get a working gcc compiler on your Macintosh. Follow these steps to install the Command Line Tools for Xcode:
- Open the Safari browser and go to http://developer.apple.com/downloads.
You may be asked to sign up for an Apple Developer ID. Go ahead and do so — it’s free. Provide your existing developer ID if you already have one.
- Search for Command Line Tools for Xcode. Select the application. See Figure 2-6.
- Double-click the mpkg package when it downloads; doing so installs it.
- Accept all the default values.
The installation should finish with Installation Was Successful.
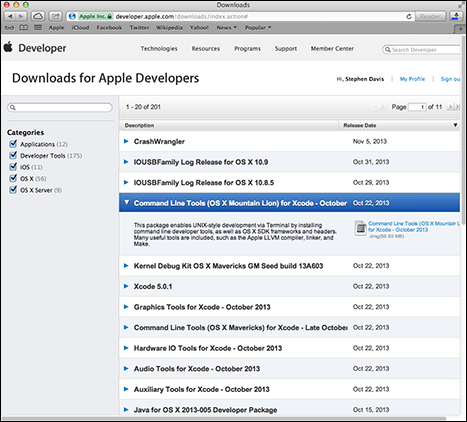
Figure 2-6: You must install both Xcode and the Command Line Tools for Xcode to get the gcc compiler for Macintosh.
Installing Code::Blocks
Now, at last, you can finish your Mac OS installation by downloading the Code::Blocks package:
- Open the Safari browser and go to www.codeblocks.org/downloads.
- Click Downloads⇒Binaries.
- Click Mac OS X.
- Select either the BerliOS or the Sourceforge.net mirror site for the most recent version.
At the time of this writing, CodeBlocks-13.12-mac.zip was the most recent.
- Install the downloaded Zip file into the Applications folder.
If you’ve never installed an application from a third-party site, you may need to execute these extra steps before you can do so:
- Click System Preferences.
- Click Security and Privacy.
- Click the padlock in the lower-left corner of the window to allow changes.
- Click Allow Applications Downloaded from: Anywhere, as shown in Figure 2-7.
When you’ve completed the installation of Code::Blocks, you may choose to return to this window and restore the settings to Mac App Store.
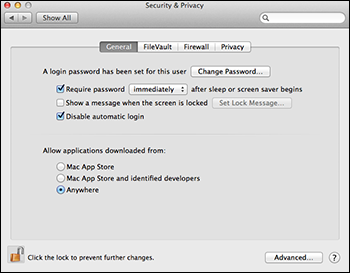
Figure 2-7: You’ll need to allow third-party applications to be installed before you can install Code:: Blocks on your Macintosh.
- Double-click the Code::Blocks icon.
The first time you do this, the Mac OS asks, “Are you sure you want to open it?”
- Select Don’t Warn Me When Opening Applications on This Disk Image and click Open.
Code::Blocks should start and find the gcc compiler installed with the Command Line Tools.
- Select the gcc compiler, as shown in Figure 2-8. Click Set as Default and then click OK to continue starting Code::Blocks.
Code::Blocks opens with a banner page, followed by a menu across the top of the dialog box.
Continue to the next section, “Setting Up Code::Blocks.”
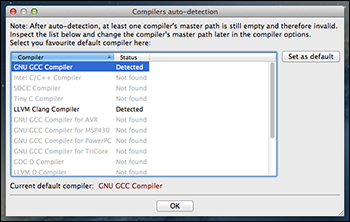
Figure 2-8: Code:: Blocks automatically finds the gcc compiler the first time you execute it.
Setting up Code::Blocks
The GNU C++ compiler that comes with Code::Blocks supports a myriad of options; all of them affect the way it reads your programs. For this book, you’ll need to make sure that a few of these options are set. The instructions in this section are the same whether you’re using Windows, Linux, or Mac OS.
- Start Code::Blocks if it isn’t started already.
In Windows, you can use the icon that Code::Blocks installed on the desktop. A window similar to Figure 2-9 appears. (The details of this opening screen vary by operating system and by version. This is the opening screen from the Version 13.12.)
- Choose Settings⇒Compiler from the menu options.
A window similar to Figure 2-10 appears.
- Select Global Compiler Settings from the options on the left side of the window.
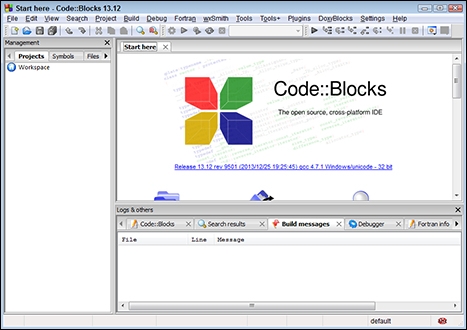
Figure 2-9: The opening screen of the Code:: Blocks environment.
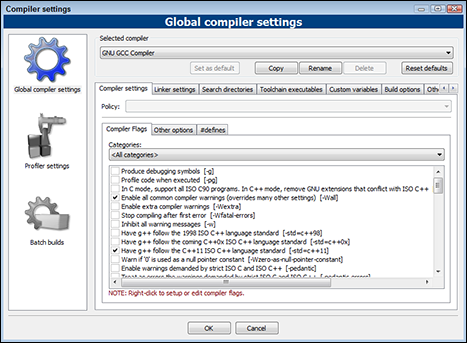
Figure 2-10: The compiler settings window allows the user to adjust the details of the way the C++ compiler works.
- Select the Compiler Flags tab.
This displays the compiler options.
- Select the Enable All Compiler Warnings check box.
This will cause the GNU C++ compiler to complain about anything that it sees that might be a problem. Turning on all warnings is a good idea when you’re first learning a language — or when you’ve been programming for over 30 years (like me).
- Select the Have g++ Follow the C++11 ISO C++ Language Standard check box.
The most recent upgrade to the C++ standard was adopted in 2011. This upgrade implements several new features, many of which are beyond the scope of this book. Some of these features actually make life easier, however, so you’ll want to use them. Selecting this check box gives you access to these useful extensions.
- Select OK.
The Settings window closes.
Testing the Code::Blocks Installation
In this section, you’ll build a default program that comes with Code::Blocks. This program does nothing more than display Hello, world! on the display, but building and running this program successfully will verify that you’ve installed Code::Blocks properly.
Start Code::Blocks by double-clicking the Code::Blocks icon created on the Desktop or selecting Programs⇒Code::Blocks⇒Code::Blocks. This should open a window like the one shown in Figure 2-9.
Across the top of the window are the usual menu options, starting with File, Edit, View, and so on. The window at the upper right, the one that says “Start here,” is where the source code will go when you get that far. The window at the lower right is where Code::Blocks displays messages to the user. Compiler error messages appear in this space. The window on the left labeled Management is where Code::Blocks keeps track of the files that make up the programs. It should be empty now since you have yet to create a program. The first thing to do is create a project.
Okay, what’s a project?
You want Code::Blocks to create only Console Applications, but it can create a lot of different types of programs. For Windows programmers, Code::Blocks can create Dynamic Link Libraries (also known simply as DLLs). It can create Windows applications. It can create both static and dynamically linked libraries for Linux and Mac OS.
In addition, Code::Blocks allows the programmer to set different options on the ways each of these targets is built. (Later chapters show you how to adjust a few of these settings.) And finally, Code::Blocks remembers how you have your windows configured for each project. When you return to the project, Code::Blocks restores the windows to their last configuration to save you time.
Code::Blocks stores the information it needs about the type of program that you’re building, the optional settings, and the window layout in two project files. The settings are stored in a file with the same name as the program but carrying the extension .cbp. The window configuration is stored in a file with the same name but with the extension .layout.
Creating the project
- Select File⇒New⇒Projects to open the window shown in Figure 2-11.
This is a list of all of the types of applications that Code::Blocks knows how to build.
Fortunately, you’ll be concentrating on just one, the Console Application.

Figure 2-11: Select the Console Application from the many types of targets offered.
- Select Console Application and select Go.
Code::Blocks responds with the display shown in Figure 2-12. Here Code::Blocks is offering you the option to create either a C or a C++ program.
- Select C++ and click Next.
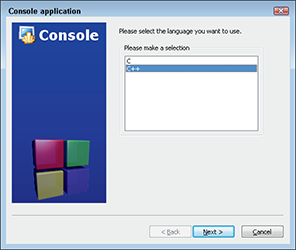
Figure 2-12: Select C++ as your language of choice.
Code::Blocks opens a dialog box where you’ll enter the name and optional subfolder for your project. First, click the little ... button to create a folder to hold your projects, and navigate to the root of your working disk (on a Windows machine, it’ll be either C or D, most likely C). Select the Make New Folder button at the bottom left of the window. Name the new folder Beginning_Programming-CPP.
- Click OK when your display looks like the one shown in Figure 2-13.
The folder that you create to hold your project must not contain any spaces in the name. In addition, none of the folders in the path should contain spaces. That automatically eliminates placing your projects on the Desktop since the path to the Desktop contains spaces. You should also avoid spaces in the name of the project. You can use underscores to separate words instead. The Code::Blocks compiler gets confused with spaces in the filenames and generates obscure and largely meaningless errors.
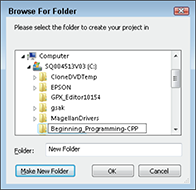
Figure 2-13: Create the folder Beginning_Programming-CPP into which you’ll collect your C++ projects.
Now enter the name of the Project as HelloWorld. Notice that Code:: Blocks automatically creates a subfolder of the same name to contain the files that make up the project.
- Click Next when your display looks like Figure 2-14.
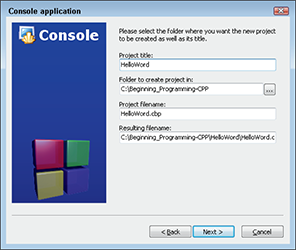
Figure 2-14: Call your first project HelloWorld.
- When Code::Blocks asks how you want your subfolders set up, you can accept the default configuration, as shown in Figure 2-15. Select Finish.
You can select the Back button to back up to a previous menu in the preceding steps if you screw something up. However, you may have to re-enter any data you entered when you go forward again. When you select Finish, you can no longer return and change your selections. (If you screw up and want to redo the project, you’ll first need to remove the Project: Right-click HelloWorld in the Management window and select Close Project. Now you can delete the folder Beginning_Programming-CPPHelloWorld and start over again.)
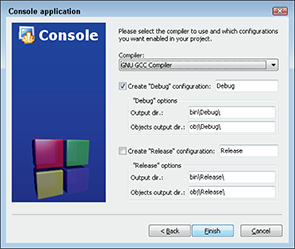
Figure 2-15: Select Finish on the final page to complete the creation of the HelloWorld Project.
Testing your default project
Code::Blocks creates a console application project — and even populates it with a working program — when you select Finish on the Project Wizard. To see that program, click the plus (+) sign next to Sources in the Management window on the left side of the display. The drop-down list reveals one file, main.cpp. Double-click main.cpp to display the following simple program in the source code entry window on the right:
#include <iostream>
using namespace std;
int main()
{
cout << "Hello world!" << endl;
return 0;
}
It’s okay to skip over what some of this stuff means for now, but the crux of the program starts after the open brace following main(). This is where execution begins. The line
cout << "Hello world!" << endl;
says to output the line "Hello, world!" to the cout, which by default is the command line. The next line
return 0;
causes control to return to the operating system, which effectively terminates the program.
- Select Build⇒Build to build the C++ source statements into an executable machine language program.
(You can press Ctrl+F9 or click the Build icon if you prefer.) Immediately, you should see the Build Log tab appear in the lower-right screen followed by a series of lengthy commands, as shown in Figure 2-16. This is Code::Blocks telling the C++ compiler how to build the test program using the settings stored in the project file. The details aren’t important. What is important, however, is that the final two lines of the Build Log window should be
Process terminated with status 0 (0 minutes, 1 seconds)
0 errors, 0 warningsThe terminated status of 0 means that the build process worked properly. The “0 errors, 0 warnings” means that the program compiled without errors or warnings. (The build time of 1 second is not important.)
If you don’t get a status of 0 with 0 errors and 0 warnings, then something is wrong with your installation or with the project. The most common sources of error are- You already had a gcc compiler installed on your computer before you installed Code::Blocks. Code::Blocks uses a special version of the GNU gcc compiler, but it will use any other gcc compiler that you may already have installed on your computer. Your safest bet is to uninstall Code::Blocks, uninstall your other gcc compiler, and reinstall Code::Blocks from scratch.
- You built your project in a directory that contains a space in the name; for example, you built your project on the Desktop. Be sure to build your project in the folder Beginning_Programming-CPP in the root of your user disk (most likely C on a Windows machine).
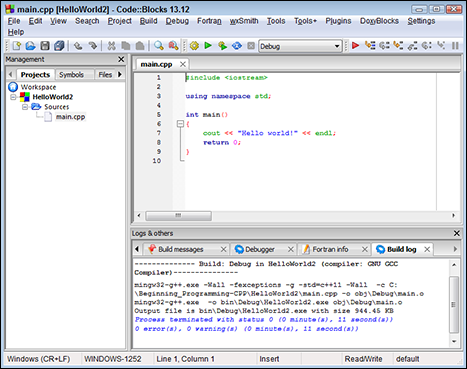
Figure 2-16: Building the default program should result in a working program with no errors and no warnings.
- Select Build⇒Run (Ctrl+F10) to execute the program.
Immediately a window should pop open with the message Hello, world! followed by the return code of zero and the message Press any key to continue (as shown in Figure 2-17).
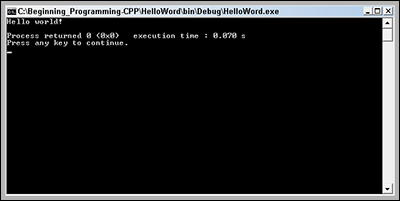
Figure 2-17: The default program displays "Hello, world!" and waits for you to press a key.
- Press Enter.
The window disappears and control returns to the Code::Blocks text editor.
If you were able to see the Hello, world! message by executing the program, then congratulations! You’ve installed your development environment and built and executed your first C++ program successfully. If you did not, then delete the Beginning_Programming_CPP folder, uninstall Code::Blocks, and try again, carefully comparing your display to the figures shown in this chapter. If you’re still having problems, refer to www.stephendavis.com for pointers as to what might be wrong, as well as a link to my email where you can send me questions and comments. I cannot do your programming homework for you, but I can answer some questions to get you started.