
Chapter 13
Piles of Files: Dealing with Information Overload
IN THIS CHAPTER
![]() Using data on your hard drive
Using data on your hard drive
![]() Writing code to access the hard drive
Writing code to access the hard drive
![]() Troubleshooting input/output behavior
Troubleshooting input/output behavior
Consider these scenarios:
- You’re a business owner who handles hundreds of invoices each day. You store invoice data in a file on your hard drive. You need customized code to sort and classify the invoices.
- You’re an astronomer with data from scans of the night sky. When you’re ready to analyze a chunk of data, you load the chunk onto your computer’s hard drive.
- You’re the author of a popular self-help book. Last year’s fad was called the Self Mirroring Method. This year’s craze is the Make Your Cake System. You can’t modify your manuscript without converting to the publisher’s new specifications. You need software to make the task bearable.
Each situation calls for a new computer program, and each program reads from a large data file. On top of all of that, each program creates a brand-new file containing bright, shiny results.
In previous chapters, the examples get input from the keyboard and send output to the Eclipse Console view. That’s fine for small tasks, but you can’t have the computer prompt you for each bit of night sky data. For big problems, you need lots of data, and the best place to store the data is on a computer’s hard drive.
Running a Disk-Oriented Program
To deal with volumes of data, you need tools for reading from (and writing to) disk files. At the mere mention of disk files, some people’s hearts start to palpitate with fear. After all, a disk file is elusive and invisible. It’s stored somewhere inside your computer, with some magic magnetic process.
The truth is, getting data from a disk is much like getting data from the keyboard. And printing data to a disk is like printing data to the computer screen.
 In this book, displaying a program’s text output “on the computer screen” means displaying text in Eclipse’s Console view. If you shun Eclipse in favor of a different IDE (such as NetBeans or IntelliJ IDEA) or you shun all IDEs in favor of your system’s command window, then, for you, “on the computer screen” means something slightly different. Please read between the lines as necessary. Also, I’m well aware that some computers have SSD drives with no honest-to-goodness disks inside them. So terms like disk-oriented and disk files are showing signs of age. But let’s face facts: A “record store” no longer focuses on vinyl records, and in U.S. measurement units, 12 inches is no longer the length the of the king’s foot. Today’s LCD screens no longer need saving. And, unlike the old mechanical car radios, a web page’s radio buttons don’t mark your favorite stations.
Consider the scenario when you run the code in earlier chapters. You type some stuff on the keyboard. The program takes this stuff and spits out some stuff of its own. The program sends this new stuff to the Console view. In effect, the flow of data goes from the keyboard to the computer’s innards and then to the screen, as shown in Figure 13-1.

FIGURE 13-1: Using the keyboard and screen.
Of course, the goal in this chapter is illustrated in Figure 13-2. There’s a file containing data on your hard drive. The program takes data from the disk file and spits out some brand-new data. The program then sends the new data to another file on the hard drive. In effect, the flow of data goes from a disk file to the computer’s innards and on to another disk file.

FIGURE 13-2: Using disk files.
The scenarios in Figures 13-1 and 13-2 are similar. In fact, it helps to remember these fundamental points:
The stuff in a disk file is no different from the stuff that you type on a keyboard.
If a keyboard-reading program expects you to type
19.95 5, then the corresponding disk-reading program expects a file containing those same characters,19.95 5. If a keyboard-reading program expects you to press Enter and type more characters, then the corresponding disk-reading program expects more characters on the next line in the file.The stuff in a disk file is no different from the stuff that you see in Eclipse’s Console view.
If a screen-printing program displays the number
99.75, then the corresponding disk-writing program writes the number99.75to a file. If a screen-printing program moves the cursor to the next line, then the corresponding disk-writing program creates a new line in the file.
If you have trouble imagining what you have in a disk file, just imagine the text that you would type on the keyboard or the text that you would see on the computer screen (that is, in Eclipse’s Console view). That same text can appear in a file on your disk.
A sample program
Listing 13-1 contains a keyboard/screen program. The program multiplies unit price by quantity to get a total price. A run of the code is shown in Figure 13-3.

FIGURE 13-3: Read from the keyboard; write to the screen.
LISTING 13-1 Using the Keyboard and the Screen
import java.util.Scanner;

class ComputeTotal {

    public static void main(String args[]) {
        Scanner keyboard = new Scanner(System.in);
        double unitPrice, total;
        int quantity;

        unitPrice = keyboard.nextDouble();
        quantity = keyboard.nextInt();

        total = unitPrice * quantity;

        System.out.println(total);

        keyboard.close();
    }
}
 Grouping separators vary from one country to another. The run shown in Figure 13-3 works almost everywhere in the world. But if the unit price is nineteen and ninety-five hundredths, you type
 19.95 (with a dot) in some countries and 19,95 (with a comma) in others. When you install the computer’s operating system, you tell it which country you live in. Java programs access this information and use it to customize the way the nextDouble method works.
The goal is to write a program like the one in Listing 13-1. But, rather than talk to your keyboard and screen, this new program talks to your hard drive. The new program reads unit price and quantity from your hard drive and writes the total back to your hard drive.
Java’s API has everything you need for interacting with a hard drive. A nice example is in Listing 13-2.
LISTING 13-2 Using Input and Output Files
import java.util.Scanner;
import java.io.File;
import java.io.FileNotFoundException;
import java.io.PrintStream;

class ReadAndWrite {

    public static void main(String args[]) throws FileNotFoundException {
        Scanner diskScanner = new Scanner(new File("rawData.txt"));
        PrintStream diskWriter = new PrintStream("cookedData.txt");
        double unitPrice, total;
        int quantity;

        unitPrice = diskScanner.nextDouble();
        quantity = diskScanner.nextInt();

        total = unitPrice * quantity;

        diskWriter.println(total);

        diskScanner.close();
        diskWriter.close();
    }
}
For a guide to the care and feeding of the rawData.txt file (whose name appears in Listing 13-2), see the upcoming “Creating an input file” section.
Creating code that messes with your hard drive
“I _____ (print your name)_____ agree to pay $______each month on the ___th day of the month.”
Fill in the blanks. That’s all you have to do. Reading input from a disk can work the same way. Just fill in the blanks in Listing 13-3.
LISTING 13-3 A Template to Read Data from a Disk File
/*
 * Before Eclipse can compile this code,
 * you must fill in the blanks.
 */
import java.util.Scanner;
import java.io.File;
import java.io.FileNotFoundException;

class ___________ {

    public static void main(String args[]) throws FileNotFoundException {

        Scanner diskScanner = new Scanner(new File("_________"));

        ______ = diskScanner.nextInt();
        ______ = diskScanner.nextDouble();
        ______ = diskScanner.nextLine();
        ______ = diskScanner.findWithinHorizon(".",0).charAt(0);

        // Etc.

        diskScanner.close();
    }
}
To use Listing 13-3, make up a name for your class. Insert that name into the first blank space. Type the name of the input file in the second space (between the quotation marks). Then, to read a whole number from the input file, call diskScanner.nextInt. To read a number that has a decimal point, call diskScanner.nextDouble. You can call any of the Scanner methods in Chapter 5’s Table 5-1 — the same methods you call when you get keystrokes from the keyboard.
The stuff in Listing 13-3 isn’t a complete program. Instead, it’s a code template — a half-baked piece of code, with spaces for you to fill in.
With the template in Listing 13-3, you can input data from a disk file. With a similar template, you can write output to a file. The template is in Listing 13-4.
LISTING 13-4 A Template to Write Data to a Disk File
/*
 * Before Eclipse can compile this code,
 * you must fill in the blanks.
 */
import java.io.File;
import java.io.FileNotFoundException;
import java.io.PrintStream;

class ___________ {

    public static void main(String args[]) throws FileNotFoundException {

        PrintStream diskWriter = new PrintStream("_________");

        diskWriter.print(_____);
        diskWriter.println(_____);

        // Etc.

        diskWriter.close();
    }
}
To use Listing 13-4, insert the name of your class into the first blank space. Type the name of the output file in the space between the quotation marks. Then, to write part of a line to the output file, call diskWriter.print. To write the remainder of a line to the output file, call diskWriter.println.
 Eclipse has a built-in feature for creating and inserting code templates. To get started using Eclipse templates, choose Window ⇒ Preferences (in Windows) or Eclipse ⇒ Preferences (on a Mac). In the resulting Preferences dialog box, choose Java ⇒ Editor ⇒ Templates. Creating new templates isn’t simple. But if you poke around a bit, you accomplish a lot.
If your program gets input from one disk file and writes output to another, combine the stuff from Listings 13-3 and 13-4. When you do, you get a program like the one in Listing 13-2.
Running the sample program
Testing the code in Listing 13-2 is a three-step process. Here’s an outline of the three steps:
- Create the
rawData.txtfile. - Run the code in Listing 13-2.
- View the contents of the
cookedData.txtfile.
The next few sections cover each step in detail.
Creating an input file
You can use any plain old text editor to create an input file for the code in Listing 13-2. In this section, I show you how to use Eclipse’s built-in editor.
To create an input file:
Select a project in Eclipse’s Package Explorer.
In this example, select the
13-02project (the project containing the code from Listing 13-2). In the Package Explorer, select a branch whose label is the name of a project. (Select the 13-02branch to run the code in Listing 13-2.) Don’t select an item within a project. (For example, don’t select thesrcbranch or the(default package)branch.)On Eclipse’s main menu, choose File ⇒ New ⇒ File.
Eclipse’s New File dialog box opens.
In the File Name field, type the name of your new data file.
You can type any name that your computer considers to be a valid filename. For this section’s example, I used the name
rawData.txt, but other names, such asrawData.dat,rawData, andraw123.01.dataFile, are fine. I try to avoid troublesome names (including short, uninformative names and names containing blank spaces), but the name you choose is entirely up to you (and your computer’s operating system, and your boss’s whims, and your customer’s specifications).Click Finish.
The file’s name appears in Eclipse’s Package Explorer. An empty editor (with the new file’s name on its tab) appears in Eclipse’s editor area.
Type text in the editor.
To create this section’s example, I typed the text
19.95 5, as shown in Figure 13-4. To create your own example, type whatever text your program needs during its run.
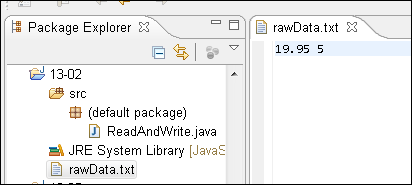
FIGURE 13-4: Editing an input file.
 This section’s steps apply when you use Eclipse to create an input file. You can use other programs to create input files, such as Windows Notepad or Macintosh TextEdit. But if you do, you have to be careful about file formats and filename extensions. For example, to create a file named
 raw123.01.dataFile using Windows Notepad, type "raw123.01.dataFile" (with quotation marks) in the File Name field of the Save As dialog box. If you don’t surround the name with quotation marks, then Notepad might add .txt to the file’s name (turning raw123.01.dataFile into raw123.01.dataFile.txt). A similar issue applies to the Macintosh’s TextEdit program. By default, TextEdit adds the .rtf extension to each new file. To override the .rtf default for a particular file, select Format ⇒ Make Plain Text before saving the file. Then, when you save the file, TextEdit offers to add the .txt extension to the name of the file. In the Save As dialog box, if you don’t want the file’s name to end in .txt, uncheck the check box labeled If No Extension is Provided, Use “.txt”.
Running the code
To have Eclipse run the code, do the same thing you do with any other Java program. Select the project you want to run (project 13-02, in this example). Then choose Run ⇒ Run As ⇒ Java Application.
When you run the program in Listing 13-2, no text appears in Eclipse’s Console view. This total lack of any noticeable output gives some people the willies. The truth is, a program like the one in Listing 13-2 does all its work behind the scenes. The program has no statements that read from the keyboard and has no statements that print to the screen. So, if you have a very loud hard drive, you may hear a little chirping sound when you choose Run ⇒ Run As ⇒ Java Application, but you won’t type any program input, and you won’t see any program output.
The program sends all its output to a file on your hard drive. What do you do to see the file’s contents?
Viewing the output file
To see the output of the program in Listing 13-2, follow these steps:
- In the Project Explorer, select the
13-02project branch. - On the main menu, choose File ⇒ Refresh.
In the Project Explorer, expand the
13-02project branch.A new file named
cookedData.txtappears in the Package Explorer tree (in the13-02project).Double-click the
cookedData.txtbranch in the Package Explorer tree.The contents of
cookedData.txtappear in an Eclipse editor. (See Figure 13-5.)

FIGURE 13-5: Viewing an output file.
Troubleshooting problems with disk files
When you run the code in Listing 13-2, the computer executes new Scanner(new File("rawData.txt")). If the Java virtual machine can’t find the rawData.txt file, you see a message like the one shown in Figure 13-6. This error message can be frustrating. In many cases, you know darn well that there’s a rawData.txt file on your hard drive. The stupid computer simply can’t find it.

FIGURE 13-6: The computer can’t find your file.
There’s no quick, surefire way to fix this problem. But you should always check the following things first:
Check again for a file named
rawData.txt.Open Windows File Explorer or Macintosh Finder and poke around for a file with that name.
The filenames displayed in File Explorer and Finder can be misleading. You may see the name rawData, even though the file’s real name israwData.txt. To fix this problem once and for all, refer to the “Those pesky filename extensions” sidebar in Chapter 2.Check the spelling of the file’s name.
Make sure that the name in your program is exactly the same as the name of the file on your hard drive. Just one misplaced letter can keep the computer from finding a file.
If you use Linux (or a flavor of UNIX other than Mac OS X), check the capitalization of the file’s name.
In Linux, and in many versions of UNIX, the difference between uppercase and lowercase can baffle the computer.
Check that the file is in the correct directory.
Sure, you have a file named
rawData.txt. But don’t expect your Java program to look in every folder on your hard drive to find the file. How do you know which folder should house files likerawData.txt?Here’s how it works: Each Eclipse project has its own folder on your computer’s hard drive. You see the
13-02project folder and itssrcsubfolder in Figure 13-5. But in Figure 13-7, Windows File Explorer shows the13-02folder, itssrcsubfolder, and its other subfolders named.settingsandbin. (Mac users can see the same subfolders in a Finder window.)The
src,bin, and.settingsfolders contain files of their own. But in Figure 13-7, therawData.txtandcookedData.txtfiles are immediately inside the13-02project folder. In other words, therawData.txtandcookedData.txtfiles live in the root of the13-02project folder. When you run this section’s example, the rawData.txtfile should be in the root of the13-02project folder on your hard drive. That’s why, in Step 1 of the earlier “Creating an input file” section, I remind you to select the13-02project folder and not the project’ssrcsubfolder.Figure 13-7 shows input and output files in the root of their Eclipse project. But in general, file locations can be tricky, especially if you switch from Eclipse to an unfamiliar IDE. The general rule (about putting input and output files immediately inside a project directory) may not apply in other programming environments.
Here’s a trick you can use: Whatever IDE you use (or even if you create Java programs without an IDE), run this stripped-down version of the code in Listing 13-2:
import java.io.File;
import java.io.FileNotFoundException;
import java.io.PrintStream;

class JustWrite {

    public static void main(String args[]) throws FileNotFoundException {

        PrintStream diskWriter = new PrintStream("cookedData.txt");
        diskWriter.println(99.75);

        diskWriter.close();
    }
}
This program has no need for a stinking
rawData.txtfile. If you run this code and get no error messages, search your hard drive for this program’s output (thecookedData.txtfile). Note the name of the folder that contains thecookedData.txtfile. When you putrawData.txtin this same folder, any problem you had running the Listing 13-2 code should go away.Check the
rawData.txtfile’s content.It never hurts to peek inside the
rawData.txtfile and make sure that the file contains the numbers19.95 5. IfrawData.txtdoesn’t appear in Eclipse’s editor area, find the Listing 13-2 project (the project named13-02) in the Package Explorer. Double-clicking the project’srawData.txtbranch makes that file appear in Eclipse’s editor area. By default, Java’s Scannerclass looks for blank spaces between input values. So, this example’srawData.txtfile should contain19.95 5, not19.955and not19.95,5. The Scannerclass looks for any kind of white space between the values. These white space characters may include blank spaces, tabs, and newlines. For example, therawData.txtfile may contain19.95 5(with several blank spaces between19.95and5), or it may have19.95and5on two separate lines.

FIGURE 13-7: The contents of the 13-02 project folder on your computer’s hard drive.
Writing a Disk-Oriented Program
Listing 13-2 is much like Listing 13-1. In fact, you can go from Listing 13-1 to Listing 13-2 with some simple editing. Here’s how:
- Add the following import declarations to the beginning of your code:
import java.io.File;
import java.io.FileNotFoundException;
import java.io.PrintStream; - Add the following throws clause to the method header:
throws FileNotFoundException - In the call to
new Scanner, replaceSystem.inwith a call tonew Fileas follows:Scanner aVariableName = new Scanner(new File("inputFileName")) - Create a
PrintStreamfor writing output to a disk file:PrintStream anotherVariableName = new PrintStream("outputFileName"); - Use the
Scannervariable name in calls tonextInt,nextLine, and so on.For example, to go from Listing 13-1 to Listing 13-2, I change
unitPrice = keyboard.nextDouble();
quantity = keyboard.nextInt();
to
unitPrice = diskScanner.nextDouble();
quantity = diskScanner.nextInt(); - Use the
PrintStreamvariable name in calls toprintandprintln.For example, to go from Listing 13-1 to Listing 13-2, I change
System.out.println(total);to
diskWriter.println(total); Use the
Scannervariable name in the call toclose.For example, to go from Listing 13-1 to Listing 13-2, I change
keyboard.close();to
diskScanner.close();Use the
PrintStreamvariable name in a call toclose.For example, to go from Listing 13-1 to Listing 13-2, I add
diskWriter.close();at the end of the
mainmethod.
Reading from a file
All the Scanner methods can read from existing disk files. For example, to read a word from a file named mySpeech, use code of the following kind:
Scanner diskScanner = new Scanner(new File("mySpeech"));

String oneWord = diskScanner.next();
To read a character from a file named letters.dat and then display the character on the screen, you can do something like this:
Scanner diskScanner = new Scanner(new File("letters.dat"));

System.out.println(diskScanner.findWithinHorizon(".", 0).charAt(0));
Notice how I read from a file named mySpeech, not mySpeech.txt or mySpeech.doc. Anything that you put after the dot is called a filename extension, and for a file full of numbers and other data, the filename extension is optional. Sure, a Java program must be called something.java, but a data file can be named mySpeech.txt, mySpeech, or just .reallymine.allminemySpeech. As long as the name in your new File call is the same as the filename on your computer’s hard drive, everything is okay.
Writing to a file
The print and println methods can write to disk files. Here are some examples:
- During a run of the code in Listing 13-2, the variable
totalstores the number 99.75. To deposit 99.75 into thecookedData.txtfile, you executediskWriter.println(total); - This
printlncall writes to a disk file because of the following line in Listing 13-2:PrintStream diskWriter = new PrintStream("cookedData.txt"); - In another version of the program, you may decide not to use a
totalvariable. To write 99.75 to thecookedData.txtfile, you can calldiskWriter.println(unitPrice * quantity); - To display
OKon the screen, you can make the following method call:System.out.print("OK");To write
OKto a file namedapproval.txt, you can use the following code:PrintStream diskWriter = new PrintStream("approval.txt");
diskWriter.print("OK"); - You may decide to write
OKas two separate characters. To write to the screen, you can make the following calls:System.out.print(’O’);
System.out.print(’K’);And to write
OKto theapproval.txtfile, you can use the following code:PrintStream diskWriter = new PrintStream("approval.txt");
diskWriter.print(’O’);
diskWriter.print(’K’); - Like their counterparts for
System.out, the disk writingprintandprintlnmethods differ in their end-of-line behaviors. For example, you want to display the following text on the screen:Hankees Socks
7 3To do this, you can make the following method calls:
System.out.print("Hankees  ");
System.out.println("Socks");
System.out.print(7);
System.out.print("        ");
System.out.println(3);
To plant the same text into a file named
scores.dat, you can use the following code:PrintStream diskWriter = new PrintStream("scores.dat");
diskWriter.print("Hankees ");
diskWriter.println("Socks");
diskWriter.print(7);
diskWriter.print(" ");
diskWriter.println(3);
Writing, Rewriting, and Rerewriting
Given my mischievous ways, I tried a little experiment. I asked myself what would happen if I ran the same file writing program more than once. So I created a tiny program (the program in Listing 13-5), and I ran the program twice. Then I examined the program’s output file. The output file (shown in Figure 13-8) contains only two letters.

FIGURE 13-8: Testing the waters.
LISTING 13-5 A Little Experiment
import java.io.File;
import java.io.FileNotFoundException;
import java.io.PrintStream;

class WriteOK {

    public static void main(String args[])throws FileNotFoundException {

        PrintStream diskWriter = new PrintStream(new File("approval.txt"));

        diskWriter.print  (’O’);
        diskWriter.println(’K’);

        diskWriter.close();
    }
}
Here’s the sequence of events, from the start to the end of the experiment:
Before I run the code in Listing 13-5, my computer’s hard drive has no
approval.txtfile.That’s okay. Every experiment has to start somewhere.
I run the code in Listing 13-5.
The call to
new PrintStreamin Listing 13-5 creates a file namedapproval.txt. Initially, the newapproval.txtfile contains no characters. Later in Listing 13-5, calls toprintandprintlnput characters in the file. So, after running the code, theapproval.txtfile contains two letters: the lettersOK.I run the code from Listing 13-5 a second time.
At this point, I could imagine seeing
OKOKin theapproval.txtfile. But that’s not what I see in Figure 13-8. After running the code twice, theapproval.txtfile contains just oneOK. Here’s why:- The call to
new PrintStreamin Listing 13-5 deletes my existingapproval.txtfile. The call creates a new, emptyapproval.txtfile. - After a new
approval.txtfile is created, theprintmethod call drops the letterOinto the new file. - The
printlnmethod call adds the letterKto the sameapproval.txtfile.
- The call to
That’s the story. Each time you run the program, it trashes whatever approval.txt file is already on the hard drive. Then the program adds data to a newly created approval.txt file.
 File handling can be tricky. If you run into trouble early on, it’s easy to become frustrated. Fortunately, these experiments will get you started on the right track.
RUN BARRY’S PROJECT
Test the waters by downloading the code from this book’s website (www.allmycode.com/BeginProg). Follow the instructions in Chapter 2 for importing the code into Eclipse. Run the code in Project 13-02. The 13-02 project comes with its own rawData.txt file. After running the project in Eclipse, check Eclipse’s Package Explorer to make sure that the run has created a cookedData.txt file.
WHERE’S MY FILE?
Create an Eclipse project containing the following code:
import java.util.Scanner;
import java.io.File;
import java.io.FileNotFoundException;
import java.io.PrintStream;

class ReadAndWrite {

    public static void main(String args[]) throws FileNotFoundException {
        Scanner diskScanner = new Scanner(new File("data.txt"));
        PrintStream diskWriter = new PrintStream("data.txt");

        diskWriter.println("Hello");

        System.out.println(diskScanner.next());

        diskScanner.close();
        diskWriter.close();
    }
}
When you run the code, you see an error message in Eclipse’s Console view. Why?
WRITE AND THEN READ
Modify the code from the where’s-my-file experiment so that the PrintStream diskWriter declaration comes before the Scanner diskScanner declaration.
When you run the code, the word Hello should appear in Eclipse’s Console view. After running the code, check to make sure that your Eclipse project contains a file named data.txt.
RANDOM NUMBERS IN A FILE
Create a program that writes ten randomly generated numbers in a disk file. After writing the numbers, the program reads the numbers from the file and displays them in Eclipse’s Console view.