
Chapter 20
Oooey GUI Was a Worm
IN THIS CHAPTER
![]() Swinging into action
Swinging into action
![]() Displaying an image
Displaying an image
![]() Using buttons and text boxes
Using buttons and text boxes
There’s a wonderful old joke about a circus acrobat jumping over mice. Unfortunately, I’d get sued for copyright infringement if I included the joke in this book.
Anyway, the joke is about starting small and working your way up to bigger things. That’s what you do when you read Beginning Programming with Java For Dummies, 5th Edition.
Most of the programs in this book are text-based. A text-based program has no windows, no dialog boxes — nothing of that kind. With a text-based program, the user types characters in the Console view, and the program displays output in the same Console view.
These days, very few publicly available programs are text-based. Almost all programs use a GUI — a graphical user interface. So if you’ve read every word of this book so far, you’re probably saying to yourself, “When am I going to find out how to create a GUI?”
Well, now’s the time! This chapter introduces you to the world of GUI programming in Java.
 You can see GUI versions of many examples from this book by visiting the book’s website (
http://allmycode.com/BeginProg).
The Java Swing Classes
Java’s Swing classes create graphical objects on a computer screen. The objects can include buttons, icons, text fields, check boxes, and other good things that make windows so useful.
The name Swing isn’t an acronym. When the stewards of the Java programming language were first creating the code for these classes, one of the developers named it Swing because swing music was enjoying a nostalgic revival. And yes, in addition to String and Swing, the standard Java API has a Spring class and a Spring Framework. But that’s another story.
Actually, Java’s API has several sets of windowing components. For details, see the nearby “Java GUIs” sidebar.
Showing an image on the screen
The program in Listing 20-1 displays a window on your computer screen. To see the window, look at Figure 20-1.

FIGURE 20-1: What a nice window!
The code in Listing 20-1 has very little logic of its own. Instead, this code pulls together a bunch of classes from the Java API.
LISTING 20-1 Creating a Window with an Image in It
import javax.swing.JFrame;
import javax.swing.ImageIcon;
import javax.swing.JLabel;

class ShowPicture {

    public static void main(String args[]) {
        JFrame frame = new JFrame();
        ImageIcon icon = new ImageIcon("androidBook.jpg");
        JLabel label = new JLabel(icon);

        frame.add(label);
        frame.setDefaultCloseOperation(JFrame.EXIT_ON_CLOSE);
        frame.pack();
        frame.setVisible(true);
    }
}
Over in Listing 17-3 (in Chapter 17), I created an instance of the Purchase class with the line
Purchase onePurchase = new Purchase();
In Listing 20-1, I do the same kind of thing — I create instances of the JFrame, ImageIcon, and JLabel classes with the following lines:
JFrame frame = new JFrame();
ImageIcon icon = new ImageIcon("androidBook.jpg");
JLabel label = new JLabel(icon);
Here’s some gossip about each of these lines:
- A
JFrameis like a window (except that it’s called aJFrame, not a window). In Listing 20-1, the lineJFrame frame = new JFrame(); - creates a
JFrameobject, but this line doesn’t display theJFrameobject anywhere. (The displaying comes later in the code.) - An
ImageIconobject is a picture. At the root of the program’s project directory, I have a file namedandroidBook.jpg. That file contains the picture shown in Figure 20-1. So, in Listing 20-1, the lineImageIcon icon = new ImageIcon("androidBook.jpg");creates an
ImageIconobject — an icon containing theandroidBook.jpgpicture. For some reason that I’ll never understand, you may not want to use my
 androidBook.jpgimage file when you run Listing 20-1. You can use almost any.gif,.jpg, or.pngfile in place of my (lovely) Android book cover image. To do so, drag your own image file to Eclipse’s Package Explorer. (Drag it to the root of this example’s project folder.) Then, in Eclipse’s editor, change the nameandroidBook.jpgto your own image file’s name. That’s it! - I need a place to put the icon. I can put it on something called a
JLabel. So, in Listing 20-1, the lineJLabel label = new JLabel(icon);creates a
JLabelobject and puts theandroidBook.jpgicon on the new label’s face.
If you read the previous bullets, you may get a false impression. The wording may suggest that the use of each component (JFrame, ImageIcon, JLabel, and so on) is a logical extension of what you already know. “Where do you put an ImageIcon? Well, of course, you put it on a JLabel.” When you’ve worked long and hard with Java’s Swing components, all these things become natural to you. But until then, you look everything up in Java’s API documentation.
You never need to memorize the names or features of Java’s API classes. Instead, you keep Java’s API documentation handy. When you need to know about a class, you look it up in the documentation. If you need a certain class often enough, you’ll remember its features. For classes that you don’t use often, you always have the docs.
For tips on using Java’s API documentation, see my article “Making Sense of Java’s API Documentation,” at www.dummies.com/programming/java/making-sense-of-javas-api-documentation.
Just another class
What is a JFrame? Like any other class, a JFrame has several parts. For a simplified view of some of these parts, see Figure 20-2.

FIGURE 20-2: A simplified depiction of the JFrame class.
Like the String in Figure 18-6 (in Chapter 18), the JFrame class has both fields and methods. The fields include the frame’s height and width. The methods include add, setDefaultCloseOperation, pack, and setVisible. All told, the JFrame class has about 320 methods.
For technical reasons too burdensome for this book, you can’t use dots to refer to a frame’s height or width. But you can call many JFrame methods with those infamous dots. In Listing 20-1, I call the frame’s methods by writing add(label), frame.setDefaultCloseOperation(JFrame.EXIT_ON_CLOSE), frame.pack(), and frame.setVisible(true).
Here’s the scoop on the JFrame methods in Listing 20-1:
- The call
frame.add(label)plops the label onto the frame. The label displays myandroidBook.jpgpicture, so this call makes the picture appear on the frame. A call to
frame.setDefaultCloseOperationtells Java what to do when you try to close the frame. (In Windows, you click the X in the upper-right corner, by the title bar. On a Mac, the X is in the frame’s upper-left corner.) For a frame that’s part of a larger application, you may want the frame to disappear when you click the X, but you probably don’t want the application to stop running.But in Listing 20-1, the frame is the entire application — the whole enchilada. When you click the X, you want the Java Virtual Machine to shut itself down. To make this happen, you call the
setDefaultCloseOperationmethod with parameterJFrame.EXIT_ON_CLOSE. The other alternatives are as follows:JFrame.HIDE_ON_CLOSE: The frame disappears, but it still exists in the computer’s memory.JFrame.DISPOSE_ON_CLOSE: The frame disappears and no longer exists in the computer’s memory.JFrame.DO_NOTHING_ON_CLOSE: The frame still appears, still exists, and still does everything it did before you clicked the X. Nothing happens when you click X. So, with thisDO_NOTHING_ON_CLOSEoption, you can become quite confused.
 If you don’t call
 setDefaultCloseOperation, Java automatically chooses theHIDE_ON_CLOSEoption. When you click the X, the frame disappears, but the Java program keeps running. Of course, with no visible frame, the running of Listing 20-1 doesn’t do much. The only noticeable effect of the run is your development environment’s behavior. With Eclipse, the little square on the Console view’s toolbar retains its bright red color. When you hover over the square, you see the Terminate tooltip. To end the Java program’s run (and to return the square to its washed-out reddish-gray hue), simply click this little square.A frame’s
packmethod shrink-wraps the frame around whatever has been added to the frame. Without callingpack, the frame can be much bigger or much smaller than is necessary.Unfortunately, the default is to make a frame much smaller than necessary. If, in Listing 20-1, you forget to call
frame.pack, you get the tiny frame shown in Figure 20-3. Sure, you can enlarge the frame by dragging the frame’s edges with the mouse. But why should you have to do that? Just callframe.packinstead.- Calling
setVisible(true)makes the frame appear on your screen. If you forget to callsetVisible(true)(and I often do), when you run the code in Listing 20-1, you’ll see nothing on your screen. It’s always disconcerting until you figure out what you did wrong.

FIGURE 20-3: A frame that hasn’t been packed.
Constructor calls
In Listing 17-3 (in Chapter 17), I created an instance of the Purchase class with the line
Purchase onePurchase = new Purchase();
The code in Listing 20-1 does the same kind of thing. In Listing 20-1, I create an instance of the JFrame class with the following line:
JFrame frame = new JFrame();
Compare Figure 17-4 (in Chapter 17) with this chapter’s Figure 20-4.

FIGURE 20-4: An object created from the JFrame class.
In both figures, a new SomethingOrOther() call creates an object from an existing class:
In Chapter 17, I create an instance of my
Purchaseclass.This object represents an actual purchase (with a purchase amount, a tax, and so on).
In this chapter, I create an instance of the
JFrameclass.This object represents a frame on the computer screen (a frame with borders, a Minimize button, and so on). In a more complicated application — an app that displays several frames — the code might create several objects from a class such as
JFrame.(See Figure 20-5.)

FIGURE 20-5: Creating three objects from the JFrame class.
In Listing 20-1, the lines
JFrame frame = new JFrame();
ImageIcon icon = new ImageIcon("androidBook.jpg");
JLabel label = new JLabel(icon);
look as though they contain method calls. After all, a method call consists of a name followed by parentheses. You might put some parameters between the open and close parentheses. The expression keyboard.nextLine() is a call to a method named nextLine. So, in Listing 20-1, is JFrame() a call to a method named JFrame? No, it’s not.
In the expression new JFrame(), Java’s new keyword signals a call to a constructor. A constructor is like a method, except that a constructor’s name is the same as the name of a Java class. Java’s standard API contains classes named JFrame, ImageIcon, and JLabel, and the code in Listing 20-1 calls the JFrame, ImageIcon, and JLabel constructors.
As the terminology suggests, a constructor is a piece of code that constructs an object. So, in Listing 20-1, when you call
JFrame frame = new JFrame();
you make a frame variable refer to a newly constructed object (an object constructed from the JFrame class).
Constructors and methods have a lot in common with one another. You can’t call a method without having a corresponding method declaration somewhere in the code. (In the case of Java’s nextLine method, the method declaration lives somewhere inside Java’s enormous bunch of API classes.) The same is true of constructors. You can’t call new JFrame() without having a constructor for the JFrame class somewhere in your code. And, sure enough, inside the Java API class, you can find a declaration for the JFrame() constructor. The code looks something like this:
public class JFrame {
  int height;
  int width;
  public Component add() …
  public void setDefaultCloseOperation() …
  public void pack() …
  public void setVisible() …
  …

  /**
   * Constructs a new frame that is initially invisible.
   */
  public JFrame() {
     …
  }
  …
}
The constructor declaration looks almost like a method declaration. But notice that the constructor declaration doesn’t start with public void JFrame() or with public double JFrame() or with public anything JFrame(). Aside from the optional word public, a constructor declaration contains only the name of the class whose object is being constructed. More on this in the next section.
The Swing Classes: Round 2
In your Java-related travels, you’ll see several variations on the code in Listing 20-1. This section explores one such variation.
This section’s example does exactly what the previous section’s example does. The only difference is the way the two examples deal with the JFrame class. This section’s code is in Listing 20-2.
LISTING 20-2 Extending Java’s JFrame Class
import javax.swing.ImageIcon;
import javax.swing.JFrame;
import javax.swing.JLabel;

class ShowPicture {

  public static void main(String args[]) {
    new MyFrame();
  }
}

class MyFrame extends JFrame {

  MyFrame() {
    ImageIcon icon = new ImageIcon("androidBook.jpg");
    JLabel label = new JLabel(icon);
    add(label);
    setDefaultCloseOperation(JFrame.EXIT_ON_CLOSE);
    pack();
    setVisible(true);
  }
}
 When you view Listing 20-2 in the Eclipse editor, you see a little yellow marker. A yellow marker represents a warning rather than an error, so you can ignore the warning and still run your code. If you hover over the marker, you see a tip about something called a serialVersionUID. A serialVersionUID is a number that helps Java avoid version conflicts when you send different copies of an object from one place to another. You can get rid of the warning by applying one of Eclipse’s quick fixes, but if you’re not fussy, don’t bother with these quick fixes.
 For information about Eclipse’s Quick Fix feature, refer to Chapter 5.
Extending a class
In Listing 20-2, the words extends JFrame are particularly important. When you see Java’s extends keyword, imagine replacing that keyword with the phrase is a kind of:
public class MyFrame is a kind of JFrame {
When you type MyFrame extends JFrame, you declare that your new MyFrame class has the fields and methods that are built into Java’s own JFrame class, and possibly more. For example, a JFrame instance has setDefaultCloseOperation, pack, and setVisible methods, so every new MyFrame instance has setDefaultCloseOperation, pack, and setVisible methods (see Figure 20-6).

FIGURE 20-6: A MyFrame instance has many methods.
When you put the words extends JFrame in your code, you get the JFrame methods for free. The MyFrame class’s code doesn’t need declarations for methods, such as setDefaultCloseOperation, pack, and setVisible. Those declarations are already in the JFrame class in Java’s API. The only declarations in the MyFrame class’s code are for brand-new things — things that are specific to your newly declared MyFrame class. It’s as though Listing 20-2 contained the following information:
public class MyFrame is a kind of JFrame {

  And in addition what’s in JFrame, MyFrame also has a brand new constructor:
    public MyFrame() {
        // Etc.
    }
}
In Listing 20-2, the words new MyFrame() get the MyFrame constructor to do its work. And the constructor in Listing 20-2 does quite a bit of work! The constructor does the stuff that the main method does in Listing 20-1:
- The constructor creates an
ImageIconcontaining theandroidBook.jpgpicture. - The constructor creates a
JLabelobject and puts theandroidBook.jpgicon on the new label’s face. The constructor adds the
JLabelobject.Time out! What’s being added to what? In Listing 20-1, the statement
frame.add(label);adds the
JLabelobject to theframe. But in Listing 20-2, there’s noframevariable. In Listing 20-2, all you have isadd(label);Well, here’s the good news: Inside a constructor declaration, the object that you’re constructing is “a given.” You don’t name that new object in order to refer to that new object. It’s as though the constructor’s code looked like this:
MyFrame() {
    ImageIcon icon = new ImageIcon("androidBook.jpg");
    JLabel label = new JLabel(icon);
    new_frame_that_is_being_constructed.add(label);
    new_frame_that_is_being_constructed.setDefaultCloseOperation
                                                 (JFrame.EXIT_ON_CLOSE);
    new_frame_that_is_being_constructed.pack();
    new_frame_that_is_being_constructed.setVisible(true);
}
Here’s how the constructor in Listing 20-2 finishes its work:
- The constructor adds the
JLabelobject to theMyFrameobject that’s being constructed. - The constructor tells the Java Virtual Machine to shut itself down when you close the frame.
- The constructor shrink-wraps the frame around the image that appears on the frame.
- The constructor makes the frame appear on your screen.
The extends keyword adds a fundamental idea to Java programming — the notion of inheritance. In Listing 20-2, the newly created MyFrame class inherits fields and methods that are declared in the existing JFrame class. Inheritance is a pivotal feature of an object-oriented programming language.
 Make some changes to this chapter’s programs.
Mix it up
Change the order of the statements in the main method of Listing 20-1. Do the same with the statements in the constructor of Listing 20-2. Does the ordering of the statements make a difference? Are there any statements that must come before some other statements in the code?
The permissive ordering of statements in the building of visual objects suggests a different way to think about GUI programming. It’s called declarative programming, and I describe it in the next section.
Make it your own
Run the code in Listing 20-1 or 20-2 with your own image file in place of my androidBook.jpg file.
Code Soup: Mixing XML with Java
Go back and feast your eyes one more time on the code in Listing 20-1. Despite Java’s object-oriented flavor, the code displays a window using a “do this, then do that” approach:
Here’s how you show a picture:
    Construct a frame
    Construct an icon containing a certain image
    Construct a label containing the icon
    Add the icon to the frame
    …
    Pack the frame
    Make the frame be visible
This “do this, then do that” approach is called procedural programming.
Now imagine you’re at the Louvre, looking at the Mona Lisa. You don’t think, “Da Vinci added a face, then he put a smile on the face, then he added a body, and then a background.” The painting doesn’t progress from one action to another. Instead, the painting simply is.
In the same way, a window in a GUI application doesn’t need a procedural progression. Instead, you can describe a window declaratively. You write code that says, “Here’s how the window looks.” The Java Virtual Machine uses your description to decide (on its own) what to display and when.
Consider, for example, the grid in Figure 20-7.

FIGURE 20-7: Names and phone numbers.
The following Swing code creates a grid like the one in Figure 20-7. Don’t look at all the details in the code. Instead, notice all the verbs: “set the layout to a new GridLayout, add a label to the frame, set the font, pack the frame, and so on.” It’s all procedural.
import java.awt.Font;
import java.awt.GridLayout;

import javax.swing.JFrame;
import javax.swing.JLabel;

public class Main {

  public static void main(String[] args) {
    JFrame frame = new JFrame();
    frame.setLayout(new GridLayout(4, 2));

    JLabel labels[] =
      { new JLabel("Name"), new JLabel("Phone"),
        new JLabel("Alice"), new JLabel("555-1234"),
        new JLabel("Bob"), new JLabel("555-4321"),
        new JLabel("Carol"), new JLabel("555-3000") };

    frame.add(labels[0]);
    frame.add(labels[1]);

    JLabel boldLabel = new JLabel("Name");
    Font boldFont = boldLabel.getFont();
    Font plainFont =
        new Font(boldFont.getName(), Font.PLAIN, boldFont.getSize());

    for (int i = 2; i < 8; i++) {
      labels[i].setFont(plainFont);
      frame.add(labels[i]);
    }

    frame.pack();
    frame.setVisible(true);
  }
}
To save the world from its procedural fixation, JavaFX offers a declarative option. Using JavaFX, you can describe a scene as an outline using XML (eXtensible Markup Language) tags. Here’s a JavaFX version of the grid from Figure 20-7:
<GridPane gridLinesVisible="true" layoutX="100.0" layoutY="165.0">
  <children>
    <Label text="Name" GridPane.columnIndex="0" GridPane.rowIndex="0">
      <font>
        <Font name="System Bold" size="12.0" fx:id="x1"/>
      </font>
    </Label>
    <Label font="$x1" text="Phone"
      GridPane.columnIndex="1" GridPane.rowIndex="0"/>
    <Label text="Alice"
      GridPane.columnIndex="0" GridPane.rowIndex="1"/>
    <Label text="555-1234"
      GridPane.columnIndex="1" GridPane.rowIndex="1"/>
    <Label text="Bob"
      GridPane.columnIndex="0" GridPane.rowIndex="2"/>
    <Label text="555-4321"
      GridPane.columnIndex="1" GridPane.rowIndex="2"/>
    <Label text="Carol"
      GridPane.columnIndex="0" GridPane.rowIndex="3"/>
    <Label text="555-3000"
      GridPane.columnIndex="1" GridPane.rowIndex="3"/>
  </children>
</GridPane>
If you’re familiar with HTML (the language of web pages), you might recognize some of the tricks in the XML grid code. If not, don’t worry. Using a tool named Scene Builder, your computer writes the XML code on your behalf. To see what I mean, keep reading.
Using JavaFX and Scene Builder
GUI programs have two interesting characteristics:
GUI programs typically contain lots of code.
Much of this code differs little from one GUI program to another.
GUI programs involve visual elements.
The best way to describe visual elements is to “draw” them. Describing them with code can be slow and unintuitive.
To make your GUI life easier, you can use JavaFX and Scene Builder. With Scene Builder, you describe your program visually. Scene Builder automatically turns your visual description into Java source code and XML code.
Installing Scene Builder
Installing Scene Builder is like installing most software. Here’s how you do it:
- Visit
http://gluonhq.com/products/scene-builder. Click the Download button.
When you do, a list of download options appears.
Click the button corresponding to your computer’s operating system (Windows, Mac, or Linux).
As a result, the download begins. On a Windows computer, you get an
.exefile. Double-click the file to begin the installation.On a Mac, you get a
.dmgfile. Depending on your Mac web browser’s setting, the browser may or may not expand the.dmgfile automatically. If not, double-click the.dmgfile to begin the installation.Follow the installation routine’s instructions.
On a Windows computer, you accept a bunch of defaults.
On a Mac, you drag the Scene Builder’s icon to the
Applicationsfolder.
That’s it! You’ve installed Scene Builder.
Installing e(fx)clipse
Eclipse has its own, elaborate facility for incorporating new functionality. An Eclipse tool is called an Eclipse plug-in. When you first install Eclipse, you get many plug-ins by default. Then, to enhance Eclipse’s power, you can install many additional plug-ins.
Eclipse’s e(fx)clipse plug-in facilitates the creation of JavaFX applications. You can add the plug-in to your existing installation of Eclipse, but it’s much simpler to download a new copy of Eclipse (a copy with e(fx)clipse already installed). Here’s how you get the new copy of Eclipse:
- Visit
http://efxclipse.bestsolution.at. - Look for the page containing All-in-One downloads.
On the All-in One downloads page, look for a way to download a copy of Eclipse for your operating system.
Your Eclipse download’s word length (32-bit or 64-bit) must match your Java version’s word length. For the full lowdown on 32-bit and 64-bit word lengths, see Chapter 2.- Follow the appropriate links or click the appropriate buttons to begin the download.
Follow the instructions in Chapter 2 to install this new copy of Eclipse on your computer.
Place the new copy of Eclipse in a brand-new folder. That way, you don’t have to uninstall your old copy of Eclipse. (In fact, it’s helpful to have two separate Eclipse installations on your computer.) On my Windows computer, I have a
c:eclipsefolder and ac:eclipseFXfolder. Both folders have their own subfolders with names likeconfiguration,features, andplugins. Both folders have their owneclipse.exefile. Similarly, my Mac has botheclipseande(fx)clipsefolders inside the Applications folder.
 When you launch your new copy of Eclipse, the program prompts you for a place on your hard drive for your workspace (the place on your hard drive where this session’s Eclipse projects live). At this point, you have a choice:
You can have two different folders for two different workspaces — one workspace for your original copy of Eclipse and a second workspace for your new copy of Eclipse.
Doing so keeps your original work (for preceding chapters) separate from this chapter’s work. Also, with two different workspaces, you can run both copies of Eclipse simultaneously.
Alternatively, you can point both versions of Eclipse to the same folder (and thus, to the same workspace).
Doing so keeps all your work in one place. You don’t have to change workspaces in order to change from your original work to this chapter’s work. On the minus side, you can’t run two copies of Eclipse using the same workspace simultaneously.
Don’t fret over the decision you make about Eclipse workspaces. In any copy of Eclipse, you can switch from one workspace to another. You can decide on a particular workspace whenever you launch Eclipse. You can also move from one workspace to another by selecting File ⇒ Switch Workspace on Eclipse’s main menu.
Creating a bare-bones JavaFX project
There’s a wise old saying: “A picture is worth 50 words.” And if you count things like javafx.application.Application as three separate words, the same picture is worth 70 words. In this section, you create a picture from which Eclipse builds a 70-word Java program. Follow these steps:
- Follow the instructions in the previous sections “Installing Scene Builder” and “Installing e(fx)clipse.”
- Launch your new copy of Eclipse and click the Welcome screen’s Workbench icon.
From Eclipse’s menu bar, choose File ⇒ New ⇒ Project.
The New Project dialog box appears.
In the dialog box’s list, expand the JavaFX branch. Within that branch, select JavaFX project and then click Next.
A New Java Project dialog box appears.
In the New Java Project dialog box, type a name for your project.
If you’re following my instructions to the letter, name the project MyFirstJavaFXProject.
Click Finish to close the New Java Project dialog box.
You see the Eclipse workbench with your newly created project in Eclipse’s Package Explorer.
Running your bare-bones JavaFX project
In the previous section, you use e(fx)clipse to create a brand-new JavaFX project. When you run the new project’s code, you see the stuff in Figure 20-8. You see a window with nothing inside it.
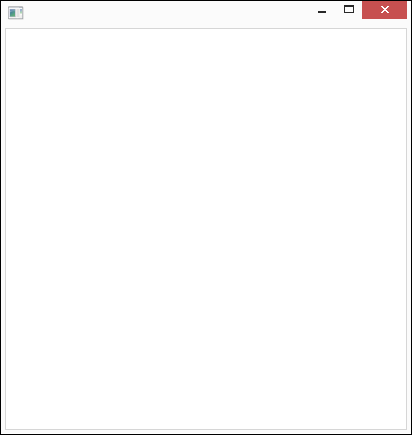
FIGURE 20-8: An empty window.
The fact that this window contains no images, no buttons, no text fields — no nothing — comes from the way e(fx)clipse creates your new project. The e(fx)clipse tool populates the project with a minimum amount of code. That way, the new project is a blank slate — an empty shell to which you add buttons, text fields, or other useful components.
Adding Stuff to Your JavaFX Project
I like empty spaces. When I lived on my own right out of college, my apartment had no pictures on the walls. I didn’t want to stare at the same works of art day after day. I preferred to fill in the plain white spaces with images from my own imagination. So, for me, the empty window in Figure 20-8 is soothing.
But if Figure 20-8 isn’t acquired by New York’s Museum of Modern Art, the window is quite useless. (By the way, I’m still waiting to hear back from the museum’s curator.) When you create a high-powered GUI program, you start by creating a window with buttons and other widgets. Then you add methods to respond to keystrokes, button clicks, and other such things.
The next section contains some code to respond to a user’s button clicks. But in this section, you use an XML file to describe a button and a text field:
Follow the instructions in this chapter’s earlier section “Creating a bare-bones JavaFX project.”
Look in Eclipse’s Package Explorer for the new project you create in that section.
Expand the new project’s branch in Eclipse’s Package Explorer.
Look for the
applicationbranch, which is inside thesrcbranch.Right-click (or on a Mac, Control-click) the
applicationbranch. On the context menu that appears, choose File ⇒ New ⇒ Other.The Select a Wizard dialog box appears.
- In the Select a Wizard dialog box’s tree, expand the JavaFX branch.
In the JavaFX branch, double-click the New FXML Document item.
An FXML File dialog box appears, as shown in Figure 20-9.
In the dialog box’s Name field, type a name for your new file and then click Finish.
If you’re following my instructions faithfully, name the file Root.
In Figure 20-9, you type the name Root, but e(fx)clipse creates a file whose full name isRoot.fxml.This new
Root.fxmlfile describes the layout of the buttons, text fields, and other things in your new JavaFX application. This is the XML document that I make such a fuss about at the start of the earlier section “Code Soup: Mixing XML with Java.”Right-click (or, on a Mac, Control-click) the new
Root.fxmlbranch in Eclipse’s Package Explorer. On the context menu that appears, select Open with SceneBuilder.The Scene Builder application window appears. (See Figure 20-10.)
The Scene Builder window contains several areas:
- The middle of the Scene Builder window contains the Content panel, where you see a preview your new app. (Currently, there’s nothing in your app to see, so the Content panel is a big, empty space.)
The upper-left portion of the window contains the Library panel, which houses a Containers section, a Controls section, and several other sections.
In the GUI world, things like buttons, text fields, labels, and check boxes are called controls. The Library panel’s Controls section forms a palette. To create a GUI window, you drag controls from the palette and drop them onto the Content panel.
The lower-left portion of the window contains the Document panel, which contains a Hierarchy section and a Controller section. The Hierarchy section contains an AnchorPane item.
The Hierarchy section contains a tree showing which elements of your window are inside which other elements. The Controller section helps you link the window that you design with the application’s Java code.
The rightmost portion of the window contains the Inspector panel, which contains a Properties section, a Layout section, and a Code section.
In the Properties section, you describe the features of the elements in your window. In the Code section, you name the Java methods associated with elements in your window.
Your mileage may vary! These instructions work on Scene Builder 8.3.0. If you have a different version of Scene Builder, your steps might be a bit different.Double-click the AnchorPane item in the Hierarchy section.
A marker appears in the middle of the Scene Builder’s Content panel.
- (Optional) Drag the marker in the Content panel to enlarge the AnchorPane. (See Figure 20-11.)
- Find the
TextFieldentry in the Controls section of the Library panel; then drag aTextFieldcontrol into the AnchorPane in the Content panel. - Find the
Buttonentry in the Controls section of the Library panel. Drag aButtoncontrol into the AnchorPane in the Content panel. (See Figure 20-12 for a peek at both theTextFieldcontrol and theButtoncontrol.) On the main menu, select File ⇒ Save.
Doing so saves your new FXML file.
Close the Scene Builder application.
When you return to the Eclipse workbench, you can see the new code in your
Root.fxmlfile. (See Figure 20-13.) Double-click the Root.fxmlbranch in the Package Explorer to see the file’s code. If you don’t see the wordsTextFieldandButtonin the code, click the mouse inside the editor window. (Clicking the mouse updates the editor to reflect the changes made by Scene Builder.) If the code in the editor doesn’t seem to be indented properly, click the mouse on a blank area in the editor and press Ctrl+Shift+F (on Windows) or ⌘ -Shift-F (on a Mac). Any time you want to format the code in Eclipse’s editor (making the code easier to read and easier to understand), press Ctrl+Shift+F or ⌘ -Shift-F.Edit the project’s
Main.javafile.Comment out the
BorderPane rootstatement and add aParent rootstatement, as shown in boldface type in Listing 20-3.The edits in Listing 20-3 connect the application to your newly designed
Root.fxmllayout.Run the project.
When you do, you see the window in Figure 20-14.

FIGURE 20-9: The FXML File dialog box.

FIGURE 20-10: Scene Builder starts running.

FIGURE 20-11: Enlarging the AnchorPane.

FIGURE 20-12: A TextField and a Button.

FIGURE 20-13: The newly coded Root.fxml file.

FIGURE 20-14: A run of your project using the Root.fxml file.
LISTING 20-3 How to Edit the Main.java File
package application;

import javafx.application.Application;
import javafx.fxml.FXMLLoader;
import javafx.scene.Parent;
import javafx.scene.Scene;
import javafx.stage.Stage;
//import javafx.scene.layout.BorderPane;

public class Main extends Application {
  @Override
  public void start(Stage primaryStage) {
    try {
      // BorderPane root = new BorderPane();
      Parent root = FXMLLoader.load(getClass().getResource("Root.fxml"));
      Scene scene = new Scene(root, 400, 400);
      scene.getStylesheets().
          add(getClass().getResource("application.css").toExternalForm());
      primaryStage.setScene(scene);
      primaryStage.show();
    } catch (Exception e) {
      e.printStackTrace();
    }
  }

  public static void main(String[] args) {
    launch(args);
  }
}
As you follow this section’s steps, Scene Builder modifies your project’s Java code. Having followed this section’s steps, you can run the project in the usual way (by choosing Run ⇒ Run As ⇒ Java Application). But when the project runs, the application doesn’t do anything. When you click the button, nothing happens. When you type in the text field, nothing happens. What a waste!
In the next section, you get the button and the text field to do something.
Taking Action
The program that you create in this chapter is approximately 50 lines long. But until this point in the chapter, you type only one line of code. In this section’s instructions, you make a button respond to a mouse click. You do this by typing only a few more lines of code!
Follow the instructions in this chapter’s earlier section “Adding Stuff to Your JavaFX Project.”
As a result, you have code that displays a
TextFieldcontrol and aButtoncontrol. It’s time to reopen Scene Builder.Right-click (or on a Mac, Control-click) the
Root.fxmlbranch in Eclipse’s Package Explorer. On the resulting context menu, select Open with SceneBuilder.The Scene Builder application window appears. (Refer to Figure 20-12.)
In the Scene Builder window, select your app’s
Buttoncontrol.You can do this by clicking the
Buttoncontrol’s picture in the Content panel or by clicking the wordButtonin the Hierarchy section of the Document panel.When you select the
Buttoncontrol, the Properties section of the Inspector panel displays some information about theButtoncontrol. Near the top of the section, you see an item labeledText. Whatever you type in the field next to the wordTextis displayed on the face of the button.In the field next to the word
Text, type the word Capitalize and then press Enter.When you do this, the word
Capitalizeappears on the face of theButtoncontrol in the Content panel. (See Figure 20-15.)Remember that the Inspector panel contains three sections: the Properties section, the Layout section, and the Code section. At this point, the Properties section is expanded, and the other two sections are collapsed.
In the Inspector panel, click on the Code section.
Doing so expands the Code section (at the expense of the Properties section).
In the Code section, look for a field that’s labeled On Action. In that field, type onClick and then press Enter. (See Figure 20-16.)
Before typing the word onClick, make sure you see the wordButtonat the top of the Code section. If you see another word (such asTextFieldorAnchorPane), you’re about to change the wrong component’s On Action field.So much for your
Buttoncontrol! Now, you work with yourTextFieldcontrol.- Select your
TextFieldcontrol (either in the Content panel or in the Hierarchy section of the Document panel). In the Code section, look for a field that’s labeled
fx:id. In that field, type textField and then press Enter. (See Figure 20-17.)Before bidding a fond farewell to Scene Builder, you link the Scene Builder’s work to the Java code:
Click on the Controller section in the Document panel.
Doing so expands the Controller section at the expense of the Hierarchy section.
In the Controller Class field (inside the Controller section), type application.Main (with a dot between the two words), and then press Enter. (See Figure 20-18.)
You have leeway in carrying out some of the other steps in this section. For example, if you type Click Me!instead ofCapitalizein Step 4, the program still runs. But you have very little leeway when you fill in this step’s Controller Class field. By default, the e(fx)clipse tool names your programMain.javaand puts your program in a package namedapplication. So, in the Controller Class field, you have to point to thisapplication.Mainprogram. If you point somewhere else, you have to rename the program or the package or both. And with more than 40 steps to follow in this chapter so far, you probably don’t want to rename things unnecessarily.At last! Your work with Scene Builder is coming to a close.
- On the Scene Builder’s main menu, select File ⇒ Save.
Close the Scene Builder application.
Whew! You’re back to the Eclipse workbench.
Eclipse might not update the Root.fxmlfile’s contents automatically when you close Scene Builder. If you don’t see the wordCapitalizein the code, click the mouse inside the editor window. (Clicking the mouse updates the editor to reflect the changes made by Scene Builder.)In the
Main.javafile, add the boldface code near the start of Listing 20-4 and near the end of Listing 20-4.The edits in Listing 20-4 tell Java to change the text that appears in your TextField control when the user clicks your Button control.
And with that step, you have a real GUI application!
- Run the project.

FIGURE 20-15: Working with the Button control’s properties.

FIGURE 20-16: When a user clicks your Button control, call the code’s onClick method.

FIGURE 20-17: Assigning an id to your TextField control.

FIGURE 20-18: Specifying the FXML file’s controller class.
LISTING 20-4 How to Edit the Main.java File
package application;

import javafx.event.ActionEvent;
import javafx.scene.control.TextField;
import javafx.application.Application;
import javafx.fxml.FXML;
import javafx.fxml.FXMLLoader;
import javafx.scene.Parent;
import javafx.scene.Scene;
import javafx.stage.Stage;
//import javafx.scene.layout.BorderPane;

public class Main extends Application {
  @Override
  public void start(Stage primaryStage) {
    try {
      // BorderPane root = new BorderPane();
      Parent root = FXMLLoader.load(getClass().getResource("Root.fxml"));
      Scene scene = new Scene(root, 400, 400);
      scene.getStylesheets().
          add(getClass().getResource("application.css").toExternalForm());
      primaryStage.setScene(scene);
      primaryStage.show();
    } catch (Exception e) {
      e.printStackTrace();
    }
  }

  public static void main(String[] args) {
    launch(args);
  }

  @FXML
  private TextField textField;

  @FXML
  protected void onClick(ActionEvent event) {
    textField.setText(textField.getText().toUpperCase());
  }
}
When you run this section’s program, you see something like the screen shots in Figures 20-19, 20-20, and 20-21. Et voilà! When you click the button, Java capitalizes your text!
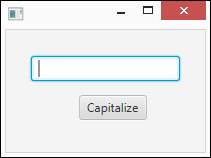
FIGURE 20-19: A brand-new frame.

FIGURE 20-20: The user types in the text box.

FIGURE 20-21: Clicking the button capitalizes the text in the text box.
Tweak the program in this section for some exciting results. (Okay. The results may be uninteresting to some people, but they’re exciting to me!)
COPY TEXT TO A TEXT FIELD
Use e(fx)clipse and Scene Builder to create a frame with a button and two text fields. When the user clicks the button, Java copies text from the first text field to the second text field.
Hint: You can create both text fields with one declaration:
@FXML
private TextField textField, textField2;
COPY BETWEEN TEXT FIELDS
Use e(fx)clipse and Scene Builder to create a frame with two buttons and two text fields. When the user clicks the first button, Java copies text from the first text field to the second text field. When the user clicks the second button, Java copies text from the second text field to the first text field.
COPY TEXT TO A LABEL
In JavaFX, a label is similar to a text field. Like a text field, a label may display text. In fact, a Label control has a setText method, like the setText method used in Listing 20-4.
But a label looks different. A label’s appearance doesn’t invite the user to change the label’s text. A label looks like text that’s been planted permanently on the frame. Of course, the text isn’t permanent, because your code can change a label’s text.
Use e(fx)clipse and Scene Builder to create a frame with a button, a text field, and a label. When the user clicks the button, Java copies text from the text field to the label.
Hint: When you declare more than one type of control, each declaration requires its own @FXML annotation.
  @FXML
  private TextField textField;
  @FXML
  private Label label;
CREATE A SMALL CALCULATOR
Use e(fx)clipse and Scene Builder to create a frame with two text fields, a button, and a label. The user types a number in one of the text fields and another number in the other text field. When the user clicks the button, Java displays the sum of the two numbers in the label.
Hint: Whatever Java gets from a text field’s getText method has String type. When you put a plus sign between two String values, Java simply pastes the values together — for example, "42" + "98" is "4298". Before you can add these values together, you have to convert them to numbers. You do this with Java’s Integer.parseInt method. (Refer to Chapter 18.)
When you call a label’s setText method, the call’s parameter must have the String type. To get a String value from an int value, use the Integer.toString method — for example, Integer.toString(86) is "86".