
Chapter 2
Setting Up Your Computer
IN THIS CHAPTER
![]() Installing Java
Installing Java
![]() Downloading and installing the Eclipse integrated development environment
Downloading and installing the Eclipse integrated development environment
![]() Checking your Eclipse configuration
Checking your Eclipse configuration
![]() Getting the code in this book’s examples
Getting the code in this book’s examples
This chapter goes into much more detail than you normally need. If you’re like most readers, you’ll follow the steps in the “If You Don’t Like Reading Instructions …” section. Then you’ll jump to the “Importing This Book’s Sample Programs” section, near the end of this chapter. With about 20 percent of this chapter’s contents, you’ll have 100 percent of the required software.
Of course, there are always glitches. One person has an older computer. Another person has some conflicting software. Joe has a PC and Jane has a Mac. Joe’s PC runs Windows 10 but Janis runs Windows 8. Joe misreads one of my instructions and, as a result, nothing on his screen matches the steps that I describe. Eighty percent of this chapter describes the things you do in those rare situations in which you must diagnose a problem.
If you find yourself in a real jam, there’s always an alternative. You can send an email to me at [email protected]. You can also find me on Facebook at /allmycode or on Twitter at @allmycode. I’m happy to answer questions and help you figure out what’s wrong.
So, by all means, skip anything in this chapter that you don’t need to read. You won’t break anything by following your instincts. And if you do break anything, there’s always a way to fix it.
If You Don’t Like Reading Instructions …
To start writing Java programs, you need the software that I describe in Chapter 1: a Java compiler and a Java Virtual Machine (JVM, for short). You can also use a good integrated development environment (IDE) and some sample code to get you started.
All the software you need for writing Java programs is free. The software comes as three downloads: one from this book’s website, another from Oracle, and a third from eclipse.org.
Here’s how you get the software for creating Java programs:
- Visit
www.allmycode.com/BeginProgand download a file containing all program examples in this book. Visit
www.oracle.com/technetwork/java/javase/downloadsand get the latest available version of the JDK.At the top of the page, you might see links and buttons for Java 8. That’s okay, but to get the most from this book’s content, I recommend Java 9. With Java 9, you can run JShell, a new interactive environment for testing Java features. If Oracle’s web page highlights Java 8, scroll down to find an early access preview of Java 9. Follow the links and buttons to get the cutting edge technology.
Choose a version of the software that matches your operating system (Windows, Macintosh, or whatever). If you have trouble choosing between the JRE and the JDK, pick the JDK.
If you run Windows and you have trouble choosing between 32-bit software and 64-bit software, flip a coin and make a note of your choice. (If you make the wrong choice, you’ll get an error message when you try to install Java or when you try to launch the Eclipse IDE.)
 Most people who have trouble with this chapter’s instructions have installed either 32-bit Java with 64-bit Eclipse or 64-bit Java with 32-bit Eclipse. If you experience pain when you get to Step 6, download and install alternative versions of Java or Eclipse.
Find the icon representing the Java software that you downloaded in Step 2. Double-click the icon to begin installing Java.
 If you’re in a hurry (and who isn’t?), you may benefit from a quick visit to
 http://java.com. Thehttp://java.comwebsite offers a hassle-free, 1-click Java installer. (Simply click the big Java Download button. You can’t miss it.) The Java Download button doesn’t work on all computers. But if it works for you, with a wave of a virtual magic wand, you’re finished with this step. You can bypass the complexities of thejava.oracle.comwebsite and move immediately to Step 4.Visit
http://eclipse.org/downloadsand get the Eclipse IDE.Most of the time, Eclipse’s website automatically checks your computer’s operating system and offers you a download that’s optimized for your system. But if the website gives a choice, select Eclipse IDE for Java Developers.
The resulting download is either an executable installer file (with the
.exeextension) or a compressed archive file (with the.zipor.tar.gzextension).If you downloaded an
.exefile in Step 4, double-click this file’s icon to begin the installation of Eclipse.If you downloaded a
.zipfile or a.tar.gzfile in Step 4, extract the contents of this compressed archive.If you have a compressed archive, you see a folder named
eclipseorEclipse.appwhen you uncompress it. Copy this folder to a handy place on your computer’s hard drive. For example, on my Windows computer, I end up with aC:eclipsefolder. On my Mac, I end up with anEclipseorEclipse.appicon inside myApplicationsfolder. In Windows, the blank space in the name
 Program Filesconfuses some Java software. I don’t think any of this book’s software presents such a problem, but I can’t guarantee it. If you want, extract Eclipse to yourC:Program FilesorC:Program Files (x86)folder. But make a mental note about your choice (in case you run into any trouble later).Launch Eclipse and click the Welcome screen’s Workbench icon.
Initially, the Welcome screen’s icons may have no text labels. But when you hover over an icon, a tooltip appears. Select the icon whose tooltip has the title Workbench.
- In Eclipse, import the code that you downloaded in Step 1.
For details about any of this stuff, see the next several sections.
Getting This Book’s Sample Programs
To get copies of this book’s sample programs, visit http://allmycode.com/BeginProg and click the link to download the programs in this book. Save the download file (BeginProgJavaDummies5.zip) to your computer’s hard drive.
In some cases, you click a download link but your web browser doesn’t offer you the option to save a file. If this happens to you, right-click the link (or Control-click on a Mac). On the resulting context menu, select Save Target As, Save Link As, Download Linked File As, or a similarly labeled menu item.
Most web browsers save files to a Downloads directory on your computer’s hard drive. But your browser may be configured a bit differently. One way or another, make note of the folder containing the downloaded BeginProgJavaDummies5.zip file.
Setting Up Java
You can get the latest, greatest versions of Java by visiting www.oracle.com/technetwork/java/javase/downloads. Look for the newest available version of the JDK. Select a version that runs on your computer’s operating system.
Figure 2-1 shows me clicking a Download JDK button (circa March 2014) at the Oracle website. When you visit the site, the page on your computer screen probably looks a lot like Figure 2-1, but you might see Java SE 9 instead of Java SE 8.
- If you see Java 9, go for it.
If you see Java 8 instead of Java 9, scroll down to find an early access Java 9 preview.
With plain, old Java 8, you can run all the programs in this book. But if you have Java 9, you can use JShell — a tool for experimenting quickly and easily with snippets of Java’s code.

FIGURE 2-1: Getting the Java JDK.
The Oracle and Eclipse websites that I describe in this chapter are always changing. The software that you download from these sites changes, too. A specific instruction such as “click the button in the upper-right corner” becomes obsolete (and even misleading) in no time at all. So in this chapter, I provide long lists of steps, but I also describe the ideas behind the steps. Browse each of the suggested sites and look for ways to get the software that I describe. When a website offers you several options, check the instructions in this chapter for hints on choosing the best option. If your computer’s Eclipse window doesn’t look quite like the window in this chapter’s figures, scan your computer’s window for whatever options I describe. If, after all that, you can’t find what you’re looking for, check this book’s website (www.allmycode.com/BeginProg) or send an email to me at [email protected].
If you can’t identify the most appropriate Java version or if you want to know what the acronyms JRE and JDK stand for, see the later sidebar entitled “Eenie, meenie, miney mo.”
Downloading and installing Java
After you accept a license agreement and click a link to a Java installation file, your computer does one of two things:
- Downloads and installs Java on your system
- Downloads the Java installation file and saves the file on your computer’s hard drive
If the installation begins on its own, follow the instructions, answer Yes to any prompts, and (unless you have good reason to do otherwise) accept the defaults. If the installation doesn’t begin on its own, start the installation by double-clicking the downloaded installation file.
If your computer runs Linux, the downloaded file might be a .tar.gz file. A .tar.gz file is a compressed archive. Extract the archive’s contents to a folder of your choice and follow the installation instructions posted on the Oracle website.
For more information about filenames, file types, and archives, see the earlier sidebars entitled “Those pesky filename extensions” and “Compressed archive files” in this chapter.
 While you’re visiting
 www.oracle.com/technetwork/java/javase/downloads, you can also download a copy of the Java API documentation. Look for a download labeled Java SE Documentation (or something like that). Accept the license agreement, click the download link, and watch the file flow downward onto your computer’s hard drive. The downloaded file is a compressed .zip archive, so you can uncompress it the way you uncompress all other such archives. (The uncompressed folder is a bunch of web pages. To start reading the Java API documentation, look in that folder for an index file or an index.html file. Double-click the file, and you’re on your way.)
For an introduction to the Java API documentation, refer to Chapter 1.
Most people have no difficulties visiting the Oracle website java.oracle.com and installing Java using the website’s menus. But if your situation is more “interesting” than most, you may have to make some decisions and perform some extra steps. The next few sections describe some of these “interesting” scenarios.
If you want to find Java on your computer …
Chapter 1 describes the Java ecosystem with its compiler, its virtual machine, and its other parts. Your computer may already have some of these Java gizmos. If so, you can either live with what you already have or add the newest version of Java to whatever is already on your system. If you need help deciding what to do, refer to the sidebar entitled “Eenie, meenie, miney mo.”
Java’s versions aren’t like indoor cats — they can coexist on the same computer without fighting or hissing at one another. If you have more than one version of Java on your computer, you’re okay. You can even mix 32-bit versions and 64-bit versions on the same computer (as long as you have at least one Java version whose word length matches your Eclipse version). I have three versions of Java on my Windows 10 computer, and I never run into trouble. (Occasionally, I cause my own trouble by confusing one version of Java for another. But this chapter’s later section “Configuring Java in Eclipse” helps me sort things out. What would I do without this book by my side?)
To find out what you already have and possibly avoid reinstalling Java, keep reading.
On Windows 10
In the taskbar’s Search box, type Programs and Features. In the list of choices that appears, choose Programs and Features. A list of installed programs appears. In that list, look for items labeled Java. (See Figure 2-2.)

FIGURE 2-2: The Programs and Features dialog box on Windows.
On Windows 8
On the Start screen, hold down the Windows key while pressing Q. In the resulting search box, type Programs and Features and then press Enter. A list of installed programs appears. In that list, look for items labeled Java. (Refer to Figure 2-2.)
On Windows 7
Select Start ⇒ Control Panel ⇒ Programs ⇒ Programs and Features. A list of installed programs appears. In that list, look for items labeled Java. (Refer to Figure 2-2.)
On a Mac
A Macintosh computer can support two different flavors of Java: a flavor developed in-house at Apple, Inc., and another flavor developed under Oracle’s auspices. Certain commands and procedures apply to one flavor of Java but not to the other. For example, to find Apple’s version of Java, you look in the /System/Library/Java/Java Virtual Machines directory or the /System/Library/Frameworks/JavaVM.framework/Versions directory. But to find Oracle’s Java, you look in the /Library/Java/JavaVirtualMachines directory. You might also find Oracle’s Java in the /Library/Internet Plug-Ins/JavaAppletPlugin.plugin/Contents/Home
Tiger, Leopard, and Snow Leopard (OS X 10.4, OS X 10.5, and OS X 10.6) have Java preinstalled. Java isn’t preinstalled on later Mac operating systems. On these later systems, the computer prompts you to install either Apple’s Java or Oracle’s Java the first time you launch an application that requires Java. (For example, later in this chapter, you install Eclipse. When you first try to launch Eclipse, if you haven’t already installed Java, your computer advises you to do so.)
Table 2-1 describes the correlations between Mac OS and Java versions.
TABLE 2-1 Mac OS X Versions and Java Versions
If You Have This Mac OS X Version … | Then You Have This Version of Java … | And You Can Install This Java Version |
OS X 10.4.11 (Tiger) OS X 10.5.8 (Leopard) PowerPC and/or 32-bit | Apple’s Java 5.0 | Apple’s Java 5.0 |
OS X 10.5.8 (Leopard) Intel-based and 64-bit OS X 10.6.8 (Snow Leopard) | Apple’s Java 6 | Apple’s Java 6 |
OS X 10.7.5 (Lion) OS X 10.8.5 (Mountain Lion) OS X 10.9 (Mavericks) OS X 10.10 (Yosemite) OS X 10.11 (El Capitan) macOS 10.12 (Sierra) | (no Java) | Apple’s Java 6 Oracle’s Java 9 |
To find out which version of OS X you’re running, do the following:
- Choose Apple ⇒ About This Mac.
In the About This Mac dialog that appears, look for the word Version.
You see Version 10.12.4 (or something like that) in faint gray text.
The information in Table 2-1 applies to updated versions of Mac OS X. If you don’t regularly apply software updates, you may be running OS X 10.8.1 instead of 10.8.5. If so, select Software Update in the Apple menu and follow the resulting prompts.
Here and there on the web, I see postings describing ways to install Java 5.0 on OS X 10.3 and other ways to circumvent the restrictions in Table 2-1. But if you don’t like to tinker, these workarounds aren’t for you. (For every hardware or software requirement, someone tries to create a workaround, or hack. Anyway, apply hacks at your own risk.)
If you don’t trust Table 2-1 (and frankly, you shouldn’t trust everything you find in print), you can perform tests on your computer to discover the presence of Java and (if your Mac has Java) the Java version number. Here are some tests:
WITH OS X 10.6 OR EARLIER
- In the Spotlight’s search field, type Java Preferences.
When the Spotlight’s top hit is Java Preferences, press Enter.
The Java Preferences window appears. (See Figure 2-3.)
The Java Preferences window lists versions of Java that are installed on your computer.
In Figure 2-3, the computer has four versions of Java: the 32-bit (i386) versions of Java 6 and Java 7 and the 64-bit (x86_64) versions of Java 6 and Java 7.

FIGURE 2-3: The Java Preferences application.
WITH OS X 10.7 OR LATER
- On the Apple menu, select System Preferences.
In the System Preferences application window, click the Java icon.
The Java Control Panel appears. It looks like the panel in Figure 2-4 or the one in Figure 2-5.
If your Java Control Panel looks like the panel in Figure 2-4, you see your computer’s Java version on the panel’s General tab.
According to the panel shown in Figure 2-4, my computer has an early access (ea) version of Java 9. You can skip the rest of these steps.
- If your Java Control Panel looks like the panel in Figure 2-5, select the panel’s Java tab. (See Figure 2-6.)
On the Java tab, click View.
The Java Runtime Environment Settings window appears. (See Figure 2-7.)
Look for versions of Java on the User tab and the System tab of the Java Runtime Environment Settings window.
Figure 2-7 shows the User tab of the Java Runtime Environment Settings window. According to the figure, the computer runs Java 1.8. (Java’s close friends call this version “Java 8.”)

FIGURE 2-4: Your Java Control Panel might look like this.
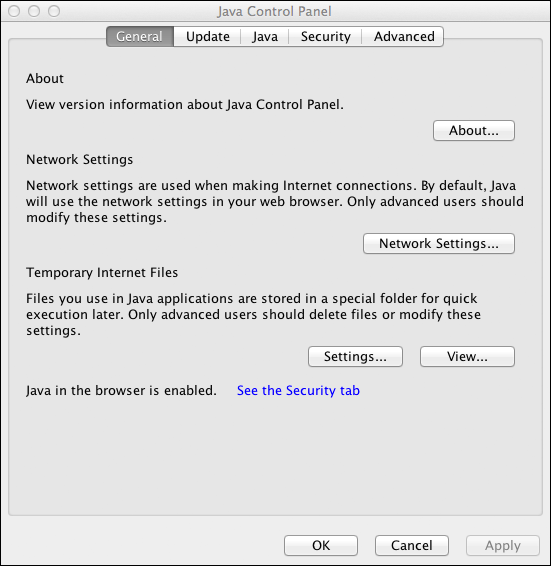
FIGURE 2-5: Another incarnation of the Java Control Panel.

FIGURE 2-6: The Java tab in the Java Control Panel.

FIGURE 2-7: The User tab in the Java Runtime Environment Settings window.
On Linux
To check your Java installation (or your lack of Java) on a Linux computer, do the following:
Poke around among the desktop’s menus for something named Terminal (also known as Konsole).
A Terminal window opens (usually, with plain white text on a plain black background).
In the Terminal window, type the following text and then press Enter: java -version.
On one of my Linux computers, the Terminal window responds with the following text:
java version 1.8.0_111On another Linux computer, I see this:
java version 9Between Java 8 and Java 9, Oracle changed its version numbering system. So version 9 comes immediately after the 1.8.0 versions. Anyway, if your computer responds with the number 9 or higher, you can pop open the champagne and look forward to some good times running this book’s examples. If the version number is 1.5 or greater, you can run many, but not all, of this book’s examples. If your computer responds with something like
command not found, most likely, Java isn’t installed on your computer.
Setting Up the Eclipse Integrated Development Environment
In the previous sections, you get all the tools your computer needs for processing Java programs. This section is different. In this section, you get the tool that you need for composing and testing your Java programs. You get Eclipse — an integrated development environment for Java.
An integrated development environment (IDE) is a program that provides tools to help you create software easily and efficiently. You can create Java programs without an IDE, but the time and effort you save using an IDE makes the IDE worthwhile. (Some hard-core programmers disagree with me, but that’s another matter.)
According to the Eclipse Foundation’s website, Eclipse is “a universal tool platform — an open extensible IDE for anything and nothing in particular.” Indeed, Eclipse is versatile. Programmers generally think of Eclipse as an IDE for developing Java programs, but Eclipse has tools for programming in C++, PHP, and many other languages.
I’ve even seen incarnations of Eclipse that have nothing to do with program development. For example, Dynatrace has an application that monitors the performance of large systems. When you run Dynatrace’s application on a desktop computer, you’re running a dressed-up version of Eclipse.
Downloading Eclipse
Here’s how you download Eclipse:
Visit
www.eclipse.org.Today, I visit
www.eclipse.organd see a big button displaying the word Download. (See Figure 2-8.) Tomorrow, who knows what I’ll see on this ever-changing website!One way or another, you probably see a Download button of some kind.
Click the Download button.
After clicking the Download button, you might find a few download options. (See Figure 2-9.)
A new version of Eclipse appears every year in June, and the version names are ordered alphabetically. In June 2016, the name is Neon. In June 2017, it’s Oxygen. In June 2018, it’s Photon. Get it? The names begin with N, and then O, and then P. (In Figure 2-9, don’t let the O in Orion fool you. That’s a different piece of software.)
Click the button to download the current Eclipse version.
In May 2017, I clicked the DOWNLOAD 64 BIT button in Figure 2-9. As a result, Eclipse’s website showed me yet another button. This other button offered me a copy of Eclipse from one of many servers around the world.
Click the appropriate button and follow the appropriate links to get the download to begin.
The links you follow depend on which of Eclipse’s many mirror sites is offering up your download. Just wade through the possibilities and get the download going.

FIGURE 2-8: The home page for eclipse.org.

FIGURE 2-9: In May 2017, I download Eclipse Neon.
Notice the Download Packages link in Figure 2-9. If you click that link, you can download a copy of Eclipse with certain features added. For example, the Eclipse IDE for Java EE Developers package includes heavyweight features for industrial-strength development. The Eclipse IDE for JavaScript and Web Developers package has features to help people create web pages.
If you land on a page that offers various packages, look for a package named Eclipse IDE for Java Developers (not Java EE Developers).
Eclipse’s download page directs you to versions of Eclipse that are specific to your computer’s operating system. For example, if you visit the page on a Windows computer, the page shows you downloads for Windows only. If you’re downloading Eclipse for use on another computer, you may want to override the automatic choice of operating system. Look for a little drop-down list containing the name of your computer’s operating system. You can change the selected operating system on that drop-down list.
 If you know which Java version you have (32-bit or 64-bit), be sure to download the corresponding Eclipse version. If you don’t know which Java version you have, download the 64-bit version of Eclipse and try to launch it. If you can launch 64-bit Eclipse, you’re okay. But if you get a
 No Java virtual machine was found error message, try downloading and launching the 32-bit version of Eclipse. For the full lowdown on 32-bit and 64-bit word lengths, see this chapter’s earlier sidebar “How many bits does your computer have?”
Installing Eclipse
Precisely how you install Eclipse depends on your operating system and on what kind of file you get when you download Eclipse. Here’s a brief summary:
If you run Windows and the download is an
.exefile:Double-click the
.exefile’s icon.If you run Windows and the download is a
.zipfile:Extract the file’s contents to the directory of your choice.
In other words, find the
.zipfile’s icon in File Explorer (also known as Windows Explorer). Then double-click the.zipfile’s icon. (As a result, Explorer displays the contents of the.zipfile, which consists of only one folder — a folder namedeclipse.) Drag theeclipsefolder to a convenient place on your computer’s hard drive.For more information about
.zipfiles, see the “Compressed archive files” sidebar, earlier in this chapter.My favorite place to drag the
eclipsefolder is directly onto theC:drive. So myC:drive has folders namedProgram Files,Windows,eclipse, and others. I avoid making theeclipsefolder be a subfolder ofProgram Filesbecause from time to time, I’ve had problems dealing with the blank space in the nameProgram Files.If you run Mac OS X:
When you download Eclipse, you get either a
.tar.gzfile or a.dmgfile.A
.tar.gzfile is a compressed archive file. When you download the file, your web browser might automatically do some uncompressing for you. If so, you won’t find a.tar.gzfile in yourDownloadsfolder. Instead, you’ll find either a.tarfile (because your web browser uncompressed the.gzpart) or aneclipsefolder (because your web browser uncompressed both the.tarand.gzparts).If you find a new
.tarfile or.tar.gzfile in yourDownloadsfolder, double-click the file until you see theeclipsefolder. Drag this neweclipsefolder to yourApplicationsfolder, and you’re all set.- If you download a
.dmgfile, your web browser may open the file for you. If not, find the.dmgfile in your Downloads folder and double-click the file. Follow any instructions that appear after this double-click. If you’re expected to drag Eclipse into yourApplicationsfolder, do so.
If you run Linux:
You may get a
.tar.gzfile, but there’s a chance you’ll get a self-extracting.binfile. Extract the.tar.gzfile to your favorite directory or execute the self-extracting.binfile.
Running Eclipse for the first time
The first time you launch Eclipse, you perform a few extra steps. To get Eclipse running, do the following:
Launch Eclipse.
In Windows, the Start menu may not have an Eclipse icon. In that case, look in File Explorer (aka Windows Explorer) for the folder containing your extracted Eclipse files. Double-click the icon representing the
eclipse.exefile. (If you see aneclipsefile but not aneclipse.exefile, check this chapter’s earlier sidebar “Those pesky filename extensions.”)On a Mac, go to the Spotlight and type Eclipse in the search field. When Eclipse appears as the top hit on the Spotlight’s list, press Enter.
The first time you try to run Eclipse on a Mac, you might get a message telling you that Eclipse isn’t from the App Store and isn’t from an identified developer. Nothing in this world is 100 percent safe, but I’ve downloaded and installed Eclipse a zillion times, and I’ve never had a problem with it. So, to get around this stumbling block, find the Eclipse app entry in your Applicationsfolder (or wherever else you installed Eclipse). Control-click the application entry and, on the resulting context menu, select Open. At this point, a dialog box appears. The dialog box asks whether you’re sure that you want to open the application. You’re sure, so click Open.When you launch Eclipse, you see a Workspace Launcher dialog. (See Figure 2-10.) The dialog asks where, on your computer’s hard drive, you want to store the code that you will create using Eclipse.
In the Workspace Launcher dialog, click OK to accept the default (or don’t accept the default!).
One way or another, it’s no big deal!
Because this is your first time using a particular Eclipse workspace, Eclipse starts with a Welcome screen. (See Figure 2-11.)
On the Welcome screen, look for a button or an icon labeled Workbench.
In Figure 2-11, that button is in the upper-right corner.
Through the ages, many of the Eclipse Welcome screens have displayed icons along with little or no helpful text. If you don’t see the word Workbench anywhere on the Welcome screen, hover the mouse over each icon until you find an icon whose tooltip contains the word Workbench.Click the Workbench icon to open Eclipse’s main screen.
A view of the main screen, after opening Eclipse with a brand-new workspace, is shown in Figure 2-12.

FIGURE 2-10: Eclipse’s Workspace Launcher.

FIGURE 2-11: Eclipse’s Welcome screen.

FIGURE 2-12: The Eclipse workbench with a brand-new workspace.
If you have to configure Java in Eclipse …
Eclipse normally looks on your computer for Java installations and selects an installed version of Java to use for running your Java programs. Your computer may have more than one version of Java, so you may want to double-check Eclipse’s choice of the Java version. The following steps show you how:
On Windows or Linux: On Eclipse’s main menu, select Window ⇒ Preferences. On a Mac: On Eclipse’s main menu, select Eclipse ⇒ Preferences.
As a result, Eclipse’s Preferences dialog appears. (You can follow along with Figure 2-13.)
- In the tree on the left side of the Preferences dialog, expand the
Javabranch. - Within the
Javabranch, select theInstalled JREssubbranch. Look at the list of Java versions (Installed JREs) in the main body of the Preferences dialog.
In the list, each version of Java has a check box. Eclipse uses the version whose box is checked. If the checked version isn’t your preferred version (for example, if the checked version isn’t version 9 or higher), you can make some changes.
- If your preferred version of Java appears on the Installed JREs list, put a check mark in that version’s check box.
If your preferred version of Java doesn’t appear in the Installed JREs list, click the Add button.
When you click the Add button, a JRE Type dialog appears. (See Figure 2-14.)
In the JRE Type dialog, double-click Standard VM.
As a result, a JRE Definition dialog appears. (See Figure 2-15.) What you do next depends on a few different things.
Fill in the dialog’s JRE Home field.
How you do this depends on your operating system.
- On Windows, browse to the directory in which you’ve installed your preferred Java version. On my many Windows computers, that directory is either
C:Program FilesJavajre-9,C:Program FilesJavajdk1.8.0,C:Program Files (x86)Javajre-9, or something of that sort. On a Mac, use the Finder to browse to the directory in which you’ve installed your preferred Java version. Type the name of the directory in the dialog’s JRE Home field.
My Mac has one Java directory named
/System/Library/Java/Java Virtual Machines/1.6.0.jdk/Contents/Homeand another Java directory named/Library/Java/JavaVirtualMachines/jdk-9.jdk/Contents/Home/System/Library/Frameworks/JavaVM.framework/Versionsdirectory, and find Oracle’s Java in the/Library/Internet Plug-Ins/JavaAppletPlugin.plugin/Contents/Home Directories like /Systemand/Librarydon’t normally appear in the Finder window. To browse to one of these directories (to the/Librarydirectory, for example), choose Go ⇒ Go to Folder in the Finder’s menu bar. In the resulting dialog, type/Libraryand then press Go. As you navigate to the directory containing your preferred Java version, you may encounter a JDK 1.8.0.jdkicon or some other item whose extension is.jdk. To see the contents of this item, Control-click the item’s icon and then select Show Package Contents from the menu that appears.- On Linux, browse to the directory in which you’ve installed your preferred Java version. When in doubt, search for a directory whose name starts with
jreorjdk.
You might have one more thing to do back in the JRE Definition dialog.
- On Windows, browse to the directory in which you’ve installed your preferred Java version. On my many Windows computers, that directory is either
- Look at the JRE Definition dialog’s JRE Name field; if Eclipse hasn’t filled in a name automatically, type a name (almost any text) in the JRE Name field.
Dismiss the JRE Definition dialog by clicking Finish.
Eclipse’s Preferences dialog returns to the foreground. The box’s Installed JREs list contains your newly added version of Java.
Put a check mark in the check box next to your newly added version of Java.
You’re almost done. (You have a few more steps to follow.)
Within the
Javabranch on the left side of the Preferences dialog, select theCompilersubbranch.In the main body of the Preferences dialog, you see a Compiler Compliance Level drop-down list.
In the Compiler Compliance Level drop-down list, select a number that matches your preferred Java version.
For Java 8, I select compliance level 1.8. For Java 9, I select compliance level 1.9 or compliance level 9.
Eclipse updates aren’t always in sync with Java updates. If you’re running Java 9 and the Eclipse’s highest compliance level is 1.8, select 1.8. Take my word for it. Everything will be okay.- Whew! Click the Preferences dialog’s OK button to return to the Eclipse workbench.

FIGURE 2-13: Eclipse’s Preferences dialog.

FIGURE 2-14: The JRE Type dialog.

FIGURE 2-15: The JRE Definition dialog.
Importing This Book’s Sample Programs
The import business in Eclipse can be tricky. As you move from one dialog to the next, many of the options have similar names. That’s because Eclipse offers many different ways to import many different kinds of things. Anyway, if you follow these instructions, you’ll be okay.
- Follow the steps in this chapter’s earlier section “Getting This Book’s Sample Programs.”
On Eclipse’s main menu, choose File ⇒ Import. (See Figure 2-16.)
As a result, Eclipse displays an Import dialog.
- In the Import dialog’s tree, expand the
Generalbranch. In the
Generalbranch, double-click theExisting Projects into Workspacesubbranch. (See Figure 2-17)As a result, the Import Projects dialog appears.
Look again at Figure 2-17. In that dialog box, don’t select Archive File or File System. My book’s download isn’t set up for either of these options.In the Import Projects dialog, choose either the Select Root Directory radio button or the Select Archive File radio button. (See Figure 2-18)
Here’s how you decide which radio button to choose:
First, make sure that you’ve heeded the advice that I give in the earlier sidebar entitled “Those pesky filename extensions.” Then look in the folder containing the file that you downloaded from this book’s website.
- If your web browser doesn’t automatically uncompress downloaded
.zipfiles, you’ll find this book’s code in an archive file namedBeginProgJavaDummies5.zip. In that case, choose the Select Archive File radio button. - If your web browser automatically uncompresses downloaded
.zipfiles, you’ll find this book’s code in a directory (a folder) namedBeginProgJavaDummies5. In that case, choose the Select Root Directory radio button.
To ensure that you can distinguish between a folder and a .zipfile, check this chapter’s “Those pesky filename extensions” sidebar.For the complete scoop on
.zipfiles and other archive files, see the sidebar entitled “Compressed archive files.”- If your web browser doesn’t automatically uncompress downloaded
Click the Browse button to find the
BeginProgJavaDummies5.zipfile or theBeginProgDummies5directory on your computer’s hard drive.After you find the file or the directory, Eclipse’s Import Projects dialog displays the names of the projects inside the file. (See Figure 2-19.)
Click the Select All button.
This book’s examples are so exciting that you want to import all of them!
Click the Finish button.
As a result, the main Eclipse workbench reappears. The left side of the workbench displays the names of this book’s Java projects. (See Figure 2-20.)

FIGURE 2-16: Starting to import this book’s code.

FIGURE 2-17: Among all the options, select Existing Projects into Workspace.

FIGURE 2-18: The Import Projects dialog.

FIGURE 2-19: Projects to be imported.

FIGURE 2-20: Eclipse displays a bunch of Java projects.
Now the real fun begins.
What’s Next?
If you’re reading this paragraph, you’ve probably finished installing Java and Eclipse on your computer. In Chapter 3, you start reaping the benefits of your software installation efforts. You use Eclipse to run a brand-new Java program.