
WHAT YOU WILL LEARN IN THIS CHAPTER
How to declare and define outlets
How to declare and define actions
How to connect outlets and actions to the views in your View window
How to add a new View Controller to your application
In the previous chapter, you built a simple Hello World! iPhone application without understanding much of the underlying details of how things work together. In fact, one of the greatest hurdles in learning iPhone programming is the large number of details you need to learn before you can get an application up and running. This book aims to make the iPhone programming experience both fun and bearable. Hence, this chapter starts with the basics of creating an iPhone application. You learn about the various files that make up an iPhone application project, as well as how your code is connected with the graphical widgets you see on an iPhone application.
A View-based Application project is a good starting point for developing a single-view application and provides an excellent opportunity for you to understand some of the important concepts in iPhone programming, so that's what you'll work with in this section. You will need to download the code.
To start, launch Xcode and create a new View-based Application project (see Figure 3-1) and name it BasicUI.
Codefile [BasicUI.zip] available for download at Wrox.com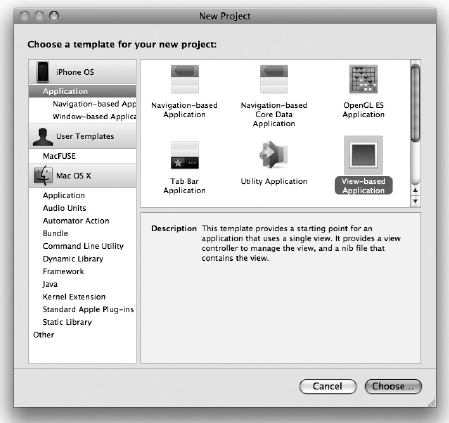
Xcode displays the list of files in the project (see Figure 3-2).
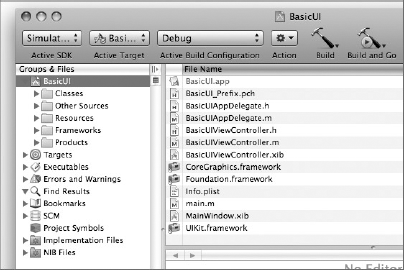
As you can see, many files are created for you by default when you create a new project. The iPhone SDK tries to make your life simple by creating some of the items that you will use most often when you develop an iPhone application. Table 3-1 describes the use of the various files created in the project.
Table 3.1. The Various Files Created in the Project
FILE | DESCRIPTION |
|---|---|
| The application bundle (executable), which contains the executable as well as the data that is bundled with the application. |
| Contains the prefix header for all files in the project. The prefix header is included by default in the other files in the project. |
| Headers file for the application delegate. |
| Implementations file for the application delegate. |
| Headers file for a View Controller. |
| Implementations file for a View Controller. |
| The XIB file containing the UI of a view. |
| C-based APIS for low-level 2D rendering. |
| APIs for foundational system services such as data types, XML, URL, and so on. |
| A dictionary file that contains information about your project, such as icon, application name, and others; information is stored in key/value pairs. |
| The main file that bootstraps your iPhone application. |
| The XIB file for the main window of the application. |
| Provides fundamental objects for constructing and managing your application's UI. |
Note
The numbers and types of files created are dependent on the type of project you have selected. The View - based Application template is a good starting point to understanding the various files involved.
The main.m file contains code that bootstraps your application. It contains the following code, and you rarely need to modify it:
#import <UIKit/UIKit.h>
int main(int argc, char *argv[]) {
NSAutoreleasePool * pool = [[NSAutoreleasePool alloc] init];
int retVal = UIApplicationMain(argc, argv, nil, nil);
[pool release];
return retVal;
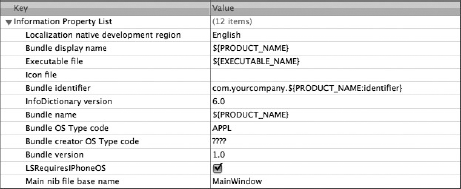
}Most of the hard work is done by the UIApplicationMain() function, which examines the Info.plist file to obtain more information about the project. In particular, it looks at the main nib file you will use for your project. Figure 3-3 shows the content of the Info.plist file. Notice that the Main nib file base name key is pointing to MainWindow, which is the name of the NIB file to load when the application is started.
Double-click the MainWindow.xib file to edit it using Interface Builder. As mentioned, the XIB file represents the UI of your application, and it is used almost exclusively by Interface Builder.
Note
An XIB file is actually an XML file. You can view and edit it using applications such as TextEdit. However, most of the time, you use Interface Builder to visually modify the UI of your applications.
When the MinWindow.xib file is opened by Interface Builder, you see a window with the same title as the name of the file (see Figure 3-4).
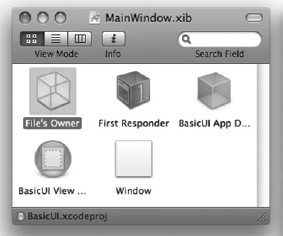
This window contains five items:
The
File's Owneritem represents the object that is set to the owner of the user interface (i.e., the class that is responsible for managing the content of the XIB file).The
First Responderitem represents the object that the user is currently interacting with. Chapter 4 discusses first responder objects in more detail.The
BasicUI App Delegateitem points to theBasicUIAppDelegateclass. (More on this topic shortly.)The
BasicUI View Controlleritem points to a View Controller that you will be using to display your UI.The
Windowitem is the screen that you will see when the application is launched.
The BasicUIAppDelegate.m file contains code that is typically executed after the application has finished loading, or just before it is being terminated. For this example, the content of it is as follows:
#import "BasicUIAppDelegate.h"
#import "BasicUIViewController.h"

@implementation BasicUIAppDelegate

@synthesize window;
@synthesize viewController;

- (void)applicationDidFinishLaunching:(UIApplication *)application {
    // Override point for customization after app launch
    [window addSubview:viewController.view];
    [window makeKeyAndVisible];
}
When the application has finished launching, it sends its delegate the applicationDidFinishLaunching: message. In the preceding case, it uses a View Controller to obtain its view and then adds it to the current window so that it can be displayed.
The BasicUIAppDelegate.h file contains the declaration of the members of the BasicUIAppDelegate class:
#import <UIKit/UIKit.h>

@class BasicUIViewController;

@interface BasicUIAppDelegate : NSObject <UIApplicationDelegate> {
    UIWindow *window;
    BasicUIViewController *viewController;
}

@property (nonatomic, retain) IBOutlet UIWindow *window;
@property (nonatomic, retain) IBOutlet BasicUIViewController *viewController;

@end
Of particular interest is this line:
@interface BasicUIAppDelegate : NSObject <UIApplicationDelegate> {The <UIApplicationDelegate> statement specifies that the class implement the UIApplicationDelegate protocol. Put simply, it means that you can now handle events (or messages) defined in the UIApplicationDelegate protocol. Examples of events in the UIApplicationDelegate protocol are the following:
applicationDidFinishLaunching: (You saw this implemented in theBasicUIAppDelegate.mfile.)applicationWillTerminate:applicationDidDidReceiveMemoryWarning:Note
Protocols are discussed in more detail in Appendix D.
In iPhone programming, you typically use a View Controller to manage a view as well as perform navigation and memory management. In the project template for a View-based Application, Xcode automatically uses a View Controller to help you manage your view. Think of a view as a screen (or window) you see on your iPhone.
Note
This section is an introduction to the basics of View Controllers; Chapter 7 covers more advanced View Controller topics and includes multi-view application instructions.
Earlier in this chapter, you saw that the MainWindow.xib window contains the BasicUI View Controller item. When you double-click it, it shows a window of the same name (see Figure 3-5).
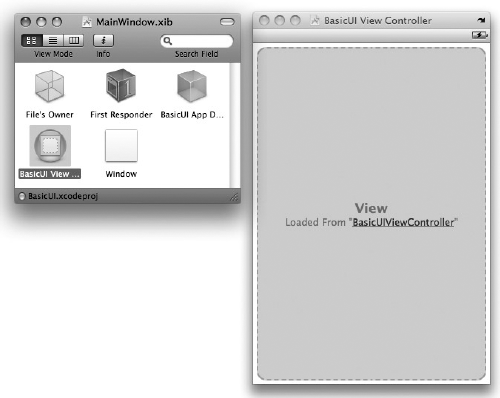
As you can see from the window, the view says that it is loaded from BasicUIViewController. The BasicUIViewController refers to the name of the BasicUIViewController.xib file, which is also within your project.
Now, double-click the BasicUIViewController.xib file to edit it in Interface Builder (see Figure 3-6).
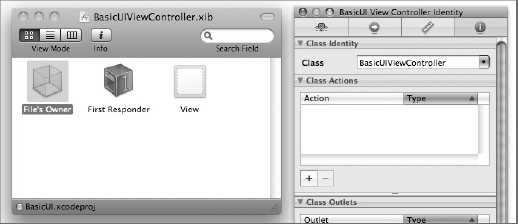
As with the MainWindow.xib file, a few objects are contained inside the BasicUIViewController.xib window. In this case, the window contains three items: File's Owner, First Responder, and View.
You can right-click (or Control-Click) the File's Owner item to view its outlets (see Figure 3-7). For now, note that the view outlet is connected to the View item.
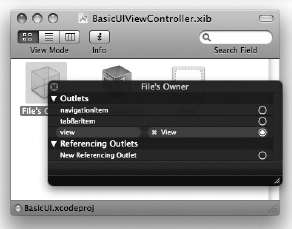
The View item represents the screen that appears on your application. Double-click View to display it (see Figure 3-8).

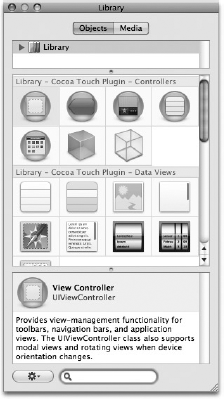
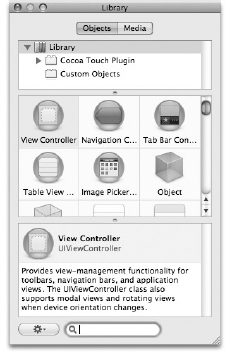
To design your View window, you can drag and drop views from the Library window (choose Tools
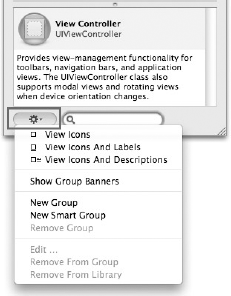
If you are new to iPhone development, you may not know that it is better to display the various views in the Library window as icons and labels. To do so, click the asterisk/star-like icon located at the bottom on the Library window and select View Icons and Labels (see Figure 3-10).
Doing so displays the view names together with the icons (see Figure 3-11).
Populate the View window as shown in Figure 3-12. The following views are used:
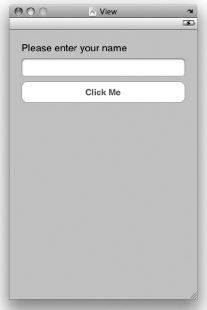
Label
Text Field
Round Rect Button
What your application will do is simple: When the user enters his or her name in the Text field and clicks the Round Rect button, the application displays an alert view showing the user's name.
In order for your application to interact with views on the View window, you need a mechanism to reference your views on the window and at the same time provide methods to be invoked when some events happen on the window. In iPhone programming, these two mechanisms are known as outlets and actions, respectively.
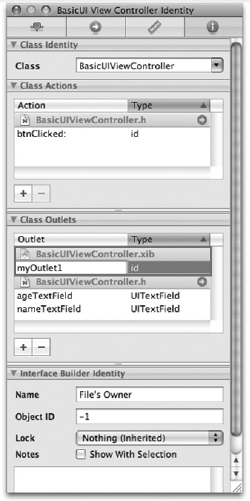
In the BasicUIViewController.xib window (see Figure 3-13), select the File's Owner item and view its Identity Inspector window (choose Tool
An action is a method that can handle events raised by views (for example, when a button is clicked) in the View window. An outlet, on the other hand, allows your code to programmatically reference a view on the View window.
With the File's Owner item selected, choose the File
Note
You can also manually modify the View Controller files (the .h and .m files). But the Interface Builder has this nice little feature that helps you generate code for your outlets and actions.
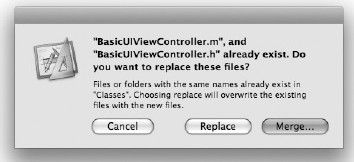
At this juncture, you have two options:
Replace the existing class files in your project. Doing so overwrites all the changes that you might have made to your existing class files.
Merge the newly generated code with the existing class files. I recommend this option because it allows you to selectively choose the statements to insert into your existing class files.
Click the Merge button. You should now see the window as shown in Figure 3-15, displaying the content of BasicViewController.h.
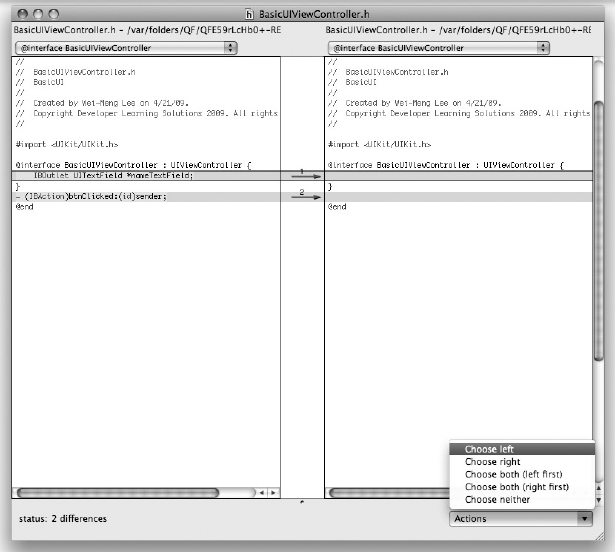
The left of the window shows the code that Interface Builder has generated for you, whereas the right side shows the content of the original file. The gray sections show the code to be inserted. Because you want the two statements to be inserted into the original file, select each section, and at the bottom-right corner of the screen, click the Actions list and select Choose Left. Repeat the same step for the second block of code.
The window should now look like Figure 3-16. Note the direction of the two arrows.

Save the file by pressing Command-S. To close the window, press Command-W.
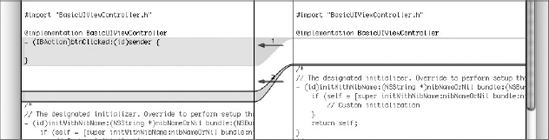
You now see the window for the next file — BasicViewController.m. Repeat the same steps outlined previously (though the second block of code does not seem to include anything; see Figure 3-17). Save and close the window.
Back in Xcode, you see the following in the BasicViewController.h file:
#import <UIKit/UIKit.h>@interface BasicUIViewController : UIViewController {IBOutlet UITextField *nameTextField; }- (IBAction)btnClicked:(id)sender;@end
The IBOutlet identifier is used to prefix variables so that Interface Builder can synchronize the display and connection of outlets with Xcode. The IBAction identifier is used to synchronize action methods.
In the BasicViewController.m file, you see the following statements inserted:
#import "BasicUIViewController.h" @implementation BasicUIViewController- (IBAction)btnClicked:(id)sender {}//...
Now that you know what an outlet is and does, it's time to practice adding outlets in the following Try It Out.
TRY IT OUT: Adding Outlets Using Code
To add outlets or actions to a View Controller, you can either use Interface Builder to add them and then generate the class file, or write the code yourself. To see how this is done, execute the following steps.
Manually add another
IBOutletobject to the class (BasicUIViewController.h), as follows:#import <UIKit/UIKit.h> @interface BasicUIViewController : UIViewController { IBOutlet UITextField *nameTextField;IBOutlet UITextField *ageTextField;} - (IBAction)btnClicked:(id)sender; @endIn this case, you are manually adding an outlet (named
ageTextField) to the View Controller.
Save the file and select the File's Owner item in the BasicUIViewController.xib file. Note its Identity Inspector window — it's the one on the right in Figure 3-18.
Note
Note that the outlets are now listed under BasicUIViewController.h. If you refer to Figure 3-13, you will notice that when you create your outlets using the Identity Inspector window, the outlets are listed under BasicUIViewController.xib. This is because at that time the outlets have not been declared to the .h file yet.
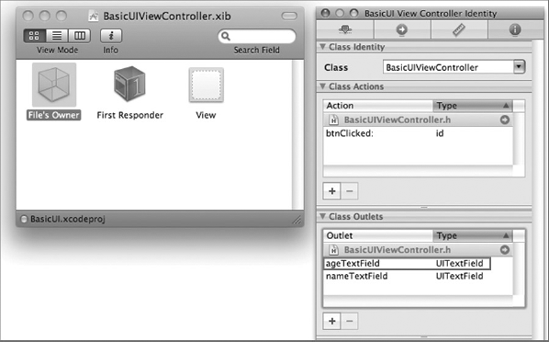
The ageTextField outlet appears in the Class Outlets section, proving that coding directly in the .h file works as well.
Note
If you want to remove any of the outlets listed under BasicUIViewcontroller.h, you have to remove them manually in the .h file. This is evident when you see that the minus (−) button is grayed out.
If, at this point, you add another outlet using the Identity Inspector window, the outlet you added will be listed under BasicUIViewController.xib (see Figure 3-19). After the outlet is declared in the .h file, the outlet then appears under BasicUIViewController.xib.
After actions and outlets are defined in the View Controller, you must have a way to connect them to the views in the View window. To link the events of the views in the View window to the actions defined in the View Controller, you need to Control-click and drag the view to the File's Owner item.
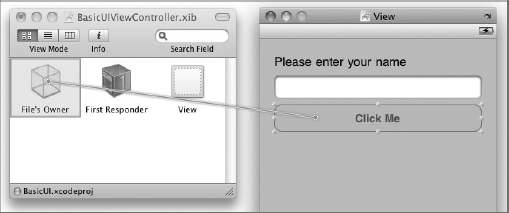
For this example, Control-click and drag the Click Me button and drop it on the File's Owner item. As you drag, notice that an elastic band appears. As your mouse hovers over the File's Owner item, it is highlighted (see Figure 3-20). When you release the mouse button, a pop-up appears. The btnClicked: action is now shown under the Events section.
Warning
Remember that to link actions, you always drag from the view in the View window onto the File's Owner item.
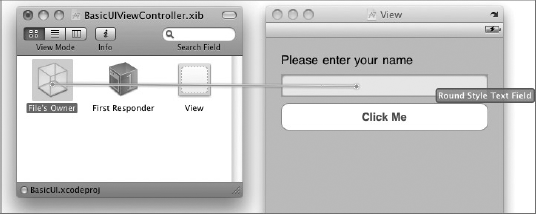
To link the outlets defined in the View Controller onto the views on the View window, Control-click and drag the File's Owner item onto the view you want to connect to (see Figure 3-21). You now see the list of outlets that you have defined in your View Controller under the Outlets group. Select the nameTextField outlet.
Note
The ageTextField outlet is not used in this example and is there for illustration purposes only.
Warning
Remember that to link outlets, you always drag from the File's Owner item onto the required view in the View window. This is the direct opposite of linking actions.
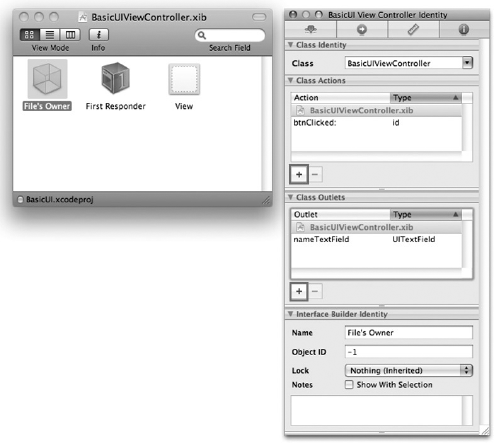
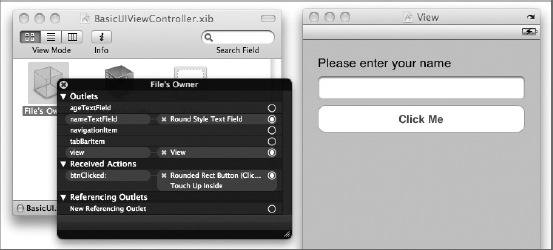
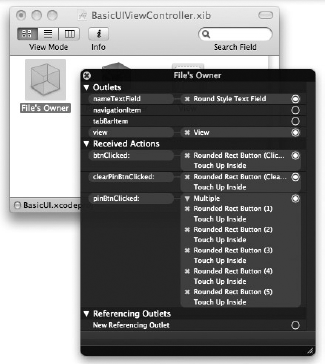
With the actions and outlets connected, you can right-click (or Control-click) the File's Owner item to view its connections (see Figure 3-22). As you can observe, the nameTextField outlet is connected to a Round Style Text Field view, and the btnClicked: action is connected to a Round Rect Button's Touch Up Inside event.
Because pressing the button is such a common activity in iPhone applications, when you connect a button with an action, the Touched Up Inside event of the button is automatically linked with the action. If you want to link some other events with an action defined in the View Controller, right-click the button view and click and drag the event (represented as a circle). Then connect it with the File's Owner item (see Figure 3-23).
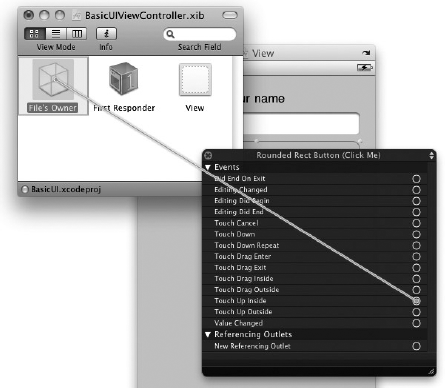
If the action is connected properly, you should see the action listed next to the event name (see Figure 3-24).

Recall that earlier, in the BasicUIViewController.h file, an outlet and an action were generated for you:
#import <UIKit/UIKit.h>

@interface BasicUIViewController : UIViewController {
    IBOutlet UITextField *nameTextField;

}

- (IBAction)btnClicked:(id)sender;

@end
The nameTextField is an IBOutlet instance member of type UITextField. A good practice in iPhone programming is to expose the member variable as a property using the @property identifier:
#import <UIKit/UIKit.h>

@interface BasicUIViewController : UIViewController {
    IBOutlet UITextField *nameTextField;
}

@property (nonatomic, retain) UITextField *nameTextField;

- (IBAction)btnClicked:(id)sender;
@end
Note
The IBOutlet tag can also be added to the @property identifier. This syntax is common in the Apple documentation:
@property (nonatomic, retain) IBOutlet UITextField *nameTextField;
Note
For the use of the nonatomic and retain identifiers, refer to Appendix D, where you can find an introduction to Objective-C. Also, the @synthesize keyword, discussed shortly, is explained in more detail there as well.
When the outlet is now exposed as a property, you need to define the getters and setters for the property. A quick and easy way is to use the @synthesize keyword in the BasicUIViewController.m file, like this:
#import "BasicUIViewController.h"

@implementation BasicUIViewController

@synthesize nameTextField;As shown earlier, you connected the Touch Up Inside event of the Round Rect Button view with the btnClick: action defined in the View Controller. To implement the btnClick: method, code the following in the BasicUIViewController.m file:
#import "BasicUIViewController.h"

@implementation BasicUIViewController

@synthesize nameTextField;
- (IBAction)btnClicked:(id)sender {

   NSString *str = [[NSString alloc]
        initWithFormat:@"Hello, %@", nameTextField.text ];
    UIAlertView *alert=[[UIAlertView alloc]
                        initWithTitle:@"Hello"
                        message: str
                        delegate:self
                        cancelButtonTitle:@"OK"
                        otherButtonTitles:nil, nil];
    [alert show];
    [alert release];
    [str release];
}

- (void)dealloc {
    [nameTextField release];
    [super dealloc];
}

@end
You use the @synthesize identifier to get the compiler to generate the accessor and mutator (also commonly known as getters and setters) for the nameTextField property. The UIAlertView class displays an alert window with the content specified.
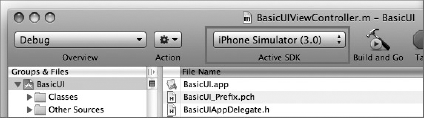
That's it! To test the application, press Command-R in Xcode. If the current active SDK selected is the iPhone Simulator (3.0) (see Figure 3-25), the iPhone Simulator is launched.
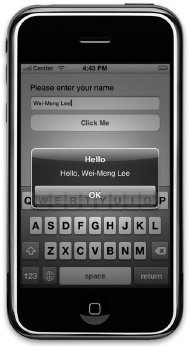
Enter your name and click the Click Me button. Figure 3-26 shows the alert view displaying the name you have entered.
Now that you have seen the detailed walkthrough of how to define outlets and actions and then link them with the View Controller, it is time for a more complex example. Using the same project you created, modify the program so that the user needs to enter a secret PIN before an alert view can be displayed. Figure 3-27 shows the additional views needed to add to the View window.
As shown in Figure 3-27, the additional views are
Label
Round Rect Button
In the BasicUIViewController.h file, add the following object and actions:
#import <UIKit/UIKit.h>

@interface BasicUIViewController : UIViewController {
    IBOutlet UITextField *nameTextField;
    NSMutableString *secretPin;
}

@property (nonatomic, retain) UITextField *nameTextField;

- (IBAction)btnClicked:(id)sender;
- (IBAction)clearPinBtnClicked:(id)sender;
- (IBAction)pinBtnClicked:(id)sender;

@end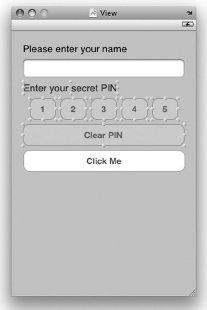
The NSMutableString class represents a mutable string (that is, its content can be changed after it has been initialized). In contrast, the NSString class represents an immutable string (that is, its content cannot be changed after it has been initialized).
In Interface Builder, connect the five Round Rect buttons to the pinBtnClicked: action. This means that one single action will handle the five buttons' TouchUp Inside event. In addition, connect the Clear PIN button to the clearPinBtnClicked: action. The connections for the File's Owner item should now look like those shown in Figure 3-28.
In the BasicUIViewController.m file, provide the following implementations:
#import "BasicUIViewController.h" @implementation BasicUIViewController @synthesize nameTextField;- (IBAction)clearPinBtnClicked:(id)sender {//---clears the secret pin---[secretPin setString:@""];}
- (IBAction)pinBtnClicked:(id)sender {//---append the pin entered to the string---[secretPin appendString:[sender titleForState:UIControlStateNormal]];}- (IBAction)btnClicked:(id)sender {//---if the user has entered the pin correctly---if ([secretPin isEqualToString: @"2345"]) {NSString *str = [[NSString alloc] initWithFormat:@"Hello, %@", nameTextField.text ]; UIAlertView *alert = [[UIAlertView alloc] initWithTitle:@"Hello" message: str delegate:self cancelButtonTitle:@"OK" otherButtonTitles:nil, nil]; [alert show]; [alert release]; [str release];}} - (void)viewDidLoad {//---init the string with an initial capacity of 1---secretPin = [[NSMutableString alloc] initWithCapacity:1];[super viewDidLoad]; } - (void)dealloc {[nameTextField release];[secretPin release]; [super dealloc]; }
In the preceding code, when the View is loaded, you initialize the mutable string secretPin with an initial capacity of one. A mutable string is a string whose content can be edited. In this case, you initialize it by setting its initial length to one. Whenever the user presses the buttons labeled 1 to 5, the pinBtnClicked: method is called. You use the titleForState: method together with the UIControlStateNormal constant to extract the text displayed on the button and then append it to the secretPin string:
[secretPin appendString:[sender titleForState:UIControlStateNormal]];
Warning
The UIControlStateNormal constant represents the normal state of a view (control). Some other possible states are UIControlStateHighlighted (when the view is highlighted) and UIControlStateDisabled (when the view is disabled).
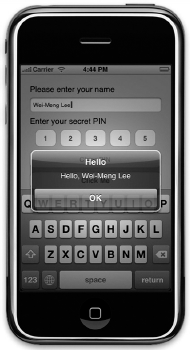
That's it! Press Command-R to debug the application on the iPhone Simulator. The alert view is displayed only after the user has entered the correct pin number (see Figure 3-29).
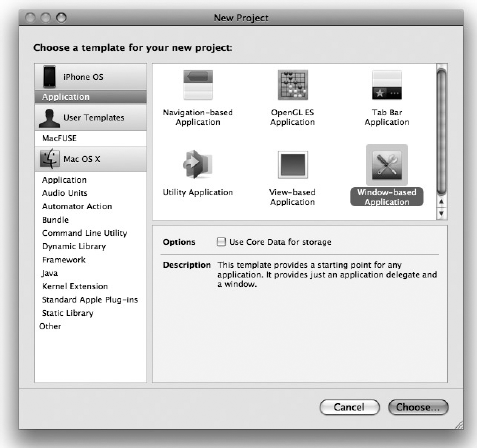
The previous section discusses the View-based Application project, which by default contains a View Controller already configured for your application use. In this section, you learn how to manually add a View Controller to your application and set it to an XIB file. The best way to see this is to create a Window-based Application project. The Window-based Application project template provides a skeleton project containing a delegate and a window. This template provides a starting point for developing any type of iPhone applications.
Let's now create a new Window-based Application project using Xcode (see Figure 3-30).
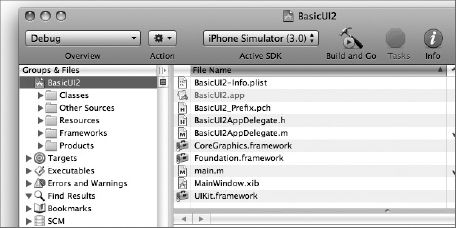
Name the new project as BasicUI2. When the project is created, you see the list of files, as shown in Figure 3-31. The main difference between a View-based application and a Window-based application is that for a Window-based application project, no default View Controller is created for you — the application just creates an application delegate and a main window for you.
To manually add a View Controller class to the project, right-click the project name (BasicUI2) in Xcode and choose Add
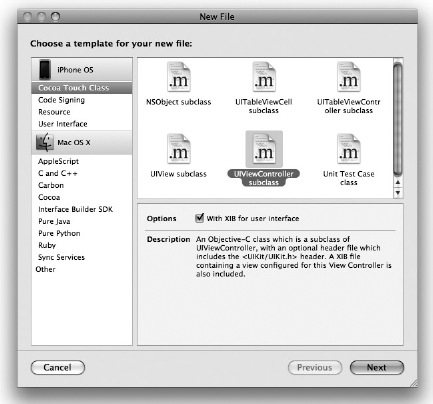
You see the New File window, as shown in Figure 3-32. Under the iPhone OS section on the left, select Cocoa Touch Class and then select the UIViewController subclass template on the right. Select the With XIB for User Interface option so that in addition to adding a View Controller class, it will also add an XIB file. Click Next.
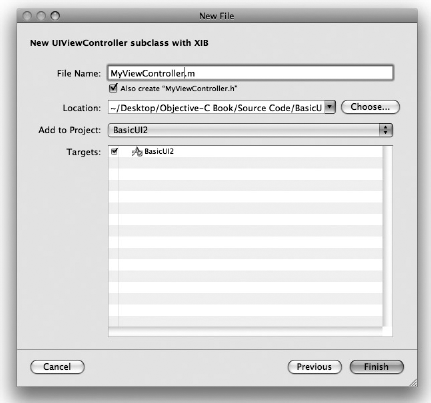
In the next window, you are asked to name your new View Controller class. Name it MyViewController.m (see Figure 3-33). A corresponding .h file is then created for you. Click Finish.
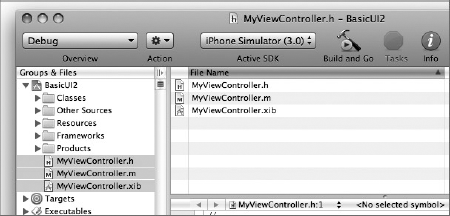
Three files are now created for you (see Figure 3-34):
MyViewController.hMyViewController.mMyViewController.xib
In the BasicUI2Delegate.h file, create an instance of the View Controller that you have just created and expose it as a property so that it can be used throughout the entire application:

#import <UIKit/UIKit.h>@class MyViewController;@interface BasicUI2AppDelegate : NSObject <UIApplicationDelegate> { UIWindow *window;MyViewController *myViewController;} @property (nonatomic, retain) IBOutlet UIWindow *window;@property (nonatomic, retain) MyViewController *myViewController;@end
Note that you use a forward declaration (described in Appendix D) to inform the compiler that the MyViewController class is defined somewhere in the project:
@class MyViewController;
In the BasicUI2Delegate.m file, add the following code so that you create an instance of the MyViewController class and then set its view to the current window:
#import "BasicUI2AppDelegate.h"#import "MyViewController.h"@implementation BasicUI2AppDelegate @synthesize window;@synthesize myViewController;- (void)applicationDidFinishLaunching:(UIApplication *)application {//---create an instance of the MyViewController---MyViewController *viewController = [[MyViewController alloc] initWithNibName:@"MyViewController" bundle:[NSBundle mainBundle]]; //---set the instance to the property--- self.myViewController = viewController; [viewController release]; //---add the view of the view controller--- [window addSubview:[myViewController view]]; // Override point for customization after application launch [window makeKeyAndVisible]; } - (void)dealloc {[myViewController release];[window release]; [super dealloc]; } @end
Codefile [BasicUI2.zip]The result of the preceding code is that when the application runs, the newly added View Controller will be loaded.
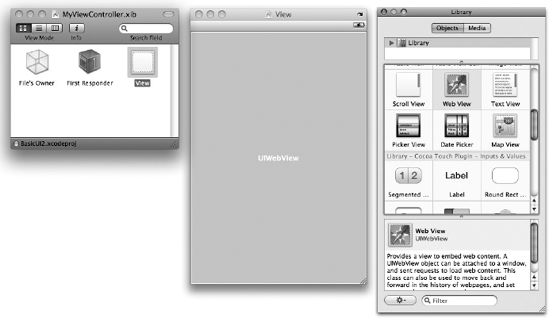
With the View Controller properly wired up, it is now time to customize the new view so that it can do something useful. To make things interesting, double-click the MyViewController.xib file and add a Web view to the View window (see Figure 3-35). A Web view is a Web browser view and is used for displaying Web content.
In MyViewController.h, create an outlet for the Web view and expose it as a property:
#import <UIKit/UIKit.h>

@interface MyViewController : UIViewController {
    IBOutlet UIWebView *webView;
}

@property (retain, nonatomic) UIWebView *webView;

@end
Back in the MyViewController.xib file, connect the outlet to the Web view. To verify that the connection is made correctly, right-click the File's Owner item. You should see the connection shown in Figure 3-36.

In the MyViewController.m file, code the following so that when the view is loaded, it displays the Web page of Apple.com in the Web view:
#import "MyViewController.h" @implementation MyViewController@synthesize webView;// Implement viewDidLoad to do additional setup after loading the view, // typically from a nib.- (void)viewDidLoad {NSString *strUrl = @"http://www.apple.com"; //---create an URL object--- NSURL *url = [NSURL URLWithString:strUrl]; //---create an URL Request Object--- NSURLRequest *request = [NSURLRequest requestWithURL:url]; //---load the request in the UIWebView--- [webView loadRequest:request]; [super viewDidLoad]; } - (void)dealloc {[webView release];[super dealloc]; } @end
That's it! Press Command-R to test the application on the iPhone Simulator. Figure 3-37 shows the simulator displaying Apple's home page.

In this chapter, you have seen the use of XIB files as well as the role played by View Controllers in an iPhone application. Understanding the use of outlets and actions is extremely important because it is the cornerstone of iPhone development. Throughout this book, you will come across them frequently.
In the next chapter, you learn how you can control the virtual keyboard that automatically pops up when the user tries to enter some data into your application.
EXERCISES
Declare and define an outlet for a UITextField view using code.
Declare and define an action using code.
WHAT YOU HAVE LEARNED IN THIS CHAPTER