A Swift Introduction to Swift
Until recently, writing an iPhone or iPad application meant working with Objective-C. Because of its unusual (some would say elegant) syntax, Objective-C is one of the more polarizing programming languages—you either love it or you hate it. At the World Wide Developer Conference in 2014, Apple changed all that by unveiling an alternative—a new language called Swift. Swift’s syntax is designed to be more recognizable to programmers who are used to more popular object-oriented programming languages like C++ and Java, therefore making it easier to start writing applications for iOS (and for Macs, since Swift is also fully supported as a development language on OS X). This appendix covers the parts of Swift that you’ll need to know in order to understand the example code in this book. We assume that you already have some programming experience and that you know what variables, functions, methods, and classes are. This appendix is neither a reference nor an exhaustive guide to the language—for that, there are numerous other resources, some of which are listed in Chapter 1. With that understanding, let’s get started right away!
Swift Basics
One of the best new features of Xcode 6 is the playground. As the name suggests, a playground is a place where you can go to play with code without having to create an environment in which to run it—just open a playground, type in some code, and see the results. Playgrounds are a great place to prototype something new and they are also an ideal place to start learning a new language, so we’re going to use them throughout this appendix.
Let’s begin by creating a new playground. Start Xcode and go to File ![]() New
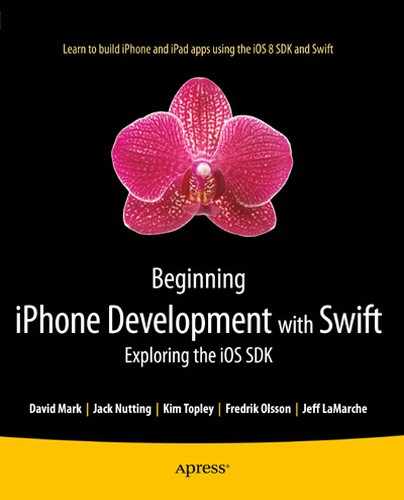
New ![]() Playground…. In the dialog that opens, choose a name for your playground (something like SwiftBasics) and make sure that the Platform is iOS, and then press Next. Choose the folder in which your playground will be saved and then press Create. Xcode creates the playground and opens it in a new window, as shown in Figure A-1. As you read through the examples in this appendix, feel free to experiment by adding code of your own to the playground or by modifying the examples to see what happens.
Playground…. In the dialog that opens, choose a name for your playground (something like SwiftBasics) and make sure that the Platform is iOS, and then press Next. Choose the folder in which your playground will be saved and then press Create. Xcode creates the playground and opens it in a new window, as shown in Figure A-1. As you read through the examples in this appendix, feel free to experiment by adding code of your own to the playground or by modifying the examples to see what happens.
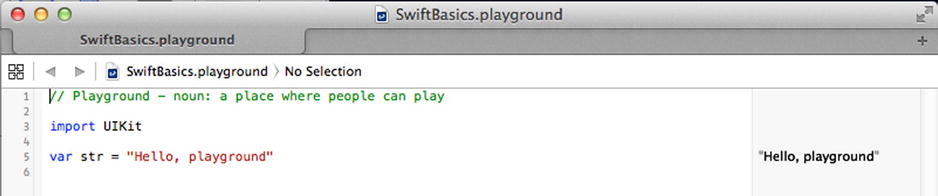
Figure A-1. Our newly created playground
Playgrounds, Comments, Variables, and Constants
Let’s take a moment to look at what we’ve got in our playground. As you can see, it’s divided into two areas—code on the left and results on the right. As you type code, the Swift compiler compiles and executes it, and shows you the result almost immediately. The code in Figure A-1 declares a new variable called str and initializes it with the string "Hello, playground". You can see this string in the results column on the right. Try changing the value and notice that the result updates to match as soon as you stop typing.
The code on line 1 in Figure A-1 is a comment. Anything following the character sequence // up to the end of the line is ignored by the compiler. Here, the comment occupies the whole line, but that’s not necessary. We could add a comment to the end of a line of code too:
var str = "Hello, world" // K&R would be proud
To write a comment that’s longer than one line, start it with /* and end it with */, like this:
/*
 This is a comment that occupies
 More than one line.
*/
There are various different ways to write a multiline comment. Some people like to make it clear that a line is part of a comment by starting each line with a * character:
/*
 * This is a comment that occupies
 * More than one line.
 */
Other people like to write single-line comments like this:
/* This is another way to write a single-line comment. */
The import statement on line 3 makes Apple’s UIKit framework available for use in the playground:
import UIKit
IOS has many frameworks, some of which you’ll read about in this book. UIKit is the user interface framework, which we’ll use in all of our code examples. Another framework that you’ll frequently make use of is Foundation, which contains classes that provide basic functionality like date and time handling, collections, file management, networking, and much more. To get access to this framework, you need to import it, like this:
import Foundation
However, UIKit automatically imports Foundation, so any playground that imports UIKit gets access to Foundation for free, without having to add an explicit import for it.
Line 5 is the first (and only) line of executable code in this playground:
var str = "Hello, playground"
The var keyword declares a new variable with a given name. Here, the variable is called str, which is appropriate because it’s a string. Swift is very liberal with variable names: you can use almost any character you like in the name, with the exception of the first character, which is somewhat restricted. You can find the precise rules in Apple’s documentation at https://developer.apple.com/library/ios/documentation/Swift/Conceptual/Swift_Programming_Language.
Following the declaration of the variable comes an expression that assigns its initial value. You don’t have to initialize a variable when you declare it, but you must do so before you use it (i.e., before you execute any code that reads its value). However, if you do, then Swift can infer the variable’s type, saving you the trouble of stating it explicitly. In this example, Swift infers that str is a string variable, because you have initialized it with a string literal. If you choose not to provide an initializer (perhaps because there is no fixed initial value), you must declare the variable’s type by appending it to the name and separated from it by a colon, like this:
var str: String
Try changing the code on line 5 of the playground to this:
var str: String
str = "Hello, playground"
This is completely equivalent to the original code, but now you’ve had to explicitly state that str is a string variable (String is the Swift type that represents a string). In most cases, it’s easier to combine the declaration and initialization, and allow the compiler to infer the variable’s type.
Here’s another example that makes use of Swift’s type inference feature:
var count = 2
Here, the compiler infers that the count variable is an integer. Its actual type is Int (we’ll cover the numeric types that Swift provides in the next section). How can you be sure that this is the case? Easy. Let Swift tell you! Type the preceding code into the playground, hover the mouse over count, and hold down the ![]() (Option) key. The cursor changes to a question mark. Now click the mouse and Swift shows you the type that it’s inferred for the variable in a pop-up, as shown in Figure A-2.
(Option) key. The cursor changes to a question mark. Now click the mouse and Swift shows you the type that it’s inferred for the variable in a pop-up, as shown in Figure A-2.

Figure A-2. Getting the inferred type of a variable
The fact that you don’t declare the type of a variable doesn’t mean that it doesn’t have one, or that you can play fast and loose with it. Swift assigns a type when the variable is declared and then you have to stick with that type. Unlike dynamic languages like JavaScript, you can’t change the type of a variable simply by assigning a new value to it. Try doing this:
 var count = 2
count = "Two"
Attempting to assign a string value to an integer variable is an error; you’ll see a red marker in the margin on the left of the playground. Click it, and Swift displays a message explaining the problem (see Figure A-3).

Figure A-3. Swift is not a dynamic language. You can’t change the type of a variable
This error message is not particularly clear. In fact, at the time of writing, Swift error messages can sometimes be a little hard to understand, but you can expect this to improve with later releases of Xcode.
You’ve probably noticed that we aren’t bothering to add semicolons at the end of our statements. That’s one of the many nice little features of Swift: it’s almost never necessary to end a statement with a semicolon. If you’re used to writing in C, C++, Objective-C or Java, that will probably feel a bit strange at first, but after a while, you’ll get used to it. Of course, you can type the semicolon if you want to, but most likely you’ll wind up not doing so. The only time you must use a semicolon is if you want to write two statements on the same line. This code is not valid:
var count = 2 count = 3
Add a semicolon, and the compiler is happy again:
var count = 2; count = 3
As the preceding line of code shows, you can change the value of a variable. That’s why it’s called a variable, after all. What if you just want to give a name to a fixed value? In other words, you want to create a constant and give it a name. For that, Swift provides the let statement. Syntactically, let is just like var, except that you must provide an initial value:
let pi = 3.14159265
As with variables, Swift can infer the type of the constant (or you can explicitly state it if you want to), but you can’t reassign the value of a constant, which is, of course, the point of making it constant:
pi = 42 // Error – Cannot assign to 'let' value 'pi'
Naturally, you can initialize the value of a variable from a constant:
let pi = 3.14159265
var value = pi
As you’ve seen, Swift prints the results of executable statements to the right of the corresponding code. You can also create output using the println() function from the Swift standard library. For example, try this:
println("Hello, world")
The string “Hello, world” appears in the playground output area, as usual, but it also goes to the console. To view the console output, hover the mouse over the results area, and you’ll see a couple of circular controls appear. Click the control on the right and the playground console opens (see Figure A-4).
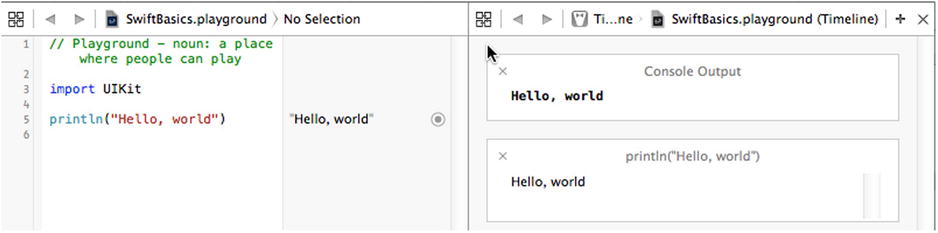
Figure A-4. Viewing output in the playground console
The console output is very useful when you execute code in a loop. In that case, the results area doesn’t show the output from each iteration of the loop, but the console does. To close the console, click the X control on the top right of its toolbar.
Tip At the time of writing, the Swift standard library is not very well-documented. You’ll find some useful but incomplete documentation at https://developer.apple.com/library/ios/documentation/General/Reference/SwiftStandardLibraryReference. Another way to see what’s in the standard library is to add the line import Swift to your playground, and then hold down the z (Cmd) key and click the word Swift. The playground switches to a listing of the content of the standard library. There’s a lot of information here, and you’ll need to know a lot more about Swift to understand all of it, but it’s worth looking it over in lieu of complete documentation.
Predefined Types, Operators, and Control Statements
Swift comes with a set of basic, predefined types. In later sections, you’ll see that you can add to these by defining your own classes, structures, and enumerations. You can even add functionality to an existing type by creating an extension of that type. Swift also has operators and control statements that will no doubt be familiar to you from other languages. Let’s start with a quick overview of the basic types.
Numeric Types
Swift has four basic numeric types—Int, Uint, Float, and Double—and a collection of more specialized integer types. The full set of integer types, together with their sizes (in bits) and the ranges of values that they can represent, is listed in Table A-1.
Table A-1. Integer Types
Int and its derivatives are signed values, whereas the types related to UInt are unsigned. The default type for integer values (i.e., the type that’s inferred when you write something like var count = 3) is Int and this is the recommended type to use, unless you have a specific reason to use one of the others.
As you can see from the table, the range of values that Int and UInt can represent depends on the platform. On 32-bit systems (e.g., some iPads and all iPhones before the iPhone 4s, and the iPhone 5c), these are both 32-bit values, whereas on 64-bit systems, they are 64 bits wide. If you need a value that’s definitely 32-bit or definitely 64-bit, then use Int32 or Int64 instead. The Int8 and UInt8 types can be used to represent bytes.
You can discover the maximum and minimum values for each of these types programmatically by using their max and min properties. For example, try entering these lines into your playground (without the comments, which show the results):
Int8.max     // 127
Int8.min     //  -128
Int32.max    // 2,147,483,647
Int32.min    // -2,147,483,648
UInt32.max   // 4,294,967,295
Integer literals can be written in decimal, hexadecimal, binary, or octal number bases. Try out these examples:
let decimal = 123      // Value is 123
let octal = 0o77       // Octal 77 = decimal 63
let hex = 0x1234       // Hex 1234 = decimal 4660
let binary = 0b1010    // Binary 1010 = decimal 10
The prefix 0o indicates octal, 0x indicates hexadecimal, and 0b indicates binary. For readability, you can also use an underscore character (_) anywhere to separate number groups:
let v = -1_234       // Same as -1234
let w = 12_34_56     // Same as 123456
Notice that you don’t have to stick with the normal rule of grouping by units of three digits.
The Float and Double types are respectively 32-bit and 64-bit floating-point numbers. You assign a value to a floating-point variable by using a floating-point literal. Swift infers a type of Double, unless otherwise specified:
let a = 1.23         // This is inferred to be a Double
let b: Float = 1.23  // Forced to be Float
You can also use exponential (or scientific) notation, which is convenient for large numbers:
let c = 1.23e2        // Evaluated as 123.0
let d = 1.23e-1       // Evaluated as 0.123
let e = 1.23E-1       // Same as 1.23e-1
By their nature, floating-point numbers are not completely precise. One reason for this is that fractional values cannot be accurately represented in binary floating-point form. You can see this if you enter the following into the playground (where, as before, the comment shows the result):
let f:Float = 0.123456789123     // 0.1234567891043282
let g:Double = 0.123456789123    // 0.123456789123
You can see that the Float representation of this value is less accurate than the Double representation. If you make the fractional part longer, you’ll exceed the precision of the Double format as well:
let g:Double = 0.12345678912345678 // 0.123456789123457
Floating-point numbers also lose precision when their value is large:
let f: Float = 123456789123456     // Inaccurate: 123,456,788,103,168.0
let g: Double = 123456789123456    // Accurate: 123,456,789,123,456.0
let h: Double = 1234567891234567   // Inaccurate: 1,234,567,891,234,570.0
Unlike other languages, Swift does not provide implicit type conversion when you assign a variable (or expression) of one numeric type to a variable of another numeric type. For example, this code does not compile (see Figure A-5):
let a = 123
let b = 0.456
let c = a + b

Figure A-5. Swift does not allow you to combine variables of different types
Variable a is of type Int and b is a Double. Swift could convert the Int to a Double and perform the addition, but it does not. You have to perform the conversion yourself:
let a = 123
let b = 0.456
let c = Double(a) + b
The expression Double(a) invokes an initializer of the Double type with an integer argument. The numeric types all provide initializers that let you perform conversions of this kind.
Another example that arises frequently involves the CGFloat type. CGFloat is a floating-point type defined by the Core Graphics framework. It’s used to represent coordinates and sizes, among other things. Depending on whether your application is running on a 32-bit or 64-bit platform, it’s equivalent either to Float or Double. To perform operations that involve a mix of CGFloats and other types, you need to explicitly convert one to the other. For example, the following code adds a Double and a CGFloat, producing a CGFloat result by converting the Double to CGFloat:
let a: CGFloat = 123
let b: Double = 456
let c = a + CGFloat(b)     // Result is of type CGFloat
On 32-bit platforms, CGFloat is less precise than Double, so this operation may lose information, but that’s inevitable if you need a value of type CGFloat. If you need a result of type Double, you can convert the CGFloat to Double without losing accuracy:
let a: CGFloat = 123
let b: Double = 456
let c = Double(a) + b    // Result is of type Double
It’s important to note that Swift allows you to mix numeric types when all of the values concerned are literals. For example:
1 + 0.5 // Evaluated as 1.5
You’ll find all of the usual binary arithmetic operators in Swift. You can use them to combine numbers of the same type and you can apply them to numbers of different types if you explicitly convert one of the operands, as you have just seen. Table A-2 lists the arithmetic operators that are available. Operators are listed in decreasing order of precedence.
Table A-2. Predefined Binary Arithmetic Operators
|
Operator |
Meaning |
|---|---|
|
<< |
Bitwise left shift |
|
>> |
Bitwise right shift |
|
*, &* |
Multiplication |
|
/, &/ |
Division |
|
%, &% |
Remainder |
|
& |
Bitwise AND |
|
+, &+ |
Addition |
|
-, &- |
Subtraction |
|
| |
Bitwise OR |
|
^ |
Bitwise XOR |
The arithmetic operations +, -, *, /, and % detect overflow. If you want overflow to be ignored, use &+, &-, &*, &/, or &% instead. For example, enter this code into the playground:
let a = Int.max
let b = 1
let c = Int.max + b
We’re adding 1 to the largest representable integer value, which will trigger overflow, so no result is printed for the line containing the assignment to the variable c. To allow the operation to proceed ignoring the overflow, use &+ instead:
let a = Int.max
let b = 1
let c = a &+ b
The << and >> operators perform a left and right shift of the left operand by the amount specified by their right operand. This is equivalent to multiplication and division by a power of two. For example:
let a = 4
let b = a << 2   // Result is 16
let c = b >> 1   // Result is 8
When the left operand is negative, the sign of the result is preserved:
let a = -4
let b = a << 2   // Result is -16
let c = b >> 1   // Result is -8
The &, |, and ^ operations perform bitwise AND, OR, and XOR operations on their operands. This is not to be confused with the operators && and ||, which are logical operators that give a boolean result (see the “Booleans” section later in this appendix). Here are some examples:
let a = 7        // Value 0b111
let b = 3        // Value 0b011
let c = a & b    // Result is 0b011 = 3

let a = 7        // Value 0b111
let b = 3        // Value 0b011
let c = a | b    // Result is 0b111 = 7

let a = 7        // Value 0b111
let b = 3        // Value 0b011
let c = a ^ b    // Result is 0b100 = 4
There are also compound variants of these operators that perform the operation followed by an assignment, with the target of the assignment acting as the left operand of the operation. For example:
var a = 10
a += 20       // Shorthand for a = a + 20, result = 30

var b = 7
b &= 3        // Shorthand for b = b & 3, result = 3
Swift has five unary operators, which are listed in Table A-3.
Table A-3. Predefined Unary Arithmetic Operators
|
Operator |
Meaning |
|---|---|
|
++ |
Pre- or post-increment |
|
-- |
Pre- or post-decrement |
|
+ |
Unary plus |
|
- |
Unary minus |
|
~ |
Bitwise NOT |
The ++ and – operators add or subtract 1 from their operand. If used before the operand, they return the value after the operation is performed; but if used after the operand, they return the initial value. For example:
var a = 10      // Declare as var because it will be modified
let b = a++     // "a++" returns value before operation: a = 11, b = 10
let c = ++a     // "++a" returns value after operation: a = 12, c = 12

let d = a--     // "a—" returns value before operation: a = 11, d = 12
let e = --a     // "—a" returns the value after the operation: a = 10, e = 10
The ~ operator performs bitwise inversion of the bits of its integer operand:
let a = 0b1001
let b = ~a
The result of this operation in 32-bits is 0b11111111111111111111111111110110, which is the same as –10.
Strings
A string, represented by the String type, is a sequence of Unicode characters. The fact that Swift uses Unicode in strings makes it possible to build applications that support many different character sets without requiring special code. However, it has some complications, some of which we’ll mention here. For a full discussion on the implications of the use of Unicode, refer to The Swift Programming Language, which you’ll find on Apple’s Developer web site at the URL shown earlier, or in iBooks.
A string literal is a sequence of characters enclosed in double quotes, like this example that you’ve already seen:
let str = "Hello, playground"
If you need to include a " character in a string, escape it with a character, like this:
let quotes = "Contains "quotes"" // Contains "quotes"
To get a , escape it with another :
let backslash = "\" // Result is
Any Unicode character can be embedded in a string by giving its hexadecimal representation (or code point), surrounded by u{}. For example, the @ symbol has code point 0x40, so the following example shows two ways to represent @ in a Swift string:
let atSigns = "@u{40}" // Result is @@
Certain characters have special escape representations. For example, and represent the new line and tab characters, respectively:
let specialChars = "Line1
Line2	Tabbed"
Strings have the useful ability to interpolate expressions enclosed in the escape sequence (). For example:
println("The value of pi is (M_PI)") // Prints "The value of pi is 3.14159265358979"
This code interpolates the value of the predefined constant M_PI into the string and then prints the result. The interpolated value can also be an expression and there can be more than one of them:
// This code prints: "Area of a circle of radius 3.0 is 28.2743338823081"
let r = 3.0
print("Area of a circle of radius (r) is (M_PI * r * r)")
The + operator can be used to concatenate strings. This is the only way to combine strings that you want to split over more than one line of a source code file:
let s = "That's one small step for man, " +
           "one giant leap for mankind"
println(s)   // "That's one small step for man, one giant leap for mankind"
You can compare two strings using the == and != operators (see the “Booleans” section), which effectively perform a character-by-character comparison of their operands. For example:
let s1 = "String one"
let s2 = "String two"
let s3 = "String " + "one"
s1 == s2     // false: strings are not the same
s1 != s2     // true: strings are different
s1 == s3     // true: strings contain the same characters.
The seemingly simple task of getting the length of a string is complicated by the fact that strings are composed of Unicode characters, because not every Unicode character is represented by a single code point. We’re going to skip a detailed discussion of this subject here, but there are two things to be aware of. First, if you want to get an accurate count of the number of characters in a string, which works under all circumstances, use the function countElements() from the standard Swift library:
countElements(s3) // 10
The countElements() function has to iterate over the whole string, character by character, to calculate its length, which is an expensive operation for long strings. If you know that the string only contains characters that are represented by a single Unicode code point, you can use the utf16Count property, which is very much faster, instead:
s3.utf16Count // 10
The String type itself provides very few useful string operations. Often the easiest way to work with a string is to make use of the fact that Swift bridges the String type to the NSString class in the Foundation framework, which means that methods defined by NSString can be used as if they were also defined on String itself. For example, String does not provide a way to get an uppercase copy of a string, but NSString has an upperCase property that does just that:
let s1 = "Mixed-case string"
let s2 = s1.uppercaseString      // MIXED-CASE STRING
Even though s1 is a String, not an NSString, Swift allows you to use the uppercaseString property of NSString as if it had been defined on String. It’s worth spending some time looking at the reference page for the NSString class to see what properties and methods are available. We’ll use many of them in the examples in this book.
The Character type can be used to hold a single character from a string. This allows iteration over the individual characters of a string:
let s = "Hello"
for c in s {
    println(c)
}
The body of the for loop in this example (the syntax of which we’ll discuss later) is executed once for each character in the string, with the character assigned to the variable c, which is inferred to be of type Character. In the playground, you can’t directly see the result of this loop in the right-hand column—only that it was executed five times. Instead, you’ll have to open the playground console, as described earlier (see Figure A-6).
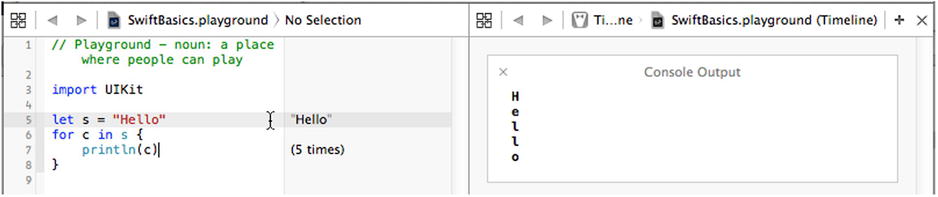
Figure A-6. Iterating over the characters in a string
You can create and initialize a Character in the same way as a String, but you need to explicitly state the type to avoid the inference of String, and the initializer must consist of exactly one character:
let c: Character = "s"
There’s not much you can do with Characters other than compare them with other Characters. You can’t append them to each other and you can’t directly add them to Strings. You have to use the append() method of String instead:
let c: Character = "s"
var s = "Book"     // "var" because we want to modify it
s += c             // Error – illegal
s.append(c)        // "Books"
Strings in Swift are not immutable, but they are value objects, which means that whenever you assign a string to a variable or use one as a function argument or return value, the string is copied. Modifications made to the copy do not affect the original:
var s1 = "Book"
var s2 = s1             // s2 is now a copy of s1
s2 += "s"               // Appends to s2; s1 is unchanged
s1                      // "Book"
s2                      // "Books"
Booleans
Booleans are represented by the Bool type, with possible values of true or false:
var b = true            // Inferred type is Bool
var b1: Bool
b1 = false
Swift has the usual set of comparison operators (==, !=, >, <, >=, <=) that return a Bool value when applied to numeric values:
var a = 100
var b = 200
var c = a

a == c      // true
a == b      // false
a != b      // true
a > b       // false
a < b       // true
a >= c      // true
These operators can also be applied to strings:
let a = "AB"
let b = "C"
let c = "CA"
let d = "AB"
a == b      // false – strings have different content
a == d      // true – strings have the same content
a != c      // true – strings have different content
a > b       // false: uses sorting order
a < c       // true: both start with C, but string c is longer than a
You can negate a boolean value with the unary ! operator:
var a = 100
var b = 200
a == b           // false
!(a == b)        // !false == true
Boolean expressions can be combined using the ==, !=, &&, and || operators. The && and || operators are short-circuiting, which means that they evaluate their second operand only if the result is not determined by the value of the first operand. Specifically, the second operand of a || operator does not need to be evaluated if the first is true, and the second operand of && is not evaluated if the first is false:
var a = 100
var b = 200
var c = 300

a < b && c > b   // true; both expression are evaluated
a < b || c > b   // true: second expression is not evaluated
a > b && c > b   // false: second expression is not evaluated
Enumerations
Enumerations let you give meaningful names to the values of types where that set of values is fixed and known in advance. To define an enumeration, you give it a name and list all of the possible values as cases:
enum DaysOfWeek {
    case Sunday, Monday, Tuesday, Wednesday,
            Thursday, Friday, Saturday
}
You can also define each case separately:
enum DaysOfWeek {
    case Sunday
    case Monday
    case Tuesday
    case Wednesday
    case Thursday
    case Friday
    case Saturday
}
To refer to an enumeration value, use the enumeration name and the case name, separated by a period:
var day = DaysOfWeek.Sunday // "day" is inferred to be of type "DaysOfWeek"
When the context is clear, you can omit the enumeration name. In the following example, the compiler already knows that the variable day is of type DaysOfWeek, so there is no need to explicitly say so when assigning to it:
day = .Friday // Note that the "." Is required
In Swift, you can also give an associated value to an enumeration case. Try this example in your playground:
enum Status {
    case OK
    case ERROR(String)
}

let status = Status.OK
let failed = Status.ERROR("That does not compute")
Here, the ERROR case has an associated value—a string that describes the error. You can recover the associated value in a switch statement, as you’ll see in upcoming “Control Statements” section.
In some cases, it is useful to map the case name itself to a value, referred to as a raw value. To do this, specify the type of the base value along with the enumeration name, and then assign individual values to each case as it is defined. Here’s a variant of the DaysOfWeek enum that assigns an integer value to each case:
enum DaysOfWeek : Int {
    case Sunday = 0
    case Monday
    case Tuesday
    case Wednesday
    case Thursday
    case Friday
    case Saturday
}
The type of the raw value is specified in the declaration of the enum. In this case, it’s Int:
enum DaysOfWeek : Int {
Raw values can be strings or any of the integer types. When the raw value type is an integer, you don’t need to assign an explicit value to each case; unassigned values are inferred by adding 1 to the previous raw value. In the preceding example, Sunday was assigned the raw value 0, and as a result, Monday is given the raw value 1, Tuesday is assigned the raw value 2, and so on. You can override the automatic assignment of values, as long as each case has a unique value:
enum DaysOfWeek : Int {
    case Sunday = 0
    case Monday         // 1
    case Tuesday        // 2
    case Wednesday      // 3
    case Thursday       // 4
    case Friday = 20    // 20
    case Saturday       // 21
}
You can get the raw value for a case by accessing its rawValue property:
var day = DaysOfWeek.Saturday
let rawValue = day.rawValue           // 21. DaysOfWeek.Saturday.rawValue is also valid
Here’s another example, using String as the raw value type:
enum ResultType : String {
    case SUCCESS = "Success"
    case WARNING = "Warning"
    case ERROR = "Error"
}
let s = ResultType.WARNING.rawValue    // s = "Warning"
Given a raw value, you can construct the corresponding case value by passing it to an initializer:
let result = ResultType(rawValue: "Error")
In this example, the type of the result variable is not ResultType, but ResultType?, an example of an optional. Since it’s possible to pass an invalid raw value to the initializer, there has to be some way to indicate that there is no valid case with that value. Swift does this by returning the special value nil, but nil cannot be assigned to an ordinary variable, only to an optional. Optional types are indicated by a trailing ? and you need to be careful when manipulating them. We will discuss optionals in more detail later.
Arrays, Ranges, and Dictionaries
Swift provides two basic collection types (arrays and dictionaries) and a range syntax that provides a convenient way to represent a (possibly large) range of values. Ranges are particularly useful when accessing arrays.
Swift supports the creation of an array of values using the syntax [type], where type is the type of the array value. The following code creates and initializes an array of integers and an array of strings:
var integers = [1, 2, 3]
var days = ["Sunday", "Monday", "Tuesday", "Wednesday",
                   "Thursday", "Friday", "Saturday"]
You can, of course, separate the declaration and initialization of an array, as long as it’s initialized before it is used. This requires explicit specification of the array type:
var integers: [Int]        // [Int] means "array of Ints"
integers = [1, 2, 3]
Use [] to initialize an empty array:
var empty: [String] = []
To access the elements of an array, use a numeric subscript as an index. The first element of the array has index 0:
integers[0]        // 1
integers[2]        // 3
days[3]            // "Wednesday"
Use the same syntax to assign a new value to an element of the array:
integers[0] = 4               // [4, 2, 3]
days[3] = "WEDNESDAY"         // Replaces "Wednesday" with "WEDNESDAY"
To extract or modify part of an array, use the Swift range syntax. This can result in a change in the number of elements in the array:
var integers = [1, 2, 3]
integers[1..<3]              // Get elements 1 and 2 as an array. Result is [2, 3]
integers[1..<3] = [4]        // Replace elements 1 and 2 with [4]. Result is [1, 4]

integers = [1, 2, 3]
integers[0...1] = [5, 4]     // Replace elements 0 and 1 with [5, 4]. Result is [5, 4, 3]
The range syntax a..<b means all the values from a to b, excluding b; so 1..<5 is the same as 1, 2, 3, 4. The syntax a...b includes b in the range, so that 1...5 means 1, 2, 3, 4, 5. The range a..<a is always empty, whereas the range a...a contains exactly one element (a itself). The value of b must be greater than or equal to the value of a, and there is an implicit increment of 1.
To get the number of elements in an array, use its count property:
var integers = [1, 2, 3]
integers.count               // 3
integers[1..<3] = [4]
integers.count               // 2
To add an element to an array, use the append() method or the insert(_, atIndex:) method:
var integers = [1, 2, 3]
integers.append(4)                // Result is [1, 2, 3, 4]
integers.insert(-1, atIndex: 0)   // Result is [-1, 2, 3, 4]
Use the removeAll(), removeAtIndex(), and removeRange() methods to remove all or some of the elements of an array:
var days = ["Sunday", "Monday", "Tuesday", "Wednesday",
                   "Thursday", "Friday", "Saturday"]

days.removeAtIndex(3)                // Removes "Wednesday" and returns it to the caller
days.removeRange(0..<4)              // Leaves ["Friday", "Saturday"]
days.removeAll(keepCapacity: false)  // Leaves an empty array
The keepCapacity argument passed to removeAll() indicates whether the space allocated for the array’s elements should be kept (value true) or released (value false).
You can iterate over a whole array or over a part of an array using the for statement, which is discussed in “Control Statements” section.
If an array is created using a let statement, neither it nor its contents can be modified in any way:
let integers = [1, 2, 3]                 // Constant array
integers = [4, 5, 6]                     // Error: cannot replace the array
integers[0] = 2                          // Error: cannot reassign elements
integers.removeAll(keepCapacity: false)  // Error: cannot modify content
Like strings, arrays are value objects, so assigning them or passing them to or from functions creates a copy:
var integers = [1, 2, 3]
var integersCopy = integers   // Creates a copy of "integers"
integersCopy[0] = 4           // Does not change "integers"
integers                      // [1, 2, 3]
integersCopy                  // [4, 2, 3]
You can create a dictionary, a data structure mapping instances of a key to a corresponding value, using a syntax that is similar to that used for an array. The following code creates a dictionary in which the keys are strings and the values are integers:
var dict = ["Red": 0,
                 "Green": 1,
                 "Blue": 2]
The formal type of this dictionary is [String: Int]. You may also see this referred to as Dictionary<String, Int>, using generics syntax, which we’re not going to cover in this appendix. Similarly, you may see an array of type [Int] referred to as Array<Int>.
If you don’t use an initializer, you need to explicitly state the type of the dictionary when you declare it:
var dict: [String: Int];
dict = ["Red": 0, "Green": 1,  "Blue": 2]
To get the value of a dictionary entry given its key, use subscript notation, like this:
let value = dict["Red"]
The inferred type of the value constant is not Int, but Int?—that is, an optional integer. That’s because the dictionary might not contain a value for the key that you use as the subscript; for example, the dictionary does not contain an entry with key Yellow, so the following expression returns the value nil:
let yellowValue = dict["Yellow"]
Optionals are discussed in more detail in the following section.
You can modify a dictionary in much the same way as you modify an array:
dict["Yellow"] = 3  // Adds a new value with key Yellow
dict["Red"] = 4     // Updates the value with key Red
To remove an element from the dictionary, use the removeValueForKey() method; to remove all values, use removeAll():
var dict = ["Red": 0, "Green": 1,  "Blue": 2]
dict.removeValueForKey("Red")   // Removes value with key "Red"
dict.removeAll()                // Empties the map
Dictionaries created using the let statement cannot be modified:
let fixedDict = ["Red": 0,  "Green": 1, "Blue": 2]
fixedDict["Yellow"] = 3              // Illegal
fixedDict["Red"] = 4                 // Illegal
fixedDict = ["Blue", 7]              // Illegal
fixedDict.removeValueForKey["Red"]   // Illegal
You can iterate over the keys of a dictionary using the for statement, as you’ll see in the “Control Statements” section. To get the number of key-value pairs in dictionary, use the count property:
var dict = ["Red": 0, "Green": 1, "Blue": 2]
dict.count      // 3
Like arrays, dictionaries are value types and are copied on assignment or when passed to and from functions. Modifications to the copy do not affect the original:
var dict = ["Red": 0, "Green": 1, "Blue": 2]
var dictCopy = dict
dictCopy["Red"] = 4   // Does not affect "dict"
dict                  // "Red":0, "Green": 1, "Blue": 2
dictCopy              // "Red":4, "Green": 1, "Blue": 2
The Foundation framework has its own Objective-C classes that represent arrays and dictionaries—NSArray and NSDictionary. The relationship between these classes and their Swift counterparts is similar to that between NSString and String: in general, you can treat a Swift array as an NSArray and a Swift dictionary as an NSDictionary. You will sometimes need to take advantage of this in order to use features of Foundation classes that are not (yet) supported by the corresponding Swift types. As an example, suppose you had the following string:
let s = "Red,Green,Blue"
How would you separate this into three separate strings, each containing one color name? There is no String method to do that, but NSString has a method called componentsSeparatedByString() that will do exactly what you want. This method takes the separator string as an argument and returns an NSArray containing the individual components. Since Swift can treat a String as an NSString, you can just call the componentsSeparatedByString() method on a String:
let s = "Red,Green,Blue"
let components = s.componentsSeparatedByString(",")  // Calls the NSString method
components                                           // ["Red", "Green", "Blue"]
Even though this method returns an NSArray, Swift is clever enough to map it to the corresponding Swift collection—an array of Strings—so the inferred type of components is [String]. You can confirm this by hovering the mouse over the variable name and clicking while holding down the ![]() (Option) key.
(Option) key.
You can directly create NSDIctionary and NSArray instances in Swift code:
let d = NSDictionary()
The inferred type of the variable d is, of course, NSDictionary. You can explicitly cast an NSDictionary (whether you created it or obtained it from a method in the Foundation framework or another framework) to a Swift dictionary type using the as keyword (which we’ll say more about later):
let e = d as Dictionary
Now if you ![]() -click the name e, you’ll see that Swift infers a type of Dictionary<NSObect, AnyObject> for this variable, which is another way of saying its type is [NSObject: AnyObject]. What are these key and value types and where did they come from? Unlike Swift dictionaries, NSDictionary is type-free: it does not know the types of the objects that it contains (the same applies to NSArray). So, in general, Swift has no way to know what the key and value types are for an NSDictionary. Instead, it substitutes more general types: NSObject is the base class for all Foundation objects and AnyObject is a Swift protocol (discussed later) that corresponds to pretty much any Swift type. The type signature [NSObject: AnyObject] says “I have almost no idea what this dictionary contains.” When you retrieve elements from an NSDictionary or an NSArray in Swift, you usually have to use the as operator to cast them explicitly to the correct types, or cast the NSDictionary itself to the type that you know it must be. For example, if you know that the NSDIctionary maps strings to strings, you can do this:
-click the name e, you’ll see that Swift infers a type of Dictionary<NSObect, AnyObject> for this variable, which is another way of saying its type is [NSObject: AnyObject]. What are these key and value types and where did they come from? Unlike Swift dictionaries, NSDictionary is type-free: it does not know the types of the objects that it contains (the same applies to NSArray). So, in general, Swift has no way to know what the key and value types are for an NSDictionary. Instead, it substitutes more general types: NSObject is the base class for all Foundation objects and AnyObject is a Swift protocol (discussed later) that corresponds to pretty much any Swift type. The type signature [NSObject: AnyObject] says “I have almost no idea what this dictionary contains.” When you retrieve elements from an NSDictionary or an NSArray in Swift, you usually have to use the as operator to cast them explicitly to the correct types, or cast the NSDictionary itself to the type that you know it must be. For example, if you know that the NSDIctionary maps strings to strings, you can do this:
let d = NSDictionary()

let e = d as [String: String]
Here, we cast the NSDictionary to [String: String]. This code works even if the dictionary actually contains NSStrings instead of Strings (which is very likely), because Swift automatically maps between String and NSString. Beware, though: if the NSDIctionary key and value types are not both what you claim they are, your application will crash. There is a safer way to handle this that involves optionals, which is the subject of the next section.
Optionals
Let’s go back to an example that we used in the previous section on dictionaries:
var dict: [String: Int];
dict = ["Red": 0, "Green": 1,  "Blue": 2]
let value = dict["Red"]
Although the values in this dictionary are all of type Int, the inferred type for value is not Int, but Int?—an optional integer. The ? signals the optional nature of the type. What does optional mean and why is it being used here? To answer that, think about what should happen if you access the dictionary with a key for which there is no value:
let yellowValue = dict["Yellow"]
What value should be assigned to yellowValue? Most languages address this by having a distinguished value that means, by convention, “no value.” In Objective-C, this value is referred to as nil (which is really just a redefinition of 0); in C and C++ it’s NULL (again, a redefinition of 0); and in Java it’s null. The problem with this is that it can be dangerous to use a nil (or equivalent) value. In Java, for example, using a null reference causes an exception. In C and C++, the application is likely to crash if you do that. What’s worse, there’s no easy way to tell whether a variable might contain a null (or nil or NULL) value. Swift solves this problem in a neat way: it has a nil value, but a variable (or constant) can only be set to nil if it’s declared as an optional, or its type is inferred to be optional. As a result, you can tell immediately whether a variable or constant could be nil by examining its type: if it’s not optional, it can’t be nil. Further to that, Swift requires you to take that into account explicitly whenever you use the value.
Let’s look at some examples to make this clearer. Suppose we define a variable called color, like this:
var color = "Red"
Because of the way it’s defined, the inferred type is String, which is not optional. Therefore, it’s illegal to attempt to assign nil to this variable:
color = nil // Illegal: color is not an optional type.
Because of this, we know for sure that we don’t need to worry about color having a nil value, ever. It also means that we can’t use this variable to hold a value returned from a dictionary, even if we know that value will not be nil:
let dict = [0: "Red", 1: "Green", 2: "Blue"]
color = dict[0]    // Illegal: value of dict[0] is optional string, color is not optional.
To make this assignment legal, we have to change the type of color from String to optional String:
let dict = [0: "Red", 1: "Green", 2: "Blue"]
var color: String?     // "String?" means optional String
color = dict[0]        // Legal
println(color)         // What does this print?
How do we make use of the value assigned to the color variable? Enter the preceding code into the playground and you’ll see that what’s printed is not “Red” but Optional("Red"). The dictionary access doesn’t return the actual value; it returns the value “wrapped” as an optional. To get the string value, we need to “unwrap” the optional using the ! operator, like this:
let actualColor = color! // "color!" means unwrap the optional
The inferred type of actualColor is String and the value that gets assigned to it is “Red”. It follows from this that whenever you retrieve a value from a dictionary, it’s going to be of optional type, and you have to unwrap it to get the value that you want. But remember, we said that nil references are dangerous; in Swift that translates as unwrapping optionals can be dangerous. Change your playground code to this:
let dict = [0: "Red", 1: "Green", 2: "Blue"]
let color = dict[4]
let actualColor = color!
Swift correctly infers that the type of color is String?, but when you unwrap the result of the dictionary access to assign the value to actualColor, you get an error. In the playground, this error is just reported to you; in an application, it would cause a crash. Why did this happen? Well, there is no entry in the dictionary with key 4, so the color variable was assigned the value nil. If you try to unwrap nil, you crash. You’re probably thinking that this is no improvement on what happens in other languages, but that’s not true. First, the fact that color is of optional type tells you that you must expect that it could be nil—and the converse (which is equally valuable). And second, Swift gives you a way to handle the case where the optional value is nil. In fact, it gives you three ways.
The first thing you can do is check whether you got nil from the dictionary access and only unwrap the value if you didn’t:
if color != nil {
    let actualColor = color!
}
This construction is so common that Swift has shorthand for it. Here’s the second way to handle optional unwrapping:
if let actualColor = color {
    // Executed only if color was not nil
    println(actualColor)
}
The code block associated with the if statement is executed only if color is not nil, and the unwrapped value is assigned to the constant actualColor. You can even make actualColor a variable by changing let to var:
if var actualColor = color {
    // Executed only if color was not nil. actualColor can be modified
    println(actualColor)
}
How about if we want to use a default value for a key that’s not present in the dictionary? Swift gives you a convenient way to do that too. Here’s the third way to handle optional unwrapping:
let dict = [0: "Red", 1: "Green", 2: "Blue"]
let color = dict[4]
let actualColor = color ?? "Blue"
The ?? operator (called the coalescing operator) unwraps its left operand, if it’s not nil, and returns its value; otherwise, it returns its second operand. In this case, since color is going to be nil, actualColor would be assigned the value “Blue”. Of course, you can contract the preceding code into two statements to make it slightly easier to read:
let dict = [0: "Red", 1: "Green", 2: "Blue"]
let actualColor = dict[4] ?? "Blue"
Dictionaries are not the only context in which optionals are used. If you look through the Swift API documentation, you’ll see plenty of methods that return optional values. It’s even possible for a type initializer to return an optional value. We’ve already seen an example of this; if you try to initialize an instance of an enumeration using an invalid raw value, the result is nil:
enum ResultType : String {
    case SUCCESS = "Success"
    case WARNING = "Warning"
    case ERROR = "Error"
}
let result = ResultType(rawValue: "Invalid")
The inferred type of result is ResultType?, and in this case, its value would be nil because there is no enumeration case that has the raw value “Invalid”.
You’ve learned that you have to be careful when unwrapping optionals, but sometimes that can be both inconvenient and unnecessary. As you’ll see as you try out the examples in this book, it’s common to define a variable in a class that cannot be initialized while the class itself is being initialized, but will have a valid value before your code needs to use it. In cases like that, you’ll have to define the variable as optional and you’ll need to unwrap it every time you use it. That keeps the compiler happy, but it means that you have to keep adding ! operators everywhere, or wrap the access in an if let construction, even though you know that the unwrapping will always succeed.
Fortunately, Swift lets you sidestep this. All you have to do is tell Swift that you want it to automatically unwrap the optional whenever you access it. Here’s how you would do that in our dictionary example:
let dict = [0: "Red", 1: "Green", 2: "Blue"]

var color: String!      // Notice the !
color = dict[0]         // Assigns Optional("Red")
println(color)          // Automatically unwraps the optional
The key to this code is that the color variable was declared to be of type String!, not String?. Variables declared this way are called implicitly unwrapped optionals. The ! tells Swift that you want it to assume that the variable will always have a non-nil value whenever you use it, and to go ahead and unwrap it. That means you can write println(color) instead of println(color!). Although we’re not saving anything here, if you had to access the result more than once, you would end up typing fewer characters by using this feature.
Beware, however. You’ve told Swift that color will never be nil. If it turns out that it is nil when you try to use it, Swift will unwrap it and your application will crash. You have been warned!
We can use optionals to address another issue that came up while discussing dictionaries: how to handle values obtained from an NSDictionary. Let’s set the problem up by creating a Foundation dictionary with some initial values:
let d = NSDictionary(objects: ["Red", "Green", "Blue"],
                                 forKeys: [0, 1, 2])
let dict = d as [Int: String]
The first line of code initializes an NSDictionary with a mapping from Ints to Strings, and then we cast it to the corresponding Swift dictionary type using the as operator. In reality, of course, you wouldn’t create an NSDictionary and cast it like this; you would just create a Swift dictionary. But suppose you got the dictionary from a call to a Foundation method—perhaps it was populated from the content of a file. As long as the dictionary really does map Ints to Strings, this code works fine and you can access its content in the usual way:
let color = d[1] // Gets an optional, wrapping "Green"
Note, however, that Swift doesn’t really know the type of the value that it got from the dictionary; it infers AnyObject?, which is an optional wrapping some kind of object. You’ll see a warning about this. You can get rid of the warning by explicitly casting the result to the correct type:
let color = d[1] as String?
But what if you got the type of the dictionary wrong? Maybe somebody put the wrong data in the file and what you’ve actually got is a [String: String]. To see what happens, change the types of the keys in the first line from numbers to strings, like this:
let d = NSDictionary(objects: ["Red", "Green", "Blue"],
                                 forKeys: ["0", "1", "2"])
let dict = d as [Int: String]
This code crashes when casting the dictionary to [Int: String]. That’s a little drastic. We really want to be able to detect this condition and take some corrective action instead of crashing. We can do that by using the as? operator instead of as. The as? operator returns an optional: if its first operand is not of the type given by its second operand, it returns nil instead of crashing. So now we can do something like this:
let d = NSDictionary(objects: ["Red", "Green", "Blue"],
                     forKeys: ["0", "1", "2"])
if let dict = d as? [Int: String] {  // as? returns nil if d is not of type [Int: String]
    println("OK")                    // As expected – use dict as normal
} else {
    println("Incorrect types")       // Executed if d is not of type [Int: String]
}
There is another way to achieve the same effect. You can use the is keyword to check whether the dictionary is of the expected type before casting it:
if d is [Int: String] {   // Evaluate to true if d maps Ints to Strings
    println("Is [Int: String]")
} else {
    println("Incorrect types")
}
That’s enough about optionals for now. We’ll have more to say about this topic when we discuss calling methods in the upcoming “Properties” and “Methods” sections.
Control StatementsControl statements
You’ve seen Swift’s data types and how you can initialize them and perform operations on them. Now let’s look at Swift’s control statements. Swift supports all of the control statements you find in most other languages and adds some interesting new features to some of them.
The if Statement
Swift’s if statement works just like it does in most other languages: you test a boolean condition and execute some code only if it evaluates to true. You can optionally include an else block that executes if the condition is false. For example:
let random = arc4random_uniform(10)
if random < 5 {
    println("Hi")
} else {
    println("Ho")
}
The arc4random_uniform() function returns a random integer between 0 (inclusive) and its argument value (exclusive), so in this case any integer from 0 to 9. We test the returned value and print “Hi” if it’s less than 5, but print “Ho” if it’s not. Notice that Swift does not require you to put the test condition in parentheses, so either of these will work:
if random < 5 {   // Parentheses not required
}
if (random < 5) { // But can be used
}
By contrast to other languages, the code to be executed must be enclosed in braces, even if it’s only a single line. That means that this code is not valid in Swift:
if random < 5
    println("Hi")         // Invalid: must be in braces
else
    println("Ho")         // Invalid: must be in braces
Swift also has the ternary operator ?:, which may be familiar to you and which you probably either love or hate. This operator evaluates the boolean expression before the ? and executes either the statement between the ? and the : if the result is true, or the statement after the : if the result is false. We can use it to write the preceding code like this:
let random = arc4random_uniform(10)
random < 5 ? println("Hi") : println("Ho")
In this case, we can shorten the code even more by observing that all we’re doing is printing one string or the other, and write this instead:
let random = arc4random_uniform(10)
println(random < 5 ? "Hi" : "Ho")
Depending on your point of view, that’s either much clearer than the code we started with, or it’s impossible to read.
The for Statement
Swift has two variants of the for statement. The first is very much like the one that will be familiar to anybody who has worked with a C-based language:
for var i = 0; i < 10; i++ {
    println(i)
}
As with the if statement, you don’t have to enclose the first part in parentheses, but the braces around the loop code block are required. As in C, you can use the break statement to prematurely end the loop, or you can use the continue statement to interrupt the current iteration and start the next.
The second variant allows you to iterate over a sequence of values, such as a range or a collection. This code produces the same result as the for loop shown earlier:
for i in 0..<10 {
    println(i)
}
Notice that you don’t need to use var to introduce the variable when using this form. You can create and iterate over a more general range by using the stride() function in the standard Swift library. Here’s an example that prints the even integers from 10 down to 0, inclusively:
for i in stride(from: 10, through: 0, by: -2) {
    println(i)
}
Looping over the elements of an array is very simple and the intent of the code is more obvious than it would be with an indexed loop:
let strings = ["A", "B", "C"]
for string in strings {
    println(string)
}
You can iterate over the keys of a dictionary by using its keys property, although the iteration order is undefined since dictionaries do not provide any ordering:
let d = [ 0: "Red", 1: "Green", 2: "Blue"]
for key in d.keys {
    println("(key) -> (d[key])")
}
You can do the same thing more directly by iterating the dictionary as a set of key-value pairs:
for (key, value) in d {
    println("(key) -> (value)")
}
Each key-value pair is returned as tuple with two elements, where the name key is linked to the first element of the tuple and the name value to the second. Refer to the Swift Programming Language book for further discussion of tuples.
The do and while Statements
The do and while statements are the same as their counterparts in C, C++, Java, and Objective-C. They both execute a body of code until a condition is met; the difference being that the while statement tests the condition before each pass of the loop, whereas do tests it at the end of each pass:
var i = 10
while i > 0 {
    println(i--)
}

var j = 10
do {
    println(j--)
} while j > 0
The switch Statement
The Swift switch statement is very powerful. We don’t have space here to talk about all of its features, but you should definitely read about it in more detail in Apple’s Swift Programming Language book. We’ll illustrate just the most important features with a few examples.
You can use the switch statement to select a code path based on one of several possible values of a variable or expression. For example, this code prints something different based on the value of the value variable:
var value: UInt = 11
switch value {
case 2, 3, 5, 7, 11, 13, 17, 19:
    println("Count is prime and less than 20")

case 20...30:
    println("Count is between 20 and 30")

default:
    println("Greater than 30")
}
There are several points to note about this code. First, a case can have multiple possible values, separated by commas. The case is executed if the switch expression has any of the listed values. Second, the case value can be a range. In fact, the switch statement is capable of pattern matching, the details of which are covered in Apple’s documentation. Third, control does not pass from one case into another, as it does in most other languages. That means that the preceding example will execute only one case and print only once; it is not necessary to include a break statement between cases in a switch. If you really want to continue execution from one case into the following case, you can do so by adding a fallthrough statement at the end of the first case.
The case list must be exhaustive: if the default case had not been included in the preceding code, the compiler would have flagged an error. Furthermore, every case must have at least one line of executable code. That means that the following code is not legal (and is also misleading):
switch (value) {
case 2:
case 3:  // Illegal – previous case is empty.
        println("Value is 2 or 3")
default:
    println("Value is neither 2 nor 3")
}
The correct way to write that code is to include both 2 and 3 in the same case:
switch (value) {
case 2, 3:   // Correct: catches value 2 and value 3
        println("Value is 2 or 3")
default:
    println("Value is neither 2 nor 3")
}
The switch expression does not have to be numeric. Here’s an example that switches based on the value of a string:
let s = "Hello"
switch s {
case "Hello":
    println("Hello to you, too")

case "Goodbye":
    println("See you tomorrow")

default:
    println("I don't understand")
}
This one uses the Status enumeration that we defined earlier and shows how to get access to the associated value of an enumeration case that has one:
enum Status {
    case OK
    case ERROR(String)
}
let result = Status.ERROR("Network connection rejected")
switch (result) {
case .OK:
    println("Success!")

case .ERROR(let message):
    println("Ooop: (message)")
}
Since the compiler knows that the type of the switch expression is Status, there is no need to fully qualify the case values; we can say .OK instead of Status.OK. The compiler also knows that the enumeration only has two possible values, and since both of those values are listed as cases, there is no need to add a default case. Notice the form of the .ERROR case: the .ERROR(let message) causes the compiler to extract the associated value of the ERROR and assign it to a constant called message, which is valid only in the scope of the case itself. If the enumeration has more than one associated value, you can get all of the values by including one let statement for each, separated by commas.
Unlike many other languages, Swift uses a keyword (func) to denote a function. To define a function, you need to give its name, its argument list, and its return type. This function calculates and returns the area of a rectangle given the lengths of its sides:
func areaOfRectangle(width: Double, height: Double) -> Double {
    return width * height
}
The function arguments are enclosed in parentheses, separated by commas, and written in the same way as variable declarations—that is, name followed by type. Unlike variable declarations, though, specifying the type is not optional. If the function has no arguments, the parentheses must be empty:
func hello() {
    println("Hello, world")
}
If the function returns a value, the type of that value must be given, preceded by the symbol ->. In this case, the arguments are both Doubles, as is the return value. If the function doesn’t return anything, you can either omit the return type (as shown in the definition of the preceding hello() function), or you can write it as -> Void. Here’s a function that either does nothing or prints its argument, depending on the value of the debug variable, and returns nothing:
var debug = true   // Enables debugging
func debugPrint(value: Double) {
    if debug {
        println(value)
    }
}
The definition of this function could also be written slightly more verbosely, like this:
func debugPrint(value: Double) -> Void { // "-> Void" is optional
To invoke a function, refer to it by name and supply the appropriate arguments:
let area = areaOfRectangle(20, 10)
One of the most unusual features of Swift is that function arguments can have two names—an external name and an internal name. It’s always optional to supply an external name. If you don’t supply one, the external name is taken to be the same as the internal one. Here’s another way to write the areaOfRectangle() function, this time with both external and internal argument names:
func areaOfRectangle(width w: Double, height h: Double) -> Double {
    return w * h
}
When you specify both an external and an internal argument name, the external name comes first; if you only supply one argument name, then it is the internal argument name and there is no external name. Notice that the body of the code uses the internal argument names (w and h), not the external names (width and height). So why would you want to use external argument names? This feature is partly motivated by the naming conventions used for Objective-C methods, which need to mapped by the compiler so that they can be called from Swift. We’ll say more about that when we examine Swift classes later in this appendix. In this example, the only benefit of adding external names is that if they exist, the caller is required to supply them when invoking the function, which makes the code more readable:
let area = areaOfRectangle(width: 20, height: 10) // "width" and "height" are mandatory
If you want the external and internal argument names to be the same but still require the caller to supply them, you can use the following shorthand:
func areaOfRectangle(#width: Double, #height: Double) -> Double {
    return width * height
}
The syntax #width: Double means the same thing as width width: Double.
You can provide a default value for a function argument by including the value in the argument list. The following function breaks an input string into components separated by the given delimiter, and defaults the delimiter to a space if it’s not given:
func separateWords(str: String, delimiter: String = " ") -> [String] {
    return str.componentsSeparatedByString(delimiter)
}
You can call this function without supplying an explicit delimiter, in which case a single space is used as the delimiter:
let result = separateWords("One small step")
println(result)    // [One, small, step]
Swift automatically supplies an external name for an argument with a default value, making it the same as the internal name (although you can override this by supplying your own external name). That means that the argument name must be used if its value is not defaulted:
let result = separateWords("One. Two. Three", delimiter: ". ")  // "delimiter" is required
println(result)    // [One, Two, Three]
If you really don’t want to force the user to include the argument name, you can write the external name as _, although this is not recommended because it reduces readability:
func separateWords(str: String, _ delimiter: String = " ") -> [String] {
    return str.componentsSeparatedByString(delimiter)
}

let result = separateWords("One. Two. Three", ". ")
println(result)
In Swift, functions are types, so you can create a variable of function type, assign a reference to a function to it, and use that variable to call the function. Similarly, you can pass a function as an argument to another function or return a function from a function.
To declare a function variable, you specify the function’s signature as the type of the variable. The signature consists of the function’s argument types in parentheses (unless there is just one argument, when the parentheses can be omitted), followed by ->, followed by the return type. The following code creates a variable that can hold a reference to a function that performs an unspecified operation on a Double and returns another Double:
var operation: (Double) -> Double
In this case, since there is only one function argument, the parentheses can be omitted:
var operation: Double -> Double
You can write functions that operate on a Double and assign any of those functions to the variable. For example:
func double(number: Double) -> Double {
    return 2 * number
}
operation = double
Now you can invoke the function using the function variable, supplying the argument as if you were directly calling the function:
operation(2) // Result is 4
You can make the operation variable refer to a different function and perform a different operation using the same call expression:
func quadruple(number: Double) -> Double {
    return 4 * number
}
operation = quadruple
operation(2)    // Result is 8
The ability to pass functions around in this way is very powerful. There are several functions in the Swift standard library that accept function arguments. One of them is the sort() function, which sorts an array based on an ordering provided by a function that’s passed as its argument. The ordering function is required to accept two arguments, which are elements of the array being sorted, and return the Bool value true if the first argument is less than the second and false otherwise. Here’s an example of such a function that compares two Ints:
func compareInts(first: Int, second: Int) -> Bool {
    return first < second
}
Now you can create an array of Ints and use sort() and the compareInts() function to sort them. To do so, pass the compareInts() function an argument to sort(), like this:
var values = [12, 3, 5, -4, 16, 18]
values.sort(compareInts)
values   // Result:  [-4, 3, 5, 12, 16, 18]
The sort() function sorts the array in place. There’s a similar function called sorted() that leaves the array unchanged and returns a new, sorted copy:
let values = [12, 3, 5, -4, 16, 18]
let sorted = values.sorted(compareInts)
sorted       // Result:  [-4, 3, 5, 12, 16, 18]
values       // Unchanged: [12, 3, 5, -4, 16, 18]
Swift takes this one step further by allowing you to write the comparison function right in the argument list of the sort() call. This means you don’t have to separately define a function and give it a name that’s not otherwise used. Here’s how you would sort the values list using that technique:
let sorted = values.sorted({(first: Int, second: Int) -> Bool in
    return first < second
})
This probably looks ridiculously complex at first, so let’s break it down. The comparison function must be enclosed in braces. After that, the first part of the definition is just its argument list and its return type, followed by the keyword in, which separates the arguments and return type from the function body:
{(first: Int, second: Int) -> Bool in
Next, we have the body of the function, which is the same as the original code from the compareInts() function, followed by the closing brace and the parenthesis that closes the argument list of the sorted() function:
    return first < second
})
There’s a name for this kind of anonymous function that’s written in-place: it’s called a closure. Once you’re used to how it works, you’ll probably find yourself making a lot of use of closures.
If a closure is the final argument of a function, Swift lets you clean the syntax up a bit by taking it outside the function’s argument list, like this:
let sorted = values.sorted() {   // The closure is now outside the parentheses
        (first: Int, second: Int) -> Bool in
             return first < second
    }
That’s still quite a lot of code. Fortunately, we can clean it up a little more. Swift can infer that the closure requires two Int arguments and must return a Bool. It knows this because of the way in which the sorted() function is defined in the standard library. Because of this, we can omit the argument types, the parentheses around the argument names, and the return type, leaving us with just this:
let sorted = values.sorted() {
    first, second in   // Swift infers the argument types and return type!
         return first < second
    }
That’s much better. But we can take it one step further by omitting the argument names too! Swift knows there are two arguments, and if you don’t name them, it calls them $0 and $1 (and $2, $3, etc., if there were more). That lets you reduce our closure to just one line of code:
let sorted = values.sorted() { return $0 < $1 }
That’s not quite the end. Swift also lets you drop the return keyword! So finally we get to this:
let sorted = values.sorted() { $0 < $1 }
We think you’ll agree, that’s a lot more expressive than what we started with. Or at least it is once you’re used to reading the somewhat terse syntax. Experiment with this in the playground, try out some variations, and see what works and what doesn’t.
If you’re wondering why closures are called closures, it’s because they “close over” variables that are in their scope when they are created. That means that they can read and even write those variables. It’s difficult to appreciate how useful this is without the correct context. You’ll see examples in the rest of the book that illustrate the point. For now, let’s just demonstrate that we can write a closure that uses a value that’s defined outside of the closure. Take a look at the following code:
func getInterestCalculator(rate: Double) -> (Double, Int) -> Double {
    let calculator = {
        (amount: Double, years: Int) -> Double in rate * amount * Double(years)
    }
    return calculator
}
The function signature tells us that the getInterestCalculator() function requires an argument of type Double and returns a function. The returned function requires two arguments—a Double and an Int—and it returns a Double. What we’re actually doing here is passing an interest rate to the getInterestCalculator() function and it’s going to return to us a function that will calculate simple interest at the given rate.
Inside the getInterestCalculator() function, we create a closure and assign it to the calculator variable:
let calculator = {
        (amount: Double, years: Int) -> Double in rate * amount * Double(years)
    }
As you can see, the closure function requires the amount as a Double, and the period over which interest will be calculated in years as an Int. Notice that the body of the closure uses the rate argument that was passed to the getInterestCalculator() function. Finally, the closure is returned to the caller of getInterestCalculator().
Now let’s write some code that calls this function and uses the function that it returns:
let calculator = getInterestCalculator(0.05)
calculator(100.0, 2)   // Result is 10.0: interest at 5% on $100 over 2 years.
The returned function is assigned to the calculator constant and then it’s invoked to compute the interest on $100 over two years, at an interest rate of 5%. What’s so interesting about this? Well, think about what is happening here. The returned closure is referencing the value of the rate argument of the getInterestCalculator() function, but it’s doing so after that function has returned! How is that possible? It works because the closure captures the function argument by referencing it. When a variable is captured by a closure as the closure is being created, a copy of its value is taken and that copy is used when the closure is executed. That’s how the interest rate value that was passed as an argument to getInterestCalculator() is made available to the closure after the argument itself no longer exists.
Classes and Structures
Swift provides two different ways to create custom types—classes and structures. Both may contain properties, initializers, and methods. A property is a variable defined within the body of a class or structure; a method is a function defined in a class or structure; and an initializer is a special type of method that is used to establish the initial state of a class or structure instance while it’s being created.
There are two main differences between classes and structures:
- Classes are reference types, whereas structures are value types. That means that when you pass an instance of a structure to a function, return an instance from a function, or assign the value of a variable that refers to a structure to another variable, the instance is copied. In other words, structures exhibit pass-by-value behavior. Swift strings, arrays, and dictionaries are all implemented as structures. By contrast, class instances are passed by reference—no copy is taken.
- Classes can be subclassed to add behavior; structures cannot.
Structures
Here’s an example of a structure that represents a circle with a given radius:
struct CircleStruct {
    var radius: Double

    func getArea() -> Double {
        return M_PI * radius * radius
    }

    func getCircumference() -> Double {
        return 2 * M_PI * radius
    }
}
The circle has one property that holds its radius. It also has two methods that return the circle’s area and circumference.
Swift automatically creates an initializer for a structure that assigns values to its properties using the initializer’s arguments. Here’s how you would use that initializer to create an instance of CircleStruct:
var circleStruct = CircleStruct(radius: 10)
The synthesized initializer for a structure has one argument for each property. The argument names are the same as the property names and they appear in the order that the properties are defined in the structure itself. Notice that the argument names are required when using the initializer: this is because the initializer arguments have both external and internal names.
Once you have created a structure instance, you can directly read and modify the properties using the property name. The following code reads the radius of the circle and then doubles it:
var circleStruct = CircleStruct(radius: 10)
let r = circleStruct.radius         // Reads the radius property – result = 10
circleStruct.radius = 2 * r         // Doubles the radius.
Structures are value objects, so the following code creates a copy of the original CircleStruct object and assigns it to the newCircleStruct variable. Changes made to the radius property using the newCircleStruct variable do not affect the original, and vice versa:
var newCircleStruct = circleStruct   // Copies the structure
newCircleStruct.radius = 32          // Affects only the copy
newCircleStruct.radius               // New value: 32
circleStruct.radius                  // Old value: 20
If you assign a structure to a constant, all of its properties become read-only:
let constantCircleStruct = CircleStruct(radius: 5)
constantCircleStruct.radius = 10    // Invalid: constantCircleStruct is constant
Swift requires that all properties of a structure (or class) be initialized before the initializer finishes execution. You can choose to set property values in the initializer itself or as part of the property definition. Here’s a slightly different implementation of the CircleStruct structure that initializes the radius to a default value of 1 when it’s defined:
struct CircleStruct {
    var radius: Double = 1

    init() {
    }

    init(radius: Double) {
        self.radius = radius
    }

    func getArea() -> Double {
        return M_PI * radius * radius
    }

    func getCircumference() -> Double {
        return 2 * M_PI * radius
    }
}
Notice that the structure now has two initializers (initializers are always called init): one that takes no arguments and another that takes the radius as its argument. The first initializer lets you create an instance of the structure using the default radius set by the definition of the radius property:
let circleStructDefault = CircleStruct()
circleStructDefault.radius    // Result is 1.0
The second initializer assigns its argument to the radius property:
init(radius: Double) {
    self.radius = radius
}
Before we added the zero-argument initializer, we didn’t need to write this one because Swift created it for us; but it does not do that if you add initializers of your own. Notice that the assignment to the property uses the form self.radius. The self variable represents the instance of the structure that’s being initialized. In method calls, it represents the instance on which the method was invoked. Usually, you don’t need to qualify the property access with self, but in this case we need to do so because the initializer argument has the same name as the property.
As noted, by default, Swift requires you to use the initializer argument name when creating a structure instance (as you’ll soon see, the same applies to classes). When you define your own initializer, you can opt out of this by using _ as an external argument name, as shown by the following modification to the second CircleStruct initializer:
init(_ radius: Double) {
    self.radius = radius
}
With this change, you must use the initializer like this:
var circleStruct = CircleStruct(10) // Argument name must be omitted
The implementations of the getArea() and getCircumference() methods don’t introduce anything new; they just perform a simple calculation using the value of the radius property. Notice that here we don’t use self when reading the property value, although we could. This version of the getArea() method is equivalent to the one shown previously:
func getArea() -> Double {
    return M_PI * self.radius * self.radius  // Explicit use of "self" – not recommended
}
You invoke these methods just like any other function, except that an instance of the structure is required:
let circleStructDefault = CircleStruct()
circleStructDefault.getArea()            // Returns the area
circleStructDefault.getCircumference()   // Returns the circumference
Creating a class is syntactically very similar to creating a structure, but there are a few differences to be aware of. Here’s an implementation of a circle as a class:
class CircleClass {
    var radius: Double = 1

    init() {
    }

    init(radius: Double) {
        self.radius = radius
    }

    func getArea() -> Double {
        return M_PI * radius * radius
    }

    func getCircumference() -> Double {
        return 2 * M_PI * radius
    }
}
The only difference between this and the structure version is the keyword class instead of struct, but there are some differences in the way that Swift handles class and structure initializers:
- Swift does not create an initializer that sets the initial values of the properties of a class. Instead, it creates an empty init() initializer.
- As with structures, if you add initializers of your own, you no longer get the free init() initializer.
In the case of CircleClass, the presence of the init(radius: Double) initializer means that Swift would not generate the init() version, so we had to add it ourselves.
You can use either initializer to create a CircleClass instance, depending on whether you want to set the radius:
var circleClassDefault = CircleClass()         // Sets the default radis
circleClassDefault.radius                      // Result is 1.0
var circleClass = CircleClass(radius: 10)      // Explicitly set the radius
circleClass.radius                             // Result is 10.0
Classes are not value objects, so assigning a class instance to a variable or passing one to a function does not create a copy, as the following code demonstrates:
var newCircleClass = circleClass    // Does not copy
newCircleClass.radius = 32          // Only one copy, so this change is visible...
newCircleClass.radius               // ...through both refences. Result is 32
circleClass.radius                  // Result is 32
The radius property of our circle is called a stored property, because the value is stored with the class or structure. It’s also possible to have computed properties, which don’t have storage of their own. Instead, you calculate the value of the property every time it’s read. The area and circumference of a circle could be regarded as properties, so we could reasonably reimplement them as calculated properties. Here’s how you would do that for CircleClass (the implementation would be the same for CircleStruct):
class CircleClass {
    var radius: Double = 1
    var area: Double {
        return M_PI * radius * radius
    }

    var circumference: Double {
        return 2 * M_PI * radius
    }

    init() {
    }

    init(radius: Double) {
        self.radius = radius
    }
}
The syntax is very simple: you state the property name and its type (which is mandatory for a computed property), followed by a code block containing the code required to calculate the property value. With area and circumference as properties, we can get their values with slightly fewer keystrokes than when using a method:
let circleClass = CircleClass(radius: 10)
circleClass.area
circleClass.circumference
We are actually using a shortcut in the implementation of these properties; the full form of the area property, for example, would be:
var area: Double {
    get {
        return M_PI * radius * radius
    }
}
The difference is the get keyword and the additional set of braces around the code that calculates the property value. Since area is a read-only property, we haven’t implemented a setter, so Swift allows us to omit this extra boilerplate.
It’s perfectly possible to regard area as a settable property; though, if a new area is set, we can calculate and store the corresponding radius—and similarly for circumference. To make a property settable, you need to add a set block, and put back the get boilerplate if you omitted it. Here’s how you would implement the setters for area and circumference:
var area: Double {
    get {
        return M_PI * radius * radius
    }

    set {
        radius = sqrt(newValue/M_PI)
    }
}

var circumference: Double {
    get {
        return 2 * M_PI * radius
    }

    set {
        radius = newValue/(2 * M_PI)
    }
}
In the implementation of the setter, you get the value that’s being set from a variable called newValue. If you don’t like that name, you can choose one of your own by declaring it after the set keyword:
set (value) {
    radius = value/(2 * M_PI)
}
Now that these properties are settable, we can use them to find out the radius for a given circumference or area:
circleClass.area = 314
circleClass.radius       // Radius for area 314 is 9.997
circleClass.circumference = 100
circleClass.radius       // Radius for circumference 100 is 15.915
Swift supports adding code to observe changes to a stored (but not computed) property. To do so, you add a willSet or didSet block (or both) to the property definition. These blocks are called whenever the property value is being set, even if the new and old values are the same, except when the property is being initialized. The willSet block is called before the new value is assigned to the property and didSet is called after the assignment. A typical use for a property observer is to ensure that the property can only be assigned valid values. Here’s how you would modify the radius property in CircleClass to make sure that only non-negative values can be assigned:
class CircleClass {
    var radius: Double = 1 {
        didSet {
            if (radius < 0) {
                radius = oldValue
            }
        }
    }
When the didSet block is called, the new value has already been stored in the radius property. If it’s negative, we set it back to the previous value, which we can get from the oldValue variable. As with property setter blocks, you can change the name of this variable if you want to. Setting the property value from within the didSet block does not cause the property observer blocks to be invoked again. With this change, an attempt to set a negative radius is ignored:
circleClass.radius = 10    // Valid: radius set to 10
circleClass.radius         // Result: 10.0
circleClass.radius = -1    // Invalid – trapped by didSet block
circleClass.radius         // Result: 10.0
You’ve seen that class and structure methods are very much like functions, but there are a couple of differences in the treatment of method arguments and the mutability of structures. Let’s briefly look at these differences.
As you probably recall, by default, you are not required to use argument names when calling a function, unless the function definition includes external argument names. By contrast, Swift automatically defines external names for initializers and requires you to use them—unless you force it not to by using _ as the external argument name. For methods, there is a slightly different default behavior, as follows:
- The first method argument does not have an external name, so you simply pass the argument value with no name.
- The second and subsequent arguments are automatically given external argument names that are the same as the internal names. This means that you must supply the argument names for these arguments.
The reason for this apparently strange convention is that it works well for Objective-C methods when they are imported into Swift.
Let’s see how this works in practice by adding a new method to CircleClass called adjustRadiusBy, which adjusts the circle’s radius by a given amount a specified number of times. Here’s the method definition:
func adjustRadiusBy(amount: Double, times: Int = 1) {
    radius += amount * Double(times)
}
Notice that we’re using the syntax to make the second argument optional. With this definition, you call this method as follows:
var circleClass = CircleClass(radius: 10)
circleClass.radius                      // Result: 10
circleClass.adjustRadiusBy(5, times: 3)
circleClass.radius                      // Result = 10 + 3 * 5 = 25
circleClass.adjustRadiusBy(5)           // "times" is defaulted to 1
circleClass.radius                      // Result = 30
What if you really want the user of your method to have to supply both argument names? That’s easy. You just supply an external argument name for the first argument, like this:
func adjustRadiusBy(amount amount: Double, times: Int = 1) {
     radius += amount * Double(times)
}
In fact, if you want the external and internal argument names to be the same, you can replace amount amount with #amount:
func adjustRadiusBy(#amount: Double, times: Int = 1) {
     radius += amount * Double(times)
}
Now both argument names are required:
circleClass.adjustRadiusBy(amount: 5, times: 3)
Taking things to the other extreme, you can make it so that neither argument name is required by supplying _ as the external name, as you have already seen. You don’t need to do this for the first argument, of course:
func adjustRadiusBy(amount: Double, _ times: Int = 1) {
    radius += amount * Double(times)
 }
Now the method is called like this:
circleClass.adjustRadiusBy(5, 3)
Although the compiler lets you do this, it’s not very readable, so let’s book the original definition back:
func adjustRadiusBy(amount: Double, times: Int = 1) {
    radius += amount * Double(times)
 }
In principle, you can add the same method to the CircleStruct structure:
struct CircleStruct {
    var radius: Double = 1

    init() {
    }

    init(radius: Double) {
        self.radius = radius
    }

    func getArea() -> Double {
        return M_PI * radius * radius
    }

    func getCircumference() -> Double {
        return 2 * M_PI * radius
    }

    func adjustRadiusBy(amount: Double, times: Int = 1) {
        radius += amount * Double(times)
    }
}
Unfortunately, this does not compile. By default, structure methods cannot mutate the structure’s state. This is because you are encouraged to make value objects immutable, if possible. If you really want to add a mutating method like this one, you have to add the mutating keyword to its definition:
mutating func adjustRadiusBy(amount: Double, times: Int = 1) {
    radius += amount * Double(times)
}
How do you call a method, or access a property of an optional? You first have to unwrap the optional. You need to be very careful when doing this because, as you already know, unwrapping an optional that is nil causes your application to crash. Suppose we have the following variable and we want to get the radius of whatever circle it’s pointing at:
var optionalCircle: CircleClass?
Since the value of optionalCircle could be nil (and, in this case, it is), we can’t just do this:
optionalCircle!.radius // CRASH!
Instead, we need to check whether optionalCircle is nil before unwrapping it, like this:
if (optionalCircle != nil) {
    optionalCircle!.radius
}
This is safe, but it’s really too much code. There’s a better way, which is called optional chaining. Instead of using ! to unwrap the optional, you use ?. Using optional chaining, you can go back to writing just one line of code:
var optionalCircle: CircleClass?
var radius = optionalCircle?.radius
When optional chaining is in use, the property access occurs only if optionalCircle is not nil, and since there may be no value to assign to the radius variable, Swift infers its type as Int? instead of Int. The real value of this comes if you have objects embedded in other objects, where the references to the embedded objects are optionals. To follow the chain of objects to the value that you want, you would have had to make a nil check for each reference. With optional chaining, you can let Swift do the hard work for you by using an expression like this:
outerObject?.innerObject?.property
Optional chaining also works for method calls:
var optionalCircle: CircleClass?
optionalCircle?.adjustRadiusBy(5, times: 3)
The method call happens only if optionalCircle is not nil; if it is nil, the call is skipped.
So we’ve got a fairly useful class that represents a circle. What if we wanted to add something new to it? For example, let’s say we want to add a color property. Well, we would just add the property to the existing class definition and we’re done. But what if we don’t own the CircleClass class? Maybe it’s part of a third-party framework. We can’t modify the source code. In many cases like this, we might be able to add an extension to the class. Extensions let you add functionality to any class—even classes that you don’t own, and sometimes that’s the right thing to do. In this case, though, it’s not the right thing because we want to add a stored property—and that’s something that you can’t do with an extension, as you’ll find out when we discuss extensions at the end of this appendix. Instead, we’ll extend the class by creating a subclass. Subclasses inherit the properties and methods of the class from which they are derived (their base class). If what the subclass provides isn’t quite right, you can override its behavior, keeping what you want and changing what you need to (subject, of course, to the base class being properly designed).
In this section, we’re going to extend CircleClass and create ColoredCircleClass. ColoredCircleClass will have the same features as CircleClass—it will still have the radius, area, and circumference properties—and it will have a new color property. Before we get started on that, let’s add a few more things to CircleClass so that you can see how to override them in a derived class.
Note You can extend classes by subclassing, but you can’t do the same with a structure. If you want to add functionality to a structure, your only recourse is to use an extension.
Clear everything from your playground and enter the following modified definition of CircleClass:
class CircleClass {
    var radius: Double = 1 {
        didSet {
            if (radius < 0) {
                radius = oldValue
            }
        }
    }
    var area: Double {
        get {
            return M_PI * radius * radius
        }

        set {
            radius = sqrt(newValue/M_PI)
        }
    }

    var circumference: Double {
        get {
            return 2 * M_PI * radius
        }

        set {
            radius = newValue/(2 * M_PI)
        }
    }

    var description: String {
        return "Circle of radius (radius)"
    }

    required init() {
    }

    init(radius: Double) {
        self.radius = radius
    }

    func adjustRadiusBy(amount: Double, times: Int = 1) {
        radius += amount * Double(times)
    }

    func reset() {
        radius = 1;
    }
}
The parts that have been added or changed are highlighted in bold. Let’s go through them.
First, we added a computed description property that just returns a description of the class in string form. It’s a computed property because we want the return value to contain the current radius, which can change. In our ColoredCircleClass, we’ll want to add the circle’s color to this description and we’ll do so by overriding the version of the property.
Next, we added the keyword required to the initializer with no arguments. It’s very useful to have an initializer like this one that sets every property to a default value. The designer of this class thought it was so useful that he wanted to ensure that any subclass that’s created also provides such an initializer. Adding required to the initializer achieves that because the Swift compiler will ensure that subclasses also implement an init() initializer; furthermore, it will ensure that it’s also marked as required so that subclasses of the subclass have the same obligation. In ColoredCircleClass, we’ll set a default color in our version of this initializer.
Finally, we added a reset() method that reverts the radius property to its default value. We’ll need to override this in our subclass to also reset the circle’s new color property.
We know what we have to do. Let’s do it. As you read through what follows, add the new code to your playground. As you go along, you will encounter errors and warnings; don’t worry about those because we’ll fix them as we go along.
First, we need to create our subclass and tell the Swift compiler that its base class is CircleClass. Here’s how we do that:
class ColoredCircleClass : CircleClass {
}
This is the normal way to start a class definition, apart from the part in bold, which tells Swift that ColoredCircleClass has CircleClass as its base class. Any class can have exactly one base class, which must be declared in this way. As you’ll see soon, it can also claim conformance to one or more protocols, which would also be listed here.
Next, we add the new stored property in the usual way:
class ColoredCircleClass : CircleClass {
    var color: UIColor = UIColor.blackColor()
}
The type of our property is UIColor—a class from the UIKit framework that represents a color. We’ve initialized the property to a UIColor instance that represents black. Next, let’s override the description property to add our color to the returned string. Here’s how we do that:
class ColoredCircleClass : CircleClass {
    var color: UIColor = UIColor.blackColor()

    override var description: String {
        return super.description + ", color (color)"
    }
}
The first thing to notice is the override keyword, which tells the compiler that we are aware that there is already a definition of a description property in the base class and we are intentionally overriding it. In some languages, it’s very easy to accidentally create a method or a property of the same name as something in the base class without realizing it. That can lead to bugs that are hard to find.
The new implementation of this property first calls the base class version using the expression super.description. The keyword super tells the compiler that we want to reference the description property of our super class (the one from which we are derived), not our own. Having done that, it then adds a string representation of our color property. The result will be that the description will include both the radius (from the super class) and the color (from this class).
Moving on, we need to add the required override of the init() initializer. Here it is:
required init() {
    super.init()
}
Every initializer is required to ensure that all the properties of its own class are initialized, and then ensure that its base class does the same. We only have the color property, and it is initialized at the point of declaration. So all we have to do is give the base class an opportunity to initialize its own state, which we do by calling super.init(). If we had any other properties that we needed to initialize, the compiler requires us to set them before calling super.init(). Also, note the required keyword, which is necessary because the base class init() is marked as required.
Next, we need an initializer that sets nondefault radius and color values. Add the following code to the class:
init(radius: Double, color: UIColor) {
    self.color = color
    super.init(radius: radius)
}
We first set the value of our Color property from the initializer argument, and then we pass the radius value to the initializer of the base class. That’s all we need to do.
The last thing we need to do is override the reset() method to reset the color property to black. By now, you should be familiar with what’s required:
override func reset() {
    super.reset()
    color = UIColor.blackColor()
}
As before, the override key tells the compiler that we are overriding a method from the base class (by the way, if we mistyped the name and called it, say, “resets”, the compiler would complain that there is no such method in the base class; that’s another benefit we get from the override keyword). The rest of this method follows the pattern you’ve seen before; do your part of the work—and delegate to the base class to do its part using the super keyword to invoke the base class method. Here, it doesn’t matter whether we do our part first, or call the base class method.
That’s it! Let’s try out the default initializer:
var coloredCircle = ColoredCircleClass()
coloredCircle.radius          // Result: 1
coloredCircle.color           // Result: black
coloredCircle.description
       // Result: "Circle of radius 1.0, color UIDeviceWhiteColorSpace 0 1"
When you type in this code, you’ll see that the color is actually displayed in the results area as a black square! The description isn’t quite so friendly, but you can see that it contains both the radius and the color.
Now let’s try out the other initializer:
coloredCircle = ColoredCircleClass(radius: 20, color: UIColor.redColor())
coloredCircle.radius    // Result: 20
coloredCircle.color     // Result: red
coloredCircle.description
                        // Result: "Circle of radius 20.0, color UIDeviceRGBColorSpace 1 0 0 1"
Subclassing is a very useful technique. Every example that you see in this book will use at least one subclass! It’s worth taking the time to review the “Initialization” and “Inheritance” sections in Apple’s Swift Programming Language book. There are a lot of subtle details that we didn’t have time to cover here.
Protocols
A protocol is the declaration of a group of methods, initializers, and properties to which a class, structure, or enumeration can conform by providing implementations of them. As you’ll see throughout this book, protocols are frequently used to define objects known as delegates, which provide hooks that allow you to customize the behavior of framework classes, react to events, and so forth.
Here’s the definition of a protocol called Resizable:
protocol Resizable {
    var width: Float { get set }
    var height: Float { get set }

    init(width: Float, height: Float)
    func resizeBy(#wFactor: Float, hFactor: Float) -> Void
}
The Resizable protocol requires any type that claims conformance to it to provide the two properties, one initializer, and one function that it declares. Notice that the protocol itself does not define anything; it simply dictates what a conforming type must do. Here’s a class called Rectangle that conforms to the Resizable protocol:
class Rectangle : Resizable, Printable {
    var width: Float
    var height: Float
    var description: String {
        return "Rectangle, width (width), height (height)"
    }

    required init(width: Float, height: Float) {
        self.width = width
        self.height = height
    }

    func resizeBy(#wFactor: Float, hFactor: Float) -> Void {
        width *= wFactor
        height *= hFactor
    }
}
A type declares that it conforms to a protocol by including the protocol name after the name of its base class, if any, in its declaration. This class conforms to both the Resizable protocol and the Printable protocol, which is defined in the Swift standard library.
As you can see, the class provides the actual implementation of the features required by the protocol. If a protocol requires the implementation of an initializer, then that initializer must be marked as required, as shown here. Instances of types that conform to a protocol can be assigned to variables of the protocol’s type, like this:
let r: Resizable = Rectangle(width: 10, height: 20)
Conformance to the Printable protocol requires the type to provide a String property called description, which is used when a human-readable representation of the type is required. In particular, this property is used when an instance of the conforming type is passed as an argument to the println() function:
let rect = Rectangle(width: 10, height: 20)
println(rect)    // Prints "Rectangle, width 10.0, height 20.0"
Note that at the time of writing, you won’t get the correct result if you run this code in a playground. However, it works if you replace println(rect) with println(rect.description). This is a known bug in Xcode’s implementation of playgrounds. The code works without changes if you include it in an application.
Extensions
Extensions are a powerful feature that Swift shares with Objective-C. An extension allows you to add functionality to any class, structure, or enumeration, including those in the standard Swift library or the system frameworks. The syntax of an extension definition is similar to that of classes and structures. The extension is introduced by the keyword extension followed by the name of the extended type and then the extensions themselves. You can add computed (but not stored) properties, methods, initializers, nested types, and protocol conformance to the extended type.
In Chapter 16, we use an extension to add a method to the UIColor class (from the UIKit framework) that returns a random color. Here’s how the extension is defined:
extension UIColor {
    class func randomColor() -> UIColor {
        let red = CGFloat(Double((arc4random() % 256))/255)
        let green = CGFloat(Double(arc4random() % 256)/255)
        let blue = CGFloat(Double(arc4random() % 256)/255)
        return UIColor(red: red, green: green, blue: blue, alpha:1.0)
    }
}
And here’s how it’s used:
let randomColor = UIColor.randomColor()
To Swiftly Go…
So now you’ve had a tour of the most important features of Swift. What you’ve seen here is by no means everything there is to know. We’ve left out quite a lot (and simplified some of the rest) and you should read the official documentation (or one of the books listed in Chapter 1) to expand your knowledge, when you have the time. In the meantime, turn back to Chapter 3 (or wherever you left off in the main part of this book) and start writing your first iOS application with Swift!