Japanese Toolbox
![]() TIME: 4 HOURS
TIME: 4 HOURS ![]() COST: $$
COST: $$
Build this strong wood box with a clever lift-out lid.
Written and photographed by Len Cullum
The first time I came across a box like this, it was housing a circular saw. It was made from rec room paneling, scrap pine, and roofing nails. While not much to look at, it was strong, and the action of the lift-out lid fascinated me. A couple of months later I learned that this is also the common design for a Japanese carpenter’s toolbox. I knew I had to make one, so with some 1×12s in hand, I had at it.
In the last 15 years, the box has carried my tools to nearly every big job. The trouble is, because I built it to fit in my hatchback instead of to fit my tools, it’s kind of big for what I need on most jobs. So instead of continuing to stuff tools into my old messenger bag, I figured it was time to build a new, smaller one.
Sizing
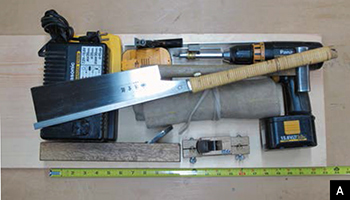
The first step was deciding how big I needed the box to be. Since I like the width of my old toolbox, I used the same 1×12 bottom. Generally, you want the box to accept your longest tool, which in this case is my saw. I found 23" to be a comfortable fit (Figure A).
With the length established, it was time to stack some tools. All together, they measured just over 5" high (Figure B), and since we lose a little height from the thickness of the lid (and you never know what else you’ll want to stuff in there) I went with 1×8 sides. After doing some math and a quick chalk layout, I determined that, with careful cutting, I could get all of my parts out of 2 boards.

Since I wanted to squeeze everything out of 2 boards, the layout was especially important. Figure C shows where each piece came from. Download the cutting diagram from makezine.com/projects/japanese-toolbox.
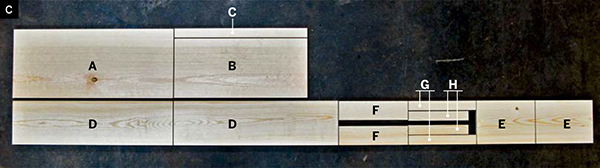
From the 1×12:
A: 11¼"×26" (bottom)
B: 911/16"×211/8" (lid)
C: 13/8"×211/8" (lid brace)
From the 1×8 (2 each):
D: 7¼"×26" (sides)
E: 7¼"× 9¾" (ends)
F: 3"×11¼" (top ends)
G: 1½"×11¼" (lid supports)
H: 1½"×9¾" (grips)
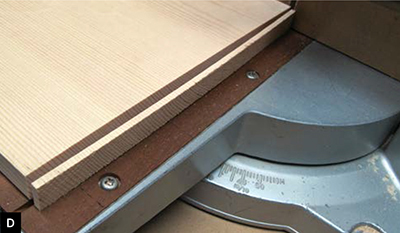
Starting with the 1×12, use a chop saw to trim away about ¼" to get rid of the factory end (Figure D); this will give you a cleaner, squarer, more reliable edge. Measure 211/8" from the fresh end and make the cut.
The bottom and sides are all 26", so to ensure they match, I set up a stop. On the 1×12, mark a line at 26" and align the board on the saw. Place a scrap piece against the cut end and clamp it in place. Check the cut alignment one more time and then make the cut.
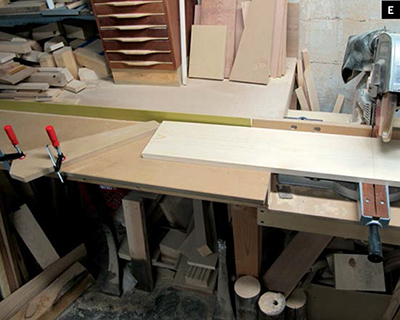
Take the 1×8, trim ¼" from the end, slide it carefully up against the stop (you don’t want to whack it out of position), and cut the 2 side pieces. Next, lay out 11¼", reset the stop, and cut 2 of those, and then the two 9¾" ends. Leave the stop in this position because you will use it again (Figure E).
Next are a couple of rip cuts. On a table saw, rip the lid piece to 91/4" wide, saving the offcut for the lid brace. From one 11¼" piece, rip two 3"-wide pieces. Lastly, from the other 11¼" piece, rip four 1½"-wide sticks. Of these 4 sticks, take 2 back to the chop saw, and using the 9¾" stop, cut the 2 grip pieces (keep these offcuts as well). And that’s it — you’re ready to assemble.
The method of assembly has a lot of options. Over the years I’ve constructed boxes using screws, nails, glue, joinery, and combinations of the four, all with good results. The point is to approach this however feels right to you. If you prefer nails, great! If you like cutting sliding dovetails, go for it!
The only thing that I would specifically recommend is to try to orient all of the boards with the bark side out (Figure F). This side of the board will generally remain smoother and will help keep the outside from developing snaggy bits when you sand or plane it.

Apply a bead of glue and then spread it across the surface (Figure G). Don’t spread it so thin that it dries before you assemble, but also don’t make it so thick that your parts are sliding around and a lot of glue is squeezing out (a little is okay).


For gluing I like to use an acid brush cut back to about half an inch long.
1. Attach the grips to the ends.
It’s important that the edges are all flush, so check the fit beforehand and take your time adjusting them before you fasten. Apply the glue and then lightly clamp the parts together (Figure H). Get them exactly where you want them before you fully tighten the clamps.

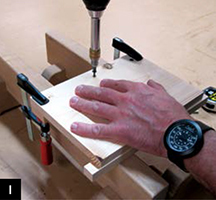
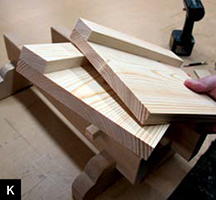
Flip the clamped pieces over. Mark the 3 holes ¾" in from the edge: 1" from each side and one centered. Drill and countersink, then fasten using 1¼" screws (Figures I, J, and K).

Putting the other end assembly loosely in place will help keep the sides from shifting.
2. Make the body.
Using an adjustable square set to 11/8", strike a line parallel to the ends, on the outside of both side pieces (Figure L). Then measure in from each edge and mark at 1" and 2¾". Pre-drill and countersink all 16 holes (Figure M).


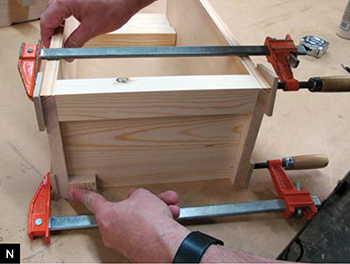
Apply glue to the ends of one end assembly and clamp in place. Again, make sure that everything is properly aligned before clamping tight. To make sure the bottom is set back the proper distance, I use one of those cutoffs from the grips (you saved those, right?) as a guide (Figure N).
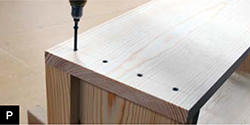
When everything is in its place, fasten with eight 15/8" screws. Because my clamp pads are in the way, I fasten the 2 center screws on each side first, then remove the clamps and drive the rest (Figures O and P). Repeat on the other end, making sure that the grips are both facing outward in the same direction.

3. Attach the bottom.
Flip the frame so that the grip side is down, and place the bottom. Lay out the fastener locations: for the sides at 3/8" from the edge, 1", 7", and 13" from either end. For the ends, the first one is at 2" (to avoid hitting side screws) and the center one is at 55/8". Drill.
Glue and clamp the bottom in place, making sure everything aligns, then fasten using 15/8" screws (Figure Q). Don’t be surprised if the bottom seems a little wider than the sides. It happens. No one knows why. You can sand or plane it flush later.

4. Attach the top ends.
Following the same procedure, drill, glue, clamp, and fasten the top ends (Figure R). Be especially careful when screwing or nailing the outer corners, as the wood is easy to split here. Pre-drilling is highly recommended. My screws are ½" from the end, but ¾" would be safer.

5. Make the lid.
For the lid to work right, make sure everything is positioned accurately. To start, make sure the lid board fits between the sides. It’s much easier to make adjustments to it now, before attaching the supports. It should be about 1/16" narrower than the opening and 1/8" longer.
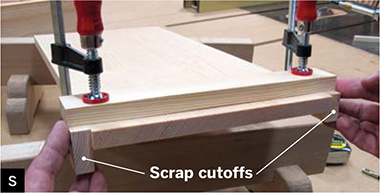
On top of the lid board, mark a line 1¼" in from one end — this is the long tab. Apply glue to one lid support (stopping about 1" from either end), and lightly clamp it along the line. Using those 2 grip cutoffs again, center the support along the line; it should slightly overhang the scraps (Figure S). Tighten the clamps, flip the board, and fasten using three 1¼" screws.
On the other end, mark a line 5/8" from the end (the short tab) and repeat the process. At this point, you can test the lid. Tilt the long tab in first, slide it in until it stops, drop the other end down, then slide it back.
Adding the diagonal is optional. I add it because I like the look, and it makes the lid stiffer and acts as a handle.
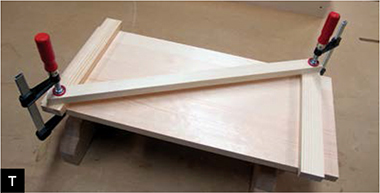
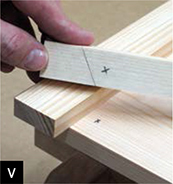
To add the lid brace, position it from corner to corner between the lid supports, and clamp it in place (Figure T). Using a sharp pencil, scribe a line on the underside (Figure U). To keep track of the orientation, after removing the clamps, make a reference mark at one end of both the brace and lid (Figure V). This is important because it often only fits one way.

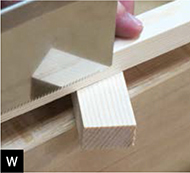
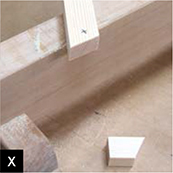
To save the hassle of adjusting the chop saw for these 2 cuts, I prefer to use a handsaw. I place a straight piece of scrap along the line, hold it tight, and run the saw against it (Figures W and X). Before cutting the other end, position the brace back on the lid to double check that the cut line is still good. Glue and fasten it in place.
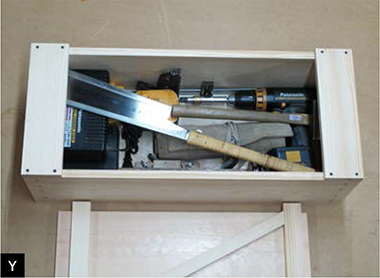
6. Wrap it up.
From here on the rest is up to you. Erase the lines or leave them, flush up the bottom if it needs it (mine did), round edges with sandpaper, and then fill it with tools (Figure Y). Or books. Or cupcakes! As for mine, I will stop here, slide it under the bench next to the larger one, and wait for the next job. ![]()
Len Cullum (shokunin-do.com) is a Seattle-based woodworker in the Japanese style. He makes shoji doors and windows, Japanese garden structures, and architectural elements.
A NOTE REGARDING WOOD MOVEMENT
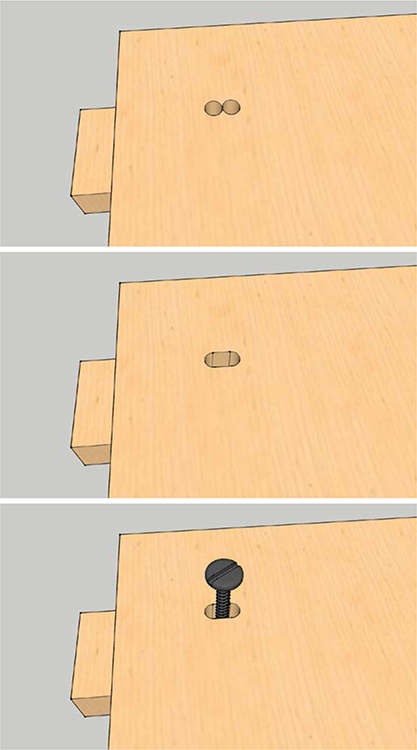
Because wood, especially unfinished wood, absorbs and releases moisture from the atmosphere throughout the year, it tends to shrink and swell across the grain. (Movement along the grain is negligible.) This means that a lid that you cut to fit perfectly in a dry week might become too tight during a rainy one. It also means that if you screw and glue a baton across the grain of a wide board (as we do here), when it tries to move the board will cup, making the lid tight during one part of the year and loose during the other.
One way to remedy this is to apply glue to only the center inch or two of the baton; then make slotted pilot holes for the outermost screws, to allow the lid board to shrink and swell freely. Another remedy is to use plywood for the lid board. That said, I’ve never slotted the pilot holes on these box lids. I’ve just dealt with the lid being tight sometimes. But if you are going to go bigger than this one, movement is something you’ll want to plan for.

To make a slotted pilot hole, simply drill one hole right next to another, and then file, chisel, or wiggle the drill bit back and forth until the web turns into a slot. Using a pan-head wood screw, attach the baton to the lid snugly, but not so tight that you are crushing the wood beneath the screw head.