![]() SKILL BUILDER
SKILL BUILDER
CNC Machining
EASY

THE SKINNY ON END MILLS
Written by Tyler Worman ![]() Illustrated by Rob Nance Photos by Anna Kaziunas France
Illustrated by Rob Nance Photos by Anna Kaziunas France
Don’t be intimidated by CNC routing. Take the first step into machining by gaining a solid understanding of subtractive tooling basics.

TYLER WORMAN
I'm a maker and software developer living in Ann Arbor, Michigan. I love playing with new microcontrollers and experimenting with rapid prototyping tools.
INTERESTED IN CNC ROUTING BUT CLUELESS ABOUT TOOLING? Can’t tell an end mill from a drill bit? Here’s an overview of end mill anatomy, some basic cutter types, and tips on how to choose the correct tooling for basic wood or plastic jobs.
Drill Bits vs. End Mills
CNC machining is a subtractive process that uses rotational cutting tools called “end mills” to remove material. An end mill, while similar in appearance to a drill bit, is far more versatile.
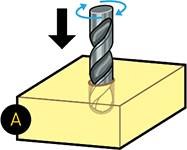
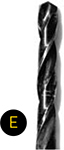
However, in practice the terms “bit” and “end mill” are often used interchangeably. Here’s the key difference. Drill bits are designed to plunge directly into material, cutting axially and creating cylindrical holes. ![]() End mills are typically used for horizontal carving and cut laterally.
End mills are typically used for horizontal carving and cut laterally.![]()
Additionally, most mills are “center- cutting,” meaning they are able to cut both axially and laterally. This is due to cutting flutes that extend to — and protrude from — the end face and enable plunge cutting.
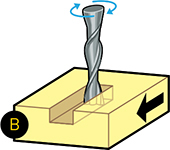
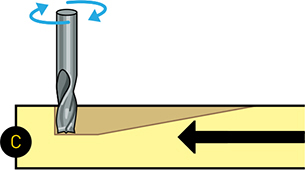
To minimize tool breakage and stress on the material being cut, most CNC software will “ramp” the end mill slowly into lateral cuts. ![]()
The project type, material being cut, and desired surface finish determines the tool geometry. Key tooling features include the diameter, shank, flutes, teeth, tip shape, center cutting capability, helix angle, helix direction, length of cut, and overall tool length. ![]()
Tip Shapes and Applications
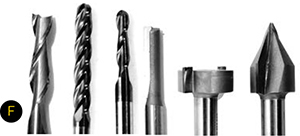
Each tip shape is designed for a particular purpose. Drill bits have a pointed center tip ![]() , while common end mill tip geometries include: fish tail, ballnose, straight, surface planing and v-bits.
, while common end mill tip geometries include: fish tail, ballnose, straight, surface planing and v-bits. ![]()
Fish tail cutters will produce a flat surface, while ballnose mills produce a rounded pass and are ideal for 3D contour work. V-bits produce a “V” shaped pass and are used for engraving, particularly for making signs.![]()
Flutes and Chipload
Flutes are the helical grooves that wrap around the sides of the end mill. Each flute has a single tooth with a sharp cutting edge (although there can be more than one) that runs along the edge of the flute.
As the tooth cuts into the wood, each flute whisks away a small section or “chip.” The fewer the flutes, the more material that is ejected with each tool rotation. ![]()

Chipload is the thickness of a machined chip as cut by a specific tool type. More flutes create a smoother surface finish, while fewer flutes remove material fastest, but make rougher cuts.
See our full tutorial (makezine.com/endmills) for more detail, but proper chipload is important because chips dissipate heat. Hot cutters can lead to suboptimal results, including burned wood, a poor edge finish and dull tooling.
If you’re machining a material like HDPE plastic, you want to use an “O” or single flute bit to clear the chips away as quickly as possible or heat will build up and melt the plastic, which can “reweld” to the tool.
Helical Direction, Chip Ejection and Surfaces Produced
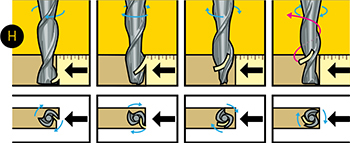
A CNC router spins a cutter clockwise. The helical direction of the flutes as they wrap around the tool determine if chips are ejected towards the top or bottom of the workpiece.
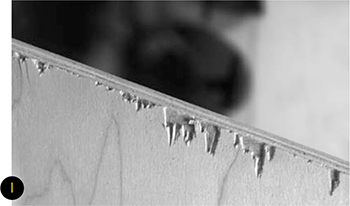
True to their name, upcut mills eject chips towards the top of the workpiece, producing a cleanly cut bottom surface. The downside is possible surface splintering or “tearout” on the top surface as the chips are ejected upwards. ![]()
Downcut tools do the opposite, producing a smooth upper surface. They are ideal for pieces that have been previously engraved or v-carved and cannot be flipped to hide tearout. In addition, as downcut mills pack the chips into the cut path, they can be used instead of tabs to hold down a workpiece and keep it from moving.
Which Cutters to Buy First?
If you are looking to purchase a great wood and plastic starter set, consider picking up a few of the following carbide tool types in ¼" and ⅛" diameters:
• 2 flute upcut and downcut end mills (great for hardwood and plywood)
• 2 or 4 flute ballnose mill (great for 3D contours)
• Single or “O” flute mill (great for plastics like HDPE and acrylic)
• 60° or 90° v-bit (great for cutting hardwood signs)
The quality of your work can be significantly improved by selecting the right tooling for your project and materials —plus you'll spend less time on hand-finishing. ![]()