
Traditional Cigar Box Guitar
By Mark Frauenfelder
Photography by Mark Frauenfelder
HAND-ROLLED MUSIC
Several years ago, MAKE featured an electric Cigar Box Guitar project (Volume 04, page 76). The project’s author, Ed Vogel, designed a simple instrument using only parts you’d find at a hardware store. I made one myself, and had a wonderful time playing it.
Recently, I decided I’d like to make a more traditional cigar box guitar. I soon found Cigar Box Nation (cigarboxnation.com), a fantastic online hangout for homemade stringed instrument enthusiasts. The photos, videos, and MP3s posted by these happy strummers and pluckers were inspiring, and the variety of guitars in the photo galleries was astounding.
I joined the group and was warmly welcomed by its members, who kindly answered my newbie questions about frets, choices of wood, and other aspects of guitar building. In a matter of days, I had built my first cigar box guitar (or CBG for short). I’ve now built more than a half dozen CBGs, and I guess you can say I’m hooked.
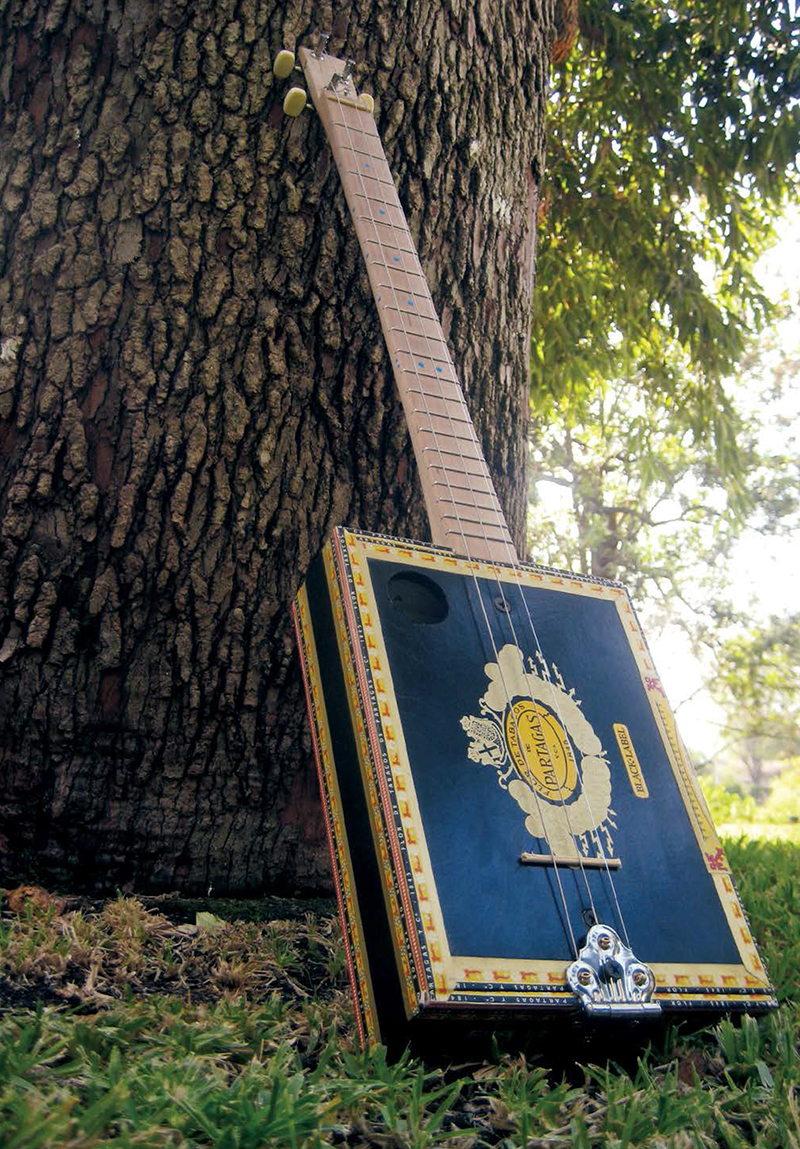
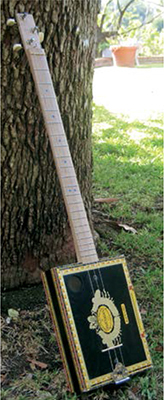
Because every CBG is built by hand, using different found and scrounged materials, no two sound alike. I love the suspense of not knowing what kind of “personality” a CBG is going to have until it’s completed. Here’s how to make a plain-vanilla, 3-string CBG that requires a minimum of tools and parts, yet sounds great.
Mark Frauenfelder is the founding editor-in-chief of Make: magazine and Wired Online, cofounder of Boing Boing, and editor of the Cool Tools website. He is the author of seven books.
A cigar box guitar is much like a regular guitar except it usually has fewer strings. Before buying parts for one, rummage around in your junk drawers. A plastic comb can be cut and used as a bridge. An old cabinet hinge can serve as a tailpiece. A bolt makes for a dandy nut. The photo section of cigarboxnation.com shows ingenious and oftentimes humorous examples of CBG builders’ resourcefulness.
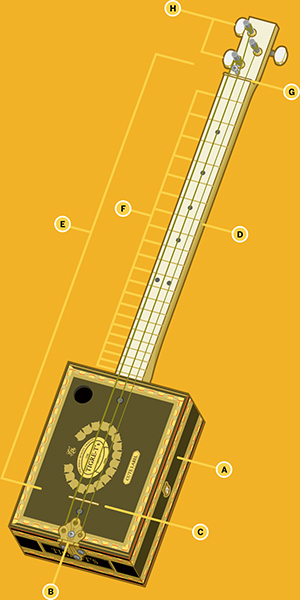
Illustration by Rob Nance
![]() The cigar box serves as the instrument’s body and resonating chamber. It doesn’t necessarily have to be a cigar box. You can use a wooden craft box, a boxy tin can (like the kind turpentine comes in), or anything else with flat, light, solid surfaces that will push the air as they vibrate.
The cigar box serves as the instrument’s body and resonating chamber. It doesn’t necessarily have to be a cigar box. You can use a wooden craft box, a boxy tin can (like the kind turpentine comes in), or anything else with flat, light, solid surfaces that will push the air as they vibrate.
![]() At the lower end of the box, a simple cabinet hinge serves as the tailpiece that holds the strings’ bottom ends. The strings pass through the screw holes on one face of the hinge, which holds back their end barrels. The other face of the hinge attaches to the end of the box.
At the lower end of the box, a simple cabinet hinge serves as the tailpiece that holds the strings’ bottom ends. The strings pass through the screw holes on one face of the hinge, which holds back their end barrels. The other face of the hinge attaches to the end of the box.
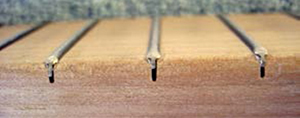
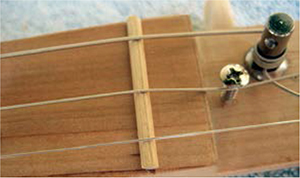
![]() The strings stretch over a thin, blade-like bridge that transfers their vibrations to the guitar’s body. For this guitar, I used a piece of wooden barbecue skewer, but I’ve also used a thin paintbrush handle with good results.
The strings stretch over a thin, blade-like bridge that transfers their vibrations to the guitar’s body. For this guitar, I used a piece of wooden barbecue skewer, but I’ve also used a thin paintbrush handle with good results.
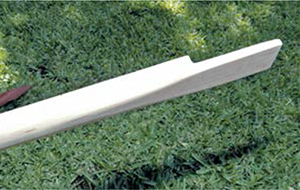
![]() The guitar’s neck can be a piece of oak or maple. Don’t use a softwood that bends easily or your neck will bow (especially if you use 4 or more strings or crank up the tension).
The guitar’s neck can be a piece of oak or maple. Don’t use a softwood that bends easily or your neck will bow (especially if you use 4 or more strings or crank up the tension).
![]() The scale length (distance between the bridge and the nut) is up to you. Most guitars have a scale length somewhere between 24" and 25½". If you want to make a cigar box bass, try 30"–34".
The scale length (distance between the bridge and the nut) is up to you. Most guitars have a scale length somewhere between 24" and 25½". If you want to make a cigar box bass, try 30"–34".
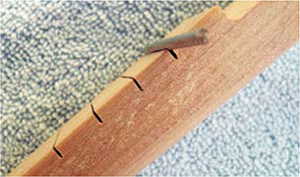
![]() Frets determine the note a string plays, by restricting the length along which it vibrates. I made them using fret wire, but toothpicks or small nails with the tips and heads clipped off will also work. Or you can go fretless, which is great for slide guitar.
Frets determine the note a string plays, by restricting the length along which it vibrates. I made them using fret wire, but toothpicks or small nails with the tips and heads clipped off will also work. Or you can go fretless, which is great for slide guitar.
![]() The nut supports the upper ends of the strings so they can vibrate freely. I used another piece from the wooden barbecue skewer, but bolts also work nicely because their threads prevent the strings from sliding sideways.
The nut supports the upper ends of the strings so they can vibrate freely. I used another piece from the wooden barbecue skewer, but bolts also work nicely because their threads prevent the strings from sliding sideways.
![]() Tuning pegs and strings can be scavenged from an old guitar, or purchased at a music store or online.
Tuning pegs and strings can be scavenged from an old guitar, or purchased at a music store or online.
Fret Spacing
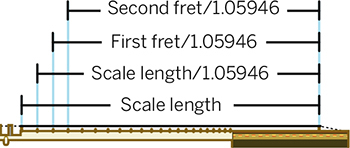
A string’s frequency is inversely proportional to its length; if you halve the string’s vibrating length by fretting it at its midpoint, it vibrates twice as fast. Musically, this means it plays one octave higher. Western music divides the octave into 12 equal intervals, so you can determine the distance between adjacent frets by successively dividing each length by the 12th root of 2. This is an irrational number, and any rounding error accrues with each division, so you’ll need to carry it out with a lot of digits. Using 1.05946309436 should be safe.
For example, starting with a 24" string gives you string lengths of 22.653", 21.382", 20.182", and so on. These lengths correspond to fret distances from the nut of 1.347", 2.618", and 3.818", and the 12th division takes the distance up to 12". Visit makezine.com/projects/cigar-box-guitar for links to online fret calculators that perform these operations instantly.
BONUS!
Illustrator Rob Nance created a sheet of Papercraft Guitar Picks to help you rock out in style with your new cigar box guitar! Get it at makezine.com/projects/cigar-box-guitar.

SET UP.
MATERIALS
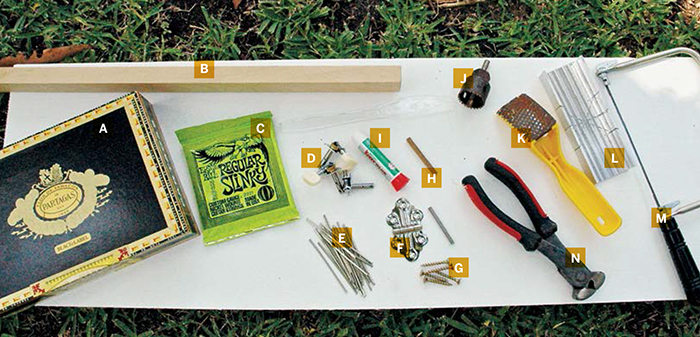
[A] Cigar box I buy them at my local cigar store for $3 each. You can also find them on eBay.
[B] 1×2 oak or maple lumber, 3' length The actual dimensions are ¾"×1½". A 6' stick (enough for 2 necks) costs about $10. Pick the straightest, flattest, clearest (free of knotholes) piece you can find.
[C] Guitar strings Standard medium-gauge strings work well. CBGs typically use open G tuning. I use strings 5, 4, and 3 (A, D, G) and tune them to G-D-G.
[D] Tuning pegs Elderly Instruments (elderly.com) sells a set of 6 (enough to build two 3-stringers) for $10. Sometimes they’re called “tuning machines.”
[E] Fret wire $10 at elderly.com or cbgitty.com. You can also use flat toothpicks or go fretless.
[F] Cabinet hinge with 3 mounting holes on each side
[G] 1" wood screws Phillips head Grip-Rite Fas’ners work well.
[H] Bamboo barbecue skewer or other hard, thin rod for the bridge and nut. A 3/16"×2" bolt also works well for the nut.
[I] Super glue (optional)
TOOLS
[J] Hole saw, ¾"
[K] Stanley Surform shaver from a hardware store
[L] Miter box hobby size
[M] Coping saw
[N] Wire cutters
[NOT SHOWN]
Yardstick A decimal inch or millimeter scale is best, as opposed to fractional inches.
Wood saw
Drill or drill press and bits for wood
Phillips head screwdrivers
Hammer
Marker or paint
Sanding block and sandpaper of various grits
Files
T square or carpenter’s square
Jeweler’s file (optional)
Pencil
Sharpie or paint
Magnifying glass
Utility knife
MAKE IT.

BUILD YOUR CIGAR BOX GUITAR
Time: An Afternoon Complexity: Easy
START≫
1. MAKE THE NECK
To begin, we’ll cut the neck to length, make the headstock (the part where the tuning pegs go), and saw off a rectangular slice so that the fretboard is flush with the cigar box lid. Making the neck and installing the frets are the most time-consuming parts of the build. Once you’re finished preparing the neck, you’ll be surprised by how fast the rest of the build goes!
1a. Using a wood saw, cut the oak or maple lumber to 36". You’ll have to cut it a little shorter later on, but it’s good to start out with more than enough.

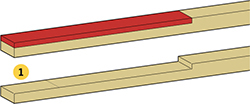
1b. Saw off a rectangular slice from the lower end. This is the end that goes into the cigar box. Measure the length and thickness of the cigar box lid. I use the box itself as a guide, tracing along the oak stick with a pencil. Mark these dimensions on the wood, then use a saw to remove the part shaded red in the illustration.
Also make a pencil mark 2¼" from the end. This is where your bridge will go later on.
1c. Mark the lines for the nut and headstock. Starting from the pencil mark you just made for the bridge, make another mark indicating the scale length (I decided on a scale length of 24½"). This second mark is where the nut will go. Make a third mark ½" farther past the nut. Make a fourth and final pencil mark 3½" beyond the third mark.
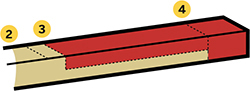
1d. Cut out the headstock. Your third and fourth pencil marks indicate the beginning and the end of the headstock. Use your saw to cut away the material shaded in red in the illustration above. The headstock should be half as thick as the neck, or 3/8".

1e. Sand the fretboard. Now is a good time to sand the top surface of the neck so it’s dead flat. Use a sanding block, starting with rough sandpaper and finishing with fine-grit sandpaper.
2. INSTALL THE FRETS
I used to be intimidated by the idea of frets. The process seemed mysterious and difficult. But it’s really not. If you take your time and make careful measurements, you’ll have no problem.
2a. Mark the fret locations. Enter your desired scale length into an online fret spacing program (see makezine.com/projects/cigar-box-guitar) and print out the table it generates. Using a yardstick and a square, make pencil marks along the length of the neck to indicate the location of the frets.

NOTE: If you don’t want to install metal frets, you can glue flat toothpicks over the pencil marks. They work quite well, but will eventually wear out. If you want a fretless guitar (which also sounds great), go over the pencil marks with a Sharpie or with some paint. In either case, skip to Step 3.
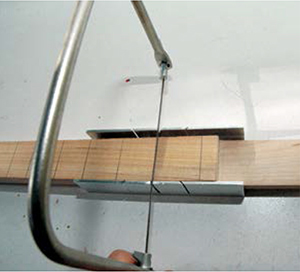
2b. Cut the fret slots. About 1/16" should be deep enough. The saw blade should be thin enough so the fret tangs bite into the slots you cut. I buy medium-gauge fret wire and have had no problem with frets popping out. A coping saw and a hobbyist’s miter box will help you keep the fret slots square with the neck.
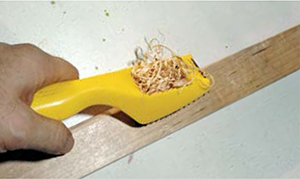
2c. Form the back of the neck. On the backside of the neck, shape the sharp 90° edges into soft curves so your fretting hand can easily slide up and down the neck. A Surform shaver tool will quickly rough out a rounded edge. Follow up with sandpaper until the wood is very smooth.
NOTE: Don’t shave the headstock or the part that will fit into the cigar box — only work on the area under the frets and nut.
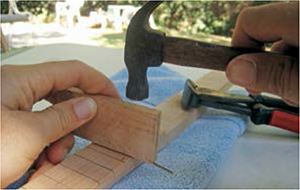
2d. Tap the frets into the slots. Fret wire usually comes pre-cut, and each piece is about an inch longer than the width of the neck. The wire’s cross section is T-shaped, and the barbed center rail goes into the slot.
At each fret slot, align one end of the fret wire so it overhangs the side of the neck just a fraction of an inch. Press the fret wire into the slot, then place a thin block of wood on the fret and tap on the block with a hammer until the fret is all the way in.
NOTE: You can smear a tiny bead of super glue across the part of the fret that fits in the slot if you wish, but I usually skip it, because it’s hard to keep the glue from getting onto the neck.
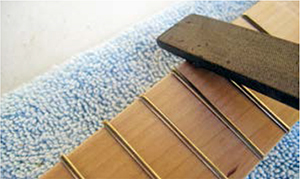
2e. Clip the fret wire. Cut it almost flush with the neck. Repeat Steps 2d and 2e until all frets are installed. I installed 21 frets on my cigar box guitar.

2f. File the ends of the frets. The cut ends of the fret wires are very jagged and would shred your hands if you attempted to play without filing them smooth. Use a file to form a gentle curve on both ends of each fret. (If you have a store-bought guitar handy, inspect it to see how the frets should look.) Run your hand up and down the neck. If your skin snags, you need to keep filing! Use a magnifying glass and look for any small burrs that need to be filed off with a jeweler’s file.
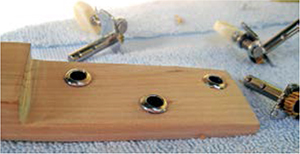
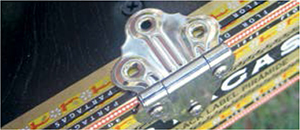
3. INSTALL THE TUNING PEGS
Study the geometry of your tuning pegs and determine where the headstock holes need to be drilled so that the strings and pegs won’t interfere with each other. Keep in mind the location of the mounting screws — they shouldn’t be too close to the edge of the headstock, or they might split the wood.
3a. For each peg, drill a large hole for the post and 2 small pilot holes for the mounting screws. A drill press will make things easier, but if you use a handheld drill, try your best to drill straight down.
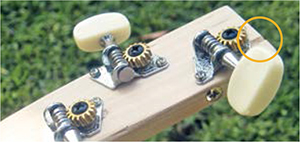
TIP: When you drill the holes for the posts, use drill bits made for wood. I used the wrong kind of bit and it tore out big splinters. (You can see a missing piece above the top tuning peg, inside the orange circle in the bottom photo.)
4. ATTACH THE NECK AND HARDWARE TO THE CIGAR BOX
Now that the neck is complete, the rest is smooth sailing!
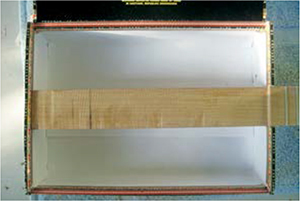
4a. Cut a hole (a 3-sided notch) in one end of the box for the neck. Measure the cross section of the part of the neck that fits inside the cigar box, and draw a matching rectangle on the inside of the box. Use a coping saw to cut the 2 vertical lines, then use a utility knife to score the horizontal line several times until you can snap off the rectangle.
Insert the neck, close the lid, and make sure the fretboard is flush with (or a tiny bit higher than) the lid. If the fretboard is lower than the lid, sand down the cut-out part of the neck that comes into contact with the lid until the fretboard and lid are flush.
4b. Now we’ll screw the neck to the box. I try to use as little glue as possible when I make a cigar box guitar because I don’t like waiting for the glue to dry, and screws make it easy to take the guitar apart for repairs, modifications, or salvage.
Drill a pilot hole in the far end of the box and drive a screw through the box into the neck. Close the lid and then pilot-drill and drive 2 more screws through the lid of the box into the neck (if you later want to install a pickup, you can remove these screws).

4c. Attach the tailpiece. Fold the cabinet hinge centered over the front lower edge of the cigar box, then drill pilot holes and screw it to the lower end of the box. The hinge will sit over the screw you inserted in the previous step, 4b.
4d. Paint position marker dots on the neck. Use paint or a Sharpie to make dots above frets 3, 5, 7, 9, and 12.
4e. String the guitar. Thread the barrel ends of the strings through the hinge’s unused mounting holes. Wind the other ends of the strings onto the tuning pegs, but not too tight yet. Here’s a good video that will teach you how to wind a guitar string: makezine.com/projects/cigar-box-guitar.
NOTE: I inserted a screw to keep the middle string centered in the headstock. You might have to do this, too.
4f. Slip in a bridge and a nut under the strings. I used a wooden barbecue skewer to make the bridge and the nut. Snip 2 pieces to size and place one above the line you drew for the nut. Place the other under the strings on the cigar box at a distance equal to the scale length you chose; this is the bridge.
4g. Screw down the tailpiece. Drill a hole through the hinge and drive a screw through it into the lid and the neck. This will increase tension on the strings and prevent rattling.

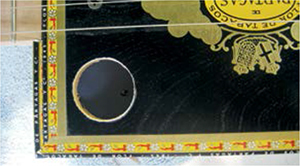
4h. Make a sound hole. Use a small hole saw (¾" diameter or so) to cut a sound hole in the top of the box. Make sure to position the hole so it doesn’t cut into the neck. (I made this mistake when I made my first cigar box guitar!)
Guess what — you’ve built your guitar! In the next section, I’ll explain tuning and playing, as well as direct you to other helpful cigar box guitar resources.

NOW GO USE IT »
FINISH X
USE IT.

TUNE UP AND TURN ON
GET IN TUNE
The most popular tuning for cigar box guitars is called open G tuning. Many of the original blues guitar players used open G, and it’s a favorite with Keith Richards of the Rolling Stones.
Visit makezine.com/projects/cigar-box-guitar for an MP3 file of this tuning played string by string on a six-string guitar. For the CBG, you can ignore the first string that’s plucked, and tune it to the 3 strings after that: G, D, and G.
FREE ONLINE LESSONS
Keni Lee Burgess, a well-known New York street musician, has posted a terrific series of cigar box guitar lessons on YouTube. Shane Speal, cofounder of cigarboxnation.com, also has fun lessons on YouTube that show you how to use a slide, and how to experiment with different tunings and scales. Visit the URL above for links to both of these series.
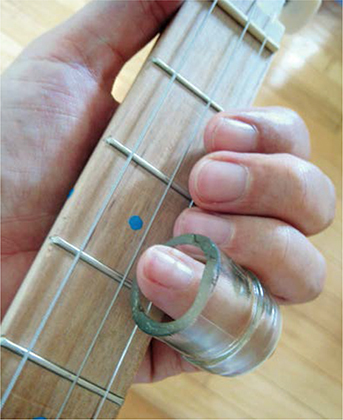
MAKE A BOTTLENECK SLIDE
Bottleneck slides sound great with open tuning, and both Burgess and Speal use them to enhance their playing.
To make one, take an empty wine bottle and score a ring around the neck with a Dremel cutting disc (wear eye protection). Wearing a pair of oven mitts, tap the score line with a spoon and snap off the neck (do this over a trash can to capture the shards). Sand off the rough edges and you’ve got something far superior to a store-bought slide. YouTube has instructional videos on making bottleneck slides using different techniques.
TURN IT UP
You can electrify your cigar box guitar in 2 ways. The easiest is by adding a piezoelectric buzzer. Buy one at RadioShack or salvage one from a discarded smoke alarm. Carefully crack open the plastic housing, remove the metal disc, and sandwich it between the neck and lid of your guitar. Wire it to a patch cord jack and plug into an amp (if you don’t have an amplifier, make our Cracker Box Amp featured in MAKE, Volume 09, page 104).
Another way to electrify a cigar box guitar is by adding an electromagnetic pickup. In MAKE Volume 15 we show you how to make your own.