
SOLAR XYLOPHONE
By Rory Nugent

Photograph by Kay Canavino
MUSIC OF THE SPHERE
Solar cells gracefully link technology with the Earth’s natural resources, bringing projects out of the dank, dusty workshop and giving them a sustainable home with the plants outside. This autonomous xylophone uses Solarengine circuits and pentatonic chimes to play in tune with that big nuclear power plant in the sky.
Wind chimes capture wind energy to move metal tubes that generate sound when they strike one another. They’re simple, timeless, and beautiful. You can never predict the composition the chimes will play after the next gust of wind, which is what makes these inventions so compelling. The elegant overlay they add to our experiences brings us closer to nature.
I wanted to create a different kind of autonomous musical instrument that would, like wind chimes, generate tones from a natural resource. So I made this solar xylophone, which gives voice to the silent sun and takes the project (and ourselves) outside, where we belong. It uses eight simple, independent systems to strike its eight chimes in parallel. So you can lose the power cord and forget the batteries, but be sure to bring your suntan lotion.
Rory Nugent (prizepony.us) is a designer and engineer living in the New York City metro area. He currently works as a senior electronics engineer for littleBits.
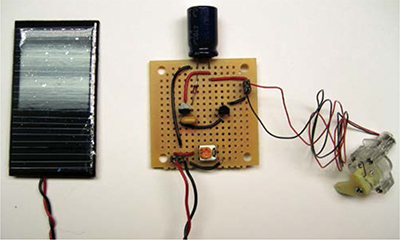
A regular xylophone fits inside of a solar-powered player box that holds a mallet over each of its 8 chime tubes. Each mallet is powered by a system that includes a solar cell, a simple Solarengine circuit, and a small motor. The systems work in parallel; the brighter the sunshine on each panel, the more frequently its corresponding tube will be struck.

Illustration by Nik Schulz
|
|
|
|
|
|
|
The sun shines upon your project. |
The 8V 44mA epoxy solar cell collects light energy, converts it to DC, and trickles it into the circuit. The more light it sees, the more power it delivers. |
The circuit, a Miller Solarengine, collects the energy in a 4,700μF capacitor until its voltage exceeds 5V. Then a voltage trigger opens and discharges the capacitor into the motor. A smaller 1.0μF monolithic capacitor sets the discharge’s duration. |
With each pulse of voltage, the pager motor pulls its mallet down with a bent paper clip. The motor has a spring on the shaft that inhibits rotation beyond 60°. This means it gives one strong momentary nudge rather than rotating continuously. This is useful for our application. |
A counterweight, made of plumbing solder, makes it easy for the motor to keep the mallet head lifted off the tube between strikes. |
When the mallet is pulled down, it strikes its chime tube. The 2 balance strips that run along either side of the instrument hold the mallets and serve as a fulcrum for them to swing around. |
The chimes are tuned to cover 1½ octaves using a pentatonic scale. This keeps the notes sounding pleasant and not dissonant in random combinations. |


SET UP.

Photography by Rory Nugent
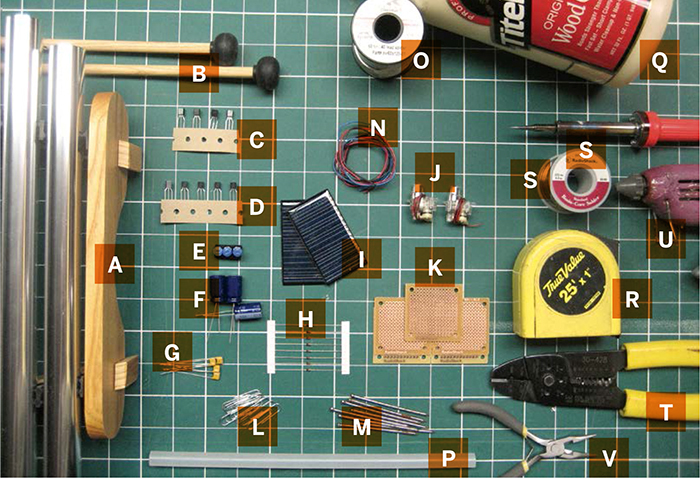
MATERIALS
[A] Xylophone I used the 8-tube Pipedream from Woodstock Chimes. Check Amazon or eBay for others. To make it less expensive, you can use smaller models with fewer tubes, even just 1 or 2, if you adjust sizes and quantities accordingly.
[B] Mallets (8) Xylophones typically come with a pair, so you’ll need to obtain 6 more. Buy cheap wooden ones, which are easier to drill through.
[C] Panasonic 1381U, 4.6V voltage triggers (8) Buy 10 for a discount from solarbotics.com.
[D] 2N3904 NPN transistors (8) RadioShack part #276-2016.
[E] 10kΩ single-turn trimpot potentiometers (8) RadioShack part #271-282
[F] 4,700μF electrolytic capacitors (8)
[G] 1.0μF monolithic capacitors (8)
[H] 1N914 silicon diodes (8) Buy 10 for a discount from solarbotics.com. RadioShack part #276-1122
[I] SCC3766 8V solar cells (8)
[J] GM10 geared pager motors (8)
[K] Dual mini perf boards (4) RadioShack part #276-148, 2 boards per package
[L] Paper clips (8)
[M] 10-penny finishing nails (8)
[N] 22-gauge solid wire, about 15'
[O] Plumbing solder, about 0.125" in diameter
[P] Hot glue Epoxy will also work nicely, but takes more time to mix and apply.
[Q] Wood glue
[NOT SHOWN] 1" plywood, at least 12"×31"
¾" wood board, at least 16"×26" You could go less than ¾" thick, but I wouldn’t suggest anything less than ¼".
1¼"×5½" wood plank, at least 14" long You could go less than 1¼" thick, but I wouldn’t suggest anything less than ½".
1"×1½" wood plank, at least 31" long
Female (16) and male (8) wire connection headers (optional) These will keep your components modular and will make testing much easier.
TOOLS
[R] Measuring tape
[S] Soldering iron and solder
[T] Wire stripper/cutter
[U] Hot glue gun unless you’re using epoxy
[V] Needlenose pliers
[NOT SHOWN]
Dremel tool
Drill press or drill and vise
Radial saw or other type of saw
Table saw or router and fence
MAKE IT.
BUILD YOUR SOLAR XYLOPHONE
Time: A Weekend Complexity: Hard
START≫
1. ASSEMBLE THE CIRCUITS
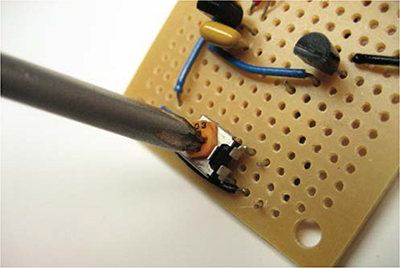
Putting the circuits together is the most straightforward step in this project, and it will ease us into the rest.
1a. Split your RadioShack perf board into single squares, or if you’re using your own perf board, cut it into 2"×2" pieces.
1b. Collect and separate the parts needed to make each circuit: voltage trigger, transistor, trimpot, diode, 4,700μF capacitor, 1.0μF capacitor, motor, solar cell, a bit of wire, 2 female connection headers (optional), and a piece of perf board.
1c. Take one group of parts and solder a circuit together, following the Solarengine schematic at makezine.com/projects/solar-xylophone. This can be a bit tricky but it’s good practice if you want to get better at electronics. I put the electrolytic capacitor and the trimpot at opposite ends, and included 2 female headers for connecting to the solar cell and motor at the edges.
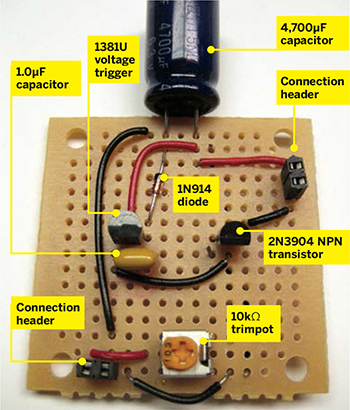

1d. After you finish one of the circuit boards, solder wire leads onto the positive and negative terminals on the solar cell. If you’re using headers, solder male headers to the motor’s delicate leads (we don’t need these for the solar cell — the 22-gauge wire is thick enough).
1e. Test your first completed circuit board by taking it outside or putting the cell under a high-wattage incandescent bulb. You should see the motor move within 10 seconds. A compact fluorescent bulb or heavy-duty flashlight will probably also work but will take longer, and you might begin to think something is wrong with your circuit.
1f. If it doesn’t work, adjust the trimpot using a screwdriver, by turning it all the way in one direction or the other. This controls the efficiency of the circuit, allowing more electricity to reach the capacitor, and thus, adjusting the timing of the motor. One side of the trimpot resists all the electricity while the other resists none.
1g. The circuit works correctly if the motor periodically turns about 60° and then quickly resets itself. If it works, pat yourself on the back, call up your friends for help, and build 7 more just like it (or however many your project calls for). Otherwise, check your solder connections, review the circuit, and use a multimeter on the solar cell and 4,700μF capacitor to see if electricity is flowing. Lastly, ask a friend to review the circuit.
2. BUILD THE PLATFORM AND STAND
I used a radial saw for cutting the wood and a table saw to put in some long grooves, but you can use other tools.
2a. Cut 2 pieces of 1" plywood to 5½"×15¼" each. These pieces will make the platforms that the mallet and motor mechanisms rest on.

2b. Cut 4 pieces of the 1¼" wood to 35"×5½". These will be the legs that support the mallet platforms above the xylophone.

2c. Cut 1 piece of ¾" wood to 16"×25¾". This is the largest piece of wood and will support the entire structure.

2d. Take the 1"×1½" wood plank and cut 2 pieces 15¼" long each.
2e. This is the tricky part. Now we’ll need to put a ½"-deep cut along the entire 1" edge of each 1"×1½" piece. A table saw is perfect for this. Place each piece on the table with the narrow edge down, adjust the fence so that the blade is centered on the wood, and run it all the way through the piece. Repeat for the second piece.

2f. Move the pieces back to the radial saw and cut four 5/16" slits into each, 2¼" apart, on the same side as the long groove. These will be the notches that hold the mallets. Start at one end of the piece and measure 33/16" from the end. Mark off a section 5/16" wide and 7/8" deep. Measure 2¼" from the marked section and repeat the marking 3 more times. Repeat this step for the second piece.

2g. Glue the 2 plywood platforms on top of the 4 leg pieces to make 2 U-shaped raised platforms. Then glue the platform tops onto the large piece of ¾" wood, running parallel and centered 23/8" from each end. Let the glue dry if needed.

2h. Glue the 2 slotted strips on top of the platforms, running parallel and 1¼" in from the outside edges. You should now have a nice wooden structure that will house the xylophone inside, below the platforms. Each slotted wooden strip will act as a balancing point for 4 mallets.
3. INSTALL THE MALLETS
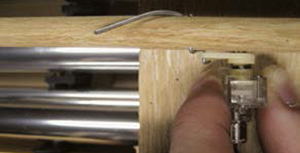
3a. Use a 1/16" drill bit to drill 2 holes into each mallet, one 51/8" from the rubber ball end, and the other 41/8" from the bare end. Slide a 10-penny nail into the hole closest to the bare end.

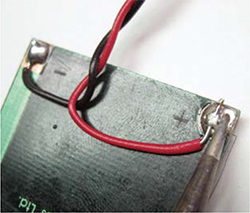
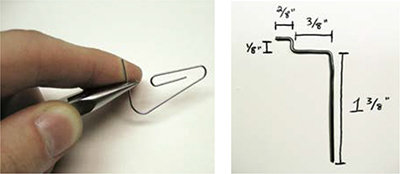
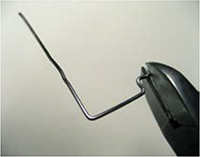
3b. Cut and bend your paper clips into the zigzag shape shown here using wire cutters and needlenose pliers. These wires will run through the holes closest to the mallets’ striking ends and drive them from the motor.
4. FINAL ASSEMBLY
This part is particularly tricky. We need to figure out where the motors should be placed and how much counterweight (plumbing solder) to spool around the mallets’ ends.
4a. Slide the xylophone in place under the platforms. Use your eyes to center it.
4b. Place each mallet with its nail into its own groove on the balancing strips. The mallets should fall and rest on or near the center of each pipe. If not, adjust the placement of the xylophone underneath, or pull out and reverse the nail — the head can sometimes push a mallet off center. If that doesn’t work, check the alignment of the strips and the placement of the platforms. Handcrafting an instrument like this takes some tinkering.
4c. Grab one of the mallets and wrap some plumbing solder around the wooden end. You want to wrap just enough to make the mallet balance nicely in the wooden groove and fall slowly down toward the xylophone, which requires trial and error.

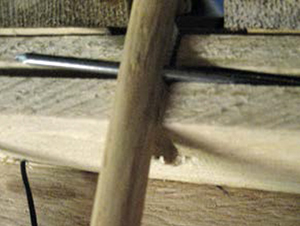
4d. Place a properly counterweighted mallet into the groove, and then bring the motor from one of your circuits close to the mallet head. Fit a bent paper clip into position, connecting the motor to the mallet, with the short end through the eyehole of the motor and the long end through the unused hole in the mallet. Curve the long end of the wire up and around the mallet.
4e. Hold the motor slightly offset from the mallet, and make sure the motor is oriented so that it will pull down on the mallet.
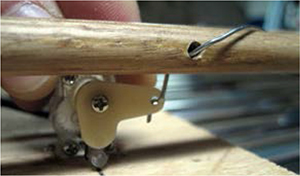
4f. Test the circuit while holding the motor in place. This will give you an idea if you’ve found the right spot. If so, mark its position on the platform with a pencil. Grab your Dremel tool, attach a round wooden shaving tip, and grind out the line you marked so that the plastic tab on the bottom of the motor will fit in it. The motor will then sit flush with the platform.
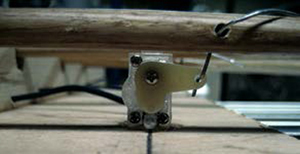
4g. Repeat the installations and tests for all other mallet/motor/circuit combinations. After each motor placement mark has been ground out, do one last quick test and then hot-glue or epoxy the motor into place.
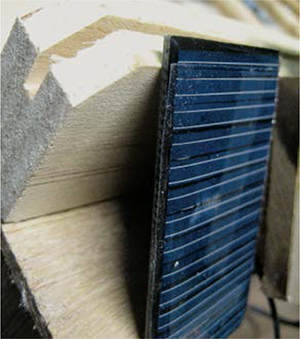
4h. Finally, drill a hole in the balancing strips next to each motor and thread the motor lead wires through. Hot-glue or epoxy the solar cells so that they rest at a 45° angle with the top touching the strip above the hole and the bottom touching the platform edge. Connect your solar cells and motors back to the circuit. You’re done!
FINISH X
NOW GO USE IT »
USE IT.
PLAY SOME SOL MUSIC
FINE-TUNING THE PAPER CLIPS
Your solar xylophone will likely need some tweaking, especially the bent paper clips. Sometimes the piece that slips through the eyehole of the motor strikes the platform. Watch closely to see if this is a problem. Make sure the long end of the paper clip is wrapped snugly around the mallet so that it grabs the mallet firmly on each strike. You may also need to shorten the tall, vertical portion of the paper clip to reduce the distance the mallet head needs to travel to sound its note.
Remember, you hand-made these motor clips; they weren’t stamped out by a machine, so there is room for error. Don’t be discouraged. Work at it, try different bends, and be proud you could do this all with your hands!
CONCERT ON THE GREEN
Now all the hard work is done, and you’ll be relieved to hear that the solar xylophone is not difficult to operate. On a sunny day, put on your favorite sunglasses, tuck a blanket under your shoulder, and carry the xylophone out to your lawn or local park. Before you even make it to the grass, the xylophone will probably start hammering away.
If it’s triggering notes too quickly for its own good, adjust the trimpot on each circuit to a more fitting speed. You may have noticed that the mallets fired at a fairly pleasant rate during your tests inside, but now that you’re under the midday sun, the xylophone has become a musical monster.
You can also put it in dappled tree shade for a randomizing effect. Solar cells work best with natural, full-spectrum sunlight, much better than with artificial sources like incandescent or compact-fluorescent light bulbs.
THEMES AND VARIATIONS
After you’ve built a full-sized solar xylophone, it’s easy to purchase smaller versions and build modular, portable models. Arrange your portable solar xylophone in a space, and experiment with spatial sound. Weatherproof your xylophones, add hooks or magnets, and attach them to locations in your neighborhood. Add sound anywhere live music is least expected: a garden, outside your window, in sneaky and precarious urban hiding spots.
You can also play around with the orientation and arrangement of the solar cells. With a full-sized xylophone, you can build a truly unique instrument that emphasizes different notes depending on the time of day — an interesting take on the idea of a sun clock. To do this, arrange the solar cells along an arc-shaped bridge, and orient the xylophone so that the arc parallels the sun’s path across the sky from east to west.
Want to build more solar instruments? Think about the rudimentary ways that sound is produced — by scratching, hitting, or plucking — and design a solar mechanism that does just that. Use solar cells to automate an already-popular instrument, attempt to re-create an instrument, or build a new instrument of your own.
RESOURCES AND INSPIRATIONS
Solar Beam community site: solarbotics.net
Socrates Sculpture Park, in Long Island City, N.Y., filled with strange sculptures and environmentally powered sound pieces: socratessculpturepark.org
LEMURplex in Brooklyn, N.Y., another great New York institution dedicated to electronic music and interactive art: lemurbots.org/aboutLEMURplex.html