Go Green! 

Special video effects are available to anyone with a cheap camcorder and $25 of software. Greenscreen is the most powerful of these, and is surprisingly easy to use. By Bill Barminski

Photography by Bill Barminski
Would you like to make a video of yourself standing on the moon? There are two ways to do it. You can build a rocket and fly there — expensive, not to mention dangerous. Or you can use a greenscreen to make it look as if you are there. Yes, a greenscreen. I hope I won’t be shattering too many illusions when I tell you that this is how they did a lot of that cool stuff in Star Wars. They placed an actor in front of a greenscreen and filmed the scene while he pretended to fight a giant space squid. A technique called chroma keying was then used to remove the green color, allowing a new piece of video to be placed behind the actor.
This is called a composite shot, and the process is called keying. In the past you needed high-end software costing hundreds if not thousands of dollars, but today you can do it for $25 plus some cheap paint and lights.
But just let me issue a word of caution: greenscreening can be tricky. There are many variables that can affect the outcome. Even professional filmmakers run into unexpected problems from time to time.
1. MAKE A BACKDROP
First you’re going to need a screen, which can consist of colored fabric or a painted wall. Lime green is most commonly used, because it is so freaking ugly that the exact-same color is unlikely to appear on anyone or anything else in the shot, and thus it can be earmarked for replacement. (This means your subject can’t wear a lime green tie.)

You can buy special greenscreen fabric and paint, but they’re expensive. I’ve used very cheap green fabric from the local fabric store with decent results. I’ve even used a lime green blanket I found at a thrift store for $4. Look for something sheer that resists wrinkles, which will show up and make it harder to pull your key; iron the wrinkles out if you need to.

If you have a wall you can paint, so much the better, since there will be no wrinkles. Go to any paint store and pick out the worst lime green color you can find. Be sure it has a flat finish, not glossy. The exact shade is unimportant, since our software will find it for us when the time comes to replace it with our desired background image.
2. LIGHTING AND PLACEMENT
The biggest problems with greenscreen shots stem from poor lighting and placement of your subject. You want to illuminate your greenscreen with a flat, even light, so that it has no shadows or highlights. Don’t use spotlights for this.

The placement of your subject in relation to the greenscreen is also crucial. The subject needs to be as far from the green as possible, to avoid picking up reflected green light. This is tricky because the reflected green is hard to see. Of course the farther away you put your subject, the bigger your greenscreen must be. If you’re doing this for the first time, frame your subject from the waist up. Don’t try a wide shot of the whole person.
The cheapest lighting source is the sun. If you can shoot outdoors, that’s great, provided you find a place that gets even lighting with no shadows on the background. A gray, overcast day is actually best for shooting since it produces an even, flat light.
If you shoot indoors, you’ll need 2 sets of lights, one for the greenscreen and one for the subject. Don’t try to use the same set of lights for both.
To illuminate the greenscreen you can use cheap fluorescent tubes. They give a smooth, even light.


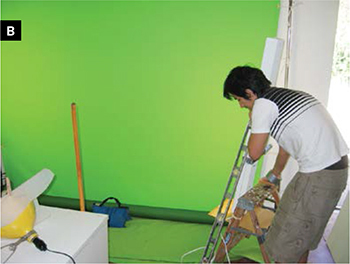
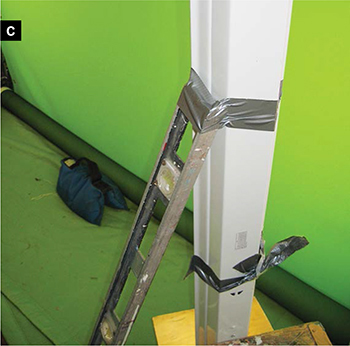
For about $12 you can buy a 4-foot fixture containing 2 tubes. Depending on the size of your greenscreen you may need 3 or 4 of these fixtures. I use sticks and lots of duct tape to anchor them. You can then light your subject with a couple of workshop clip lamps using bulbs rated from 100 to 500 watts. Remember that they must not cast shadows on your screen.
3. KEYING YOUR VIDEO
Now, let’s say you’ve shot your footage and you’re ready to key out the green. On a Mac, you can use iMovie with a plugin called Stupendous Software Masks & Compositing, which costs $25. If you have Windows, you can find free software such as ZS4 (zs4.net/downloads), or economical all-purpose editing software (with greenscreen feature included) such as Video Edit Magic, available for free in a trial version or for $69 fully featured, from trusted sites such as tucows.com.
3a. In iMovie, first import the video that you shot against a green background, and place it in the timeline. Then import the footage that will replace the background, and place it next to your video.
Select the first clip, go to the Effects category, and choose Green Screen, Smooth. This effect has 3 controls: Outside Fill, Inside Fill, and Choke. Play around with these settings. The little preview window will show a black and white sample. The 2 fill settings determine how crisp the outline will be. You basically want your subject to appear all white and the green area to appear solid black; avoid shades of gray.
The choke allows you to bite into the cutout to remove jagged edges. Once you think you have the settings right, click the Apply button. It will take several minutes or longer to render your shot. Once it’s done, you can watch your clip. You may need to go back and change the settings a few times to get the best results.
3b. In Video Edit Magic, place your background video in the Video 1 timeline. Place your foreground video (with greenscreen) in the Video 2 timeline. Click the Video Transitions tab in the Collection window and drag Chroma Key Color to the Transition timeline. In the window that pops up, you can click your green background to sample it, and drag the Similarity slider to adjust the tolerance.
You should see the green vanishing to reveal your new background. Once you have it the way you want it, stretch the transition to the desired time span, then render and save.
Other software will take you through steps very similar to those described above. For an instructional video dramatizingthe greenscreen process, check out makezine.com/go/green and browse the many other greenscreen tutorials available on YouTube.
There’s really no need for dull video backgrounds when you can key your own!
Bill Barminski is an artist, videographer, and lecturer in the Film Department at UCLA.
