
If you want your character to move like Elvis, you'd better pay attention to its pelvis. The technique we're going to see in this recipe is often called "inverted pelvis", and you'll understand why when you go through the next few paragraphs.
This approach is very useful to achieve more relaxed poses with your characters. The pelvis is usually the first bone in the spine chain and, because of the nature of the bone structure, its pivot point for transformation is not at the ideal position for the twist movement that we can do with the pelvis. That's because our actual center of gravity is closer to our belly button than it is to the base of the bone.
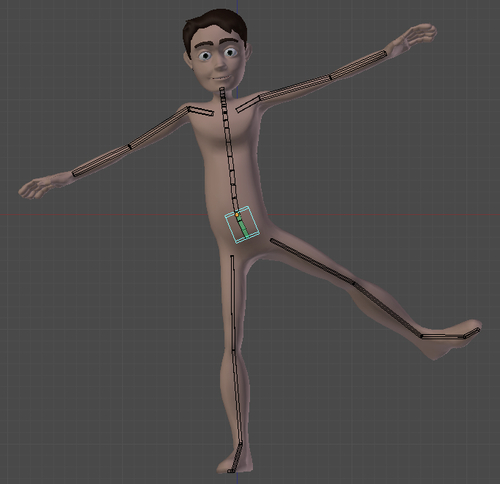
The next screenshot shows a balanced pose that is easier to achieve with this kind of setup:
- Open the file
002-Pelvis.blendfrom this book's support files. You'll see the character Otto with a basic deformation rig already applied as our starting point. If you select theD_Pelvisbone and rotate (R) it, you'll notice that the entire character moves along according to this transformation. That's because the pelvic bone is the parent of all other bones. What can we do to make him twist his pelvis to a more relaxed pose? - Go to the armature's Edit Mode (Tab), select the
D_Pelvisbone, press W, and choose Switch Direction. Go back to Pose Mode and try to rotate R and move G it again. Besides having a good pivot point for this bone's rotation, some problems arose from it: the deformations are ugly, the legs and other spinal bones are no longer its children, and most importantly, the nice curved B-Bone deformation between the pelvis and spine bone is gone! That's not what we want.This second "wrong" step was intentional so that you can clearly understand what we need and what we must avoid.
What we need is: the pelvis pivot point must be on its joint to the
D_Spine1bone; a rotation on the pelvis or the spine must give the curved B-Bone deformations; the pelvis should be the parent of the legs and spine. - Now you should reopen the source file (or hit Ctrl + Z a couple of times until you revert to the original file) so we can start over and make it the right way.
- With the original setup, enter the armature's Edit Mode (Tab), select the
D_Pelvisbone, duplicate (Shift + D) it, and press Esc so it remains in its original position. - Change its width (Ctrl + Alt + S) so we can see both bones and name it just
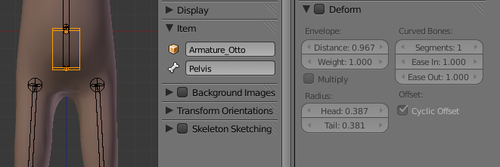
Pelvis. - Bring up the Specials Menu (W) and choose Switch Direction. Since this bone will act as a controller (thus not deforming the mesh directly), go to the Properties Window, under the Bone tab, change this bone's number of segments to 1 and disable its Deform property, as seen in the following screenshot:
- Still in Edit Mode, select the
D_Pelvisbone, hold Shift, and select the Pelvis that you've just created. Press Ctrl + P to make it parent and choose Keep Offset. - Now, you must select the
D_Spine1bone, go to the Properties Window, under the Bone tab, and disable both the Inherit Rotation and Inherit Scale options. - Go back to Pose Mode and rotate the
Pelvisbone. Now you'll see that the spine doesn't rotate along, the center of gravity for rotation is near the belly button region and the soft curved B-Bones work as expected!
If you have already set up a stretchy spine as described in a previous recipe, you should now make the Pelvis bone parent of Spine1. You should also turn off Inherit Rotation for the bone Spine1, so the Pelvis bone acts like the torso's root bone for translation and still works correctly for the twist rotation.
Note
You may wonder why the legs rotate along the pelvis, when they should remain still. This is because this pelvis setup needs an Inverse Kinematics (IK) constraint for the legs, but that's the subject of another recipe called Creating IK legs with a three-pivot foot, in Chapter 5,
The file 002-Pelvis-complete.blend has this complete recipe for your reference.
By using an inverted copy of the pelvic bone as a controller, we can set the pivot center of a rig around the belly button region. By inverting a copy, and not the original deformation bone, we can make sure that the soft curved deformations from Blender's B-Bones are applied as expected.
If you've just read the previous recipe, maybe you're wondering: what about stretching the pelvis?
Although our pelvic region doesn't stretch, it can be useful for cartoony rigs to have this option available. In order to do that, you must select the Pelvis bone, hold Shift, select D_Pelvis, press Ctrl + Shift + C, and select the Stretch To Constraint, just like the process described in the previous recipe. You also need to disable the Inherit Scale property from the D_Pelvis and leg bones in the Bone tab under the Properties Window.
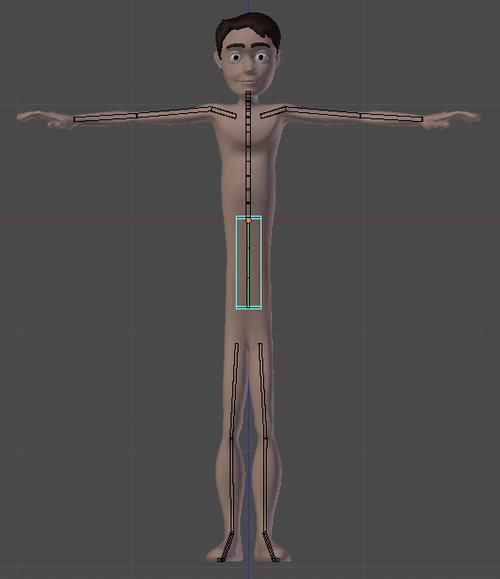
For a better view of the rig, you should also lock the X and Z scaling for the Pelvis bone under the Transform panel (N). This setup allows you to achieve distortions similar to what you see in the next screenshot:
The file 002-Pelvis-complete.blend is also set up for stretching. Try scaling the Pelvis bone and see for yourself!
Chapter 2: How to create a stretchy spine
Chapter 5: Creating IK legs with a three-pivot foot