
When you animate a character, the main goal is to make it look alive, isn't it? All techniques involved in the art of animation, regardless of the medium (paper, computers, clay...) have the same goal: help you make the audience believe that your character is a living being.
It can be very useful to add a controller to make your character look like its breathing. Although the breathing by itself isn't going to make your character believable, it can be added as a layer of visual complexity, contributing to the mood of a scene. If your character is nervous, scared, or has just finished a sprint for instance, you should probably make the breathing more noticeable.
- Open the file
002-Breathe.blend. You'll see a character with a very basic rig and weight painting, and with a bone shaped like a pair of lungs, as seen in the next screenshot. This is our room to work, since adding bones and shapes is not our focus here. Take a look at Chapter 1, Get Rigging if you have any doubts on how to set up the character like this.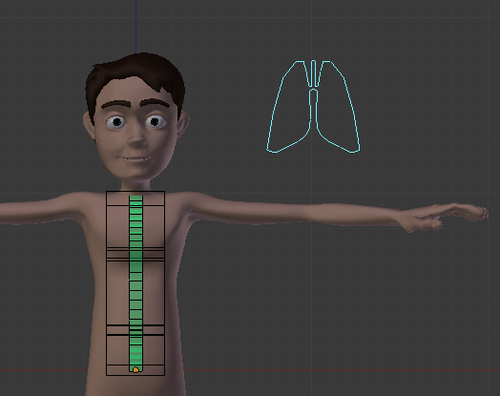
- Select the
Lungsbone, hold Shift, and select theD_Ribcagebone. Bring the constraints menu with Shift + Ctrl + C and select the Copy Scale constraint. - Go to the Properties Window, under the Bone Constraints tab. You'll see that there are two constraints assigned to that bone: the first is a Stretch To constraint, which allows the bone to be scaled while maintaining its volume. The second constraint is the one you have just created, and allows this deformation bone to be scaled following the transformation applied to the
Lungsbone. Now let's just change its values in order to get a proper controller. - Disable the Y option, since our character's imaginary lungs are just going to inflate and deflate, and the scaling would be applied only in the horizontal plane.
- Make sure you also set the two values of Space to Local Space, and bring down the influence slider to a value like
0.3. This will allow you to make bigger changes in theLungsscale and still get subtle results. The following screenshot shows the constraint setup:
- Repeat this process from steps 2 to 5 on the bone called
D_Spine2, but use a lower value for the Influence slider, like0.1. These values may be different on your own characters, but the principle here is that the distortion on the mesh would be bigger on the ribs part of the mesh, and smaller on the belly. But you should feel free to even invert this, if you seek a funnier effect.
Now, scaling (S) up and down the Lungs controller will make your character look like it's breathing. The file 002-Breathe-complete.blend has this finished recipe for your reference.
The breathing controller is nothing more than a bone which sets horizontal scaling on the ribs and belly bones. The secret is to have different (and low) Influence values for the constrained bones. When you scale the controller up, the character looks like it's breathing in. You should use this controller as a secondary one, just for adding details on top of an existing animation.
In this recipe we saw something simple but important: more than one constraint can be applied to a bone at the same time. Not only that, but a bone can have multiple targets for its different constraints, making a rig considerably more complex as you add new constraints.
This example is based on a rig with more than one constraint applied to the spine bones, showing that a single bone can have its properties changed by different controllers. You must notice that the constraints are stacked, and this means that the order in which they are applied is important. In our example, the breathing would be applied after the stretching. Fortunately the order isn't important in this unique example, but you may be wary of stacking too many constraints, since the results can be hard to predict.
Chapter 2: How to create a stretchy spine
Chapter 1: Customizing shapes and colors for your bones