
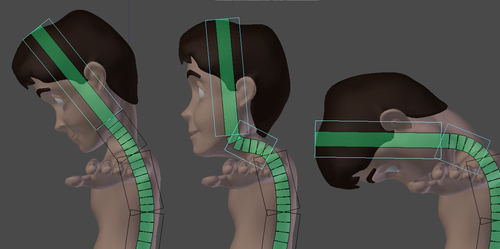
Our head movement can be broken down to basically two controllers: the head bone itself and the neck. It is possible to rotate the neck while keeping the head straight and vice-versa. For example, to move your head forward you have three options:
- You rotate just your head (like when you nod affirmatively to someone else's question).
- You rotate just your neck and keep your head up (like when you try to read those very tiny letters on a computer screen).
- You rotate both your neck and head (when you look to your belly button). You see these three positions in the following screenshot:
It is very useful in rigs to have the freedom to choose how your neck and head should behave when transforming their parent bones. You should be able, for example, bend your character's torso forward while keeping its neck and head looking forward, without inheriting their parents' rotation. This is often called hinge control. In this recipe we'll learn how to properly control the "hinge" property of the neck and head.
- Open the file
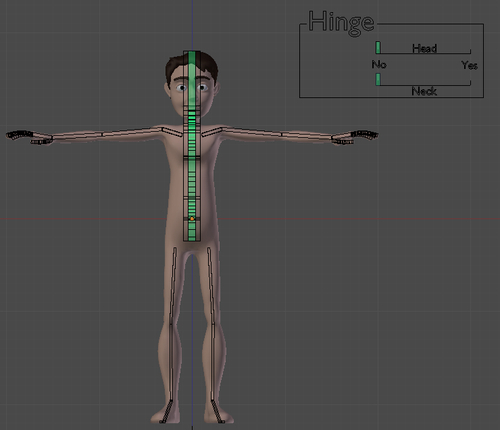
002-Neck.blendfrom this book's support files. You'll see the character Otto with an deformation already set and controller bones for its spine and pelvis, with support for stretching. There is also an interface called Hinge, with two controller bones already created. Everything up until here is covered in previous recipes, so you should take a look at them if you have any doubts on how to create the interface, pelvis, spine, or stretch controls.The next screenshot shows our initial scene:
- The first thing we would do is set the hinge controller for the
Neckbone. Select theNeckbone and go to the Properties Window, under the Bone tab. Right-click over its Inherit Rotation property and choose Add Driver. The checkbox field will get a pinkish hue.Note
As you noticed on the previous step, in Blender, even checkbox values can have drivers applied or have its on or off state animated through a keyframe. This is achieved by right-clicking over them and selecting the appropriate option. Since checkboxes can have only True or False values, Blender translates driver values as
True=1and every other value asFalse. - Open a Graph Editor window and pick the Drivers mode on its header. Click over the Inherit Rotation (Neck) driver on the left-hand side panel to view its details on the Properties Panel (N) on the right-hand side. Find the Drivers section on the Properties Panel. Leave the driver type as Scripted Expression, but change the Expr field value from
Trueto1-var. - On the box below the Add Variable button, set the Ob/Bone fields as
Armature_OttoandHinge_Neck. Leave the Type value as X Location and enable the Local Space checkbox. The next screenshot shows the driver and its values: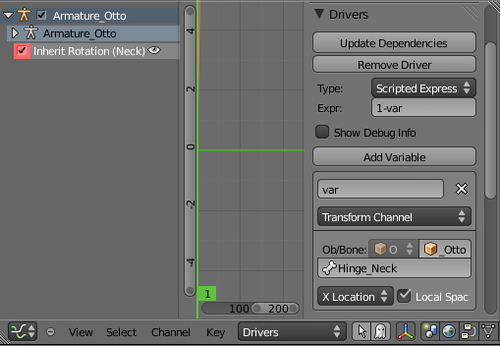
Note
The Expr field has the value of
1-var, used to invert the mapping of the bone driver. That's useful here, where our default behavior is to have the bones to inherit the rotation of their parents. Having these default behaviors properly planned is important when you just want to reset your UI sliders with Alt + G and have the rig working on its default state. - Repeat the process of steps 2 to 4 for the
Headbone, making the driver for its Inherit Rotation property driven by theHinge_Headbone. - In front view, rotate the
Ribbone to the side. Move the sliders for the hinge controls, and you'll have three possible situations, demonstrated in the next screenshot:- Both head and neck follow the torso
- The head doesn't follow the neck and torso (it's "hinged")
- The neck (and consequently the head) is "hinged"
The file 002-Neck-complete.blend has this finished recipe for your reference.
By adding drivers to the Inherit Rotation property of single bones, we can animate the "hinge" feature of the neck and head bones, allowing the animators to pose the characters with more freedom and flexibility. Blender 2.5 allows us to add drivers to user interface fields such as checkboxes, making it easier to animate the on/off state of virtually any feature in our rigs.
The ability to animate and drive checkboxes in Blender 2.5 makes it easier to control features that only have on/off states. In previous versions, that wasn't possible and the rigger would have to try emulating that particular feature with fairly complex constraint setups.
Chapter 2: How to create a stretchy spine
Chapter 1: Customizing shapes and colors for your bones
Chapter 5: Setting up the shoulders