
Shape Keys, as you may already know, are saved states of your mesh that can be blended from one to another. For creating facial expressions, which can drastically change the shape of your character's face (like from a smile to an angry face), these are indispensable in the rigger's toolbox.
As a rule of thumb, you should use Shape Keys whenever a facial expression is too specific or complicated to achieve with regular bones. For instance, while smiling, the facial muscles create specific forms for your mouth and cheeks, creating skin folds (even your eyes and ears can move in a smile). Reproducing this kind of deformation with bones can be very hard, so you'd better model the specific shapes to accomplish this expression.
- Open the file
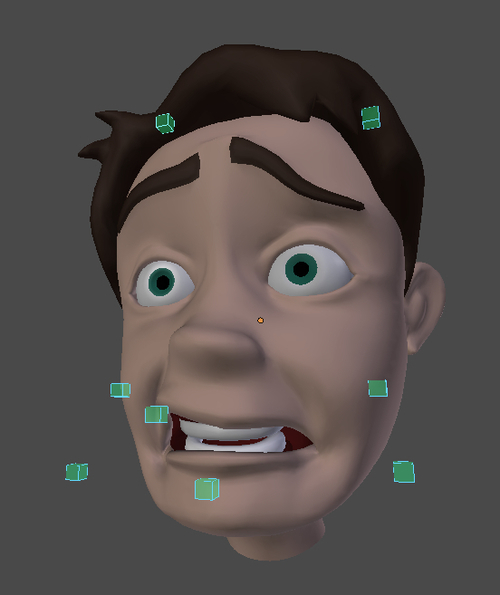
004-Face.blend. It has our character head model, ready for the creation of shape keys. - Select it, go to the Properties window, under the Object Data tab and look for the Shape Keys section. Click on the plus sign icon to add the Basis shape on which the others will be based on. Click on the same button again to create the first shape and name it
Mouth_cornerUp.L, as you can see in the next screenshot: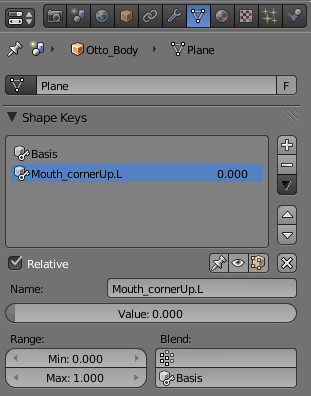
- Enter in the mesh's Edit Mode (Tab) and model the shape of a half smile at the left side of the mouth. You can move (G) the vertices, edges, and faces as you wish, using modeling tools such as the Proportional Editing (O) mode. The next screenshot demonstrates our modeled shape. Notice the modeled skin fold, giving shape to a smile line around the mouth. This kind of deformation would be difficult to accomplish with bones.

- To create the right side of the expression, you can model it yourself or mirror the current one. In order to accomplish the latter, set the
Mouth_cornerUp.Lshape slider value to 1, add another shape key through the plus sign, click on the down arrow button, and select Mirror Shape Key, as seen in the next screenshot. Then you can name this shape properly asMouth_cornerUp.Rand tweak its shape if you wish.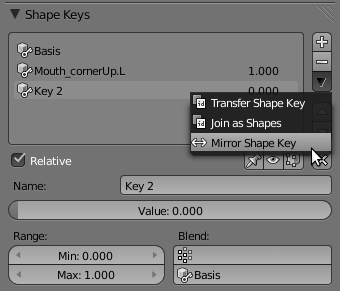
Note
Another approach to this bilateral symmetry is to model the full expression with both its sides and create two vertex groups (one for each side of the face, such as
Face.LandFace.R). Then you can duplicate that shape and set each copy to affect only one of these vertex groups. Each Shape Key has a field to select a vertex group: if one is selected, its weights would be used as a "mask" for the influence of the Shape Key; if none is selected, the entire mesh will be influenced by it.After you create this shape, go on to model new shapes for different facial expressions. Building a Shape Key library is a somewhat long and repetitive task, so you should only model the shapes that are required to achieve a good variety of facial expressions. For instance, the main character from the Blender Foundation's short movie Sintel required more than 50 shapes.
Note
Along with facial expressions, some professionals also choose to model phonemes (such as the character saying the letters "a", "o", "e", "m", "f", and so on). That's very useful, but you should use these phoneme shapes only as an addition to your existing library, since the emotional state of your character (thus his facial expression) will probably be different regardless of the spoken words.
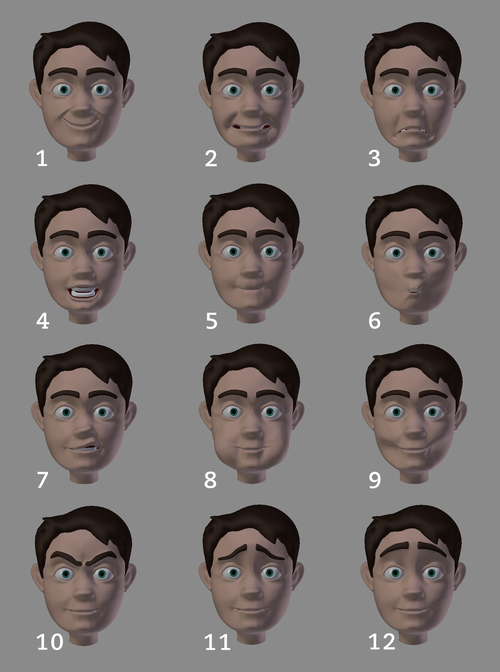
You can have a look at some commonly used shapes in the following list and what they look like in the next screenshot:
- Mouth_cornerUp (left and right)
- Mouth_cornerSide (left and right)
- Mouth_cornerDown (left and right)
- Mouth_wide (top and bottom lips)
- Mouth_curled (top and bottom lips)
- Mouth_puck (only one shape)
- Mouth_sneer (left and right)
- Cheek_puff (left and right)
- Cheek_suck (left and right)
- Brow_mad (left and right)
- Brow_sad (left and right)
- Brow_surprise (left and right)
Note
To stay organized, you should adopt some naming conventions for the shapes. Use prefixes such as
Mouth_, Eyebrow_and the suffixes.Land.R.- After you model all your needed shape keys, it's time to create the appropriate drivers. This is a matter of creating some controller bones and mapping their channels (location, rotation, scale, and so on) to the amount of influence of each shape key. The good thing is that one bone can drive more than one shape key.
- Let's create the drivers for the left corner of the mouth: open the file
004-Face-shapes.blend. This file has the head mesh with all shapes already modeled and an armature with the bones properly named and positioned after the face parts. - Select the head mesh, go to the Object Data tab in the Properties window, and navigate to the Shape Keys panel. Select the
Mouth_cornerUp.Lshape, right-click over the Value slider and choose Add Driver. Do the same for theMouth_cornerSide.LandMouth_cornerDown.Lshapes. We'll map these drivers to different channels and values of theMouth_corner.Lbone. - Go to a Graph Editor window, select the Drivers mode, and select the driver
Mouth_cornerUp.Lon the left side of the window. In the Properties panel (N), find the Drivers tab and entervar*10in the Expr field. This will make a small amount of movement on theMouth_corner.Lbone to give a high level of influence on the shape. - Below the Add Variable button, leave the variable type as Transform Channel, select the Armature object, and the
Mouth_corner.Lbone. Select the Y Location channel and check the Local Space field. The next screenshot shows the setup values: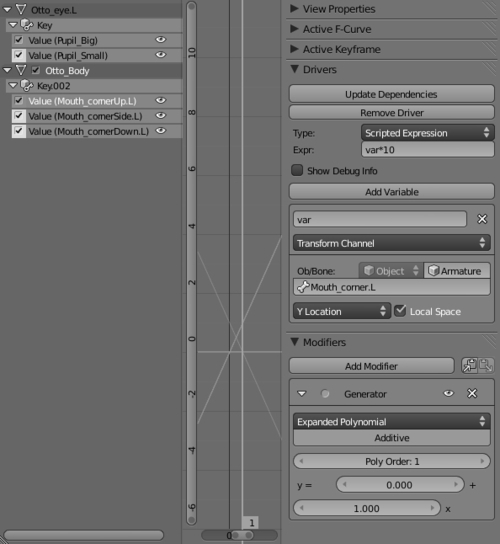
- Now you should repeat steps 6 and 7 for the
Mouth_cornerSide.LandMouth_cornerDown.Ldrivers, with a few changes: for theMouth_cornerSide.Lyou should use the X Location channel and set the remaining values exactly as you did before; for theMouth_cornerDown.Lthe only difference to theMouth_cornerUpdriver is the Expr value, which should be inverted with thevar*-10expression.When you finish setting up these three drivers, the controller will act like this: when moved up, the Mouth_cornerUp shape is triggered; when translated to the side, the Mouth_cornerSide.L shape is activated; and when moved down, it will trigger the Mouth_cornerDown.L shape. The cool thing about this is that you can mix related shapes when moving the controller in a diagonal direction.
Using the principles and procedures shown here you can now set up the remaining drivers using the other bones. As a guideline, you should map:
- The
Cheek_puff.LandCheek_suck.Lshapes to theCheek.Lbone, using the positive and negative X local location channels, respectively. The opposite goes for the right-hand side. - The
Mouth_wide.topshape to theMouth_lip.Topbone, using the up Y local location channel. - The
Mouth_curled.topshape to theMouth_lip.Topbone, using the down Y local location channel. - The
Mouth_sneer.Lshape to theMouth_lip.Topbone, using the left X local location channel. Use the inverted expression to the right equivalent. - The
Mouth_wide.bottomshape to theMouth_lip.Bottombone, using the down Y local location channel. - The
Mouth_curled.bottomshape to theMouth_lip.Bottombone, using the up Y local location channel. - The
Mouth_puckshape to theMouth_lip.Bottombone, using the front Z local location channel. - The
Eyebrow_mad.L, Eyebrow_sad.L, andEyebrow_surprise.Lshapes to theEyebrow.Lbone, using the negative local X location, the positive local X location, and the local Y location respectively.
- The
The complete setup can be found in the file 004-Face-complete.blend, for your reference if you have any doubts regarding the drivers configuration. With this setup you can achieve facial expressions like the one you see in the following screenshot:
By carefully creating a library of shape keys, we can set up drivers and mix them to achieve good facial expressions. A single controller can (and should in some cases) drive more than one shape key. It's good to map opposite channels to opposite shapes so they don't overlap: this is the reason for mapping the Mouth_cornerUp.L shape to the positive local Y location and the Mouth_cornerDown.L to the negative local Y location of the same bone.
The facial expressions based on driven shape keys are good, but they aren't very flexible since the modeled shapes act like the extreme positions. In the next recipe we'll see how to use lattices to add more flexible deformations.
Chapter 4: Face controls with lattices