
The use of shape keys allows us to model some very specific facial expressions, notably those which produce deformations such as skin folds and creases. By building a shape key library you can interpolate between them to create very convincing facial expressions. The problem is that you're always limited to the size of your library, and building a huge one requires an equally huge amount of time and effort.
A good solution to achieve more freedom when building facial expressions is to add another layer of lattice-based controllers so that the animator can mold the face as desired in real time. This is easier, quicker, and makes your file lighter for not having an insane amount of modeled shapes. But the real benefit is that it allows you to achieve pretty good results.
With this mixed-technique approach we can get the best of each tool: modeling specific creases and wrinkles with shape keys; freely deforming the mesh in real time with lattices; and using bones where we need rotation (for the eyelids or the jaw, as we'll cover in the next recipe).
- Open the file
004-Lattice.blend. You'll see a face already set up with shape key controllers as the result of our previous recipe. This is our starting point.We're going to create some Lattice modifiers to deform our head mesh, but we'll make them deform only specific regions. We need one lattice to deform the face as a whole, one for fine tuning the upper lip, and another for the bottom lip. In order to achieve this, we need to create three vertex groups: one for each lattice.
Note
A lattice is a special object in 3D applications: visually, it's shape is similar to a subdivided mesh box, but it's not visible on the rendered image. It's purpose is to deform a mesh object based on the position of its control points. There is another modifier in Blender that allows us to achieve similar results: the MeshDeform modifier. Instead of using this special lattice object to deform our mesh, it uses another mesh (with fewer vertices) as the reference for the deformation.
- Select the head mesh and go to the Vertex Groups section, under the Properties window, in the Object Data tab. There will be some groups already created, but we need more. Add three groups by clicking on the plus button and name them
face, lips_bottom, andlips_top, as seen in the following screenshot: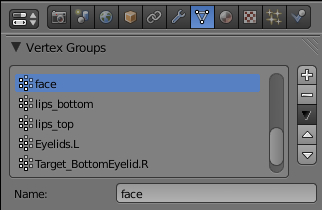
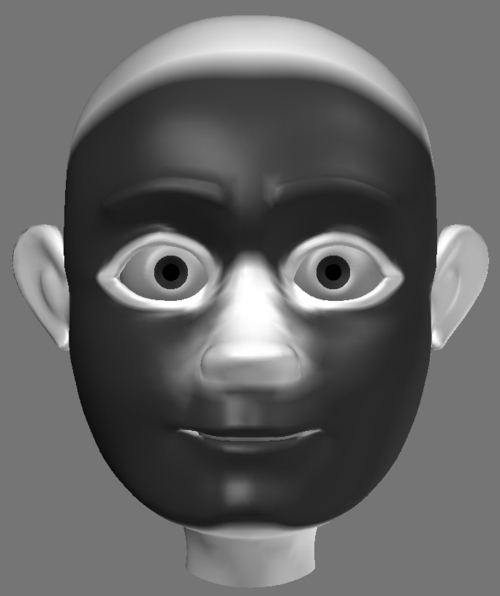
- On the 3D View, select the head mesh and activate the Weight Paint mode on the window header or through Ctrl + Tab. Make sure that the face vertex group is activated in the Properties window, set your painting tool to Add in the Toolbox panel (T), and start painting the influence zone of the face. When painting, leave the eyes and nose regions with no influence (blue, in Blender default colors; white in the grayscale image given next) and full influence (red, in Blender default colors; dark grey in the grayscale picture given next) from the chin to the forehead.
- Repeat the process for the
lips_bottomandlips_topvertex groups, painting its regions as seen in the next screenshot. Notice that thelips_topvertex group also adds the nose to its influence region (dark):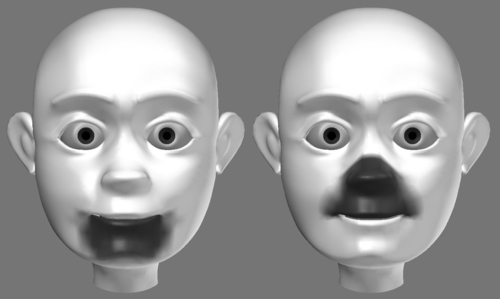
With the regions of influence properly painted, it's time to create the Lattices to deform our mesh.
- Go back to Object Mode, position the 3D cursor in front of the face, go to front view (Numpad 1), press Shift + A, and choose Lattice.
- In the Object Data tab, under the Properties window, set this lattice to have 5, 1, and 7 points on its U, V, and W coordinates respectively.
- On the 3D view, scale (S) and position (G) the lattice so it fits the face size, similar to what you see in the next screenshot. Set its name as
Lattice_Face.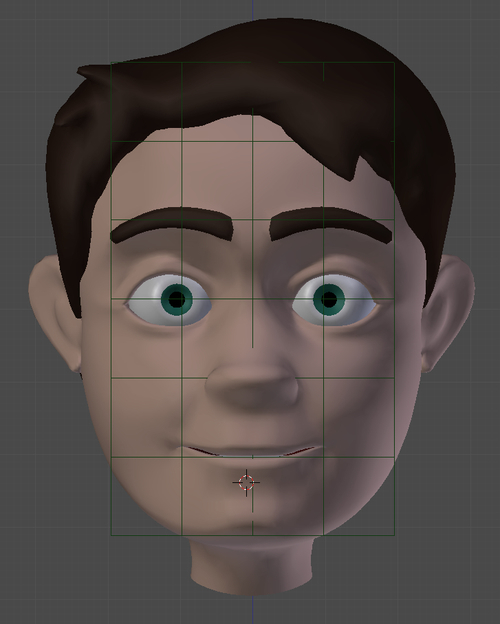
Now that we have the Lattice and Vertex Group properly created, let's add the modifier.
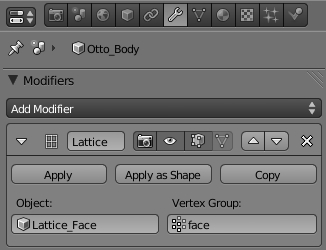
- Select the head mesh, go to the Properties window in the Modifiers tab, and add a Lattice Modifier. Set the Object field value as Lattice_Face and choose face as the Vertex Group, as seen in the following screenshot:
If you enter into the lattice's Edit Mode and move any of its points, you'll see that the mesh is deformed accordingly. Now we just need to set some controllers to act on the Lattice. Since we already have an armature (on layer 2) to control the eyes and shape keys, it's a good idea to use it to also control the Lattice points.
- Select the armature, enter in its Edit Mode, and add a bone between the eyebrows and name it
Eyebrows_Center. Move (M) it to an empty armature layer (such as layer 3), and make it the only armature's visible layer by pressing Shift + M and choosing that layer. This layer should have only bones that affect lattices, so you know where to find them. You should now have something similar to the next screenshot:
- Select the Lattice, go to the Properties window in the Modifiers tab, and add a new Hook modifier. In the Object field, choose Otto_Armature; for the Bone field, pick Eyebrows_Center.
- It's time to assign the lattice's points to that bone. Enter into the lattice's Edit Mode (Tab). You should notice that the Hook modifier panel in the Properties window had changed a bit. Now you have two new buttons called Select and Assign for that modifier.
- Select the Lattice point near the
Eyebrows_Centerbone. Go to the Hook modifier panel and click on Assign and then Reset to recalculate the modifier. - Exit the Edit Mode, select, and move the
Eyebrows_centerbone. You'll see that the assigned point follows it and the face shape is deformed by the Lattice, as seen in the following screenshot: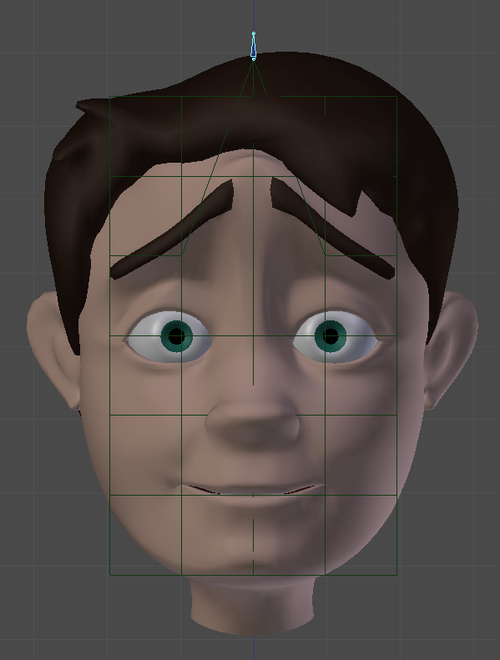
- Repeat steps 9 till 13 to add new bones to the Armature and more Hook modifiers to control the other points of the Lattice. Once you're finished, you'll have a good amount of control over the face, even if you have a shape key applied.
- After finishing with the first lattice, create two more: one for the bottom lip and another for the upper lip, with their sizes and number of control points relevant to the vertex groups you've created: lips_bottom and lips_top respectively.
- Repeat the process from steps 5 to 14 for each Lattice, defining their deformation range to their relevant vertex group and creating more bones and hook modifiers as you wish. To follow the head movement, all lattices should be parented to the Head bone.
Note
This process can also be applied to have a finer control over the shapes shapes of eyelids, if you need more control than just opening and closing them.
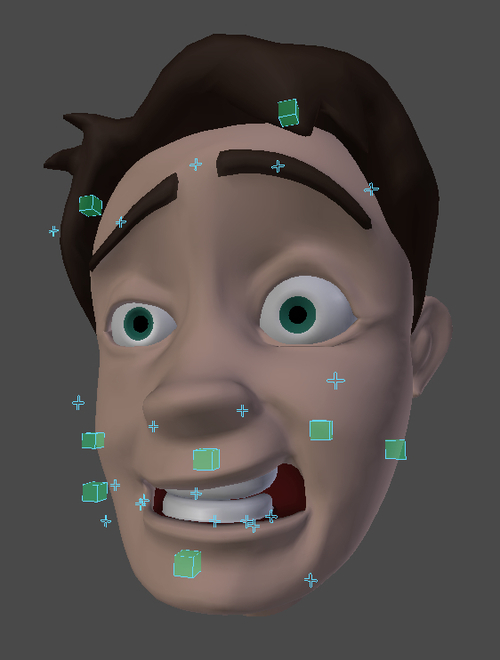
After you finish assigning all the lattices, bones, and hook modifiers, you should end up with a very flexible rig, which allows you to freely deform the mesh on top of previously assigned shape keys. The following screenshot shows an example of it, and you can find the complete exercise in the file 004-Lattice-complete.blend. The shape keys controllers are the square bones, while the lattice controllers are the cross-shaped ones:
By assigning lattices to specific regions of the face through vertex groups, you can control them with bones through the Hook modifier, thus easily creating free deformations on top of any existing shape keys.
This method is good for creating smooth and subtle changes in the mesh, but you shouldn't be limited only to faces. Bouncy bellies in fat characters or muscles can also be tweaked with this technique.
Chapter 4: Adding expressions using Shape Keys