
When using arms in Inverse Kinematics mode, the target hand controllers are disconnected from the actual chain. These controllers are often children of a "root" controller, which is the topmost level in the hierarchy of bones. This is something animators often call the "world space".
The "world space" is good for various situations, such as when the character's hands need to be held still at one point while the rest of the body moves (imagine a circus acrobat holding himself in a rope, for instance), but we often need other "spaces". For example, animators should be able to rotate the character's Ribcage controller and have its IK hands to follow the movement. That would be the "Ribcage space", as many others which can be required by your animation.
- Open the file
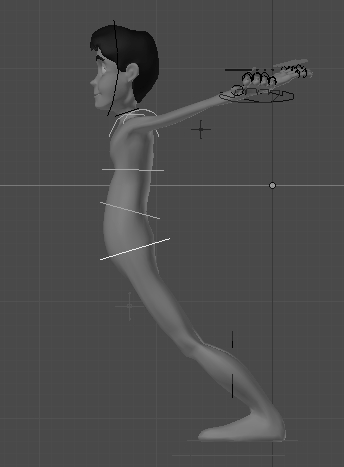
005-Spaces.blend. It has our character rig with enabled IK for both arms. Since the arms have a regular IK constraint, they are in the default "world space", with its controllers parented to theRootbone. There is a new UI slider to switch between "world" and "ribcage" spaces so that we can work on creating the controller. - If you go to side view (Numpad 3) and move the Hips controller to the character's front, you'll see that his hands and arms remain in place. That's okay for the legs, since we assume that they are planted on the ground, but the arms look like they are held by something. Is our character in a dungeon, with handcuffs attached to a wall?
We need the arms controllers to follow the ribcage position and rotation, so the animator can make a basic pose with the character torso and then pose the arms, which will be in a more appropriate position.
- Go back to front view (Numpad 1), select the Ribcage controller, hold Shift and select the
Hand.Lcontroller. Press Ctrl + Shift + C and pick the Child Of constraint. Things will look weird, but we're going to fix it now. - With the
Hand.Lbone selected, go to its Bone Constraints tab, under the Properties window and click on the Set Inverse button. Things will be back to normal. Now, right-click over the Influence slider and pick Add Driver. It will gain a purple hue. - Let's bind the driver to the appropriate controller now. In a Graph Editor, make sure it's in the Drivers mode, look for and click on the driver that we've just created: Influence(Hand.L: Child Of).
- In the Properties panel (N) on the right-hand side, under the Drivers section, select
Otto_ArmatureandSpace_Arm.Lfor the Ob/Bone fields. Leave the X Location channel untouched and check the Local Space option. In the Expr field, above the Add Variable button, write justvar. The following screenshot shows the driver setup values: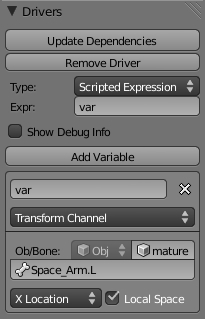
Now, by moving the Space_Arm.L controller to the "Ribcage" position, the left hand will follow the movement of the character's torso.
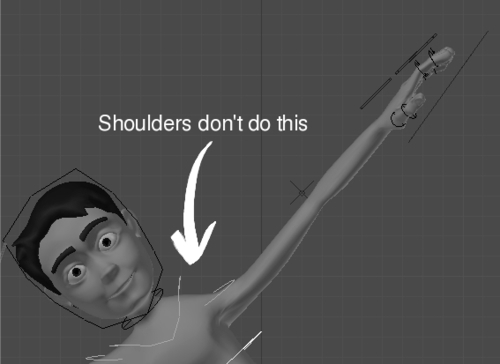
You may notice that we have a hierarchy of constraints here. Since the arm is at a lower level than the shoulder controller, you may get unwanted deformations if you set its space to Ribcage and the Shoulder is in hinged mode. You should use the Hinge controller for the shoulders only when the IK arm is in the world space. We can fix that with a driver. First, lets see the problem.
The next screenshot shows the weird deformation when we rotate the torso with the Hand.L bone in the Ribcage space and the Shouder.L bone in hinged mode:
Fortunately this is very easy to do with our setup. Every controller on our UI has a Limit Location constraint attached to it. This constraint is to allow only the values 0 to 1 in their local X Location, since that is what we need for the drivers.
All we have to do is to set a driver for the Minimum X value in the Hinge-Arm.L controller. If the Space-Arm.L is set to 1, the Hinge-Arm.L must have its position locked to 1, having both Minimum and Maximum X values equal to 1. But, wait: we already have a driver set to read the X position of the Space-Arm.L bone, since it drives the Child Of constraint of the Hand.L controller. Let's copy and paste it!
- Select the
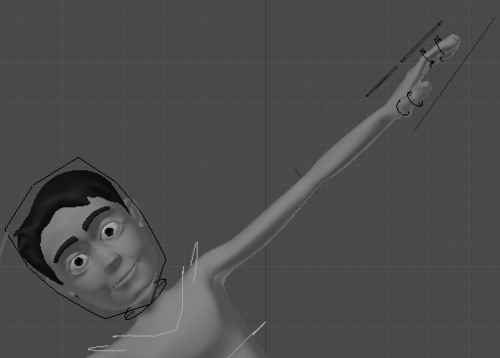
Hand.Lbone and go to its Bone Constraints tab in the Properties window. Right-click on the purple Influence slider and select Copy Driver. Now select the Hinge-Arm.L controller, go to its Limit Location constraint in the Properties window, right-click on the Minimum X slider, and select Paste Driver. That's it!Now, if you set the Space-Arm.L controller to Ribcage, you can't move the Hinge-Arm.L slider to the "Hinge" position. It's only allowed if you set the world space. The next screenshot shows the desired behavior with the Hand.L bone in the Ribcage space:
The file 005-Spaces-complete.blend has this final setup applied to both left and right hand controllers, so you can refer to it in case of doubt.
By assigning a Child Of constraint of the IK hand controllers to the ribcage controller as target, we can change the default "space" from which the IK controllers' positions are evaluated. This gives a lot of flexibility to the animator in the way of approaching an animation scene. Because of the inherent nature of bone chains, we have to pay attention to bones between the IK controller and its target space: in this case, the shoulder controller gave us unwanted deformations when in hinged mode. A simple copy of the main driver fixes that.
Don't just be limited to creating a "Ribcage space"! Every animation shot is different in nature, and may require you to set various different "spaces". Imagine if your character glued its hand to its head! You should be able to move the head and affect the "glued" hand. Creating a "head" space using the principle showed in this recipe you can do that.