
We may be used to seeing the term "multitasking" related to computers, where they are able to run multiple programs at the same time. Something quite similar happens with us all the time, when we're doing more than one action at once.
The animation principle of secondary actions deals with this nature: while we're performing a main action there are a number of complementary secondary actions. For instance, if our character is walking on the sidewalk in a hurry to catch a bus, some possible secondary actions may be looking at his wristwatch—meaning he's probably late—or adjusting his necktie—meaning he was so late when leaving home that he couldn't even properly wear it.
The important thing to notice here is that secondary actions should be used in your shots just as an accessory to the main action. They should reinforce the idea of your shot and add to the main idea you're trying to portray.
- Open the file
009-Secondary-actions.blend. It has our character Otto walking in a hurry through a rough sidewalk model, as you can see in the next screenshot: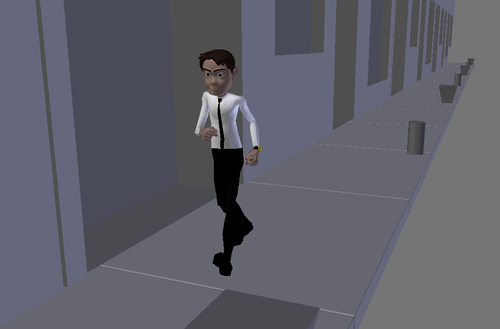
After hitting Alt + A, you'll notice that he's marching down the sidewalk with a fast pace and a serious facial expression. The action itself may look a bit boring, since it's just a repeating walk cycle. Let's make it more interesting by adding a secondary action to reinforce the feeling of hurry in our character.
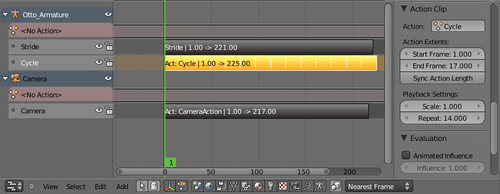
- Go to an NLA Editor window and look at the existing layers. We have one called Stride, which is used to make the character walk forward, and one called Cycle containing a repeating two-step walk. The cycle is set to repeat 14 times within the NLA editor, as you can see in the next screenshot:
- Open a DopeSheet window and select the Action Editor mode on the header. Click on the New button next to it in order to create a new action and name it Watch. In this action we're going to pose only those bones necessary to make him look at his wristwatch.
- Move the timeline marker to frame 50, so our character walks a few steps before he starts looking at his watch. Select the following bones:
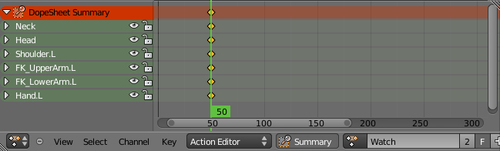
FK_UpperArm.LFK_LowerArm.LShoulder.LHand.LNeckHead
- With these bones selected, insert a new LocRot keyframe (I) for them. Your DopeSheet window should look like this:
Now, when you hit Alt + A, something weird happens: up until frame 50 the animation looks fine, but after that the bones for which we've set a keyframe remain still. That happens because of the default way that the NLA Editor works: this new "Watch" strip is layered on top of the existing animation, replacing any information below it.
In order to change that behavior, we need to change the Action Extrapolation value for this strip in the NLA Editor.
- Open an NLA Editor window and make sure the Properties (N) panel is opened. On the Animation Data section, ensure the active Action is "Watch" and change the Action Extrapolation field to Nothing. Leave the Action Blending field unchanged.
That will make our new action overwrite any animation below it, but without considering anything after its last keyframe set.
- Go back to a DopeSheet window and move the timeline marker to frame 111. Select the same bones as you did in step 4 and insert a new keyframe for them. Now we have set our first and last positions for this action, and they are identical to the positions set on the actions beneath it on the NLA Editor. This will ensure our secondary action will be added seamlessly on top of the walk cycle.
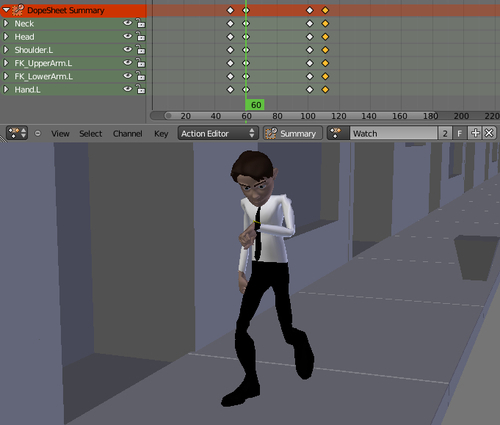
- After that, go to the 3D View window and pose our selected bones between frames 50 and 111, making our character raise his left arm, look at his wristwatch, and return to his cycled and worried walk. The next screenshot shows the DopeSheet with some poses set for this action, along with the character pose on frame 60:
- Now you may select the keyframes set on frame 60, representing the final position of him looking at his wristwatch, duplicate (Shift + D) them on the DopeSheet window and move them to frame 100.
- Change their rotation (R) slightly on the 3D View and replace the keyframes (I). If you hit Alt + A again, you'll see that the walk animation transitions seamlessly to the secondary action of looking at the watch.
- Back to the NLA Editor window, you can click on the snowflake icon to convert the Walk action into a NLA strip. This way you can repeat the process shown in this recipe to add more subtle secondary actions, making the scene look more natural. The file
009-Secondary-actions-complete.blendhas this complete example for your reference.
After having a solid base animation complete, you can add secondary actions using the NLA Editor. The secondary actions are layered on top of the base animation, using its positions as a starting point to make a seamless transition. The secondary actions should be an accessory to the main action, supporting the basic idea of the scene. This approach leads to a non-destructive workflow, meaning your main action remains unchanged as you add new layers of secondary animations.
Appendix: Understanding Extremes, Breakdowns, Inbetweens, ones and twos
Chapter 6: Non-linear animation
Chapter 6: Animating in layers
Chapter 7: Easy to Say, Hard to Do: Mastering the Basics