
Since the Golden Age of traditional animation in the previous century, animators know that regardless of the action performed by our characters, they must feel alive to our audience. When a character reaches the end of one action, it shouldn't remain completely still. When it happens, it looks like something went wrong—is he dead? Frozen? Is the TV broken?
To avoid that, we must add a slightly modified and carefully built pose after the hold so the character keeps moving and "alive". This is specially true in CG animation, where the animation is on Ones (meaning that each new frame brings a new "drawing") by default. In traditional 2D animation, where the number of drawings per second of footage is normally reduced, this principle is relevant but not always so crucial.
The animation principles are often related, so we generally find and use moving holds along with the principles of Follow Through, Anticipation, Slow In, and Slow Out. Thus, we shouldn't just add a random pose after the hold just to keep our character moving. This motion should be relevant to the timing and spacing of its surrounding poses.
- Open the file
009-MovingHolds.blend. It has our character Otto with a basic action where he turns his head from his right to his left, as if something called his attention. The next screenshot shows the last keyframe, where he looks to his left: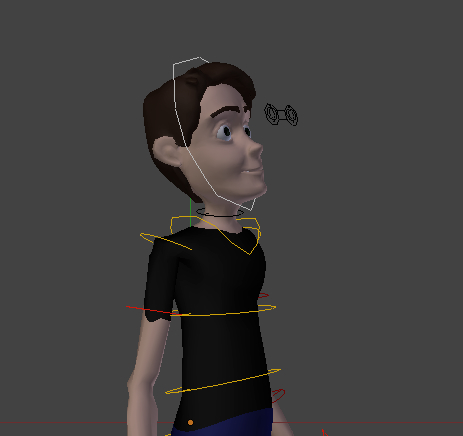
- Although it does have a saved position on frame 1, our character holds its position until frame 12, when he starts the head turn. If you press Alt + A, you'll notice he's still like a statue before and after the turning action. Nobody (except some robots) move like that. We need to add some slightly different poses before and after the head turn in order to make the action look natural. This transformation on the poses shouldn't be random, though. Move the DopeSheet timeline marker back and forth until frame 19, where the Breakdown position is set, and check the speed and direction each of these bones go.
- Since his body makes a quick turn to the left, it's a good idea to make this moving hold also act as a subtle anticipation. Go to frame 12 and rotate (R) some bones such as the
Belly, Head, FK_UpperArm.L, FK_UpperArm.R, FK_LowerArm.L, andFK_LowerArm.Rslightly (hold Shift for precision) to the opposite direction of the main action.The next screenshot demonstrates this subtle difference by comparing the before and after using the local Y rotation axis curve of the Belly bone:
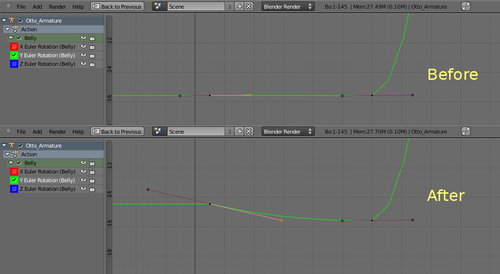
By making the moving hold go in a direction opposite to the main movement, we create a contrasting movement that acts as an anticipation to the turning action. The transformation for the hold should happen in a balanced amount and, although there are no rules for a moving hold (as they rely on the nature of each movement), here are some general issues to care about:
- If the transformation difference is subtle and the timing of the hold is too big, the action will look weightless.
- The hold should happen with a consistent speed to its surrounding actions, reinforcing the feeling of weight and avoiding linear movements.
- Remember: it's a moving hold, so you should avoid too much movement on it.
- You also shouldn't go the other extreme and add an unperceivable movement, or it won't have any effect.
- If the moving hold happens in the same direction as the related main action, the Extreme positions next to it will lose their strength. The action will lose contrast, and the poses won't be very defined.
Now that you have created the moving hold preceding the action, let's create another one after it.
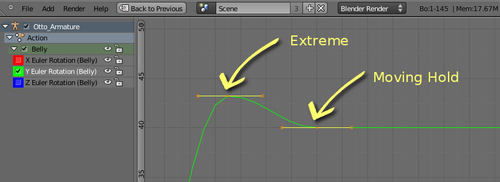
- Hit Alt + A again and notice that our character stops suddenly just after the turn. The last Extreme set for this action happens on frame 25, so go up five frames on the DopeSheet timeline.
- On the same bones as before, make a subtle adjustment on their rotation (R). Make them rotate back slightly, as if the Extreme set on frame 25 was too extreme and needed to go back and settle. This will bring fluidity to the movement, making it come to rest in a gradual pace while emphasizing the Extreme position.
The next screenshot shows the same Y local rotation curve for the Belly bone, with the Extreme position set on frame 25 followed by its moving hold:
The file 009-MovingHolds-complete.blend has this finished example for reference. Take a look at how the torso and arms bones have their moving holds at different frames, enhancing the movement with a subtle overlapping action.
Before and after each action, our characters normally stay in a held position. While at it, it's important to add subtle movements in order to keep them moving—or look alive—to the eyes of our audience. With this in mind, it's also crucial to add this Moving Hold while considering the preceding and succeeding actions in order to make this motion look natural.
Appendix: Understanding Extremes, Breakdowns, Inbetweens, ones and twos
Chapter 6: Animating in layers
Chapter 7: Easy to Say, Hard to Do: Mastering the Basics
Chapter 9: Animating characters with appendages