
We often need to animate characters with appendages such as long ears, tails, antennas, a necktie, or even mesh-based hair. Their motion follows the body part they are attached to, usually at a different pace due to their soft and bouncy nature.
When the character stops its movement, the appendages continue to follow it and keep moving for some time until they overcome inertia. This nature is described by the Follow Through principle of animation, and is often applied as a layer of detail over the main action.
The appendages are often animated after the main body parts—as the torso or head—because it's easier to visualize and test their behavior after you have finished the main action. In this recipe we'll apply the Follow Through principle to a ponytail.
- Open the file
009-Appendages.blend. You'll see our character Otto with a beard and new hairstyle—and a ponytail—with the same action we got as a result of the previous recipe on moving holds, in which he turns his head to the left. Press Alt + A and you'll notice something looks weird, since the ponytail is too stiff and doesn't have the delayed and soft action we would expect. Did he use too much hair spray?
We need to add a nice follow-through action to his ponytail. This principle tells us that soft appendages must follow the main source of movement in a delayed and bouncy fashion.
Note
Blender offers a wide range of simulations tools, including the ability to create hair, cloth, and bouncy elements such as gelatin. These tools allow us to simulate very realistic movements, but are beyond the scope of this book. Our goal here is to understand the animation principles so we can create realistic or exaggerated movements.
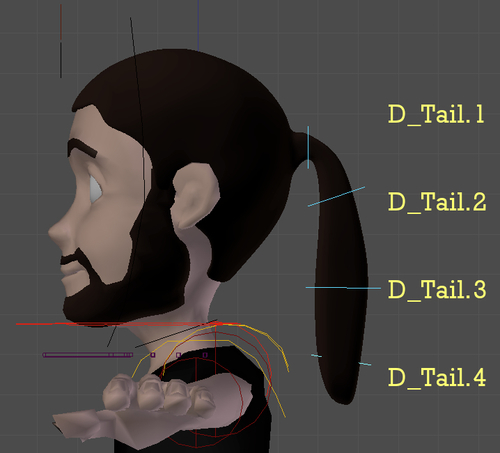
To achieve this, it's good to use a FK bone setup to control the ponytail, since the head leads the movement of the hair. With a FK setup, we can control the base of the ponytail and adjust each bone of the chain until the tip. There is a simple FK setup linked to the Head bone to control the ponytail. The bones in that chain are:
- D_Tail.1
- D_Tail.2
- D_Tail.3
- D_Tail.4
All bones are set to have 16 segments, so they perform a curved deformation on the mesh. The next screenshot portrays them in a resting position:
Now, for the actual animation! Since the head action is roughly a rotation on the global Z axis, we're going to mainly use the top (Numpad 7) and side (Numpad 3) views. We're going to animate the ponytail in four "steps"—one for each bone of the chain, starting from its root.
- Select the
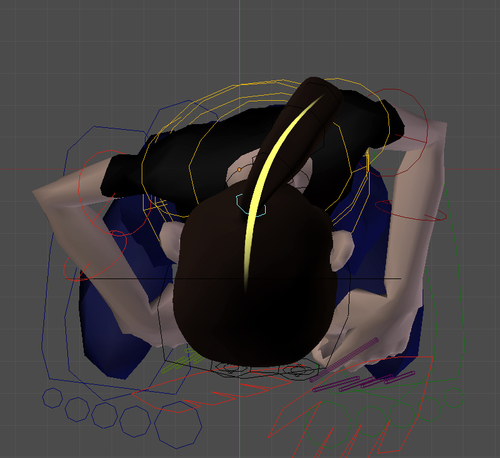
D_Tail.1bone. On the DopeSheet window, go to frame 12 (which is when the head turn begins) and set a rotation keyframe (I) for it. - Move the timeline marker to frame 19, which has our character's head in the Breakdown position for the turn. Using the top and side views, rotate the
D_Tail.1bone so that the ponytail looks like it follows the head with a small delay.If you move the timeline marker back and forth, you'll notice that the character's head goes from looking to its right-hand side (frame 12) to looking to its front (frame 19). A delayed rotation to the D_Tail.1 bone means that it shouldn't be pointing in the same direction as the head on frame 19, but to a point a few frames in the 'past'; make it point a bit to the right, as is highlighted with a curve in the following screenshot:
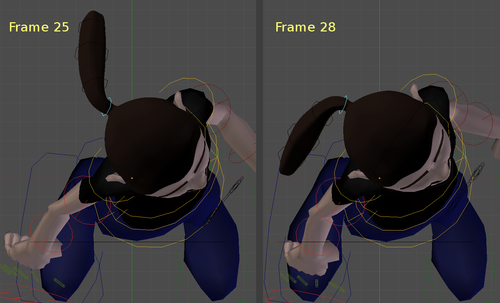
- Go to frame 25, which is when our character's head begins to stop its movement. Rotate the
D_Tail.1bone so that the overall shape of the ponytail describes a curve pointing to the character's back. The root of the ponytail is now closer to the head movement, but the remaining bones of the chain are still 'in the past'. That means the farther on the chain a bone is, the greater is its delay to the source of the movement.On frame 28 the character's head is almost still, but the ponytail movement should continue. Rotate the D_Tail.1 bone so that the ponytail now points to the opposite side of frame 25. That will bring the feeling of "bounciness" to the ponytail. The head stopped its rotation on frame 25, but the ponytail reaches its peak movement on frame 28. The next screenshot shows a comparison between frames 25 and 28:
- Now, to complete the base movement of the ponytail, add four more rotation keyframes to it—each will make the hair point to its opposite direction, gradually reducing the spacing and timing until it stops, around frame 41.
- After you're happy with the follow-through action, timing, and spacing, applied to the root of the ponytail, move on to the next bone on the chain,
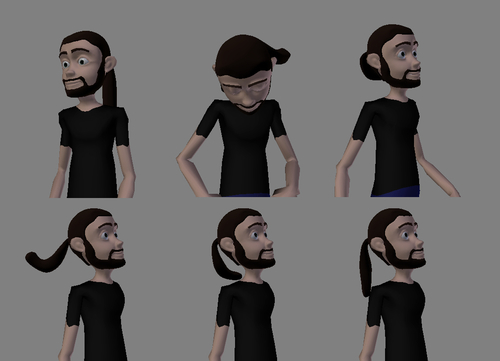
D_Tail.2. Go back to frame 12, where the head turn begins, and save a keyframe for this bone on its current rotation. - Now it's time for the second "step": it's just a matter of repeating the process you did for the ponytail's root bone, but now you should use the
D_Tail.1bone as a reference for movement instead of theHeadbone. TheD_Tail.2bone will now be delayed in comparison to theD_Tail.1bone. This will lead to a "S" shaped ponytail, as you apply the follow-through to the remaining bones of the chain in steps 3 and 4.The following screenshot shows some frames of the ponytail movement after completing the animation for each of its bones:
The file 009-Appendages-complete.blend has this complete example for your reference.
The follow-through animation principle tells us that soft body parts or objects continue their movement in a delayed fashion after the main source of the motion stops. To achieve this effect, it's optimal to use a Forward Kinematics chain and animate it from its root to its tip, always using the parent object's motion as reference.
This technique is useful to animate soft elements such as hair, clothing, or fat when the use of built-in Blender simulations tools is out of the question.
Appendix: Understanding Extremes, Breakdowns, Inbetweens, ones and twos
Chapter 6: Animating in layers
Chapter 6: Tracking animation arcs
Chapter 7: Easy to Say, Hard to Do: Mastering the Basics
Chapter 9: Hold, but not still: using moving holds