
Among Blender's very interesting features is the ability to "sculpt" meshes in the 3D view, deforming their shapes without having to worry about individual vertices, edges, or faces. While—at first—this is something useful only for character modelers, it's been used as a new paradigm for animation refinement in Blender.
The use of sculpting tools in Blender to enhance the character's shapes in movement, saving separate Shape Keys for each enhancement during the timeline, is called AniSculpt. This technique was first demonstrated by the well known character animator and teacher Daniel Martinez Lara, also known as Pepeland.
This technique is incredibly useful because it liberates the character riggers from the impossible pursuit of the "perfect character rig", suitable for every single action imaginable. Every character rig brings imperfections and gives some unwanted deformations that animators dread. Fixing every imperfection is a somewhat tedious, slow, and painful task, since the model has to "look good" from every possible position and angle.
With AniSculpt, the animator can sculpt the shapes of the characters after the animation is finished, as a layer of refinement to fix imperfections and make the overall shapes nicer on the screen. It represents a new step in the animation workflow, but can save a lot of time in the rigging stage. The rigs no longer need to give "perfect" deformations, only "acceptable" ones to be adjusted in the sculpting phase.
It doesn't mean, of course, that the rig shouldn't be good. The better the rig, the fewer the corrections that need to be made. It's a matter of leaving the right amount of work for each stage, without overloading either the rigger nor the animator.
Note
At the time of writing this book, Blender doesn't allow the use of AniScupt on linked group meshes. You have to append the objects before the AniSculpt stage. A workaround for it is animating with a linked group and, when the animation is finished and ready to render, appending the needed objects and applying the action to it before sculpting.
- Open the file
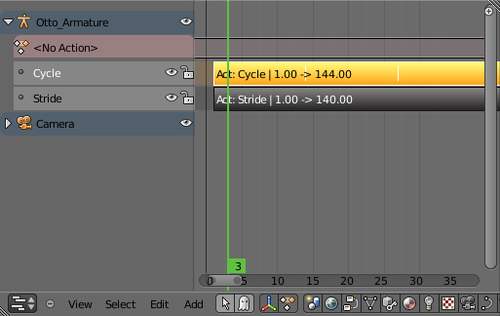
009-Anisculpt.blend.It has our character Otto with a run cycle action applied to it. All deformations on its mesh are made by the rig, and we need to adjust it in order to make the shapes look better.Take a look at the NLA Editor window. It has two layers of actions set for the run cycle, as you can see in the following screenshot:
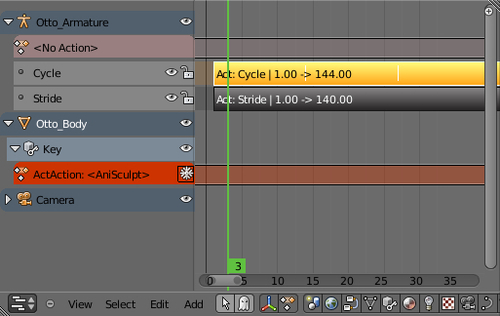
- Since the sculpting phase is the final "layer" of refinement, we can create an actual layer on the NLA Editor window to accommodate these changes. Select the
Otto_Bodyobject on the 3D View, go to a DopeSheet window, select the ShapeKey Editor mode on its header, and press the New button to add a new action. Name it AniSculpt. - Back on the NLA Editor window, you'll see a new line for the
Otto_Bodyobject. Click on the triangle next to its name to unveil the line underneath named Key (reserved for Shape Key actions). - Click on the triangle next to Key to see the layer containing our AniSculpt action. This is where our refinement layer will be placed, as you can see in the next screenshot:
- Go to the 3D View window and make sure our character's mesh is selected. Open a Properties window, in the Object Data tab, and locate the Shape Keys section. Select the Basis shape and click on the plus (+) sign on the right-hand side to create a new shape based on it. Name this new shape as
AniSculpt.01and click on the pin button in order to enable the sculpting on this shape. The following screenshot shows our new shape selected and the enabled pin button highlighted: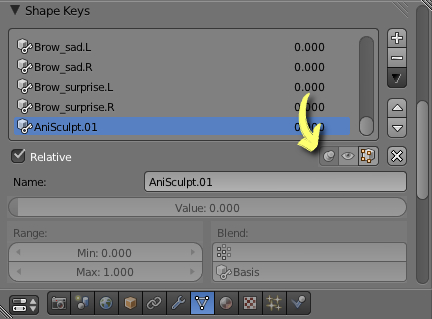
This shape is where our first sculpted correction will be stored. There may be dozens of sculpted shapes for your scene, and that number can be as high as one sculpted shape per frame, although normally one sculpted shape works for more than one frame. For each new shape you need to repeat step 5.
- Go back to the DopeSheet window with our AniSculpt action selected. Move the timeline marker and look closely at our character's mesh to find places that need correction (you can even hide the Armature layer, since we won't touch it anymore).
- Now, the fun part! When you find a frame that needs corrections, make sure your mesh is selected and the Shape Key you've created in step 5 is pinned. Enter in Sculpt Mode on the 3D View window header and start sculpting your corrections. You'll get finer control if you're using a pen tablet, since Blender can use the pressure information to the sculpt brush values.
- Sculpting the mesh is easy: the mouse cursor becomes a sculpting brush and lets you change the shape interactively with tools such as Grab, Smooth, or Inflate on the Toolshelf (T). Try creating nice arched shapes that follow an imaginary line of action.
Note
Try to avoid going too crazy with the sculpting; just make the corrections to the overall shape of our character on that position. Altering the mesh too much can give you a hard time when trying to blend all different shapes seamlessly on the timeline, but that's up to your artistic choice.
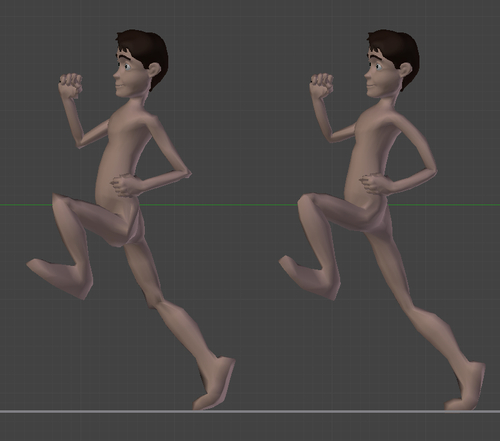
The next screenshot shows our original mesh (left) and our sculpted shape (right) with the added refinements. Notice how some skin folds were softened and the overall shape of the limbs and torso were curved to enhance the line of action. Also in the sculpted version the toes were correctly positioned on the ground and the elbows had their joints softened.
- Move the timeline marker on the DopeSheet. You'll notice that, besides looking good on the frame you have worked on, the shape can look weird when our character reaches different positions. This is why we need to set keyframes for it.
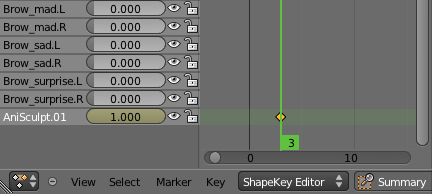
- Go back to the Shape Keys section in the Properties window, under the Object Data tab, and disable the pin button you've set to create the sculpted shape. On the DopeSheet window, make sure you're in the ShapeKey Editor mode and with the AniSculpt action selected. Locate and click over the AniSculpt.01 shape on the left-hand side panel. Go to the frame where you made your sculpted corrections and insert a keyframe for it; it's just a matter of moving the slider value for that channel to 1, and a keyframe will be placed on the current frame, as you can see in the next screenshot:
- Now, for preceding and succeeding frames, you just have to move the timeline and adjust the
AniSculpt.01channel slider to set a keyframe with lower values on those frames. A new keyframe will be automatically added as you change the channel slider. Change it to0when you feel the sculpted shape no is no longer needed.Now it's just a matter of repeating the process from steps 5 to 12 in order to create as many sculpted corrections as you need. This can be a bit time consuming, but it is a lot easier and quicker than trying to build the all-purpose perfect character rig.
Note
The AniSculpt script published by the animator Pepeland on his website (http://www.pepeland.com) automates a good amount of the steps covered in this recipe, but it is currently (at the time of writing) not compatible with the Blender version 2.57, but now you know what is needed to accomplish the same results.
- After you're happy with all the necessary corrections, go to the NLA Editor window and click on the snowflake icon next to the AniSculpt channel. This will make this layer of refinement independent and non-destructive to your already built animation.
The file 009-AniSculpt-complete.blend has this complete example for your reference.
The AniSculpt technique, developed by the animator Daniel Martinez Lara, allows an easy way to make refinements to your animations. It uses Blender's built-in sculpting tools to let the animator make adjustments to the characters in an intuitive way.
Appendix: Understanding Extremes, Breakdowns, Inbetweens, ones and twos
Chapter 1: Using corrective Shape Keys
Chapter 6: Animating in layers
Chapter 6: Tracking animation arcs
Chapter 7: Easy to Say, Hard to Do: Mastering the Basics
Chapter 8: Run, Forrest! (in cycles)