In this recipe, we are going to see one of the more commonly used parenting options: the handy Automatic Weights tool.
Start Blender and open the Gidiosaurus_rig_from_scratch_02.blend file.
- Select the Armature item in the Outliner and press Ctrl + Tab to go out of Pose Mode and enter Object Mode.
- Go to the Armature window under the Properties sidepanel to switch the Display mode from Wire to Octahedral and deselect the Shapes item.
- Enable the third Armature layer by clicking on the 3rd button under the Skeleton subpanel.
- Disable the 13th scene layer to hide the Armor.
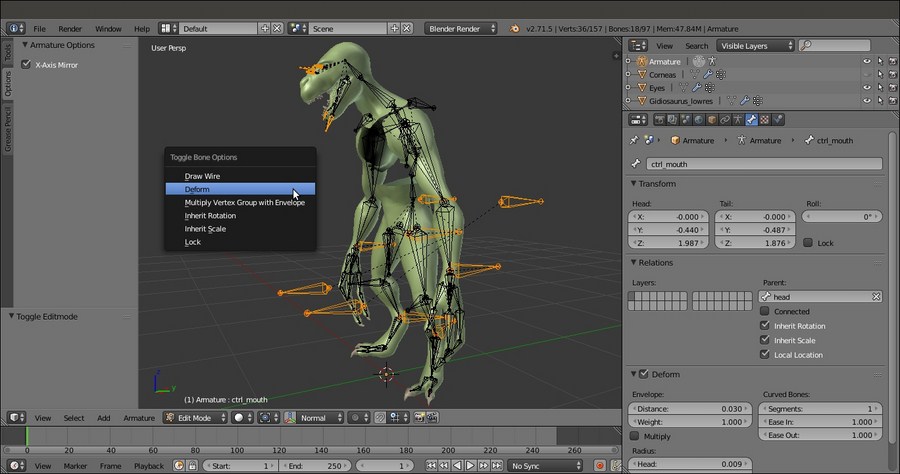
- Go in to Edit Mode and Shift multi-select the MAIN bone, the pole bones and the ctrl bones; in short, all the bones that don't have to deform anything, but are used to control the rig. Press Shift + W and in the Toggle Bone Options pop-up panel, select the Deform item to disable it for all of them at once:

Toggling the Deform item for all the selected bones at once
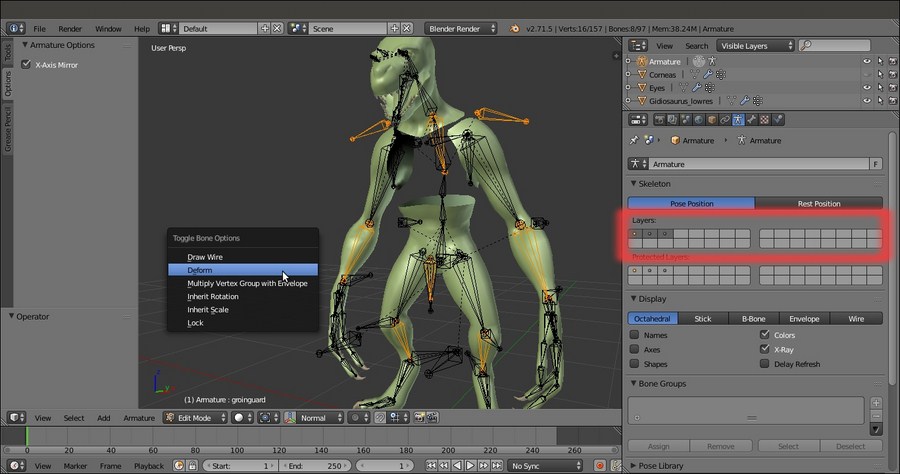
- Now, deselect everything and select all the bones that, in the previous chapter, we had added specially to rig the Armor object, using the Armature Layers buttons: the armor_ctrl bone, groinguard, vanbrace.L and .R, greaves.L and .R, kneeguard.L and .R, spaulder.L and .R; again, press Shift + W | Deform to disable the option.

Repeating for the Armor object bones
- Don't deselect the Armor bones, simply switch from Edit Mode to Object Mode.
- Select the Gidiosaurus_lowres object and then Shift-select the Armature, and press Ctrl + P; in the Set Parent To pop-up menu; select the With Automatic Weights item:

The Set Parent To pop-up menu
- Reselect the Armature, go in to Edit Mode, and press Shift + W | Deform to re-enable the item for the still-selected Armor bones; then, go out of Edit Mode.
- Now, reselect the Gidiosaurus object; go to the Object Modifiers window, move the newly created Armature modifier upwards in the stack, and enable the Preserve Volume item.
- Disable the Display modifier in viewport button (the one with the eye icon) of the Subdivision Surface modifier to speed up the 3D viewport (sadly, Blender still has very bad real-time viewport performances, so even if you have a lot of RAM and a powerful workstation, it's wise to stay as light as you can).
- Select the Armature and under the Object Data window, re-enable the Shapes item and hide the second and the third Armature Layer; press Ctrl + Tab to go in Pose Mode and try to select some of the control bones to move or rotate them and so control how they are deforming the mesh; temporarily, hide the Eyes object in the Outliner.

The Armature modifier subpanel and the posed mesh
To rotate the bones on their local axis, enable the 3D manipulator widget in the 3D view toolbar (Ctrl + Spacebar), click on the Rotate icon, and set Transformation Orientation to Normal.
- Save the file as
Gidiosaurus_autoweights.blend.
The Automatic Weights tool creates the necessary Vertex Groups based only on the bones that have been set as Deformers in the subpanel under the Bone window. It then assigns weights inside a range from 0.000 to 1.000 to the vertices contained in these vertex groups, calculating their proximity to the bone with the same name. In short, the arm.L bone will deform only the vertices inside the arm.L vertex group, and with an intensity based on their weights.
Because we used the Automatic Weights tool to skin only the sole Gidiosaurus mesh (leaving the skinning of other objects such as the Eyes or the Armor for the next recipe and method), before the parenting we had to check for any bone erroneously left as a deformer (that is, one of the several control bones in the previous chapter), but, especially we had to temporarily disable the Deform item for the Armor bones, which otherwise would have also been evaluated by the tool for the body.
In most cases, the Automatic Weights tool can give quite good results without the need of further tweaking; however in some areas, for example the head, where the head bone length doesn't fully fit the upper part of the shape of the mesh and where there are also other deforming bones, it can easily fail.
Look at the following screenshot; at first, by rotating the head control, the only issue seems to be some of the teeth left out from the calculations but then, simply by moving the controls for the eyes, tongue, and jaw, it becomes evident that the tool assigned several vertices to the wrong bones merely based on their proximity to that part of the mesh:

The failure of the Automatic Weights tool parenting
Although at first sight this can appear to be a total mess, it's usually less complex to fix than one might think.
For the moment, by selecting the Gidiosaurus mesh and pressing Ctrl + Tab, we go in to Weight Paint mode, and by right-clicking on a bone (the Armature is still in Pose Mode), the weights of the corresponding vertex group became visible as colored areas on the mesh; the color red corresponds to a weight value of 1.000 and blue to a value of 0.000, with all the intermediate hues corresponding to the intermediate values. For example, green = 0.500 and so on.
Let's see all this step by step:
- Select the Armature and, while still in Pose Mode, enable the visibility of the third Armature layer (and therefore of all the deforming bones) and then disable the Shapes item again.
- Select the Gidiosaurus mesh and by pressing Ctrl + Tab, enter Weight Paint mode (or switch to it by the object interaction mode button on the toolbar of the 3D view).
- Click on any one of the deforming bones, for example the neck bone, and notice that while the weights appear on the mesh surface, at the same time the corresponding vertex group is highlighted in the Vertex Groups subpanel to the right:

Visualizing the vertex groups on the mesh
By clicking on the head bone and/or the mand bone, the reasons for the bad deformations are immediately clear: the Automatic Weights tool didn't assign the whole upper part of the head of the character to the sole head vertex group (and therefore to the bone with the same name) with a full value of 1.000; instead, it assigned part of the head mesh to the eyes bones, other parts to the tongue.005 bone, some to the mand bone, and so on.

Different weights of the vertex groups associated with different bones
Obviously, this isn't the tool's fault, but it is an unavoidable issue due to the particular arrangement of the bones in the head area and can be quite easily fixed anyway; we'll see how in the next and the Editing the Weight Groups by the Weight Paint tool recipe.
