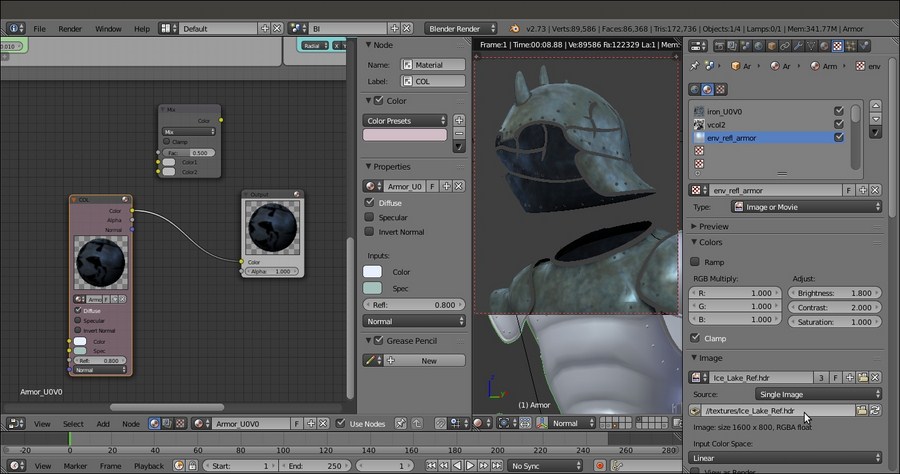
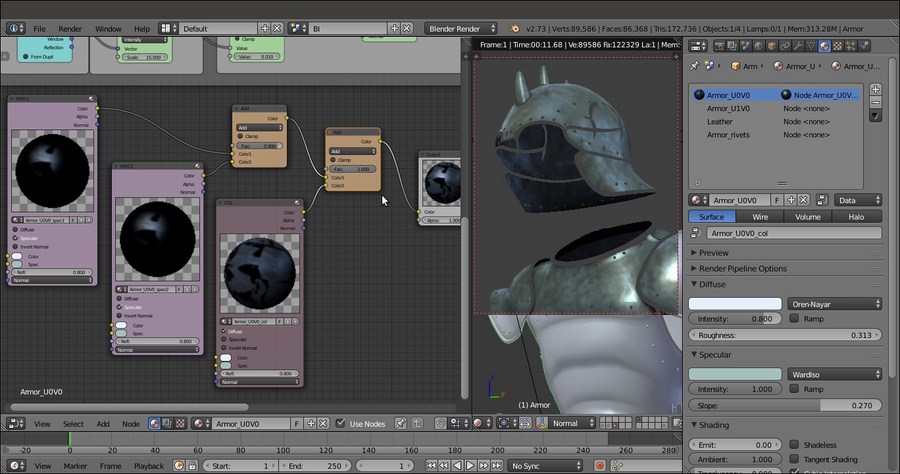
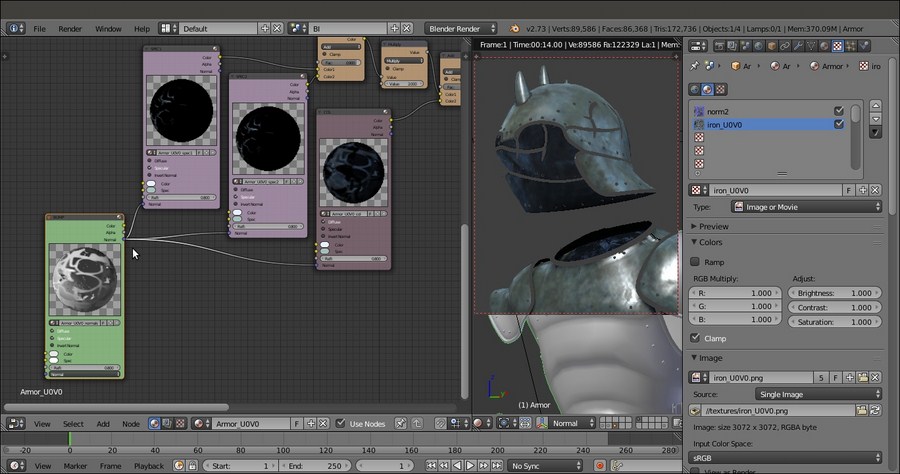
We arrive finally at making the Armor shaders under the Blender Internal engine; we have four materials, here: the two UDIM plate shaders, the rivets shaders and the leather material for the tiers.
Enable the 6th and the 13th scene layers and select the Armor object; if your computer is powerful enough, use the Rendered preview while you are working.
Let's start with the first UDIM tile material creation, the main armor plates:
- Put the mouse pointer in the Node Editor window and add a Material node (Shift + A | Input | Material), a MixRGB node (Shift + A | Color | MixRGB) and an Output node (Shift + A | Output | Output). In the N Properties sidepanel, label the Material node as COL.
- Connect the Color output of the COL node to the Color input socket of the Output node, then click on the New button on the Material node to create a new material and rename it
Armor_U0V0_col; in the Node Editor window, disable the Specular item. - Go to the Material window and find the Diffuse subpanel; change the shader model to Oren-Nayar, set the color to R 0.817, G 0.879, B 1.000 and the Roughness value to 0.313.
- Go down to the Specular subpanel: set the shader model to WardIso, the Intensity to 1.000, the Slope to 0.270, and the color to R 0.381, G 0.527, B 0.497. In the Shading subpanel enable the Cubic Interpolation item.

Starting the "Armor_U0V0" material in Blender Internal
- Go to the Texture window and in the first texture slot, load the image
iron_U0V0.png; rename the ID datablock asiron_U0V0and set the UVMap coordinates layer, then go to the Influence subpanel and enable the diffuse Intensity channel at value 1.000, leave the Color channel as it is and change the Blend Type to Multiply:
Adding the first texture image
- In the second texture slot, load the image
vcol2.png, rename the ID datablock asvcol2and set the UVMap_norm UV coordinates layer; go to the Colors subpanel, enable the Ramp item and set the Interpolation to B-Spline, then move the black color stop to position 0.245 and the white color stop to position 0.755. In the Image Sampling subpanel set the Filter Size to 1.10 and in the Influence subpanel enable the diffuse Intensity channel at value 0.500, the diffuse Color channel at 0.300, set the Blend Type to Difference and enable the Negative item. - In the third texture slot, load the image
Ice_Lake_Ref.hdrand rename the ID datablock asenv_refl_armor. Set the Mapping coordinates to Reflection and, in the Image Sampling subpanel, the Filter Size to 6.00; in the Colors subpanel set the Brightness to 1.800 and the Contrast to 2.000, then move to the Influence subpanel and set both the diffuse Intensity and Color channels to 0.600 and the Blend Type to Multiply:
Adding the hdr image as reflection map
- Go to the Node Editor window and press Shift + D to duplicate the COL node; label the duplicate as SPEC1, then make the material single user and rename it
Armor_U0V0_spec1; disable the Diffuse item on the node interface and enable back, the Specular one. - Go to the Texture window; select the first
iron_U0V0texture slot and go straight to the Influence subpanel: disable the diffuse Intensity and Color channels and enable the specular Intensity, Color and Hardness channels at 1.000. Set the Blend Type to Mix. - Select the second
vcol2texture slot, disable the diffuse Intensity and Color channels and enable the specular Intensity channel at 0.300. - Select the third
env_refl_armortexture slot, disable the diffuse Intensity and Color channels and enable the specular Intensity and Color channels at 0.500. - Press Shift + D to duplicate the SPEC1 node and label the duplicated one as SPEC2: make the material single user and rename it as
Armor_U0V0_spec2. In the Material window go to the Specular subpanel and set the Slope to the maximum = 0.400. - Now, connect the Color output of the SPEC1 material node to the Color1 input socket of the MixRGB node and the Color output of the SPEC2 node to the Color2 input socket; set the Blend Type of the MixRGB node to Add and the Fac value to 0.900.
- Press Shift + D to duplicate the MixRGB node and connect the output of the first MixRGB node to the Color1 input socket of the duplicated MixRGB node, and the Color output of the COL node to the Color2 input socket; set the Fac value of the second MixRGB node to 1.000 and connect its output to the Color input socket of the Output node.

Adding the specular component
- Add a Math node (Shift + A | Converter | Math) and paste it between the two MixRGB nodes; set the Operation to Multiply and the second Value to 2.000.

Enhancing the specularity
- Add a Material node (Shift + A | Input | Material) and label it as BUMP; create a new material and rename it as
Armor_U0V0_normals; in the Shading subpanel enable the Cubic Interpolation item. - Go to the Texture window and in the first texture slot, load the image
norm2.png, rename the ID datablock asnorm2and in the Image Sampling subpanel enable the Normal Map item; in the Mapping subpanel set the UVMap_norm coordinates layer and in the Influence subpanel disable the Color channel and enable the Normal one at 0.500. - In the second texture slot, load the image
iron_U0V0.png, mapping to UVMap layer and Influence to Normal at 0.010; set the Bump Method to Best Quality. - Go to the Node Editor window and connect the Normal output of the BUMP node to the Normal input sockets of the SPEC1, SPEC2, and COL nodes.

Adding the bump pattern
- Box-select and press Ctrl + C to copy all these nodes, go to the Material window to select the
Armor_U1V0material slot and, back in the Node Editor window, paste the copied nodes: then make the materials inside the nodes as single users, rename them accordingly and go to the Texture window to substitute theiron_U0V0.pngimage with theiron_U1V0.pngimage. - Copy and paste again, the nodes for the
Armor_rivetsmaterial slot, but don't substitute the texture image: instead, simply delete the BUMP node, which wouldn't be of any use in such small parts.
The completed armor shaders in Blender Internal
- Save the file.
These shaders work, and have been built, exactly the same way as for the Gidiosaurus' skin and eyes; the only thing worth noting here is the order of the normal map and of the texture used for the bump pattern: in fact, to work together, in Blender Internal, the normal map must be placed higher in the texture stack, otherwise it will overwrite the effect of the bump map.
The Leather material is a simple basic Oren-Nayar diffuse shader with the usual WardIso specular shader model, provided with a bump effect obtained through a Voronoi procedural texture with default values, except for the Size.
Note that the Voronoi texture influences the Color channel with the Multiply blend type and the Normal channel with a negative low value to obtain an actual bulging out pattern, instead of a concave one; negative values, in fact, reverse the direction of the bump.
The size of the procedural texture along the three axes is also further tweaked in the Mapping subpanel, scaling the three axes differently to resemble the dimensions of the Texture Space (basically the mesh bounding box, than can be made visible through the subpanel of the same name in the Object Data window), in order to avoid stretching along the mesh.

The "Leather" material in Blender Internal
Note also that in all these Blender Internal materials, simple mono materials (as for example the Leather BI material shown here earlier) are loaded inside a Material node and then connected to an Output node in the Node Editor window even if this wouldn't be necessary for the material itself to work: but, to let the Blender Internal and the Cycles render engines work together (through the compositor, as we'll see in the next chapter), it is mandatory to have all the shaders as nodes.
