In this second tree recipe, we will create the leaves shaders, as shown in the following screenshot:

The leaves as they appear in the final rendering
Carrying on with the blend file of the previous recipe, now, activate (hold Shift while clicking) the 2nd and the 11th scene layers, and in Outliner, select the leaf_generic_mid object.
Let's proceed with the creation of the leaves shaders:
- Click on the New button in the Node Editor window toolbar or in the Material window, and rename the material as
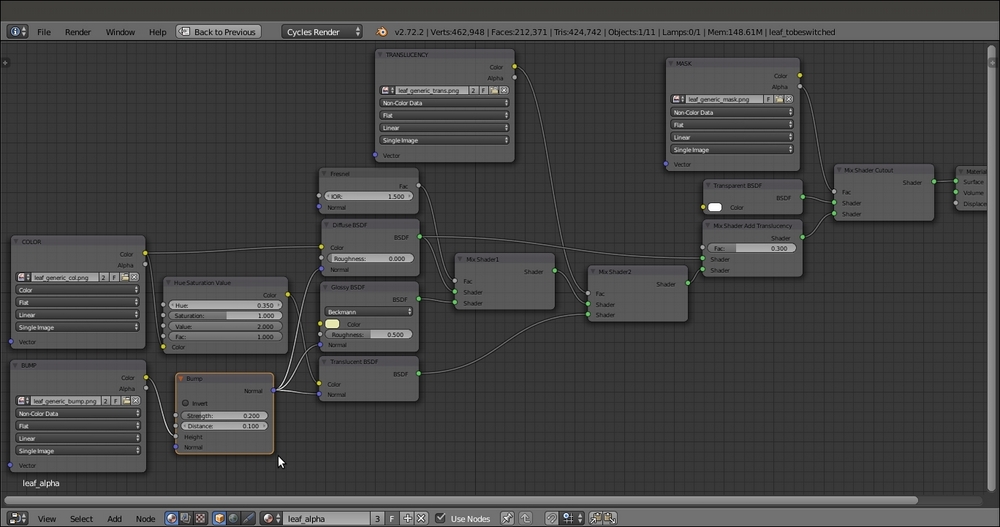
leaf_alpha. - In the Material window, switch the Diffuse BSDF shader with a Mix Shader node and label it as Mix Shader Cutout; in the first Shader slot, select a Transparent BSDF shader node, and in the second one, select a new Mix Shader node, which will be labeled as Mix Shader Add Translucency.
- Add an Image Texture node (press Shift + A and navigate to Texture | Image Texture), label it as
MASK, and connect its Alpha output to the Fac input socket of the Mix Shader Cutout node. - Click on the Open button of the MASK node, browse to the
texturesfolder, and load theleaf_generic_mask.pngimage (which actually is a simple black leaf silhouette with a transparent alpha channel). Set Color Space to Non-Color Data. - Add a Diffuse BSDF node (press Shift + A and navigate to Shader | Diffuse BSDF), a Glossy BSDF node (press Shift + A and navigate to Shader | Glossy BSDF), and a Translucent BSDF node (press Shift + A and navigate to Shader | Translucent BSDF).
- Add two new Mix Shader nodes (press Shift + A and navigate to Shader | Mix Shader), and label them as
Mix Shader1andMix Shader2. - Connect the output of the Diffuse BSDF shader to the first Shader input socket of the Mix Shader1 node, and the output of the Glossy BSDF shader to the second Shader input socket. Set the Glossy BSDF node's Distribution to Beckmann, and change the Color values for R to
0.794, G to0.800, and B to0.413, and the Roughness value to0.500. - Connect the output of the Mix Shader1 node to the first Shader input socket of the Mix Shader2 node, and the output of the Translucent node to the second one; connect the output of the Mix Shader2 node to the second Shader input socket of the Mix Shader Add Translucency node.
- Connect the output of the Diffuse BSDF shader node to the first Shader input socket of the Mix Shader Add Translucency node. Set its Fac value to
0.300(this value establishes the amount of translucency in the shader). - Add an Image Texture node (press Shift + A and navigate to Texture | Image Texture), label it as
TRANSLUCENCY, and connect its Color output to the Fac input socket of the Mix Shader2 node. Click on the Open button, browse to the usualtexturesfolder, and load theleaf_generic_trans.pngimage. Set Color Space to Non-Color Data. - Add a Fresnel node (press Shift + A and navigate to Input | Fresnel), connect it to the Fac input socket of the Mix Shader1 node, and set IOR to
1.500. - Add an Image Texture node (press Shift + A and navigate to Texture | Image Texture), label it as
COLOR, and connect its Color output to the Color input socket of the Diffuse BSDF shader node and to the Color input socket of the Translucent BSDF node. Click on the Open button, browse to thetexturesfolder, and load theleaf_generic_col.pngimage. - Add a Hue Saturation Value node (press Shift + A and navigate to Color | Hue/Saturation) and paste it between the COLOR image texture node and the Translucent BSDF shader node. Set the Hue value to
0.350and Value to2.000. - Add a last Image Texture node (press Shift + A and navigate to Texture | Image Texture) and label it as
BUMP; add a Bump node (press Shift + A and navigate to Vector | Bump) and connect the BUMP image node's Color output to the Height input socket of the Bump node, and the Normal output socket of this node to the Normal input sockets of the Diffuse BSDF, Glossy BSDF, and Translucent BSDF shader nodes. - Click on the Open button, browse to the
texturesfolder, and load theleaf_generic_bump.pngimage. Set Color Space to Non-Color Data and the Bump node's Strength value to0.200, as shown in the following screenshot:
The leaf_alpha material network
- From step 1 to 11, we built the basic shader of the leaf, using an image that has alpha channel data to cut out the leaf shape on the Plane and a gray-scale image to drive the translucency effect.
- From step 12 to 15, we added the color of the leaf, using it also with a hue and intensity variation for the translucency color, and then we added the bump.
Now, assign the same material to both the leaf_generic_low and leaf_generic_hi meshes on the 11th layer.
The modeled leaf mesh doesn't need the alpha channel, so select the leaf_generic_hi object, and in the toolbar of the Node Editor window, click on user data number to make it single-user. Rename the new material as leaf and delete the MASK and Transparent BSDF nodes, and then press Alt + D to remove the Mix Shader Cutout node from the link and delete it as well.
Remember that the examples in the preceding and following images are made with very stylized models that come from the Big Buck Bunny short movie; real objects have more subtle details and more random repeating patterns, but in this case, this just depends on the image textures you are going to use for your material.
Such a shader is of good use not only for leaves, but also for other kinds of plants; in many cases, it's enough to give variations to the color.
