
Chapter 2. Anatomy of a watchOS App
Although a watchOS app may seem like a miniature version of an iOS app, the underlying architecture is subtly different. It isn’t essential to know the difference, but it can help in understanding how your watchOS app works and performs.
Apps and Extensions
A major limitation of the first generation of watchOS apps was that they could not run their code directly on the device. To circumvent this limitation, Apple allowed a watchOS app to run its code in the background on the user’s iPhone, by taking advantage of iOS extensions.
For the second generation of watchOS apps, Apple has retained the same extension-based execution model but with the distinction that the extension now runs on the watch instead of on the iPhone. In most respects the code that now runs on the watch is the same as that which ran on the iPhone, but with some changes to the APIs and to the performance characteristics.
When you created an iOS App with WatchKit App project in Chapter 1, it included a number of extra elements in your project that you might not have encountered before. There are some additional targets and schemes, but perhaps the most obvious differences are the addition of two new file groups in the Project Navigator: WatchKit App and WatchKit Extension.
 Tip
Tip
We’re aware that we use the terms WatchKit and watchOS in a seemingly interchangeable fashion in this book. We’ve tried to match the terminology that Apple has used in any specific dialog or documentation.
What Is a WatchKit App?
A WatchKit app is the binary application that gets executed on your watch. The main responsibility of the app is to load the user interface, and for that reason the storyboard file that represents your app is located within the WatchKit App file group. This group is also the ideal place to include images and other resources that will be used within your user interface. Although storyboards themselves can contain a degree of conditional logic, the WatchKit App file group is limited to relatively static content. The layout of the storyboard scenes can be controlled through code, yet there is no code in the WatchKit App file group. To remedy this, during the compilation process the app bundle will be augmented with another bundle: the WatchKit Extension file group.
What Is a WatchKit Extension?
A WatchKit extension is a collection of code and other compiled resources that form the application logic that drives the user interface presented by the WatchKit app. When the app is launched, the extension host can load the app extension and marshal the communications between the user interface and the extension.
Although you can add as many files as you wish to your WatchKit extension, there are a number of files worth noting in the output of the iOS App with WatchKit App project template:
![]()
InterfaceController.swift: This is the controller file that is associated with the main interface scene of your storyboard. It implements the WKInterfaceController class—the WatchKit equivalent of UIViewController—and is explored in detail in Chapter 3.
![]()
ComplicationController.swift: This file is used to support a complication on the watch face. It implements the CLKComplicationDataSource that is used to provide information to a watch face that includes the complication. It is covered in Chapter 7.
![]()
Assets.xcassets: This is a standard Xcode asset catalog file that is pre-populated with a folder for managing the assets associated with complications (Chapter 7). You can use it for storing other image assets beyond complications.
![]()
GlanceController.swift: The GlanceController class is used to support the glance that the template creates for you. It’s a fairly standard subclass of WKInterfaceController, and its use is documented in Chapter 8.
![]()
NotificationController.swift: The NotificationController class is a subclass of WKUserInterfaceController and is used to provide extra functionality required by dynamic notification scenes. Notifications are intimately examined in Chapter 9.
![]()
PushNotificationPayload.apns: This file is a sample payload for testing notifications. It is also detailed in Chapter 9.
One file that we have not mentioned yet is ExtensionDelegate.swift. This file is special because it’s the main entry point for your app and is analogous to the UIApplicationDelegate in your iOS app. It contains a class named ExtensionDelegate, which implements a protocol named WKExtensionDelegate. By implementing the protocol, the class assumes three main responsibilities:
![]() Stage Change Monitoring: The lifecycle callback methods
Stage Change Monitoring: The lifecycle callback methods applicationDidFinishLaunching(), applicationDidBecomeActive(), and applicationWillResignActive() are defined here. These give you the opportunity to prepare your app as it launches, and tidy up as it’s about to shut down.
![]() Notification Handling: Your app can respond to notifications both while it is running and when response action buttons are pressed. This protocol allows you to implement
Notification Handling: Your app can respond to notifications both while it is running and when response action buttons are pressed. This protocol allows you to implement didReceive... methods to handle notifications as they come in, and handleActionWithIdentifier... methods to respond to notification actions taken when your app isn’t running. Refer to Chapter 9 for everything you’ll ever want to know about notifications.
![]() Handoff Coordindation: When your app is launched as a result of a handoff event, this protocol provides a method,
Handoff Coordindation: When your app is launched as a result of a handoff event, this protocol provides a method, handleUserActivity(_:), that you can implement to respond to the event. Handoff is explored in Chapter 10.
Why Do We Need This Convoluted System?
It’s hard to know why Apple has presented us with what is seemingly a quite convoluted system. After all, iOS apps bundle the user interface and application logic into the one app, so why doesn’t watchOS?
It may simply be that, as we evolve from the extension-on-iPhone model of watchOS 1, we are at a stepping-stone on the way to completely bundled watchOS apps. Alternatively, an extension running within an extension host written by Apple can be more tightly controlled; this provides watchOS with more ways to enforce security and energy efficiency measures.
WatchKit App Project Layout
Adding any additional targets to an iOS app greatly increases the complexity of your Xcode project setup. Adding a WatchKit app goes even further; if you followed the walkthrough in Chapter 1, you noticed that creating a WatchKit app target can lead to an explosion of targets, schemes, and files in your project. These may seem intimidating—after all, you just want to write an app, not get a lesson in (Xcode) project management—but there is a method to the madness.
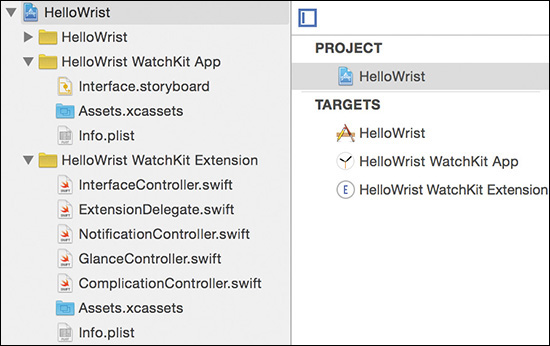
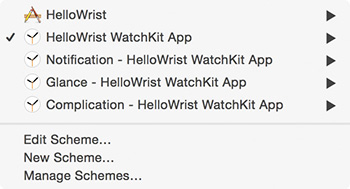
In Chapter 1 we created a project using the iOS App with WatchKit App template, with the Include Notification Scene, Include Glance Scene, and Include Complication options selected (Figure 1.2). This resulted in the generation of extra file groups and targets for the HelloWrist WatchKit app and for the HelloWrist WatchKit extension (Figure 2.1). It also resulted in the generation of four new schemes; one allows you to directly build and run the full WatchKit app, and the other three allow you to run the notification, glance, and complication features directly (Figure 2.2).
You have some control over the number of schemes that are being created; you can deselect the Notification, Glance, and Complication options in the template options (Figure 1.2) if you don’t need the functionality they provide. Notable by its absence is a scheme that allows you to directly build and run the WatchKit extension; the only options are for building the WatchKit app and the notification, glance, and complication schemes. Your WatchKit Extension target will be built as part of the WatchKit app scheme; the tight integration between app and watch means you should never need to run the extension in isolation.
Creating WatchKit Apps and Extensions
We have already established that watchOS apps result in a lot of extra files, schemes, and targets to manage in Xcode, but how do you go about bringing that extra complexity into your life?
Xcode project and target templates come in many flavors and have differing options that affect how much of your app configuration you get for free and how much you need to configure yourself. Your route through this maze is determined by your requirements—and yours alone—but with the following sections we hope to point out some of the options available to you and help you make a decision.
Using Project Templates
The important thing to remember when creating a watchOS app is that it requires an iOS app in order to live. This has the potential to be confusing; iOS apps have their own set of templates, and attempting to create a standard iOS app project will not furnish you with the artifacts you need to build a watchOS app. Conversely, creating a watchOS-specific app may not necessarily provide an iOS app that meets your immediate requirements.
When you start to create a new app project (using File > New > Project from the Xcode main menu), you should decide whether the watchOS app is the primary focus for your development.
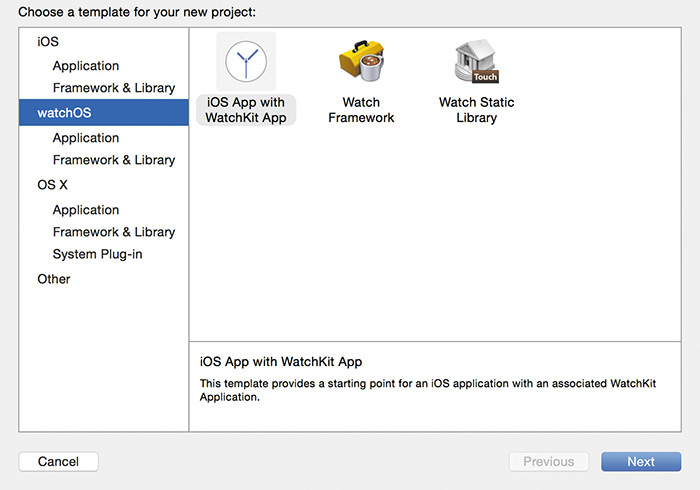
If the iOS app is intended only as a delivery mechanism, or will be very light in features, then you are unlikely to need a particularly complex iOS app, and your logical next move is to select the watchOS section in the template chooser dialog (Figure 2.3). Selecting the option iOS App with WatchKit App provides you with a basic iOS app that is functionally equivalent to a Single View application from the iOS project templates.
 Note
Note
The other options available in the watchOS section are for creating a framework or a static library. We’re not going to cover these here;if you’re the kind of developer who wants to create a framework for your watchOS app, you’re probably already in the advanced developer category. Thanks for buying the book, though!
When you select an iOS App with WatchKit App template you are presented with a set of options relating to both the iOS and watchOS apps (Figure 2.4). They may seem straightforward, but there are a few things to be aware of so we’ll run through the options one by one.
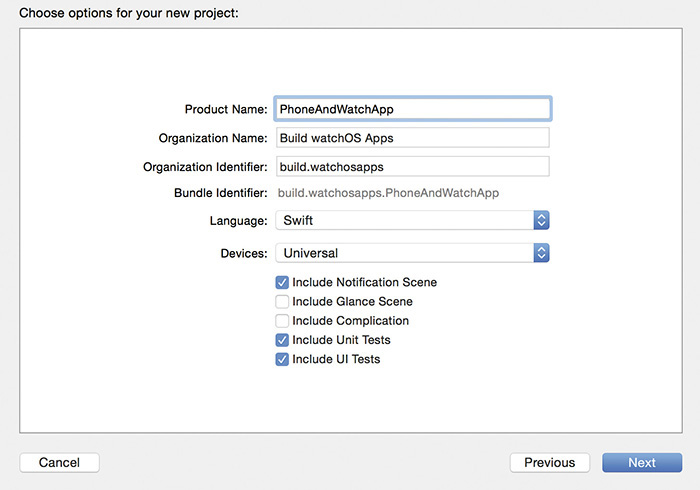
![]() Product Name: This is the same as the Product Name option in any normal Xcode project, with the caveat that it is the name of your iOS app only. The watchOS app will be given a name of the form ProductName WatchKit App.
Product Name: This is the same as the Product Name option in any normal Xcode project, with the caveat that it is the name of your iOS app only. The watchOS app will be given a name of the form ProductName WatchKit App.
![]() Organization Name and Organization Identifier: These options are the same as they would be in any Xcode project.
Organization Name and Organization Identifier: These options are the same as they would be in any Xcode project.
![]() Bundle Identifier: Although not editable, Bundle Identifier is displayed as it is generated from some of the previous options. The significance of the identifier here is that it refers to the iOS target and not the WatchKit App target, which gets its own identifier of the format
Bundle Identifier: Although not editable, Bundle Identifier is displayed as it is generated from some of the previous options. The significance of the identifier here is that it refers to the iOS target and not the WatchKit App target, which gets its own identifier of the format ios-bundle-identifier.watchkitapp.
![]() Language: The Language option can be Swift or Objective-C, and this setting will be applied to the generated code for both the iOS and watchOS targets.
Language: The Language option can be Swift or Objective-C, and this setting will be applied to the generated code for both the iOS and watchOS targets.
![]() Devices: Unlike a normal iOS project template, the Devices pop-up menu offers only the choice of Universal or iPhone; you can’t bundle a watchOS app with an iPad-only app.
Devices: Unlike a normal iOS project template, the Devices pop-up menu offers only the choice of Universal or iPhone; you can’t bundle a watchOS app with an iPad-only app.
![]() Include Notification Scene: Selecting this option creates a scheme, storyboard scene, and source file for including basic notification handling support in your watch app.
Include Notification Scene: Selecting this option creates a scheme, storyboard scene, and source file for including basic notification handling support in your watch app.
![]() Include Glance Scene: Selecting this option creates a scheme, storyboard scene, and source file for including a glance in your watch app.
Include Glance Scene: Selecting this option creates a scheme, storyboard scene, and source file for including a glance in your watch app.
![]() Include Complication: Selecting this option creates a scheme and source file for including a complication in your watch app.
Include Complication: Selecting this option creates a scheme and source file for including a complication in your watch app.
![]() Include Unit Tests and Include UI Tests: Selecting these options adds the necessary configuration to create test targets, though the test targets are only applicable to your iOS app; watchOS doesn’t fully support unit or UI testing yet.
Include Unit Tests and Include UI Tests: Selecting these options adds the necessary configuration to create test targets, though the test targets are only applicable to your iOS app; watchOS doesn’t fully support unit or UI testing yet.
Maybe you don’t want to start with a Single View application for your iOS app and require a bit more in the way of complexity. For example, if your iOS app is intended to be a fully featured app with a companion watchOS app, then you may find the Single View application to be somewhat lacking. Or maybe you could be satisfied with a Single View application but have a requirement to use Core Data; in that case, you will find that the iOS App with WatchKit App project template is lacking a Use Core Data option, which means you may be better served by creating a dedicated iOS app and adding a watchOS target at a later stage.
Using Target Templates
Creating a watchOS app from scratch is simple, but what happens when you already have an iOS app and you want to add a watchOS app to it? You have two main options: Create a new project based on the iOS App with WatchKit App template and painstakingly copy your existing iOS app code across by hand (losing any commit history you might have had on the way); or add a WatchKit App target to your existing iOS app project. Although you may want to do the former (everyone wants a fresh start sometimes!), we definitely recommend the latter.
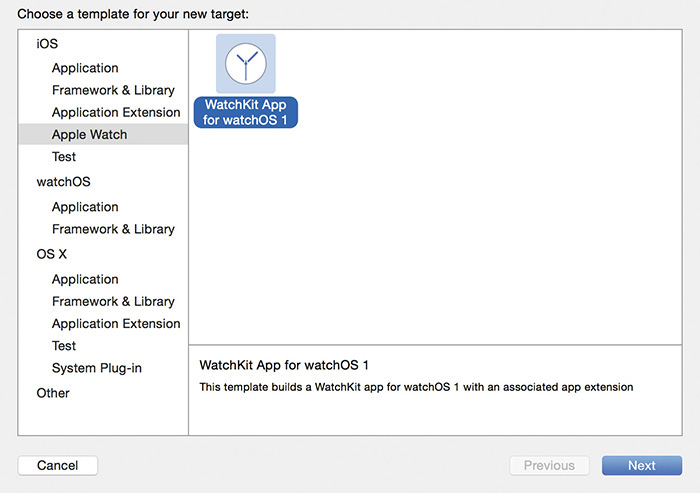
To add a watchOS app to your existing iOS app project you should select File > New > Target from the Xcode main menu to display the target template chooser dialog. One potentially confusing item is an entry named Apple Watch, under the iOS heading in the left-hand column. Clicking the Apple Watch option reveals more (Figure 2.5); this is how you can create an older-style WatchKit app for watchOS 1. At the time of this writing we can’t see many good reasons for going down this route, but if you happen to have a stubborn customer base who refuse to upgrade to watchOS 2, this is where your world of pain begins.
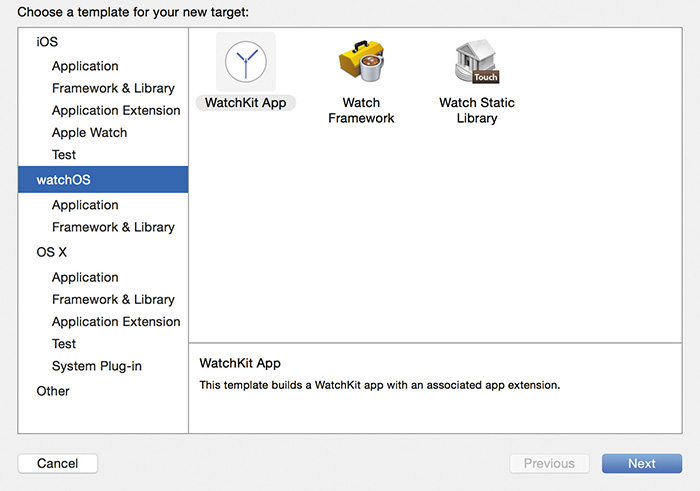
For modern watchOS development, select the watchOS section to see the options available to you for creating a watchOS 2 app (Figure 2.6). Unlike with the project template options, this time you don’t get iOS App with WatchKit App as a choice—instead you get a boring old WatchKit App. At this stage Apple is making the assumption that you already have an iOS app target in your project. If you don’t (maybe this is an OS X project), you’ll need to go back and create an iOS app target first.
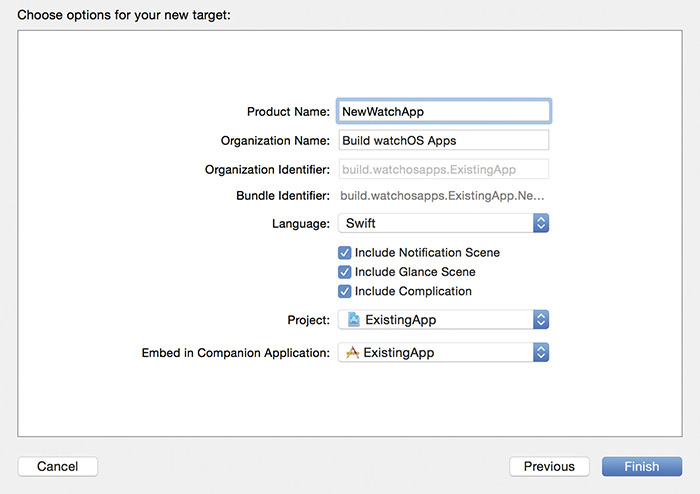
If you select the WatchKit App template and click Next, you are presented with a series of options for the target that are similar to those shown for the iOS App with WatchKit App project (Figure 2.7). There are a few differences worth highlighting:
![]() Product Name: In this dialog, Product Name is the name of the watchOS app and can be distinct from the iOS app.
Product Name: In this dialog, Product Name is the name of the watchOS app and can be distinct from the iOS app.
![]() Organization Identifier: This cannot be changed here because Xcode must set to the Bundle Identifier of the companion iOS app.
Organization Identifier: This cannot be changed here because Xcode must set to the Bundle Identifier of the companion iOS app.
![]() Bundle Identifier: This also can’t be changed but is formed from the Organization Identifier and the Product Name.
Bundle Identifier: This also can’t be changed but is formed from the Organization Identifier and the Product Name.
![]() Language: Interestingly, when creating your WatchKit app target you can choose to use a different language than the one you used when creating your iOS app project. This is good for developers with existing iOS apps that were created in Objective-C but wish to perform ongoing development in Swift.
Language: Interestingly, when creating your WatchKit app target you can choose to use a different language than the one you used when creating your iOS app project. This is good for developers with existing iOS apps that were created in Objective-C but wish to perform ongoing development in Swift.
![]() Include Notification Scene, Include Glance Scene, and Include Complication: These options, when selected, create the appropriate extra artifacts in your project.
Include Notification Scene, Include Glance Scene, and Include Complication: These options, when selected, create the appropriate extra artifacts in your project.
![]() Project: If you are working in a multi-project workspace, this option allows you to select which project the new target should be created within.
Project: If you are working in a multi-project workspace, this option allows you to select which project the new target should be created within.
![]() Embed in Companion Application: The WatchKit app must be associated with an companion iOS app; if you have only one iOS app in your project, this is an easy choice to make, but if you have more than one iOS app target in your project (or workspace), you have to decide which app will be the official companion. This determines which iOS app the user has to install to get the WatchKit app onto their watch.
Embed in Companion Application: The WatchKit app must be associated with an companion iOS app; if you have only one iOS app in your project, this is an easy choice to make, but if you have more than one iOS app target in your project (or workspace), you have to decide which app will be the official companion. This determines which iOS app the user has to install to get the WatchKit app onto their watch.
The iOS App with WatchKit App project template will generate two targets:Product Name WatchKit App and Product Name WatchKit Extension. This is different from the WatchKit App target template, which creates targets named Product Name and Product Name Extension. These subtle naming differences can be confusing, especially if you are following the instructions in this book, where we will often start our examples with the iOS App with WatchKit App project template.
Using Old-School Techniques
You can, of course, do things the hard way. This is also known as “hand-crafting” or “taking the hipster route.” Although there are always some people who think they can do it better themselves, sometimes it really is necessary to create targets, schemes, and code without the aid of Xcode. For example, you may have created your WatchKit App target at a time when you thought you wouldn’t need a complication with your app, but now you’ve identified such a need. For those circumstances, we’ll cover the manual creation of such project artifacts in the appropriate chapters later in the book: Chapter 7, “Working with Complications,” Chapter 8, “Working with Glances,” and Chapter 9, “Working with Notifications.”
However, what if you need to tweak some settings that the templates created on your behalf? Most of the settings you need to worry about can be found hidden under the settings for the WatchKit App and WatchKit Extension targets. It’s rare that you’ll need to change these settings too much, but if you find you have a need, make sure you have a recent source control commit to revert to, or a recent backup of your project. Just in case.
Wrapping Up
This completes our discussion of WatchKit apps and extensions. After the hands-on approach of Chapter 1, this has been quite the theoretical run through the way WatchKit apps are created and configured, but we feel that it is worth knowing how they are organized and behave so you can work with confidence when building them.
The next chapter dives back into WatchKit itself to explore how to work with the APIs that are provided by watchOS to allow you to interact with your watch app.