
Chapter 8. Working with Glances
If you were to look up the word glance in the OS X dictionary application, you would see that the first definition (to “take a brief or hurried look”) is followed by an example usage: “Ginny glanced at her watch.” Glances and watches are inextricably linked; the size and position of a wristwatch makes it ideal to glance at for quick information. It seems fitting then that Apple has used the word as the name for this feature.
What Is a Glance?
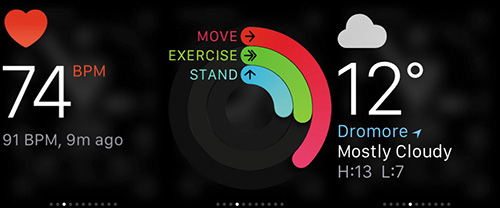
Whereas a normal glance is a quick look at anything, a glance in Apple Watch terms is a short summary of information provided by an app that can be accessed quickly by swiping upward from the main watch face. Glances are displayed as a horizontal sequence of pages that bears a resemblance to a basic UIPageViewController layout in iOS. Once the sequence is accessed, the user can swipe from side to side to switch between the glances that they have configured for display (Figure 8.1).
The content provided in a glance is intended to be a quick summary of your Watch app. It is restricted to a single screen of information; nothing happens when attempting to swipe upward, swiping downward dismisses the glances completely, and swiping sideways switches between glances. This limitation may provide something of a challenge to modern developers, providing an experience that may seem closer to the early days of mobile web browsers and WML (Wireless Markup Language) decks than to the expansive apps they are used to developing on iOS.
Not only is screen real estate in short supply, but so is the level of interaction you can offer to the user. Your glance is not a place to load with buttons as a jumping-off point for different parts of your app. Although you can customize and even animate and update the information in your glance, it is sadly lacking in the customizability that you might take for granted elsewhere in WatchKit. You do have one option available to you, however—tapping anywhere in the glance will take you straight to the corresponding Watch app.
A glance seems similar in concept to a notification; both are intended to convey a small amount of pertinent information for your app. However, the delivery of this information has a fundamental difference: A notification is delivered to the user as a push model, whereas a glance is, in effect, a pull of information.
Notifications can be delivered to the Watch through local channels (such as calendar or timer alerts) or from a remote source (such as a push notification service). This means that you as a developer have a degree of control over when the notification is displayed. You may be in control of the push notifications being sent to the user’s phone, or you may have configured the local notifications. Regardless of how the information is being sent to the device, you are in control of the content and the timing of the delivery.
Glances are different in that they are completely user-driven. You have no say as to when users of your app will raise their wrists and swipe upward to start viewing glances. As a result, you cannot accurately predict when a glance will happen and prepare the information to be displayed in advance. This has an effect on how you develop your glance; the lack of foresight means you need to produce your glance quickly so that the user gets the information when they are ready, not when you are.
Manufacturing a Glance
A glance is a combination of artifacts, such as a storyboard scene to present the UI and source files to control the data that is presented to the user in the storyboard scene. You need to add these to your project and set them up appropriately for your Watch app to properly furnish a glance. You can add a glance to your project in two ways: You can either add one while creating the initial Watch app target or add one to an existing target.
Creating a Glance in a New Project
To add a glance to a project as you are creating a new project, you need to ensure that the Include Glance Scene option has been selected in the iOS App with WatchKit App target options dialog. You did this in Chapter 1, but you may not have realized at the time the significance of selecting the option, so we’ll repeat it here to refresh your memory.
1. Create a new project by selecting File > New > Project from the Xcode main menu.
2. In the project template selection dialog, navigate to the watchOS Application category, select the iOS App with WatchKit App template, and click Next.
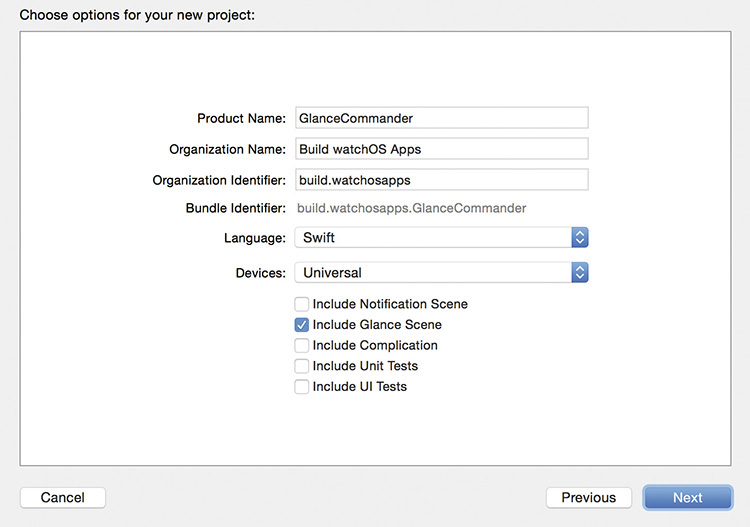
3. Name the project GlanceCommander, and ensure that the Include Glance Scene option is selected in the template options (Figure 8.2).
5. Choose a location on disk, and click Create to save your iOS app project, which includes a WatchKit app target with a glance.
This is the easiest way to create a glance, because the iOS App with WatchKit App project template sets up everything for you. It’s definitely worth taking the time to create the glance when you create your project if you need a glance as part of your Watch app.
Adding a Glance to an Existing Project
If you have a change in requirements and need to add a glance to an existing Watch app, it is still possible to get in on the action, although with a few more hoops to jump through. The following walkthrough assumes you have an existing project that contains a WatchKit app target.
1. Open your existing project containing a WatchKit App target.
2. In the Project Navigator, select the file group containing the WatchKit extension.
3. Select File > New > File from the Xcode main menu.
4. In the new file template selection dialog, choose watchOS > Source > WatchKit Class, and click Next.
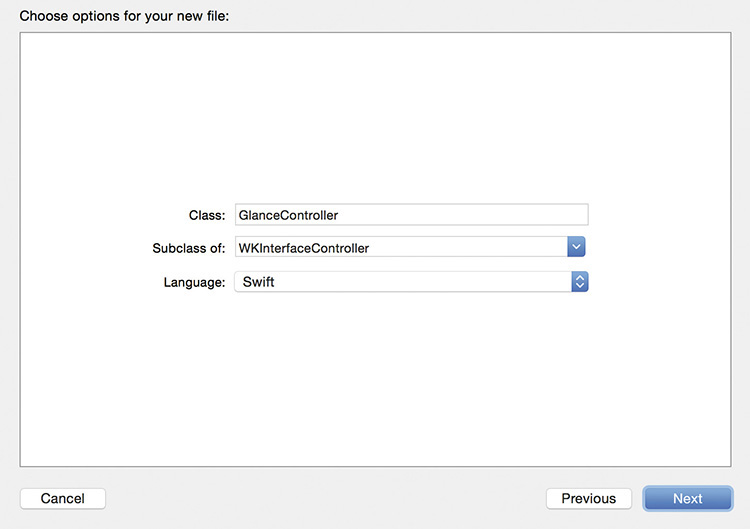
5. Adjust the new file template options so that the file is named GlanceController and is a subclass of WKInterfaceController (Figure 8.3), then click Next.
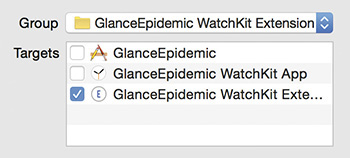
6. Choose a location in which to save the new file, and ensure that the target is set to the WatchKit extension (Figure 8.4)
7. Click Create to finish the process.
At this point you have a basic controller class that is capable of supporting the glance scene that you will create in the Watch app storyboard file.
8. In the Project Navigator, expand the file group containing the WatchKit App, and click the Interface.storyboard file to open it in Interface Builder.
9. Open the Object Library, and find the Glance Interface Controller option (Figure 8.5).

10. Drag the glance interface controller onto the storyboard canvas.
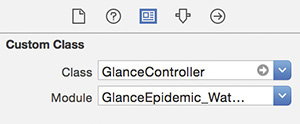
11. Ensure that the new glance scene is selected, open the Identity inspector, and enter GlanceController as the custom class (Figure 8.6).
Everything is ready from a code perspective, but one aspect of the new target template isn’t quite matched yet; you still need to create a scheme so that it’s possible to directly execute and test the glance.
12. From the Xcode main menu, choose Product > Scheme > New Scheme.
13. In the Target menu, choose the target that corresponds to the WatchKit app, and give the scheme a name that identifies it as relating to a glance (Figure 8.7).
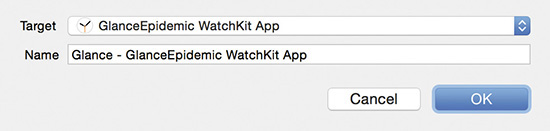
We have named our scheme “Glance - GlanceEpidemic WatchKit App” to keep it consistent with the Apple naming conventions, but you are free to choose something shorter if you wish.
14. Click OK to create the scheme.
15. From the Xcode main menu choose the Product > Scheme > Edit Scheme command.
16. Select the Run action in the left panel, then select the Info tab, and change the Watch Interface pop-up menu from Main to Glance (Figure 8.8).
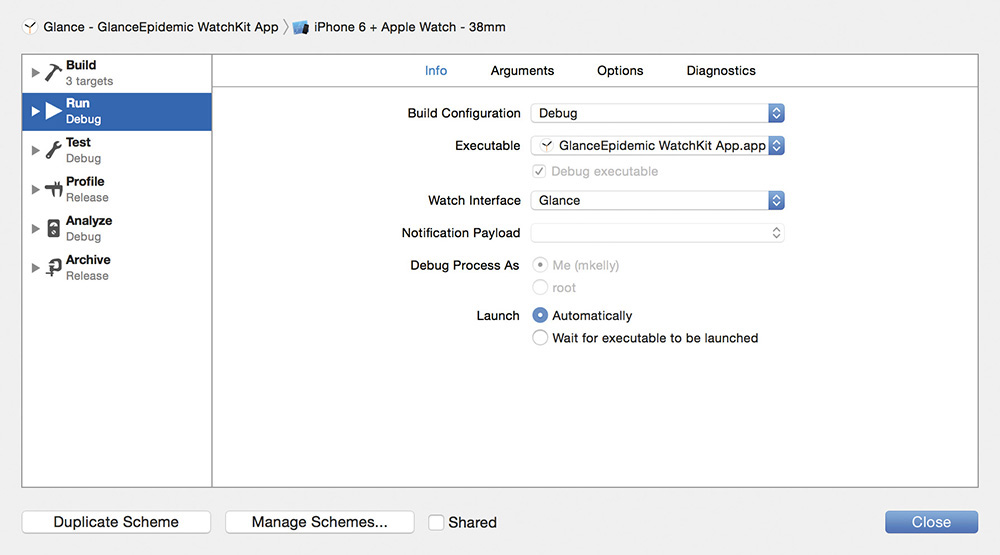
17. Repeat step 15 for the Profile action, then click Close to save the changes.
Although it’s somewhat more complex to set up glances this way, it does have the added advantage of giving you a better understanding of how the glance (and the components that compose it) integrate into your project. It also gives you the opportunity to slap a hipster statement like “artisanally created” on your app website. After all, you just handcrafted your glance.
Developing the Glance
Now that your app contains a minimal glance, the next step is to decide what it should look like, what to put in it, and how to keep it up to date.
Visual Customization
The visual appearance of your glance is defined by what you can squeeze into the confines of the glance scene you created. The scene is a small rectangle, just 312 by 390 pixels for the larger watch size, and 272 by 340 pixels for the smaller watch. Combined with the lack of scrolling, these screen sizes mean that every pixel counts, and only the most critical information can be accommodated.
Layout Options
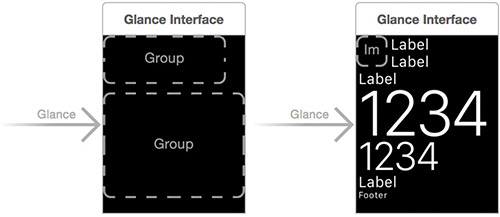
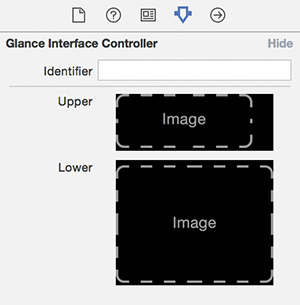
When you first view a new glance interface controller scene in Interface.storyboard, it may contain either two empty group (WKInterfaceGroup) elements or a cornucopia of controls (Figure 8.9). Although it may be tempting to delete them and give yourself a blank canvas to work with, it’s not so easily done. It’s not possible to delete these elements, and they cannot be resized or moved. This is somewhat limiting, but the empty groups can be populated with other controls, allowing you to personalize your app.
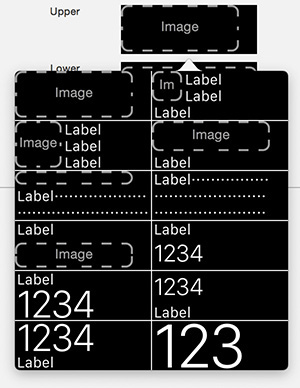
Additionally, it is possible to choose from a collection of preset layouts that can be selected independently for the upper and lower portions of the glance. To access the presets, select the glance scene in Interface Builder and open the Attributes inspector (Figure 8.10). You can click the Upper and Lower groups to present a set of alternative layouts that provide enough variety to cover many app designs (Figure 8.11). When the canned layouts provided do not suit your design, you can customize them by using included subgroups.
Strict Controls
A fundamental limitation of glances is that they are restricted to a single interaction, in the form of a tap. Tapping the glance launches the full Watch app, although without any context; you can’t know if the user tapped a specific control.
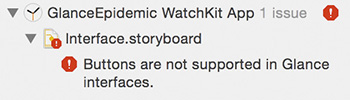
To reinforce this limitation, Apple does not support the use of some controls in a glance scene. Adding any of these restricted elements causes Xcode to display an error in the Log Navigator, and you’ll be unable to compile and run your application (Figure 8.12). On the list of prohibited controls are buttons, pickers, movies, sliders, and switches.
Not so strictly controlled are maps and tables, though both come with big limitations. Maps (as discussed in Chapter 4) are restricted to a non-interactive view of a specified location. Unlike the Apple-supplied Maps glance, you cannot pan or zoom a map control in your own glance. Even tapping the map will not cause the map app to open. Instead, your app will be invoked as though you’d tapped anywhere else in the glance.
Similarly, you can take advantage of the table row controller to help you with presenting tabular data, but you are restricted to showing static data that will fit on the limited amount of space available to you. Any attempts by the user to scroll the table will result in a tap being registered by the glance, and the full Watch app will launch.
Given that you cannot use interactive controls to directly invoke part of your glance, there is no value in creating actions in the glance controller to handle interactions. You can still insert outlets to get programmatic interaction with elements such as labels and images that cannot be manipulated by the user.
The Glance Commander
As a practical example of glance user interface creation, you’re going to start creating a small glance with an express purpose: let a glance commander tell you whether an activity should be stopped or is safe to continue. If you’re not a fan of the six-piece band Electric 6, we apologize for this otherwise seemingly foolish example.
The glance commander UI is a simple one containing the name of the app and two elements indicating the current status. The active element will appear larger and colored, whereas the inactive element will be smaller and gray. To manually duplicate this behavior, open the GlanceCommander project that you created in the “Creating a Glance in a New Project” section, and follow these steps:
1. Expand the GlanceCommander WatchKit App group in the Project navigator, and select the Interface.storyboard file to open the storyboard.
2. Select the glance scene in Interface Builder, and open the Attributes inspector to display the Upper and Lower group templates (Figure 8.10).
3. Change the Upper group to display a small label on top and a larger label on the bottom. Leave the Lower group as a plain group (Figure 8.13).
4. Double-click the first label to change the text from Label to Glance. Change the text in the second label from Label to COMMANDER.
5. Set the Min Scale value to 0.6 in the Attributes inspector to make sure the label fits horizontally within the containing group.
6. Open the Object Library, locate the Table element, and drag it onto the lower group in the glance scene (Figure 8.14).
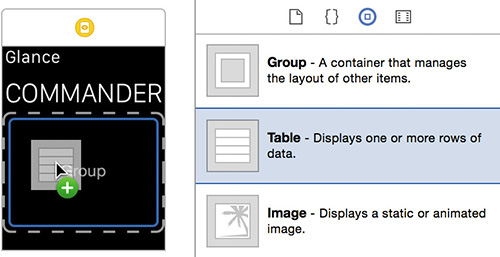
7. In the Attributes inspector, increase the number of Prototype Rows for the table to 2.
If the Table element is not selected after adding it in the previous step, you may need to use the document outline to select it. You can show the document outline by choosing Editor > Show Document Outline from the main Xcode menu.
8. Select the first table row controller, and set the Identifier to GlanceCommandActive in the Attributes Inspector.
9. Select the second table row controller, and set the Identifier to GlanceCommandInactive.
To introduce some color and enlarge the active row so that it stands out some more, you need to make modifications to the groups contained within the table rows.
10. Select the group in the first table row so that the configurable attributes are displayed in the Attributes inspector (Figure 8.15).
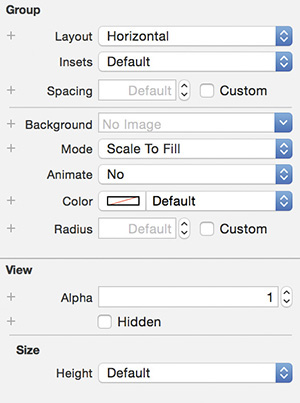
11. Change the Height setting from Default to Fixed.
12. In the new field that appears, change the value to 60.
13. Select the group in the second table row.
14. Change the Color setting to the Dark Gray Color preset.
15. Change the Height setting from Default to Fixed, and this time set the value to 40.
We now want to add some controls to the two table rows, as well as perform some basic styling.
16. In the Object Library, find the Label element, and drag one to the first table row.
17. Select the label in the first table row so that the configurable attributes are displayed in the Attributes inspector (Figure 8.16).
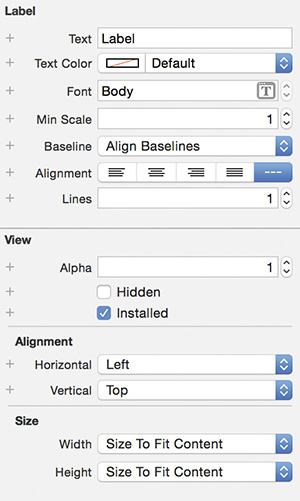
18. Change the Text field from Label to Active.
19. In the Font drop-down menu, choose the Headline option.
20. Change the Alignment control to the Centered option.
21. Under the Size section, set both the Width and Height options to Relative to Container.
22. Repeat steps 16 through 21 to make the changes for the second table row (changing the Text setting from Label to Inactive), resulting in a layout like that shown in Figure 8.17.
Later, when using the glance, we want the ability to change the label text as well as the color of the groups. We also want to be able to specify the type and order of the table rows to be displayed, so you need to create some outlets to your glance controller, a subclass of WKInterfaceController.
Working with WKInterfaceController
A glance that is completely configured through a storyboard is useless to the user of your app. To be useful on more than one occasion it’s important that the glance is capable of being updated with fresh data. As you might expect, this requires a companion controller, and a glance scene uses exactly the same type of WKInterfaceController as a standard interface scene.
Customizing Your Commands
When you first open your example glance, you don’t know yet what the glance commander is going to instruct you to do. You also don’t have any meaningful information to show the user, because you need to populate the table with inactivate rows. To access the table, we need to have an outlet through which you can programmatically control it.
1. Select the glance scene in Interface Builder, and click the Assistant button in the toolbar, ensuring that the assistant editor is displaying the GlanceController class.
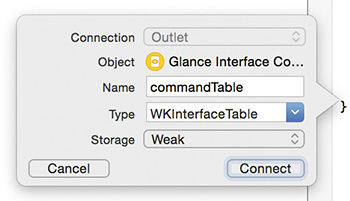
2. Control-click the table element in the scene, and drag the mouse pointer across to the GlanceController class. Release the click when the Insert Outlet instruction appears where you want the outlet to be created.
3. In the popover that appears, name the outlet commandTable, and click Connect (Figure 8.18).
To allow customization of the table rows, you need to define a class that you can use to connect to some outlets. Chapter 4 covers this in greater detail, so this will be a whistle-stop tour with the express purpose of getting set up for the next section.
4. Right-click the GlanceCommander WatchKit Extension group in the Project Navigator, and select New File.
5. In the new file template chooser, navigate to watchOS, select Source, and select the WatchKit Class template. Click Next to continue.
6. Name the class GlanceCommand, and ensure that it is a subclass of NSObject and that the language is Swift. Click Next to continue.
7. Choose a location to save the file, and ensure that the target is set to GlanceCommander WatchKit Extension. Click Create to finish.
8. Replace the contents of the new file with the following code:
import WatchKit
class GlanceCommand: NSObject {
@IBOutlet weak var group: WKInterfaceGroup!
@IBOutlet weak var label: WKInterfaceLabel!
func activateStop() {
updateWithText("STOP!", UIColor.redColor())
}
func deactivateStop() {
updateWithText("STOP!", UIColor.darkGrayColor())
}
func activateContinue() {
updateWithText("CONTINUE!", UIColor.greenColor())
}
func deactivateContinue() {
updateWithText("CONTINUE!", UIColor.darkGrayColor())
}
private func updateWithText(text: String, _ color: UIColor) {
label.setText(text)
group.setBackgroundColor(color)
}
}
Now, let’s use the new class.
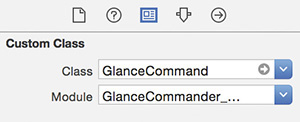
9. Open the Interface.storyboard file, and in the document outline select the GlanceCommandActive table row controller.
10. Open the Identity inspector, and enter GlanceCommand as the Custom Class (Figure 8.19).
11. Open the assistant editor, and ensure that the GlanceCommand.swift file is displayed as the counterpart.
12. In the document outline, expand the GlanceCommandActive table row controller.
13. Control-click the Group element, and drag the pointer over the @IBOutlet definition for the WKInterfaceGroup (Figure 8.20).

14. Connect the Label element to the WKInterfaceLabel outlet.
15. Repeat steps 9 to 14 for the GlanceCommandInactive table row controller.
Controlling the Glance
Now that you have access to the glance from your controller, you can start to think about how you can manipulate the interface and, just as importantly, when you can manipulate the interface. Glances are intended to be very quick interactions, and this needs to be accounted for in their programming. Your priority will always be to make the user wait for as little time as possible to get information. If your glance is populated primarily by the app running on your watch, the wait should be quick. If, on the other hand, your glance requires information from the network, then a perceptible delay is possible due to the nature of Bluetooth communication with the iPhone (which the watch will mostly use for network access).
The best approach is to make the user feel that things are happening even when they are not. Although you could use a classic spinner to indicate progress, this is often the kiss of death for user attention. A better approach is to present the basic user interface as soon as possible, and update it when the required information becomes available.
For the example app, you want to ensure that the table will default to displaying two inactive rows while you wait for guidance to come from the glance commander.
1. Create a method named activateCommands(stop:continue:) in the GlanceController.swift file that does the heavy lifting:
private func activateCommands(stop stop: Bool, kontinue: Bool) {
var commands = [String]()
commands.append(stop ? "GlanceCommandActive" : "GlanceCommandInactive")
commands.append(kontinue ? "GlanceCommandActive" : "GlanceCommandInactive")
commandTable.setRowTypes(commands)
let command1 = commandTable.rowControllerAtIndex(0) as! GlanceCommand
let command2 = commandTable.rowControllerAtIndex(1) as! GlanceCommand
stop ? command1.activateStop() : command1.deactivateStop()
kontinue ? command2.activateContinue() : command2.deactivateContinue()
}
 Note
Note
Because continue is a reserved word in Swift, we’ve taken the traditional approach of substituting the C for a K (for example, class becomes klass and continue becomes kontinue).
2. Initialize both rows as inactive by adding the following code to the willActivate() method:
override func willActivate() {
super.willActivate()
activateCommands(stop: false, kontinue: false)
}
Sneaking a Glance
You’ve spent quite a bit of time preparing the glance, but you have yet to see it in action. Running a glance in the Watch simulator is not quite as straightforward as accessing the glances directly on the hardware. Although you can swipe upward to view glances in a running simulator, you won’t find your glance among them. Fortunately, it’s possible to launch a Watch app directly to a specific interface mode (Main, Glance, or Notification) that can be configured through the Scheme editor. For more information, refer to the “Manufacturing a Glance” section earlier in this chapter. Let’s run the GlanceCommander example.
1. Choose the Glance - GlanceCommander WatchKit App scheme from the scheme selector pop-up menu.
2. Click Run, and prepare to await your command.
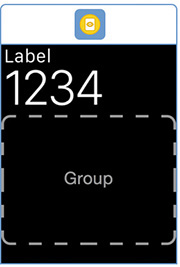
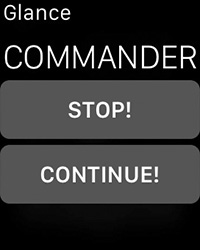
Although it’s nice to finally see the glance in action, we currently find ourselves waiting for a command that never comes (Figure 8.21). Remember that feeling, because that is what you want the users of your glance to never experience.
To simulate an update, you’ll create an updateCommands() method that randomly chooses a command to be issued to the user. To further simulate waiting, you’ll use Grand Central Dispatch (GCD) to delay the execution of this update by one second.
3. Add the following code to handle the updates:
private func updateCommands() {
let delayTime = dispatch_time(DISPATCH_TIME_NOW,
Int64(1 * Double(NSEC_PER_SEC)))
dispatch_after(delayTime, dispatch_get_main_queue()) {
if (arc4random_uniform(2) != 0) {
self.activateCommands(stop: false, kontinue: true)
} else {
self.activateCommands(stop: true, kontinue: false)
}
}
}
4. Add the following highlighted code to the willActivate() method to cause the update to be triggered:
override func willActivate() {
super.willActivate()
activateCommands(stop: false, kontinue: false)
updateCommands()
}
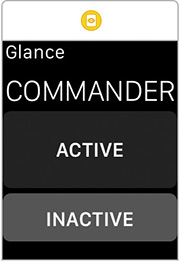
5. Try it for yourself. Run the app, and see if you should stop or continue (Figure 8.22).
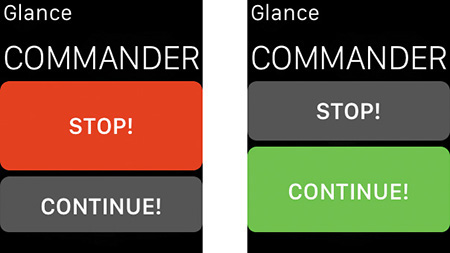
This is a very simple example, but the pattern it illustrates can be extrapolated out to handle real-world data. Initiating a costly (in terms of time) task as soon as the glance is ready, and updating the UI when the required data has been received, is the ideal way to ensure that your user feels like something is happening and that the glance hasn’t just silently failed.
Wrapping Up
In this chapter, you learned how to add a glance to your WatchKit app and what you can, and can’t, do within that glance. We’ve also discussed the techniques that you can apply to make the user experience of viewing your glance as pleasant as possible.
Next, we’ll look at notifications, the push operation to a glance’s pull. Whereas a glance has to request data to be displayed, a notification is fed some initial information, which adjusts the dynamic of how it’s designed and implemented.