
Chapter 9. Working with Notifications
The ability to receive notifications directly, and discreetly, to your wrist is a top selling point of the Apple Watch for many users. Although every notification that an iPhone receives can be displayed on the watch, it requires a bit more effort to make sure the notifications your app users receive are tailored to the new device and its capabilities.
What Are Notifications?
Although using apps, browsing the web, or scanning a Twitter timeline are actions initiated and driven by the users of mobile devices, notifications are how the devices, or the sites and services they subscribe to, can get your attention—usually when you’re about to settle down to a productive writing session. The nature of the relationship between the Apple Watch and the iPhone means that notifications follow something of a two-tier existence—starting life on the phone and making their way to the watch.
iPhone Notifications
Notifications on the iPhone are by no means a new experience to most users, but there’s a good chance that users are not completely aware of where they come from and who, or what, creates them. They can be broken down into two general categories: remote and local.
Remote Notifications
A remote notification is one that has been created by an online system and has been pushed to a device. The concept of push notifications to mobile devices was established in the late 1990s through the use of UP.Notify and WAP Push technologies, but the modern equivalent for iOS devices is the Apple Push Notification Service (APNS).
When an iPhone has network access (via Wi-Fi or cellular) it establishes a long-lived connection to servers maintained by Apple. While connected to these servers, the APNS has a direct connection to the iPhone and can send it information such as new mail notifications and iMessages received. The APNS also has a public interface that trusted third-party developers can use; the developers can send to the APNS carefully formatted messages that have been targeted for a specific app on a specific user’s device. If the message is valid, and the sender is authorized, the APNS will deliver a notification directly to the device if it is currently connected, or dispatch it later if the device is offline.
Local Notifications
When most people think about iOS notifications, they tend to focus on remote notifications and overlook the obvious: local notifications. If you have ever created a calendar event with an alert, or a reminder with an alarm, you have received a local notification on your device. Local notifications are not limited to first-party apps created by Apple; third-party developers have access to a local notification API that they can use to trigger timed or scheduled notifications, or even to provide an alert as part of a background job.
It’s therefore important to consider locally originated notifications in the same way as remote notifications. As far as the user is concerned, notifications arrive at their phone in the same way, and so local notifications are dispatched similarly to the watch regardless of origin.
Watch Notifications
Apple Watch does not have the ability to receive direct notifications from third-party apps by itself; any notifications you wish your watch app to display must originate from a remote service via APNS or be triggered locally on the user’s iPhone. So how does the notification get from the phone to the watch?
Getting a Notification to the Watch
On receipt of a notification, iOS and the target phone app have a number of decisions to make. Is the app that the message is intended for still installed on the device? Does the user have Do Not Disturb enabled? Is the app currently running? Is the app in the foreground or the background? And of course, iOS now has an additional decision: Does the iPhone have an Apple Watch paired? As a developer, you have no say over the decision-making process, but it certainly helps to be aware of what is happening.
When a notification is received by the iPhone, iOS performs a number of checks:
![]() If the user is using the phone at the time and is using the target app, the app accepts and handles the notification directly.
If the user is using the phone at the time and is using the target app, the app accepts and handles the notification directly.
![]() If the user is using the phone at the time and is not using the target app, the notification is displayed at the top of the screen in a notification banner.
If the user is using the phone at the time and is not using the target app, the notification is displayed at the top of the screen in a notification banner.
![]() If the user is not using the phone at the time and is also not wearing the watch, then the notification is displayed on the lock screen of the phone.
If the user is not using the phone at the time and is also not wearing the watch, then the notification is displayed on the lock screen of the phone.
![]() If the user is not using the phone at the time and is wearing the watch, then the wearer will feel a “tap” from the haptic feedback mechanism, though the screen will not light up.
If the user is not using the phone at the time and is wearing the watch, then the wearer will feel a “tap” from the haptic feedback mechanism, though the screen will not light up.
 Tip
Tip
When it comes to testing both local and remote notifications using real devices, make sure to put your phone to sleep or you won’t get the notifications delivered to your watch!
Although it may seem like a miracle that a notification gets to the watch at all, it really happens quite often, so it’s time to think about how you want to present your notifications to your users.
While the App Is Active
One annoyance many users had with watchOS 1 was that notifications were an interruption even while they were actively using the app that had received the notification. This was a source of frustration for developers as well; if you had an app with a stream of information (like a Twitter client, a messaging service, or a podcast feed), your users would be interrupted with a notification when what you really wanted was to simply update the UI in response.
Thankfully, Apple has remedied this in watchOS 2, and it’s now possible for your app to respond directly to incoming notifications if it’s already active. To achieve this, you must implement one or more optional methods on the class that implements the WKExtensionDelegate protocol—in most templates this will be the ExtensionDelegate class.
The methods you need to implement are didReceiveRemoteNotification() or didReceiveLocalNotification(). They receive a copy of the notification and can pass the information off to whichever part of the app is active at the time.
The Short Look
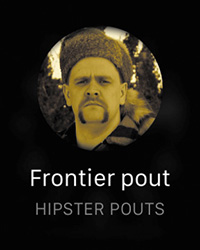
If the user is not actively using the app receiving the notification, they will feel a haptic “tap” of a notification arriving, and will commonly respond by raising the watch to see what app or service the notification was for. At this point, the watch will display a simple view that Apple has named a short look.
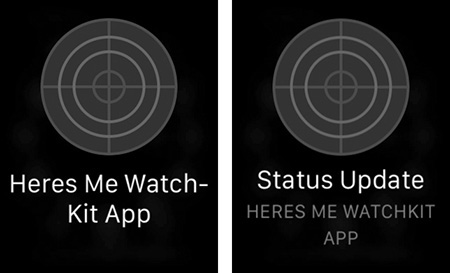
The short look is an almost completely static view that is displayed for just a few seconds. It consists of three interface elements: the app icon, a title string for the notification, and the app name (Figure 9.1). Your only customization option here is the title string. It’s defined in the notification itself, so if your app supports Apple Watch, you should endeavor to make sure there is enough information in the title—usually the first two or three words—to adequately inform the user.
The Long Look
Should the user continue to keep their watch raised while the short look is being displayed, it will be replaced with a view named the long look. So far, notifications have been fairly inflexible with regard to customization, but this is where it all changes. The long look comes in two further flavors: static and dynamic.
The static notification is a single page of information that cannot be programmatically updated. That is not to say that the notification does not change at all—the message body and the action buttons can vary according to the payload of the notification—but the customization must all be carried out in the static interface scene in the Interface.storyboard file and is baked into your application at compile time.
If you want to customize your static interface scene based on the type of notification to be handled, you can take advantage of notification categories. Notification payloads contain a category field, and you as a developer can set this to whatever you want; for example, you might want to have a calendarInvite category for new meeting requests and a calendarAlert category to remind the user to attend an imminent meeting. Static interface scenes can specify a category to which they should respond, and you can create multiple static interface scenes for handling different notification categories.
Alternatively, a dynamic notification can be displayed by including a dynamic interface scene in your storyboard; this is an optional extra to the static interface scene, and it comes with a whole lot more capability. The interface scene for a dynamic notification can be customized to a much greater extent than the static notification, and more importantly it can be updated programmatically by implementing a subclass of the WKUserNotificationInterfaceController (described in more detail later).
As a developer, you have only one way that you can force which type of long-look notification to display and that is by implementing only the static interface scene. Otherwise, it is up to watchOS to determine the type of long look to display. The predetermined nature of the static interface scene means that it can be displayed in many more situations than the dynamic interface scene. When battery life is limited, or the network connection to the paired iPhone is not functioning correctly, the watch may stick with the static interface scene so that the user experience is not compromised.
Given the large amount of customization that you can perform to both static and dynamic interface scenes, how do you add this capability to Watch apps? If your development schedule is tight, you’ll be pleased to know that any iOS app that runs on the iPhone is capable of delivering a plain notification style to the watch. Although this is perfectly functional, it employs a very standard template and doesn’t allow your app to stand out. To really make the notification your own, you need to create a notification interface scene in your storyboard.
Creating a Notification Scene
As with glances, there are two ways to create a notification scene in your own app: at target creation time and as a storyboard modification. Unlike with glances, however, it’s possible to create more than one notification scene per app, so although you’ll often create a notification scene up front, it’s very possible that you’ll want to create an additional notification scene by hand at a later stage.
Creating a Notification in a New Project
Adding a notification to a new project requires that you select the Include Notification Scene option in the options dialog for the iOS App with WatchKit App project template.
1. Create a new project by selecting File > New > Project from the Xcode main menu.
2. In the project template selection dialog, navigate to the watchOS Application category, select the iOS App with WatchKit App template, and click Next.
3. Give the project a name, and customize the template options to ensure that the Include Notification Scene option is selected (Figure 9.2).
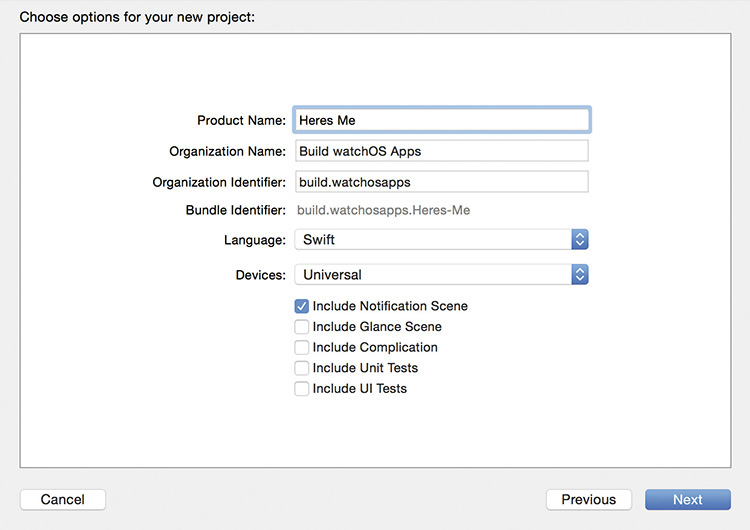
We’re going to name this project Heres Me; it’s a location- and status-sharing project for natives of Belfast, Northern Ireland.
4. Click Next to proceed to the save dialog.
5. Choose a location on disk, and click Create to save it.
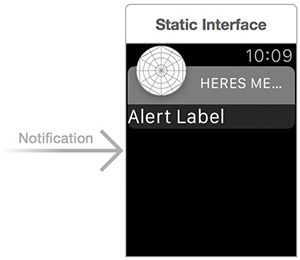
The result of this process will be two additional scenes in Interface.storyboard that provide both static and dynamic notification capabilities (Figure 9.3). You’ll also be the proud owner of a Swift file named NotificationController.swift in the Heres Me WatchKit Extension group, and a file named PushNotificationPayload.apns under Supporting Files in the same group. We’ll talk more about this file later when it comes to testing notifications.

Adding a Notification to an Existing Project
Maybe you forgot to add a notification when you first created your Watch app, or maybe you just want to add an additional notification handler. Adding notification handling is a relatively painless process, so let’s add an additional notification type to the scene you created in the previous section:
1. In the Project Navigator, expand the WatchKit App group, and click the Interface.storyboard file to open it in Interface Builder.
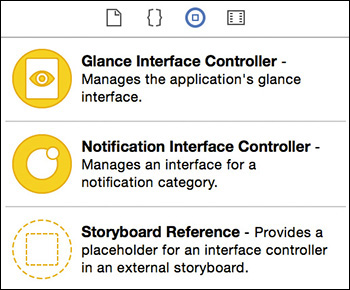
2. Open the Object Library, and find the Notification Interface Controller (Figure 9.4).
3. Drag the Notification Interface Controller onto the storyboard canvas.
Be aware that the Notification Interface Controller always produces a static/dynamic notification pairing when added to the storyboard.
If you don’t want them all and only want an additional static scene, add the pair, select the static scene, open the Attributes inspector, and deselect the Has Dynamic Interface option.
To add a dynamic scene to a static scene, select the Has Dynamic Interface option again. You can even connect two or more static scenes to a single dynamic scene (thus sharing code) by Control-clicking the unpaired static scene and dragging to the body of the dynamic scene—a popup will be displayed offering you the opportunity to create a dynamic notification relationship segue.
You now have two static notification scenes and a dynamic scene all ready to be worked with. Before you can start writing any code, you need to determine what the notification interactions will be and how they can be presented to the user.
Designing Your Notifications
The Heres Me app can receive two types of notifications: location updates and status updates. The key information for each type varies—location updates need to display the location, whereas status updates need to display the status—so you need to customize the notification layout accordingly.
Notification Layout
Understanding the layout of the notification can help you make the most of the space available to you. The default static notification layout can be seen in Figure 9.5. The position of the sash (the area containing the app icon and the app name) is fixed, and the action buttons (not shown while in Interface Builder) will move up or down depending on the size of the content area you create. The number of buttons and their labels are controlled by registering notification actions in your iOS app.
Notification actions are a means by which your iOS app can specify the action buttons to display alongside a notification. The buttons can be customized on a per-notification category basis if you wish, and the same actions will be passed down to the watch if the notification is not going to be displayed on the phone. For more information about notification actions, have a look at the Apple documentation for local and remote notification programming (bit.ly/bwa-notif-guide).
The content area is where the real customization takes place. As with glances, there are limitations to what can be included in the content area; once again, you cannot take advantage of interactive controls such as sliders, switches, and buttons, though you do of course get a set of buttons for free if you have registered notification actions in your iOS app.
If you are using a static notification scene, you must include a label that is linked to a notificationAlertLabel outlet by default (Figure 9.6). You are free to delete the existing label (or simply reconfigure it), but your project will fail to build unless a label is connected to the outlet.

 Note
Note
Although the dynamic notification scene also has the same notificationAlertLabel outlet, you won’t get in trouble if it isn’t hooked up.
This label is your only way to display content from the notification payload in a static notification scene, because it isn’t possible to change the underlying view controller for a static scene. When the scene is displayed, the alert label is updated, as are the action buttons, and everything else remains, well, static!
If you want to be able to customize and programmatically update the notification scene, you instead have to rely on a dynamic notification scene, which we will examine in a later section of this chapter.
Static Notifications
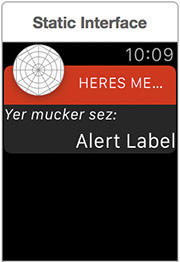
The basic notification that your app needs to deal with is the status update notification. Although a status update could contain a lot of distinct information, which your main Watch app should be capable of handling at some stage, we’re going to assume that the notification will send a simple string that contains both the name of the sender and its status. For example, a user named Wez could send a status notification like this: “Wez says: headin downa art callidge wimme glubeg!”
If your notification payload contains the status message as the body property, it will replace the content of the label currently displaying the text “Alert Label.” If you use the default configuration for the static scene, you will quickly be disappointed because the text will be truncated. You would also like the status message to be right-aligned, which is the convention that makes it look as though it was said by someone else:
1. Select the alert label on the static notification scene that has no dynamic scene associated with it.
2. Open the Attributes inspector to show the normal attributes available for a WKInterfaceLabel.
3. Change the Width attribute to Relative to Container.
4. Change the Alignment attribute to right-aligned.
5. Change the Lines attribute to 0.
It would be useful to have a clear indicator that this message is something that was said by someone else, so you will add a custom label to the content area.
6. Open the Object Library, and find a Label element.
7. Drag the Label element over the static scene, and make sure it is located above the alert label.
8. Open the Attributes inspector.
9. Change the Text attribute to Yer mucker sez:.
10. Click the Font attribute, and change it from Body to System Italic.
11. Change the font size to 12.
So the user can immediately tell what type of notification has been received, you will use different sash colors to distinguish the status notification from a location notification.
12. Select the notification category for the scene (the arrow that points into the scene from the left side).
13. Open the Attributes inspector.
14. Change the Sash Color attribute to a hex value of #D00000—you can do this through the RGB sliders on the standard color picker.
15. Change the Name attribute to statusNotification. You will use this later to customize your notification payload.
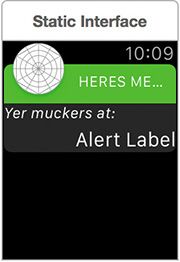
You now have a distinct style and layout for your status notification (Figure 9.7), but the other static notification for location updates looks a bit plain in comparison.
16. Repeat steps 1 through 15 for the other static notification scene but with the following changes:
![]() For step 9, set the label text to Yer muckers at:.
For step 9, set the label text to Yer muckers at:.
![]() For step 14, set the Sash Color attribute to #00D000.
For step 14, set the Sash Color attribute to #00D000.
![]() For step 15, set the Name attribute to locationNotification.
For step 15, set the Name attribute to locationNotification.
The location update notification now has a layout that’s consistent with the status notification (Figure 9.8).
Dynamic Notifications
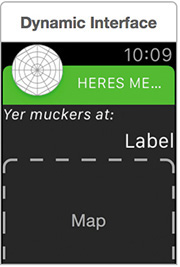
At a bare minimum, the location update will display a textual representation of the user’s location, but ideally it would also feature a map representation, where network access permits. You could include the map in the static notification, but we would like to reserve the static notification for quick information that doesn’t require loading of extra data (for example, map tiles).
Instead, you’ll take advantage of the dynamic notification, which can perform live processing of the notification information to determine exactly what to display. If the location update contains a geolocation field, you can choose to display a Map element that can be hidden otherwise.
Start by replicating the location update labels in the dynamic notification scene.
1. Select the dynamic interface scene in the Interface.storyboard file.
2. From the Object Library, drag two Label elements to the dynamic scene.
3. Select the first Label element, and open the Attributes inspector.
4. Change the Text attribute to Yer muckers at:.
5. Click the Font attribute, and change it from Body to System Italic.
6. Change the font size to 12.
7. Select the second Label element.
8. Change the Width attribute to Relative to Container.
9. Change the Alignment attribute to right-aligned.
10. Change the Lines attribute to 0.
Your dynamic notification now matches the static location notification, but you still need the map.
11. From the Object Library, drag a Map element onto the dynamic notification scene, ensuring it’s located below the two labels (Figure 9.9).
The scene has been set, but the dynamic aspect of the dynamic notification needs to be controlled by something. As you would expect, there’s a controller for that.
The WKUserNotificationInterfaceController
Because you selected the Include Notification Scene option at project creation time, Xcode created a file named NotificationController.swift in the Heres Me WatchKit Extension file group. It contains a class named NotificationController, which is a subclass of WKUserNotificationInterfaceController (itself a specialized subclass of WKInterfaceController).
As well as having access to the normal lifecycle methods of WKInterfaceController (covered in detail in Chapter 3), it also has two extra callback methods that you can use to customize your dynamic notification scene in response to the local or remote notification. The method didReceiveRemoteNotification(_:withCompletion:) will be called when watchOS has received a remote notification destined for your app, and the method didReceiveLocalNotification(_:withCompletion:) can be used in the same way for local notifications. In both cases, you should remember to execute the supplied completion block to ensure that watchOS knows you have finished processing the notification.
In the default templates, these methods will be commented out and will need to be uncommented in order to take effect. You can use this as a crude means of enabling support for one or the other of the notification types.
To achieve the best results, you should perform any initial setup in the init() method as usual, process the notification in the appropriate callback method, and perform any additional setup in the willActivate() method.
In addition, you have two other optional methods that can be implemented: suggestionsForResponseToActionWithIdentifier(_:forRemoteNotification:inputLanguage:) and suggestionsForResponseToActionWithIdentifier(_:forLocalNotification:inputLanguage:). These can be implemented when handling notifications that require a text response from the user. This is covered in the section “Text Responses” later in this chapter.
For our example, you need to have access to the lower Label element and the Map element to change their values in response to the notification payload. You can do this by adding some outlets to NotificationController that are connected to the UI elements.
1. Open the Interface.storyboard file, and ensure that the assistant editor is open and displaying the NotificationController.swift file.
2. Control-click the lower Label element, and drag it into the assistant editor to create an outlet named alertLabel (Figure 9.10).
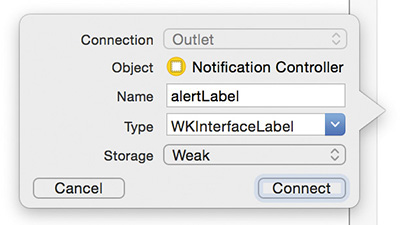
3. Control-click the Map element, and drag it into the assistant editor to create an outlet named locationMap.
You now have the ability to change the UI, but you need to extract payload data in order to do so.
4. Replace the commented-out didReceiveRemoteNotification(:withCompletion:) method with the following code:
override func didReceiveRemoteNotification(remoteNotification: [NSObject : AnyObject], withCompletion completionHandler: ((WKUserNotificationInterfaceType) -> Void)) {
let apsDictionary = remoteNotification["aps"] as! NSDictionary
let alertDictionary = apsDictionary["alert"] as! NSDictionary
let bodyText = alertDictionary["body"] as! String
let locationCoord = alertDictionary["locationCoord"] as! String
let (location, region) = createLocationAndRegionFromCoordinate(locationCoord)
alertLabel.setText(bodyText)
locationMap.setRegion(region)
locationMap.addAnnotation(location, withPinColor: .Red)
completionHandler(.Custom)
}
Most of the method involves the extraction of data from the notification, which is received as a dictionary. You already know that the dictionary contains a property named aps, which references another dictionary and which in turn contains a property, named alert, that contains yet another dictionary of properties. These properties are parsed to extract the data that is needed to populate the label and the map.
5. Add a helper method named createLocationAndRegionFromCoordinate() to the same file using the following code:
func createLocationAndRegionFromCoordinate(coordinate: String)
-> (CLLocationCoordinate2D, MKCoordinateRegion) {
let coordinateArray =
coordinate.characters.split { $0 == "," }.map(String.init)
let lat = (coordinateArray[0] as NSString).doubleValue
let long = (coordinateArray[1] as NSString).doubleValue
let location = CLLocationCoordinate2DMake(lat, long)
let span = MKCoordinateSpanMake(0.1, 0.1)
let region = MKCoordinateRegionMake(location, span)
return (location, region)
}
Now you’re ready to test the code and view the notification you’ve just created, but how exactly do you do that?
Testing Notifications
Testing the notification-handling capabilities of your app requires that you have a notification payload to send and a means of sending it to your app. When testing with a real device, it’s advantageous to have access to an APNS, but in the early stages of development you’ll likely be using a simulator, which is more difficult to send pushes to. Fortunately, Xcode and the watchOS SDK provide a way to directly launch your app in notification-handling mode with a specific payload.
Notification Payloads
Xcode helpfully provided a file named PushNotificationPayload.apns when you created your project; you can find this file in the Supporting Files subgroup of the WatchKit Extension file group in the Project Navigator. This file contains an example of the data that your app can receive when it receives a push notification.
It takes the format of a JSON dictionary containing two properties that will be processed by the simulator when the payload is received: aps and WatchKit Simulator Actions. The sample contains a third property (customKey) that exists solely as a comment and is not actively processed by the simulator. We have reproduced the sample content that follows (without customKey) for ease of reference as we discuss it further.
{
"aps": {
"alert": {
"body": "Test message",
"title": "Optional title"
},
"category": "myCategory"
},
"WatchKit Simulator Actions": [
{
"title": "First Button",
"identifier": "firstButtonAction"
}
]
}
The aps Property
The aps property represents the data that would be received by a real device when a push notification has been received. Associated with the property is another dictionary containing two more properties: alert and category.
![]()
alert
The alert property contains yet another dictionary that is home to the real substance of the notification—two properties named body and title. The use of these properties depends on the way the notification is being displayed:
![]() Short look: The
Short look: The title property is optional, but it is worth including whenever you can do so; if watchOS finds that property in your payload, it will substitute it into a short-look notification. This makes the difference between your app displaying just the name of your app or instead displaying some useful information. Figure 9.11 shows the difference between short-look displays for notifications that do and don’t include title. It also highlights the fact that the title property has limited space to occupy (and is displayed for a short time), so keep the title short but meaningful!
![]() Static long look: If you have included a static notification scene in your storyboard, then the
Static long look: If you have included a static notification scene in your storyboard, then the body property is the bare minimum that you should include in your test data. The value associated with this key is a text string that watchOS will inject into the notificationAlertLabel in the static notification scene.
![]() Dynamic long look: A dynamic notification scene does not actually require either the
Dynamic long look: A dynamic notification scene does not actually require either the body or title property; you write the code, so you are free to extract whatever data you wish from the notification payload. However, we still recommend including the properties because there is no guarantee that your dynamic scene will be displayed. Remember that watchOS can decide when to show the static and dynamic scenes, and the short look can be displayed as well.
![]()
category
When creating your static notification scenes earlier (in the section “Designing Your Notifications”), you did so with the intention of having two different notification types: status and location. You were able to do this by updating the Name attribute in the Notification Category element in the storyboard (Figure 9.12).
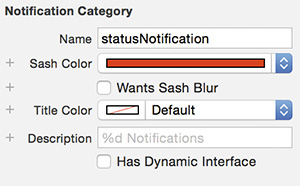
The category property in the alert dictionary corresponds directly to the value entered in the Name attribute of the Notification Category element in the storyboard. When a notification is received by a watchOS app, it can inspect the category property value and direct the payload to the static notification scene with the same Name attribute.
WatchKit Simulator Actions
The aps property of the payload file is included to simulate the data received as part of a push notification, but the WatchKit Simulator Actions property is unique to the payload file created by Xcode, and will not be sent to a real device from the APNS. The purpose of this property is to allow you to add a collection of actions to your device based on the actions that your parent iOS app would respond to.
This may seem confusing—after all, we’re talking about the watch so why are we concerned with the iOS app—but it makes more sense when you consider that notifications are part of the larger ecosystem. At the beginning of the chapter we explained that notifications are first delivered to the iPhone, which makes the decision to display or forward to the watch. iOS apps have an API that allows developers to register actions that are associated with a notification for display to the user. For example, Apple’s own Mail app offers the user an opportunity to reply to or archive/delete an email from the lock screen or when a banner notification is tapped.
The sample payload in Xcode includes the WatchKit Simulator Actions so that the simulator can receive and parse a collection of actions as though they had come from the iOS device. The property value itself is composed of an array, each element of which represents an action in the form of a dictionary. Each action requires a title property—the text displayed on the button—and an identifier property—the unique identifier that is passed to watchOS so that it knows which button the user actually tapped. An additional, optional property named destructive can be supplied; it takes a 1 or a 0 to indicate whether the button should be displayed in a way that indicates a destructive action (where 1 represents the destructive action).
Note
watchOS automatically adds a Dismiss button for you, so there is no need to create it for yourself.
To handle notification actions, you must implement a number of optional methods on the ExtensionDelegate class—this is a class that implements the WKExtensionDelegate protocol and is found in the file named ExtensionDelegate.swift in the default Xcode project templates. The methods are named handleActionWithIdentifier(_:forRemoteNotification:) and handleActionWithIdentifier(_:forLocalNotification:), and, as the names suggest, they apply to remote and local notifications, respectively.
How you handle the actions is up to you and your application logic, but a suggested pattern would be to use a switch statement using the identifier parameter. This parameter tells you which button the user tapped, and you can call for each identifier a separate method that contains logic specific to the type. The identifier parameter can be an empty string in the circumstance where the user didn’t tap an action button but instead tapped elsewhere on the notification to launch the app. You also receive a copy of the notification so that you have some context on what the user has responded to.
An additional pair of methods can be implemented if you have allowed the user to make a text response to the notification. These methods have the same format as those listed previously, but also include the text response from the user as an additional parameter. The methods are named handleActionWithIdentifier(_:forRemoteNotification:withResponseInfo:) and handleActionWithIdentifier(_:forLocalNotification:withResponseInfo:). You can learn more about text responses in the “Text Responses” section later in this chapter.
Creating Additional Payloads
You have more than one notification category for your app, so you’ll need more than one payload file to test with. Rather than just editing the existing file, you will instead create two new files and populate them with test data—you can delete the existing one if you wish. To create a new payload file:
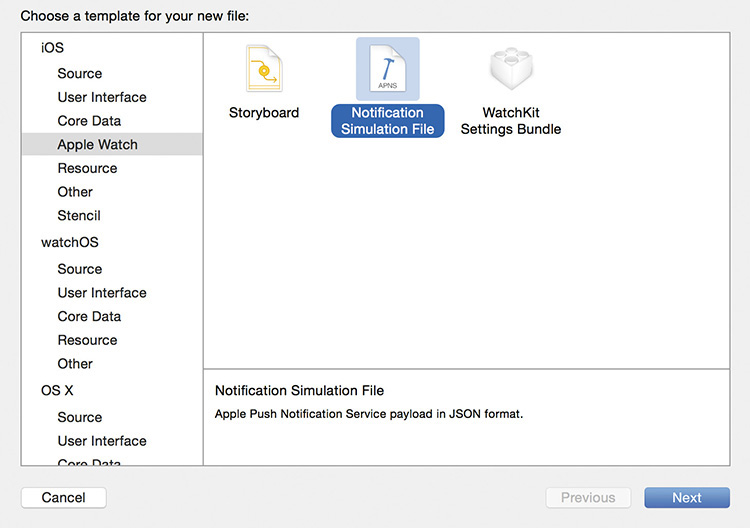
1. Right-click the Supporting Files subgroup within the Heres Me WatchKit Extension, and select the New File command from the popup menu.
2. In the new file template chooser, choose iOS > Apple Watch, select the Notification Simulation File option, and click Next (Figure 9.13).
Note
The location of the Notification Simulation File option in the iOS category may be a mistake in the current version, and it’s possible that it may have been moved by the time you read this. If so, you may find it under the watchOS category instead.
3. Choose a location to save the file, give it a name—we used PushNotificationPayload-status.apns—and click Next.
You don’t need to worry about including the file in a target; it isn’t going to be bundled with any of the app or test targets.
4. Repeat steps 1 to 3 to create a second file; this time we named it PushNotificationPayload-location.apns.
5. Open the first payload (for the status category), and update it with the following test data:
{
"aps": {
"alert": {
"body": "Headin downa snooks",
"title": "Status Update"
},
"category": "statusNotification"
},
"WatchKit Simulator Actions": [
{
"title": "Reply",
"identifier": "statusReplyAction"
}
]
}
You’ve added the status message to the body property, and set the title property to “Status Update” so that the type of notification is clearer on a short look. The category property has been set to statusNotification so that it matches the status notification scene.
You also added a single action to the Watch Simulator Actions property. The Reply button is intended to trigger a statusReplyAction so that the user can instantly reply to their friend’s status and attempt to top it.
6. Repeat step 5 for the second payload (for the location category) with the following test data:
{
"aps": {
"alert": {
"body": "Already downa Art Callidge",
"title": "Location Update",
"locationCoord": "54.603264, -5.929300"
},
"category": "locationNotification"
},
"WatchKit Simulator Actions": [{
"title": "Post Location",
"identifier": "postLocationAction"
}, {
"title": "Reply",
"identifier": "locationReplyAction"
}
]
}
Again you’ve added the body and title properties, and set the category property to be locationNotification so that it matches the location scene. You have also added a custom property named locationCoord with a value containing a coordinate that can be extracted by the dynamic notification.
Notification Test Schemes
Now that you know how to get the data into a payload file, how do you go about sending it to the simulator for testing? Apple has solved this problem with schemes in Xcode. When you created the project, the template included a scheme named Notification - Heres Me WatchKit App. Selecting and running the scheme will cause Xcode to start the watchOS simulator, launch the Heres Me app in a notification handling mode, and inject a payload file to be handled.
To use the one of the new payload files you just created, you need to update the scheme.
1. Select Product > Scheme > Manage Schemes from the Xcode main menu.
2. Click the scheme name—Notification - Heres Me WatchKit App—and change it to Status Notification; a bit of brevity never hurt nobody.
3. Ensure that the Status Notification scheme is highlighted, and click the Edit button.
4. Select the Run action, click the Watch Interface popup menu, and select the Static Notification option, if it is not already selected (Figure 9.14).
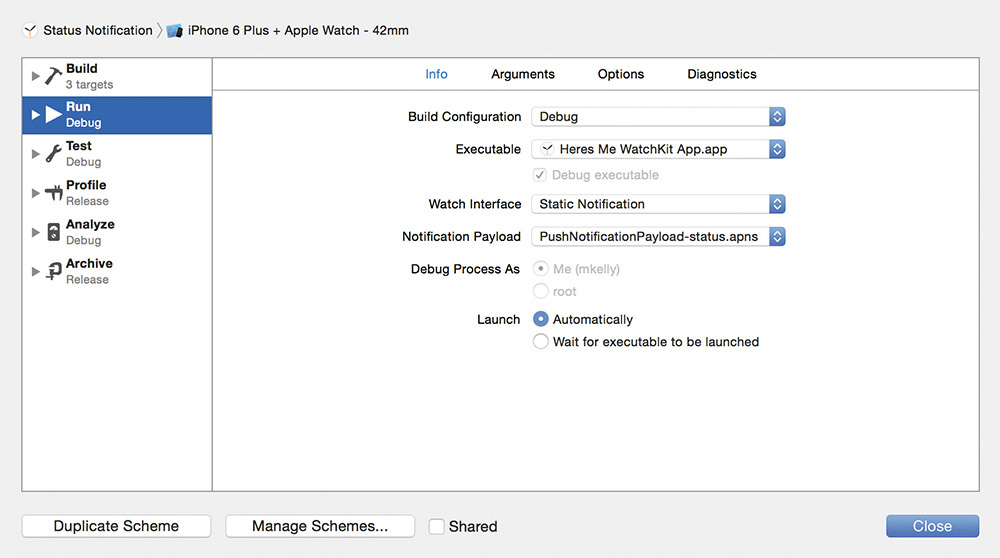
5. Click the Notification Payload popup menu, and select the PushNotificationPayload-status.apns option.
6. Click Close.
7. Click Run to test the status notification.
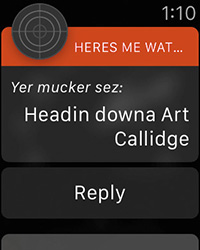
The iOS and watchOS simulators should start up, and after a little initialization time, the status notification will be displayed (Figure 9.15). Not only is the correct status message displayed, but your Reply button shows and the correct static notification scene is selected (as evidenced by the red sash).
It has been quite the journey, but you have finally tested your status notification. Of course there is still the location notification to test, and an easy way to do so would be to edit the Status Notification scheme, changing the Notification Payload setting to select the location payload instead. Although it would be quite quick to do this, it would become tedious, so instead you will create a new scheme for the location notification.
8. Select Product > Scheme > New Scheme from the Xcode main menu.
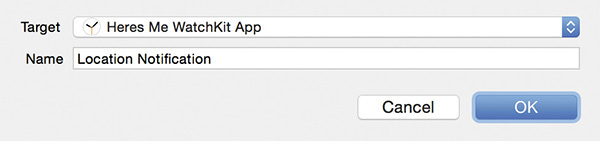
9. In the dialog, select the Heres Me WatchKit App target, enter the name Location Notification, and click OK (Figure 9.16).
10. Select Product > Scheme > Manage Schemes from the Xcode main menu.
11. Select the Location Notification scheme, and click Edit.
12. In the Run action, click the Watch Interface popup menu, and select the Static Notification option.
13. Click the Notification Payload popup menu, and select the PushNotificationPayload-location.apns option.
14. Click Close.
15. Click Run to test the location notification.
Again, the simulators should start up and the location notification should be displayed (Figure 9.17). The appropriate location information should be displayed, and the green sash confirms that the location scene is correctly displayed. The Post Location and Reply action buttons also show that the WatchKit Simulator Actions data has been successfully extracted from the payload.
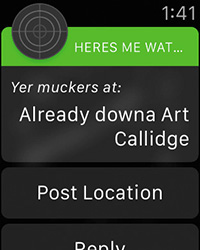
There is one thing missing, however. When you created the location notification scene, you added a dynamic notification that included a map. The notification displayed in Figure 9.17 doesn’t contain a map, so you are displaying only the static notification right now. That is because you set the Watch Interface setting to Static Notification; you really wanted Dynamic Notification instead.
16. Select Product > Scheme > Edit Scheme from the Xcode main menu.
17. In the Run action, click the Watch Interface popup menu, and select the Dynamic Notification option.
18. Click Close.
19. Click Run to test the dynamic notification.
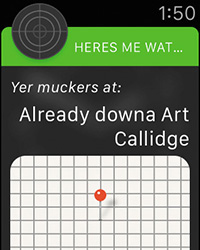
This time you can see the map view appear in the notification (Figure 9.18), confirming that the dynamic notification scene is displayed.
Note
Unfortunately, the watchOS simulator is unable to load the map view correctly at the time of this writing. Trust us that it will work on a physical device, and hopefully Apple will correct this soon.
Actioning Notifications
So what happens when your user actions a notification? Ultimately, actioning a notification will end up dismissing it, but what happens after the dismissal is determined by how, and where, you tap the notification.
Tapping the Notification
The result of tapping a notification can be roughly divided into three categories:
![]() Tapping the Dismiss button.
Tapping the Dismiss button.
![]() Tapping the action buttons.
Tapping the action buttons.
![]() Tapping the main notification area; this includes the sash and any non–action-button UI components.
Tapping the main notification area; this includes the sash and any non–action-button UI components.
The easiest tap to understand is that of the Dismiss button—this will very simply dismiss the notification with no other action. Your app will not be launched at all, and you are free to go about your business. This is the notification equivalent of saying, “These aren’t the droids you’re looking for.”
Tapping the action buttons causes your app to launch, and if you have taken the time to implement it, either the handleActionWithIdentifier(_:forRemoteNotification:) or the handleActionWithIdentifier(_:forLocalNotification:) method will be executed. Tapping an action button causes the associated action identifier name to be passed as a string through the identifier parameter. An exception to this behavior is described in the “Text Responses” section.
Tapping elsewhere in the main notification area and not on a button will also cause your app to launch, and these methods, if implemented, will be executed. This time, however, the identifier parameter will remain as an empty string.
The following code shows how you might handle actioning a notification in your Heres Me app. Add these methods to the ExtensionDelegate.swift file:
func handleActionWithIdentifier(identifier: String?, forRemoteNotification remoteNotification: [NSObject : AnyObject]) {
guard let identifier = identifier else { return }
switch (identifier) {
case "statusReplyAction":
handleStatusReplyForNotification(remoteNotification)
case "locationReplyAction":
handleLocationReplyForNotification(remoteNotification)
case "postLocationAction":
handlePostLocationForNotification(remoteNotification)
default:
handleGeneralTapForNotification(remoteNotification)
}
}
func handleStatusReplyForNotification(notification: [NSObject:AnyObject]) { }
func handleLocationReplyForNotification(notification: [NSObject:AnyObject]) { }
func handlePostLocationForNotification(notification: [NSObject:AnyObject]) { }
func handleGeneralTapForNotification(notification: [NSObject : AnyObject]) { }
Note
As of Xcode 7 beta 6, tapping the main notification area attempts to launch the app, but the handleActionWithIdentifier(_:remoteNotification:) method is not executed, and the app eventually exits. We’re assuming this to be a bug in the simulator right now.
Text Responses
With the introduction of watchOS 2, interaction with notifications took on a whole new dimension. It is now possible to mark a specific action as expecting a text response—doing so causes the normal flow to be interrupted, and watchOS will prompt the user for a personal response. The response can take the form of a dictated message, emoji, or choosing from a selection of predefined messages.
Your statusReplyAction and locationReplyAction buttons are the perfect candidates for a text response. You set this up to reply to a location notification as follows:
1. Open the file PushNotificationPayload-location.apns.
2. Replace the existing WatchKit Simulator Actions property with the following:
"WatchKit Simulator Actions": [
{
"title": "Post Location",
"identifier": "postLocationAction"
}, {
"title": "Reply",
"identifier": "locationReplyAction",
"behavior": "textInput"
}
]
3. Click the Scheme Selection popup menu, and choose the Location Notification scheme.
4. Click Run to execute the scheme.
5. Click the Reply action button.
Instead of switching to the main app, watchOS instead displays the inline-text response screen (Figure 9.19).
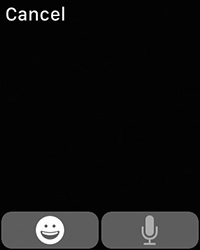
At this point the options available are a bit sparse—the dictation button is understandably disabled within the simulator, but there are also no canned responses for the user to choose from. The reason for this is simple: You haven’t provided any yet!
To provide a canned response, you need to implement the suggestionsForResponseToActionWithIdentifier(_:forRemoteNotification:inputLanguage:) method on the NotificationController class. You can remedy that by presenting some very generic responses.
6. Open the NotificationController.swift file, and add the following method to the class:
override func suggestionsForResponseToActionWithIdentifier(identifier: String, forRemoteNotification remoteNotification: [NSObject : AnyObject], inputLanguage: String) -> [String] {
return ["Swet", "Na mate!"]
}
7. Run the scheme again, and you should see a populated response like that shown in Figure 9.20.

Such generic responses are rarely going to cover everything your users might want to say, so you can use the parameters passed to the method to make better decisions. Use the identifier to know what type of action the user has taken, and the remoteNotification parameter will give you the context in which the user is replying. You could parse the notification for keywords, use time and location information for ideas, or, if you’re feeling particularly adventurous, you could have your push service pass a list of potential responses down to the user through the notification payload.
When the user has picked or dictated a response, the flow of control will return to your app; this time the optional methods handleActionWithIdentifier(_:forRemoteNotification:withResponseInfo:) and handleActionWithIdentifier(_:forLocalNotification:withResponseInfo:) will be called if implemented. The responseInfo parameter will contain a dictionary; a key named UIUserNotificationActionResponseTypedTextKey can be used to access the response as a string of text.
Local Notifications
Most of what we’ve discussed so far has dealt primarily with remote notifications. This is understandable given that remote notifications are the most commonly used type. Every app is different, though, and you may rely on the creation and receipt of local notifications for your core functionality, whether that be reminders, timed events, or geolocation triggers.
Handling a local notification differs only in the names of the methods you need to implement and in the format of the notification parameter. A remote notification handler will receive a dictionary, whereas a local notification receives a UILocalNotification object.
The local notification is dispatched to watchOS from the companion iOS app running on the user’s iPhone. A notification is created and scheduled for fireDate—a time in the future when it should fire. When the notification fires, it will follow the aforementioned rules for determining where it should be displayed; if the user is not using his phone and is wearing his watch (and it is unlocked!), the notification will be displayed on the watch.
It isn’t possible to create a local notification on the watch. Instead, you need to use the Watch Connectivity framework to send a request to the iOS app on the iPhone. Your iOS app should understand this request and use any data sent with it to construct a local notification and schedule it. The Watch Connectivity framework was covered in detail in Chapter 6.
Wrapping Up
This has been quite the chapter—and with good reason: Although your main app and glances are important, the primary entry point to your app will likely be notifications. Apple has recognized this and has given you a tremendous level of control over your users’ experience. Ensuring they get the right level of information at the right time is essential in a device that is so much about the moment.
This also ends the section on the core technologies in watchOS. In the next part, we show you how to make the most of the platform by delving deeper into some of the frameworks that let you take input from users and their environment, and we give you some guidance on working with physical devices.