
Chapter Objectives
Describe installation, configuration, and standard operation of
SystemImagerDetail extending
SystemImagerto use multicast compressed archivesIntroduce the
SystemImager flamethrowerfacility for multicast installation
The SystemImager tool is one of the most flexible and versatile installation tools available—at any price. This chapter covers the information necessary to start using SystemImager in your cluster. We will prototype an extension of the standard SystemImager tool to multicast compressed tar archives to client systems to show the inner workings of the tool. Finally, I introduce the flamethrower extension to SystemImager that provides an integrated multicast capability.
The SystemImager package allows you to capture and replace system images in the form of a system's complete directory hierarchy and its contents. The server stores an identical tree structure to be placed on a target system, complete with every file captured from the original “golden” system used as a prototype. The SystemImager tool consists of both client and server software packages, and supports several of the more popular processor architectures, and Itanium.
Actually, SystemImager is part of and uses the components of the System Installer Suite (SIS) (available at http://sisuite.org; SystemImager software is available at http://systemimager.org,) which comprises SystemImager, SystemInstaller, and SystemConfigurator. From this point on, we will refer to SystemImager as SI for simplicity's sake. When I say SI I am really referring to the complete set of SIS tools that are necessary to make SI function.
The SIS is the installation and management tool set for the open-source cluster application resources package (OSCAR), which is produced by the Open Cluster Group (information available at http://openclustergroup.org). I consider OSCAR in a later chapter, along with other integrated “complete” cluster environments. For now, let's focus on just SI.
The high-level steps to follow for installing and using the SI software in your cluster are
Choose one or more administration servers to provide
SIservicesConfigure the proper storage and network resources on the
SIservers to support simultaneous image loading by multiple client systemsInstall and configure the
SIserver softwareInstall and configure compute slice operating system and software
Install
SIclient software on a “golden” system, which serves as the prototype for cloningCapture the client system image to the
SIserverBoot and install other clients using the captured image
Fine-tune the image contents and client configuration
Replicate your configurations as necessary
The hardware and I/O capabilities of the SI servers are important to the overall performance of the imaging service. The number of simultaneous client installations is affected by the network and disk I/O performance of the server system. I cover ways to improve performance (multicasting) later in this chapter, but for now let's assume that multiple systems will “hit” the SI server at the same time.
The SI developers provide us with a really nice tool and procedure to get the SI code, as contained in the RPM packages for Red Hat distributions. A script, using the wget command[1] will download the proper packages for us:
# cd /tmp
# wget http://sisuite.org/install
--23:02:04--  http://sisuite.org/install
           => install
Resolving sisuite.org... done.
Connecting to sisuite.org[66.35.250.210]:80... connected.
HTTP request sent, awaiting response... 200 OK
Length: 13,573 [text/plain]

100%[==================>] 13,573       109.54K/s    ETA 00:00

23:02:06 (109.54 KB/s) - install saved [13573/13573]
# chmod +x install
We have the install script (note there is already a command by that name on the system, so make sure you run the local one), now let's follow directions and see what's available for download:
# ./install --list
Packages available for download and/or install:
  perl-AppConfig
  perl-MLDBM
  systemconfigurator
  systemimager-client
  systemimager-common
  systemimager-i386boot-standard
  systemimager-ia64boot-standard
  systemimager-ppc64-iSeriesboot-standard
  systemimager-ppc64boot-standard
  systemimager-server
  systeminstaller
  systeminstaller-x11
To install packages, do a:
       ./install --verbose PKG1 PKG2 ...
For example:
       ./install --verbose systemconfigurator perl-AppConfig
Okay, so the packages we want are picked up with the following command:
# ./install systemimager-client
                     systemimager-server
                     systemimager-common
                     systemimager-i386boot-standard
The results are dropped into the sis-packages directory. Wow, this is easy! Let's go ahead and install the packages:
error: Failed dependencies:
        perl-XML-Simple is needed by
           systemimager-server-3.0.1-4
Uh, oh. We have some package dependencies missing. A quick check of the Web site instructions lists the following packages that have to be installed:
rsync
perl-DBI
perl-Tk
perl-XML-Simple
So, we have to track down these dependencies before we can continue. This actually turns out to be a fairly common activity on Linux systems. Packages are shared by multiple projects, distributions, and software tools, so there are common repositories and “natural” places to look for the required pieces. Let's start by eliminating packages that are already loaded:
# rpm -q rsync
rsync-2.5.7-0.8
The rsync package is already loaded on my system. If you have not loaded it on yours, it is available on the Red Hat installation media. The perl-DBI package is also available on the installation media. No such luck for the other two packages. They are not included in Red Hat and derivative releases (Fedora Core 1 is missing the files, also).
Off to our trusty friend, http://rpmfind.net, where we can search for the missing packages. Drat. The files are there, but no Red Hat or Fedora versions, just Mandrake, Debian, and PLD Linux, which are different package schemes. Off to another place mentioned on the Web site—the comprehensive Perl archive network (CPAN).
At http://search.cpan.org we can look for the modules. Ah, the pain. There must be at least 20,195 hits to the search for perl-Tk on the CPAN site. Which one do we want? Oh, I guess I am specifying the wrong format, I need to speak perl module syntax—but forgot my phrase book. Let's try ::Tk and see what we get. This narrows it down to only 520 hits. Forget that.
Next let's try a Google search for perl-Tk. This comes up with http://www.perltk.org/binaries/index.htm as one of the hits. Success! We have finally located some Red Hat–compatible RPM packages, even though they are for Red Hat release 7.0. It will have to do.
The perl-XML-Simple module is available off the SI site, but the note says there is no guarantee that it will install on our system. Let's settle on using that one, because we are tired of grunging around the Internet, looking for the right pieces. This could be a little easier for first-time users, couldn't it?
Everything has to be properly installed, in the correct order. On my system, the perl-DBI package was already installed. Installing the dependencies yields
# rpm -ivh perl-AppConfig-1.55-1.7.3.noarch.rpm
        perl-Tk-800.024-2.i386.rpm
        perl-XML-Simple-1.08-1.noarch.rpm
Preparing... ################################## [100%]
   1:perl-XML-Simple ########################## [ 33%]
   2:perl-AppConfig ########################### [ 67%]
   3:perl-Tk ################################## [100%]
I have found it somewhat easier to install the dependencies separately from the rest of the packages. Don't forget to include the systemconfigurator package, because it is a dependency for the rest of the SI packages. Deal with any package dependencies, ordering, or version issues before continuing with the installation.
Once we have all of the packages and understand the dependencies, we can complete the installation of the proper SI pieces at the top of the dependency tree. Installing the actual systemimager and systemconfigurator packages goes smoothly, once the dependencies are in place:
# rpm -ivh system*.rpm
Preparing... ##################################### [100%]
   1:systemconfigurator ########################## [ 25%]
   2:systemimager-common ######################### [ 50%]
   3:systemimager-i386boot-standard ############## [ 75%]
   4:systemimager-server ######################### [100%]
On the client we install the client and common RPMs (along with dependencies), and on the server we install common, server, and the i386boot-standard packages (along with dependencies). If, for some reason, you want to capture the server (for example, to clone it to an identical system), you will need to install all the packages to make it both a client and a server.
Once we have all the necessary packages and have slogged through at least one attempt, SI installation is easy. (Once you know how to do something, knowing how to do it is easy.) I actually create three directories that contain all the necessary pieces: SiClient-<version>, SiServer-<version>, and SiClientServer-<version>. In this way, I don't have to think about the installation dependencies; I can just change to the proper directory and perform
# rpm -ivh *.rpm
I also make sure that I have the directories backed up and included in my CD-ROM-based cluster tool kit. I don't want to have to go through the whole package and dependency discovery process “on-site” during a cluster installation.
Let me state right here: The work necessary to get SI installed is well worth it. It is my tool of choice when it comes to cluster installation. Hopefully the information about satisfying dependencies will get you over the initial frustration of dealing with this wonderful tool.
Before we close the section on installing SI, there is one more dependency that you may encounter (yes, I know it seems like there is always one more). In Itanium installations, there is a special version of TFTP that must be installed for proper operation. This package is tftp-hpa and may be found at http://rpmfind.net or at http://www.kernel.org.
The SI software, once loaded, has components in several system locations: /etc/systemimager, /var/lib/systemimager, and /usr/lib/systemimager. Configuration files are placed in /etc/systemimager to control the behavior of the software, including a special configuration file for rsyncd. Log files are created under the /var/log/systemimager directory, but no logrotate configuration is installed, so you need to provide that file yourself.
Documentation packages are available in the /usr/share/doc/systemimager-client-<version> and /usr/share/doc/systemimager-server-<version> directories. As of this writing, the most recent value for <version>” is 3.0.1. Manuals for the software are available in PDF or HTML format at http://systemimager.org/documentation, and they are quite good.
TIP
Plan on storing SI images on an external file system that has at least 2 GB available for every expected image. The actual size will depend on the number of revisions you keep and the operating system footprint of the systems being imaged.
The manuals cover all the possible options in the configuration files in /etc/systemimager, including settings in client.conf, rsyncd.conf, systemimager.conf, and updateclient.local.exclude. The last file is important, because it contains a list of files not to update on client systems when using the updateclient command. This prevents altering system information, like device files, that may be client specific.
A brief note about the /etc/rsyncd.conf file. This configuration file is automatically generated as image information is added to the server. The information for the file is kept in the rsync_stubs directory and is used by the mkrsyncd_conf command. If the SI server seems to know about image or override directories that don't exist, you have probably gotten this information out of “sync.” Always use rmimage to remove images from the SI server; it keeps the data properly up-to-date. (Although I do not cover the details here, clients that share a common structure with only some differences may apply an “override” directory to the installation to create the unique content. See the SI manual for details about using this feature.)
Probably the most important directory, from the standpoint of local server hardware and storage configuration choices, is the /var/lib/systemimager directory. There is a subdirectory, called images, under /var/lib/systemimager that contains the system image “trees” from the systems that you wish to clone. This directory can grow to be quite large, exhausting even the largest /var partition you might create on the imaging server.
I usually end up linking this directory to an external storage device that has the space to contain the multiple tens of gigabytes of image data. This involves creating an image directory somewhere else, moving the README, ACHTUNG, CUIDADO, and DO_NOT_TOUCH_THESE_DIRECTORIES files (containing warnings about messing with the images) to that directory, then replacing the /var/lib/systemimager/images directory with a soft link to the new location.
Now that we have the SI server software installed, we need to configure the start-up links, enable the service, and start it:
# chkconfig --add systemimager
# chkconfig systemimager on
# service systemimager start
This will start the rsync service as a daemon, using the custom configuration file in the /etc/systemimager directory. After the daemon is started, the SI client systems may open connections to it.
You need to consider the security issues involved with running the daemon carefully. Constrain the rsync activities to the management network, limit the client access with TCP wrappers, or otherwise ensure that a random system may not access the rsync daemon. It is also possible to use SSH as the installation transport, but that currently requires special modifications to SI components.
The installation of the systemimager-i386boot-standard-<version> package (or the other possible boot support packages) will place information in /usr/share/systemimager/boot/<arch>/standard, which contains the files necessary to support network booting and installation with the SI software. In this case, the <arch> component of the directory name is i386. There is support available for ia64 and other architectures as well.
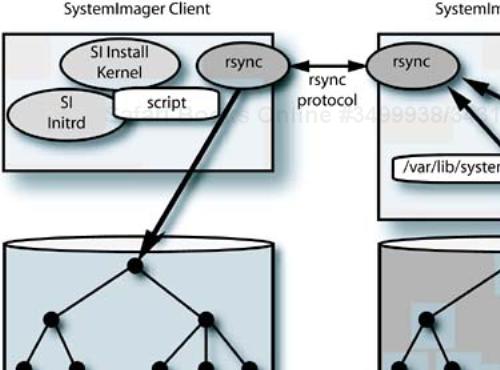
The network boot support directory contains files named kernel, initrd.img, boel_binaries.tar.gz, and config. The first three files need to be placed into the /tftpboot directory on the DHCP server, as shown in the pxelinux example in Figure 12-3 on page 340. This assumes that you will be using pxelinux to boot things other than SI. If this is not the case, then you can use the default SI boot configuration and information, which is in /etc/systemimager/pxelinux.cfg. The components of the SI cold-installation environment are shown in Figure 13-1.
The file config is the configuration information used to build the SI boot kernel, so you can produce your own boot kernel if necessary. If you are familiar with this process, then substituting the SI configuration information into the build, and rebuilding a kernel, is a trivial process. I do not cover how to do this here.
We can examine the contents of the boel_binaries.tar.gz file with
# tar tvzf boel_binaries.tar.gz
This shows a list of files, relative to the file system root, that are made available to the SI install kernel at boot time. This takes care of making resources like commands and kernel modules available to a boot environment that does not have everything included in the initial configuration. If we once again practice our skills at taking an initrd file apart we will find a slightly different structure than that with which we are accustomed, however, following the information in /etc/inittab, we can locate the start-up script in /etc/init.d/rcS. (We know that the first program to be executed at system start-up is init. This usually, but not always, makes /etc/inittab the center of initial system activity.) This is fairly involved, and I won't go deeper into it at this point. If you are willing to explore, you can use this as an example of how to create your own custom installation environment.
# cp initrd.img /tmp
# cd /tmp
# gunzip < initrd.img >initrd
# losetup /dev/loop0 initrd
# mkdir image
# mount -o loop /dev/loop0 image
The kernel, once loaded into memory by the bootloader and activated, will load its binary package, install it in the RAM disk, and continue with the installation process. This involves preparing the disk partitions and then using rsync to replicate the directory tree from the SI server to the local disk. Once the installation completes, the system is rebooted to its new configuration.
The installation process is guided by a system-specific script that is loaded from the SI server. The /var/lib/systemimager/scripts directory contains the scripts that may be shared between groups of identical systems by (you may have guessed it) creating soft links. We will look at the contents of a client script in an upcoming section. First we need to install the client software and capture an image.
A number of useful server-side commands are available with SI. Some of them are listed in Table 13-1.
Table 13-1. Some SI Server-side Commands
Command Name | Description |
|---|---|
| Capture a system image from a golden client |
| Update a client's image by synchronizing files or reinstalling |
| Create an |
| Create a DHCP server configuration from network parameters |
| Create a DHCP server configuration file from dynamically leased IP addresses |
Once you have an SI server installed, configured, and started, it is time to prepare for capturing your first client image. Obviously you need to install the operating system software and configure the system for proper operation before capturing the image. Remember, anything that is on the “golden” system will be replicated on each of its clones—this includes good things as well as bad.
An example client software installation (after the dependencies) is
# rpm -ivh system*.rpm
Preparing... ##################################### [100%]
   1:systemconfigurator ########################## [ 33%]
   2:systemimager-common ######################### [ 67%]
   3:systemimager-client ######################### [100%]
This has installed a number of commands on the client, including prepareclient, updateclient, and lsimage.
The prepareclient command performs the local operations necessary for the SI server to take a snapshot of the local system's disk format and contents. Running the command will make some modifications to the client, which are reversed once the image is captured. Check the man page for prepareclient, and the SI manual for complete details on using the command.
The updateclient command will perform a “pull” update from the SI server of only the changes to the client's image tree that have occurred since the system was imaged or last updated. I discuss this command in more depth in an upcoming section.
One way of testing the client-to-server connection for SI is to use the lsimage command from the client to connect to the rsync daemon on the server. This will list the available images:
# lsimage -server ns2
-------------------
Available image(s):
-------------------
As we might expect, there are no “captured” images yet, so none show up in the list. This command does not accomplish much at this stage of the installation, besides verifying that the local system can connect to the SI server.
Executing prepareclient will create the necessary information on your client, start the local rsync daemon, and wait for the SI server to issue a getimage command to copy the client's information. Two files are placed into a “known location”—that is, /etc/systemimager—so that the SI server can find them in its local image directory. The files include mounted_filesystems, which contains the following information for the example client:
/dev/hda2 on / type ext3 (rw)
none on /proc type proc (rw)
none on /dev/pts type devpts (rw,gid=5,mode=620)
usbdevfs on /proc/bus/usb type usbdevfs (rw)
/dev/hda1 on /boot type ext3 (rw)
none on /dev/shm type tmpfs (rw)
Additionally, a file named autoinstallscript.conf is created, which contains local partition information (in XML format):
<!-- This file contains partition information about the disks on your golden client. It is stored here in a generic format that is used by yourSystemImager server to create an autoinstall script for cloning this system. You can
The next step is to go to the SI server and issue a getimage command:
# getimage -golden-client cs01 -image cs01_20040316
      -ip-assignment dhcp -post-install reboot
      -exclude '/scratchdir/*'
The options to this command first assign the name cs01_20040316 to the image being collected, use DHCP as the address assignment method, cause the client to reboot automatically when the installation terminates, and exclude the directory contents of /scratchdir from the image, but include the empty directory. We are now prompted to make sure that we wish to continue. The message output is
This program will get the "cs01_20040316" system image from "cs01"making the assumption
The next message is
Retrieving /etc/systemimager/mounted_filesystems from cs01 to check for mounted filesystems...
------ cs01 mounted_filesystems RETRIEVAL PROGRESS ---------
receiving file list ... done
/var/lib/systemimager/images/cs01_20040316/etc/systemimager/mounted_filesystems
wrote 132 bytes  read 709 bytes  560.67 bytes/sec
total size is 595  speedup is 0.71
------ cs01 mounted_filesystems RETRIEVAL FINISHED ---------
Retrieving image cs01_20040316 from cs01
------ cs01_20040316 IMAGE RETRIEVAL PROGRESS ----------
There is a pause in activity while the rsync daemon calculates the information it needs to do the transfers. During this time, there is some content under the SI image directory. Indeed, the /etc/systemimager directory is the first location fetched for the client-specific information underneath it.
Once the rsync calculations are completed and the imaging begins, you will see all the file names flying by on the screen, unless you selected the -no-listing option to getimage. After debugging is completed, specifying -no-listing speeds up the imaging process by not printing the file paths being received to stdout. The -quiet option will suppress questions (like “Overwrite existing image on the server?”), but will report errors if they occur.
Although it is tedious, you should watch the files being saved to the image. You may notice all kinds of things being put into the image that you will want to remove in the next iteration. The absolute first time you get an image from the golden client, just treat it as a learning and debugging experience. It is unlikely that you will keep the first image's configuration without additional trimming of the software footprint.
You will learn about /usr/lib/local, /usr/share, and other system directories with contents that your compute slice will probably not need. Remember a small compute slice system footprint is your goal! Every 100 MB of size you save is one second on a GbE link. You can use the -exclude option to exclude a single location (in a variety of ways) or to read the excluded locations from a file with -exclude-file <file-with-list>. However you trim things from the system tree, you will eventually see the messages
wrote 1438312 bytes read 2118609960 bytes 1047195.99 bytes/sec
total size is 2112589544  speedup is 1.00
------ ns1_20040316 IMAGE RETRIEVAL FINISHED -------------

Press <Enter> to continue...
Would you like to run the "addclients" utility now?(y/[n]): y
Proceeding on to the addclients utility allows you to link the system name (or a set of system names following a convention) to the proper installation script in the /var/lib/systemimager/scripts directory. In this case, we are specifying only one system in the range, which will create a single link. It is also possible to create the links manually if they are “sparse.”
addclients -- Section 1 (hostname information) ------------------------------------------------------------ The next series of questions will be used to create a range of hostnames.You will be asked
We've created the autoinstall script, and there is now a link named ns1 pointing to it. This is the installation behavior that will be applied to the ns1 client when it boots the SI install kernel.
addclients -- Section 2 (soft links to master script)
--------------------------------------------------------------
Would you like me to create soft links to a "master" script so that hosts:

ns1 through ns1

can be autoinstalled with that image? ([y]/n): y
Here is a list of available autoinstall scripts:

ns1_20040316

Which script would you like these hosts to be installed with?
[ns1_20040316]:

Your soft links have been created.
Press <Enter> to continue...
Okay, now the installation process wants to run addclients. Because we already have DNS working, let's skip this operation.
addclients --Section 3(adding or modifying /etc/hosts entries) -------------------------------------------------------------- Your target machines need to be able to determine their host names from their IP addresses
There is now a master script in the /var/lib/systemimager/scripts directory named ns1_20040316.master, after the name of the image. There is a single soft link in that directory named ns1, after the system's host name, pointing to the master script. This is how SI automatically maps the installation behavior to a particular image for a particular system. Simple and elegant.
If you examine the master script, you will see that it runs under the memory-based install kernel. Environment variables are passed from the memory-based kernel's start-up script via a file: /tmp/variables.txt. The script will install kernel modules for the disk devices, partition the disks, create and mount the file systems, and will then “fill” the disk with the image contents from the SI server using rsync.
Once the image tree is installed to the local disk, the master script invokes SystemConfigurator to configure the local system's network interfaces. The commands to SystemConfigurator are read right from the body of the master script, and are contained in a shell “here document” (between the EOL markers in the following example excerpt). You can find the documentation for the possible commands at http://sisuite.org/systemconfig/man/systemconfig.conf.html. The portion of the master script for our example system is
### BEGIN systemconfigurator ###
# Configure the client's hardware, network interface, and boot
# loader.
chroot /a/ systemconfigurator --configsi --stdin <<EOL || shellout

[NETWORK]
HOSTNAME = $HOSTNAME
DOMAINNAME = $DOMAINNAME

[INTERFACE0]
DEVICE = eth0
TYPE = dhcp
EOL
### END systemconfigurator ###
This is where you can perform more complicated initialization of network and system parameters by editing the script. The [INTERFACE0] block is always the default gateway interface, but otherwise there is no mapping between the [INTERFACE<N>] blocks and the actual ordering of the interfaces (it took quite a while to figure this out).
When all actions are completed, the system will then will either spin and beep until re-booted, automatically reboot, or halt—based on the choice made with the -post-install <action> option. Let's chose reboot for the action, so the system will automatically reboot when the installation completes. These behaviors are built into the master script, so to change the option requires regenerating the master script, editing it, or using mkautoinstallscript.
One note, based on experience with systems that have multiple network interfaces, and several possible modules to drive the interface, is in order here. The SystemConfigurator portion of the SI software has its own database that maps the VendorID:CardID returned from the PCI hardware scan to the proper kernel module containing the driver. I have seen the wrong driver installed in some cases. Although the documentation tantalizingly mentions the ability to use an “order” directive in the [HARDWARE] section to force the order of the driver loading, this did not solve the problem that I encountered.
To override the SystemConfigurator choice of driver for a particular VendorID:-CardID pair, you need to place a file named hardware.lst underneath etc/systemconfig in the client image tree to force the proper mapping. The VendorID:CardID information may be found in the distribution's /etc/sysconfig/hwconf file, which is produced by the hardware scanning utility kudzu at system boot time. The kudzu tool uses the databases in /usr/share/hwdata to look up the proper driver for the hardware.
These are both four-digit hexidecimal numbers—for example, 14E4:1645 for the Broadcom GbE hardware used in the particular Hewlett-Packard rx2600 Itanium 2 systems we were using. The etc/systemconfig/hardware.list file in the image tree contains lines like this example:
#VendorID  CardID   Type        Module
14E4       1645     ethernet    tg3
The sketchy information about this configuration file is contained in the man page at http://sisuite.org/systemconfig/man/systemconfigurator.html. This specific example occurred on a cluster I helped build that was headed for Qatar (during the War in Iraq). We lost about a day's time locating the problem and reverse-engineering this information. Use the information wisely.
The SI server is properly configured and functioning, there are images resident on the server, and we have blank-slate compute slices to install. In our example pxelinux environment, we can follow these steps to install a compute slice.
Reboot the system.
Hold down the
CtrlandAltkeys together to activatepxelinux.Type
linux.sito theboot:prompt frompxelinux.Confirm the installation.
Do the next client, repeating these steps.
These steps require connecting to the console of each system. There is another way to “fire off” client installations, without interacting with the console. We can use our old friend SSH and the updateclient command:
# ssh ns2
Last login: Tue Mar 16 21:38:03 2004 from ns1.cluster.local
# updateclient -server ns1 -image ns2_20040316
       -autoinstall -reboot
This will move the SI boot kernel and initrd into place on the client and will reboot into the installation process. No boot media or console interactions are necessary with the client, as long as it is accessible via the network and has a “live” operating system on it. It is also possible to use the pdsh command to do the same operation on multiple nodes at the same time:
# pdsh -w cs[01-24] updateclient -server ns1
      -image cs_20040316 -autoinstall -reboot
Clients may also be installed from an SI boot floppy created with mkautoinstall-diskette or a boot CD-ROM created with mkautoinstallcd, in case the client system does not support PXE, BOOTP, or DHCP booting.
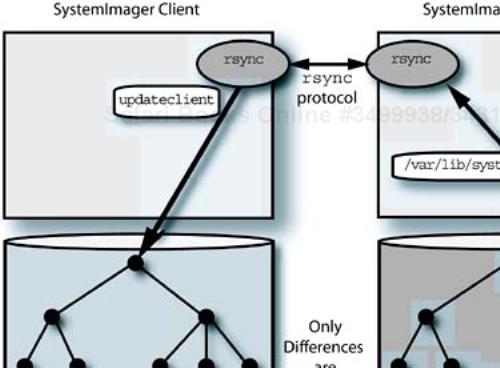
Using the rsync as the central update engine in SI allows some very powerful system administration processes. The rsync daemon detects any files on the client that are out of date with respect to a reference tree and updates them, without reinstalling the whole tree. Only the differences are transferred between the reference tree and the client tree.
This means that for most minor changes to the client systems—that is, changes that don't involve disk partition structure—the SI server's use of rsync allows the clients to synchronize with the server's image without copying any more data than necessary. The proper form of the SI updateclient command is all that is needed. This is shown in Figure 13-2.
In practice, this means you can update the <image-directory>/etc/hosts file relative to a stored image tree on the SI server, say with the file's full path being /var/lib/systemimager/images/ns1_20040316/etc/hosts, then cause the clients to “pull” the update from the server to the local file. Again, we can use SSH or, better yet, PDSH to cause the clients to update themselves:
# pdsh -w cs[01-29] updateclient -server ns1
      -image ns2_20040316
In the event of a major change, say the update of a large software package, the update may be performed to the golden client, the image recaptured (it will update the image stored on the server), and then pulled to all clients. We can write scripts to detect the clients linked to a particular image by looking at the links in the /var/lib/systemimager/images directory, and perform the update.
Although SI is very flexible, it does not implement or enforce any system administration practices or processes. It is up to us to decide how to use the tool and what features to use. As you can see from some of the examples so far, it is important to have naming conventions for the systems in the cluster to help differentiate between the various classes of systems.
It is also important to have a naming convention for the system images that are maintained for the SI clients, and a versioning scheme to make sure that we can track changes to images. It is entirely possible to push an out-of-date or experimental image to the cluster, and to wreak havoc with the users and their applications. For this reason, I strongly suggest that you have a naming convention that identifies the target type of system, a class (production, experimental, obsolete, and so on), and a date string as part of the image name.
This, of course, means more typing when you execute SI commands, but it will save putting the right image in the wrong place, or at least reduce the chances. An example image name might be, ComputeSlice-Experimental-Version01-20040627. There is nothing to stop you from being as verbose as strikes your fancy with image names.
Before we finish with this introduction to SI, I should mention one other procedure that may save a lot of time, but is not necessarily obvious: How to deal with gathering the MAC addresses necessary to use DHCP in the cluster. We could call this the big MAC debacle, because each system may have as many as three MAC addresses (associated with data, management, and HSI network connections) for us to gather and manage in the DHCP server configuration file.
This is a lot of tedious, error-prone hand copying of multiple-digit hexidecimal numbers, followed by a lot of typing. We all have better things to do with our time. Several of the SI tools, notably mkdhcpserver and mkdhcpstatic can help with this task.
The process, in theory, follows these steps:
Generate a dynamic DHCP configuration for the networks with
mkdhcpserver.Configure the DHCP server to have a long lease time, so that once a dynamic address is assigned to a client, it will remain in use for several days.
Boot the cluster's systems in the order that you want IP addresses assigned from the pools.
Verify that the current client has the appropriate address assigned before moving to the next client.
When all clients are booted, run the
mkdhcpstaticcommand, which will take all assigned IP and MAC information and modify the DHCP configuration file to contain the static MAC-to-IP address mapping.
Now, in practice, it may not be easy to get all systems booted properly and assigned the correct IP addresses, but the “theoretical” process can still help save a lot of collecting and typing of MAC addresses. This works better in smaller, less complex clusters.
SystemImager is a very powerful tool that can help with the installation and system administration of a cluster's software. In this section we examined a representative section of the SI functionality, but there is still more to learn. Even with concrete examples, as provided here, the specific configuration and adaptation of SI to your cluster's environment and your system administration practices will take time.
Practical experience with SI in large clusters tells us that there are potential scaling issues with the network, the SI server, the disk subsystems on the servers and clients, and the file systems used for storing the images. All these issues may be addressed to the best of Linux's ability, and the SI approach still may not scale well beyond about 500 to 700 systems, and this number will require multiple servers. There is ongoing research into the area of multicasting and other special techniques to break through the scaling barriers.
The following is an overview of details relating to several of the SI server performance issues that were just mentioned.
Network performance—. The
SIserver needs to have the network bandwidth to handle multiple client installations at the same time. The theoretical maximum for a GbE link is 125 MB/s. Network bonding can provide additional scaling, but only if the switching equipment can handle it.Server disk performance—. If the network link out of the system represents one bottleneck, then the ability to feed data from the image storage file system to the network can also limit the number of clients that an
SIserver can feed. RAID 5 disk storage is immune to failure, is cheaper than striped (RAID 0) file systems, but does not perform well for writes. The image installation process can be primarily reads (read-mostly), so the capture of images may be the major issue.Server I/O performance—. Using high-performance disks in an
SIserver can help performance, but the number of I/O channels and their maximum bandwidth are important to keeping the client systems “fed” with outgoing data. Striping across multiple devices and multiple I/O channels can keep the back-end storage from becoming a bottleneck. If hardware RAID is in use, multiple SCSI or Fibre-Channel interfaces may be necessary to remove single-channel I/O bottlenecks.Server memory configuration—. The
SIserver needs a substantial amount of memory to allow caching of disk information destined for clients. The time offset between clients' access to a given file can mean that the page cache is not able to keep the data long enough to prevent physical reads for multiple installation streams.File system configuration—. The more images you keep on the back-end file system, the larger the requirement for storage and meta-data, like inodes. It is quite common to get file system “full” error messages during image capture, even when there appears to be substantial free space within the file system. Check the inode information with
dumpe2fs -h<device>to determine whether the file system is out of free inodes. It is extremely painful to have to unload multigigabytes of image data, rebuild the file system with more inodes, then restore the images.Dedicated resources—. The amount of RAM, CPU, and I/O necessary during the installation of multiple clients makes the server unsuitable for other activities without destructive interference with services that share the system. Care is required to ensure that the
SIactivities do not impact clusterwide performance.
These issues have more to do with the configuration of the server used to run SI, than with the software itself. You should treat these issues as design recommendations, intended more as suggestions to help you avoid performance issues, than as criticism of SI itself. I think that SI is currently the best choice for a network-based cluster system installation tool, especially if you want something that is ready to use and has been proved to work with multiple architectures.
Some of the installation server scaling issues discussed in the last section are the result of the nature of cloning multiple nodes at the same time, by simultaneously streaming separate image data to every node. The same scaling issues affect package-based installation methods, resulting from multiple systems accessing the package repository on the server.
If we were able to send a single data stream to all nodes being installed, as if it were being broadcast, it would reduce the load on the installation server to approximately that of one system being installed. Broadcasting, however, will flood frames to every switch port in the network, regardless of whether a system needs the data. Casting about for solutions, we find there is a better answer: multicasting.
Multicasting is a one-to-many data transmission scheme, but unlike the recipients of a broadcast, a multicast client specifically subscribes to a multicast group to receive the multicast traffic for that group. (Actually, systems that are not recipients of the multicast traffic may send data “into” the multicast group. They cannot, however, receive any data out of it until they register their interface with the multicast group.) With multicasting, we have the one-to-many benefits of a broadcast, but with the ability for the client to determine which data streams it sees. Switches that are multicast capable will make the multicast data available to all LAN segments that have a subscribed client. Care must be taken not to eradicate the performance gains that switching equipment gave us by controlling broadcast traffic flooding to switch ports.
There are protocols like the Internet Group Management Protocol (IGMP), the Generic Attribute Registration Protocol (GARP), and the GARP Multicast Registration Protocol (GMRP; built on top of GARP) that attempt to control the flooding of multicast information to all ports on a switch. Simply put, these protocols allow clients to tell switching equipment to which ports to send multicast traffic based on entries in the switch's filtering tables. The level of support for these features is network interface and switch dependent.
Multicast data is transported by the TCP/UDP layer; it is not a connection-oriented stream like the TCP/IP transport. Multicast data may have greater scope than the local LAN (segment or switch domain), and the “time to live” (TTL) values in the packets determine how “far” the data is allowed to travel. Switches and routers that are multicast capable look at the TTL value to determine whether to forward the packet. Scoping values for TTL are listed in Table 13-2.
Table 13-2. Multicast Scoping Based on TTL Values
TTL Value | Multicast Datagram Scope |
|---|---|
0 | Local host only, not transmitted |
1 | Local subnet only, not forwarded |
2–32 | Same site, organization, or department |
33–64 | Same region |
65–128 | Same continent |
129–255 | Unrestricted |
In our discussion in Chapter 5 about IP addressing, we showed some of the fixed TCP/IP address formats (classes A, B, and C) that are commonly used, along with subnetting and supernetting examples with the associated net masks. The address format reserved for multicasting is a “class D,” in which the first 4 bits of the 32-bit IP address are 1110. This scheme has no “network” and “host” portions; instead, there is the 4-bit portion necessary to identify a class D address, followed by a 28-bit multicast group identifier.
Figure 13-3 shows the class D address range for multicast groups, along with the net mask format and two reserved address ranges. The first reserved address range is for local use. For example, all hosts subscribe to the all hosts address 224.0.0.1 when they initialize multicast-capable interfaces. If you ping that address, you will get a reply from every multicast-capable interface connected to the LAN. Linux systems are fully multicast capable. Other addresses in this range include the all routers address, 224.0.0.2, and addresses belonging to several other classes of devices.
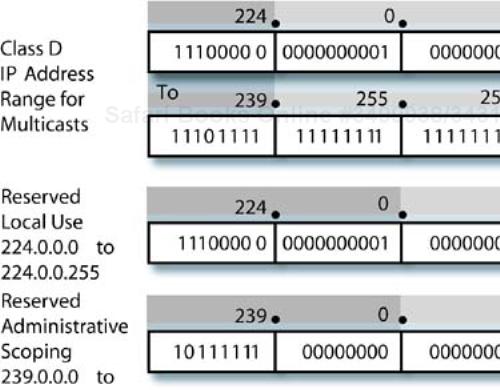
The address range reserved for “administrative scoping” allows determining scope in more flexible ways than the TTL values. Switching and routing equipment may be configured to contain multicast packets and frames with “administrative scope” addresses to specific zones. There are protocols, like the Multicast Scope Zone Announcement Protocol (MZAP), that handle sharing zone information among network devices. Thankfully, this is all I'll mention about this topic here.
Once they reach their target LAN segment, IP multicast addresses must be converted to MAC addresses by the network equipment for delivery to Ethernet interfaces. One little issue needs to be resolved: What is the correct destination MAC address (because there are potentially multiple target MAC addresses and this is not a broadcast frame)? There is a formula for converting the incoming multicast group address to a local MAC address: The first 24 bits of the MAC address are set to 0x01005E, the next bit is a 0, and the last 23 bits of the multicast address are copied to the last 23 bits of the multicast MAC address.
This is the pattern that local Ethernet interfaces detect if they are registered to the associated multicast group. As an example, let's use a multicast group address of 230.3.2.1 as the destination multicast group. The destination MAC address would be 0x01005E-030201.
Now that we have some of the basic information about the mechanics of multicasting out of the way, we can move to more practical matters. What can we do with multicasting, and how do we do it? Fortunately, there is an available open-source implementation of multicast sender and receiver software that may be useful in crafting multicast installation tools. (As a matter of fact, the administrators at the PNNL have reportedly modified SystemImager to use a multicast approach for their cluster. The work is available in NWLinux, compiled for Itanium 2 systems, from their Web site at http://www.emsl.pnl.gov/nwlinux. I don't know if they used the particular software I am using as an example.) This software is udpcast, available from http://udpcast.linux.lu.
The udpcast package consists of a sender program (/usr/sbin/udp-sender), a receiver program (/usr/sbin/udp-receiver), and /usr/lib/udpcast/makeImage, which takes files from a template under /usr/lib/udpcast/templ and creates an initrd file. There are manual pages installed for the sender and receiver components.
By installing the kernel-udpcast package, you also get a prebuilt kernel (/boot/vmlinuz-2.4.25-udpcast) and a matching set of kernel modules under /lib/modules/2.4.25-udpcast. When you install both RPMs, you get a do-it-yourself kit that allows you to build bootable environments that use the multicast software on your hardware to do one-to-many system installations. The boot kernel environment needs to have its driver components tailored for your target hardware, unless you use another framework for booting (more on this in a short while).
The udp-sender and udp-receiver commands may be used on the command line or as part of the bootable environment. In the simplest case, data from a file (or stdin) may be sent from the udp-sender to one or more waiting udp-receiver programs over a multicast “channel.” This has usefulness that is not just limited to installation. Any data that needs to be sent to multiple systems in parallel is a candidate for this method.
Let's test the udp-sender and udp-receiver software in a simple command-line example. On the multicast “client,” I used the -p option to pipe the output of the receiver to the standard input of the tar command. The multicast data will be received by udp-receiver, decompressed and unpacked by tar, and written to the local disk. The receiver gets started and will wait for the incoming data from the sender, which we run here:
# udp-receiver -log /tmp/multi.log -p "tar xvzf -"
Udp-receiver 2004-02-22
Compressed UDP receiver for (stdout) at 192.168.0.109 on eth0
received message, cap=00000019
Connected as #0 to 192.168.0.110
Listening to multicast on 232.168.0.110
Press any key to start receiving data!
root/.ssh/     10 240  (  8.32 Mbps) 73 709 551 615
root/.ssh/known_hosts
root/.ssh/id_dsa
root/.ssh/id_dsa.pub
root/.ssh/authorized_keys2
bytes=         10 240  (  0.16 Mbps) 73 709 551 615
Transfer complete.
The output on the receiver side is
# tar cvzf - /root/.ssh | udp-sender
Udp-sender 2004-02-22
Using mcast address 232.168.0.110
UDP sender for (stdin) at 192.168.0.110 on eth0
Broadcasting control to 192.168.0.255
New connection from 192.168.0.109  (#0) 00000019
Ready. Press any key to start sending data.
tar: Removing leading / from member names
root/.ssh/
root/.ssh/known_hosts
root/.ssh/id_dsa
root/.ssh/id_dsa.pub
root/.ssh/authorized_keys2
Starting transfer: 00000019
bytes=         10 240 re-xmits=000000 (  0.0%) slice=0202  73 709 551 615 -   0
Transfer complete.
Disconnecting #0 (192.168.0.109)
Notice that I made a “boo-boo” in this example. I sent the /root/.ssh SSH keys, which are the identity of one root account on a specific system, to all the multicast receivers. Darn. Now I have to regenerate all the root DSA keys. So much for creative demonstrations.
These multicast tools have a number of options that are quite useful, including the ability for the sender to group UDP packets into “slices” and ensure that all clients have successfully received the whole slice before continuing on. There are forward error correction (FEC) packets sent with each slice, and the size of the “slice” and number of FEC packets can be configured. The maximum transmit bit rate may also be controlled to keep from overrunning slower network equipment.
If we wanted to implement a system installation tool based on udpcast, how would it function? One approach might be to use the SystemImager boot and capture framework, and add udpcast as an optional replacement for the rsync installation. How would we package the data sent to the clients?
Our first instinct might be to use a tool, like tar, to save a tree, compress it, and send it to the clients, for whom the archive stream would be unpacked in real time to the disk, as in our simple previous example. Something would need to prepare the disk partitions on the client, just like SI and its bootable kernel and scripting, prior to installing the file system contents. It turns out that as a cluster gets larger, the differences in the disk access times across systems can cause the installation to fail using this method. We want to do something that scales.
A better approach might be to send either a prepackaged, compressed “tar ball” or to create the archive on the fly from the local system image. The multicast receivers would stuff the compressed archive into a RAM disk and unpack it to the local disk only when the whole archive is received. In this way nobody has to wait for retries as a result of disk timing issues. The issue then becomes the size of the compressed image archive versus the size of the available RAM disk on the installation clients. Keeping the image small and compressed addresses the memory issues.
We should consider using SI commands and as much of the existing infrastructure to capture the image tree from the golden client, and to manage the images on the server. This model would entail just using the udpcast tools to perform the initial multicast installation of the clients from the image tree. In other words, we should add multicasting as an option to the existing behavior of SI to minimize the amount of development work needed to get “on the air” (on the ether?) with a multicast solution.
After handling the boot modifications, one remaining issue is the synchronization of the sender and the receivers. The sender should wait until all the receivers are ready before launching into its multicast conversation. The udp-sender program has facilities to support this by waiting for a predetermined minimum number of clients to connect before proceeding, or for a period of time. There also are controls over how long to wait for all clients to connect, and how long to wait after all clients have connected.
Let's run some experiments with the udpcast software from the command line to determine some of the possibilities for time savings. We will also get some experience with using the options to the sender and receiver commands.
In this example, let's send to only two clients and create a compressed archive file from the SI image tree on the fly. We are also specifying some FEC and a maximum bit rate that is 90% of the local 100baseTx switched network's maximum throughput:
# cd /var/lib/systemimager/images/ns1_20040316
# tar czf - * | udp-sender --full-duplex --nokbd
      --min-clients 2 --max-bitrate 90m --fec 8x8
Udp-sender 2004-02-22
Using mcast address 232.168.0.110
UDP sender for (stdin) at 192.168.0.110 on eth0
Broadcasting control to 192.168.0.255
[ ... output deleted ... ]
Transfer complete.
Disconnecting #0 (192.168.0.109)
One of the issues with this approach is that the efficiency is limited by the back-end speed of reading the directory tree (and lots of little files) from a software RAID 5 device, creating the archive blocks, compressing the blocks, then piping them to udp-sender, which transmits the data as packets. We find that the transfer of the image data takes roughly 30 minutes for a tree captured from a full Fedora installation (@ everything). We used the following receiver command once the sender was started:
# udp-receiver --nokbd --nosync --file /tmp/localarchive.tbz
The image tree is roughly 2,342,828,000 bytes (2.2 GB), and the network throughput observed was roughly 1.3 MB/s average, substantially below the capabilities of 100base-TX (theoretical, 12.5 MB/s). The numbers work out if you divide the size by the data rate: The transfer time is 30 minutes. I watched carefully and saw that the network data rate improved markedly when a large file was transferred. It kept the “channel” from the server's disk to the client busier.
A more efficient approach might be to produce the compressed archive from the tree and send that. It is a smaller amount of data to send (773,051,480 bytes or 737 MB), and the compute bottleneck is moved away from the on-the-fly archive creation. This transfer completed in three minutes at just more than 4.1 MB/s. We have to conclude that distributing a precompressed archive is the route to take.
Looking at the sender output from your test, you might notice that there are a substantial number of retransmissions, probably because of data overruns in the switch path. Note that some vendor's switches do not buffer UDP traffic if they get congested. They throw it away. By using the --max-bitrate option on the sender, you can determine the maximum transmission rate without retries and limit the data rate to this value or less.
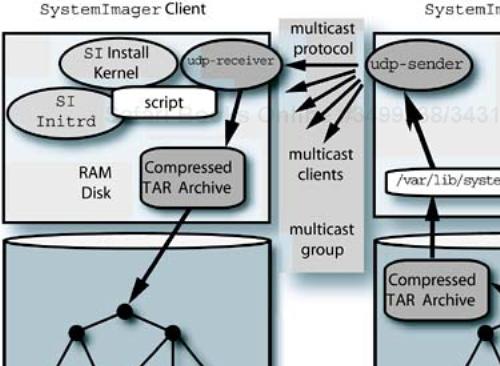
We have tested the udpcast software on the command line and liked what we saw. Now how do we put what we know about initrd files, booting, and the udpcast tools to work? First we decide on an architecture for our installation tool using multicast. We want the individual system to
Set up a large RAM disk to hold a compressed
tararchive containing a system imageUse the
SImaster script to prepare the partition information on the diskRun the multicast receiver from the master script to get the compressed
tararchive into the RAM diskExecute
tarto unpack the archive to the disk, instead of thersynccommand, when the receiver finishesReboot the system to its new configuration
The multicast sender needs to be waiting for the client systems to connect as they boot. We will start the sender, then boot the individual clients to be installed. A diagram of this is shown in Figure 13-4.
We need to start somewhere and with some minimal debugging capability to track the software's actions. Let's set up a separate boot for a test client, boot a system, execute a shell, and look at the memory-based environment. Steps involved in this are as follows.
Copy an existing master script. Make a copy of an existing
SImaster installation script in the/var/lib/systemimager/scriptsdirectory and create a soft link to it, named with a test system's host name and a.shextension—for example,testsys.sh.Edit the master script. Delete everything in the copy of the master script that you just linked, below the comment line that says
### BEGIN Stop RAID devices before partitioning begins ###
Add an escape to a shell in the master script. There is a function defined in the master script named
shelloutthat is intended to exit the master script and execute a command shell when an error occurs during normal operation. Let's use this to “take a look around” once the installation kernel is booted. Add a line to the end of the master script that saysshellout.Add a boot option to
pxelinux. Using thepxelinuxfacility allows us to add a new booting option while maintaining the normalSIbooting. Replicate a configuration clause with a new kernel and newinitrdpath information in the/tftpboot/pxelinux.cfg/default.netbootfile that readslabel linux.udp kernel udp/kernel append vga=extended load_ramdisk=1 prompt_ramdisk=0 initrd=udp/initrd.img root=/dev/ram rw ramdisk_blocksize=4096Create the
/tftpboot/udpdirectory. Create the directory referenced by the kernel andinitrdfiles in the previous step, and place a copy of theSIkernel andinitrdin the directory. We may not need the copy of the files (the master script modifications might be enough to differentiate the installation method), but let's play it safe.Create a statically bound version of
udp-receiver. Download the source package forudpcastfrom http://udpcast.linux.lu. “Untar” the archive in/tmpand modifyMakefileto create a statically bound version of the executable that requires no shared libraries. (Otherwise, we get into the realm of needing to identify the proper shared libraries used by the application [easy with thelddcommand], and matching them to the kernel version being used in the boot framework [hard].) You can do this by changing theLDFLAGSoption by adding-staticto the end of the line. Typingmakewill recompile the programs and create static versions.Add the static
udp-receiverprogram to the binary tools package. The RAM-based installation kernel uses tools from/usr/share/systemimager/boot/<arch>/standard, which are in theboel_binaries.tar.gzfile. This is loaded by the master script, viarsync, as part of the start-up. Because this package is in one place, we cannot create a duplicate; we have to unpack the archive, add theudp-receiverprogram, and then recreate the archive file. To create an enhanced version of thetararchive, follow these steps (assuming you are on an i386 architecture):# cd /usr/share/systemimager/boot/i386/standard # mkdir new # cp boel_binaries.tar.gz boel_binaries.tar.gz.SAVE # cd new # tar xvzf ../boel_binaries.tar.gz.SAVE # cp /tmp/udpcast-<version>/udp-receiver bin/ # tar cvzf ../boel_binaries.tar.gz *
Boot the
SIinstall kernel. Boot to thepxelinuxprompt and enterlinux.udp, which is the label of our experimental environment. This will boot the install kernel, discover the hardware, initialize the network interface, load the master script, copy theboelarchive, install the modified binary tools, and then exit to a shell. We can then use the console to look around at the environment and investigate using theudp-receivercommand from the command line. We have not modified the local disk on the test machine, everything is in RAM only.
Now that we have the install kernel booting and have verified the operation of the statically bound udp-receiver in the RAM-based environment, we can start to automate the process a little more. My philosophy when making modifications like this is to keep the additions separate and modular. There will be another release of SI coming along, and we need to be able to upgrade without too much effort.
Fortunately, because the authors of the tool also have a good philosophy about their use of infrastructure like rsync, we can extend things without hacking up the original intent or operation of the tool. Once we have a base of understanding, we can extend the software for our own needs. This, by the way, is the very heart of what open-source software is all about. If we had no access to sources (scripts, programs, and so on), we could not find out how the system works, nor could we modify or extend it.
Next, I will outline the modifications that I undertook to get an experimental multicast capability into the SI tool. There are a few more extensions and discoveries necessary in our next step.
Create a separate “depot” for multicast information accessible with
rsync. This involves creating a directory in/usr/share/boot/systemimager, calledmulticastand then allowingrsyncdto pick up information from it. This will also provide a base path thatrsyncwill understand, and that we can use to pick up configuration information for the multicast installation inside the modifiedSIscripts. Add the following configuration lines to the/etc/systemimager/rsync_stubs/99localfile and then runmkrsyncd_confto create the new/etc/systemimager/rsyncd.conffile and restart the daemon:[multicast] /usr/share/boot/systemimager/multicast
Consider how to pass information into the multicast install. The
SItool uses shell environment variables at various points in the process to direct the installation. One source of the configuration information may be thelocal.configfile that is created in the installation target's root directory by some of the scripts (options that mention “create a local configuration file”). This file is sourced, if it exists, by the installation kernel's start-up script. Network configuration information may be provided by DHCP, if it is present. Examine theetc/dhclient.conffile in theinitrd.imgfile for the information thatSIrequests from DHCP (including options). There are two other available methods of getting parameter information: (1) get the kernel command line, passed by the bootloader, from/proc/cmdlineafter the/procfile system is mounted; and (2) test for environment variables passed from the kernel to theinitprocess and on torcS.Passing
/etc/init.d/rcSinformation on to the master script. Information is passed from thercSscript to the master script in the/tmp/variables.txtfile in the RAM file system. ThercSscript defines variables namedARCH,FLAVOR,SCRIPTS,VERSION, and aPATHvalue at the very top of the script.Use
rsyncto get information. In addition to the shell variables, thersyncddaemon understands “module” definitions that are placed in its configuration file, like the[multicast]definition used previously. This allows us to reference the modules (directory paths) inrsynccommands in our scripts. See themanpages forrsyncandrsyncd.conffor details. You will find command lines in theSIscripts of the form# Get a file from the rsync server under the path defined # as [scripts] in the /etc/systemimager/rsyncd.conf file. Put # the file in /tmp, follow links, and be verbose. rsync -avL ${IMAGESERVER}::${SCRIPTS}/${SCRIPTNAME} /tmpPrecedence of master scripts. In the version of
SIthat I have installed, 3.0.1, thercSscript implements a hierarchy of master scripts. If there is an image name specified by theIMAGENAMEvariable in a/local.configfile, then the install script will load (with theget_scriptsubroutine) and will execute the<ImageName>.masterscript; otherwise, the<HostName>.shscript is attempted, followed by<BaseHostName>.master(which is the host name stripped of any numerical suffix). We could modify this logic in the script to test whether the multicast-specific script exists, and to load it if it does. This would allow us to preserve the “standard”SIinstallation process as much as possible and yet add our specific steps and data.Create a modified boot environment start-up. We need to modify the start-up script,
rcS, in the boot kernel'sinitrdfile to contain the changes we make to thercSscript. If we have separatepxelinuxboot directories for the “standard”SIand our multicast experiment, we can place the modifiedinitrd.imgfile into/tftpboot/udp. Without the flexibility of a network bootloader, we would have to replace the “standard” boot files for our experiments.Consider how to handle different hardware architectures. We need to remember that we might be dealing with different hardware architectures in our installation facility, so let's add a hierarchy under the new
/usr/share/systemimager/boot/multicastdirectory to handle this. TheSI rcSscript defines variables calledARCHandFLAVORthat can be used to generate the proper paths in relation to anrsyncdknown location. An example command line forrsync, to pick up theboel_binaries.tar.gzfile would be# # Must define appropriate variable values in rcS script # rsync -avL ${IMAGESERVER}::${BOOT}/${ARCH}/${FLAVOR}/${BOEL} /tmpMake changes to the
rcSscript. You should know how to mount and examine theinitrd.imgfile's contents by now, but we need to modify the contents. You will find that you cannot change anything within the loop device mounted file system, because it is “full”—the maximum size it can be. The file system is mounted as acramfs, if you look at the output of themountcommand, so we need to usemkcramfsto create a new one. Investigatingmkcramfsleads to the following commands if theinitrdfile system is mounted under/tmp/image(I usetarto preserve any existing links during the copy). If you keep the copied directory and contents, you don't have to unpack theinitrdfile repeatedly, just make the changes, recreate the file, compress it, and move it into place:# cd /tmp # mkdir newimage # tar cvf - image/* | (cd newimage; tar xf -) # vi newimage/etc/init.d/rcS # mkcramfs newimage newinitrd # gzip < newinitrd > newinitrd.img # cp newinitrd /tftpboot/udp/initrd.img
Make modifications to the
rcSscript to catch kernel parameters. The bootloader can pass parameters to the kernel and the kernel will pass them on toinit, which will pass them on to thercSscript in its environment. By modifying the start of thercSscript, we catch two options that affect the script's behavior. Setting theFLAVORvariable will pick up a differentboel_binaries.tar.gzfile:# Passed in from kernel command line -RwL-, set a multicast # installation, and possibly enable simple debug # if [ -n "${simulti}" ]; then FLAVOR="multicast" MULTICAST=yes if [ -n "${simulti_debug}" ]; then MULTICAST_DEBUG=yes fi fiAdd the kernel command-line parameters to the
pxelinuxconfiguration. To pass parameters “through” the kernel toinitandrcS, the parameters must be declared as<name>=<value>on the bootloader line. If the parameters have no values associated with them, they will not be passed. We also need to add another parameter definition,tempfs_size=173m, to the bootloader command line (this will be explained a little further on). Edit the/tftpboot/pxelinux.cfg/default.netbootfile and modify thelinux.udpboot stanza to readlabel linux.udp kernel udp/kernel append vga=extended load_ramdisk=1 prompt_ramdisk=0 initrd=udp/initrd.img root=/dev/ram rw ramdisk_blocksize=4096 tempfs_size=173m simulti=1 simulti_debug=1Make another modification to the
rcSscript. This modification is to determine which master script is grabbed byrsyncfrom the image server by thercSscript. We will show the section to be modified in the/etc/init.d/rcSscript inside theinitrdimage (see page 185 if you need a refresher on howinitrdworks). There is a function calledget_scriptthat usesrsyncto pick up a script from/var/lib/systemimager/scripts. The last actions thatrcSperforms is to select a master script name, get it from the boot server, save the local variable definitions, and then execute the master script.if [ ! -z $IMAGENAME ]; then # If IMAGENAME is specified, then the IMAGENAME.master # script takes precedence over the HOSTNAME.sh script. # -BEF- echo echo "This host will be installed with image:${IMAGENAME}" SCRIPTNAME="${IMAGENAME}.master" get_script || shellout else # Try to get an autoinstall script based on $HOSTNAME. SCRIPTNAME="${HOSTNAME}.sh" get_script SCRIPTFAIL=$? # Try for a multicast script name if [ ${SCRIPTFAIL} != 0 ]; then echo "Trying ${HOSTNAME}.mcast" SCRIPTNAME="${HOSTNAME}.mcast" get_script SCRIPTFAIL=$? fi if [ ${SCRIPTFAIL} != 0 ]; then echo "$CMD failed!" # Try to get a master file based on the "base # hostname". For example,if the hostname is # compute99, then try to get compute.master. -BEF- # BASE_HOSTNAME=`echo $HOSTNAME | sed "s/[0-9]*$//"` echo "Trying ${BASE_HOSTNAME}.master" SCRIPTNAME="${BASE_HOSTNAME}.master" get_script SCRIPTFAIL=$? fi [ ${SCRIPTFAIL} != 0 ] && shellout fi echo echo write_variables # Save variable values to write_variables || shellout # to /tmp/variables.txt echo echo run_autoinstall_script # Execute the master script run_autoinstall_script exit 0Adjust the RAM disk size. We would like the RAM disk used by the install kernel to encompass all the available RAM to make room for the compressed archive containing the system image. The
rcSscript mounts the/directory to atempfsdevice, which by default will take only 50% of the system's available RAM. This may be fine for a fully operational system that wants to usetempfsas scratch, but we need to have as much space as is available to contain the compressed archive with the system image in it. One way to pass an adjustment is as a kernel parameter on the kernel command line from the bootloader. The whole kernel command line shows up in the special/proc/cmdlinefile after/procis mounted, which it isn't when this subroutine is executed. We must rely on the variables being set from theinitenvironment from the kernel, with a definition oftempfs_size=<size>used to set themountoption. As mentioned in The Temporary File System on page 213, an option may be specified tomountfor the size of the file system, withk,m, orgas a suffix to a numerical value. Note that themountcommand has a slightly different syntax here. Modifications torcSfor this behavior are in theswitch_root_to_tmpfssubroutine:switch_root_to_tmpfs() { # Switch root over to tmpfs so we don't have to worry about # the size of the tarball and binaries that users may decide # to copy over. -BEF- (mods to control tempfs size -RwL-) # if [ -n "${MULTICAST}" ]; then RAMFS_OPTS="" if [ -n "${tempfs_size}" ]; then RAMFS_OPTS="-o size=${tempfs_size}" echo -e "Options for tempfs are"${RAMFS_OPTS}"." [ -n "${MULTICAST_DEBUG}" ] || sleep 10 fi fi mkdir -p /new_root || shellout mount tmpfs /new_root -t tmpfs ${RAMFS_OPTS} || shellout cd / || shellout rsync -a bin etc lib my_modules root sbin tmp usr var /new_root/ || shellout cd /new_root || shellout mkdir -p old_root || shellout pivot_root . old_root || shellout }
We are finally ready to boot our configuration all the way through to the shellout that we added in the master script for our test system. We boot to the pxelinux prompt, type linux.udp, and watch the output stream by on the console. We are rewarded with a shell prompt when we hit Enter. We should probably test to determine whether our interface is multicast enabled by pinging the multicast “all hosts” address (you should see responses from your host and all multicast-enabled systems on the network:
# ping 224.0.0.1
Now it's time to test the whole thing up to the unpacking of the archive on the client. We have to make sure that the following configuration tasks are completed:
Ensure the
/tftpboot/pxelinux.cfg/default.netbootfile contains the proper boot stanza and variables. Removesimulti_debugand increase the value oftempfs_sizeto the maximum your system will support.Ensure that the
boel_binaries.tar.gzfile withudp-receiveradded is in the correct location for the installation client. This is in the/usr/share/systemimager/boot/<ARCH>/multicastdirectory.Check that the
/var/lib/systemimager/scripts/udp.masterfile is in place, and the test system link is present:<system>.mcast.Make sure the
/tftpboot/udp/initrd.imgfile contains the modifiedrcSscript.Create the entry in the
/etc/systemimager/rsync_stubs/99localfile for/etc/systemimager/multicastand recreate the/etc/systemimager/rsyncd.conffile from it. (We will use this in the next section.)Make sure that the
systemimagerservice has been restarted if thersyncdconfiguration file was changed:# service systemimager restartAdd the following line to the
udp.masterfile to run theudp-receiverprogram from the script:udp-receiver --nokbd --file /tmp/localarchive.tgz shellout
With all this in place, you can start the udp-sender program on the image server, with the following command line:
# udp-sender --nokbd --min-clients <N> --fec 8x8
       --max-bitrate <N>m --file <ImageArchive>
Keep the number of clients you reboot to a minimum, unless you want to go for the “smoke factor.” Debugging information for files transferred to the client via rsync will be in /var/log/systemimager/rsyncd. When the basic modifications are working, we can move on to the next phase of improvement.
The first issue I had was forgetting to start the udp-sender manually on the image server, which caused the udp-receiver on the clients to exit with no debugging messages. I modified the udp.master script to add a logging option for the receiver:
# udp-receiver --nokbd --log /tmp/receiver.log
       --file /tmp/localarchive.tgz
It was smooth sailing after the initial issue. The next section makes some final adjustments to the prototype configuration.
We have a proof-of-concept prototype for multicast system installation, using SI. The basic framework is in place, now we need to think a little more about what we are doing and generalize the process that we are automating. Once we do that, we can apply some finishing touches to our handiwork and get on with other cluster software issues. Some design questions for us to consider include the following.
The
udpcasttools are currently using the default administrative and multicast network addresses. How can we control the client and server usage of the network resources?Will we have different images for different clients (most certainly for testing and debugging), and will we need to perform multiple installs at the same time?
How do we automatically schedule the
udp-senderprogram on theSIserver prior to initiating the client installations?How do we apply tuning parameters to the
udpcasttools to utilize the network and minimize errors best?How do we continue to use the benefits of
SIto capture system images, and provide client updates without reinstallation, but maintain the advantage of multicasting?
The best answer I can think of to most of these questions begins with a model in which an installation image and a group of clients are associated with a specific multicast group and set of administrative settings. In this model, one set of installation parameters, primarily a compressed archive and a set of udpcast sender and receiver options, are associated with a group of systems. We can pick one client or all clients in a particular “multicast install group” to participate in an installation, but all clients and the sender have the same set of configuration parameters and the same target image.
The udpcast sender supports a kind of barrier operation, where it starts and waits either for a predetermined minimum number of clients to connect, a fixed period of time, or for a fixed period of time after a minimum number of clients connect. (All processes or tasks rendezvous at a the “barrier”, and will not continue until a preset condition is met. In our case, this is the arrival of the number of expected installation clients.) We need to think about starting the sender, then getting all clients rebooted to the receiver program. At that point the installation starts automatically.
I decided to create two files in the /etc/systemimager/multicast directory that is accessible from the rsyncd: an mcast.default.defs file that contains common variable definitions and an mcast.default.list file that contains a list of systems that participate in the multicast group default. The general format is mcast.<mcastgroup>.<file>, which allows us to make name assumptions in scripts based on the multicast group name.
The first file allows us to share information between the clients and the server, and the second file allows us to set up the number of clients to install for the udp-sender program when we write a script to start the installations automatically. The definitions file contains
# Default multicast group parameters for sender and receiver.
# Use the command-line options for "udp-receiver" and
# "udp-#sender". See the man pages for these commands for
# details. 20040317 -RwL-
#
SIMCASTGROUPNAME="mcast.default" # File names driven from this
           MYPID="$$"
UNARCHIVECOMMAND="tar xvzf "
   ARCHIVESUFFIX="tbz"
       LOGSUFFIX="${MYPID}.log"
     UDPRECEIVER="/sbin/udp-receiver"   # Different on client!
       UDPSENDER="/usr/sbin/udp-sender"

# ------ Common values for both sender and receiver
# Send and receive file name
  AFILENAME="${SIMCASTGROUPNAME}.${ARCHIVESUFFIX}"
LOGFILENAME="${AFILENAME}.${LOGSUFFIX}"
     NOUSER="--nokbd"                   # No user prompts

# ------ Values for receiver only -------
RFILEPATH="/tmp"
    RFILE="${RFILEPATH}/${AFILENAME}"
 RLOGFILE="${RFILEPATH}/${AFILENAME}.${LOGSUFFIX}"
 RSYNCOPT="--nosync" # Set if writing to mounted file system
 RFILEOPT="--file ${RFILE}"   # File name for local file
  RLOGOPT="--log ${RLOGFILE}" # Local log file for transfer
# Single quote holds off substitution until "eval"
 RCMDLINE='${UDPRECEIVER} ${RFILEOPT} ${RLOGOPT} ${NOUSER}'

# ------ Values for sender only   -------
  BITRATE="70m"         # Numeric, can have "k" or "m" suffix
SFILEPATH="/var/lib/systemimager/images"
    SFILE="${SFILEPATH}/${AFILENAME}"   # File to send
 SLOGPATH="/tmp"
 SLOGFILE="${SLOGPATH}/${AFILENAME}.${LOGSUFFIX}"
BITRATEOPT="--max-bitrate ${BITRATE}"   # Limit bit rate
DUPLEXOPT="--full-duplex"    # For switched network
MCASTADDR=""                 # Default 232.<27 bits of IP>
  SFILEOPT="--file ${SFILE}" # File to send
   SLOGOPT="--log ${SLOGFILE}"   # Local log for transfer
# Expect value to be set in environment for ${NMCLIENTS}
# then "eval ${SCMDLINE}"
 CLIENTOPT='--min-clients ${NMCLIENTS}'
# Single quote holds off substitution. Order of the options
# matters!
  SCMDLINE="${UDPSENDER}
        ${SFILEOPT}
        ${BITRATEOPT}
        ${DUPLEXOPT}
        ${NOUSER}
        ${SLOGOPT}
        ${CLIENTOPT}
 "
When a shell sources this file, it defines the shared variables for the sender and receivers in a multicast installation group. Several variable values are quoted to prevent evaluation until the shell eval command is used to execute the command line. This allows a script to set a value in the environment for the number of expected clients, then execute eval ${SCMDLINE} to start the udp-sender or udp-receiver program.
We can tune both the sender and receiver behavior with the common definitions file. The client's master script gets the definitions with rsync, sources the variable definitions, and executes the udp-receiver command line:
. /tmp/variables.txt || shellout

MCASTGROUP="mcast.default"
MCASTDEFS="${MCASTGROUP}.defs"
MCAST=multicast

[ -z $OVERRIDES ] && OVERRIDES="${MCASTGROUP}"

# Pull in remote definitions for this mcast group
echo "Getting multicast group definitions"
rsync -aL ${IMAGESERVER}::${MCAST}/${MCASTDEFS} /tmp/
       >/dev/null 2>&1
[ $? != 0 ] && shellout
[ ... disk partitioning and file system init ... ]
#Fill it up

echo "Sourcing multicast group definitions"
. /tmp/${MCASTDEFS} >/dev/null
[ $? != 0 ] && shellout

echo "Starting the multicast receiver ..."
echo -e "Command line "${RCMDLINE}" ..."
eval ${RCMDLINE}

echo "Unpacking archive to disk ..."
cd /a/
${UNARCHIVECOMMAND} ${AFILENAME}
[$? != 0 ] && shellout

[ ... System Configurator Operations ... ]

# Tell the image server we're done.
rsync $IMAGESERVER::scripts/imaging_complete > /dev/null 2>&1

# Take network interface down
ifconfig eth0 down || shellout

# reboot the autoinstall client
shutdown -r now
We very carefully preserve all the operations that would take place if this were a “normal” installation with rsync, but replace the rsync operations from the image tree with the multicast receiver and archive unpacking. The disk partitions are made, file systems are formatted, and the file systems are mounted under /a by the unmodified portions of the script.
When the disk is ready, we schedule udp-receiver to get the compressed tar archive to the /tmp directory. Once the archive is received, we unpack it to /a, run the override directory processing, and allow the SystemConfigurator to run on the new system structure. The actual modifications to the master script are minimal, so we can capture the image normally and then run mkautoinstallscript on the system image to produce a script we can modify.
Up to this point, we have been using the pxelinux bootloader and manual intervention to test our multicast installation modifications. We are now ready to start using the autoinstallation tools provided with SI. This will eliminate the need for manual intervention and physical presence to boot the clients.
Running the updateclient script on the clients, with the -autoinstall and the -reboot options will cause the install kernel and initrd to be installed, and the client will be rebooted to the installation process. The kernel and initrd.img files are found and installed by updateclient from the /usr/share/systemimager/<ARCH> directory on the SI server. We can use the -flavor option to updateclient to trigger an installation of the kernel and initrd.img from /usr/share/systemimager/i386/multicast instead of the /usr/share/systemimager/i386/standard directory.
Just make sure that the modified boot files and boel_binaries.tar.gz file are in the proper location under the flavor directory multicast. The client will automatically reboot with our modified kernel and initrd, and will locate the proper autoinstall script in /var/lib/systemimager/scripts, which will guide its installation. Synchronizing all of this is the next step.
To perform the installations automatically, we need to run updateclient on all the clients in the multicast install group and make sure that the udp-sender process is running on the image server. The automatic install process should do the rest for us. A rough prototype script, using PDSH to launch the updateclient command remotely, follows:
#!/bin/sh
# Start up a multicast installation on the passed group name
  PDSH="/usr/bin/pdsh"
DSHBAK="/usr/bin/dshbak"
MGROUP="default"
if [[ -n "${1}" ]]; then
    MGROUP="${1}"
fi
MULTIPATH="/etc/systemimager/multicast"
MULTIPREF="mcast.${MGROUP}"
 MDEFFILE="${MULTIPATH}/${MULTIPREF}.defs"
MLISTFILE="${MULTIPATH}/${MULTIPREF}.list"
#Check that all files are there
[ -f ${MDEFFILE} ]  ||   exit 1
[ -f ${MLISTFILE} ] ||   exit 2
# Source the common definitions
. ${MDEFFILE}
[ $? != 0 ] &&    exit 3
#Count systems in the list
typeset -i SYSCOUNT
SYSCOUNT=$( sed -e '/^#.*$/d' < ${MLISTFILE}  | wc -l )
[ ${SYSCOUNT} -gt 0 ] ||  exit 4
# Start the reboots with PDSH, using the group list
export WCOLL="${MLISTFILE}"
${PDSH} updateclient -server ${HOSTNAME}
      -flavor multicast
      -autoinstall
      -reboot         |
${DSHBAK}
# Start the sender and wait for the clients
export NMCLIENTS=${SYSCOUNT}
eval ${SCMDLINE}
[ $? != 0 ] &&   exit 9
exit 0
Obviously, if you don't want to update all the clients in the multicast installation group list at once, this script would need modification. There is little or no error checking, but if a client fails to reboot, the sender will wait for the full complement of clients, so there is time to fix the problem manually. This is still a prototype, and will be improved as we gain experience with this installation method.
Now that we have trundled through a custom implementation of multicast installation, we can take a look at a multicast installation tool that is integrated with SI: flamethrower. The software for the tool is available on the SI download site. The most current version as of this writing is 0.1.6-1.
The documentation describes the tool as a general-purpose multicast installation facility that is capable of stand-alone operation or integration with SI. The flamethrowerd daemon is started on the server and uses information in a configuration file to determine where the multicast information source is located. This is the SI image directory in the case of integration with SI.
The first client initiates a multicast session by contacting the flamethrowerd daemon, which will wait for a preset length of time before initiating the multicast session. Clients that miss the starting window will wait until the next session is started on their behalf. This looks like it fills the void in our previously described prototype. Let's take a closer look.
The package is a noarch type, which is an indication of architecture-independent code, usually scripts or Perl code. The first step is to download the flamethrower package from http://sourceforge.net/projects/systemimager. To take a look at the package requirements, use the following command:
# rpm -qp -requires flamethrower-0.1.6-1.noarch.rpm
/usr/bin/perl
udpcast
/bin/sh
res flamethrower-0.1.6-1.noarch.rpm
rpmlib(PayloadFilesHavePrefix) <= 4.0-1
rpmlib(CompressedFileNames) <= 3.0.4-1
If you examine the content listings, you will see that it requires Perl and the udpcast package that we discussed in the previous section. The udpcast package is also available from the SourceForge site. Thankfully, there are no more dependencies that we saw previously.
We can also look at what files the package provides to the system when it is installed:
# rpm -qp -filesbypkg flamethrower-0.1.6-1.noarch.rpm
flamethrower /etc/flamethrower/flamethrower.conf
flamethrower /etc/init.d/flamethrower-server
flamethrower /usr/bin/flamethrower
flamethrower /usr/bin/flamethrowerd
flamethrower /usr/lib/flamethrower/Flamethrower.pm
flamethrower /usr/share/doc/flamethrower-0.1.6
flamethrower /usr/share/doc/flamethrower-0.1.6/COPYING
flamethrower /usr/share/doc/flamethrower-0.1.6/CREDITS
flamethrower /usr/share/doc/flamethrower-0.1.6/HOWTO
flamethrower /usr/share/doc/flamethrower-0.1.6/README
When I installed this version of the package on an already installed SI server, I found the HOW-TO file empty. I thought this was a little odd.
Examining the /etc/flamethrower/flamethrower.conf file installed by the RPM package, we see some global options that may be configured, including the base port for the flamethrower daemon (9000) and some other udpcast-related items. I decided to stick with the default values for the initial tests. The service for flamethrower-server needs to be added with chkconfig:
# chkconfig --add flamethrower-server
Once this is done, the next step is to try to “light up” the daemon:
# service flamethrower-server start
This results in an error message about /var/state/systemimager/flamethrower not being present, so let's create it:
# mkdir -p /var/state/systemimager/flamethrower
The daemon starts up without any problems this time and creates the file /var/log/messages/flamethrower.flamethrower_directory, and two process PID files in the /var/state/systemimager/flamethrower directory named flamethrowerd.flame-thrower_directory.pid and flamethrowerd.flamethrower_directory.udp-sender.pid. Let's see just what is running on the system. In addition to a process for flamethrowerd, there is
# ps -ef | grep
       $( < ./flamethrowerd.flamethrower_directory.pid )
root     21631 21630  0 16:48 ? 00:00:00
       udp-sender --pipe tar -B -S -cpf
So flamethrowerd starts a subprocess that runs the tar command from a pipe, with commands to make handling sparse files and reading from a pipe more efficient. So far, so good. Now for the interface to SI.
The documentation mentions that three commands—mvimage, cpimage, and getimage—will make appropriate entries in the /etc/systemimager/flamethrower.conf file. We find no such linkage in the Perl code for the commands, so this is where we really start scratching our heads.
What we find when we retrace our steps is that we completely missed downloading the newest version of the SI tools before installing the latest version of flamethrower. So, hoping the dependencies have not changed, let's download
systemimager-client-3.2.0-4.noarch.rpmsystemimager-common-3.2.0-4.noarch.rpmsystemimager-flamethrower-3.2.0-4.noarch.rpmsystemimager-i386boot-standard-3.2.0-4.noarch.rpmsystemimager-server-3.2.0-4.noarch.rpm
After we've updated the packages, let's decide to keep this as an example of “if things don't add up, check your assumptions.” We had downloaded the stand-alone copy of flamethrower and were trying to get it to work with an old copy of SI. We will find that the new commands, configuration files, directories, and other components were added to the system during the package update.
The following services were added by the update:
/etc/init.d/systemimager-server-flamethrowerd/etc/init.d/systemimager-server-netbootmond/etc/init.d/systemimager-server-rsyncd
The configuration file contents for flamethrowerd have changed only minimally, but SI keeps its own copy of the file, /etc/systemimager/flamethrowerd.conf. After performing the configuration, adding the new services (to be certain the links are in place), and restarting the services (to see which ones are already there), we are rewarded with operating daemons.
One addition that is necessary to get clients to use the new multicast installation is to modify the DHCP configuration (if you use that rather than a local.cfg file). The addition places some “custom” parameters in the DHCP response packet that the SI clients will pick up and use. This sets the base port for the client's udp-receive multicast client to match the server's base port:
option option-143 code 143 = string;
       # (only for ISC's dhcpd v3)
option option-143 "9000";
This value is set into the FLAMETHROWER_DIRECTORY_PORTBASE variable by the DHCP client in the installation initrd file. This will trigger the client's use of the multicast installation process.You can control which clients are fed this option by properly placing it in a group or pool definition in the DHCP configuration file. This allows multicast installation for specific systems to coexist with “normal” installations.
The flamethrower daemon manages multicasts of the various modules (scripts, overrides, and so forth) associated with an installation by multicasting directory information to the clients that have requested a multicast installation. After receiving the directory information, the client locates its installation script and executes it, which processes the directory information and uses it to join the appropriate multicast “sessions.”
Images that are added to the server by the getimage, mvimage, and cpimage commands are entered into the /etc/systemimager/flamethrower.conf file. The file is dynamically read by the daemon as images are added, so there is no need to restart the daemon manually after making changes. The daemon can manage multicast sessions to multiple groups of clients simultaneously.
As usual, the SI folks have done a wonderful job of providing system installation functionality that we can all use. Thanks to their efforts, our prototype multicast installer can remain just an experiment. The concepts are directly applicable to understanding the new flamethrower facility.
This version of SI has several new and very useful features.
The ability to change the default boot behavior from a network installation to a local boot, using the
netbootmond. This functionality is configured in the file/etc/systemimager/systemimager.confwith theNET_BOOT_DEFAULTvariable, which may have the valuesnetorlocal. The daemon monitors installation completion and changes the default behavior for the client.flamethrowermulticast capabilities.The ability to control access to images (lock them) to prevent interference or bad installations if an image is being modified. See the
/etc/systemimager/imagemanip.confand/etc/systemimager/imageman.permfiles, along with theimagemanipcommand. Information is still a little sketchy on this feature.
In this chapter I have introduced multicasting concepts and the udpcast tools that implement multicast communications protocol between a sender and receiver. We used these tools to modify an existing open-source solution, SI to use multicasting instead of rsync to replicate system structure. The expectation is that the scaling for cluster installation will be much better with multicast tools.
We applied an iterative approach to extending the SI tool, gaining understanding of its operation one step at a time, then modifying its behavior to meet our needs. The modifications have been kept to a minimum to allow the normal imaging process and use of the standard tools. This type of modification and approach would not be possible if SI were not an open-source tool, with its sources readily available to us.
Along with the specific application to multicast installation, we have covered a lot of the booting process and mechanics for Linux in general. There is a wide range of this knowledge that may be applied elsewhere, and this was an ulterior motive in spending so much time on this example. The end result is a fairly functional multicast installation tool, but it is still in a prototype stage.
The flamethrower facility for SI, of course, removes the need for further work in the area of the prototype, unless there are still enhancements required for your particular installation. Thanks again, SI team!