
![]()
Managing the Application Life Cycle
To make the most of Windows Store apps development, you must understand a lot of core concepts in order to have control over the behavior of your application. One of these is the application life cycle, which is a basic concept for writing a good application that resumes its state correctly when the user reopens an application after a suspension.
Dissecting the Application Life Cycle
The first step of the application life cycle, just after the user downloads it from the Windows Store, is the NotRunning state, which is also the starting state when your app is crashed or closed. In the NotRunning state, your app can assume the Running state, which happens in only two cases:
- When the user opens your application by touching the tile or a notification
- When your app is chosen by the user to interact with another application using “Contracts and Extensions” (refer to Chapter 3 for an in-depth discussion)
Figure 5-1 shows different application execution states:
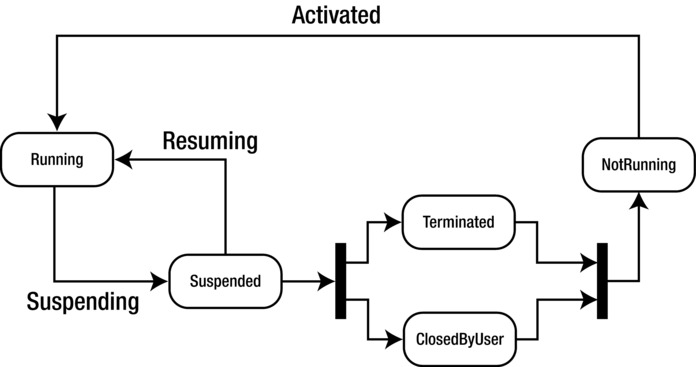
Figure 5-1. Windows Store app life cycle
An application is activated when passing from a NotRunning to a Running state. You can initialize all resources required for application execution by overriding the OnLaunched event.
There is a best practice that you must keep in mind: this transition is related to the time that the splash screen is visible on the user’s screen device. For this reason, every background task needs to be as fast as possible to give control over your application to the user. If you need to load a large amount of data or connect to a service, you should not do it in the OnLaunched event; you should use an extended splash screen to avoid forcing the user having to wait for completion.
Suppose that the user leaves your application and returns to the Start screen or switches to another application: your app is still running. If you use the closing gesture, swiping the app from the top of the bottom of the screen, the app is still running, but it saves resources. This behavior is introduced with Windows 8.1.
If you want to permanently close your app, you have to use the close gesture. Hold the app thumbnail for about 2 seconds on the bottom of the screen, until it flips over. Then the runtime will maintain the app running for about 10 seconds until it will be suspended and then closed. When the user switches from or to the app, the VisibilityChanged event is called. This event can be used to manage an interaction (for example, stopping a timer if your app is a game).
The app will remain in a Suspended state until it is terminated by the operating system (OS) for memory reasons or from a closing gesture. The transition to the Suspended state raises the Suspending event, which you should handle to save the application state and release resources that your application requires.
Windows can manage many applications in a Suspended state to ensure that users can switch quickly between them. Of course, applications should not remain in a Suspended state, so they are terminated to recover resources. You need to remember that your application does not receive notifications about terminating, so you have only one opportunity to save the state of your application: the Suspending event.
By the way, although you cannot manage any terminating event, you can know how the application was terminated by evaluating the PreviousExecutionState of Activated event arguments. This property returns one of the following values from the ApplicationExecutionState enumeration:
- Terminated (or closed by the OS)
- ClosedByUser
- NotRunning
There is a lot of information to know about application termination. Unlike desktop applications, when you develop an immersive application you must keep in mind that your app can’t offer a functionality to close itself, except in rare cases such as security issues. In that event, Windows will consider your application to be crashed, which could be a problem for users because when your app crashes (raises an exception or stops responding), the user is asked for consent to send a report to Microsoft with a subset of the error information (as discussed in Chapter 4). If you programmatically close your application with a button, you could receive a problem report every time a user closes your application. If the application crashes when it starts, there is no notification of the crash (unless you have your own internal code that tracks this issue) and the ApplicationExecutionState value will be NotRunning.
As you can see in Figure 5-1, from the Suspended state your app can reach the Running state by passing the Resuming event that fires when the user switches to it. When resumed, your app will start from the same point it was before being suspended, and you can handle the Resuming event to refresh contents of your application or require some resources from the system.
This is a quick overview of the application life cycle, but theory is nothing without practice. The following sections contain some code examples of how to manage the various events raised during the life cycle. Because this book is based on the C# and VB.NET languages, we will show you code for these languages supported by Windows Store apps, and you can be inspired by the language that meets your requirements and knowledge.
You start managing the Activated event in order to follow a logical flow. In this chapter, you will use a simple app; in Chapter 6, you will learn about Windows Store app creation in detail. For now, just create a project inside Visual Studio 2013. Inside of the section of your favorite programming language, choose the Blank App template to create a new Windows Store app, as shown in Figure 5-2. The figure shows the C# section, but the steps are the same for the other languages. Let’s see how to handle an Activated event in different languages.
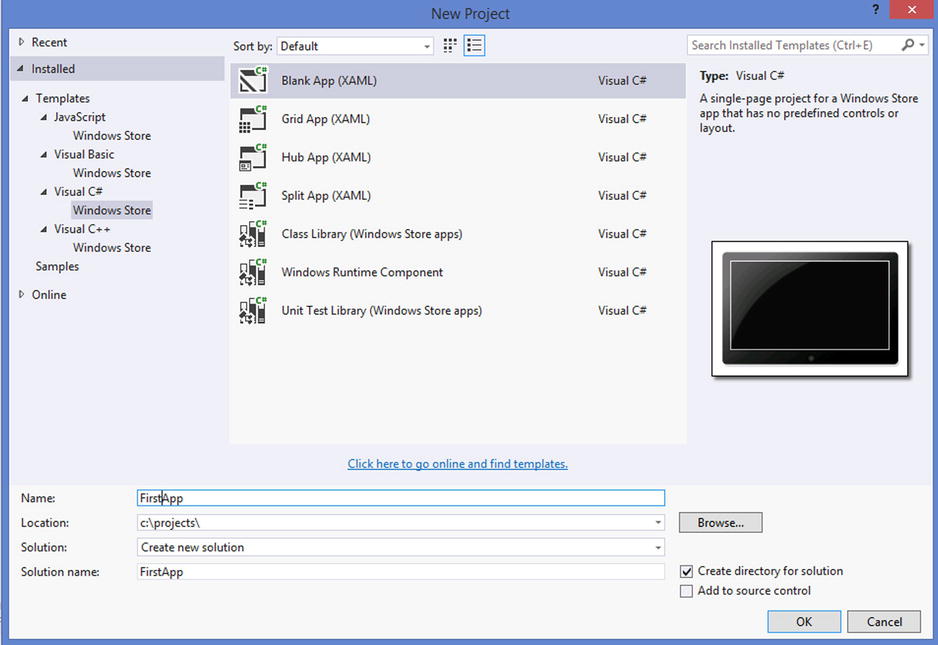
Figure 5-2. Selecting a project template
After your project is created, you will see a default implementation of the OnLaunched method inside the App.xaml.cs file. This file represents the main class of the application and inherits from the Application class (shown in Figure 5-3). This class exposes methods, events, and properties that represent the behavior of the application inside the OS.

Figure 5-3. Application class diagram
What is interesting are the OnLaunched and OnActivated methods that you will override in order to manage the application’s Launching and Activation events.
The OnLaunched method will be called when the user executes the application explicitly; conversely, OnActivated will be called whenever your application is launched for other situations (for example, when it answers to Contract subscription).
In C#, the OnLaunched method looks like this (App.xaml.cs):
        protected override async void OnLaunched(LaunchActivatedEventArgs e)
        {

#if DEBUG
            // Show graphics profiling information while debugging.
            if (System.Diagnostics.Debugger.IsAttached)
            {
                // Display the current frame rate counters
                this.DebugSettings.EnableFrameRateCounter = true;
            }
#endif

            Frame rootFrame = Window.Current.Content as Frame;

            // Do not repeat app initialization when the Window already has content,
            // just ensure that the window is active

            if (rootFrame == null)
            {
                // Create a Frame to act as the navigation context and navigate to the first page
                rootFrame = new Frame();
                //Associate the frame with a SuspensionManager key
                SuspensionManager.RegisterFrame(rootFrame, "AppFrame");
                // Set the default language
                rootFrame.Language = Windows.Globalization.ApplicationLanguages.Languages[0];

                if (e.PreviousExecutionState == ApplicationExecutionState.Terminated)
                {
                    // Restore the saved session state only when appropriate
                    try
                    {
                        await SuspensionManager.RestoreAsync();
                    }
                    catch (SuspensionManagerException)
                    {
                        //Something went wrong restoring state.
                        //Assume there is no state and continue
                    }
                }

                // Place the frame in the current Window
                Window.Current.Content = rootFrame;
            }
            if (rootFrame.Content == null)
            {
                // When the navigation stack isn't restored navigate to the first page,
                // configuring the new page by passing required information as a navigation
                // parameter
                if (!rootFrame.Navigate(typeof(GroupedItemsPage)))
                {
                    throw new Exception("Failed to create initial page");
                }
            }
            // Ensure the current window is active
            Window.Current.Activate();
        }
The default implementation evaluates the PreviousExecutionState property of LaunchActivatedEventArgs to see whether its value is equal to the Terminate value of the ApplicationExecutionState enumeration that you can see in the class diagram shown in Figure 5-4. Remember this diagram because you will refer to it when you evaluate other values of ApplicationExecutionState for other transitions. By checking the PreviousExecutionState, you can restore a saved state. The #if DEBUG statement enables the framerate counter on the top of the screen (starting in Windows 8.1).
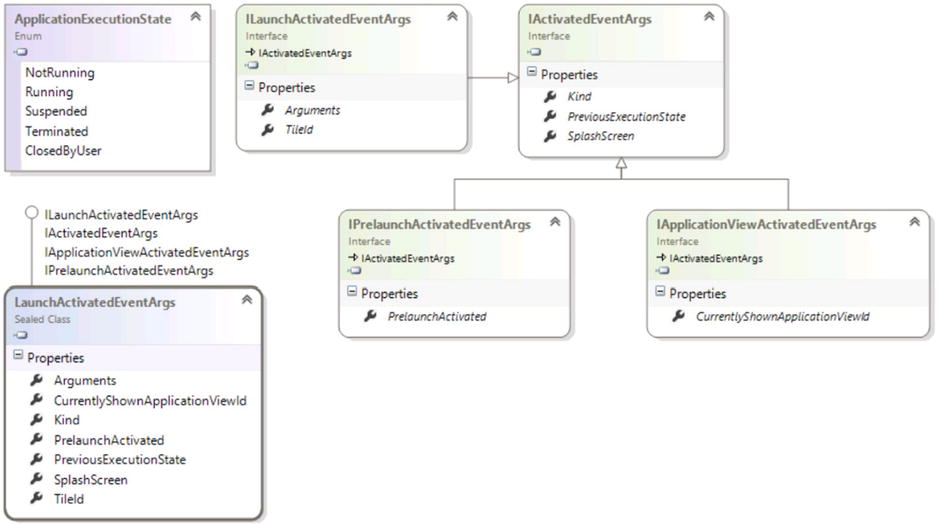
Figure 5-4. Application activation class and enumeration
The remaining code allows the application to start using a root content of your application as an instance of the MainPage application page.
To manage the application activation completely, you must handle the OnActivated event this way:
protected override void OnActivated(IActivatedEventArgs args)
{
    switch (args.Kind)
    {
        case ActivationKind.CachedFileUpdater:
            //Do something here
            break;
        case ActivationKind.CameraSettings:
            //Do something here
            break;
        case ActivationKind.ContactPicker:
            //Do something here
            break;
        case ActivationKind.Device:
            //Do something here
            break;
        case ActivationKind.File:
            //Do something here
            break;
        case ActivationKind.FileOpenPicker:
            //Do something here
            break;
        case ActivationKind.FileSavePicker:
            //Do something here
            break;
        case ActivationKind.PrintTaskSettings:
            //Do something here
            break;
        case ActivationKind.Protocol:
            //Do something here
            break;
        case ActivationKind.Search:
            //Do something here
            break;
        case ActivationKind.ShareTarget:
            //Do something here
            break;
    }
}
In this code, you are preparing your application to manage various types of activation, evaluating the Kind property of the IActivatedEventArgs interface (see Figure 5-5). You may be wondering why you use an interface. You do so because you’ll have a different implementation of IActivatedEventArgs depending on ActivationKind. (It will be clarified when we talk about contracts and extensions).
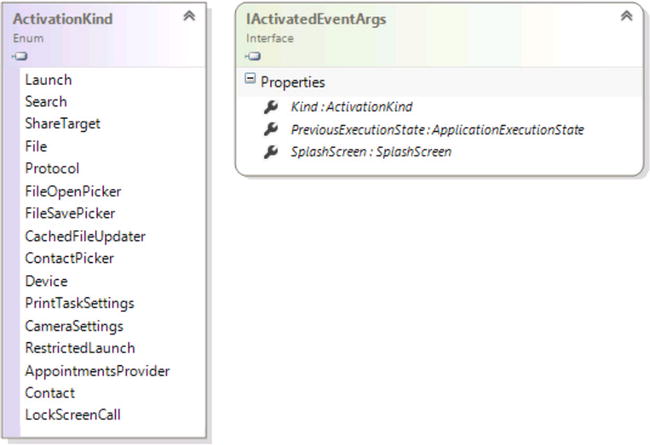
Figure 5-5. Activation arguments class diagram
As soon as you create your project, a file named App.xaml.vb is created. In this file is a standard implementation of the OnLaunched method that looks like this:
    Protected Overrides Sub OnLaunched(e As Windows.ApplicationModel.Activation.LaunchActivatedEventArgs)
#If DEBUG Then
        ' Show graphics profiling information while debugging.
        If System.Diagnostics.Debugger.IsAttached Then
            ' Display the current frame rate counters
            Me.DebugSettings.EnableFrameRateCounter = True
        End If
#End If

        Dim rootFrame As Frame = TryCast(Window.Current.Content, Frame)

        ' Do not repeat app initialization when the Window already has content,
        ' just ensure that the window is active

        If rootFrame Is Nothing Then
            ' Create a Frame to act as the navigation context and navigate to the first page
            rootFrame = New Frame()
            If e.PreviousExecutionState = ApplicationExecutionState.Terminated Then
                ' TODO: Load state from previously suspended application
            End If
            ' Place the frame in the current Window
            Window.Current.Content = rootFrame
        End If
        If rootFrame.Content Is Nothing Then
            ' When the navigation stack isn't restored navigate to the first page,
            ' configuring the new page by passing required information as a navigation
            ' parameter
            If Not rootFrame.Navigate(GetType(MainPage), e.Arguments) Then
                Throw New Exception("Failed to create initial page")
            End If
        End If

        ' Ensure the current window is active
        Window.Current.Activate()
    End Sub
If you compare this code with C# code, you’ll notice that there’s no difference between the implementations except for a slight difference in syntax. And this consideration is valid also for the OnActivated override, which looks like this:
Protected Overrides Sub OnActivated(args As IActivatedEventArgs)
    Select Case args.Kind
        Case ActivationKind.CachedFileUpdater
            'Do something here
        Case ActivationKind.CameraSettings
            'Do something here
        Case ActivationKind.ContactPicker
            'Do something here
        Case ActivationKind.Device
            'Do something here
        Case ActivationKind.File
            'Do something here
        Case ActivationKind.FileOpenPicker
            'Do something here
        Case ActivationKind.FileSavePicker
            'Do something here
        Case ActivationKind.PrintTaskSettings
            'Do something here
        Case ActivationKind.Protocol
            'Do something here
        Case ActivationKind.Search
            'Do something here
        Case ActivationKind.ShareTarget
            'Do something here
    End Select
End Sub
That’s all you have to do to manage the activation of your application. Now you learn how to manage the VisibilityChanged event.
When the visibility of the application changes, the VisibilityChanged event fires, allowing you to manage this change. All you need to do is to manage the VisibilityChanged event of CoreWindow class. In Figure 5-6, you can see a class diagram that shows the classes used to manage this event.
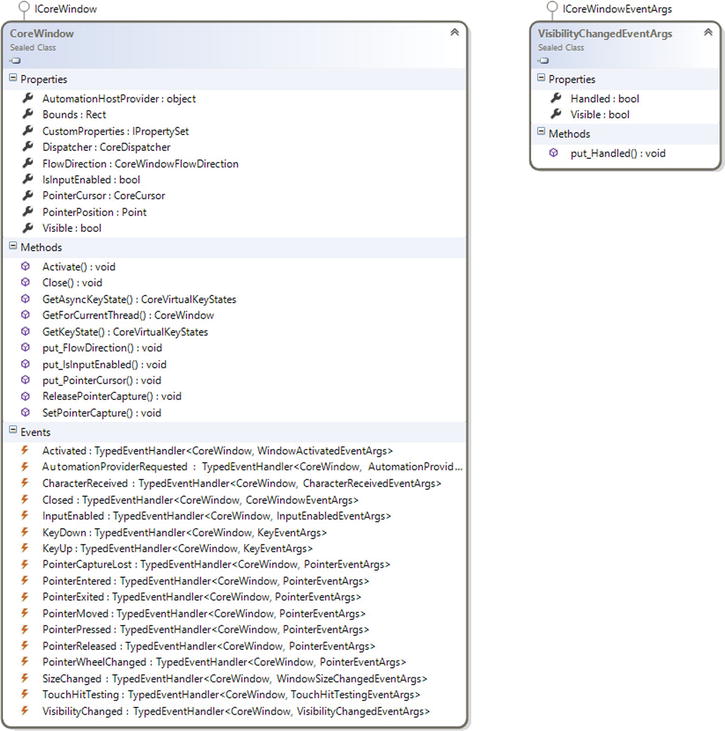
Figure 5-6. CoreWindow and VisibilityChangedEventArgs class diagrams
To simulate a real situation in your C# and VB.NET code, you will stop a DispatcherTimer that measures time elapsed in a game.
![]() Note DispatcherTimer, which is a class available only in a Windows Store app, provides a Timer that is integrated in a Dispatcher queue. If you use this class, you can refer from your code to a UI object; if you use a simple Timer and do something on a UI thread, you will get a CrossThreadException.
Note DispatcherTimer, which is a class available only in a Windows Store app, provides a Timer that is integrated in a Dispatcher queue. If you use this class, you can refer from your code to a UI object; if you use a simple Timer and do something on a UI thread, you will get a CrossThreadException.
First, declare the DispatcherTimer and a CoreWindow reference to subscribe to the VisibilityChanged event. You start the timer when visibility is true; you’ll stop it when it is false. Let’s play!
As mentioned, you declare a private member of the DispatcherTimer type in the App class (App.xaml.cs) and you initialize it inside the constructor, using 1 second as the TimeSpan to set the value of the Interval property of DispatcherTimer.
private DispatcherTimer _timer;

...

public App()
{
   this.InitializeComponent();
   this.Suspending += OnSuspending;
   timer = new DispatcherTimer
   {
      Interval = TimeSpan.FromSeconds(1)
   };
}
Another thing that you need is a private member of the CoreWindow type, which you’ll initialize in the OnLaunched method, getting an instance from the static method GetForCurrentThread of the CoreWindow class:
private CoreWindow coreWindow;

...

coreWindow = CoreWindow.GetForCurrentThread();

coreWindow.VisibilityChanged +=
   (s, e) =>
   {
      if (e.Visible)
         timer.Start();
      else
         timer.Stop();
   };
![]() Note You can get the same instance of CoreWindow by navigating the Current static property of the Window static class and looking for the CoreWindow property.
Note You can get the same instance of CoreWindow by navigating the Current static property of the Window static class and looking for the CoreWindow property.
In this way, when the app loses visibility, the timer stops running and starts again when the app becomes visible. Of course, this is only an example of how to manage the VisibilityChanged event, and the code inside the event handler will change based on your own application.
As in C#, the first thing that you need is an instance of DispatcherTimer created in this way:
Dim _timer = New DispatcherTimer() With {.Interval = TimeSpan.FromSeconds(1)}
Then you need to add an event handler for the VisibilityChanged event, which is like this in VB:
Private Sub VisibilityChanged(sender As Windows.UI.Core.CoreWindow, args As Windows.UI.Core.VisibilityChangedEventArgs)
        If args.Visible Then
            _timer.Start()
        Else
            _timer.Stop()
        End If
End Sub
Now that you have an event handler, you will get an instance of CoreWindow. Because VB is a managed language like C#, you create an instance of CoreWindow inside the App class and then you can get the CoreWindow instance inside the OnLaunched event in two ways:
Dim _coreWindow As Windows.UI.Core.CoreWindow
...
_coreWindow = coreWindow.GetForCurrentThread()
Or
_coreWindow = Window.Current.coreWindow;
There is no difference between these two methods because you will always get the same instance. The last thing to do is to subscribe the event handler to the event, and you will do it inside the OnLaunched method in this way:
AddHandler coreWindow.VisibilityChanged, AddressOf VisibilityChanged
That’s it.
As mentioned before, an app in the running state can reach only the Suspended state, which happens raising the Suspending event. Here you’ll learn how to handle this event. Again, be careful about the Windows Store app’s execution model; there is no assurance that the VisibilityChanged and Suspending events raise one after the other in a short time.
When the OS fires the suspending event, it saves the actual state of your application in order to resume from the same point later. In this way, the user gets the impression that the app is running in the background. The Suspending event is where you’ll save app data and release resources such as devices because the OS doesn’t notify your app while terminating.
Figure 5-7 shows a diagram of classes used during the Suspending event. The starting point is the SuspendingEventArgs class that contains a property of the SuspendingOperation class. SuspendingOperation contains a GetDeferral method that you can use during your process of saving in order to ask for “extra time” before the suspension ends. This method returns an object of the SuspendingDeferral class, in which you’ll call the Complete method to notify that your operation ended.
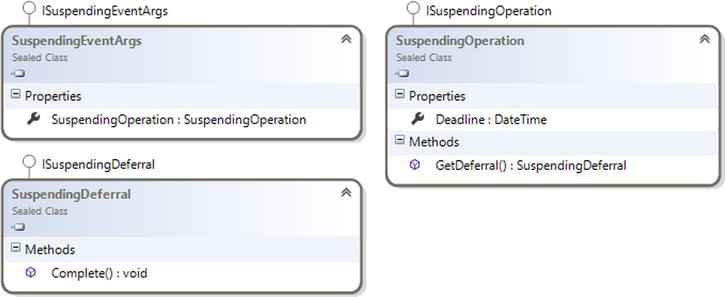
Figure 5-7. Classes used in a Suspending event
Managing the Suspending event in C# is really simple. The first thing that you need is an event handler in App.xaml.cs:
private async void OnSuspending(object sender, SuspendingEventArgs e)
{
    var deferral = e.SuspendingOperation.GetDeferral();
    await SuspensionManager.SaveAsync();
    deferral.Complete();
}
In the first line of code, you get an object of the SuspendingDeferral class in order to notify the OS that your operations ended in the last line of code. Now that you have an event handler, you can attach your handler to the event:
this.Suspending += OnSuspending;
app is an instance of your application that you can refer to by using the this keyword if you are working in App.xaml.cs or using the Current static property of the Application object:
Application.Current.Suspending += OnSuspending;
The code to manage the Suspending event in VB is also really simple:
AddHandler Application.Current.Suspending, AddressOf OnSuspending
Private Async Sub OnSuspending(sender As Object, e As SuspendingEventArgs) Handles Me.Suspending
     Dim deferral As SuspendingDeferral = e.SuspendingOperation.GetDeferral()
     Await Common.SuspensionManager.SaveAsync()
     deferral.Complete()
End Sub
From the Suspended state, your app can assume the NotRunning and Running states. You don’t have control over the transition to the NotRunning state, but you can control the behavior when passed to the Running state by firing the Resuming event.
Managing the Resuming event is really easy. The event handler can be implemented as follows in App.xaml.cs:
void OnResuming(object sender, object e)
{
    //Place your code here
}
Attach the event handler to the Resuming event in the App() constructor:
this.Resuming += OnResuming;
In the App.xaml.vb file, use this code:
AddHandler Application.Current.Resuming, AddressOf App_Resuming

Private Sub App_Resuming(sender As Object, e As Object)
        ' TODO: Refresh network data
End Sub
Conclusion
In this chapter, you have seen different ways to handle application life cycle event inside your application. It is important to understand that data is not loaded or saved automatically when your app is terminated. You need to save it on the available storage as the local storage or the cloud storage to recover it when app is loaded again or refresh it if necessary. Understanding the life cycle of a Windows Store app is necessary to avoid unexpected behavior during runtime.