Chapter 3. Building Data Entry Forms
Building data entry forms has always been pretty simple in Access VBA
and even Classic VB. This process is more complicated in C#, and really any
of the .NET languages. When using DAO and ADO, the main data object is the
recordset, which is connected to the
database, and you can easily move through records and perform all of the
CRUD operations (create, read, update, and delete). You can certainly do all
of those things in C#, but the data objects that you will be working with
are disconnected, which means that you will need to take explicit steps to
keep the datasource in sync with the changes.
There are controls in Visual Studio that can help you build a data entry form and navigate through the records. Those controls won’t be covered until the next chapter. While it is less likely that you’ll need to make a data entry form that dynamically adjusts to different datasources, it is still useful to build the data connections with code, even if it is just to help you understand what is happening behind the scenes when you use the controls.
The first thing that will be covered is a simple change to the project that we covered in Chapter 2. What you’ll be doing is adding a couple buttons to the form to allow you to browse through the records. Also, you will be adding a text box that will bind to a field in the table, and you will be able to make edits to the table in the grid or in the text box. This is an unlikely scenario in the real world, but it is a good learning exercise for how to build a data entry form that will work with multiple tables.
Once you have done this, you will be building a simple data entry form for a specific table. Again, you might find it easier to use the controls provided in Visual Studio in the future, but going through this exercise will be helpful for future programming.
Also, before explaining these items, there are a couple of things that
you should know about the .NET objects that we have been and will be using.
In the example in Chapter 2, we used a DataTable to get the data. There is another object
called a DataSet, which contains a
collection of the DataTables that you are
connecting to. The DataSet contains
information about the relationships between tables in the DataSet. This lets you navigate through parent
records and also show the child records at the same time. If you think about
a form/sub-form in Access, this is the way that you can achieve similar
functionality in C#. However, you don’t need to create a separate form to
browse and edit the child records; you will be doing everything in one form.
You will find that it is very convenient to have all the data you are
working with in one object. Also, the same objects that you are going to be
creating are created when you use the built-in controls.
Binding a TextBox to Data
When you are binding data, you will need the BindingSource object available while the form is
open, and you will also need a couple extra controls on the form. So, for
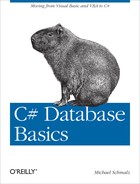
this example, you just need to put a label (named label1), a text box (named textbox3), and a button (named button4) on the form. It really doesn’t matter
where you put them for this example, but in the screenshot, you will see
that I put them at the bottom of the form. To make the BindingSource object available, you need to put
the following line of code up where you are defining variables at the
class level:
public BindingSource bndSource;
Then you will need to add the following lines of code at the bottom
of the Form1() and change_data_source procedures:
this.textBox3.DataBindings.Add(new Binding("Text", bndSource,
this.dataGridView1.Columns[1].HeaderText.ToString(),true));
this.label1.Text = this.dataGridView1.Columns[1].HeaderText.ToString();
The first line is setting the DataBindings property of the textbox control.
That property is a collection of data bindings for the control. You can
link any number of properties for the control to data. In this case, the
property of the control that we want to drive is the Text property—this is what drives the display on
the screen. Going from left to right, you are adding a binding to the
collection, then creating a new binding object. The new binding object
takes the following parameters: property name, data source, data member,
and a formatting flag. Since for this hypothetical example we don’t know
the name of the field that we are binding to, we are just using the name
of the second column (the column numbers are zero-based, so Columns[1] is the second column). The example
uses the second column because I didn’t want to link to the primary key,
in order to show how we can update data. The last line of code sets the
text for the label to be the name of the field that you are binding
to.
The last step is to set a click event for the button to move through the data. You could add multiple buttons, but this is really just to demonstrate this concept, so one button is fine for now. There is only one line of code needed within the event to do this:
private void button4_Click(object sender, EventArgs e)
        {
            bndSource.MoveNext();
        }
We are missing one line of code, but I want you to run this to see where the error is. When you open this, you will see the screen shown in Figure 3-1.
You can click the Move Next button and you will see that your text
box updates with the Company field. You will also see that the current
record in the datagrid is moving as well. This is because the binding
object is being shared by both. So, where is the error? Well, if you pick
a different table and click the Change Source button, you will see an
error on the line where you are setting the bindings. This is because
there is already a binding to the Text property. So, you will need to add
the following line of code above the line where you are setting the
binding in the change_data_source
procedure:
this.textBox3.DataBindings.Clear();
All this line of code does is remove all the bindings for that
control. If you run it again, you will be able to change tables without
error. Because we are still using the datagrid, we already have code that
is updating the datasource (it is on the RowValidated
event). So, you will be able to edit data in the text box or up in the
grid, and when you move around with the button or within the datagrid, you
will see that the data updates on the screen and in the database. You will
see later that we need to add code to accomplish the edits when we aren’t
using the datagrid, and it is really unlikely that you would have both a
datagrid and a text box like we have here. However, this demonstrates how
to use the bindings to get a control to sync up with data in the
database.
The full code combining all these changes is shown below:
using System;
using System.Collections.Generic;
using System.ComponentModel;
using System.Data;
using System.Data.OleDb;
using System.Drawing;
using System.Linq;
using System.Text;
using System.Windows.Forms;

namespace EditingDatabaseTest
{
    public partial class Form1 : Form
    {
        public string connString;
        public string query;
        public OleDbDataAdapter dAdapter;
        public DataTable dTable;
        public OleDbCommandBuilder cBuilder;
        public DataView myDataView;
        public BindingSource bndSource;

        public Form1()
        {
            InitializeComponent();
            connString = "Provider=Microsoft.ACE.OLEDB.12.0;Data Source=C:\users\michael\documents\Northwind 2007.accdb";
            query = "SELECT * FROM Customers";
            dAdapter = new OleDbDataAdapter(query, connString);
            dTable = new DataTable();
            cBuilder = new OleDbCommandBuilder(dAdapter);
            cBuilder.QuotePrefix = "[";
            cBuilder.QuoteSuffix = "]";
            myDataView = dTable.DefaultView;
            dAdapter.Fill(dTable);
            bndSource = new BindingSource();
            bndSource.DataSource = dTable;
            this.dataGridView1.DataSource = bndSource;
            for (int q = 0; q <= dataGridView1.ColumnCount - 1; q++)
            {
                this.comboBox1.Items.Add(this.dataGridView1.Columns[q].HeaderText.ToString());
            }
            OleDbConnection xyz = new OleDbConnection(connString);
            xyz.Open();
            DataTable tbl = xyz.GetSchema("Tables");

            dataGridView2.DataSource = tbl;
            DataView tbl_dv = tbl.DefaultView;

            this.textBox3.DataBindings.Add(new Binding("Text", bndSource,
                this.dataGridView1.Columns[1].HeaderText.ToString(),true));
            this.label1.Text = this.dataGridView1.Columns[1].HeaderText.ToString();
        }

        private void Cell_Update(object sender, DataGridViewCellEventArgs e)
        {
            try
            {
                dAdapter.Update(dTable);
                this.textBox1.Text = "Updated " + System.DateTime.Now.ToString();
            }
            catch (OleDbException f)
            {
                this.textBox1.Text = "Not Updated " + f.Source.ToString();
            }
        }

        private void filter_click(object sender, EventArgs e)
        {
            string mystr;
            if (myDataView.RowFilter == "")
            {
                mystr = "[" + dataGridView1.CurrentCell.OwningColumn.HeaderText.ToString() + "]";
                mystr += " = '" + dataGridView1.CurrentCell.Value.ToString() + "'";
                myDataView.RowFilter = mystr;
            }
            else
            {
                mystr = myDataView.RowFilter + " and ";
                mystr += "[" + dataGridView1.CurrentCell.OwningColumn.HeaderText.ToString() + "]";
                mystr += " = '" + dataGridView1.CurrentCell.Value.ToString() + "'";
                myDataView.RowFilter = mystr;
            }
        }

        private void clear_filter(object sender, EventArgs e)
        {
            myDataView.RowFilter = "";
        }

        private void change_data_source(object sender, EventArgs e)
        {
            string tbl_str = dataGridView2.CurrentRow.Cells[2].Value.ToString();
            query = "SELECT * FROM [" + tbl_str + "]";
            dAdapter = new OleDbDataAdapter(query, connString);
            dTable = new DataTable();
            cBuilder = new OleDbCommandBuilder(dAdapter);
            cBuilder.QuotePrefix = "[";
            cBuilder.QuoteSuffix = "]";
            myDataView = dTable.DefaultView;
            dAdapter.Fill(dTable);
            bndSource = new BindingSource();
            bndSource.DataSource = dTable;
            this.dataGridView1.DataSource = bndSource;

            for (int q = 0; q <= dataGridView1.ColumnCount - 1; q++)
            {
                this.comboBox1.Items.Add(this.dataGridView1.Columns[q].HeaderText.ToString());
            }
            this.textBox3.DataBindings.Clear();
            this.textBox3.DataBindings.Add(new Binding("Text", bndSource,
                this.dataGridView1.Columns[1].HeaderText.ToString(), true));
            this.label1.Text = this.dataGridView1.Columns[1].HeaderText.ToString();

        }

        private void button4_Click(object sender, EventArgs e)
        {
            bndSource.MoveNext();

        }


    }
}
Now that you have tried to do everything with some existing code, next you will have the chance to build a simple data entry form with your own navigation buttons.
Simple Data Entry Form
To do this, save and close the project you were working on and
create a new Windows Forms Application project. In this example, I’ve
called it SimpleDataEntryForm. You will be using the Northwind database
again, and this is just a simple form to navigate through Invoice and
Invoice Details records. Since this is just an example, we are going to
use the bare-minimum number of fields. So, create a text box, two DateTimePicker controls, and labels for each.
These will be for Order ID, Order Date, and Ship Date. Then, add five more
text boxes with labels. These will be for the Order Details fields for ID,
Order ID, Quantity, Unit Price, and Discount. Then, add two more text
boxes with a label in the middle that says “of.” Then add four buttons
that say Next Parent, Next Child, Add New Order Detail, and Save Changes.
How your form looks isn’t that important, but Figure 3-2 shows you what mine looks
like.

You will be adding a bunch of additional objects when compared to
the previous example, and you will also be adding event handlers to
determine when the form has been updated. In addition, since I will be
introducing the DataSet object here, you will see how
updates are handled differently there. Please note that you could add
Previous, Next, Move First, Move Last, and a host of other buttons if you
wanted. Those button click events are handled just like Next buttons—you
would just call the corresponding navigation method.
The only special things you need to take care of on the form design
is setting the Enabled property of the
“ID” TextBox (textBox2 on my form) to
False. You also need to make sure that
you put the button click events onto the right buttons. So, let’s dig into
this.
As in the other code, you need to add the line of code to use
System.Data.OleDb, and you will need to add the
following variables at the class level:
public string connString;
public string query1;
public string query2;
public OleDbDataAdapter orders_dAdapter;
public OleDbDataAdapter order_details_dAdapter;
public DataSet NW_Orders;
public OleDbCommandBuilder cBuilder;
public OleDbCommandBuilder cBuilder1;
public BindingSource orders_bndSource;
public BindingSource order_details_bndSource;
public Boolean saveprompt;
The new items to discuss here are the two data adapters, two command
builders, two binding sources, the lack of DataTable objects as variables, and the DataSet object. Because this form is using a
parent table and the related records in a child table, you need to have
different variables for all of those items. In addition, there is also a
Boolean variable to track when you need to prompt the user to save
changes. For the most part, the various data objects are going to be doing
the exact same things that they were doing in the other examples; the new
step in the code is going to be when you add the DataTables to the DataSet and then set the relation between the
tables.
The DataSet object is very handy
when compared to the ADO/DAO objects that you would have used in Access.
Typically in VBA and Classic VB programming, you would get related records
through a join query or a parameterized query. In C#, the DataSet object lets you add any of the tables
that you want to the one object. You can then show how the parent records
relate to the child records. By doing this, you can simplify the process
of adding and updating related records. You can also show parent and child
records on the same form and handle the navigation without having to
resort to separate forms. It does make sense in most cases to have your
form laid out in a way to accomplish that. But there are times when you
might be storing some related data in a separate table where it won’t
matter to the end user. As an example, you might store phone numbers in a
separate table but only want to allow editing of the primary phone number
in your form. In those cases, you can have one form that shows all your
data, and you can have a very simple form that you couldn’t achieve with
VBA or Classic VB.
There is certainly some complexity in setting up this data structure, but I think once you break down the steps you will find that it isn’t too complicated. When I was learning this, the biggest challenge that I had was finding complete examples showing what I was trying to do. When I was learning Classic VB and VBA, I could usually count on a good example with the particular function, method, or event being used in context in a complete example that I could run. Often, when you are searching for the same thing in C#, you see a partial example that you may or may not be able to use as-is in your code.
When I built my first form using a DataSet with multiple tables that were related,
it took me some time to figure out how to use all of the objects in the
right way to make updating the database work, etc. As it turns out, the
methods are the same, but how you call them and which overloads you use to
make them work are different.
The next snippet of code is what you need to set-up the DataSet:
InitializeComponent();
saveprompt = false;
connString = "Provider=Microsoft.ACE.OLEDB.12.0;Data Source=C:\users\michael\documents\Northwind 2007.accdb";
NW_Orders = new DataSet();
query1 = "SELECT * FROM Orders";
query2 = "Select * from [Order Details]";
orders_dAdapter = new OleDbDataAdapter(query1, connString);
order_details_dAdapter = new OleDbDataAdapter(query2, connString);

cBuilder = new OleDbCommandBuilder(orders_dAdapter);
cBuilder.QuotePrefix = "[";
cBuilder.QuoteSuffix = "]";
cBuilder1 = new OleDbCommandBuilder(order_details_dAdapter);
cBuilder1.QuotePrefix = "[";
cBuilder1.QuoteSuffix = "]";

orders_dAdapter.Fill(NW_Orders, "Orders");
order_details_dAdapter.Fill(NW_Orders, "Order Details");

DataColumn parentcolumn = NW_Orders.Tables["Orders"].Columns["Order ID"];
DataColumn childcolumn = NW_Orders.Tables["Order Details"].Columns["Order ID"];
DataRelation relation = new System.Data.DataRelation("OrderstoDetails", parentcolumn, childcolumn);
NW_Orders.Relations.Add(relation);
When you break this down, you are writing the queries, setting the
command builders (this creates the functions to Add/Update/Delete),
filling the data adapters in the DataSet (you could also create DataTable objects and add them, but this is
easier and eliminates the need for more variables), and then setting up
the relations. I’m going to focus on the DataSet differences here.
Once you have created the new DataSet called NW_Orders, you are going to fill your data
adapters in the DataSet. You do this
with the line of code that reads:
orders_dAdapter.Fill(NW_Orders, "Orders");
If you remember or page back to the example in Chapter 2, you filled the data
adapter right into the Data Table. In this case, you are filling in the
parameter for the DataSet object that
you are using and you set the name that you want to give the DataTable that you are filling inside the
DataSet. The DataSet differences were already covered; now
let’s see how you set up the relations between the DataTables. Take a look at the following
lines:
DataColumn parentcolumn = NW_Orders.Tables["Orders"].Columns["Order ID"];
DataColumn childcolumn = NW_Orders.Tables["Order Details"].Columns["Order ID"];
DataRelation relation = new System.Data.DataRelation("OrderstoDetails", parentcolumn, childcolumn);
NW_Orders.Relations.Add(relation);
First, you are defining DataColumn variables for the parent and child
columns. I called them parentcolumn and
childcolumn just to make it easier
follow what is going on. The next line of code is where you are setting up
the relation. The overload we are using here has three items. First, you
have a string name that you are giving to the relation. This is important,
and you need to remember it because you will need to refer to it when you
create the binding source for the child records. An interesting thing
happens when you set the DataSet up in
this way. First, you will still have access to the entire table of child
records that will not be related. This is tricky because if you refer to
the child DataTable directly when you
are trying to access the records related to the parent table, you won’t
get what you expect. This becomes visually clear in the next chapter when
you access the DataSets with the GUI.
In that example, you’ll see each table individually, and then you’ll also
see the child DataTable again inside
the parent table. When you are trying to access the child records related
to the parent, this DataTable inside
the parent table is what you need to access.
Doing that is fairly simple—you just won’t see many examples that show you explicitly how to do that with code. There are plenty of examples with the data controls, but I do think it’s helpful to learn it this way, and there are times when you will want to do this with code instead of doing it at design time. Take a look at the following lines:
orders_bndSource = new BindingSource();
orders_bndSource.DataSource = NW_Orders.Tables["Orders"];
order_details_bndSource = new BindingSource();
order_details_bndSource.DataSource = orders_bndSource;
order_details_bndSource.DataMember = "OrderstoDetails";
This is pretty straightforward once you see it. You create a
BindingSource object and set it equal
to the parent DataTable that you have
in the NW_Orders (DataSet) object. Then, you create the BindingSource for the child records. However,
the change is that the DataSource for
the child data binding is the parent DataSource. Then, you set the DataMember equal to the name (string) that you
gave the DataRelation. And that’s
it—now you have two binding sources that you can use. When you increment
the parent record, the child binding source will update with the related
child records.
Next, you’ll set up event handlers to determine when the current item you’re working with changes and when the list changes (meaning changes that aren’t happening to the current item). We will also be putting in a more generic handler to catch these events in order to make sure we prompt the user to save the data, but I wanted to also show these events because you will often want to do something when one of them happens. The code snippet follows:
order_details_bndSource.CurrentItemChanged += new EventHandler(order_details_bndSource_CurrentItemChanged);
            order_details_bndSource.ListChanged += new ListChangedEventHandler(order_details_bndSource_ListChanged);
You can do this for any event, so if you haven’t had a chance to use these in the past, this is a very powerful thing to be able to do. You can watch for mouse events, keyboard events, property changes, etc., and then run code to do specific things based on what happened. Keep in mind that these types of event handlers have to be done in code because these objects don’t exist on the form for editing. You will also see that we can set the event handler for groups of objects on the form instead of editing every one. We are going to do that shortly.
While you have now written many lines of code, it wouldn’t do anything yet if you executed the program now. While you have binding objects that are full of data, the code binding that data to the text boxes and date pickers hasn’t been written yet. If you are writing this yourself instead of using the downloaded source code, make sure that you watch the text box names because if yours are named differently, you will need to edit which gets bound to what data. The code to bind is very simple and follows here:
this.textBox1.DataBindings.Add(new Binding("Text", orders_bndSource, "Order ID", true));
            this.dateTimePicker1.DataBindings.Add(new Binding("Text", orders_bndSource, "Order Date", true));
            this.dateTimePicker2.DataBindings.Add(new Binding("Text", orders_bndSource, "Shipped Date", true));
            this.textBox2.DataBindings.Add(new Binding("Text", order_details_bndSource, "ID"));
            this.textBox3.DataBindings.Add(new Binding("Text", order_details_bndSource, "Order ID"));
            this.textBox4.DataBindings.Add(new Binding("Text", order_details_bndSource, "Quantity"));
            this.textBox5.DataBindings.Add(new Binding("Text", order_details_bndSource, "Unit Price"));
            this.textBox6.DataBindings.Add(new Binding("Text", order_details_bndSource, "Discount"));
            this.textBox7.Text = "" + (order_details_bndSource.Position + 1);
            this.textBox8.Text = order_details_bndSource.Count.ToString();
This code snippet is binding the Text property of each control to a specific
field in either the parent or child data source. The last two lines are
adding a count of child records and writing the current position. (The
current position will always start at zero because it is a zero-based
collection, so we add one and it will always start at one.) Each time you
move through the child records, you will need to increment that counter.
And each time you move to a new parent record, you will need to update the
count.
For the final lines of code in the opening procedure, I want to catch any instance of a user physically going into a field. If he does that, I want to prompt him to save any changes that may have been made. There are a lot of ways to accomplish this, and I wouldn’t do it in this manner in a real-world application. But what I wanted to demonstrate here is a way for you to apply an event handler to a group of controls without having to manually do it. If you had a form with 100 controls and you wanted to run certain events on groups of them, you would save yourself a lot of time by using this next piece of code:
foreach (Control tx in this.Controls)
            {
                if (tx.DataBindings.Count > 0 && tx.Name != "textBox1"
                   && tx.Name != "textBox3" )
                {
                    tx.Enter += new EventHandler(tx_Enter);
                }
            }
The code snippet above is looping through every control. It is using
the && operator to signify an
AND condition. The operator != is the
inequality operator. So, that line of code is saying if this control has
bound data and it isn’t one of the ID fields, then put an event handler on
that field that will run when the user enters that control. I only needed
to test for textBox1 and textBox3
because textBox2 isn’t enabled. In this example, the
event handler calls the tx_Enter procedure. I hope you
can see how using three lines of code to accomplish this could be useful
on a form with a lot of controls. The next lines of code are the event
handlers. You could write all of them in one event handler, but I did this
with separate ones because you might want to apply different lines of
code, depending on the event. So, I wanted you to see how to assign
different procedures. If you replaced those other procedure names with
tx_Enter in the code, you could
eliminate those other procedures:
        void tx_Enter(object sender, EventArgs e)
        {
            saveprompt = true;
        }

        void order_details_bndSource_ListChanged(object sender, ListChangedEventArgs e)
        {
            saveprompt = true;
        }
        private void order_details_bndSource_CurrentItemChanged(object sender, EventArgs e)
        {
            saveprompt = true;
        }
In these cases, you are saying: if any of these events are
triggered, set the saveprompt variable
to true. Before I show you how we use
that variable, I first want to cover how you pass the changes in the
form’s bound controls to the database. This is done slightly differently
than we’ve seen earlier:
        private void SaveChanges_Click(object sender, EventArgs e)
        {
            try {

                orders_bndSource.EndEdit();
                order_details_bndSource.EndEdit();
                orders_dAdapter.Update(NW_Orders, "Orders");
                order_details_dAdapter.Update(NW_Orders,"Order Details");
                saveprompt = false;

                MessageBox.Show("Record Updated");
            }
            catch (OleDbException f)
            {
                MessageBox.Show("Record Update Failed - Error Code " + f.ErrorCode.ToString() );
            }

        }
First, you again will want to put this code in a try ... catch statement so that if there are any
problems saving the data, you can pass that information to the user. It
could fail for any number of reasons, including failing validation and
invalid field names (if you didn’t set the QuotePrefix and QuoteSuffix). You can also trap specific
exceptions. In this case, you are trapping any OleDbException, but you can have specific text
for every kind of exception. The first steps in the saving procedure are
to end the edits on both data sources. Then there is a specific order that
you need to call updates in a parent/child DataSet: Delete Child Records, Add/Update/Delete
Parent Records, and finally Add/Update Child Records. Since the users
don’t have the ability to delete records in this sample application, you
will skip that step here. If you think about how you called the update
methods in the previous examples, this is similar. But remember that you
don’t have a DataTable object described
here. So, you will use a different overload method, which takes the
DataSet object and then the name of the
DataTable as a string. The slightly confusing part is that for
the child table, you pass the DataTable name and not the name that you gave
the relation. Once this completes, you will show the message to the user,
letting her know that it updated. You could also do this by updating a
text box like we did in the example in Chapter 1. You set the saveprompt to false after the user clicks save
so that if she clicks save and then clicks a navigation button before any
additional editing, you won’t prompt her again.
The next two procedures are the navigation procedures; if someone
clicks one of those buttons, you will prompt the user to see if she wants
to save before moving off of the current record if the saveprompt is true. The code here is very
similar to code that you would have in Classic VB or VBA:
        private void NextChild_Click(object sender, EventArgs e)
        {
            if (saveprompt)
            {
                DialogResult x =  MessageBox.Show("Do you want to save the data first?", "Important", MessageBoxButtons.YesNo);
              if (x == DialogResult.Yes)
              {
                  try
                  {

                      orders_bndSource.EndEdit();
                      order_details_bndSource.EndEdit();
                      orders_dAdapter.Update(NW_Orders, "Orders");
                      order_details_dAdapter.Update(NW_Orders, "Order Details");

                      MessageBox.Show("Record Updated");
                  }
                  catch (OleDbException f)
                  {
                      MessageBox.Show("Record Update Failed - Error Code " + f.ErrorCode.ToString());
                  }
              }
            }
                order_details_bndSource.MoveNext();
                this.textBox7.Text = "" + (order_details_bndSource.Position + 1);
                saveprompt = false;

        }
        private void NextParent_Click(object sender, EventArgs e)
        {
            if (saveprompt)
            {
                DialogResult x = MessageBox.Show("Do you want to save the data first?", "Important", MessageBoxButtons.YesNo);
                if (x == DialogResult.Yes)
                {
                    try
                    {

                        orders_bndSource.EndEdit();
                        order_details_bndSource.EndEdit();
                        orders_dAdapter.Update(NW_Orders, "Orders");
                        order_details_dAdapter.Update(NW_Orders, "Order Details");

                        MessageBox.Show("Record Updated");
                    }
                    catch (OleDbException f)
                    {
                        MessageBox.Show("Record Update Failed - Error Code " + f.ErrorCode.ToString());
                    }
                }
            }
            orders_bndSource.MoveNext();
            this.textBox7.Text = "" + (order_details_bndSource.Position + 1);
            this.textBox8.Text = order_details_bndSource.Count.ToString();
            saveprompt = false;
        }
Breaking down this code is pretty straightforward, and both pieces
of code are similar. First, you are prompting to save, and that code is
exactly the same as the save procedure (except that you didn’t need to
change the saveprompt to false). The first if statement is checking if you need to prompt
the user, and since that variable is a Boolean, you just need the variable. The second
if statement is checking the user
input, and the code only runs the save routine if the user selects Yes.
Then, regardless of what the saveprompt
was or how the user answered the Save question, the binding source (parent
or child, depending) is going to be incremented. Then the text boxes that
let you know how many child records there are and the current position are
updated. The last step sets the saveprompt to false because we have already prompted the user
to save, so now we are waiting for the next change. Note that you are
doing the navigation methods on the binding source. But this shouldn’t
lead you to believe that the binding source is equivalent to the recordset object in ADO/DAO, because while there
are some similarities, they are very different. The specific differences
are that the recordset objects
generally are connected. The ADO.NET objects that you have been using here
are loaded and then disconnected, which is why you must call the updates
to the database explicitly.
The only part of the code that hasn’t been covered here is the
AddNew method for adding child
records:
private void AddNew_Click(object sender, EventArgs e)
        {
            order_details_bndSource.AddNew();

        }
This code snippet simply adds a new data row to the child data table. When you do that, the binding source automatically moves to that new record. You should notice that the linked field—in this case, the Order ID—is automatically populated with the current parent record’s Order ID. You don’t need to do anything special with this; when you navigate away or click Save, those changes will be committed to the database.
While this chapter covered a lot of information, it is hopefully presented in easily digestible chunks. Once you go through the examples, things become very clear. The hardest part of this type of application programming is knowing when to use each option that you have. Typically, there are 5 to 10 different ways to accomplish any given task. I’m hoping to show a way that works here, however, you should keep your eye out for other ways of doing these things. I’m not suggesting that any of the methods here are the absolute right methods, but they have been tested and they work.
The full code listing for this example follows:
using System;
using System.Collections.Generic;
using System.ComponentModel;
using System.Data;
using System.Data.OleDb;
using System.Drawing;
using System.Linq;
using System.Text;
using System.Windows.Forms;

namespace SimpleDataEntryForm
{
    public partial class Form1 : Form
    {
        public string connString;
        public string query1;
        public string query2;
        public OleDbDataAdapter orders_dAdapter;
        public OleDbDataAdapter order_details_dAdapter;
        public DataSet NW_Orders;
        public OleDbCommandBuilder cBuilder;
        public OleDbCommandBuilder cBuilder1;
        public BindingSource orders_bndSource;
        public BindingSource order_details_bndSource;
        public Boolean saveprompt;

        public Form1()
        {
            InitializeComponent();
            saveprompt = false;
            connString = "Provider=Microsoft.ACE.OLEDB.12.0;
Data Source=C:\users\michael\documents\Northwind 2007.accdb";
            NW_Orders = new DataSet();
            query1 = "SELECT * FROM Orders";
            query2 = "Select * from [Order Details]";
            orders_dAdapter = new OleDbDataAdapter(query1, connString);
            order_details_dAdapter = new OleDbDataAdapter(query2, connString);

            cBuilder = new OleDbCommandBuilder(orders_dAdapter);
            cBuilder.QuotePrefix = "[";
            cBuilder.QuoteSuffix = "]";
            cBuilder1 = new OleDbCommandBuilder(order_details_dAdapter);
            cBuilder1.QuotePrefix = "[";
            cBuilder1.QuoteSuffix = "]";

            orders_dAdapter.Fill(NW_Orders, "Orders");
            order_details_dAdapter.Fill(NW_Orders, "Order Details");

            DataColumn parentcolumn = NW_Orders.Tables["Orders"].Columns["Order ID"];
            DataColumn childcolumn = NW_Orders.Tables["Order Details"].Columns["Order ID"];
            DataRelation relation = new System.Data.DataRelation("OrderstoDetails", parentcolumn, childcolumn);
            NW_Orders.Relations.Add(relation);

            orders_bndSource = new BindingSource();
            orders_bndSource.DataSource = NW_Orders.Tables["Orders"];
            order_details_bndSource = new BindingSource();
            order_details_bndSource.DataSource = orders_bndSource;
            order_details_bndSource.DataMember = "OrderstoDetails";

            order_details_bndSource.CurrentItemChanged += new EventHandler(order_details_bndSource_CurrentItemChanged);
            order_details_bndSource.ListChanged += new ListChangedEventHandler(order_details_bndSource_ListChanged);

            this.textBox1.DataBindings.Add(new Binding("Text", orders_bndSource, "Order ID", true));
            this.dateTimePicker1.DataBindings.Add(new Binding("Text", orders_bndSource, "Order Date", true));
            this.dateTimePicker2.DataBindings.Add(new Binding("Text", orders_bndSource, "Shipped Date", true));
            this.textBox2.DataBindings.Add(new Binding("Text", order_details_bndSource, "ID"));
            this.textBox3.DataBindings.Add(new Binding("Text", order_details_bndSource, "Order ID"));
            this.textBox4.DataBindings.Add(new Binding("Text", order_details_bndSource, "Quantity"));
            this.textBox5.DataBindings.Add(new Binding("Text", order_details_bndSource, "Unit Price"));
            this.textBox6.DataBindings.Add(new Binding("Text", order_details_bndSource, "Discount"));
            this.textBox7.Text = "" + (order_details_bndSource.Position + 1);
            this.textBox8.Text = order_details_bndSource.Count.ToString();

            foreach (Control tx in this.Controls)
            {
                if (tx.DataBindings.Count > 0 && tx.Name != "textBox1" && tx.Name != "textBox3" )
                {
                    tx.Enter += new EventHandler(tx_Enter);
                }
            }


        }

        void tx_Enter(object sender, EventArgs e)
        {
            saveprompt = true;
        }

        void order_details_bndSource_ListChanged(object sender, ListChangedEventArgs e)
        {
            saveprompt = true;
        }


        private void NextParent_Click(object sender, EventArgs e)
        {
            if (saveprompt)
            {
                DialogResult x = MessageBox.Show("Do you want to save the data first?", "Important", MessageBoxButtons.YesNo);
                if (x == DialogResult.Yes)
                {
                    try
                    {

                        orders_bndSource.EndEdit();
                        order_details_bndSource.EndEdit();
                        orders_dAdapter.Update(NW_Orders, "Orders");
                        order_details_dAdapter.Update(NW_Orders, "Order Details");

                        MessageBox.Show("Record Updated");
                    }
                    catch (OleDbException f)
                    {
                        MessageBox.Show("Record Update Failed - Error Code " + f.ErrorCode.ToString());
                    }
                }
            }
            orders_bndSource.MoveNext();
            this.textBox7.Text = "" + (order_details_bndSource.Position + 1);
            this.textBox8.Text = order_details_bndSource.Count.ToString();
            saveprompt = false;
        }

        private void order_details_bndSource_CurrentItemChanged(object sender, EventArgs e)
        {
            saveprompt = true;
        }


        private void NextChild_Click(object sender, EventArgs e)
        {
            if (saveprompt)
            {
                DialogResult x =  MessageBox.Show("Do you want to save the data first?", "Important", MessageBoxButtons.YesNo);
              if (x == DialogResult.Yes)
              {
                  try
                  {

                      orders_bndSource.EndEdit();
                      order_details_bndSource.EndEdit();
                      orders_dAdapter.Update(NW_Orders, "Orders");
                      order_details_dAdapter.Update(NW_Orders, "Order Details");

                      MessageBox.Show("Record Updated");
                  }
                  catch (OleDbException f)
                  {
                      MessageBox.Show("Record Update Failed - Error Code " + f.ErrorCode.ToString());
                  }
              }
            }
                order_details_bndSource.MoveNext();
                this.textBox7.Text = "" + (order_details_bndSource.Position + 1);
                saveprompt = false;

        }

        private void AddNew_Click(object sender, EventArgs e)
        {
            order_details_bndSource.AddNew();

        }

        private void SaveChanges_Click(object sender, EventArgs e)
        {
            try {

                orders_bndSource.EndEdit();
                order_details_bndSource.EndEdit();
                orders_dAdapter.Update(NW_Orders, "Orders");
                order_details_dAdapter.Update(NW_Orders,"Order Details");
                saveprompt = false;
                MessageBox.Show("Record Updated");
            }
            catch (OleDbException f)
            {
                MessageBox.Show("Record Update Failed - Error Code " + f.ErrorCode.ToString() );
            }

        }


    }
}
The biggest takeaway from this chapter should be using related data
tables within a DataSet. There are
specific actions you take in navigating the data in these data sets and in
passing changes to the database. While this process in C# is certainly
more challenging from a programming standpoint, I do think that it opens
up some options that you don’t have with a form/sub-form solution in
Access. Also, there is nothing stopping you from drawing the controls on
the form with a border that makes it look like a sub-form if you think
that is what your users are expecting.
The other thing that you may have not noticed is that you can bind
to different types of controls. As an example, you bound the date fields
to a date/time picker control. You can bind to a CheckBox, ProgressBar, ComboBox, etc. While that isn’t new, it also
isn’t something that you are giving up when you use C#.
In the next chapter, you will have the chance to use the built-in controls for data access. You will build a similar parent/child form and when you are done, you’ll have two different ways to accomplish these tasks.