
6.3. Implementing the Event Callback Routines
Our implementation is driven by three user-initiated events:
1. |
The entry of text into the text box. |
2. |
The clicking of the OK button signaling that entry is complete. |
3. |
The clicking of the Quit button to terminate the application. |
The methods we implement to respond to these events are referred to as callbacks or event handlers. There are two steps to implementing event handlers: Writing the code, of course, is the first step. The second step is registering the callback function with the control widget through which the event occurs. For our program, the three controls are the text box and the two buttons.
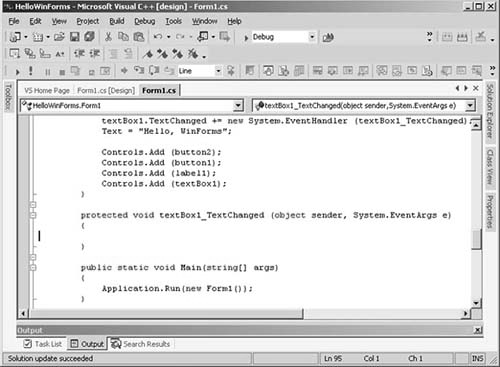
When we double-click on the control—for example, the text box—the designer generates the skeleton of a callback method for that control (and generates the code necessary to register the event handler with the control). The view changes to the code view, and our cursor is placed between the curly braces of the empty function body (see Figure 6.9).
Figure 6.9. Code View of Our TextBox Event in Form1.cs
Notice that the designer and code views share the same name (Form1.cs, by default). The designer view is distinguished by the [Design] attribute to the right of its name. We can toggle between the two views of the form by clicking either on the name or on the Code (F7) or Design (Shift+F7) menu item under View.
The object representing our window is automatically inherited from the Form class defined within the System.Windows.Forms namespace. Each of the controls we drag and drop onto the design form is added to the class as a private member. For example, here is the data portion of the generated class definition:
public class Form1 : System.Windows.Forms.Form
{
      private System.Windows.Forms.Button  button2;
      private System.Windows.Forms.Button  button1;
      private System.Windows.Forms.Label   label1;
      private System.Windows.Forms.TextBox textBox1;

      // ...
}
By default, when we add a control using the designer, the name of the object is the name of the control, but with a lowercase first letter, and a number suffix representing the count of instances of that type of control that our Form object currently contains. For our TextBox control, the associated object is named textBox1. For our two Button controls, the objects are named button1 and button2. The Label object, not surprisingly, is named label1.
button1 and button2 are particularly uninformative as names. In a form with many controls, these generic names quickly become confusing. It is much more helpful to rename the button objects to something meaningful—perhaps buttonOK and buttonQuit.
In general, we change the name of a control by modifying the Name entry of the control's Properties window. (By the way, I recommend that you do this before you add your own code. The form designer updates code that it has generated; it does not modify code that you have added.)
Controls is a property of the Form class. It represents an initially empty collection of the child controls associated with the window. As we drag and drop each control into our form, the designer generates code to define the control and insert it into the Controls property. Add() is the collection's insertion method. For example, if you look at Figure 6.9, you'll see the code generated by the designer to associate the four controls with our window:[1]
[1] The strategy for the designer has changed since the version of code reflected in Figure 6.9. An AddRange() method is now used to add all the controls within one statement rather than each control being added individually.
Controls.Add( button2 );
Controls.Add( button1 );
Controls.Add( label1 );
Controls.Add( textBox1 );
Our job at this point is to implement the associated event handlers for these controls. The name of the first event we wish to handle is TextChanged. This event is triggered whenever the content of the text box changes—literally as soon as we lift a finger from the key we've pressed.
The default name for the event handler is the combination of the control name and the event name, joined by an underscore. The event handler always has a return value of void and a two-parameter signature. The first parameter refers to the control through which the event occurs. For our event, the control is the TextBox object whose text string is being modified. The second parameter holds additional event data, if any. For the TextChanged event, this parameter is empty.
Code to register the callback method is generated automatically by the form designer. It appears as the first line of code in Figure 6.9:
textBox1.TextChanged +=
   new System.EventHandler(textBox1_TextChanged);
TextChanged is an event property of the TextBox control. Each time the content of the text box changes, the callback methods currently registered with TextChanged are invoked.
EventHandler is a delegate type. A delegate serves as a reference to a static or nonstatic class member function. In this example the designer creates an EventHandler object that is bound to the event handler. (See Section 2.12 for a discussion of the delegate type.)
The compound assignment operator (+=) does the registration. It adds this new event handler to the list maintained by the TextChanged property.
6.3.1. Implementing a TextBox Event
What we want to do within this callback method is modify the title bar, which begins the application as Hello, Windows Forms, to reflect the entry as the user types in his or her name. So, for example, as the user enters Stan, the title bar becomes in turn Hello, S; Hello, St; Hello, Sta; and finally Hello, Stan.
How can we do that? The text associated with textBox1 is stored in its Text property. For example, to test if the text box is empty, we write
if ( textBox1.Text == string.Empty )
          return;
The title bar is part of our Form1 class, and it is represented by its associated Text property. If you look at Figure 6.9, you'll see it assigned its initial string value on line 2 of the code:
Text = "Hello, Windows Forms";
(Outside a Form1 member function, we would write Form1.Text.)
To modify the title bar within our callback method, we'll reset the title bar Text property with the Text property of the text box:
protected void
textBox1_TextChanged( object sender, EventArgs e )
{
   if ( textBox1.Text != String.Empty )
          Text = "Hello, " + textBox1.Text;
}
6.3.2. Implementing the Button Events: OK
By clicking on the OK button, the user indicates that she has completed entering her name. The first thing we need to do in response to the click event, then, is confirm that the text box is not empty. If it is empty, we pop up a message box indicating that the entry in the text box is invalid. Otherwise, we pop up a message box containing our greeting. Our greeting includes not only the user's name, but the current date and time as well. OK, let's see how we do that.
The event we wish to respond to is the Click property of the Button class. The OK button object is by default named button1, just because it is the first button we designed. Here is the code generated by the form designer to register the button1_Click callback method:
button1.Click +=
    new System.EventHandler( button1_Click );
First we check whether the textBox1.Text property is empty. If it is, we display a bad-data pop-up dialog and return (see Figure 6.3 for an illustration). In the following code segment, the dialog messages, titles, and style attributes for the dialog are factored into individual arrays:
protected void
button1_Click( object sender, System.EventArgs e )
{

   string [] messages =
   {
        "Please enter your name before pressing OK",
        "Welcome to your first Windows form"
   };

   string [] titles =
   {
        "Bad Data Dialog",
        "Hello, Windows Dialog"
   };

   if ( textBox1.Text == string.Empty )
   {
         MessageBox.Show( messages[0], titles[0],
                          MessageBoxButtons.OK,
                          MessageBoxIcon.Warning );
         return;
   }
Let's defer discussing the MessageBox pop-up dialog class until later (it is covered in Section 6.5). Everything else in the code segment should be familiar at this point. Finally, we compose our Hello message string to greet the user, and we invoke the MessageBox.Show() method to generate the corresponding pop-up dialog (see Figure 6.2):
    string helloMessage = "hello, " +
        textBox1.Text + "!
" +
        messages[1] + "
at " +
        current.ToShortTimeString() + " on " +
        current.ToLongDateString();

    MessageBox.Show( helloMessage, titles[1],
                     MessageBoxButtons.OK,
                     MessageBoxIcon.Information );
}
That completes the callback method to be invoked when the user clicks on the OK button.
6.3.3. Implementing the Button Events: Quit
When the user clicks on the Quit button, we'll spawn one of those annoying Are you sure? pop-up dialogs (see Figure 6.4). If the user responds by clicking OK, we generate an OK: bye! pop-up dialog (see Figure 6.5) and close the application using the Close() method of our Form1 class. The callback method is implemented as follows:
protected void
button2_Click( object sender, System.EventArgs e )
{
   string message =
          "Are you sure you want to quit, "
          + textBox1.Text + "?";

   string title = "DoubleCheck Dialog";

   DialogResult dr =
          MessageBox.Show(
                message,
                title,
                MessageBoxButtons.OKCancel,
                MessageBoxIcon.Error
          );

   if ( dr == DialogResult.OK )
   {
         MessageBox.Show(
                 "OK: "
                 + textBox1.Text + " -- bye!"
          );

         Close();
   }
}
That's the full implementation of our first Windows Forms application. In the next section we look in more detail at the events associated with the various controls.