
CHAPTER 5
Chapter Objectives
By the end of the chapter, readers will be able to:
![]() Understand and use input and output streams.
Understand and use input and output streams.
![]() Understand the difference between endl and ‘
’.
Understand the difference between endl and ‘
’.
![]() Format output streams using manipulators.
Format output streams using manipulators.
![]() Format output streams using member functions.
Format output streams using member functions.
![]() Understand the value of using various debugging tools.
Understand the value of using various debugging tools.
![]() Set and remove breakpoints.
Set and remove breakpoints.
![]() Use watches to examine the contents of variables.
Use watches to examine the contents of variables.
In the previous chapters we have written text to the screen using cout without a detailed explanation of how cout works. Although there are other forms of input and output (I/O), this chapter focuses on how to write output to the console window (the screen) and read input from the keyboard using streams. Remember, input and output were two of the key aspects of the IPO phases discussed in Chapter 2.
5.1 Input and Output Streams
The basic form of I/O in C++ incorporates the use of streams, similar to a stream found in a forest. A C++ stream, however, is a flow of information instead of water. The flow can run either from the input device (keyboard) into your program or from your program to an output device (console window or screen). All of the streams in this chapter require including the header file <iostream>.
![]()
Remember: To include a header file in your program, you must use the #include preprocessor directive, in this case #include <iostream>.
5.1.1 Namespaces and I/O Streams
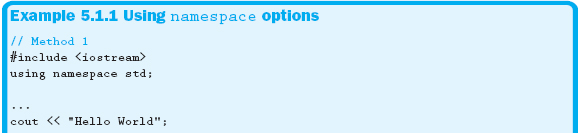
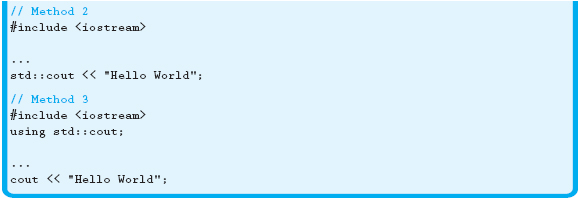
Don't forget that the namespace rules must be followed in order to access the individual components of the header file, as shown in Example 5.1.1. While all the methods shown would work, the third method is the preferred approach, as discussed in Section 3.5.1.
5.1.2 The cout Statement
The cout statement allows us to display information to the screen. The information we can write using cout includes literals, constants, and variables. Example 5.1.2 shows how to use the cout statement to write a string literal, “Hello World”, to the screen.

![]()
Remember: The term cout stands for console output.
Because we are inserting the string literal “Hello World” into the cout stream, the operator << associated with the cout statement is called the insertion operator. As previously noted, the cout statement is not limited to displaying string literals. Example 5.1.3 demonstrates using the cout statement to display the contents of variables.

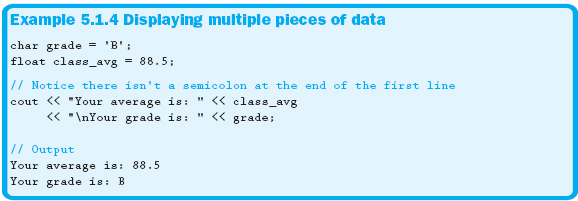
Displaying variables of other data types with cout is just as easy. The only data type that might produce some unexpected results is the bool. Instead of printing true or false, cout actually prints a 1 for true values and a 0 for a false value. Another feature of the cout statement is that we can write multiple pieces of data using a single statement, as shown in Example 5.1.4.
![]()
Remember: The ‘ ’ is an escape sequence that moves the cursor to the next line.
![]()
Remember: Always put a space between any operator and its operands to improve readability.
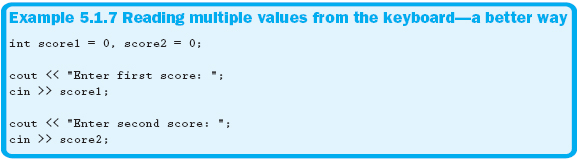
The cin statement reads data from the input stream, which is the keyboard by default, and stores that value, if possible, in the variable used in the cin statement. Example 5.1.5 shows how to use cin to read from the keyboard.

![]()
Remember: The term cin stands for console Input.
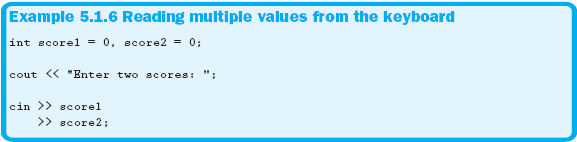
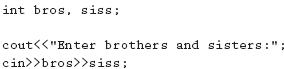
Notice that we use a different operator (>>) with cin than we did with cout. Because we are removing, or extracting, information from the data stream, this operator is called the extraction operator. The right operand of the extraction operator must be a variable or variables. Like cout, cin can handle multiple values from the keyboard using a single statement, as demonstrated in Example 5.1.6.
The two scores entered in Example 5.1.6 must be whitespace delimited. This simply means that when the two values are entered, they must be separated by some form of whitespace. Whitespace can be one or more spaces, a tab, or carriage return. When all of the input has been typed in, press the enter key to signify that the input process is finished.
Section 5.1 Exercises
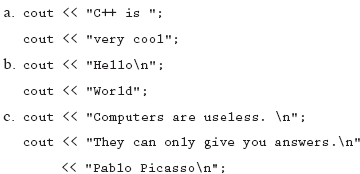
1. Show the output generated by the following lines of code:
2. What header file do you need to include in your program when using cin or cout?
![]()
3. Earlier in the text we discussed I → P → O. Which of the following C++ statements relate to the output phase?
![]()
4. Assume you wanted to read data from the keyboard. Which of the following C++ statements would you use?
![]()
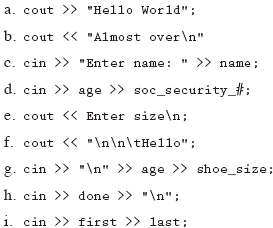
5. Which of the following statements are invalid? For each invalid statement, state what is wrong with it.
Section 5.1 Learn by Doing Exercises
The following exercises are intended to be short, hands-on programs that emphasize the topics covered in this section. Write, compile, and run the following programs.
1. Write a program to display a prompt and read a person's age.
2. Take the following code fragment and convert it to a more appropriate style. Don't forget to make the variable names more descriptive. Be sure to write the entire program.
5.2 The end1 Manipulator
We have already seen the use of the ‘ ’ escape sequence to move the cursor to the next line. The endl manipulator also moves the cursor to the next line and has an additional characteristic, as you will soon see. Example 5.2.1 demonstrates the use of endl.
![]()
A manipulator is a command that is directly placed into the stream.
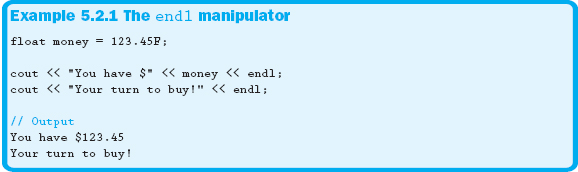
![]()
Remember: The term endl stands for end line.
5.2.1 The endl Manipulator Versus ‘ ’
As stated before, endl and ‘ ’ seem to do the same thing. However, endl does something ‘ ’ does not. In order to understand the difference, we need to know what really happens under the hood when we print to the screen.
There is actually an intermediate step between the execution of the cout statement and the text appearing on the screen. All of the information inserted into the stream is sent to an area in memory called the output buffer. The buffer holds the information until a signal is received to write the entire buffer to the screen. This process is called flushing the buffer. The endl manipulator is one way to flush, or dump, the contents of the output buffer to the screen. While ‘ ’ does indeed move the cursor to the next line, it doesn't flush the buffer. The buffer is also flushed when your program ends. There is also another way to flush the buffer, which we will discuss in Section 5.4.4.
So which method is preferred? It really depends on your situation. There is more overhead to endl; therefore, it is more expensive, in relation to speed. Use the ‘ ’ when possible unless you need to flush the output buffer. One thing you should never do is have more than one endl per cout statement. The additional performance cost doesn't justify having the extra endls. Use an endl only at the end of a cout statement.
Section 5.2 Exercises
1. Which of the following moves the screen cursor to the next line and flushes the output buffer?
![]()
2. What output would be displayed in each of the following lines?
5.3 Input and Output Buffers
In programming, the term buffer is often used to refer to a specific area of memory that holds data. The input buffer contains data that is going to be read via a cin statement, while the output buffer holds data generated by a cout statement.
The reason for the output buffer is to speed up the process of writing to the screen. It is always quicker and less resource-intensive to perform one write to the screen with a lot of information than multiple writes with just one piece of information.
This process is similar to when Troy moved a pile of gravel for his dad. He started by carrying a shovel full of gravel to the new location and then went back to the original pile and repeated the process. Troy's dad informed him it would be much quicker if he were to fill a wheelbarrow with the gravel and use it to dump the gravel at the new location. Troy did as he was told, even though he preferred the other method because he was being paid by the hour.
The input buffer is used to temporarily store data typed from the keyboard so it can be manipulated and assigned to variables. It is much quicker and easier to work with the data in the buffer than to process each individual keystroke. We will have more to say about the input buffer in Chapter 10.
5.4 Formatting the Output Stream
Up to this point, we had to accept the default way our output appeared. Now we will see several ways to format the output to fit our specific needs. There are two syntactically different techniques for formatting the output stream (cout).
The first method involves using member functions, in which the function can only be accessed through cout. There is a lot more going on here, which we will discuss later in the text. The following shows the syntax for using a cout member function:
cout.<function_name> ( <parameters> );
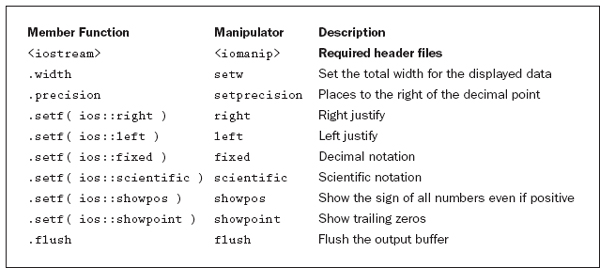
Table 5.4.1 Formatting member functions and manipulators
The preceding syntax example uses the term parameters. A parameter is the data we supply to the function so that it has all the information it needs to perform its task.
The second method of formatting the output uses manipulators. We have already seen an example of manipulators when we discussed endl. Remember, a manipulator is a command placed directly into the output stream.
Both member functions and manipulators allow you to format the output stream; they are just two different ways to accomplish the same thing. Table 5.4.1 shows some of the more common member functions and the corresponding manipulators.
5.4.1 The .width Member Function and setw Manipulator
When data is printed to the screen, all of the data is printed without any additional padding.
![]()
Padding is placing spaces on either side of the data.
The .width member function and setw manipulator allow you to specify how much space a piece of data will occupy on the screen. If the data isn't big enough to fill the allotted space, the data will be padded with spaces. The side of the data the spaces will appear on depends on the justification of the data. If the data is right justified, spaces will appear on the left side of the data. If the data is left justified, spaces will appear on the right side of the data. By default, all data is right justified or aligned.
![]()
Remember: If the data is larger than the specified width, the data will not be truncated; it will simply not appear with any padding.
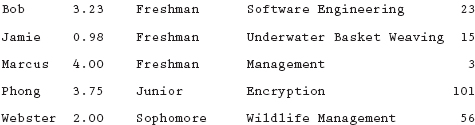
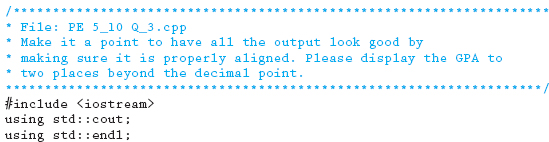
Strings are typically left justified, so the beginning of each string appearing on separate lines will line up. Numbers, however, should always be right justified so that the decimals line up. Figure 5.4.1 shows an example report that uses appropriate justification.
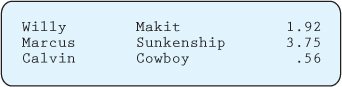
Figure 5.4.1 Sample justification
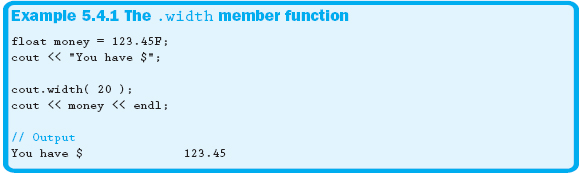
Example 5.4.1 demonstrates the .width member function and how the output will be displayed on the screen.
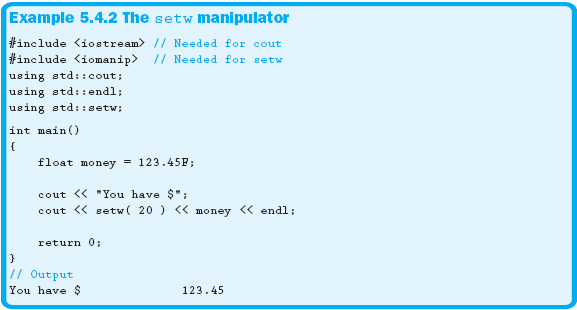
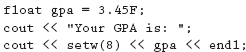
Example 5.4.2 shows the corresponding form using the setw manipulator. In order to use formatting manipulators, include the header file <iomanip> and use the appropriate namespace rules.
Notice the extra spaces, or padding, between the literal and the value stored in money. We set the width for 20 total spaces and the data takes up 6; therefore, there are 14 spaces used as padding.
![]()
Remember: It is a common mistake to not include the decimal point as a character when counting the total space required for your output.
The width setting is volatile, meaning the setting is applied only to the next output statement. After that statement, the width setting is automatically reset.
5.4.2 The .precision Member Function and setprecision Manipulator
The .precision member function and setprecision manipulator set the number of digits displayed to the right of the decimal place. Unlike .width and setw, .precision and setprecision are not volatile. Therefore, the precision remains set until a different value is given.
5.4.3 The .setf Member Function
The .setf member function can be used to perform many formatting tasks by incorporating the concept of flags. A flag is a value that represents a specific setting or state.
![]()
Remember: The term setf stands for set flag.
To format the output stream, a flag representing the specific formatting function is passed to .setf. Example 5.4.3 shows an example of how to use .setf. An entire program is provided so that you can see the required header files and related namespace rules.
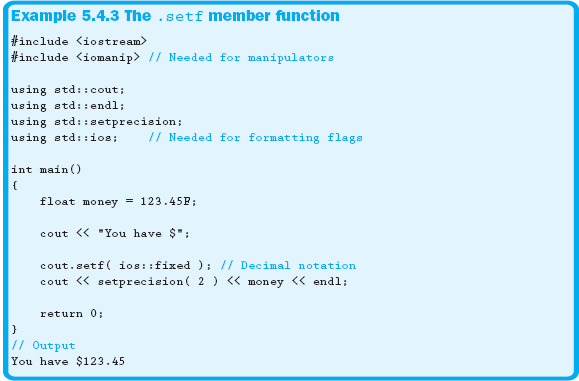
For every flag passed to .setf, there is a corresponding manipulator with the same name as the flag, as shown in Example 5.4.4.

![]()
Remember: Any flag that is set, or turned on, can be unset using the member function unsetf.
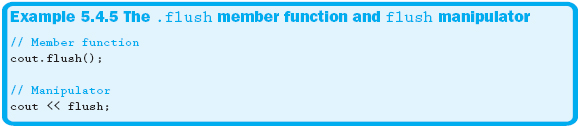
5.4.4 The .flush Member Function and flush Manipulator
When discussing the endl manipulator, we presented the concept of the output buffer. We also mentioned that endl flushes the output buffer and moves the cursor to the next line. But what if we want to flush the output buffer without moving the cursor to the next line? That is where the .flush member function or flush manipulator comes in. The .flush member function and the flush manipulator both flush the output buffer without creating a new line, as shown in Example 5.4.5.
Section 5.4 Exercises
1. You can use a couple of different options for formatting the output stream. However, all of these methods are only used with:
![]()
2. What are the two main categories or techniques available for formatting the output stream?
3. The predefined identifier endl is an example of which of the following?
![]()
4. The code fragment .setf( ios::right ) is an example of which of the following?
![]()
5. Both .setf( ios::right ) and the manipulator right do what?
![]()
6. The .width member function and setw manipulator allow you to specify how much space a piece of data will occupy on the screen. If the data or value isn't large enough to fill the requested space, the data will be padded with what?
![]()
7. By default, all data is _______________________ justified.
![]()
8. Based on the following section of code, please display the data generated. Use ‘b’ in your output to represent spaces.
9. When displaying the total spaces you requested for your output, you must remember to include the decimal point in your count.
True |
False |
10. If the data you attempt to display is bigger than the size of the width you specified, the data will be truncated.
True |
False |
11. What header file do you need to include to use formatting manipulators?
![]()
Section 5.4 Learn by Doing Exercises
The following exercises are intended to be short, hands-on programs that emphasize the topics covered in this section. Write, compile, and run the following programs.
1. Write a program that accepts as input from the keyboard a decimal number representing a person's temperature. Display the person's temperature on the screen, formatted so that it reserves six total spaces on the screen and will always show one decimal place, even if it is zero.
2. Write a program that generates the following report and displays it to the screen. Use literals for all data. Make sure to display appropriate column headings. In the following sample, the fields are first name, GPA, class, major, and number of credits. Be sure to refer to Table 5.4.1 for help.
5.5 Debugging
Now that you are starting to write larger programs, you will encounter more runtime and logic errors. As mentioned earlier, the debugger will quickly become your new best friend in locating and correcting these errors. The debugger is actually a set of tools that allows you to analyze your program line by line while it is running. This way you can narrow down where the errors were introduced into your program. This section introduces some of the tools commonly encountered in most programming environments. Section 5.9, Debugging Exercise, will extend your knowledge by guiding you step-by-step through a practical application of the debugger.
![]()
Remember: The debugger can only help find logic and runtime errors. All syntax errors must be resolved before an executable is built.
5.5.1 Step Into, Step Over, and Step Out
These tools allow you to execute your program line by line. The Step Into tool executes the current line in the execution process. This line is designated in Visual Studio by a yellow arrow in the left margin, as shown in Figure 5.5.1.
If the current line is a function call or routine, using Step Into will attempt to step into the code within that function or routine. Although usually undesirable, this can be interesting if the function or routine is predefined. For example, using Step Into as shown in Figure 5.5.1 will take you to the code for the insertion operator. This might be interesting, although it is guaranteed to be highly confusing. It is usually better to use Step Over when the current line of execution includes a predefined routine.

Figure 5.5.1 Current line of execution
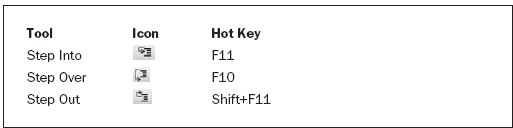
Table 5.5.1 Visual Studio tools
Step Over executes the current line without stepping into the code within that function or routine. Using Step Over in Figure 5.5.1 will execute Line 11 and advance the arrow to Line 12. If you accidentally find yourself in some code you really don't want to be in, such as cout, using Step Out will take you back to where you entered the undesirable code. Visual Studio has toolbar icons as well as hot keys to access these tools, as shown in Table 5.5.1.
5.5.2 Run to Cursor
Although the step tools are very useful, in large programs it could be quite time consuming to step over each line until an error is encountered. If there are lines of code that have been proven to be correct, you can bypass these lines by placing the cursor—not to be confused with the mouse cursor—on any executable line and selecting Run to Cursor. The program will then run normally until that line of code has been reached. Execution will then stop, and you will be able to continue from that line of code using the step tools to resume the line-by-line execution.

Figure 5.5.2 Breakpoints
Visual Studio hides this tool; however, it can be executed by right-clicking in the code window and choosing the correct option from the popup menu. You can also use the Ctrl+F10 hot key to initiate the Run to Cursor process.
5.5.3 Breakpoints
Breakpoints accomplish the same basic functionality as Run to Cursor. The added benefit of breakpoints is that you can have multiple breakpoints located strategically throughout your code. Using the Start Debugging option in Visual Studio runs to the first breakpoint. Once the program has been started using any of the debugging tools, the Resume option will jump to the next breakpoint.
To place a breakpoint on a line of code is very simple in Visual Studio. By clicking in the left margin on the desired line, a reddish circle will appear. This designates that the line now has a breakpoint associated with it. Figure 5.5.2 shows an example program with two breakpoints, the first one having been encountered, which stopped the program execution on that specific line.
There are several other options that are important in managing breakpoints from within Visual Studio.
![]() Toggle Breakpoints (F9): Sets or removes a breakpoint on the current line, as designated by the cursor.
Toggle Breakpoints (F9): Sets or removes a breakpoint on the current line, as designated by the cursor.
![]() Delete All Breakpoints (Shift+Ctrl+F9): Removes, permanently, all breakpoints from your program.
Delete All Breakpoints (Shift+Ctrl+F9): Removes, permanently, all breakpoints from your program.
![]() Disable/Enable All Breakpoints: Temporarily turns all breakpoints on or off.
Disable/Enable All Breakpoints: Temporarily turns all breakpoints on or off.
Breakpoints have other, more powerful features that will be discussed in later chapters, when their usage will make more sense.
5.5.4 Watches
Watches allow you to examine the contents, or the state, of variables, constants, and expressions. These watches often give important clues as to what is causing your errors. If the data in a variable, for example, doesn't match what is expected—as determined through desk checking—watches can greatly narrow down where you went wrong in your program. In most cases, all of the other tools discussed get us to the spot where we can use watches to examine the variables in the general location of the error.
Most IDEs, including Visual Studio, have some method of providing watches. There are several windows provided by Visual Studio: Autos, Locals, and Watch 1 through Watch 4. The Autos window shows any variables within a few lines of the current line of execution. The Locals window shows any variables within the current scope. The variables shown are automatically determined by Visual Studio. Although scope is a topic that will be expanded on later in the text, it can be thought of as the area in which a variable can be seen.
The last four windows (Watch 1 through Watch 4) are available for programmers to examine variables of their own choosing. Figure 5.5.3 shows the Autos watch window for our example program.
Visual Studio also allows you to view the contents of a variable by hovering over it with the mouse while debugging. Doing so displays a popup window, which contains the variable's name and value.
5.5.5 Importance of Debugging
Although the preceding sections discussed many Visual Studio specific commands, most IDEs have equivalent tools. The names and how they are accessed may differ, but the concepts remain the same.
With the size and complexity of the programs you have written so far, the topic of debugging may seem unnecessary. However, as your programs increase in complexity, so too will the time you spend finding and correcting errors. At that point, if you haven't learned the debugging tools available in your environment as well as the techniques associated with debugging, you will find yourself getting overly frustrated and bogged down.
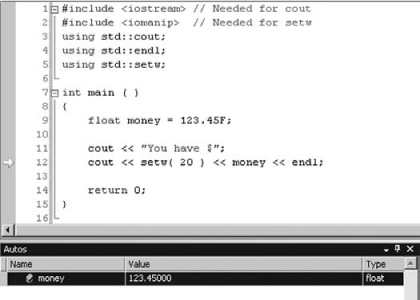
Figure 5.5.3 Autos watch window
Because this is such an important topic, almost every chapter contains an exercise in it to help develop your debugging skills. Up to this point the debugging exercises consisted of locating errors within pseudocode. While this is an important skill, starting with this chapter we are providing a program that can be loaded off of the book's website to help reinforce these critical concepts. Instructions and tips are provided within the source code file in the form of comments.
5.6 Problem Solving Applied
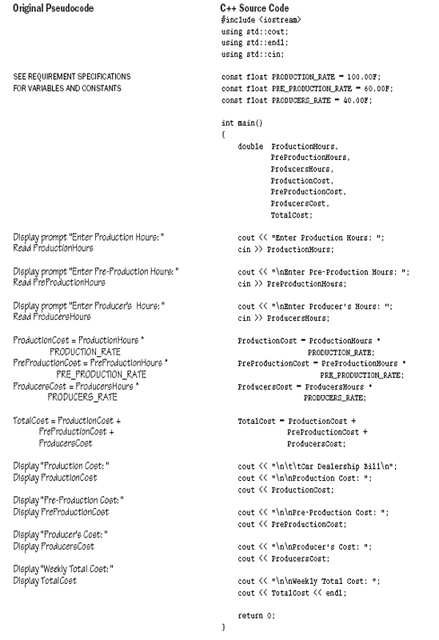
Up to this point we have provided you with a complete example illustrating the steps required in designing a solution to a problem, making it a point to show you all the necessary steps along the way. Now we have added the additional phase of converting your algorithm, or pseudocode, to C++ source code. Below is the full solution, including the C++ translation that was easily written based on the pseudocode.
Updated problem statement: Translate the pseudocode solution from Section 4.9 to C++ source code. Please make it a point to include a report title in the output. You will notice that the conversion process will take advantage of all the hard work done in the pseudocode phase.
Original problem statement: Develop the pseudocode solution to calculate the weekly developmental billing report for local radio station WJJQ's biggest client, a car dealership. WJJQ has been in operation for over 30 years, and recently Alexis Blough has taken over as general manager. The station has a format of contemporary rock and country music.
WJJQ uses the following rate structure for the car dealership account:
Production |
$100.00 per hr |
Pre-production |
$60.00 per hr |
Producer's fee |
$40.00 per hr |
The car dealership will be billed for the following time during the past week:
Production |
1.5 hours |
Pre-production |
2 hours |
Producer's fee |
3 hours |
Alexis needs you to display the amount due for each respective activity and to display the overall total owed by the car dealership.
Requirement Specification:
Input(s):
Input Type |
Data |
Source |
Decimal |
ProductionHours |
Keyboard |
Decimal |
PreProductionHours |
Keyboard |
Decimal |
ProducersHours |
Keyboard |
Output(s):
Output Type |
Data |
Destination |
Decimal |
ProductionCost |
Screen |
Decimal |
PreProductionCost |
Screen |
Decimal |
ProducersCost |
Screen |
Decimal |
TotalCost |
Screen |
Constants:
Type |
Data |
Value |
Decimal |
PRODUCTION_RATE |
100.00 |
Decimal |
PRE_PRODUCTION_RATE |
60.00 |
Decimal |
PRODUCERS_RATE |
40.00 |
Design:
A whole chapter could be devoted to the differences in I/O routines between C and C++. C doesn't perform input or output the same way as C++. For example, C does not include cin, cout, or namespaces. All I/O in C is accomplished using a series of functions. Although there are many functions available in C to perform I/O tasks, the more common ones are discussed in this section.
![]()
Remember: The term function refers to a task or job. For example, the function of a waiter is to serve food. Similarly, in programming, a function is a group of related statements that together perform a specific task or job.
All of the examples in the following sections are direct translations of the examples previously shown in the C++ I/O sections.
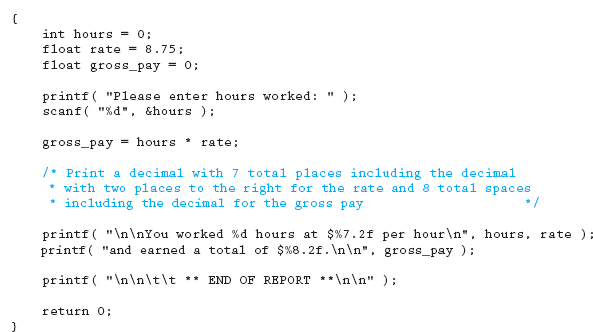
5.7.1 The printf Function
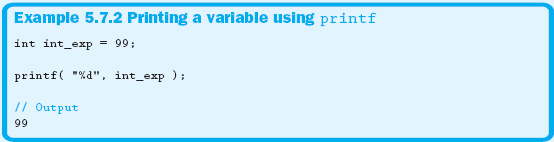
The printf function allows a programmer to print formatted output to the screen. Example 5.7.1 shows a very simple printf function call.

The printf function supports the use of format specifiers to determine the type of the data to be printed. Table 5.7.1 shows data types and some of their respective format specifiers.
The syntax of printf using format specifiers is as follows. Be sure to include the header file <stdio.h>.
printf ( <format_string>, <argument_list> );
The printf function requires a formatting string, usually a string literal designated by the programmer. If the formatting string contains any of the format specifiers listed in Table 5.7.1, an argument list must be supplied. There has to be a matching argument for every format specifier in the format string. Think of the format specifier as a placeholder for its corresponding argument. Example 5.7.2 demonstrates how to print the contents of a variable.
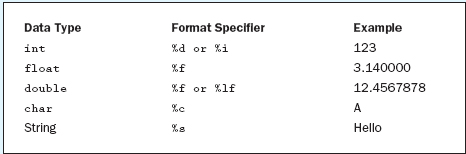
Table 5.7.1 Format specifiers
Example 5.7.3 demonstrates how to print the contents of multiple variables.
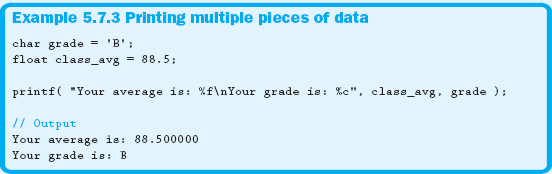
Notice there are two format specifiers, %f and %c, in the formatting string; therefore, there are two arguments in the argument list. The first specifier corresponds to the first argument, class_avg, the second specifier corresponds to the second argument, grade.
![]()
Remember: Never mix C and C++ I/O routines. If you are writing a C++ program, use C++ routines. Likewise, use only C routines when writing C programs.
5.7.2 Formatting the printf Statement
Formatting output with printf is accomplished in a much different manner than using the C++ equivalent techniques associated with cout. No member functions or manipulators are needed to format the output. If used, width specifiers and alignment adjustments are placed directly into the formatting string of printf. A number placed between the percent (%) and the character representation of the data type acts as a width specifier. Examine Example 5.7.4 to see how printf formats different types of data.
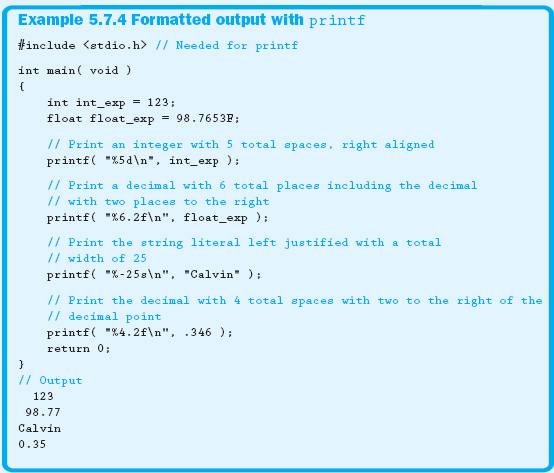
Notice in Example 5.7.4 that the third example printed the data left justified. This is due to the negative sign (—) being used in the format specifier. The default is to right-justify the text. Also notice that the last printf statement rounded the results.
5.7.3 Flushing the Output Buffer
Similar to C++, C also needs a way to flush the output buffer. The flushall function clears all buffers, including the output buffer. The header file <stdio.h> needs to be included to use this function. Example 5.7.5 demonstrates the flushall function.

5.7.4 The scanf Function
The scanf function allows us to read information from the keyboard. The scanf function uses the same idea of format specifiers discussed in Section 5.7.1. The only difference is that the formatting string should only contain format specifiers and spaces. Also, each argument in the argument list—except for strings, as discussed in Chapter 10—must be prefaced with an ampersand (&).
![]()
The ampersand used in this context is called the “address of” operator.
The scanf function requires an address to be passed to the function in the argument list. That is why each argument is prefaced with the address of operator. Example 5.7.6 demonstrates how to read a value from the keyboard and place it at the address associated with the variable score.

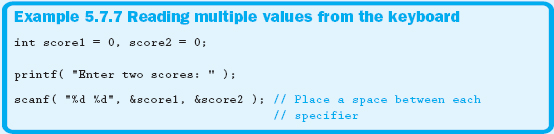
Example 5.7.7 shows how to read multiple values from the keyboard. Similar to the C++ cin statement, the two scores entered must be delimited by whitespace. When all the input has been typed in, press the enter key to signify the input process is finished.
As you can see, using C's printf and scanf functions to output and input data is a bit more complicated than using C++’s cout and cin. However, you should be aware that many C++ programmers who originally learned C still miss the various output formatting options. Another popular option for reading data from the keyboard, although not part of the ANSI C standard, is provided with the getch function.
![]()
The American National Standards Institute (ANSI) formed a committee to standardize the C programming language. Therefore, any non-ANSI C functions may not be available in strict ANSI C environments.
For all of the input routines discussed so far, the enter key must be pressed to signify you are done entering data. The getch function, however, doesn't require the enter key to be pressed because it only reads a single character from the keyboard. Example 5.7.8 shows the getch function.
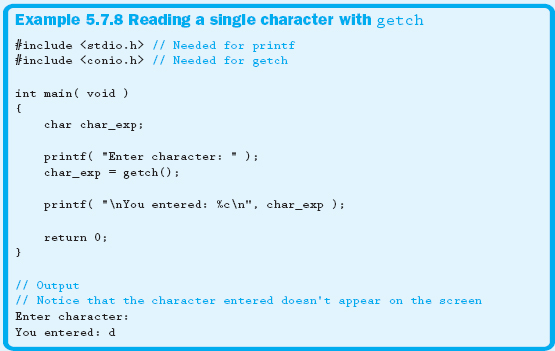
A related function to getch is getche. This function is identical to getch except that it displays the character typed. Notice that you must include the header file <conio.h> to be able to use either getch or getche.
![]()
Remember: The term getch stands for get character; the term getche stands for get character with echo, which means that the character entered is displayed (echoed) to the screen.
Within this chapter we have introduced the concept of streams and their use in helping us perform input- and output-related tasks. To help illustrate streams, we showed you two fundamental options. Reading information from the keyboard was accomplished using cin, while directing output to the screen was achieved by using cout. We will see a lot of other examples using streams as we continue our exploration of C++, but you have now been introduced to two of the most popular methods available.
Another topic examined related to cout compared the use of the ‘ ’ escape sequence and the endl statement. As you recall, both ‘ ’ and endl provide us with a method to move the cursor down to the next line, but endl also flushes the output buffer.
If you are like most of our beginning programming students, once you learned how to output information to the screen, you wanted to see how to format your results to make them more readable and physically attractive to users. To help with that task, we introduced a variety of formatting options, including some of the fundamental manipulators, like setw and setprecision, and some member functions, like .precision and .width, to help dress up your output. Most people new to C++ are often a bit overwhelmed with all the various options. However, you will quickly get used to using the numerous member functions and manipulators presented; it will just take some practice.
The next topic we covered was the crucial topic of debugging. We stressed the importance of debugging as well as some of the tools used in the process. Although the text provides many Visual Studio specific commands and tool names, there are equivalents in most other environments. Remember, the best way to learn debugging is to practice.
Before moving on to the next chapter, please make it a point to fire up your compiler and practice with the material just presented. You need not get bogged down in trying to memorize all the different manipulators and functions. However, do make sure you feel good about the fundamental aspects of reading data in from the keyboard and displaying your results in a formatted fashion to the screen. Once you actually try implementing this material, you will find that it will make much more sense and that your users will become more impressed with the overall look and feel of your applications.
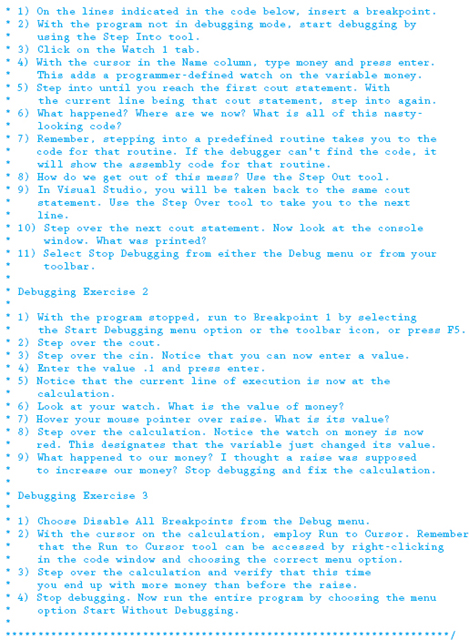
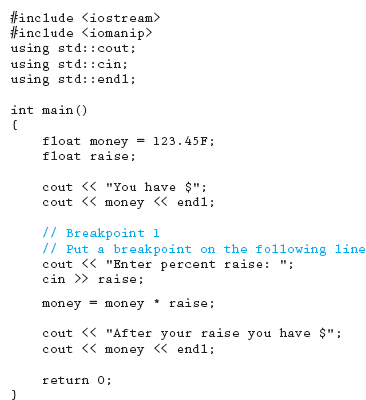
5.9 Debugging Exercise
Download the following file from this book's website and run the program following the instructions noted in the code.
5.10 Programming Exercises
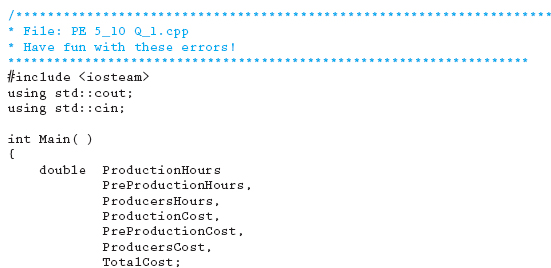
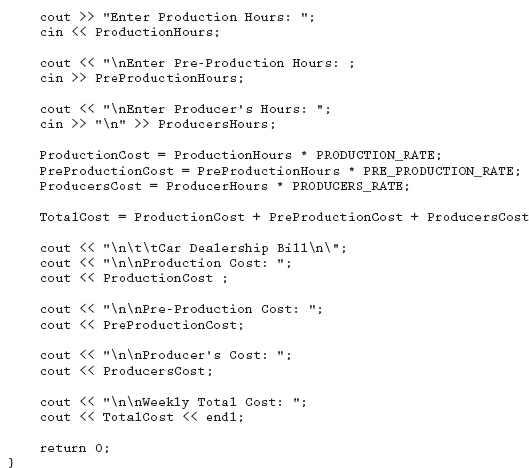
1. Download the following file from this book's website. Fix, compile, build, and execute the code.
2. Using the entire development process discussed in Chapter 2, write a working program that accepts as input the radius and height of a cylinder. From this input, calculate the volume of the cylinder. Be sure that you complete all phases of the development process and that your output is self-documenting and correct.
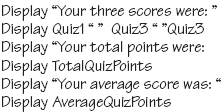
3. Using the following code, add the necessary formatting to make the various values align properly and the overall report look good. Use manipulators for the output in Part 1 and member functions for the output in Part II. See the code itself for some additional information.
5.11 Team Programming Exercises
1. Your newest team member Troy has begun developing the solution for a short grade processing program. A copy of his pseudocode and his idea of what the output might look like follow. Based on his notes and the algorithm provided, please write the C++ program. Make sure you verify the accuracy of your code by actually building, running, and testing it using your own compiler. Hopefully, Troy has provided the correct pseudocode solution. However, you should double-check that too!

2. Well, here we go again! This time your pen pal has a new request. She was given some pretty rough legacy code written in C and has asked you to convert it for her to C++. Once you have it converted, please type your solution into your compiler to prove it actually works.
5.12 Answers to Chapter Exercises
Section 5.1
1.
a. C++ is very cool
b. Hello
World
c. Computers are useless.
They can only give you answers.
Pablo Picasso
2. c. <iostream>
3. b. cout
4. a. cin
5. a. invalid; should use << instead of >>
cout << “Hello World”;
b. invalid; needs semicolon
cout << “Almost over
”;
c. invalid; should not put a string literal in a cin statement
cout << “Enter name:”;
cin >> name;
d. invalid character in variable name ‘#’
cin >> age >> soc_security_no;
e. invalid; requires double quotation marks around the string literal “Enter size”.
cout << “Enter size ”;
f. valid
g. invalid; should not put a string literal in a cin statement
cin >> age >> shoe_size;
h. invalid; cannot include a string literal in the input stream
cin >> done;
i. valid
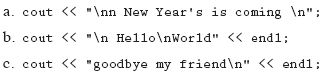
Section 5.2
1. d. endl
2. a
n New Year's is coming
b.
Hello
World
c. goodbye my friend
Section 5.4
1. b. cout
2. member functions and manipulators
3. c. manipulator
4. b. member function
5. a. right-justify a field
6. d. spaces
7. b. right
8. YourbGPAbis:bbbbb3.45
9. True
10. False
11. b. <iomanip>