Chapter 8
Chapter Objectives
![]() By the end of the chapter, readers will be able to:
By the end of the chapter, readers will be able to:
![]() Recognize the value of using repetition control statements.
Recognize the value of using repetition control statements.
![]() Understand the syntax for the three different types of loops.
Understand the syntax for the three different types of loops.
![]() Implement the while loop, do-while loop, and for loop structures.
Implement the while loop, do-while loop, and for loop structures.
![]() Understand the flow of a nested loop.
Understand the flow of a nested loop.
![]() Understand how to set conditional breakpoints within loops.
Understand how to set conditional breakpoints within loops.
![]() Determine the correct situational usage for each type of loop.
Determine the correct situational usage for each type of loop.
The previous chapter discussed conditional statements and how they allow a programmer to conditionally execute one or more statements. In this chapter we extend these concepts to show how to conditionally repeat one or more statements or actions. This concept of repetition, or looping, is an extremely important and powerful programming component in that it allows the reuse or repetition of existing sections of code. We will examine three basic looping constructs: while, do-while, and for. The use of these constructs allows for the development of more complex and interesting algorithms.
![]()
The process of looping or repetition is also referred to as iteration.
Like many of the concepts covered so far, information provided in this chapter will also directly apply to numerous other programming languages, including C, C#, Java, and Visual Basic. The only real difference is the specific syntax for each language.
Please pay careful attention to the material presented in this chapter because loops are the most error-prone programming constructs. Many errors are caused by malformed loops, including infinite loops, empty bodies, and off-by-one errors.
8.1 General Repetition Concepts
Repetition control structures, or loops, allow the programmer to conditionally repeat the execution of specific statements. There are two general types of loops: pre-test and post-test. A pre-test loop checks the condition prior to executing the statements associated with the loop's body or action. A post-test loop checks the condition after executing the body of the loop the first time. Therefore, the body of a post-test loop will execute a minimum of one time, whereas the body of a pre-test loop may never be executed. As you will soon find, the distinction between pre- and post-test loops is very important.
![]()
The statements associated with a loop are called the body of the loop.
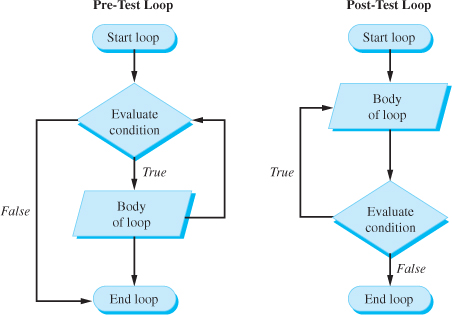
Figure 8.1.1 Pre-test loop versus post-test loop
Figure 8.1.1 uses flowcharts to illustrate the differences between pre- and post-test loops.
These looping structures must have each of the following components or aspects:
1. A variable with an initial value that controls whether the body of the loop is executed; this variable is often referred to as the control variable
2. A conditional expression involving the control variable
3. A statement within the body where the control variable is modified or altered each time the body of the loop is executed
One undesirable situation a lot of beginning programmers encounter is an infinite loop. While this is often a mistake on the programmer's part, the infinite loop may indeed be a valuable, although debatable, tool.
![]()
An infinite loop is a loop that continuously executes. When this happens, the program or loop has to be terminated by the user or programmer.
The most common cause of an infinite loop is the programmer's failure to manipulate the control variable in the body of the loop. A control variable usually determines when the loop stops and therefore must appear in the condition of the loop. The key thing to remember here is that the control of the loop is determined by the contents of a variable that must change during the execution of the program.
![]()
Remember: If you discover an infinite loop while running your program, pressing Ctrl+C will terminate the execution of the program from within Microsoft Visual Studio.
So what kind of statements can appear in the body of a loop? Almost any—yes, even another loop. This concept of a nested loop is extremely powerful, and we will cover it in this chapter.
![]()
A loop embedded in another loop is called a nested loop.
Once any loop has finished executing, the flow or control of the program is transferred to the statement following the loop.
8.2 The while Loop
The first repetition statement examined is the while, which is a pre-test loop that has the following syntax:
![]()
The action or body of the loop will execute as long as the condition continues to be true. Fortunately, the condition and the action block in this syntax are exactly the same as those you saw in the last chapter for the discussion on conditional statements. Likewise, if you need to execute more than one statement, enclose them within curly braces. Example 8.2.1 demonstrates how to use a while loop.
![]()
Remember: Sometimes students will encounter a while loop written as while ( 1 ) {…}. Because the numeric literal 1 is treated as a true condition and will never change, this is an infinite loop and would require an additional statement within the body of the loop to terminate it. Although there are reasons to use this type of loop, it should only be used by experienced programmers and then only with due consideration.
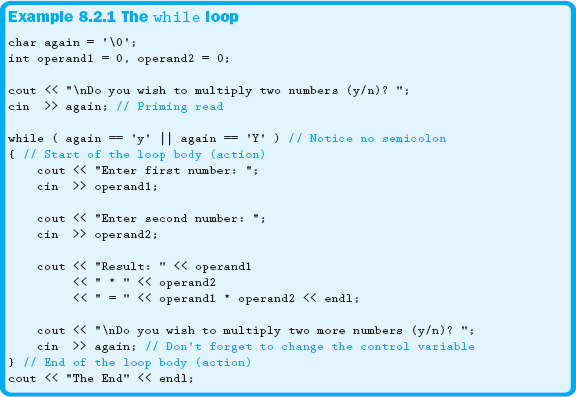
In Example 8.2.1, we prompt the user to determine if he or she wants to multiply two numbers. If a ‘y’ or a ‘Y’ is entered, the user will be prompted for two numbers, which will be multiplied and the results displayed. The user will then be asked if he or she wants to multiply two more numbers. If another ‘y’ or ‘Y’ is entered, the user will be prompted again for two different numbers. If an ‘n’ or ‘N’ is entered, or anything else for that matter, the loop terminates, and control flows to the statement located after the action—in this case, the last cout statement. If an ‘n’ or ‘N’ had been entered at the initial prompt, the user would not have been asked for the two numbers because the body of the loop would have never executed, since a while loop is a pre-test loop.
An additional aspect of Example 8.2.1 is the prompt prior to encountering the loop. This is typically called a priming read, and it ensures that the control variable has a user-provided value before evaluating the condition. With priming reads, there must be a corresponding prompt as the last statement in the body of the loop.
If we neglected to include a priming read, the loop would not have executed because the control variable was initialized to the null character and would not evaluate to true when the condition was checked. If the read at the end of the body was left out, we would have an infinite loop because the control variable would not be changed within the body of the loop.
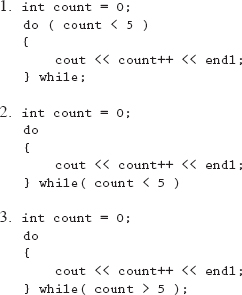
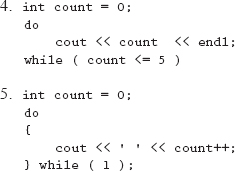
Section 8.2 Exercises
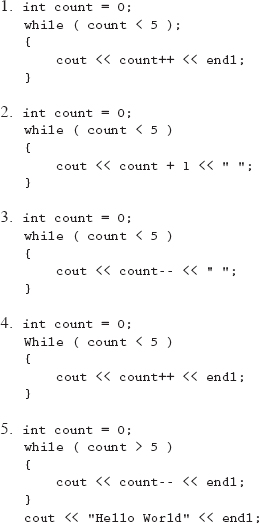
For each of the following code fragments, indicate if there are any errors. If there is an error, identify what type of error it is (syntactical, logical, runtime) and how you would fix it. If the code fragment would compile and run, what would be the output? If you are unsure or would like to see the proof, type it into your compiler and run it.
Section 8.2 Learn by Doing Exercise
Write a program that prompts the user to enter an integer between 1 and 50. The program should then display all of the even integers starting with the number and working back to 0.
8.3 The do-while Loop
The next looping structure is the do-while. This type of loop is an example of a post-test loop, meaning that the body of the loop always executes at least once. The general syntax of the do-while loop is as follows:
do
<action>
while ( <condition> );
As always, if the action requires more than one statement, you must enclose the statements in curly braces. Example 8.3.1 demonstrates a common use of a do-while loop: a menu-driven program.
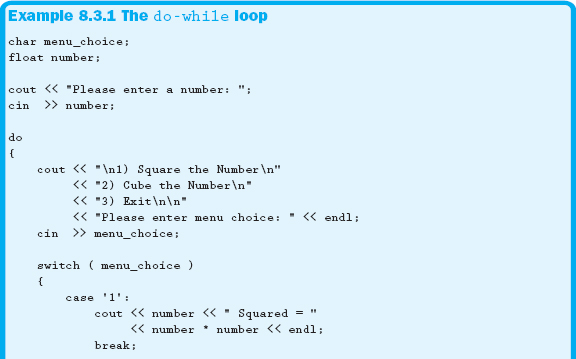
In Example 8.3.1, the menu is displayed at least once. As demonstrated in the example, a do-while is the preferred loop for menu-driven programs because these types of programs should always exit from one of the menu options. Therefore, the menu should always be displayed, allowing the user to decide when to quit. Notice that the priming read is not necessary because it is a post-test loop.
Section 8.3 Exercises
For each of the following code fragments, indicate if there are any errors. If there is an error, identify what type of error it is (syntactical, logical, runtime) and how you would fix it. If the code fragment would compile and run, what would be the output? If you are unsure or would like to see the proof, type it into your compiler and run it.
Section 8.3 Learn by Doing Exercise
1. Modify the program from Section 8.2 Learn by Doing Exercise so that it uses a do-while to test for a valid range. If the user enters an invalid value, an error message should be displayed and the user re-prompted for the value.
8.4 The for Loop
The for loop is the final looping structure we will discuss. A for loop is generally used when the specific number of iterations are known. This is not a rule but something of a style issue. Since both while loops and for loops are pre-test loops, they can be used interchangeably. However, most programmers only use the for loop when the loop will execute a known number of times. The syntax of the for loop is as follows:
![]()
Although there are four different sections to the for loop, the only components required are the two semicolons and the body or action.
![]()
Remember: One of the more common errors we have seen students make is to put a semicolon after the closing parenthesis. Although legal, the semicolon terminates the loop, just like it would in any other statement. In effect, it takes the place of the body of the loop. This is often a difficult error to find.
When the execution of the program encounters the for loop, the <initexpr> section is executed. This is the expression that is generally used to initialize, and sometimes even declare, the control variable for the loop. The <init-expr> section is executed only once for the duration of the loop. Multiple expressions can be contained in this section by separating the expressions with a comma.
The C++ standard states that the scope of any variable declared in this section is visible only within the body of the loop. Although your compiler may or may not follow this standard, you should always assume the variable will go out of scope when the loop terminates.
![]()
Remember: The scope of a variable is what determines where within your code it can be referenced and used.
After the initialization section is executed, the condition is evaluated. Since the condition is evaluated before the body of the loop is performed, the for loop is an example of a pre-test loop. If the condition is true, the body of the loop is executed. If the condition is false, the body of the loop is never executed.
Once the body of the loop is finished executing, the <post-loop-expr> section is evaluated. This section is generally used to change the control variable. One of the most common operators found in this section is the increment operator. Again, if multiple expressions are desired, separate the expressions with a comma. Once this section has finished executing, the condition is checked again to determine if the loop is to continue.
Figure 8.4.1 uses a flowchart to illustrate the flow of the for loop shown in Example 8.4.1. Please make it a point to pay careful attention to the detail associated with the overall flow of each of the components.
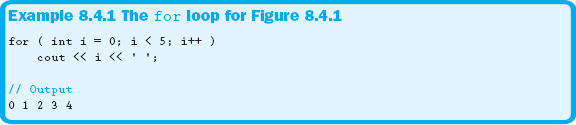
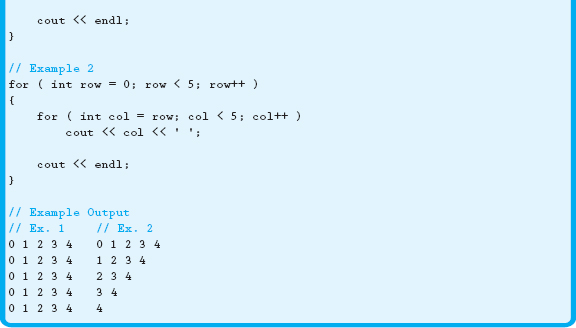
In Example 8.4.1, we used the post-increment operator. The results would have been the same if we had used the pre-increment operator because the entire section is evaluated before moving on to the condition. It is up to the programmer whether to use pre- or post-increment operators with primitive data types. Example 8.4.2 shows several for loops.
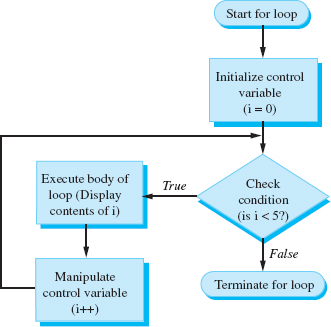
Figure 8.4.1 A for loop flowchart
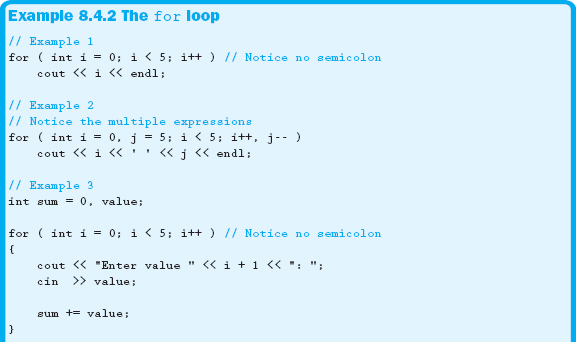
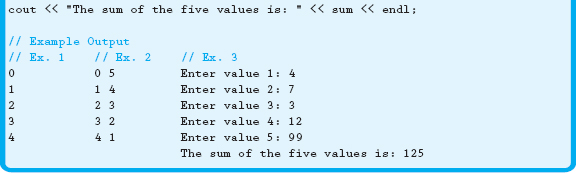
Notice the use of both accumulators and counters in Example 8.4.2. The expression i++ is representative of a counter, whereas the expression sum += value is an example of an accumulator. Remember to initialize the variables associated with each of these expressions to zero.
8.4.1 Nested for loops
Like other loops, for loops can be nested. This technique is commonly used in conjunction with other concepts discussed later in the text. To help visualize a nested for loop, we've provided you with the example flowchart shown in Figure 8.4.2. Please take a few minutes and carefully review this graphical representation illustrating a nested for loop. The code for this loop is shown as the first example in Example 8.4.3.
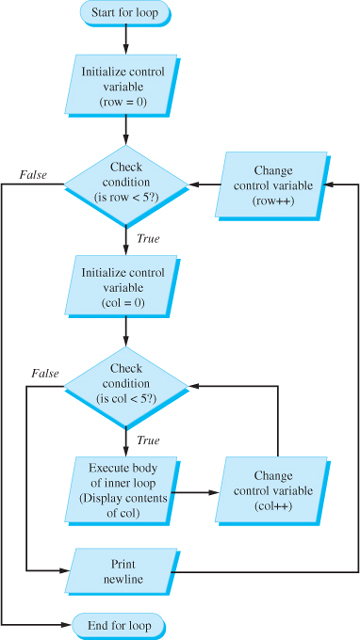
Figure 8.4.2 Nested for loop flowchart

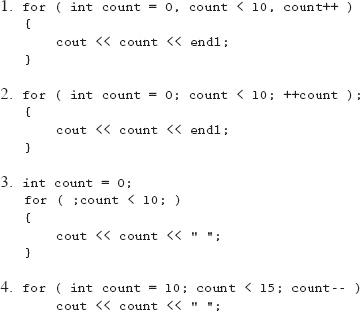
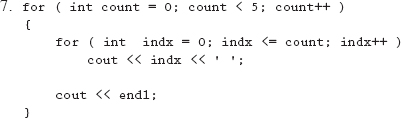
Section 8.4 Exercises
For each of the following code fragments, indicate if there are any errors. If there is an error, identify what type of error it is (syntactical, logical, runtime) and how you would fix it. If the code fragment would compile and run, what would be the output? If you are unsure or would like to see the proof, type it into your compiler and run it.
![]()
Convert the following while loop to a for loop.
![]()
What is the output from the following code fragment?
Section 8.4 Learn by Doing Exercises
1. Write a program that prompts the user for the number of assignments in a specific class. Then using a for loop, prompt for each score. Use an accumulator to store the sum of the assignments, and then calculate the average score for the assignments.
2. Write a program that displays an upside-down right triangle made of asterisks for a user-specified base length. The triangle shown here is created for the input of four.
![]()
8.5 Breakpoints and Loops
When we discussed debugging tools in Chapter 5, we covered breakpoints and showed how important they were to have available. We also said there were some added features in breakpoints that wouldn't be useful until later. Well, it's later!
As you start developing more complicated programs that make extensive use of loops, you will find it time consuming and annoying to step through the loop when you already know the program doesn't break until the 10,000th iteration. Breakpoints have the added functionality to break, or stop, execution, either dependent on a condition or after a line of code has been encountered a certain number of times.

Figure 8.5.1 Breakpoint pop-up
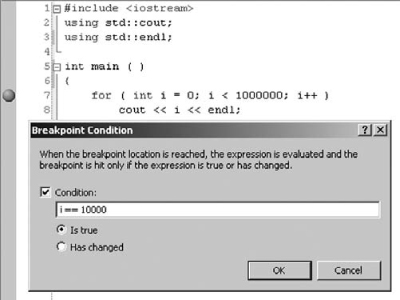
Figure 8.5.2 Breakpoint Condition
In Visual Studio, it is very easy to set these conditions on breakpoints. Place a breakpoint anywhere in the body of a loop and then right-click on the red dot that designates a breakpoint. A pop-up menu is displayed that provides a number of options, as shown in Figure 8.5.1.
The two options that are the most useful are Condition and Hit Count. After choosing the Condition option, a new window will appear. This will allow you to enter a condition that will cause the execution of the program to stop based on the evaluation of that condition. This window is shown in Figure 8.5.2.

Figure 8.5.3 Breakpoint Hit Count
Once the condition is set, the execution of the program will stop as soon as the variable i reaches 10,000.
The Hit Count option performs much in the same way as the Condition option. This window is shown in Figure 8.5.3.
Once the breakpoint options have been selected, the red dot will change to include a white + inside the dot to show that the breakpoint has a condition attached.
Like other debugging tools, this will take some time to get familiar with. Please take this opportunity to experiment with these breakpoint options. Although there are other breakpoint options available, they won't be discussed in this text. Don't worry, however; there will be other debugging tools introduced throughout the book.
8.6 Problem Solving Applied
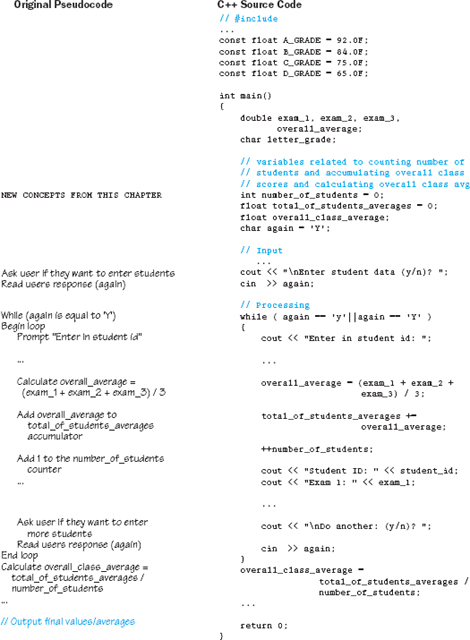
Updated problem statement: In the last chapter you got a part-time job working for one of your teachers on campus. She was happy with your work and would like you to expand the program. The problem now includes all the requested material from Chapter 7 plus two additional aspects:
1. The teacher would like the ability to use the program to do the calculations for the approximately 20 students in her class entering each student's information until she indicates she is finished.
2. After all of the students’ information has been entered and printed, the program will need to calculate and print the total number of students in the class and the overall class average.
To save you a bit of time, we have provided you with the information from the previous chapter.
Previous information: The teacher you work for has asked for your help in writing a program that can be used to determine the grade assigned to an individual student based on the results of his or her three exam scores. You will need to ask the user for his or her student ID—a 5-digit number created by the school—and scores on each of the three exams. Once you have all the necessary input, please calculate the individual student's overall average and letter grade. The cutoffs for the letter grades are shown here:
A >= 92.0 B >= 84.0 C >= 75.0 D >= 65.0 F < 65.0
Requirement Specification:
Input(s):
| Input Type | Data | Source |
| Integer | student_id | Keyboard |
| Decimal | exam_1 | Keyboard |
| Decimal | exam_2 | Keyboard |
| Decimal | exam_3 | Keyboard |
Output(s):
| Output Type | Data | Destination |
| Integer | student_id | Screen |
| Decimal | exam_1 | Screen |
| Decimal | exam_2 | Screen |
| Decimal | exam_3 | Screen |
| Decimal | overall_average | Screen |
| Character | letter_grade | Screen |
| Integer | number_of_students | Screen |
| Decimal | overall_class_average | Screen |
Constants:
| Type | Data | Value |
| Decimal | A_GRADE | 92.0 |
| Decimal | B_GRADE | 84.0 |
| Decimal | C_GRADE | 75.0 |
| Decimal | D_GRADE | 65.0 |
Design:
The only difference between C and C++ related to loops is that it used to be illegal to declare a variable in the initialization section of the for loop within C. This is because all variables in C were to be declared at the beginning of a block, right after an opening curly brace. The current version of ANSI C no longer has this limitation. Example 8.7.1 shows a legal C for loop.

8.8 SUMMARY
This chapter examined the three major types of C++ loops. It also showed how to combine conditional expressions with various looping structures to repeat a group of statements based on a specific condition.
The first loop discussed was the pre-test while. As noted, if the pre-test condition fails, the loop body will never be executed, and control will flow to the statement following the action. The second structure was the do-while, which is based on the post-test condition, meaning it is guaranteed to do the action once before the condition is even checked. The last structure presented was the for loop, along with the three major components required: init-expr; condition; post-loop-expr.
You were also provided with some general guidelines for deciding which loop to use for a given task. The for loop should be used when there are a specific, known number of iterations. The do-while is a good loop to use for menus because the menu will be displayed at least once. In this way, the user can choose to quit the program through a menu item. The while loop is used when the body of the loop may not be executed at all, depending on the condition.
The chapter also tried to make you aware of various errors made by beginning programming students (and experienced ones, too), such as including a semicolon after the parenthesis of the for statement, which signifies an empty action body.
You are now familiar with a number of extremely powerful programming constructs that you will use in a variety of future programming activities. Make sure you feel comfortable with the material presented in this chapter before moving on.
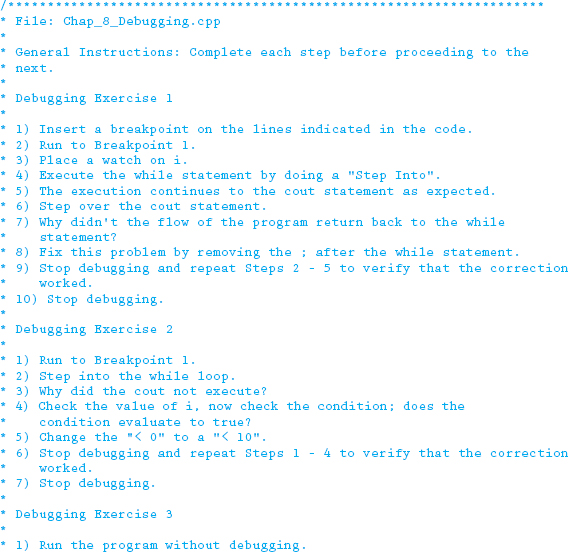
8.9 Debugging Exercise
Download the following file from this book's website and run the program following the instructions noted in the code.

8.10 Programming Exercises
The following programming exercises are to be developed using all phases of the development method. Be sure to make use of good programming practices and style, such as constants, whitespace, indentation, naming conventions, and commenting. Make sure all input prompts are clear and descriptive and that your output is well formatted and looks professional.
1. Write a program to calculate the sum of $.01 a day, doubled for n number of days. For example, on the first day you would receive $.01; on the second day you would receive $.02, for a total of $.03. On the third day you would receive $.04, for a total of $.07. Get the input for the number of days from the user, but make sure it is between 1 and 30 days. Display the number of cents accumulated, along with the number of days entered by the user.
2. Write a program that calculates the factorial of a user-defined number. For example, 5! = 1 * 2 * 3 * 4 * 5 = 120. The “!” is the mathematical notation for factorial. Because factorials get very large very quickly, limit the input to a maximum of 25 and a minimum of 2.
3. Write a program to generate a Fibonacci sequence up to a user-specified ending number. For example, if the user entered 25, the Fibonacci sequence would be:
1, 1, 2, 3, 5, 8, 13, 21
Notice that after the initial two numbers, each new number is generated by adding the previous two numbers.
4. Write a program that takes input from the user that represents a numerator and a denominator of a fraction. Then reduce the fraction to its lowest terms and display it to the screen. If appropriate, display the fraction as a mixed number (3 1/2).
To reduce a fraction to its lowest terms, divide both the numerator and the denominator by the greatest common denominator. The GCD can be calculated by using Euclid's algorithm. Euclid's algorithm states: Let m represent the numerator and n represent the denominator of a fraction. Divide m by n. Save the divisor in m and save the remainder in n. If n is 0, then stop: m contains the GCD. Otherwise, repeat the process.
Be sure to display the fraction in a well-formed manner. If the denominator is a one, display the fraction as a whole number. If the denominator is a zero, display a message that the fraction is undefined. A fraction will never be displayed with a negative denominator.
5. Write a program that displays the ASCII chart. Display numeric values as well as characters so that there are four columns and as many rows as it takes. For an extra challenge, display the chart so that its outside borders are made up of double line ASCII characters, and separate each column with a single vertical ASCII character.
6. Write a program that draws a rectangle on the screen using ASCII characters. The program will prompt the user for the height and width, specified in characters, of the rectangle. Use the following ASCII values for the box characters: 218 upper left-hand corner, 217 lower right-hand corner, 196 top and bottom, 192 lower left-hand corner, 191 upper right-hand corner, and 179 left and right sides.
8.11 Team Programming Exercise
Marcus's children really liked what you did for them in Chapter 7’s Team Programming Exercise. Marcus would like you to expand what you did to include the following functionality.
• The children got a little tired of having to rerun the program each time to try another menu item. Add a loop to the program that continues until an Exit menu option has been chosen.
• Marcus noticed that if his children accidentally entered a wrong number for the menu choice, they were a little confused when the program abruptly ended. Add functionality to the switch statement that checks the menu choice and displays an error message if an incorrect value is entered.
• Good news: Marcus got his promotion and so will be programming even less. He is, however, taking his kids to Disneyland with his raise. Unfortunately, he doesn't have enough cash to take you.
• Add a few additional menu options.
• The first new menu option displays the number of digits in the number. Hint: Repeatedly divide the number by 10, keeping track of the number of times you divide.
• Another new menu item is similar to the last except that Marcus wants you to find the digit at a specific position in the number. For example, if the number entered is 98765, Marcus wants you to display “8” if the user specifies the fourth digit.
• Display an addition table for all numbers up to 12.
• Display a multiplication table for all numbers up to 12.
Don't forget to perform all phases of the development process on each new additional piece, including pseudocode, for all the new functionality. Don't forget to verify your results. It would be very embarrassing if Marcus's 4-year old caught you on an error.
8.12 Answers to Chapter Exercises
Section 8.2
1. Error: Logic
Fix/Explanation: Remove the semicolon after the while. This semicolon indicates that the loop contains an empty action; it has no body. Since the control variable is not manipulated in the loop, this loop becomes an infinite loop.
Output: None
2. Error: Logic
Fix/Explanation: Change the “count + 1” in the cout statement to a “count++”. Although it might appear that the control variable is being changed in the body of the loop, it really isn't.
The statement “count + 1” does not change the actual contents or value of the variable count. Therefore, this is another infinite loop.
Output: 1 1 1 1 1 1 1…
3. Error: Logic
Fix/Explanation: Because the control variable is initialized to zero, the condition states that the loop will continue while the control variable is less than five, and since the control variable is decremented, this results in, for all practical purposes, an infinite loop. The reason it is not a full infinite loop is that as the variable is decremented, the number gets more and more negative. Once the variable is decremented far enough, the sign bit of the integer will get set to a zero. This makes the integer a positive number greater than five, which stops the loop. Even though this is technically not an infinite loop, it is considered an error.
Output: 0 –1 –2 –3 –4…–2147483648
4. Error: Syntax
Fix/Explanation: The “W” in the while reserved word needs to be lowercase. Remember, all the keywords in C++ begin either with a lowercase letter or an underscore.
Output: None; won't compile
5. Error: Logic
Fix/Explanation: The loop will never execute because the condition is initially false. Change the condition or the initialization.
Output: Hello World
Section 8.3
1. Error: Syntax
Fix/Explanation: The conditional expression belongs with the while part of the do-while loop.
Output: None; won't compile
2. Error: Syntax
Fix/Explanation: Place a semicolon behind the condition associated with the while.
Output: None; won't compile
3. Error: Logic
Fix/Explanation: The body of the loop will only execute once even though the condition is initially false. Because the do-while is a post-test loop, the condition is not evaluated until the body of the loop is executed at least once.
Output: 0
5. Error: Logic and Syntax
Fix/Explanation: Logic error: Since the control variable is not manipulated in the loop, the loop becomes an infinite loop.
Fix/Explanation: Syntax error: Place a semicolon behind the condition associated with the while.
Output: None; won't compile
5. Error: Logic
Fix/Explanation: Since there is no control variable in the conditional, the loop becomes an infinite loop. Avoid writing this type of conditional statement! There is no way out of the loop as shown. Always include a variable inside your conditional expression so that it can be altered during program execution.
Output: 0 1 2 3 4 5…
Section 8.4
1. Error: Syntax
Fix/Explanation: The commas between each section of the for loop need to be replaced with semicolons.
Output: None; won't compile
2. Error: Logic
Fix/Explanation: The for loop doesn't need the semicolon at the end. Because the semicolon acts as the body or action of the loop, all the loop accomplishes is to increment the control variable. Therefore, after the condition becomes false, the next line—the cout statement—is executed. Notice that the value of the control variable is 10, proving exactly what you would (hopefully) have thought.
Output: 10
3. Error: Logic
Fix/Explanation: The statement is syntactically correct; however, the control variable is not changed, making this an infinite loop.
Output: 0 0 0 0 0…
4. Error: Logic
Fix/Explanation: The control variable is initialized to 10. The condition states that the loop will continue as long as the control variable is less than 15. However, the control variable is decremented, which makes the value move even farther away from the terminating condition, resulting in—for all practical purposes—an infinite loop. The reason it is not a full infinite loop is that as the variable is decremented, the number gets more and more negative. Once the variable is decremented far enough, the sign bit of the integer will get set to a zero. This makes the integer a positive number greater than 15, which would finally terminate the loop.
Output: 10 9 8 7 6…-2147483648
5. Error: Logic
Fix/Explanation: Infinite loop. No condition section of the for loop. Note: to be clear and readable, avoid writing for loops without all three of the components we discussed.
Output: 0 1 2 3 4 5…
6. for ( int i = 0, j = 10; i <= 10; i++, j--)
cout << i << ‘ ‘ << j << endl;
7. 0
0 1
0 1 2
0 1 2 3
0 1 2 3 4