CHAPTER 2
Program Design and Development
Chapter Objectives
By the end of the chapter, readers will be able to:
![]() Explain the characteristics of the procedural programming paradigm.
Explain the characteristics of the procedural programming paradigm.
![]() Understand the components of problem solving, program design, and algorithm development.
Understand the components of problem solving, program design, and algorithm development.
![]() Understand the characteristics associated with flowcharts and pseudocode.
Understand the characteristics associated with flowcharts and pseudocode.
![]() Understand the role of stepwise refinement in developing algorithms.
Understand the role of stepwise refinement in developing algorithms.
![]() Distinguish between the types of errors encountered in building, compiling, and running programs.
Distinguish between the types of errors encountered in building, compiling, and running programs.
![]() Understand the steps required in both compiling and building an executable file.
Understand the steps required in both compiling and building an executable file.
![]() Understand how to key in, build, and execute a program within Microsoft Visual Studio.
Understand how to key in, build, and execute a program within Microsoft Visual Studio.
![]() Explain the role of desk checking and debugging in the development of programs or solutions.
Explain the role of desk checking and debugging in the development of programs or solutions.
This chapter introduces some of the fundamental skills and tools necessary to design, develop, and implement computer programs. These skills are not language specific but are essential for any programmer; whether you are going to write a program in C++, C, Visual Basic, or C#, the fundamental skill set required is the same. The chapter also introduces how to create, debug, and execute a program using a software development tool from Microsoft called Visual Studio. Following this, we present and explore an assortment of errors a programmer could encounter. Finally, we conclude the chapter by beginning the process of familiarizing you with Visual Studio.
![]()
Remember: A program is a specific set of structured (or ordered) operations to be performed by a computer.
2.1 Procedural Programming
Over the past number of years, a wide variety of programming paradigms have evolved. Programming paradigms are simply methods or approaches used to conceptualize how we might solve a specific problem or design and structure a program. Countless books and articles continue to discuss the advantages and disadvantages of individual paradigms. However, our personal experience, as well as that of other educators and industrial partners, has clearly shown that if you are new to programming, you are likely to have the most success by learning programming from a procedural point of view.
Procedural programming performs, or presents, the steps needed to solve a problem in a very sequential and logical manner. For example, in a recipe to bake a cake, the steps need to be followed in the order presented. Deviating from those steps could lead to disastrous results.
In addition, procedural programming provides us an easy way to point out potential problem areas and to make useful suggestions for helping develop good programming habits from the very start. Finally, procedural programming lends itself well to various aspects of learning about problem solving, program design, and algorithm development.
Section 2.1 Exercises
1. Define the term “procedural programming.”
2. Define the term “program.”
2.2 Problem-Solving Overview
Perhaps one of the most difficult activities for beginning (and even some advanced) programmers to appreciate is the need to make sure they clearly understand the problem they are trying to solve. At first glance this appears to be a very easy task, but upon further digging and review it becomes apparent that identifying the problem may not be nearly as obvious (or easy) as one might hope. It is imperative as we progress in our exploration of C++ that you continue to refine your skills in identifying and defining the problem at hand. Your teacher (or boss) will not appreciate having spent time and effort on the development of a solution for a problem they never asked you to solve. This is a waste of your time—and your employer's money. If you do not have a clear goal of where you are headed, how will you know when the problem has been solved?
Too often beginning programming students want to immediately “code” or type commands into their editor instead of making sure they understand the problem. Obviously you wouldn't leave for a spring-break road trip with your buddies to go from Madison, Wisconsin to Keno, Oregon, without looking at a map. With the high price of gas, it would be a huge misuse of your money. Plus, you just don't have the time to waste by accidentally ending up in Virginia.
Before writing a program in C++ or any other language, it is crucial for you to have an overall strategy for solving the problem. We all know that developing a plan (or looking at the map) takes time; however, it will most definitely save time in the long run.
The next section offers a suggested guideline to follow in developing your programs. This method requires completing each step sequentially. Notice that you do not write any code until the fourth step. The goal of the steps is to help develop effective problem-solving skills. In addition, by following these steps, you will find that you are able to create programs in a timelier fashion, which will prove to be more accurate, efficient, and maintainable.
There are many methodologies geared to aid in program design and general problem solving. One thing to realize is that we unconsciously solve problems every day of our lives. The techniques used to plan a road trip are really no different from those used to develop a program to keep track of employee payroll information.
The following steps illustrate one of several possible problem-solving approaches. These steps attempt to clarify the approach by walking through the process involved in dealing with a relatively common event.
Step 1: Define the Problem. In this step, determine what you are trying to accomplish. Although this sounds simple, it is one of the most crucial and challenging steps in solving the problem. An error here would prove to be an extremely costly mistake in relation to both time and money.
As an example, suppose your friend has asked you to be responsible for planning a small party for her 21st birthday. She really doesn't want anything big or fancy, but just a few friends to get together for some beverages and dessert. To restate the problem definition in more concise terms, “Plan a friend's birthday party.”
Step 2: Requirement Specification. In this step, remove all ambiguities (unclear or not well-defined statements) from the problem definition. Also determine what output or results are required. Lastly, determine what input is needed as well as the source of that input (for example, from the keyboard or from a file) to achieve the desired results or output.
It is essential that the following steps be performed on a small subset of the program. Do not attempt to perform the following steps on the entire program. In general, you can't produce output until you perform some type of processing, and you can't process something until you get the appropriate input. Therefore, the input phase is a good place to start. For this very reason, a lot of procedural programs often contain three stages.
Input (I) → Process (P) → Output (O)
Continuing with the example started previously, the second step of our birthday-party illustration involves further refining and identifying requirements for the party. This is what is known so far:
![]() 21st birthday
21st birthday
![]() Female friend
Female friend
![]() Small group of attendees
Small group of attendees
![]() Dessert and beverages will be provided
Dessert and beverages will be provided
Further clarification of the requirements is necessary to help in the planning. For example, the number of attendees needs to be solidified so that the appropriate amount of food can be obtained. After some deliberation, the decision is made to begin by concentrating on making a dessert—angel food cake—for the party.
Another element related to the overall party relates to finalizing the date and time for the big event. Once you have identified this information, the process can continue on to the next step, having established a clear goal and anticipated timeline.
At the conclusion of this step in our example, we have a much clearer problem statement, which now includes the following requirements:
![]() 21st birthday
21st birthday
![]() Female friend
Female friend
![]() 14 attendees
14 attendees
![]() Angel food cake (use Grandma's Devilishly Good Angel Food Cake recipe)
Angel food cake (use Grandma's Devilishly Good Angel Food Cake recipe)
![]() Fruit punch
Fruit punch
![]() Party will be Friday, August 2 at 7:00 p.m.
Party will be Friday, August 2 at 7:00 p.m.
![]() Calvin's place is the location of the party
Calvin's place is the location of the party
The ingredients for Grandma's recipe are the inputs needed to produce the desired output, Grandma's Devilishly Good Angel Food Cake. The source of these ingredients will be our cupboards as well as the local market. We are now finished with Step 2 because we have identified the inputs and output for our solution. Also, all ambiguities have been removed from the problem statement.
Step 3: Design. In this phase, develop an algorithm for a small piece of your program or problem. This text focuses on using pseudocode to represent the algorithm. Pseudocode is a written list of the individual steps needed to solve the problem, independent of any programming language. This list should include all the necessary details to clearly outline the solution.
![]()
An algorithm is a finite set of instructions that leads to a solution.
Once the algorithm has been completed, use some sample data and attempt to validate the results by hand. (This simply refers to test data being used to determine if the outlined steps achieve the desired results.)
![]()
The process of verifying the logic of your solution is often referred to as desk checking.
The desired results of this third step are to provide enough detail to prove you have
1. accounted for all required input,
2. completed all the necessary processing steps,
3. addressed all of the issues required to generate the output or solution identified in the Requirement Specification (Step 2).
Applying Step 3 to our example requires us to determine the amount and type of ingredients necessary to make Grandma's cake. The amount of ingredients is based on the number of attendees. Since our cupboards are bare, we will need to go to the store with the list of ingredients. Once back from the store, all of the ingredients are measured and arranged. Writing the pseudocode for this process results in the following list of steps:
1. Calculate the amount and type of ingredients
2. Go to store
3. Purchase ingredients
4. Come home
5. Measure and arrange all ingredients
Keep in mind that the design of the algorithm created in Step 3 may not be implemented by you. Therefore, the design must be clear and concise enough for someone who hasn't been involved in the design process to be able to implement the solution.
In our example, we are fortunate that Grandma has already created the algorithm for baking the cake—it's included with the recipe. If we assume you were suddenly called away right after assembling all the needed items, our process should be able to be continued by someone else without much of a problem. Indeed, because we have a detailed recipe (i.e., pseudocode) clearly outlining the remaining steps, you can quickly ask one of your friends to complete the dessert. From your friend's perspective, all she or he would really need to do is follow the recipe by mixing the various ingredients together as outlined, and bake our dessert as explained in the recipe. Because of the preliminary work and documentation provided, your sudden departure two hours before the party would not be cause for failure.
Step 4: Implementation. Write the source code based on the algorithm developed in Step 3. Once the pseudocode has been translated to the desired programming language, integrate the newly generated code into any existing source code. Again, please resist the temptation to immediately jump to this step before completing Steps 1-3.
![]()
Remember: Write the pseudocode before writing the source code. Use pseudocode to help generate your program. This will save you time, especially as the problems become more challenging.
We now enter the final phases of the development of our birthday cake. Your friend follows the steps as outlined in the recipe and bakes the cake as directed. Once the cake is placed in the oven, we have completed almost all of the steps required—except, of course, the one that many of us would say is the best of all.
At this point we now have our cake in the oven and are ready to focus our attention on following a similar process as just described, only this time with an objective to developing the frosting for our dessert. As you can see, it's the accumulation of these individual components, or subpieces, that will help make our dessert an ultimate success.
Step 5: Testing and Verification. In this step, make sure the program works and produces the correct output. This step involves good news and bad news. The bad news: This is not nearly as easy as it sounds, but it is crucial that you verify your results, including checking their accuracy by hand. The good news: Because you have been doing this each step of the way, any error is generally localized to the last section designed and implemented. If the testing and verification reveals the algorithm was incorrect, return to Step 3. Resist the urge to bypass the design step. Going directly to Step 4 without redesigning your algorithm leads to “hacking,” which is an undesirable form of programming that some beginning students unfortunately slip into. Hacking is a trial-and-error method of programming, which typically leads to a less robust program that is extremely difficult to debug and maintain, and usually results in a huge amount of time being wasted. After all, would you go on a long road trip or design a new car by using a trial-and-error method?
In relating this step to our example, you need to double-check the cake after it has finished baking. Once the cake is done, remove it from the oven, take it out of the pan, and let it cool. This would be the perfect time to check your final results by sampling the crumbs that remain inside the pan and verifying that the cake is indeed perfect.
Step 6: Repeat Steps 3-5. Once you have tested your code sufficiently, determine the next piece of the solution to be implemented and repeat Steps 3-5. The size of the piece is usually determined by the complexity of the solution and the experience of the programmer.
For the next item in our menu for the party, you would now repeat the previous steps (3-5), only this time focusing your energies on making the punch. Assuming our cake has cooled and we have completed Steps 3-5 for our punch, we can now serve our food.
Step 7: Maintenance. Once you have completed your program, including the required testing and verification, your job isn't over really. Usually the program will need to be revised and enhanced over time. Keeping the design documents as well as providing readable source code makes this phase of the process more productive and less time consuming. This is indeed a crucial step of the development process. To stress the importance of this step, you will be given an exercise at the end of each upcoming chapter for which you will be requested to modify, enhance, or test someone else's code. We call this section the Team Programming Exercise.
We have found that students who get into the habit of following the steps as outlined save considerable time and frustration in learning programming. Particularly when they begin developing more complex and robust applications, the development process becomes a crucial tool.
Comparing the preparation of the dessert (and punch) with the overall maintenance phase might involve altering or experimenting with some of the ingredients we used in making the dessert. For example, maybe we can try to reduce the number of calories each piece of cake contains by substituting artificial sweeteners for sugar the next time. While not perhaps a real crowd-pleasing idea, you no doubt get the point.
![]()
Remember:
Step 1: Define the problem
Step 2: Requirement specification
Step 3: Design
Step 4: Implementation
Step 5: Testing and verification
Step 6: Repeat steps 3-5
Step 7: Maintenance
Section 2.2 Exercises
1. In which steps would you find each of the following activities?
a. Writing pseudocode.
b. Clarifying the problem statement with your client.
c. Writing C++ code.
d. Determining what information will be needed from the user.
e. Determining what problem needs to be solved.
f. Identifying what outputs or actions are generated by the program.
g. Running the program and determining if it works correctly.
2. As referred to in this chapter, what does IPO stand for?
2.3 Algorithm Representation
As previously noted, pseudocode is an important tool to help illustrate the specific steps required to accomplish a particular task. Perhaps the best-known example of an algorithm is a recipe, as demonstrated in the previous section. The ingredients and steps are all clearly defined and outlined in an effort to provide the chef with a road map to follow in making the specific food item. There are a number of ways to represent an algorithm, including flowcharts and pseudocode.
To help illustrate the concepts that follow, assume we want to ask (prompt) a person to enter a score on a test. Our goal is to print out a message that says “Excellent job” if the test taker had a score above 90. If, however, the test taker scores at or below 90, we want to print out a message suggesting they “Try a little harder”.
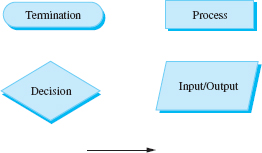
Figure 2.3.1 Flowchart symbols
Notice in the preceding problem statement that we can clearly identify the problem or objective—to display a message directly tied to the results of the individual grade entered. Remember, defining the problem is the first step in the development process outlined in the last section. The second step involves identifying what the desired outputs are and what input we need to achieve those results. The output in our short sample will only be one of two messages—either “Excellent job” or “Try a little harder”. To display the messages correctly, we only need one input—the score—which will then be evaluated based on the criteria outlined. The third step requires us to develop an algorithm. Next we introduce two options for representing the algorithm.
2.3.1 Flowchart
A flowchart is a graphical or pictorial representation of an algorithm. It is a series of standardized shapes, each with their own meaning, arranged to represent the overall flow of the program. Although there are many other symbols, Figure 2.3.1 shows some of the basic flowcharting shapes and their purpose.
Termination—marks the start or the end of the flowchart
Process—denotes any activity associated with manipulating the data
Decision—illustrates the flow of the solution based on either a true or a false condition
Input/Output (I/O)—shows reading data or displaying results
The arrow illustrates the flow of control.
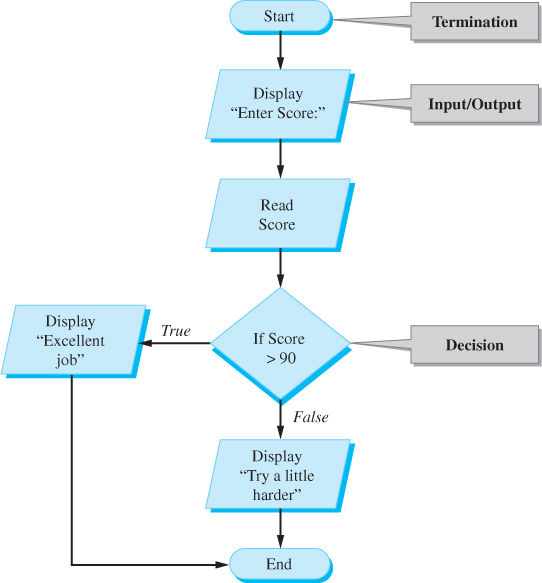
Figure 2.3.2 Flowchart
Figure 2.3.2 shows a flowchart that demonstrates the design of the grade program.
Looking at the flowchart in Figure 2.3.2, you quickly see the flow is from the top down. Notice also how a diamond is used to denote a choice or conditional path, which leads to only one of two possible choices based on a specific condition. Flowcharts can be used to demonstrate the flow of any system, from a program's algorithm to a college's admissions process. However, we will focus our attention on representing algorithms using pseudocode to help us identify and outline the steps needed in solving a specific problem.
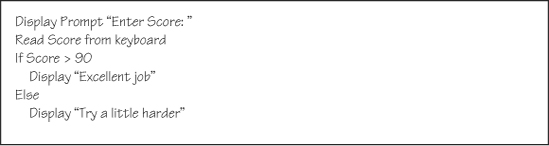
Figure 2.3.3 Pseudocode
2.3.2 Pseudocode
Pseudocode is an English representation of an algorithm. Pseudocode, like flowcharting, is just another tool we can use to help in our quest to clearly outline the specific steps we must take to solve a problem. Unlike flowcharting, however, it does not require the use of any special predefined symbols.
Pseudocode provides you with the capability to develop an algorithm in English (not in C++ or any other programming language), so you can focus on the problem at hand without regard to the syntax of a specific language. This is the method of representing an algorithm we will use within this text. Figure 2.3.3 demonstrates the use of pseudocode to solve the test-score problem previously discussed.
![]()
A prompt is text displayed to the user asking (prompting) him or her to do something.
We will return often to the topic of pseudocode as additional programming concepts are introduced in the remaining chapters. Because we view this topic as such a crucial component in programming, we include a section in each chapter called Problem Solving Applied, which will contain examples of the development process, including pseudocode. Based on our experience, we have found that in the development process, design and pseudocode are vital to student success in learning to program, regardless of the language.
![]()
Remember: One of the biggest mistakes we have seen beginning students make is not providing enough detail in their pseudocode. Ideally there should be almost a one-to-one translation between lines of pseudocode and source code. Pseudocode should explain how to accomplish a task, not just what task needs to be performed.
Figure 2.3.4 demonstrates Step 4 and the idea of using pseudocode or a flowchart to represent your solution. Remember, Step 4 of the development process requires you to translate your algorithm to C++, as illustrated in the figure.
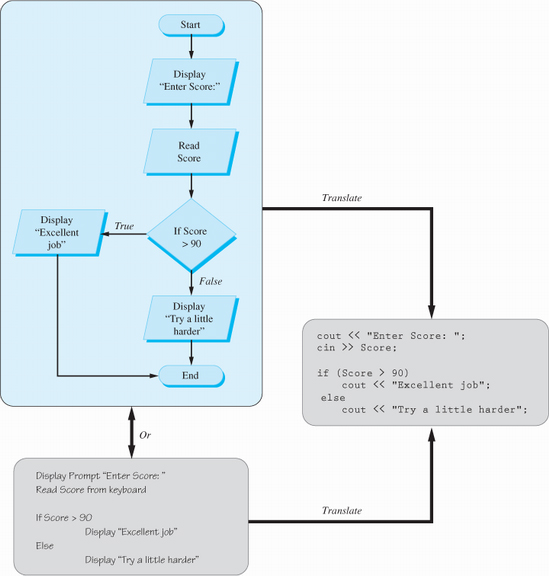
Figure 2.3.4 Translation process
1. What is an algorithm?
2. What form of algorithm representation uses symbols?
3. What form of algorithm representation is English-like?
4. When in the development process do we develop the algorithm?
5. You read a flowchart from __________ to _____________.
6. What symbol is used to mark the beginning and end of a flowchart?
2.4 Algorithm Development
Even though the test-score example in Figure 2.3.4 is very straightforward, hopefully it can help you understand the steps required in actually developing an algorithm. Did you notice how we needed to get the input before we could check the score to see what message to display? Did you also notice that we included a clear message telling the person using our solution what specific data needed to be entered (i.e., our prompt)? Once we had collected all the input and done all the required processing, we were only left with our final task—displaying the output as requested in the original problem definition. As you can see, we have now accomplished all three of the I → P → O phases discussed earlier.
2.4.1 Value of Algorithm Development
Although developing your algorithm will take time, please remember it should be done before you ever attempt to write any code. The time you spend working on and testing your algorithm will greatly reduce the total time it takes to complete your problem-solving task or program. As the problems become more complex, you will see the value of your pseudocode increase dramatically.
2.4.2 Stepwise Refinement
This is a methodology that greatly aids in decreasing the time required to create a program. While this technique takes some effort and practice, when done correctly, it is an incredible time saver.
The key to stepwise refinement is to break the program down into smaller, more manageable, and detailed pieces. Then take the first piece and design, implement, and test it. If it is correct, move on to the next piece, if it is not correct, fix it before continuing.
That's about all there is to it, but it is one of the best techniques to use in developing programs. This technique not only saves time but has the added benefit of confining any errors introduced into your program to a smaller area, making them easier to find. Stepwise refinement meets the objective of Step 6 in the development process.
2.5 Compilation Process
Once your solution has been coded using a programming language (like C++), it needs to be turned into a form the computer can understand. Computer languages will perform this process in one of three ways: compilation, interpretation, or a combination of both.
Compilation translates the entire program to machine language and creates a file that can be executed by the operating system. Since translation is done at compilation time, a compiled program runs faster than an interpreted program. Also, the translation process only needs to be completed once (or until changes are made to the source code). However, since each operating system (Windows, UNIX, Macintosh) has a unique command set, the executable compiled on one operating system will not work on a different one. Therefore, the program must be recompiled to run on different operating systems. C and C++ are commonly compiled languages.
Interpretation takes the source code line by line, translates it, and then executes that line immediately. This all takes place when the program is running, so interpreted programs tend to execute slower than other forms of language translation. An advantage of an interpreted program is that as long as you have an interpreter for your platform, you can run your program on any operating system. HTML, LISP, and Forth are languages that are usually interpreted. The disadvantage of this translation method is that every time you execute or run the program it must be reinterpreted.
The last form of translation is a hybrid of interpretation and compilation. The program is compiled into an intermediate form. This intermediate form is then interpreted when executed. Since much of the translation process is done during the compilation phase, the speed during execution is greatly improved over that of a true interpreted language, but retains much of the platform independence of the interpreted languages. Java is an example of a hybrid language.
Since C and C++ are typically compiled, this book focuses on the compilation process. There are many C/C++ compiler products available today. Microsoft, Borland, and MetroWerks all offer commercial products, while groups such as the GNU Foundation offer a free compiler used by many professional programmers. While the code samples in this text will work on these platforms, they have been tested using Microsoft's Visual Studio.
2.5.1 Editor
Once you have developed your algorithm as discussed previously, you need to translate the pseudocode solution into C++ and then type the source code into an editor. We advise beginning programmers to write out their source code using paper and pencil to help reduce the tendency to program using a trial-and-error approach, often called hacking. Once that's done, the code can be entered into an integrated development environment (IDE) focused on C++ development. An IDE combines many development tools in one application. Most of today's IDEs provide a great deal of support to help programmers along the way, including color-coded keywords and automatic text formatting. Using the editor, you are creating a text file with a .cpp file extension containing your source code.
![]()
Remember: A text editor is different than a word processor. A text editor, such as Notepad and UNIX's vi editor, will create a file that consists of text only. Word processors, such as Word and WordPerfect, allow you to include many advanced formatting features, such as bolding, special fonts, tables, and image-handling capabilities. Word processors, by default, save their files in a binary format, whereas text editors save their files as text.
2.5.2 Preprocessor
After your C++ code has been written, the first step in the translation process is to run your code through the preprocessor. The preprocessor identifies special commands within your code—called preprocessor directives—and performs the tasks specified by the directives. Preprocessor directives are easy to recognize because they all begin with a pound sign (#). Some of the more common preprocessor directives are #include and #define. These statements will be discussed in more detail later in the text.
2.5.3 Language Translator
Once the preprocessor phase has been completed, the language translator (compiler) takes over. The compiler takes the source code that has been processed by the preprocessor and translates it into something called object code. Object code is mostly machine code that is understandable by the CPU. The object code is stored in an object file. An object file is a binary file with the filename extension .obj. If desired, you can use Windows Explorer to see that this file now exists.
2.5.4 Linker
Once the object files have been created (yes, there can be multiple), the linker combines them into one executable file. In Windows, the file will have the extension .exe. The reason there can be multiple object files is that larger programs are often broken into many separate source-code files. Each source-code file needs to be translated; and an object file, created. This step in the process is often called building your program. Assuming the process doesn't encounter any errors, you now have an executable file and can run your program.
Figure 2.5.1 shows how all of these components fit into the compilation process.
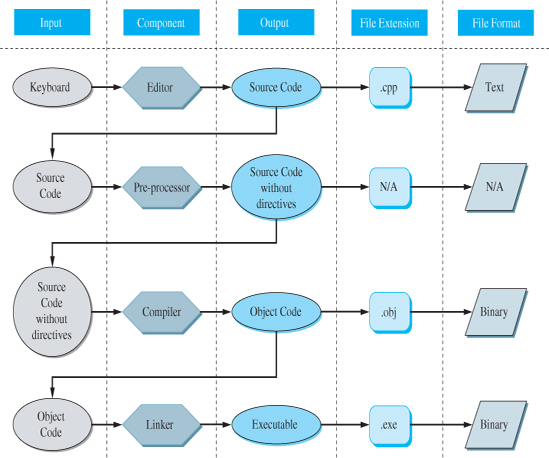
Figure 2.5.1 Compilation process
1. What is the filename extension for each of these files?
a. C++ source code
b. executable file
c. object file
2. What step in the compilation process generates object code?
3. What step in the compilation process creates an executable file?
4. What file format are the following files?
a. source code
b. executable
c. object file
d. Word document
5. #define and #include are examples of ____________ directives.
6. What step in the compilation process is commonly referred to as building?
7. What step in the compilation process is commonly referred to as compiling?
8. List in order the components used in the compilation process.
2.6 Program Development in Microsoft Visual Studio
Visual Studio is a suite of tools developed by Microsoft to aid in various programming activities. Programs can be written in Visual Studio using many different languages, including C++, Visual Basic, C#, and J#. Recent versions of Visual Studio can be used to build applications targeted for Windows, mobile devices, and the World Wide Web.
2.6.1 Using an Integrated Development Environment (IDE)
Visual Studio is often referred to as an integrated development environment, and like most modern IDEs, it includes an editor for entering your source code, a language translator, a debugger, and many additional tools used in program development. We will focus mainly on using the editor, compiler, and debugger in this text.
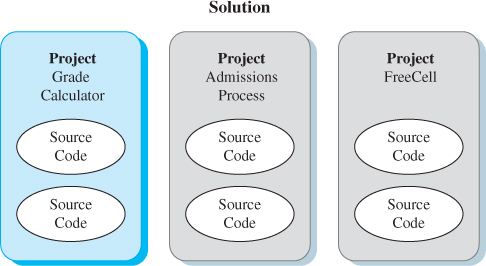
Figure 2.6.1 Microsoft Visual Studio hierarchy
To use Visual Studio, it is necessary to understand the hierarchy involved in creating a program. The current hierarchy was introduced by Microsoft in the .NET version of their IDE in 2003.
A solution encapsulates one or more projects. Each project can encapsulate one or more source-code files, as shown in Figure 2.6.1. Although only one project can be active at any given time, each individual project represents one complete program.
When you build the program, the active project, represented by the rectangle at the far left in Figure 2.6.1, is actually the one that gets created. In addition, the name of the executable will mirror the name of the active project you are building. For example, for the project named Grade Calculator, the name of the executable will be GradeCalculator.exe.
As previously mentioned, Visual Studio allows you to quickly build a wide range of applications. In this text, we use it to help us develop our understanding of C++ by actually using it to create, debug, and test our console-based applications.
![]()
A console application is a text-based application. Usually a console application doesn't include any of the familiar graphical user interface (GUI) features, such as buttons, menus, or even mouse control.
1. What does IDE stand for?
2. In Visual Studio, what is a solution?
3. In Visual Studio, what is a project?
4. Where does the name of the executable come from?
5. In this text we will be writing __________-based console applications.
2.7 Running the Program
Once you have built your program, there are several ways to execute it. You can run the executable either from the operating system or through the IDE. To run your application from the operating system, double-click on the executable from Windows Explorer or run it from the Command Prompt (under All Programs—Accessories). However, while you are still in the development mode of Visual Studio, you will find it much quicker and easier to run your program from within the IDE.
2.8 Errors
While we would all like to think we can write error-free code, chances are extremely good that you will encounter some type of error. Some errors will be easy to find and fix, while others may take a long time to locate and resolve. The following sections address the types of errors a programmer will encounter.
2.8.1 Syntax Error
A syntax error is caused by something incorrect in the mechanics of the statement(s). For example, in the English language, a sentence without appropriate punctuation at the end would be considered syntactically incorrect. An executable cannot be created until all syntax errors are corrected.
A syntax error is found during the compilation process. These errors are identified and displayed by the compiler. Most modern development environments allow the programmer to jump to the line of source code that the compiler “thinks” the error is on. The IDE will also display an error message—although it is sometimes fairly cryptic—and provide help on the typical causes of the error. Remember, the compiler is working on the programmer's behalf to locate any syntax errors. Unfortunately, with most other types of errors, the burden of locating them rests squarely on the shoulders of the programmer.
The compiler also determines the severity of the syntax problem. If the infraction is minor, the compiler will flag it as a warning. A program with warnings still compiles but may or may not run correctly. Even if the program may run correctly, it is best to remove all warnings as well as errors before running it. In fact, in our classes we stress that all warnings will be treated as errors and should be corrected before running, or turning in, a program.
It is important to understand how the compiler actually works in relation to errors. When a line of source code is translated, it is checked for syntax errors. If there is an error, the compilation process doesn't stop. Instead, the compiler makes assumptions as to what you were trying to accomplish, and the compilation process continues using those assumptions. Most of the time, however, the assumptions are incorrect. This makes it seem like there are more errors than there actually are. The correction of one error may actually remove many error messages. It is extremely important that you correct the first error the compiler identified and then recompile. This will save you a lot of time in chasing phantom errors.
![]()
Remember: Always correct the first error or warning in the compiler-generated list and recompile before moving on to the next item in the list.
2.8.2 Linker Error
Another type of error is called a linker error, identified by the linker during the build process. These error messages are often very cryptic and hard to understand for beginning programmers, but with practice you can usually find and correct them. Unfortunately, since the linker's job is to build the executable from the object code, there are no tools that allow you to jump to the line that caused the error. Linker errors seldom appear until you start writing your own functions, as shown in Chapter 9. Like syntax errors, all linker errors must be corrected before an executable can be created.
2.8.3 Run-Time Error
Once your program has been built into an executable file, you can now finally run it. Unfortunately, this doesn't mean your program will work correctly. One type of error that may still exist is a run-time error. If your program abruptly terminates, or crashes, during execution, you have a run-time error. The cause of the error could be anything from dividing a number by zero to accessing memory that doesn't belong to your program. For finding the cause of this error, the debugger will become an extremely valuable tool and your new best friend. The debugger is a set of tools that helps the programmer locate errors, or bugs. (A bug is the common term used for an error in a program.)
2.8.4 Logic Error
The most difficult type of error to find is the dreaded logic error. A logic error occurs if your program compiles, links, and runs without crashing but doesn't produce the correct results. The debugger is a crucial tool for helping locate logic errors. Stepwise refinement also helps by confining the logic error to a more localized area, making the place where the error was first introduced into your program much easier to find.
![]()
Remember: Stepwise refinement breaks large tasks into smaller ones. Each small task is then designed, developed, and tested before moving on to the next small task.
You need to recognize when you do have a logic error. Appropriate desk checking—validating the results by hand—is absolutely vital to your success.
Section 2.8 Exercises
1. What types of errors must be resolved before an executable can be created?
2. What types of errors does the debugger help find?
3. Why is it important that the first syntax error be corrected and then the program recompiled?
4. What type of error would you get if you forget to include a required semicolon at the end of a statement?
2.9 Desk Checking
One of the most fundamental activities you can undertake in relation to locating errors is to mentally simulate and draw out by hand the overall flow of your program before you actually run it. This process, often referred to as desk checking, can act as a valuable tool in identifying and catching various bugs and problems in your code on paper—well before they enter into the compilation of your program.
![]()
Remember: A bug is a phrase coined by Grace Hopper, which refers to an error or a flaw found in a computer or computer program.
To desk-check your program, examine your completed source code and write the values of your data on a piece of paper. This is done with the intent to confirm your program's accuracy or to find and correct bugs. Freely draw various boxes to represent your data, and create the necessary test values to see if your calculations are indeed correct.
While this can be a time-consuming process, it is often very helpful for beginning programmers to incorporate desk checking into their development process. This has proved to be an excellent learning tool over the years, and we would suggest you take the time to complete this step. A picture is indeed worth a thousand lines of code and many wasted hours of valuable development time.
Once your program is compiling and apparently executing correctly, it is imperative that you verify your results by hand. To verify that the results of your program are correct, determine ahead of time exactly what your results and calculations should look like, then compare that information against the data generated by your program. Make sure to always double-check some of your calculations as well as your totals on reports to confirm their accuracy. There is obviously nothing worse in programming than generating a report and then finding that you have made an error in the calculations.
![]()
Remember: Make it a point to verify your results on all programs you write.
2.10 Using Visual Studio (VS)
As previously mentioned, Visual Studio (VS) is also referred to as an integrated development environment (IDE). The material presented here is simply designed to help get you started using this very powerful and professional tool. Before we get too far, please remember to relax and have fun with this package. Remember, any time you spend learning how to use this application will be time well spent. Figures 2.10.1-2.10.10 were done using Microsoft Visual Studio 2008 Professional Edition.
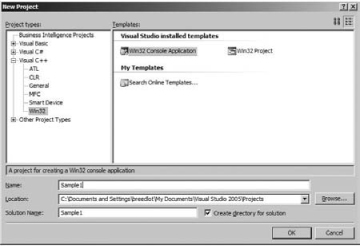
Figure 2.10.1 New project window
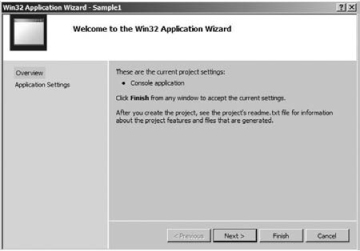
Figure 2.10.2 Win32 application wizard
2.10.1 Getting Started
1. Launch Visual Studio (Start → All Programs → Microsoft Visual Studio). Then select Microsoft Visual Studio 2008.
2. Select File → New → Project → and click on the “+” sign to the left of Visual C++ (under Project types). The results are shown in Figure 2.10.1.
3. Now click on Win32 under Project types. On the right-hand side under Templates, select Win32 Console Application. Enter the name of your new project in the Name field. For illustrative purposes we have called our project “Sample1”. Click the OK button. Figure 2.10.2 shows the window that is now displayed.
4. You will now see the Win32 Application Wizard. On the left side you will find the link called Application Settings. Under Application Settings/Additional options, check the box that says Empty project. Make it a point to verify that the Console application radio button has been selected for you. This is illustrated in Figure 2.10.3.
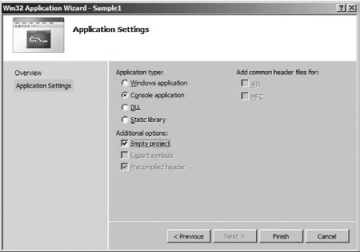
Figure 2.10.3 Application settings
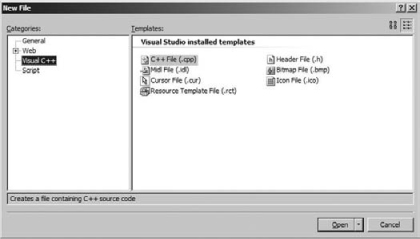
Figure 2.10.4 New file window
Click the Finish button. We have now created a solution. As you may recall, a solution is composed of one or more projects (i.e., applications).
5. Under File, select New → File causing a new file dialog box to appear, as shown in Figure 2.10.4.
6. Under Categories, be sure to click on Visual C++, and under Templates, be sure to select C++ File (.cpp). Now press the Open button.
7. By default, the name of your new file is called Source1.cpp. Immediately save this file to the same directory as your solution but give it a new name, as we did: Sample1.cpp. Visual Studio should now appear as shown in Figure 2.10.5.
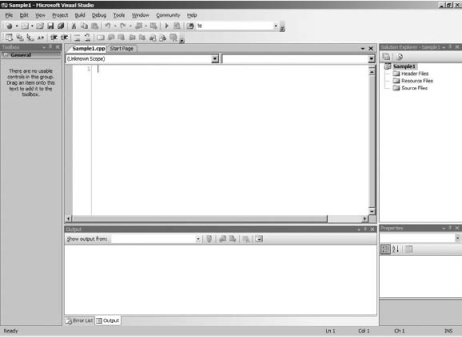
Figure 2.10.5 Visual Studio with Sample1.cpp
8. Now go to the File menu option and select the Move Sample1.cpp into → 1 Sample1 project. This is directly above the Exit menu option at the bottom of that menu. The menu system is shown in Figure 2.10.6.
9. You are now in the editor, and the file Sample1.cpp has been added to this project.
Type in the program as shown in Figure 2.10.7.
10. Notice the use of the colored text in relation to the syntax highlighting in your IDE. Your code should look something similar to that in Figure 2.10.7.
Notice an asterisk appears to the right of the filename, indicating that the file has not yet been saved.
11. Under the Debug menu option, select Start without Debugging.
12. You may see a dialog box appear, noting that Visual Studio is working on your behalf to monitor the changed state of your application. If you have indeed made changes, you will be asked if you would like to build your application; click the Yes button. This is shown in Figure 2.10.8.
13. Notice that once you start the build process, the Output window at the bottom of Visual Studio provides status information. The Output window is shown in Figure 2.10.9.

Figure 2.10.6 Including source file
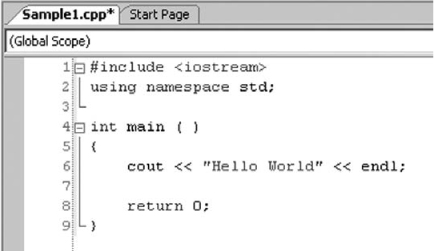
Figure 2.10.7 Unsaved source code
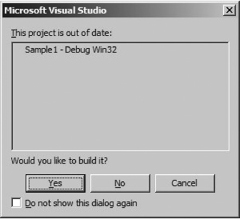
Figure 2.10.8 Project out-of-date confirmation window
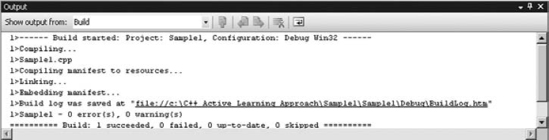
Figure 2.10.9 Output window
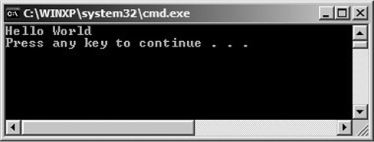
Figure 2.10.10 Console window
14. As you can see, your application has launched a new console application and displays the text “Hello World”. Remember, to terminate the console application, you need only press any key. The console window is shown in Figure 2.10.10.
Congratulations! You have now just entered, compiled, built, and executed your first C++ program!
We will have much more to say about using Microsoft's Visual Studio in the future, but for now you can indeed be proud of your progress. If you ran into any errors in the compilation process, correct them and repeat the process, beginning with Step 11.
2.11 Debugging
Debugging is the process of removing run-time and logic errors from a program. There are many tools available to aid in the debugging process. These tools, which are integrated into the IDE, will not find the errors for you but will allow you to analyze the situation to determine whether the results of the code being examined meet the expectations.
![]()
Remember: Debugging tools only help you find logic and run-time errors in running applications. All syntax and linker errors must be corrected before using debugging tools.
Most modern developer environments have some form of these debugging tools. It is crucial for you to learn the tools available in your specific IDE. We will begin to explore the various debugging tools integrated into Visual Studio in Chapter 5.
2.12 Problem Solving Applied
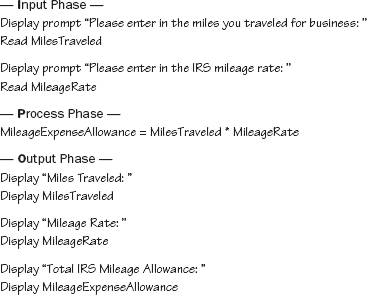
Problem statement: One of your friends, Jamie, who is majoring in physics, operates a small computer business on the side to help her pay for her college expenses. She has asked you to create an algorithm that outlines the steps needed to calculate her total mileage expenses for her federal tax return. This year the IRS allows 58.5 cents a mile for business-related travel. However, since that amount is subject to change ever year, your solution should simply ask her for that information. Unfortunately the IRS will not allow the deduction of her mileage accrued while traveling for the softball team. She would like to be able to enter in the amount of miles she traveled for business and calculate the total mileage expenses.
Please develop the necessary pseudocode solution outlining the steps needed to solve the problem of calculating and displaying her mileage expenses for last year.
Requirement Specification:
Input(s):
Input Type |
Data |
Source |
Decimal |
MilesTraveled |
Keyboard |
Decimal |
MileageRate |
Keyboard |
Output(s):
Output Type |
Data |
Destination |
| Decimal | MilesTraveled | Screen |
| Decimal | MileageRate | Screen |
| Decimal | MileageExpenseAllowance | Screen |
Design:
Required formulas:
MileageExpenseAllowance = MilesTraveled * MileageRate
Pseudocode:
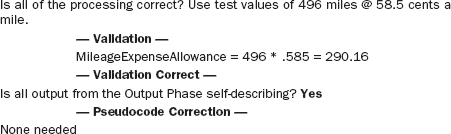
Testing and Verification:
Desk Checking:
![]()

Many of the concepts presented in this chapter will be the basis for much of the material in the remainder of the text. While some of these concepts might appear abstract or theoretical at this time, it is imperative that you become familiar with them.
This chapter illustrates various aspects associated with procedural programming. In addition, we have outlined a series of steps you should follow in the development of your programs.
After completing the design overview, we presented information related to actually entering, compiling, and running your application within Microsoft's Visual Studio. It is during this process that various errors will be encountered, including those related to syntax and program logic. Although there are many available debugging tools, covered later in the text, your best resource in finding errors currently lies in the desk-checking process.
2.14 Debugging Exercise
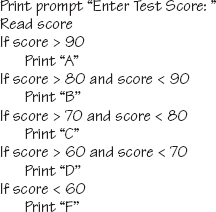
1. Given the following problem statement and pseudocode, verify (desk-check) that the solution is correct. If it is not correct, make the necessary changes and rewrite the pseudocode.
Problem: Read a test score and determine what letter grade the student should receive based on the following grading scale:
90+ → A
80+ → B
70+ → C
60+ → D
Score of less than 60 → F
Solution:
Input(s): A decimal number for the test score.
Output(s): A letter signifying the grade.
Pseudocode:
2. Based on the following recipe for making French onion soup, answer the following questions:
a. Does the recipe appear complete and easy to follow?
b. What specific items are lacking?
c. Would you eat it?
Recipe for Marie's World-Famous French Onion Soup:
Ingredients (Inputs)
4 medium fresh onions
3 tablespoons butter
4 cups beef broth
1 teaspoon Worcestershire sauce
2 slices toasted French bread
¼ cup grated Parmesan cheese
Activities (Process)
• In a covered large saucepan, cook the onions in the butter over low heat, stirring occasionally
• Uncover and add the beef broth to the saucepan
• Add Worcestershire sauce to the saucepan
• Heat to boiling
• Reduce heat, cover, and simmer
• Place ½ slice of toasted bread in each of 4 soup bowls; pour hot soup over bread and sprinkle generously with Parmesan cheese
Serve and enjoy (Output)
1. Write the pseudocode to find the average of three fixed numbers (10, 100, and 1,000) and print the results.
2. Assume you take three exams during the term. Write the pseudocode solution that prompts you to enter the score for each of your three exams, calculates the sum and average of your exam scores, and prints the final total and average to the screen.
2.16 Team Programming Exercise
A long time pen pal of yours from another country has recently come to stay with you and attend your school for one academic term. She asks you to review a pseudocode solution she has been working on to help her determine if it appears to be logically correct. Even though we have just touched the surface in relation to using and writing algorithms, you agree—perhaps somewhat reluctantly—to help her out. Basically your friend is trying to write a pseudocode solution to find the sum of the first five natural numbers. The problem statement and her solution follow, preceded by some questions to aid you in your evaluation:
1. Is the solution proposed logically correct? If not, what is wrong and how would you correct it?
2. How might you be able to actually prove that her solution works?
3. What suggestions do you have to improve the overall readability of her pseudocode?
Problem: Construct an algorithm to find and print out the sum of the first five positive, non-zero integer numbers.
SET x to 0
Set n to 0
WHILE n < 5
ADD n to x
Print out x
Write your response to each of the preceding questions (1-3). In addition, rewrite the entire solution, addressing all of your concerns and correcting any errors.
2.17 Answers to Chapter Exercises
Section 2.1
1. Procedural programming performs, or presents, the steps needed to solve a problem in a very sequential and logical manner.
2. A program is a specific set of structured (or ordered) operations to be performed by a computer.
Section 2.2
1.
a. Step 3: Design
b. Step 2: Requirement specification
c. Step 4: Implementation
d. Step 2: Requirement specification
e. Step 1: Define the problem
f. Step 2: Requirement specification
g. Step 5: Testing and verification
2. Input → Process → Output
Section 2.3
1. An algorithm is a finite set of instructions that leads to a solution.
2. flowchart
3. pseudocode
4. Step 3: Design
5. top; bottom
6. oval
Section 2.5
1.
a. .cpp
b. .exe
c. .obj
2. language translation
3. linking
4.
a. text
b. binary
c. binary
d. binary
5. preprocessor
6. linking
7. language translation
8. editor, preprocessor, language translator (compiler), linker
Section 2.6
1. integrated development environment
2. A solution in Visual Studio encapsulates one or more individual projects.
3. A project in Visual Studio is part of a solution and contains all the necessary files for a particular application. You could have a solution called MyInLabs that contained a number of weeks’ InLab projects (InLabWeek1, InLabWeek2, etc.)
4. The name of the executable file will be the same name as that of the active project within your solution.
5. text
Section 2.8
1. There are two different categories of errors that must be fixed before an executable file can be created: syntax (compiler) errors and linker errors.
2. run-time and logic errors
3. Because the correction of one error may indeed remove a number of other error related messages.
4. syntax error