
- John goes about setting up his Visual Studio environment, including getting connected to GitHub, by clicking on Team in the menu and clicking on Manage Connections....
- He logs in to GitHub with his e-mail address and password.
Take note that if you have just signed up to GitHub, you will need to click on the verification e-mail sent to the e-mail address you specified when signing up. Without verifying your e-mail address, you will not be able to log in from Visual Studio.
- After connecting, John sees his GitHub details loaded:
- He now wants to work on the GitHubDemo application and finds it on GitHub by searching for it by name:

- He now copies the URL from the Clone with HTTPS textbox from the Clone or download button:

- Back in Visual Studio, John expands the Local Git Repositories and clicks on Clone. He pastes the copied URL to the Git Repository path and specifies where the code should be cloned to on his hard drive. He then clicks on Clone:

- When the code is cloned, it will be in the folder path John specified earlier.
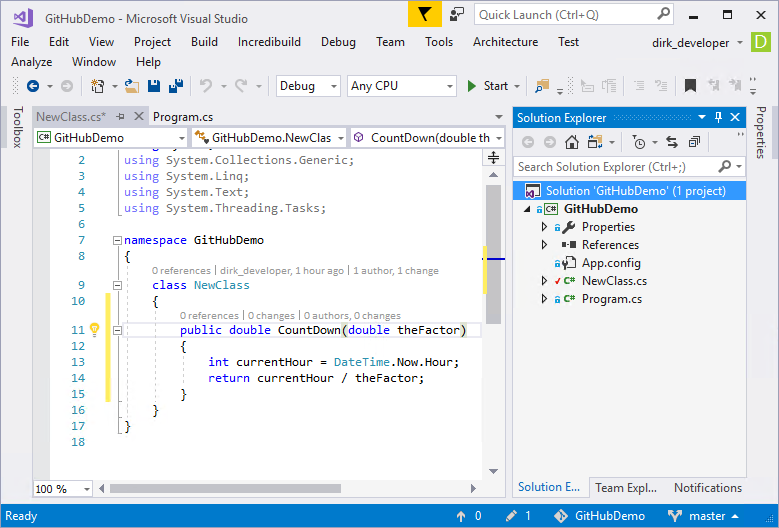
- Time to make some changes to the code. He opens the project in Visual Studio as normal. John decides to work on the NewClass class and adds a new function that returns a countdown integer:

- After the code change is complete, John prepares to commit the code he just added to the GitHubDemo project.
- After adding a commit message, he then clicks on Commit All and Sync.
One important thing to note is that you have three commit options available to you if you click on the down arrow next to the Commit All button. This button will just record the changes you make on your local machine. In other words, the change will not be reflected in the remote repository. The Commit All and Push button will record the changes on your local machine and push those changes to your remote GitHub repository. The Commit All and Sync button will record the changes on your local machine, then it will pull any changes from the remote repository, and finally it will do the push.
- John's changes are committed to the GitHub repository:

- On the other side of the office, I am working on the same bit of code. The only problem is that I have added the same method with my own implementation of the CountDown logic:
- I get ready and commit my changes to GitHub:

- GitHub immediately prevents me from doing this. This is because if my code is pushed, the earlier commit by John will be lost. GitHub has a great help file on the subject in GitHub Help at https://help.github.com/articles/dealing-with-non-fast-forward-errors/.

The Output window contains a more descriptive error message:
Error encountered while pushing to the remote repository: rejected Updates were rejected because the remote contains work that you do not have locally. This is usually caused by another repository pushing to the same ref. You may want to first integrate the remote changes before pushing again.
- To resolve this, click on Pull to get the latest commit that John did. Your code will then be in a conflicted state. This sounds bad, but it isn't. It is putting you in control of the decision on which code will be used. You can see that the pull shows that there are conflicted files and also the incoming commit message that John added:

- To view the conflicts, click on the Resolve the conflicts link in the message pop-up:

- You will then see the Resolve Conflicts screen listing the conflicted files. Clicking on a file will expand it into a short summary and action options screen. It is always prudent to click on the Compare Files link to see the difference between the files in conflict:

- The differences in code are immediately evident. The process you follow from here on is subject to how you work together as a team. Usually, the conflict can be quite complex and it is always a good idea to speak to the developer concerned about the way forward:

- In this case, John and I decided that his code was better and more concise. So the decision was made to simply click on Take Remote and use John's code. When you have clicked on the link, you need to click on Commit Merge:

- After adding a commit message, you can then push your code to the repo. In this case, I simply replaced all my code with John's, but there might be situations when you will be using some of your code and some of another developer's code. GitHub allows us to easily handle these conflicts:

- After pushing the code to the remote, GitHub notifies you that the code has successfully been synchronized:
