Appendix F. Previous Edition ICND1 Chapter 35: Managing IOS Files
Cisco has a wide and complex product catalog. The CCENT and CCNA R&S exams focus on two major branches of the product line: routers that run Cisco IOS software as the operating system (OS) and Catalyst LAN switches that also run IOS. While the IOS for each type of device has some differences, just because routers and switches perform different functions, IOS that runs on these switches and routers has many similarities. Within the exams, Cisco attempts to be generic in that the exam does not ask you to make distinctions between different models of routers and switches.
This chapter looks at some topics that again apply to IOS that runs in both Cisco routers and Cisco Catalyst switches. In particular, this chapter looks at the IOS itself: the file systems where the IOS stores files, how to upgrade IOS, and what happens when you reboot the router or switch to upgrade the IOS. This chapter also looks at how to manage configuration files beyond simply keeping them inside router or switch memory in the startup-config file. This chapter also includes a brief discussion about how to recover if you lose the password for a router or switch.
Note that this chapter focuses on features on Cisco routers. However, many of the same features work either exactly the same, or in a very similar way, on Cisco Catalyst switches.
Foundation Topics
Managing Cisco IOS Images and Upgrades
IOS exists as a file—a single file—that the router then loads into RAM to use as its operating system (OS). This first major section of the chapter works through the story of how to upgrade to a new version of IOS.
This first section has one primary purpose but many secondary purposes. Primarily, this section shows how to upgrade IOS on a router. As a secondary goal, this section works through a variety of small IOS features that engineers use during that upgrade process—features not covered in any detail until this point in the book. This section explains these topics, in order:
The IOS File System
Upgrading IOS Images
The Cisco IOS Boot Sequence
The IOS File System
Every OS creates file systems to store files. A computer needs some type of permanent storage, but it needs more than just a place to store bytes. The OS organizes the storage into a file system, which includes directories, structure, and filenames, with the associated rules. By using a file system, the OS can keep data organized so the user and the applications can find the data later.
Every OS defines its own file system conventions. Windows OSs, for instance, use a left-leaning slash () in directory structures, like DesktopApplications. Linux and OS X use a right-leaning slash, for example, /Desktop. Each OS refers to physical disks slightly differently as well, and IOS is no different.
As for the physical storage, Cisco routers typically use flash memory, with no hard disk drive. Flash memory is rewriteable, permanent storage, which is ideal for storing files that need to be retained when the router loses power. Cisco purposefully uses flash memory rather than hard disk drives in its products because there are no moving parts in flash memory, so there is a smaller chance of failure as compared with disk drives. Some routers have flash memory on the motherboard. Others have flash memory slots that allow easy removal and replacement of the flash card, but with the intent that the card remain in the device most of the time. Also, many devices have USB slots that support USB flash drives.
For each physical memory device in the router, IOS creates a simple IOS file system (IFS) and gives that device a name. Example F-1 lists the surprisingly long list of IOS file systems. Note that the entries of type disk and usbflash are the physical storage devices in that router. In this case, the router has one of two of the 2901’s compact flash slots populated with a 256 MB flash card, and one of the two USB flash slots populated with an 8 GB USB flash drive. Look at the size column and prefixes column in the output to find these devices, based on their types as disk and usbflash.
Example F-1 Cisco IOS File Systems on a Router
R2# show file systems
File Systems:
       Size(b)       Free(b)      Type  Flags  Prefixes
             -             -    opaque     rw   archive:
             -             -    opaque     rw   system:
             -             -    opaque     rw   tmpsys:
             -             -    opaque     rw   null:
             -             -   network     rw   tftp:
*    256487424      49238016      disk     rw   flash0: flash:#
             -             -      disk     rw   flash1:
        262136        253220     nvram     rw   nvram:
             -             -    opaque     wo   syslog:
             -             -    opaque     rw   xmodem:
             -             -    opaque     rw   ymodem:
             -             -   network     rw   rcp:
             -             -   network     rw   pram:
             -             -   network     rw   http:
             -             -   network     rw   ftp:
             -             -   network     rw   scp:
             -             -    opaque     ro   tar:
             -             -   network     rw   https:
             -             -    opaque     ro   cns:
    7794737152    7483719680  usbflash     rw   usbflash0:
74503236 bytes copied in 187.876 secs (396555 bytes/sec)
The example lists 20 different IOS file systems in this case, but the router does not have 20 different physical storage devices. Instead, IOS uses these file systems for other purposes as well, with these types:
Opaque: To represent logical internal file systems for the convenience of internal functions and commands
Network: To represent external file systems found on different types of servers for the convenience of reference in different IOS commands
Disk: For flash
Usbflash: For USB flash
NVRAM: A special type for NVRAM memory, the default location of the startup-config file
Many IOS commands refer to files in an IFS, but only some commands refer directly to the files by their formal names. The formal names use the prefix as seen in the far right column of Example F-1. For instance, the command more flash0:/wotemp/fred would display the contents of file fred in directory /wotemp in the first flash memory slot in the router. (The more command itself displays the contents of a file.) However, many commands use a keyword that indirectly refers to a formal filename, to reduce typing. For example:
show running-config command: Refers to file system:running-config
show startup-config command: Refers to file nvram:startup-config
show flash command: Refers to default flash IFS (usually flash0:)
Upgrading IOS Images
One of the first steps to upgrade a router’s IOS to a new version is to obtain the new IOS image and put it in the right location. Typically, Cisco routers have their IOS in one of the local physical file systems, most often in permanent flash. The only requirement is that the IOS be in some reachable file system—even if the file sits on an external server and the device loads the OS over the network. However, the best practice is to store each device’s IOS file in flash that will remain with the device permanently.
Figure F-1 illustrates the process to upgrade an IOS image into flash memory, using the following steps:
Step 1. Obtain the IOS image from Cisco, usually by downloading the IOS image from cisco.com using HTTP or FTP.
Step 2. Place the IOS image someplace that the router can reach. Locations include TFTP or FTP servers in the network or a USB flash drive that is then inserted into the router.
Step 3. Issue the copy command from the router, copying the file into the flash memory that usually remains with the router on a permanent basis. (Routers usually cannot boot from the IOS image in a USB flash drive.)

Figure F-1 Copying IOS Image as Part of the Cisco IOS Software Upgrade Process
Copying a New IOS Image to a Local IOS File System Using TFTP
Example F-2 provides an example of Step 3 from the figure, copying the IOS image into flash memory. In this case, Router R2, a 2901, copies an IOS image from a TFTP server at IP address 2.2.2.1.
Example F-2 copy tftp flash Command Copies the IOS Image to Flash Memory
R2# copy tftp flash
Address or name of remote host []? 2.2.2.1
Source filename []? c2900-universalk9-mz.SPA.152-4.M1.bin
Destination filename [c2900-universalk9-mz.SPA.152-4.M1.bin ]?
Accessing tftp://2.2.2.1/c2900-universalk9-mz.SPA.152-4.M1.bin ...
Loading c2900-universalk9-mz.SPA.152-4.M1.bin from 2.2.2.1 (via GigabitEthernet0/1):
!!!!!!!!!!!!!!!!!!!!!!!!!!!!!!!!!!!!!!!!!!!!!!!!!!!!!!!!!!!!!!!!!!!!!!!!!!!!!!!!!!!!
!!!!!!!!!!!!!!!!!!!!!!!!!!!!!!!!!!!!!!!!!!!!!!!!!!!!!!!!!!!!!!!!!!!!!!!!!!!!!!!!!!!!
!!!!!!!!!!!!!!!!!!!!!!!!!!!!!!!!!!!!!!!!!!!!!!!!!!!!!!!!!!!!!!!!!!!!!!!!!!!!!!!!!!!!
!!!!!!!!!!!!!!!!!!!!!!!!!!!!!!!!!!!!!!!!
[OK - 97794040 bytes]

97794040 bytes copied in 187.876 secs (396555 bytes/sec)
R2#
The copy command does a simple task—copy a file—but the command also has several small items to check. It needs a few pieces of information from the user, so the command prompts the user for that information by showing the user some text and waiting for the user’s input. The bold items in the example show the user’s input. The router then has to check to make sure the copy will work. The command works through these kinds of questions:
What is the IP address or host name of the TFTP server?
What is the name of the file?
Ask the server to learn the size of the file, and then check the local router’s flash to ask whether enough space is available for this file in flash memory.
Does the server actually have a file by that name?
Do you want the router to erase any old files in flash?
The router prompts you for answers to some of these questions, as necessary. For each question, you should either type an answer or press Enter if the default answer (shown in square brackets at the end of the question) is acceptable. Afterward, the router erases flash memory if directed, copies the file, and then verifies that the checksum for the file shows that no errors occurred in transmission.
You can view the contents of the flash file system to see the IOS file that was just copied by using a couple of commands. The show flash command shows the files in the default flash file system (flash0:), as seen at the top of Example F-3. Below it, the more general dir flash0: command lists the contents of that same file system, with similar information. (You can use the dir command to display the contents of any local IFS.)
Example F-3 Command Copies the IOS Image to Flash Memory
R4# show flash
-#- --length-- -----date/time------ path
1    104193476 Jul 21 2015 13:38:06 +00:00 c2900-universalk9-mz.SPA.154-3.M3.bin
3      3000320 Jul 10 2012 00:05:44 +00:00 cpexpress.tar
4         1038 Jul 10 2012 00:05:52 +00:00 home.shtml
5       122880 Jul 10 2012 00:06:02 +00:00 home.tar
6      1697952 Jul 10 2012 00:06:16 +00:00 securedesktop-ios-3.1.1.45-k9.pkg
7       415956 Jul 10 2012 00:06:28 +00:00 sslclient-win-1.1.4.176.pkg
8         1153 Aug 16 2012 18:20:56 +00:00 wo-lic-1
9     97794040 Oct 10 2014 21:06:38 +00:00 c2900-universalk9-mz.SPA.152-4.M1.bin

49238016 bytes available (207249408 bytes used)

R4# dir flash0:
Directory of flash0:/

    1  -rw-   104193476  Jul 21 2015 13:38:06 +00:00  c2900-universalk9-mz.SPA.154-3.
                                                      M3.bin
    3  -rw-     3000320  Jul 10 2012 00:05:44 +00:00  cpexpress.tar
    4  -rw-        1038  Jul 10 2012 00:05:52 +00:00  home.shtml
    5  -rw-      122880  Jul 10 2012 00:06:02 +00:00  home.tar
    6  -rw-     1697952  Jul 10 2012 00:06:16 +00:00  securedesktop-ios-3.1.1.45-k9.
                                                      pkg
    7  -rw-      415956  Jul 10 2012 00:06:28 +00:00  sslclient-win-1.1.4.176.pkg
    8  -rw-        1153  Aug 16 2012 18:20:56 +00:00  wo-lic-1
    9  -rw-    97794040  Oct 10 2014 21:06:38 +00:00  c2900-universalk9-mz.SPA.152-4.
                                                      M1.bin
256487424 bytes total (49238016 bytes free)
Pay close attention to the memory usage per file and for the IFS as shown in the example. The output lists the size in bytes for each file. Note that the IOS file is about 104 MB. Note that the size of the IOS file matches the size shown earlier in the TFTP transfer in Example F-2. The end of each of the commands then lists the amount of space available for new files to be added to flash (one lists it as “bytes available”; the other as “bytes free”). However, that same ending line of each command shows slightly different information about usage: show flash lists the bytes used, whereas the dir command lists the total bytes (bytes used plus bytes free). Play around with the numbers in this example to make sure you know which command lists which particular total.
Verifying IOS Code Integrity with MD5
You download the IOS from Cisco, copy it to your router, and run it. Is it really the code from Cisco? Or did some nefarious attacker somehow get you to download a fake IOS that has a virus?
Cisco provides a means to check the integrity of the IOS file to prevent this type of problem. Figure F-2 shows the basic mechanics of the process. First, when Cisco builds a new IOS image, it calculates and publishes an MD5 hash value for that specific IOS file. That is, Cisco uses as input the IOS file itself, runs the MD5 math algorithm against that file, producing a hex code. Cisco places that code at the download site for all to see. Then, you run that same MD5 math on your router against the IOS file on the router, using the IOS verify command. That command will list the MD5 hash as recalculated on your router. If both MD5 hashes are equal, the file has not changed.

Figure F-2 MD5 Verification of IOS Images—Concepts
The verify /md5 command generates the MD5 hash on your router, as shown in Example F-4. Note that you can include the hash value computed by Cisco as the last parameter (as shown in the example), or leave it off. If you include it, IOS will tell you if the locally computed value matches what you copied into the command. If you leave it out, the verify command lists the locally computed MD5 hash, and you have to do the picky character-by-character check of the values yourself.
Example F-4 Verifying Flash Memory Contents with the show flash Command
R2# verify /md5 flash0:c2900-universalk9-mz.SPA.154-3.M3.bin a79e325e6c498b70829d4d
   b0afba5041
......................................................................................
......................................................................................
…..MD5 of flash0:c2900-universalk9-mz.SPA.154-3.M3.bin Done!
Verified (flash0:c2900-universalk9-mz.SPA.154-3.M3.bin) = a79e325e6c498b70829d4d
   b0afba5041
Copying Images with FTP
The networking world has many options for file transfer, several of which IOS supports for the transfer of files into and out of the IOS file systems that reside on the router. TFTP and FTP have been supported for the longest time, with more recent support added for protocols like SCP. Table F-1 lists some of the names of file transfer protocols that you might come across when working with routers.
Table F-1 Common Methods to Copy Files Outside a Router
Method |
Method (Full Name) |
Router’s Role |
Encrypted? |
TFTP |
Trivial File Transfer Protocol |
Client |
No |
FTP |
File Transfer Protocol |
Client |
No |
SCP |
Secure Copy Protocol |
Server |
Yes |
To copy files with FTP, you follow the same kind of process you use with TFTP (see Example F-5). You can follow the interactive prompts after using an EXEC command like copy ftp flash. However, the copy command allows you to use a URI for the source and/or destination, which lets you put most or all of the information in the command line itself. Each URI refers to the formal name of a file in the IFS.
Example F-5 Installing a New IOS with FTP
R1# copy ftp://wendell:[email protected]/c2900-universalk9-mz.SPA.155-2.T1.bin flash
Destination filename [c2900-universalk9-mz.SPA.155-2.T1.bin]?
Accessing ftp://192.168.1.170/c2900-universalk9-mz.SPA.155-2.T1.bin...
Loading c2900-universalk9-mz.SPA.155-2.T1.bin !!!!!!!!!!!!!!!!!!!!!!!!!!!!!!!!!!!!!!!
!!!!!!!!!!!!!!!!!!!!!!!!!!!!!!!!!!!!!!!!!!!!!!!!!!!!!!!!!!!!!!!!!!!!!!!!!!!!!!!!!!!!!
!!!!!!!!!!!!!!!!!!!!!!!!!!!!!!!!!!!!!!!!!!!!!!!!!!!!!!!!!!!!!!!!!!!!!!!!!!!!!!!!!!!!!
!!!!!!!!!!!!!!!!!!!!!!!!!!!!!!!!!!!!!!!!!!!!!!!!!!!!!!!!!!!!!!!!!!!!!!!!!!!!!!!!!!!!!
!!!!!!!!!!!!!!!!!!!!!!!!!!!!!!!!!!!!!!!!!!!!!!!!!!!!!!!!!!!!!!!!!!!!!!!!!!!!!!!!!!!!!
!!!!!!!!!!!!!!!!!!!!!!!!!!!!!!!!!!!!!!!!!
[OK - 107410736/4096 bytes]


107410736 bytes copied in 119.604 secs (898053 bytes/sec)
First, take a close look at the long URI in the command that begins with “ftp”. The “ftp” part identifies the protocol, of course. After the //, the text references the username (wendell) and password (odom), as well as the FTP server’s IP address. After the single / comes the filename on the server.
Although the command is long, it has only two parameters, with the long first parameter and the short keyword flash as the second parameter. The copy command lists the source location as the first parameter and the destination as the second. The destination in this case, flash, is a keyword that refers to the default flash, typically flash0:, but it does not identify a specific filename. As a result, IOS prompts the user for a specific destination filename, with a default (in brackets) to keep the source filename. In this case, the user just pressed Enter to accept the default. To avoid being prompted at all, the command could have listed flash:c2900-universalk9-mz.SPA.155-2.T1.bin as that second parameter, fully defining the destination file.
Finally, with another twist, you can configure the FTP username and password on the router so that you do not have to include them in the copy command. For instance, the global configuration commands ip ftp username wendell and ip ftp password odom would have configured those values. Then the copy command would have begun with copy ftp://192.168.1.170/..., omitting the username:password in the command, without needing to then prompt the user for the username and password.
Copying Images with SCP
SSH Copy Protocol (SCP) provides a secure way to transfer files, but with a small twist as compared to other methods mentioned in this chapter: the router acts as the server, and you do not use the copy command on the router. Instead, you configure the router to act as an SCP server and then use an SCP client command or application on a desktop computer to transfer the files.
SCP uses SSH for two key parts of the work to securely transfer files: to authenticate the user and to encrypt all data transfer. SSH already does those tasks anyway, so SCP, defined after SSH was well established, simply relies on SSH to do those tasks. SCP then defines a method to transfer files.
To make SCP work on a router, the router first needs configuration to support SSH login as normal, as discussed in detail back in Chapter 8, “Configuring Basic Switch Management.” Then you just need to change one command plus add another, as follows:
Give the SSH user direct access to privileged mode by adding parameters to the username command, for example, username fred privilege-level 15 password barney.
Enable the SCP server with the ip scp server enable global command.
Then to use SCP to transfer files, the network engineer must use an SCP client on some computer that has network connectivity to the router. You can search the web for SCP clients, many of which are integrated as part of SSH clients. However, for the purpose of transferring files with Cisco devices, a command-line SCP client may actually be the best choice.
Example F-6 shows an SCP file copy with a router, using the Mac OS X built-in scp command. The command again copies an IOS file from the computer to the router, like the earlier examples. Note that it uses the full URI of the destination, with the username (wendell), router IP address (192.168.1.9), and IOS filename. The command then prompts the user for the password and begins transferring the file.
Example F-6 SCP Client IOS Copy from a Mac to a Router
WO-iMac:Desktop wendellodom$ scp c2900-universalk9-mz.SPA.155-2.T1.bin
[email protected]:flash0:c2900-universalk9-mz.SPA.155-2.T1.bin
 Password:
c2900-universalk9-mz.SPA.155-2.T1.bin                       100%  102MB 322.8KB/s
   05:25
Once you copy the IOS file into a local IOS file system on the router, you must reload the router to start using the new IOS. The next topic looks at the entire IOS boot process, including how to make a router start using the new version of IOS.
The Cisco IOS Software Boot Sequence
Cisco routers perform the same types of tasks that a typical computer performs when you power it on or reboot (reload) it. However, most end-user computers have a single instance of the OS installed, so the computer does not have to choose which OS to load. In contrast, a router can have multiple IOS images available both in flash memory and on external servers, so the router needs a process to pick which IOS image to load into RAM and use. This section examines the entire boot process, with extra emphasis on the options that impact a router’s choice of what IOS image to load.
When a router first powers on, it follows these four steps:
Step 1. The router performs a power-on self-test (POST) process to discover the hardware components and verify that all components work properly.
Step 2. The router copies a bootstrap program from ROM into RAM and runs the bootstrap program.
Step 3. The bootstrap program decides which IOS image (or the ROMMON OS) to load into RAM, and then the bootstrap program loads the OS. After loading the chosen OS image, the bootstrap program hands over control of the router hardware to the newly loaded OS.
Step 4. If the bootstrap program happened to load IOS, once IOS is running, it finds the startup-config file and loads it into RAM as the running-config.
All routers attempt all four steps each time the router is powered on or reloaded. The first two steps do not have any options to choose; either both of these steps succeed or the initialization fails. If it fails, you might need to call the Cisco Technical Assistance Center (TAC) for support. However, Steps 3 and 4 have several configurable options that tell the router what to do next, as noted in Figure F-3.
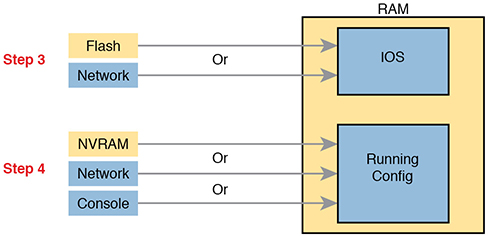
Figure F-3 Loading IOS and Initial Configuration
As you can see, the router has options at both Steps 3 and 4 in the figure. However, at Step 4, routers almost always load the configuration from NVRAM (the startup-config file), when it exists. There is no real advantage to storing the initial configuration anywhere else except NVRAM, so this chapter does not look further into the options of Step 4. But there are reasonable motivations for keeping IOS images in flash and on servers in the network, so the rest of this section examines Step 3 in more detail.
The Configuration Register
A router’s configuration register has an impact on a router’s choice of which OS to load.
Routers use a configuration register to find some configuration settings at boot time, before the router has loaded IOS and read the startup-config file. The 16 bits (4 hex digits) in the configuration register set a variety of different parameters. For example, the console runs at a speed of 9600 bps by default, but that console speed is based on the default settings of a couple of bits in the configuration register. By changing specific bits in the configuration register, the next time the router boots, you can change the speed of the console line.
You can set the configuration register value with the config-register global configuration command. Engineers set the configuration register to different values for many reasons, but the most common are to help tell the router what IOS image to load, as explained in the next few pages, and in the password recovery process. For example, the global configuration command config-register 0x2100 sets the value to hexadecimal 2100, which causes the router to load the ROMMON OS rather than IOS the next time the router is reloaded.
Interestingly, Cisco routers automatically save the new configuration register value when you press Enter at the end of the config-register command; you do not need to use the copy running-config startup-config command after changing the configuration register. However, the configuration register’s new value has no effect until the next time the router is reloaded.
How a Router Chooses Which OS to Load
A router chooses the OS to load based on two factors:
The last hex digit in the configuration register (called the boot field)
Any boot system global configuration commands in the startup-config file
The boot field, the fourth hex digit in the configuration register, tells the router the initial instructions about what OS to try to load. The router looks at the boot field’s value when the router is powered on or when reloaded. The boot field’s value then tells the router how to proceed with choosing which OS to load.
The process to choose which OS to load on modern Cisco routers happens as follows:
If boot field = 0, use the ROMMON OS.
If boot field = 1, load the first IOS file found in flash memory.
If boot field = 2-F:
A. Try each boot system command in the startup-config file, in order, until one works.
B. If none of the boot system commands work, load the first IOS file found in flash memory.
If all other attempts fail, load ROMMON, from which you can perform further steps to recover by copying a new IOS image into flash.
The first two steps are pretty straightforward, but Step 3 then tells the router to look to the second major method to tell the router which IOS to load: the boot system global configuration command. This command can be configured multiple times on one router, with each new boot system command being added to the end of a list of boot system commands. Each command can point to different files in flash memory, and filenames and IP addresses of servers, telling the router where to look for an IOS image to load. The router tries to load the IOS images in the order of the configured boot system commands.
Both Step 2 and Step 3B refer to a concept of the “first” IOS file, a concept that needs a little more explanation. Routers number the files stored in flash memory, with each new file usually getting a higher and higher number. When a router tries Step 2 or Step 3B from the preceding list, the router looks in flash memory, starting with file number 1, and then file number 2, and so on, until it finds the lowest numbered file that happens to be an IOS image. The router then loads that file.
Interestingly, most routers end up using Step 3B to find their IOS image. From the factory, Cisco routers do not have any boot system commands configured; in fact, they do not have any configuration in the startup-config file at all. Cisco loads flash memory with a single IOS when it builds and tests the router, and the configuration register value is set to 0x2102, meaning a boot field of 0x2. With all these settings, the process tries Step 3 (because boot = 2), finds no boot system commands (because the startup-config is empty), and then looks for the first file in flash memory at Step 3B.
Figure F-4 summarizes the key concepts behind how a router chooses the OS to load.

Figure F-4 Choices for Choosing the OS at Boot Time: Modern Cisco Router
The boot system commands need to refer to the exact file that the router should load. Table F-2 shows several examples of the commands.
Table F-2 Sample boot system Commands
Boot System Command |
Result |
boot system flash |
The first file from system flash memory is loaded. |
boot system flash filename |
IOS with the name filename is loaded from system flash memory. |
boot system tftp filename 10.1.1.1 |
IOS with the name filename is loaded from the TFTP server at address 10.1.1.1. |
Finally, remember the process of upgrading the IOS? The whole point of the boot system commands and boot field of the configuration register is to control which IOS loads. Once a new IOS has been copied into flash memory on the router, the upgrade process has a few more steps. Add a boot system command to refer to the correct new file, save the configuration, and reload the router. The router will now go through the boot sequence discussed in this section, load the new IOS image, and the IOS upgrade is complete. For instance, Example F-2 showed a router copying an IOS image into flash; that router would then also need a boot system flash:c2900-universalk9-mz.SPA.152-4.M1.bin command saved into the startup-config.
Verifying the IOS Image Using the show version Command
Once it is upgraded, you should verify the new IOS has loaded using the show version command. This command lists not only the version of software but also the source from which the router found the IOS image and the time since it loaded the IOS. As a result, the show version command actually identifies some key facts about the results of the previous boot process.
The show version command lists many other facts as well, as shown in Example F-7. The example shows output from Router R2, which has been configured with the boot system flash:c2900-universalk9-mz.SPA.152-4.M1.bin command and been reloaded, migrating to use the new Version 15.2(4) IOS.
To help point out some of the many important facts in this command, the example shows many highlighted items. The following list describes each of the items in the output in the same order as they are shown in the example, top to bottom:
The IOS version
The uptime (the length of time that has passed since the last reload)
The reason for the last reload of IOS (reload command, power off/on, software failure)
The time of the last loading of IOS (if the router’s clock has been set)
The source from which the router loaded the current IOS
The amount of RAM memory
The number and types of interfaces
The amount of NVRAM memory
The amount of flash memory
The configuration register’s current and future setting (if different)
Example F-7 show version Command Output
R2# show version
Cisco IOS Software, C2900 Software (C2900-UNIVERSALK9-M), Version 15.2(4)M1, RELEASE
   SOFTWARE (fc1)
Technical Support: http://www.cisco.com/techsupport
Copyright  1986-2012 by Cisco Systems, Inc.
Compiled Thu 26-Jul-12 20:54 by prod_rel_team

ROM: System Bootstrap, Version 15.0(1r)M15, RELEASE SOFTWARE (fc1)

R2 uptime is 44 minutes
System returned to ROM by reload at 19:44:01 UTC Tue Feb 12 2013
System restarted at 19:45:53 UTC Tue Feb 12 2013
System image file is "flash:c2900-universalk9-mz.SPA.152-4.M1.bin"
Last reload type: Normal Reload
Last reload reason: Reload Command

This product contains cryptographic features and is subject to United
States and local country laws governing import, export, transfer and
! Rest of legal disclaimer omitted

Cisco CISCO2901/K9 (revision 1.0) with 483328K/40960K bytes of memory.
Processor board ID FTX1628837T
2 Gigabit Ethernet interfaces
4 Serial(sync/async) interfaces
1 terminal line
DRAM configuration is 64 bits wide with parity enabled.
255K bytes of non-volatile configuration memory.
3425968K bytes of USB Flash usbflash1 (Read/Write)
250880K bytes of ATA System CompactFlash 0 (Read/Write)


License Info:

License UDI:

-------------------------------------------------
Device#    PID                     SN
-------------------------------------------------
*0         CISCO2901/K9            FTX1628837T


Technology Package License Information for Module:'c2900'
-----------------------------------------------------------------
Technology      Technology-package              Technology-package
                Current        Type             Next reboot
------------------------------------------------------------------
ipbase          ipbasek9       Permanent        ipbasek9
security        None           None             None
uc              None           None             None
data            None           None             None

Configuration register is 0x2102
Password Recovery
Suppose that you are sitting at your desk and you try to Secure Shell (SSH) or Telnet to a router. However, you cannot log in. Or, you can get into user mode but not into enable mode because you forgot the enable secret password. You want to recover, or at least reset the passwords, so you can get into the router and change the configuration. What can you do?
Cisco provides a way to reset the passwords on a router when sitting beside the router. With access to the router console and the ability to power the router off and back on, anyone can reset all the passwords on the router to new values.
The details differ from router model to router model. However, if you go to www.cisco.com and search for “password recovery,” within the first few hits you should see a master password recovery page. This page lists instructions on how to perform password recovery (actually password reset) for almost any model of Cisco product.
The General Ideas Behind Cisco Password Recovery/Reset
Although the details differ from model to model, all the password recovery procedures follow the same general principles. First, the end goal of the process is to make the router boot IOS while ignoring the startup-config file. Of course, this startup configuration holds all the passwords. Once the router boots while ignoring the initial configuration, the router has no passwords at all, so you can log in at the console with no password restrictions and reconfigure all the passwords.
One config-register bit holds the key: the ignore configuration bit. (The bit is the second bit in the third nibble, reading left to right.) When set to binary 1, the router will ignore the startup-config file the next time the router is loaded. To set that value, the default configuration register value of 0x2102 can be changed to 0x2142.
Unfortunately, under normal circumstances, you need to remember the enable password to reach the mode to configure the configuration register’s value. When you need to do password recovery, you clearly do not know the passwords, so how can you change the configuration register? The solution is to use ROMMON mode.
ROMMON enables you to set the configuration register. ROMMON contains a small and different set of CLI commands as compared to IOS, with the commands varying from router model to router model. However, each router’s ROMMON software supports some command, usually the confreg command, that lets you set the configuration register. For instance, the ROMMON command confreg 0x2142 would set the correct bit to tell the router to ignore the startup-config file at reload.
So, how do you get the router to boot in ROMMON mode? Older routers require you to press the break key at the console during boot of the router. Some newer routers happen to have all removable flash memory—on those, just remove the flash (so there is no IOS available), and turn the router off and back on, and the router has no IOS to load—so it loads ROMMON. (Put the flash back in once ROMMON loads.)
In summary, the big ideas behind password recovery are as follows:
Step 1. Boot ROMMON, either by breaking into the boot process from the console or by first removing all the flash memory.
Step 2. Set the configuration register to ignore the startup-config file (for example, confreg 0x2142).
Step 3. Boot the router with an IOS. The router boots with no configuration. Now you can reach enable mode from the console without needing any passwords.
A Specific Password Reset Example
Example F-8 shows a sample password recovery/reset process on a 2901 router. The example begins with Router R1 powered on and the user connected at the console. These 2901 routers use compact flash slots for the primary flash memory; in this example, I removed the flash memory and rebooted the router so that the normal boot process caused ROMMON to load. Look at the highlighted steps in the example for the specific action that resets the password.
Example F-8 A Password Recovery/Reset Example
! 1) User walks to the router and powers off the router

! 2) User removes all flash memory

! 3) User turns router back on again

System Bootstrap, Version 15.0(1r)M15, RELEASE SOFTWARE (fc1)
Technical Support: http://www.cisco.com/techsupport
Copyright  2011 by cisco Systems, Inc.

! 4) Several lines of messages omitted: ROMMON is initializing

Readonly ROMMON initialized

rommon 1> confreg 0x2142

You must reset or power cycle for new config to take effect
rommon 2 >
! 5) Just above, user sets the config register to ignore the startup-config.

! 6) User powers off router and then safely plugs the flash back in.

! 7) User powers on router, so that the router now boots IOS.

System Bootstrap, Version 15.0(1r)M15, RELEASE SOFTWARE (fc1)
Technical Support: http://www.cisco.com/techsupport
Copyright  2011 by cisco Systems, Inc.

! Lots of IOS initialization messages omitted; watch for these next messages


          --- System Configuration Dialog ---

Would you like to enter the initial configuration dialog? [yes/no]: no


Press RETURN to get started!

! 8) Just above, IOS asked the user if they wanted to do the initial config dialogue.
! That happens when a router boots with no startup config. That confirms the router
! booted and ignored startup-config. The user answered no, to avoid using setup.

! 9) Below, the console user logs in with no passwords required to reach enable mode.

Router>
Router>enable
Router#

! 10) Next, user copies the starting config to make the router do its normal job
Router# copy startup-config running-config
Destination filename [running-config]?
3297 bytes copied in 0.492 secs (6701 bytes/sec)

! 11) User changes the forgotten enable secret password, and sets config register back
! to the default setting of 0x2102
R1# configure terminal
Enter configuration commands, one per line.  End with CNTL/Z.
R1(config)# enable secret cisco
R1(config)# config-reg 0x2102
R1(config)# ^Z
R1#

! 12) User saves his changes to the password
R1# copy running-config startup-config
Destination filename [startup-config]?
3297 bytes copied in 0.492 secs (6701 bytes/sec)
R1#
Note that those last few steps are pretty important. Remember, this process makes the router boot with no initial configuration, so it is clearly disruptive to the normal working state of the router, even beyond the time required to work through the process. The copy startup-config running-config command makes up for the fact that the router ignored the startup-config file when it booted IOS. Also, to be ready for the next time the router reloads, put the configuration register value back to its normal permanent value, usually hex 2102.
Managing Configuration Files
Cisco routers and switches happen to use two different configuration files: a startup-config file to save the configuration to use each time the device boots, and the running-config file that holds the currently used configuration for current use inside RAM. By now, you should be used to changing the running-config file using configuration mode and saving the running-config using the copy running-config startup-config command.
This last of three major sections of the chapter takes the discussion of configuration files much further. It begins with a look at the traditional methods to copy configuration files outside the router or switch. It then examines more recent options to archive and restore the configuration. This section ends with a brief example of the setup process by which the router can build an initial configuration file.
Copying and Erasing Configuration Files
A good operational plan includes regular backup of the configuration files. The startup and running-config files reside in the router only, and that poses a risk. If the router configuration is never backed up to an external site and the router fails, then even after you replace the router hardware, you may have difficulty piecing a correct router configuration together based on old project notes.
The IOS copy command gives you a way to make a copy of the configuration, and has been around for a long time. This command lets you use any of the IFS references to network protocols, including TFTP, FTP, and SCP.
You can also just copy files to and from removable USB flash memory in the router. The USB slots on most recent models of Cisco routers allow you to insert and remove the USB flash drives with IOS running. For instance, a Cisco 2901 router has two USB flash drive slots (usbflash0: and usbflash1:). As demonstrated in Example F-9, an engineer could easily copy the running-config file to flash.
Example F-9 Copying a File to USB Flash
R1# copy running-config usbflash1:temp-copy-of-config
Destination filename [temp-copy-of-config]?
3159 bytes copied in 0.944 secs (3346 bytes/sec)
R1# dir usbflash1:
Directory of usbflash1:/
! lines listing other files omitted for brevity.
   74  -rw-          3159  Feb 12 2013 22:17:00 +00:00   temp-copy-of-config
7783804928 bytes total (7685111808 bytes free)
R1#
While useful in a lab, using USB flash to back up configuration files does not work well with thousands of devices spread around many sites. More than likely, you would back up the files to a more centralized server over the network. The next topic looks at the overall backup and restore plan for systematically backing up configurations.
Traditional Configuration Backup and Restore with the copy Command
One primary motivation of copying the configuration to an external server is to then later restore the configuration if a problem occurs. Like any backup and restore process, the configuration restore process is just as important as backing up the configuration. However, the IOS copy command, which has been in IOS for a long time, has an odd behavior when copying files to the running config file to restore the configuration. That odd behavior impacts how to restore the configuration rather than how to back up the configuration.
The copy command does not replace the running-config file when copying a configuration into RAM. Effectively, any copy into the running-config file works just as if you entered the commands in the “from” configuration file while in configuration mode. In some cases, adding the new commands does actually replace the old command; for instance, the ip address interface subcommand would simply replace the old value. However, with other commands, the command would not replace the old configuration but add to it instead (for instance, with IP access-list commands), creating a different configuration.
To drive the point home with a few examples, Figure F-5 shows the cases that result in a replacement of the configuration versus an addition to the configuration. The figure shows commands to copy to and from a TFTP server. Note that the two commands with an asterisk beside them are the ones that effectively add the configuration.

Figure F-5 Copy into RAM (running-config) Adds Configuration Instead of Replacing
Because of the effect of copying configurations into the running-config file, the restore process basically avoids using the copy command to copy a backup configuration file into running-config. The complete process, using the copy command, to both back up and restore configurations, works like this:
Step 1. To back up: Copy the running-config file to some external server; for instance, copy running-config tftp.
Step 2. To restore:
A. Copy the backup configuration into the startup-configuration file using the copy command, which replaces the startup-config file; for instance, copy tftp startup-config.
B. Issue the reload command, which reloads, or reboots, the router. That process erases all running config in RAM and then copies the startup-config into RAM as part of the reload process.
Alternatives for Configuration Backup and Restore
Cisco has improved the backup and restore process over the years beyond the basic capabilities of the IOS copy command. Two improvements stand out as compared to the use of the copy command:
Create backup configurations, called archives, based on the use of the archive EXEC command. Archives can be created by command, based on a configured timer, or automatically created each time someone saves the configuration.
Perform a restore of the archived configuration to the running-config file without requiring a reload by using the configure replace command.
The archival process revolves around an IOS file system called the archive. The router just needs to know where to store these configuration files. The router also needs to know whether or not to save the configuration archives automatically. Those rules define the archive—when to automatically save the configuration and where to save them. Example F-10 shows a sample archive configuration, in which the router defines an FTP server at address 192.168.1.170 as the place to store the configurations, with username wendell and password odom. It also defines automatic backup every 1,440 minutes (that is, daily) and stores a copy of the configuration every time the configuration is saved (per the write-memory subcommand).
Example F-10 Creating a Configuration Archive
R1# configure terminal
Enter configuration commands, one per line.  End with CNTL/Z.
R1(config)# archive
R1(config-archive)# path ftp://wendell:[email protected]/
R1(config-archive)# time-period 1440
R1(config-archive)# write-memory
R1(config-archive)# ^Z
R1#
The configuration in the example makes a great improvement over using the copy command. First, it improves backups by backing up the configuration automatically. It also improves the restore process because of the configure replace command. Basically, the configure replace command allows you to copy a configuration archive into the running-config file, so it completely replaces the running-config without requiring a reload of the router. Basically, the router analyzes all the configuration, does a series of comparisons, and determines what sequence of configuration commands would be required to change the configuration correctly—all without reloading the router.
To show the process, Example F-11 shows a sequence in which a router does not have an ACL (141) at the time the archive is made. Then the user changes the configuration to add an ACL 141. Next, the configure restore command is used to restore the earlier archived configuration (which doesn’t have ACL 141). Because the restore should replace the running-config file, the running-config should no longer have ACL 141 at the end of the process. The example also shows the hostname being changed as a more obvious confirmation that the configure replace command changed the configuration.
Example F-11 Replacing the Running-config with the configure replace Command
R1# archive config
Writing -Oct-24-09-46-43.165-2
R1# show archive
The maximum archive configurations allowed is 10.
The next archive file will be named ftp://wendell:[email protected]/-<timestamp>-3
 Archive #  Name
   1        ftp://wendell:[email protected]/-Oct-24-09-21-38.865-0
   2        ftp://wendell:[email protected]/-Oct-24-09-22-22.561-1
   3        ftp://wendell:[email protected]/-Oct-24-09-46-43.165-2 <- Most Recent

R1# configure terminal
Enter configuration commands, one per line.  End with CNTL/Z.
R1(config)# hostname ridiculousname
ridiculousname(config)# access-list 141 permit ip host 2.2.2.2 host 3.3.3.3
ridiculousname(config)# ^Z
ridiculousname#
*Oct 24 09:47:57.189: %SYS-5-CONFIG_I: Configured from console by console

ridiculousname# configure replace ftp://wendell:[email protected]/
   -Oct-24-09-46-43.165-2
This will apply all necessary additions and deletions
to replace the current running configuration with the
contents of the specified configuration file, which is
assumed to be a complete configuration, not a partial
configuration. Enter Y if you are sure you want to proceed. ? [no]: y
Loading -Oct-24-09-46-43.165-2 !
[OK - 6498/4096 bytes]

Loading -Oct-24-09-46-43.165-2 !
Total number of passes: 1
Rollback Done

R1# show access-list 141
R1#
Note that by the end of the example, the hostname has reverted back to the original name (R1) and ACL 141 is no longer configured, as expected.
Erasing Configuration Files
IOS supports three different commands to erase the startup-config file in NVRAM. The write erase and erase startup-config commands are older, whereas the erase nvram: command is the more recent, and recommended, command.
Note that Cisco IOS does not have a command that erases the contents of the running-config file. To clear out the running-config file, simply erase the startup-config file; then reload the router so that the router loads an empty startup-config file into the running-config.
Initial Configuration (Setup Mode)
Cisco IOS software supports two primary methods of giving a router or switch an initial basic configuration: configuration mode and setup mode. Setup mode leads a switch administrator through a basic configuration by using questions that prompt the administrator. Because configuration mode is required for most configuration tasks, most networking personnel quickly get comfortable with configuration mode and do not use setup at all. However, new users sometimes like to use setup mode, particularly until they become more familiar with the CLI configuration mode.
Just so you know how to get to setup mode, an engineer can get into setup mode in two ways. Figure F-6 shows one of the methods that occurs during the boot process: If the router boots, with no initial configuration, the router asks if the user wants to enter the “initial configuration dialogue,” also known simply as setup mode. You can also enter setup mode by using the setup command from privileged mode.

Figure F-6 Logic and Decisions for Entering Setup Mode After Reload
Command References
Tables F-3 and F-4 list configuration and verification commands used in this chapter. As an easy review exercise, cover the left column in a table, read the right column, and try to recall the command without looking. Then repeat the exercise, covering the right column, and try to recall what the command does.
Table F-3 Appendix F Configuration Commands
Command |
Mode and Purpose |
config-register value |
Global command that sets the hexadecimal value of the configuration register. |
boot system {file-uri | filename} |
Global command that identifies an externally located IOS image using a URI. |
boot system flash [flash-fs:] [filename] |
Global command that identifies the location of an IOS image in flash memory. |
boot system {tftp | ftp} filename [ip-address] |
Global command that identifies an external server, protocol, and filename to use to load an IOS from an external server. |
archive |
Global command that moves the user into archive mode. |
write-memory |
Archive mode command to tell the router to archive the configuration each time the configuration is saved to startup-config. |
time-period minutes |
Archive mode command to define the time between the automatic creation of a new configuration archive. |
path uri |
Archive mode command that defines where to store configurations. |
ip ftp username name |
Global command to define the username used when referencing the ftp: IOS file system but not supplying a username. |
ip ftp password pass |
Global command to define the password used when referencing the ftp: IOS file system but not supplying a password. |
username name privilege-level 15 secret pass |
Global command to define a username useful to SCP with a privilege level that enables SCP file transfers. |
Table F-4 Appendix F EXEC Command Reference
Command |
Purpose |
reload |
Enable mode EXEC command that reboots the switch or router. |
copy from-location to-location |
Enable mode EXEC command that copies files from one file location to another. Locations include the startup-config and running-config files, files on TFTP and RPC servers, and flash memory. |
copy running-config startup-config |
Enable mode EXEC command that saves the active config, replacing the startup-config file used when the switch initializes. |
copy startup-config running-config |
Enable mode EXEC command that merges the startup-config file with the currently active config file in RAM. |
show running-config |
Lists the contents of the running-config file. |
write erase erase startup-config erase nvram: |
Each one of the three enable mode EXEC commands erases the startup-config file. |
setup |
Enable mode EXEC command that places the user in setup mode, in which Cisco IOS asks the user for input on simple switch configurations. |
show flash |
Lists the names and size of the files in flash memory, as well as noting the amount of flash memory consumed and available. |
dir filesystem: dir filesystem:directory |
Lists the files in the referenced file system, or file system directory. |
verify /md5 filesystem:name [MD5-hash] |
Performs an MD5 hash of the referenced file and displays the results. If listed, the command compares the MD5 hash in the command with the results of performing MD5 on the local file. |
archive config |
Creates a copy of the running-config file in the archive. |
configure replace filesystem:name |
Copies the referenced file into running-config, replacing the running-config, without reloading the router. |